Solid fuel boilers diagrams and drawings. Schemes of solid fuel boilers. Design features and device
What is needed first of all in order to make a solid fuel boiler with your own hands: drawings, diagrams, availability of appropriate materials or skills? Of course, all this is necessary, but the first thing you need to do is to choose exactly the type of boiler or its design that you are able to manufacture. In this article we will look at several types of such metal structures, their diagrams and drawings. We hope that some of the options considered will be useful to you, or based on them you will make your own design that best satisfies your requirements.
What kind of solid fuel boiler can you make yourself?
Before you start making your own boiler that runs on solid fuel, you need to choose the type of boiler that you are able to handle, based on the availability of skills, appropriate materials, tools and equipment. And only after this, in accordance with the chosen type, should you begin to search for suitable drawings or draw them up yourself based on the scheme of its operation and the required power. What kind of boiler could this be?
Firstly, such units may differ in the direction of fuel combustion:
- bottom, when it is ignited from below - this is how most solid fuel boilers work;
- top, in this case the fuel is ignited from above and gradually burns to the bottom.
Boilers with bottom combustion can be divided into two types:
- traditional ones, in which the fuel is ignited and burned in one chamber (it is both the loading chamber and the firebox) and exits through a chimney located in its upper part;
- shaft type - in which the loading chamber (shaft) serves only to load fuel; it is ignited from below, but the flame and combustion products pass through a heat exchanger located in the adjacent one.
Based on the combustion method, the following units can be distinguished:
- with conventional combustion;
- with pyrolysis or gas generator combustion, when solid fuel burned in special conditions(at high temperature and lack of oxygen) with the release of pyrolysis (wood) gas, which is then burned.
Solid fuel boilers may also differ in the type and design of the heat exchanger. It can be made in the form of a simple “water jacket” around the firebox or have a more complex design with additional registers made of pipes or sheet metal, allowing maximum transfer of combustion thermal energy to the coolant.
In addition, solid fuel boilers can be made only for wood or wood and coal. In the second case, it is necessary to take into account that the combustion temperature of coal is quite high, so the grates, firebox and heat exchanger walls must be thicker. In some cases, the firebox is lined with refractory bricks.
Below, we will look at several designs of solid fuel boilers, their diagrams and drawings, as well as features of operation and manufacturing.
Simple solid fuel boilers with traditional combustion method
As already mentioned, the fuel in such units is ignited from below. The loading chamber also serves as a firebox, and the combustion products, having given a significant part of their energy to the coolant through the heat exchanger, are removed into the chimney. There are a large number of such designs. We'll look at a few of them. They can be made from sheet metal and pipes, 3-5 mm thick.
Option 1
This design solid fuel boiler quite simple. The heat exchanger can be made of sheet steel in the form of a “water jacket”. For maximum efficiency heat transfer and increasing the contact area with flame and hot gases, its design provides for the presence of two reflectors (protrusions inward).

Option 2
In this design, the heat exchanger is a combination of a “water jacket” around the combustion chamber and an additional slot-like sheet metal register in its upper part.

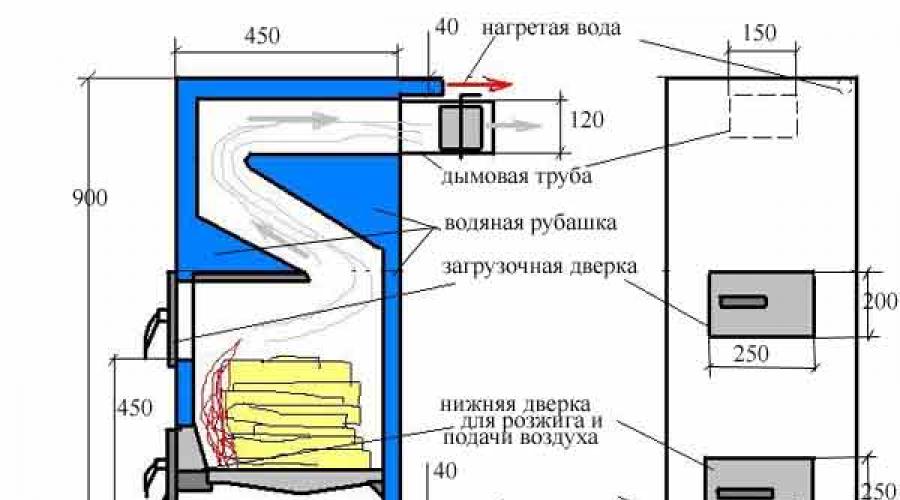
Rice. 2 Diagram of a boiler with a slot-type heat exchanger
Rice. 2: 1 - chimney; 2 - water jacket; 3 - slot heat exchanger; 4 - loading door; 5 - firewood; 6 — lower door for ignition and cleaning; 7 - grate; 8 - door for regulating air supply and cleaning the ash pan.
Options 3 and 4 (boilers with hob)
In these options, the “water jacket” is supplemented with heat exchange registers made of pipes in the upper part of the combustion chamber. In addition, such units are designed for cooking food on them. Option 4 is more powerful and has a top loading door.
 Rice. 3 Designs of solid fuel boilers with additional registers and hob
In Fig. 3: 1 - firebox; 2 - register made of pipes; 5 — return pipe; 6 - supply pipe; 7 - upper loading door; 8 — lower door for ignition and air supply; 9 — loading door; 10 - chimney; 13 — grate; 14,15,16 — reflectors; 17 - damper; 19 — water jacket; 20 - ash pan; 21 - hob.
Top combustion boiler
 This unit differs from the previous ones - firstly, in shape (it round section and can be made from pipes different diameters), secondly, the way fuel is burned in it (it is burned in it from top to bottom). In order to ensure such a combustion process, it is necessary to provide air supply from above, directly to the combustion site. This function here is performed by an air supply telescopic pipe, which rises up when loading fuel and falls down after igniting the fuel. As it burns gradually, the pipe falls down under its own weight. At the bottom of the pipe, to ensure uniform air supply, a “pancake” with blades is welded.
To provide better conditions After fuel combustion, an air heating chamber is located in the upper part. The air supply, and therefore the burning rate, is regulated by a valve at the entrance to this chamber from above. The heat exchanger here is made in the form of a “water jacket” around the combustion chamber.

Fig.4 Drawing of a top combustion solid fuel boiler
In Fig.4: 1 - outer wall (pipe); 2 — inner wall; 3 - water jacket; 4 - chimney; 5 — telescopic air supply pipe; 6 — air distributor (metal “pancake” with ribs; 7 — air preheating chamber; 8 — air supply pipe; 9 — supply pipe with heated water; 10 — air damper; 11 — loading door; 12 — cleaning door; 13 — pipe with water from the system (return); 14 — cable controlling the damper.
Boiler with pyrolysis combustion of solid fuel
The difference between this design is that solid fuel does not burn in it, as in a conventional one, but if there is a lack of primary air supply, it is “distilled” into wood (pyrolysis) gas, which is burned in a special afterburner chamber when secondary air is supplied to it. Such a presentation can be either natural or forced.

Fig. 5 Scheme drawing of one of the variants of a pyrliz boiler
In Fig. 5: 1 — draft regulator with temperature sensor; 3 - firewood; 4 - bottom door; 5 - grate; 6 — air damper for primary air supply; 7 - ash pan; 8 — grate; 10 — cleaning; 11 - drain; 12 — thermal insulation of the body; 13 — return (coolant supply from the system); 14 — nozzle; 15 — secondary air supply; 16 - damper chimney; 17 - pipe with heated water; 18 — damper; 21 — loading door; 22 - afterburning chamber.
Shaft type boilers
As already mentioned, a feature of such boilers is the presence of two chambers: a large vertical loading chamber (shaft) and a chamber with a heat exchanger. The fuel is ignited from below in the first chamber and the flame enters the other through a hole, where it transfers its energy to the coolant through a heat exchanger.
Such boilers can be either with conventional fuel combustion or with pyrolysis. In the first case, all the necessary air is supplied through the lower door, and the combustion products, after passing through the heat exchanger, are removed into the chimney. In the second case, a limited amount of primary air is supplied to the combustion site, where the wood burns, releasing pyrolysis gas. In addition, such structures are equipped with an additional afterburning chamber, where secondary air is supplied and gas is burned. In the upper part of the heat exchange chamber there is a valve, which opens when ignited and allows flue gases exit directly into the chimney.
Below are diagrams of two options for shaft-type boilers with afterburners.
Option 1

Rice. 6 Drawing diagram of a shaft-type boiler with an afterburner chamber
In Fig. 6: 1 — primary air supply damper; 2 - lower door for ignition and cleaning; 3 - grate; 4 - firewood; 5 — loading door (can be located on top); 12 - pipe with heated water (supply); 13 — starting valve; 14 — chimney damper; 15 - heat exchanger; 16 — secondary air supply; 17 — afterburning chamber; 18 — return; 19 — drain; 20 - cleaning; 21 - damper; 22 — grate; 25 - ash pan.
Option 2

Rice. 7 Diagram of a shaft-type boiler with lining of the inner surface of the combustion and afterburning chambers
Video on the topic
DIY solid fuel boiler
Sometimes it is advisable to make a solid fuel boiler with your own hands long burning: drawings and diagrams are freely available. The ability to handle the tool and skillful hands have good service when building your own house or cottage. There is always a need to build some kind of structure yourself. After all, this significantly reduces the cost of any undertaking. Heating units are no exception. In the old days, people hired a stove maker to lay brick stoves. Today, long-burning solid fuel boilers have become the most popular.

The principle of operation of solid fuel boilers and their design
Solid organic fuel is the most ancient source of energy for humanity. It is impossible to abandon it completely, even in the modern world. Moreover, in addition to firewood and coal, many other types of flammable solids have appeared today:
- peat briquettes – dried and compressed peat releases a lot of heat when burned;
- briquettes from wood processing waste - compressed sawdust, shavings and tree bark;
- birch charcoal - the same as for barbecue;
- recycled waste from landfills;
- fuel heating pellets are fine fuel obtained by pressing sawdust. Can be fed automatically;
- ordinary dry sawdust.

It is clear that all this fuel is obtained by processing various wastes, which solves the problem of recycling at enterprises and goes in line with the “green” economy.
As a result of human activity, a colossal amount of waste is generated that can be converted into high-energy fuel, which led to the appearance of long-burning solid fuel heating boilers on the market. Unlike conventional stoves, these units do not operate on the combustion of the fuel itself, but on its splitting as a result of heating. In the working chamber of such boilers, gaseous decomposition products of solid fuel burn. This operating scheme is several times more efficient than conventional combustion of fossil fuels. Pyrolysis gas, gives off a large number of energy.

The design of such a gas generator installation is not very complicated. You can even build a long-burning solid fuel boiler with your own hands. The drawing of the simplest version looks like this:
- a closed cylindrical tank, which has a hatch for storing fuel, an ash pan and a hole for installing a chimney;
- An air distributor is located inside the tank, which creates a vortex of pyrolysis gas. It is attached to a movable telescopic tube. This whole piston-like structure presses on the fuel from above. Gas combustion occurs above the piston, and the fuel smolders below it;
- The heat exchanger is built into the upper chamber, where the maximum temperature is reached.
Slow smoldering of solid fuel occurs in lower chamber. This is achieved by adjusting the air supply to the blower. The released gas burns intensely in the upper chamber and heats the coolant.

Long-burning solid fuel boilers can be indispensable in private homes, in utility buildings, garages and greenhouses. They will be especially beneficial where there is a large wood processing industry, since waste at such enterprises is given away almost free of charge. These units are also needed in areas where there are regular interruptions in gas supply. Such installations have many advantages, but there is also one important drawback - very high cost. That is why today it is important to make long-burning solid fuel boilers with your own hands. Drawings for this can be used of varying degrees of complexity. It depends on the skill level.
How to make a long-burning solid fuel boiler with your own hands: drawings and diagrams
Before you start making a boiler, you need to decide on its design. Its choice depends on the purpose of the unit. If it is intended for heating a small utility room, garage or country house, then it is not necessary to install a water circuit in it. Heating of such a room will occur directly from the surface of the boiler, through convection of air masses in the room, like from a furnace. For greater efficiency, you can arrange for forced airflow of the unit using a fan. If there is a system liquid heating indoors, it is necessary to provide a device in the boiler circuit in the form of a coil made of pipe or other similar structure.

The choice of option also depends on the type of solid fuel that will need to be used. For heating with ordinary wood, an increased volume of the firebox is required, and for the use of small fuel pellets you can arrange a special container from which granulated fuel is supplied to the boiler automatically. To make a long-burning solid fuel boiler with your own hands, you can take a universal drawing. It is suitable for any type of solid fuel used.

We will tell you step by step how and from what parts you can make a long-burning solid fuel heating boiler according to the proposed scheme:
- We will prepare the place where the future unit will be installed. The base on which it will stand must be level, strong, rigid and fire-resistant. A concrete foundation or a thick cast iron or steel slab is best suited for this. The walls also need to be covered with fire-resistant material if they are wooden;
- we collect all required material and tools: of which we need apparatus for electric arc welding, grinder and roulette. Made of materials: 4 mm sheet steel; 300 - mm steel pipe with 3 mm walls, as well as other pipes of 60 and 100 mm in diameter;

- in order to make a long-burning solid fuel boiler, you need to cut a piece 1 m long from a large 300 mm pipe. You can do it a little less, if necessary;
- from steel sheet we cut the bottom according to the diameter of the pipe and weld it, equipping it with channel legs up to 10 cm long;
- The air distributor is made in the form of a circle made of a sheet of steel with a diameter 20 mm smaller than the pipe. IN bottom part circle, an impeller is welded from a corner with a flange size of 50 mm. For this, you can use a channel of a similar size;
- We weld a 60 mm pipe into the middle of the distributor from above, which should be higher than the boiler. In the middle of the distributor disk we cut a hole along the pipe so that there is a through tunnel. It is needed for air supply. A damper is embedded in the upper part of the pipe, which will allow you to adjust the air supply;

- in the very bottom part of the boiler we make a small door, equipped with a valve and hinges, leading to the ash pan for easy removal of ash. We cut a hole in the top of the boiler for the chimney and weld a 100 mm pipe into this place. At first she goes under small angle sideways and up 40 cm, and then strictly vertically up. The passage of the chimney through the ceiling of the room must be protected according to fire safety rules;
- We complete the construction of a long-burning solid fuel heating boiler by manufacturing the top cover. There should be a hole in its center for the air flow distributor pipe. The fit to the walls of the boiler must be very tight, preventing air from entering.


How I made a long-burning solid fuel boiler: reviews and recommendations
“I work at a sawmill. I used to carry branches and cuttings home in carts. I found out about a long-burning solid fuel boiler, read the reviews and decided to make one. Happened. Now the wood consumed is three times less, and the same amount of heat.”
Alexander Nikolaev, Syktyvkar
“I saw a miracle boiler in a friend’s garage. He and I were repairing the car in the morning. He put the wood in it and didn’t touch it again until evening. I couldn’t understand anything until he explained the whole scheme to me. So, I also got the idea to put it in my garage. A friend said he would give me the drawings.”
Nikolay Platonov, Surgut

“If you decide to make, for example, a long-burning solid fuel boiler at your dacha, reviews of which you found on the Internet, then do everything strictly according to the plan in compliance with all safety rules. And then, my neighbor burned down my dacha when he installed the boiler full of holes.”
Andrey Shirshov, Tyumen
Described above heating device will serve you faithfully, allowing you to save on energy. However, do not forget to do everything efficiently, without deviating from the scheme.
Solid fuel boilers are not only a way to provide autonomous heating at home, but also to save on energy resources. Is it really so profitable to make a solid fuel boiler with your own hands? Or is it better to buy a ready-made unit from a reliable manufacturer? Let's figure it out together!
Ready-made solutions - which boiler to buy?
Frankly speaking, a homemade long-burning boiler is unlikely to be cheaper than purchasing a ready-made option. You need to take into account not only the cost of materials, but also the time spent creating the unit yourself. Plus, few people manage to do everything correctly on the first try - errors will inevitably emerge during operation that will need to be corrected, which is fraught with new costs.
You also need to understand that many of the technologies that boiler manufacturers use are inaccessible to ordinary people and there is nothing to replace them with. For example, in everyday life without expensive equipment it is impossible to repeat powder coating boilers, which significantly extends their service life. The accuracy of parts, the quality of welding - all this differs significantly in homemade and purchased versions. For these reasons, most people prefer to purchase already ready-made options, besides, there are more than enough offers today.
Today, long-burning boilers made in Lithuania, Stropuva or Candles, have proven themselves to be excellent - these units can operate on one load of wood for up to 40 hours, and when loaded with coal - all 5 days. Models operating on wood are marked with the letter S, while those operating on coal are marked with the letter U. The efficiency of such boilers is up to 90%. In the design of these units, combustion occurs from top to bottom - the fuel burns according to the principle of a candle. Due to the fact that the flame is from above, wood and coal burn out much better, so you will have to clean the boiler much less often.
Alternative options – gas generation and pellets
Long-burning boilers include boilers, as well as boilers operating on pellets. Pyrolysis (gas generator) boilers are loaded with firewood every 8–12 hours. First, the fuel starts to ignite so that the temperature inside the boiler reaches 800 °C. At this temperature, gas generation becomes possible - with the help of valves it is installed desired mode, namely, the access of oxygen to burning wood is limited. As a result, wood gas is released, which burns in a special chamber, and only then the charcoal is burned. Ash and soot are formed minimal amount. The efficiency of gas generator boilers is about 85%.

The main advantage of pyrolysis units is economical fuel consumption. Thereby heating season will cost you two to three times less than usual - this is how the high cost of such devices pays off. However, you will have to constantly struggle with another problem - a wood-burning boiler of this type only works effectively on very dry fuel or clean coal.
Pellet boilers with automatic fuel supply can operate indefinitely, the main thing is that the required amount of fuel is nearby. The structure of such units is practically no different from conventional solid fuel boilers, with the exception of automatic feeding fuel. Domestic boilers They have a container where pellets are poured - one load is enough for several days. In general, servicing the unit will take about 20 minutes a week - this is enough to occasionally remove the ash and add fuel to the bunker.
General overview of boilers available in design
A design feature of top-combustion boilers is the supply of air to the combustion site using a telescopic pipe. Making such a wood-burning unit with your own hands is not an easy task even for experienced craftsmen. For this reason, in most cases, homemade solid fuel boilers long burning have traditional bottom combustion, and the duration of operation of the unit is achieved due to the increased volume of fuel and connection automatic regulators, which can be purchased separately and installed on any boiler. Fuel is loaded into such a unit through the upper hatch, and the lower hatch is intended for arson, through which combustion products are also cleaned out.

Air is supplied to the fuel chamber through the ash pan and grate bars; the air supply and combustion force are regulated using the ash chamber door. Depending on the design, the units are made from sheet steel 3–5 mm thick or from pipes with a diameter of at least 300 mm. Regular steel is suitable, but it is better to purchase heat-resistant steel or use a double layer of material. The role of a heat exchanger can be performed by either the walls themselves or the registers, or a combination of both.
The main task when creating such a unit with your own hands is to provide largest area contact of fuel with the surface of the heat exchanger, due to which efficiency increases.
The simplicity of the design is ensured by the fact that the water circuit is in direct contact with the flame. However, it should be taken into account that a large amount of heat will still escape into the chimney, so you can additionally create a water heating device. To set it up you need two pipes of different diameters and some sheet steel. A larger pipe will serve as a container for water, and a pipe with a smaller diameter will act as a chimney and heating element.

The shaft type is more difficult to do with your own hands, but is characterized by high efficiency. Such units consist of two chambers - the first serves as a compartment for loading fuel, and the second, located on the side, contains a heat exchanger. When the fuel is ignited in the adjacent chamber, the flame and hot gases, due to draft, enter the chamber with the register and heat the coolant inside the pipes. Since the smoke travels a long way from the combustion site to its release into the atmosphere, it almost completely transfers heat to the register.
Difficult, but doable - burning fuel from top to bottom
Even using the example of an ordinary match, you can see for yourself the efficiency of combustion from top to bottom. A match in a vertical position with a flame below emits heat, which is enough to heat the thermometer to 60 ° C. If you turn the match over, due to the long burning, the thermometer can be heated to 120 °C. On a scale heating boiler this principle ensures uniform and long-lasting combustion of fuel, but in this case a water jacket is required that will cover the entire surface combustion chamber. Registers in similar design are not required, but their presence will add 5–10% to the overall efficiency of the boiler.

To make such a wood-burning boiler with your own hands, you will need a powerful grinder for cutting metal and another one for grinding work. However, it is better to cut the metal when purchasing it at a metal depot, since when cutting with a grinder, there is a high probability of overheating the material at the cut site, which will cause it to become too brittle. You also need a good welding machine. Choose sheet metal with a thickness of at least 4 mm, preferably heat-resistant. You will also need several pipes, one with a diameter of 300 mm and a length of one and a half to two meters with a wall thickness of 3–4 mm and pipes with a diameter of 60 mm and 100 mm - the first for the air distributor, the second for the chimney.
Solid fuel boilers work differently than conventional boilers, in which heat comes directly from the fire. Such units are installed in private and country houses, country cottages or production premises. At home, you can make a solid fuel boiler with your own hands, using special diagrams and drawings. In this case, you must follow the step-by-step instructions, observing all safety measures.
Do not forget about safety measures with such a boiler
Work principles
In a solid fuel boiler, one fill can be enough for seven hours of combustion. If you don’t add firewood in time, the temperature in the room will begin to drop quickly. This occurs due to the principle of free gas movement: Hot air flows up and then out. A long-burning device can maintain heat in a room for one or two days; the most expensive models last up to seven days.
From the drawings of a solid fuel boiler with your own hands, you can understand that the efficiency of its operation lies in the correct structure. In a conventional unit, fuel is located at the bottom, the flame from it rises to the air distributors. The hot oxygen then enters the heating chamber, from which it exits through pipes to the heating radiators. The fan ensures timely air supply to the flame.
In this video you will learn how to make a heating boiler with your own hands:
A solid fuel boiler contains two combustion chambers at once, and the firebox itself is located in the upper part. Firewood or coal is placed in it, and air is supplied using special fans. When the top layer of fuel burns out, new streams of oxygen are supplied. This allows the wood to burn very slowly, giving off large quantity heat to the room.
You can purchase several models of such equipment. Budget units include wood boilers- you can’t put anything in them except logs. The remaining devices are heated with coal, sawdust, household waste, and briquettes.
In engineering drawings, do-it-yourself solid fuel boilers are depicted with the location of the main elements:
- the firebox door is on top;
- in the same part the smoke pipe is connected to the chimney;
- An ash pan is built below, through which the boiler is cleaned;
- With the help of a damper, oxygen enters the upper part of the air chamber.
The ash pan of the structure is completely sealed; it does not serve as a blower, since air enters through the top. Both chambers, the ash pan and the chimney are located in a steel boiler body with walls 5-7 mm thick.
Disadvantages and advantages
The homemade unit has large dimensions and a complex design. It is better to use it for heating a cottage or house with large rooms. The device will not be economical in small country houses. The advantages of the boiler include:
- autonomy of the heating system;
- long service life and design reliability;
- efficiency and economy;
- high efficiency;
- availability and versatility of fuel;
- environmentally friendly home heating.
 This boiler has a number of pros and cons
 Do-it-yourself solid fuel boilers also have a number of advantages over purchase option: homemade unit It will cost less, it can be made more powerful, and the design can also be changed to a more convenient one. Among the disadvantages are:
- the need to constantly clean the device;
- complexity of boiler diagrams and drawings solid fuel with your own hands;
- preliminary equipment small room for the boiler.
It is possible to give a steel sheet the shape of a cylinder only using a rolling machine. But you can replace the steel with an empty propane tank or a durable iron pipe with a suitable diameter. The thickness of the walls of the container must exceed 5 mm.
Manufacturing instructions
First you need to prepare all the diagrams and drawings. After that materials and tools should be selected, which will be needed during work:
- drill and welding machine;
- pliers;
- grinding machine;
- grinder;
- tape measure, level;
- empty cylinder and steel sheets;
- asbestos, steel pipe;
- hinges, handles, corner;
- hood and fiber for the passage of the chimney.
All markings are drawn on the cylinder according to the drawing, and a hole for the ash pan is cut out. A mark is made at the top along which the top will be removed. It needs to be cut with a grinder. In the center you need to make an opening for the chimney to exit. A metal ring is welded onto the lid, and steel is also attached to the internal and external sides balloon.
 To assemble such a boiler, do not forget about the right tool
 A metal circle is attached to the bottom of the prepared pipe, which will act as an air distributor. Fasteners are cut from metal, welded along the cut line, placing an asbestos cord. You need to weld a handle to the cut top and put the lid on the cylinder. A grinder is used to make a pipe, fasten it to the chimney, and connect the structure to the body.
A metal door is screwed to the ash pit opening. Measure the inner diameter of the cylinder and make marks on a steel sheet. It is necessary to cut a circle with a diameter exceeding the body by 5 mm. From metal corner six identical blades are made and attached to a round part - this is the future fan. The amount of firewood laid depends on the size of the heat exchanger. It needs to be welded from steel walls, then the finished element must be inserted into the body.
The entire boiler body is covered with sheet metal for greater strength and reliability. At the top and bottom there are pipes for air inlet and outlet. An opening for the ash pan is cut out in the steel so that it coincides with the hole on the cylinder, and the metal is welded on top. This creates a sealed housing with a round firebox inside. You need to load fuel into the finished structure. To do this, remove the lid, take out the oxygen supply limiter, and load coal or firewood. The pipe is returned to its place, a burning match is thrown into the firebox. As soon as the fuel starts to ignite, you need to close the lid. The limiter will lower as the wood burns.
To install a coal-fired boiler with your own hands, you need to allocate a special place in the room. An additional cut should be made for the chimney outlet in the roof or wall. You need to place a small brick pedestal under the cylinder. The adjacent walls are sheathed with steel or other heat-resistant material. All joints of the chimney are coated with sealant, it is connected to the pipe on the boiler, and the other end is brought out.
Before installing a coal boiler in your house, need to test it on the street. Since the top is cut off from the cylinder, the operating time of the firebox is reduced from ten to five hours. If you don’t want to add firewood every time, you can connect two cylinders together.
The sealant can be replaced with asbestos cord, gluing it along all joints and seams. It is necessary to constantly monitor the temperature of the system and prevent it from overheating. A shut-off valve is not installed on the pipeline.
The room must be constantly ventilated, because even a small amount carbon monoxide may lead to poor health. Do not keep flammable objects near the structure and protect it from children and pets.
It is advisable to equip a separate utility room for the TT boiler yourself, as it gets a little dirty during operation. It is necessary to monitor its condition, the amount of fuel and oxygen access.
Today on the market you can purchase numerous options for heating boilers.
Most of them are designed to work with gas and electricity, there are also solid fuel options and using fuel oil.
However, they will not suit everyone. Many would like to make a heating boiler with their own hands (see drawings below), because they believe that the market is not able to satisfy their needs, or the price of purchased boilers is too high.
Well, in many ways they will be right, and we will try to satisfy their requests.
We'll tell you how you can make a boiler yourself and how to avoid mistakes.
Brick heating boiler option - something you can’t buy on the market
Heat exchanger in brick oven
Naturally, you are unlikely to buy a brick heating boiler on the market, in which the manufacturing material is brick.
You can build such a heating boiler with your own hands.
Drawings and principle of operation various systems Let's look at it below.
In fact, such a boiler is a furnace with a heat exchanger that is connected to a heating system or water tank.
The heat exchanger is located in the fuel combustion zone in the furnace or in the smoke circulation system.
Most likely, you will have to look at the design of the stove itself somewhere or develop it yourself.
The main element that turns the stove into a boiler is the heat exchanger. It is located in the firebox or in the smoke circulation area.
In the latter case, it will be more rational to use a non-revolving stove design, as in a Russian stove, so that the size of the heat exchanger that can be placed in it is as large as possible.
However, the temperature of the water in the heating system will be significantly lower, and such a system is more suitable for heating water for household purposes. When placed in a smoke circulation system, the heat exchanger can be made of ordinary steel.
Placing the heat exchanger in the firebox will, accordingly, require an increase in the size of the firebox. In this case, the material from which the heat exchanger is made must be made of heat-resistant steel of great thickness, which is not cheap.
The price of such steel is approximately 400-500 rubles per kilogram, pipes are even more expensive, and a heat exchanger made of thick metal can weigh more than 50 kilograms. However, this design, all other things being equal, will cost less than a purchased boiler of similar power.
The heat exchanger can be made either in the form of a coil or in the form of a water jacket. In the first case, water passes through a system of pipes, which create a significant area for heat extraction from the firebox during operation.
The coil is welded from heat-resistant steel pipes with a wall thickness of at least 5 millimeters. The diameter of the pipe is at least 50 millimeters.
Typically, sections of pipes and corners are welded until 3-4 rectangular contours are obtained, which are then connected to each other in height by pipes in four places.
This method will require a highly qualified welder; there will be a number of welds that will have to be welded “with a mirror”. In terms of complexity, this is work of the fifth category and even higher.
In the second case, combustion occurs in a firebox, which is located inside a container with water surrounding the firebox for at least three sides.
In the case of a water jacket, the heat exchanger can be lined, thereby reducing the requirements for the quality of the steel used, but its volume will be significantly larger, and this negates the use of brick as a boiler building material.
Most of the boiler will be made of metal, and the volume of welding work increases significantly, although their qualifications decrease.
Regardless of the type of heat exchanger, if it has direct contact with fire, the water in it can heat up to a temperature above 90 degrees. Therefore, at the outlet, the heat exchanger must be equipped with a protective water seal valve, which will operate if the water begins to boil and will save the pipes from rupture.
Both solid fuel and gas can be used as fuel for homemade brick boilers. liquid fuel. In the latter case, a nozzle with a fuel and air supply system or gas burner.
Long burning boilers
They work on the same principle as a long-burning stove. For this, you can also make a heating boiler yourself.
The drawings and diagrams will be the same as for long-burning furnaces, with the difference that it is advisable to place the heat exchanger in the area with the highest combustion temperature. The fuel for such a boiler is peat, sawdust and coal.
The operating principle of a long-burning furnace is based on the fact that the fuel burns with little access to oxygen. In this case, the main heat is produced by coals.

Construction of a long-burning furnace
Their smoldering and combustion produces gas, which, in fact, burns in the boiler furnace. The rest of the fuel is located outside the combustion zone, and its oxidation occurs gradually.
One of the advantages of such a boiler is self-sufficiency. You can load the fuel once every two or three days and it will burn without your supervision, ensuring a constant temperature for the heating system.
The efficiency of such boilers is quite high - it reaches 90-95% versus 80-85% for conventional boilers. Not only prepared materials can be used as fuel, but also sawdust and bulk peat - practically free fuel in most regions of Russia.
The downside is that you won’t be able to lower the temperature in your batteries instantly, and you won’t be able to lower it at all if necessary. It is difficult to adjust the operation of the boiler to any selective temperature regime.
At the same time, for a conventional solid fuel boiler it is quite easy to regulate the temperature by the amount of fuel loaded. In addition, long-burning boilers require a lot of maintenance - their firebox and chimneys will have to be cleaned frequently.
How to make a long-burning boiler with your own hands is presented in the video:
Heat exchanger without pipes
If you are not a great welding expert and have only recently learned to hold an electrode in your hands, you can make a heat exchanger for a boiler from metal plates. To do this, the boiler itself must have the shape of a rectangular container so that one of its sides communicates with the firebox along larger area.
One of its walls, which communicates with the firebox, must be made of heat-resistant steel and have a thickness of at least 8 mm. All other walls can be made from ordinary walls.
The heat exchanger is made from a series of metal plates about 8 mm thick, which are welded to this wall and go into the firebox. For ease of welding, the plates are placed every 5 cm; welding is carried out alternately for each plate until all are welded.
The plate size is the maximum possible so that the combustion zone is completely filled with plates. The same plates are welded on the inside of the boiler and go into the boiler itself.
The more they occupy the volume of the boiler, the better. The plates in the boiler can be made thinner - about 3 mm. Welding must be carried out so that the plates in the firebox are not opposite the plates in the boiler, but offset, in a checkerboard pattern.
This is necessary in order for the place weld the plates did not spoil the metal walls. To make welding the plates easier, one of the boiler walls is welded after all the boiler plates have been welded.
This scheme is suitable for brick boilers. The boiler is embedded with one of its walls into the furnace, and an asbestos gasket is placed between it and the furnace so that the brick does not collapse when the metal deforms.
The heat exchanger will take heat from the flame in the firebox, while providing a sufficiently high temperature for heating the water. The efficiency of such a boiler is only slightly inferior to boilers with a coil.
One of the disadvantages is that the plates in the firebox will constantly burn out, unlike the pipes of a coil filled with water. About once every 2 years you will have to partially disassemble the stove, remove the boiler and weld the plates again. Of course, it is possible to make the plates from heat-resistant steel, but this will significantly increase the cost of the design.
Boilers that are better to buy
 Numerous gas boilers. Of course, you can put a gas burner in a stove with a heat exchanger, which is designed to operate the heating system.
In all more difficult cases It is best to buy a gas boiler in a store, especially if the boiler will use additional devices frog type control or temperature control device.
And in general, gas equipment is quite a dangerous thing; it is better to purchase devices that have passed tests and are mass-produced.
Coal fired boilers. No matter how strange it may seem, coal-fired boilers are also best purchased separately. The fact is that the combustion temperature of coal is twice that of wood.
Therefore, the risk of fire will also be twice as high. In addition, you can only make a heat exchanger for a solid fuel boiler made of steel.
And when industrial production Both cast iron and copper heat exchangers are made, which will have a longer service life.
Electrical equipment of low performance and dimensions. For example, there is no point in making a flow-through heating boiler yourself, which will take up little space and heat cold water from the water supply - the market is replete with cheap offers of low-power equipment. This makes it pointless to manufacture such heating boilers on your own.
Noticed a mistake? Select it and press Ctrl+Enter to let us know.
foxremont.com
How to make a heating boiler with your own hands?
When designing a heating system for a private home, many owners, in order to reduce the cost of purchasing equipment, prefer homemade heating boilers to factory ones. Indeed, factory units are quite expensive, but making a wood-burning boiler with your own hands is quite possible if you have competent drawings and skills in handling tools for machining materials, as well as with a welding machine.

The operation scheme of hot water boilers is, as a rule, universal - thermal energy, which is released during fuel combustion, is transferred to the heat exchanger, from where it goes to heating devices for heating the house. The design of the units can be very different, such as the fuel used and materials for manufacturing.
Long-burning pyrolysis boilers
The operation scheme of a long-burning pyrolysis device is based on the process of pyrolysis (dry distillation). During the smoldering process of firewood, wood gas is released, which burns at a very high temperature. In this case, a large amount of heat is released - it is used to heat the water heat exchanger, from where it is supplied through the main line to the heating devices to heat the house.
Solid fuel pyrolysis boilers are quite expensive, so many owners prefer to make a homemade heating boiler for their home.
The design of such a unit is quite simple. Solid fuel pyrolysis boilers consist of the following elements:
- Firewood loading chamber.
- Grate.
- Combustion chamber for volatile gases.
- A smoke exhauster is a means of providing forced draft.
- Water type heat exchanger.
Firewood is placed in the loading chamber, set on fire and the damper is closed. In a sealed space, smoldering wood produces nitrogen, carbon and hydrogen. They enter a special compartment where they burn, releasing a large amount of heat. It is used to heat the water circuit, from where, together with the heated coolant, it is used to heat the house.
The fuel combustion time for this water heating device is about 12 hours - this is quite convenient, since there is no need to visit it often to load a new portion of firewood. For this reason, solid fuel pyrolysis boilers are very highly valued among private sector home owners.
The drawing in the diagram clearly demonstrates all the design features of pyrolysis hot water boilers.

In order to make such a device yourself, you will need a grinder, a welding machine and the following Consumables:
- Sheet of metal 4 mm thick.
- Metal pipe with a diameter of 300 mm and a wall thickness of 3 mm.
- Metal pipes, the diameter of which is 60 mm.
- Metal pipes with a diameter of 100 mm.
The step-by-step manufacturing algorithm is as follows:
- We cut a section 1 m long from a pipe with a diameter of 300 mm.
- Next you need to attach a bottom made of sheet metal - to do this you need to cut out a section required size and weld with the pipe. The stands can be welded from channel bars.
- Next we make a means for air intake. We cut out a circle with a diameter of 28 cm from sheet metal. In the middle we drill a hole measuring 20 mm.
- We place the fan on one side - the blades should be 5 cm in width.
- Next, we install a tube with a diameter of 60 mm and a length of more than 1 m. We attach a hatch on the top side so that it is possible to adjust the air flow.
- A hole for fuel is required at the bottom of the boiler. Next, you need to weld and attach the hatch for a hermetically sealed closure.
- We place the chimney on top. It is placed vertically at a distance of 40 cm, after which it is passed through a heat exchanger.
Solid fuel pyrolysis devices hot water type very efficiently provide heating for a private home. Their self-production helps you save a very significant amount of money.
How to make a steam boiler with your own hands
The operation scheme of steam heating systems is based on the use of thermal energy of hot steam. When fuel burns, a certain amount of heat is generated, which enters the water heating section of the system. There the water turns into steam, which is high pressure flows from the water heating section into the heating main.
Such devices can be single-circuit or double-circuit. A single-circuit device is used only for heating. Double-circuit also ensures the presence of hot water supply.
Steam system heating consists of the following elements:
- Water heating steam device.
- Stoyakov.
- Highways.
- Heating radiators.
The drawing in the figure clearly demonstrates all the nuances of the design steam boiler.

Read also: Gas homemade heating boiler.
You can weld such a unit with your own hands if you have some skills in handling a welding machine and tools for mechanical processing of materials. The most important part of the system is the drum. We connect the water circuit pipes and instruments for control and measurement to it.
Water is pumped into the upper part of the unit using a pump. Pipes are directed downwards, through which water enters the collectors and the lifting pipeline. It passes through the fuel combustion zone and water is heated there. Essentially, the principle of communicating vessels is involved here.
First you need to think through the system well and study all its elements. Then you need to purchase all the necessary consumables and tools:
- Stainless steel pipes with a diameter of 10-12 cm.
- Stainless steel sheet 1 mm thick.
- Pipes with a diameter of 10 mm and 30 mm.
- Safety valve.
- Asbestos.
- Tools for machining.
- Welding machine.
- Instruments for control and measurement.

- We make the body from a pipe 11 cm long with a wall thickness of 2.5 mm.
- We make 12 smoke pipes 10 cm long.
- We make a flame tube 11 cm.
- We make partitions from stainless steel sheets. We make holes in them for the smoke tubes - we attach them to the base by welding.
- We weld the safety valve and manifold to the body.
- Thermal insulation is carried out using asbestos.
- We equip the unit with monitoring and adjustment devices.
Conclusion
As practice shows, the manufacture of boilers for heating systems in private houses is quite common. At correct execution everyone thermotechnical calculations, if you have a well-designed drawing and wiring diagram for the main line, such devices cope with their task quite effectively and allow you to save a significant amount of money, since such factory-made devices are quite expensive.

Making heating devices on your own is a scrupulous, complex and time-consuming task. In order to cope with it, you need to be able to use a welding machine and have skills in using tools for mechanical processing of materials. If you don’t have such skills, this will be a good opportunity to learn - and you will be able to provide your home with warmth and comfort with your own hands.
mynovostroika.ru
DIY heating boiler: necessary drawings and product features
 Making a heating boiler yourself is not as simple as it is written on many websites. A person who decides to make a boiler with his own hands must have certain qualifications and skills, have necessary tools and materials, and also be able to create homemade drawings for heating boilers, according to which the product will be manufactured. The most complex technical structures on Earth have been created by human hands, so it is not surprising that home-made heating boilers are much better in their technical data than factory products.
The enterprise is created in order to make a profit, so a product design is developed that has a minimum cost for the given technical parameters. But for self-production, steel of higher quality and thickness is most often chosen. Usually no one saves and purchases high-quality fittings, fittings and pumps. And for the heating boiler you create with your own hands, the drawings are either of already tested models, or your own unique ones are being developed.
Homemade electric heating boilers
 Having the skills to work with metal, having the necessary material and tools, it is easiest to make homemade electric boilers - electrode or heating elements. If a heating element is used as an electricity converter, then you need to make or select a steel housing in which it will be installed. All other components - regulators, sensors, thermostat, pump and expansion tank can be purchased separately in specialized stores. Electric boilers can be used in closed or open heating systems.
What is needed and how to make a 220V electric heating boiler with your own hands, efficient and reliable?
 You need a steel container in which one or more heating elements are placed in accordance with the drawings or sketches for the product being created. Even at the stage of the project for do-it-yourself heating boilers, the drawings should provide for the possibility of quickly and easily replacing a burnt heating element. For example, the body can be made of a steel pipe with a diameter of 220 mm with a body length of about 0.5 m. Flanges with supply and return pipes are welded to the ends of the pipe and seats, in which heating elements are installed. The circulation pump, expansion tank and pressure sensor are connected to the return line.
Features of power supply of electric boilers
Heating elements consume significant power, usually more than 3 kW. Therefore, for electric boilers you need to create a separate power supply line. For units with a power of up to 6 kW, a single-phase network is used, and for large values power required three-phase network. If you equip a homemade heating boiler with a heating element with a thermostat and connect it through RCD protection, then this perfect option. When installing conventional heating elements, the thermostat is purchased and installed separately.
Electrode heating boilers
Boilers of this type impress with their extreme simplicity. It is a container in which an electrode is installed; the second electrode is the boiler body. Two pipes are welded into the container - supply and return, through which the electrode boiler is connected to the heating system. The efficiency of electrode boilers is close, like that of other types of electric boilers, to 100% and its real value is 98%. The famous Scorpion electrode boiler is the subject of heated debate. Opinions are extremely varied, from excessive admiration to complete denial of use for heating circuits.
 It is believed that electrode boilers were designed for heating submarines. Indeed, the manufacture of heating boilers requires a minimum of materials, sea water with dissolved salts is an excellent coolant, and the hull of the submarine, to which the heating system is connected, is an ideal grounding. At first glance, this is an excellent heating circuit, but can it be used for heating homes and how to make an electric heating boiler with your own hands, repeating the design of the Scorpio boiler?
Electrode boiler Scorpio
 In electrode boilers, the coolant heats the current passing between the two electrodes of the boiler. If distilled water is poured into the system, the electrode boiler will not work. There is a special salt solution for sale for electrode boilers with a specific conductivity of about 150 ohm/cm. The design of the unit is so simple that making a Scorpio electric boiler with your own hands, if you have the necessary skills, is quite simple.
The boiler is based on a steel pipe with a diameter of up to 100 mm and a length of up to 300 mm.
Two pipes are welded to this pipe for connection to the heating system. Inside the device there is an electrode isolated from the body. The boiler body plays the role of a second electrode; it is connected to neutral wire and protective grounding.
Disadvantages of electrode boilers
 The main disadvantage of electrode boilers is the need to use saline solutions, which adversely affect radiators and heating pipelines. Over the course of several years, the heating system may require a complete replacement of radiators, especially aluminum ones (more detailed information which you will read about here) and pipelines. Circulation pumps, which are designed to work with antifreeze or clean water are at great risk. The second huge drawback is that electrode boilers require ideal protective grounding housings, otherwise they pose a huge risk of electric shock. It is prohibited to sell and install such equipment in foreign countries!
Homemade solid fuel heating boilers
Due to rising prices for gas and electricity, the demand for solid fuel boilers is growing, and their prices are rising accordingly. An alternative is to manufacture heating boilers yourself, because they will cost less and will work no worse than factory-made products.
Make it at home cast iron firebox impossible, so steel is used for manufacturing.
 If possible, it is better to use heat-resistant alloy steel (stainless steel) with a thickness of at least 5 mm. There is no point in saving on metal, because the boiler is made for yourself, for long years. You can use ready-made drawings as a basis or make them yourself.
Features of manufacturing gas boilers
 Theoretically, making a gas heating boiler with your own hands is not particularly difficult for people who know how to work with metal and have the necessary skills and tools. Gas boilers are classified as products increased danger, therefore, homemade gas heating boilers must obtain permission for installation from the gas service, which requires a product certificate.
It should be borne in mind that obtaining a certificate is quite expensive and the slightest deviation from established norms and rules leads to refusal. Is it worth the risk? In addition, modern SNIiP prohibits the manufacture of gas-fired heating boilers with your own hands!
spetsotoplenie.ru
DIY drawings of solid fuel boilers
The article describes in detail how to make a slow and ultra-long-burning boiler with your own hands using the drawings. The process, only at first glance, seems difficult and unique, but following the instructions from the article, you will be able to do no worse than the masters, the main thing is to carefully watch the video.
Drawing of a simple long-burning boiler
This design of a solid fuel boiler is quite simple. The heat exchanger can be made of sheet steel in the form of a “water jacket”. To maximize heat transfer efficiency and increase the contact area with flame and hot gases, its design includes two reflectors (protrusions inward).
 Drawing of a simple solid fuel boiler
 In this design, the heat exchanger is a combination of a “water jacket” around the combustion chamber and an additional slot-like sheet metal register in its upper part.
 Diagram of a boiler with a slot-type heat exchanger
 1 - chimney; 2 - water jacket; 3 - slot heat exchanger; 4 - loading door; 5 - firewood; 6 - lower door for ignition and cleaning; 7 - grate; 8 - door for regulating air supply and cleaning the ash pan.
Read also:
In these options, the “water jacket” is supplemented with heat exchange registers made of pipes in the upper part of the combustion chamber. In addition, such units are designed for cooking food on them. Option 4 is more powerful and has a top loading door.
Rice. 3 Designs of solid fuel boilers with additional registers and hob
1 - firebox; 2 - register made of pipes; 5 - return pipe; 6 - supply pipe; 7 - upper loading door; 8 - lower door for ignition and air supply; 9 - loading door; 10 - chimney; 13 - grate; 14,15,16 - reflectors; 17 - damper; 19 - water jacket; 20 - ash pan; 21 - hob.
Back to contents
Top combustion boiler
This unit differs from the previous ones - firstly, in its shape (it has a round cross-section and can be made from pipes of different diameters), and secondly, in the method of burning fuel in it (it is burned in it from top to bottom). In order to ensure such a combustion process, it is necessary to provide air supply from above, directly to the combustion site. This function here is performed by an air supply telescopic pipe, which rises up when loading fuel and falls down after igniting the fuel. As it burns gradually, the pipe falls down under its own weight. At the bottom of the pipe, to ensure uniform air supply, a “pancake” with blades is welded.
To ensure better fuel combustion conditions, an air heating chamber is located in the upper part. The air supply, and therefore the burning rate, is regulated by a valve at the entrance to this chamber from above. The heat exchanger here is made in the form of a “water jacket” around the combustion chamber.
 Drawing of a top combustion solid fuel boiler
 1 - outer wall (pipe); 2 - inner wall; 3 - water jacket; 4 - chimney; 5 - telescopic air supply pipe; 6 - air distributor (metal “pancake” with ribs; 7 - air preheating chamber; 8 - air supply pipe; 9 - supply pipe with heated water; 10 - air damper; 11 - loading door; 12 - cleaning door; 13 - pipe with water from the system (return); 14 - cable controlling the damper.
Back to contents
Boiler with pyrolysis combustion of solid fuel
The difference between this design is that solid fuel does not burn in it, as in a conventional one, but if there is a lack of primary air supply, it is “distilled” into wood (pyrolysis) gas, which is burned in a special afterburner chamber when secondary air is supplied to it. Such a presentation can be either natural or forced.
Scheme-drawing of one of the variants of a pyrliz boiler
1 - draft regulator with temperature sensor; 3 - firewood; 4 - lower door; 5 - grate; 6 - air damper for primary air supply; 7 - ash pan; 8 - grate; 10 - cleaning; 11 - drain; 12 - thermal insulation of the body; 13 - return (coolant supply from the system); 14 - nozzle; 15 - secondary air supply; 16 - chimney damper; 17 - pipe with heated water; 18 - damper; 21 - loading door; 22 - afterburning chamber.
Such boilers can be either with conventional fuel combustion or with pyrolysis. In the first case, all the necessary air is supplied through the lower door, and the combustion products, after passing through the heat exchanger, are removed into the chimney. In the second case, a limited amount of primary air is supplied to the combustion site, where the wood burns, releasing pyrolysis gas. In addition, such structures are equipped with an additional afterburning chamber, where secondary air is supplied and gas is burned. At the top of the heat exchange chamber there is a valve that opens when ignited and allows the flue gases to escape directly into the chimney.
 Drawing diagram of a shaft-type boiler with an afterburner chamber
 1 - primary air supply damper; 2 - lower door for ignition and cleaning; 3 - grate; 4 - firewood; 5 - loading door (can be located on top); 12 - pipe with heated water (supply); 13 - starting valve; 14 - chimney damper; 15 - heat exchanger; 16 - secondary air supply; 17 - afterburning chamber; 18 - return; 19 - drain; 20 - cleaning; 21 - damper; 22 - grate; 25 - ash pan.
 Diagram of a shaft-type boiler with lining of the inner surface of the combustion and afterburning chambers to contents
 Do-it-yourself solid fuel boiler for ultra-long burning
A homemade heater will have the following design:
- The firebox is a “box” 460 mm deep, 360 mm wide and 750 mm high with a total volume of 112 liters. The fuel load volume for such a combustion chamber is 83 liters (the entire volume of the firebox cannot be filled), which will allow the boiler to develop power up to 22 - 24 kW.
- The bottom of the firebox is a corner grate on which the firewood will be placed (air will flow into the chamber through it).
- There should be a 150 mm high compartment under the grate to collect ash.
- The 50 liter heat exchanger is mostly located above the firebox, but its lower part covers it on 3 sides in the form of a 20 mm thick water jacket.
- A vertical flue pipe connected to the top of the firebox and horizontal flame pipes are located inside the heat exchanger.
- The firebox and ash pan are closed with sealed doors, and air is taken in through a pipe in which a fan and gravity damper are installed. As soon as the fan turns off, the damper lowers under its own weight and completely blocks the air intake. As soon as the temperature sensor detects a decrease in the temperature of the coolant to a user-specified level, the controller will turn on the fan, the air flow will open the damper and a fire will break out in the firebox. Periodic “shutdown” of the boiler in combination with an increased volume of the firebox allows you to extend operation on one load of fuel up to 10 - 12 hours with wood and up to 24 hours with coal. The automation of the Polish company KG Elektronik has proven itself well: a controller with a temperature sensor - model SP-05, a fan - model DP-02.
 do-it-yourself solid fuel boiler with extra long burning time
 The firebox and heat exchanger are wrapped in basalt wool (thermal insulation) and placed in the housing.
The process of making a boiler with your own hands.
First of all, you need to prepare all the necessary preparations:
- Steel sheets 4 - 5 mm thick for making a firebox. Alloy steel of heat-resistant grades 12Х1МФ or 12ХМ (with additions of chromium and molybdenum) is best suited, but it needs to be welded in an argon environment, so the services of a professional welder will be needed. If you decide to make a firebox from structural steel (without alloying additives), then you should use low-carbon grades, for example, Steel 20, since they are high-carbon from exposure high temperature may lose their ductility (hardening occurs).
- Thin sheet steel 0.3 - 0.5 mm thick, painted with a polymer composition ( decorative paneling).
- 4mm structural steel sheets for the body.
- Pipe DN50 (flame pipes inside the heat exchanger and pipes for connecting heating system).
- Pipe DN150 (pipe for connecting the chimney).
- Rectangular pipe 60x40 (air intake).
- Steel strip 20x3 mm.
- Basalt wool 20 mm thick (density - 100 kg/cubic m).
- Asbestos cord for sealing openings.
- Factory made door handles.
Welding of parts should be performed with MP-3S or ANO-21 electrodes.
Back to contents
DIY heat exchanger for a solid fuel boiler
First, the firebox is assembled from two side, one rear and one upper walls. The seams between the walls are made with full penetration (they must be airtight). A 20x3 mm steel strip is welded horizontally from below to the firebox on 3 sides, which will serve as the bottom of the water jacket.
Next, to the side and rear walls of the firebox, you need to weld short pieces of small-diameter pipe in a random order - the so-called clips, which will ensure the rigidity of the heat exchanger structure.
Now the outer walls of the heat exchanger with pre-made holes for the clips can be welded to the bottom strip. The length of the clips should be such that they slightly protrude beyond the outer walls, to which they need to be welded with a sealed seam.
In the front and rear walls of the heat exchanger above the firebox, coaxial holes are cut into which flame tubes are welded.
All that remains is to weld the pipes to the heat exchanger for connection to the heating system circuit.
 Homemade sheet metal boiler to contents
 Boiler assembly
The unit must be assembled in the following sequence:
- First, the body is made by attaching short seams to its bottom. side walls and frames of openings. The bottom frame of the ash pit opening is the bottom of the housing itself.
- From the inside, corners are welded to the body on which the firebox grate pan (grid) will be placed.
- Now you need to weld the grill itself. The corners of which it consists must be welded with the outer corner down, so that the air coming from below is evenly distributed over the two inclined surfaces of each corner.
- Next, a firebox with a heat exchanger is welded to the corners on which the grate is laid.
- The doors of the firebox and ash pan are cut from steel sheet. From the inside they are framed with a steel strip laid in two rows, between which an asbestos cord must be laid.
Now we need to weld the mating parts of the door hinges and several 20 mm wide brackets to which the casing will be attached to the boiler body.
The heat exchanger must be lined on three sides and on top with basalt wool, which is tightened with a cord. Since the insulation will be in contact with hot surfaces, it should not contain phenol-formaldehyde binders and other substances that emit toxic volatile substances when heated.
The sheathing is screwed to the brackets using screws.
An automation controller is installed on top of the heat generator, and a fan is screwed to the air duct flange.
The temperature sensor must be placed under the basalt wool so that it is in contact with the rear wall of the heat exchanger.
If desired, the boiler can be equipped with a second circuit, allowing it to be used as a water heater.
The circuit has the form of a copper tube with a diameter of about 12 mm and a length of 10 m, wound inside the heat exchanger on flame tubes and brought out through the rear wall.
For information for the article, we thank our colleagues: microklimat.pro, v-teple.com
Water hammer in the heating system
Expansion tanks open type for heating system