Three ways to paint a brick wall. Imitation of a brick wall with your own hands (50 photos, videos) Imitation of brickwork from plasterboard

Read also
With the advent of the loft style in the mid-20th century, brick walls became incredibly popular. But there is not always real masonry in the room, so it is often imitated using plastic panels, wallpaper, tiles, etc. In this article we will look at how to make artificial wall under brick using decorative plaster.

What does plaster look like under brickwork?
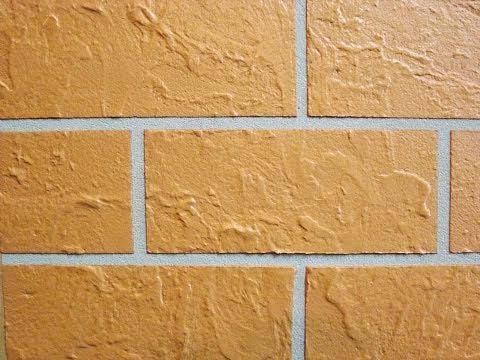
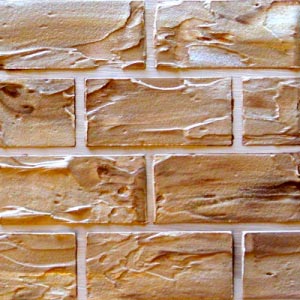
Decorative brick-like plaster is used for finishing walls, arches, doorways in apartments, cottages, office or administrative premises. This type of finishing can also be used to highlight individual sections or parts of the wall. Less expensive cement-based compositions are used for cladding building facades. But the most successful look are bricks made of light or red stone, pressed onto decorative plaster.
Below are photos of an imitation brick wall made of plaster in the interior of premises and the decoration of facades.
But ready-made polymer-based compounds are considered the highest quality and most durable: silicate and silicone. They are plastic, easily distributed over the surface and have high adhesion (cohesion), strength and moisture resistance.
To save money, you can make your own decorative plaster from ordinary putty .
Preparing the walls
The walls on which decorative brickwork will be applied require certain preparation.
Curved walls need to be straightened plastering or, for example, sheets of plasterboard.
Remove jet finish. If the decor is planned on an old plaster layer, then it needs to be cleaned, a rough surface created, and treated with an adhesive primer. Unstable areas are knocked off the wall, chips are cleaned and puttied. If the surface has been previously painted, the paint layer must also be removed, otherwise the plaster will not adhere firmly. This is discussed in detail in our article: “Is it possible to plaster over paint: what is the right thing to do?” Read .
Before plastering the wall is primed. For interior decoration universal acrylic composition is suitable deep penetration. The primer will improve adhesion and bind small particles and dust to the wall.
Imitation of brickwork with your own hands
There are several ways to make "bricks" using decorative plaster. Let's describe each of them.
Making bricks using a stamp and roller
 On sale you can find special silicone or polyurethane stamps for one or more bricks. They are carefully applied to the slightly dried plaster layer on the wall, and then also carefully, trying not to damage the print, removed.
If small defects arise when applying the “bricks”, they are smoothed out with a spatula. If the plastered wall does not dry out enough, the print may be smudged. In this case, the surface must be smoothed again with a spatula, wait a while, and apply the mold again.
Another way to create a brick-like imprint on a wall is to use textured rubber rollers. Roll the roller along the plastered wall in a horizontal direction. At one time it turns out two - four brick rows(depending on the width of the roller).
Using tape
To create artificial masonry, the location of future seams is marked with a pencil on a dry wall. First, marks are made from floor to ceiling at one edge every 7.5 cm. Then on the opposite side. The horizontality of the lines can be controlled with a bubble or laser level.
Masking (paper) tape 1-1.5 cm wide is glued over the markings. It is not always possible to find such tape on sale, so you often have to buy a larger size (3 cm) and cut the mats lengthwise.
Paste the horizontal lines first, then the vertical ones. This is a labor-intensive task that will take several hours. What the markup looks like is shown in the diagram:

To make the ends of the tape easy to find under the layer of mortar, they are brought outside the boundary of the area to be plastered.
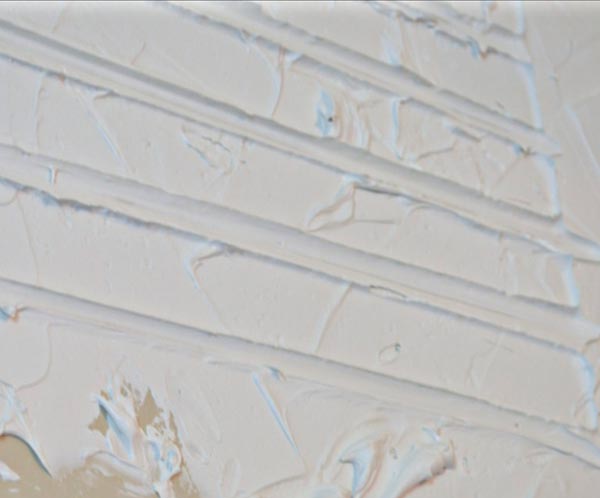
The wall is covered with mortar directly on top of the tape. Layer thickness 3-5 mm.
After alignment, they begin to pull the ends of the tape. When the tape is torn off, a clear pattern of seams remains on the surface. After completely dry uneven edges are cleaned. This method will be clearly shown in the video below.
Cutting bricks
Masonry joints can be cut on slightly dried plaster and using available tools - a small spatula, a thick knitting needle or any other pointed objects of a suitable size.
It is necessary to “draw” the seams until the plaster has completely hardened. To prevent the wall from looking too smooth, it is better to go over it with sandpaper after finishing the work. A rough surface with marked seams will look more like a brick wall. To make the wall look realistic, you can add small scratches and chips.
Rusticized plaster
 To imitate voluminous bricks or massive stones on the facades of houses, rustras are used - straight seams that divide the surface into blocks. There are several ways to create them:
- using wooden lathing;
- stuffing with metal strip;
- by pulling using templates;
- cutting out with a saw according to the rule ( construction tool in the form of a long ruler).
When creating masonry, it is absolutely not necessary to make the lines too even. There may be small irregularities at the seams, giving the wall a more expressive texture.
Video
How to make decorative brick plaster with your own hands is shown in next video lesson. The master marks and extrudes the masonry joint using a rule.
The following video shows how to do it using tape.
You can find other master classes on applying decorative plaster in our video section.
Painting plaster bricks
After the plastered surface has dried, it is painted with acrylic, latex, alkyd or water-based compositions. When choosing a color, you can stick with a natural red-brown or experiment by mixing them to create a unique shade.
The color can be added to the plaster mixture when mixing it. But in this case, you will have to prepare the solution for the entire wall at once, otherwise the shades in individual areas may not match.
The seams are painted separately with a thin brush. A good technique is to apply two layers of paint. different color: the second is applied a couple of minutes after the first, that is, before it dries. Sometimes individual bricks are distinguished by a different shade from bright yellow to almost black.
To protect against dust and dirt, the surface is additionally treated with matte acrylic varnish.
We hope that the article was useful to you. Leave your feedback and questions in the comments below.
PreviousDecorative plasterArtificial foam brick: DIY finishing tutorial
When carrying out repairs, quite often there is a desire to decorate the wall with a brick with your own hands. This work can actually be done using ordinary plaster mixtures. It is very important to choose the right place where such an accent will effectively emphasize the individuality of the interior.
When choosing the type of interior decoration for your home, you have to take into account many factors. A brick wall is one way to follow fashion trend. This type of decor can be done on an entire wall or a separate area (arch, niche). “Bricks” play the role of an accent in the interior of the room.
Preparatory work
Before finishing, you should prepare the surface on which you plan to apply the decor. First you need to remove the old coating. The thickness of the created finishing layer can reach 1.5 cm. Imitation brick for interior decoration looks good on extremely smooth walls. Therefore, it is necessary to check their quality level. If the deviation exceeds 2 cm/m, then the surface must be leveled according to the beacons ( cement mortar). Leave for several days until the mixture dries completely.
The flat surface on which the plaster will be applied should not contain large depressions or bulges. Any defects should be repaired with the mixture. The dry wall, prepared for finishing, must be coated with a suitable primer. Without this, the solution layer may peel off over time. The primer for brick walls under plaster is selected according to the base material. It is convenient to apply the liquid with a paint roller, and in corners and other hard-to-reach places you need to carefully go over it with a brush.
After the primer has dried, the plaster is mixed. When preparing the material, the consumption of the composition should be taken into account. If the layer is laid with a thickness of 10 mm, then 8-9 kg of dry mixture is required per 1 m² of surface. Standard bags are packaged in 30 kg. This amount is enough for a wall section of 3.5 m². To avoid getting dirty, it is recommended to cover the floor with film. The solution should be mixed with a drill with a special attachment. The mixture should be quite thick and viscous. If you do not plan to paint the finish, the solution can be tinted.
The brick wall decor will look absolutely natural if the seams are drawn using a special tool (joint). But you can use another available “tool” (broken pencil, thick knitting needle, etc.).
Creating imitation brickwork
If you plan to cover only a section of the wall with plaster, then work should begin by applying markings:
- it is necessary to draw the borders of the finish using a pencil;
- Apply masking tape along the lines.

To work with plaster, two steel spatulas (20 cm, 5 cm) are used. Using a narrow tool, the mixture is applied to a wide one. Also, small defects (protrusions, pits) are corrected with a small spatula. Using a wide spatula, the base is spread with gypsum plaster (starting from the edge), the layer is leveled. The work is carried out in separate sections, their area depends on the volume of the prepared solution (up to 15 liters are mixed at one time). There is no point in achieving a perfectly flat surface (natural brick is not like that). To apply seams, you can use a stencil for brick plaster.
To draw a brick pattern on the decor, you should familiarize yourself with two technologies:
- cut through the seam with a scraper;
- Before applying the solution, mark and apply masking tape.
Drawing seams with a scraper
In the first case, the plaster brickwork is painted after applying the mortar. A rule or level (1.5-1.8 m long) is applied to the dried surface of the decor. The seams are marked with a sharp plate ( optimal width is done somewhere around 0.5-1.0 cm).
The masonry “pattern” you like is done based on your own preferences. Marking on the wall should be done with bandaging of the seams. It is necessary to take into account the dimensions of classic bricks (250x 65x120 mm). Today an extended wall material, or almost square. There are also relief, textured, specially chipped and various non-standard products. You cannot draw random seams on the wall, otherwise the imitation of brick from plaster will not turn out natural.
After this, you should take a scraper, a narrow chisel or some homemade tool and carefully follow the drawn lines, removing the plaster. This is how seams are formed, the depth of which is 3-6 mm. It is not very convenient to do this work with a simple chisel. Excess mixture on the seams forms a “fringe”; it should be constantly removed.

To carefully form the seams, you can use jointing; it gives a convex or concave relief. Brick wall from plaster it is drawn starting with horizontal lines, and then short vertical ones are made. After the decor has gained strength, all imperfections in the design should be removed. Excess mixture formed on the bricks after the formation of the seams must be immediately removed with a dry cloth. You can walk along the edges with a damp sponge.
It is important to have time to apply the design before the plaster is completely dry. Otherwise, the “bricks” can be damaged. Therefore, it is recommended to treat the surface in sections. After complete drying, the decor should be painted:
- First, the entire surface is tinted.
- Then you should carefully go through the seams with a narrow brush.
Forming seams with masking tape
There is another way to make bricks on a plaster wall. In this case, future seams are marked with a pencil along the entire pre-primed, finished surface. Short vertical lines must be shifted relative to the top (and bottom) row by half a brick. Masking tape is applied according to the markings (first horizontally, then vertically). If this process is performed differently, the tape will be difficult to remove. Its ends extend beyond the boundary of the treated area.
The solution is applied to the surface prepared in this way with a spatula. Quickly leveled, select the degree of surface smoothness by at will. It depends on whether you prefer embossed bricks or absolutely smooth ones. After this, without waiting for the solution to dry, you should carefully pull the ends of the horizontal tape, which leaves a pattern of seams on the decor.
Imitating a brick wall from plaster with your own hands requires some experience. Therefore, beginners are recommended to form a drawing using the first method.
To add severity, the dried “masonry” can be wiped with a hard brush. If you walk over a completely dry wall with sandpaper, the surface will become smooth. After this, the decor is ready for painting.
When the brick wall finishing has been completed and the surface has acquired the required hardness, all excess should be removed (residues of mortar that disturb the design). Peculiarities finishing depend on whether a colored (tinted) mixture was used or a regular one.
Decorative plaster should not remain white-gray color. Therefore, a colorless wall should be painted by mixing several different shades, or settle on a ready-made tone. In this case, it is necessary to take into account the interior design and lighting features. The wrong color can ruin the whole impression.
Advantages of imitation masonry
Decorating brick walls with your own hands has a number of advantages:
- the work will not require any special financial expenses, time costs, professional knowledge and special skills, accuracy and diligence are required;
- you can choose the material based on your own preferences and financial capabilities (plaster, any additives, paint of the shade you like);
- plaster mixtures are environmentally friendly and will not cause harm to health;
- imitation brickwork has good thermal insulation properties;
- the finishing layer is quite thin, due to which the space of the room is not reduced;
- a brick wall made of plaster does not require special care and will not need repairs for a long time.
"Brickwork" in a modern interior
A brick wall in the interior is made in the loft style. This method is used spectacular accent. You can’t go overboard and decorate the entire room “like brick.” The following options for creating accents can be given:
- the space around the opening, niche, arch, door, window, mirror is designed, this solution looks quite attractive;
- the wall is decorated with individual “bricks” scattered across the wall; in this case, the surface does not resemble real masonry, but the result is an original decor;
- one entire wall is finished, this approach is classic accent in a room, which is done where all attention is directed, for example, the wall behind the TV or fireplace.
Minor issues
This type of finish can be disappointing:
- in a room of very modest size, where it is important to preserve every centimeter of free space;
- this surface attracts dust very much, which can be easily removed with a damp sponge, but this should be done quite often;
- repairs may require additional financial costs if you need to level the base before making a brick wall with plaster.
But no matter what, this type of interior decoration is very popular.
One of fashion trends in the decoration of the premises - a brick wall. Good for those who have a brick house. All they need is to knock off the plaster and slightly “tamper” what is available. What should the rest of us do? There are wallpapers and brick-like tiles, but not all of them are plausible, and good ones cost almost like a natural brick wall. The best option in this case - a self-made imitation brick for interior decoration. Moreover, “bricks-tiles” can be made separately, or you can decorate the entire wall in one go.
How to make an imitation brick wall: a short list of methods
The easiest way is if you have brickwork hidden under the plaster. Beat the plaster, clean the seams, prime and paint. The result is a natural brick wall. Moreover, it will look quite “old” and vintage. Those who are less fortunate will have to imitate this brickwork. The good news is that there are many ways available inexpensive materials, you can make a “brick wall” on concrete, plasterboard, plywood... any more or less durable surface. By the way, most techniques take little time. So, here's how to make imitation brick for interior decoration:
This is just a short list. There are several technological differences at each point. So imitation brick for interior decoration can be done in at least a dozen ways. Let's talk about some in more detail.
sawing brick
It seems like a reasonable idea to replace the expensive finishing tiles“like a brick” with bricks loosened into plates. But you need a brick good quality, without voids, inhomogeneities, underburning or overburnt areas. In general, you need an expensive brick. Or old.

An example of sawn bricks... but these are two “beautiful” parts
It is better to cut it with a water-cooled circular saw. The result will be decorative brick-like tiles in a natural color. The thickness of the tiles is at least 8-10 mm. The advantages are clear: low price, no need to paint - there is a natural color. These homemade brick tiles are then glued to the walls using regular tile adhesive.
We lay out any texture from sawn bricks. And this is for decorating external corners
But there are also disadvantages: you need a good quality brick, but you still have to find it. When cutting, the plates may break. Only two of them are obtained with beautiful surface- extreme. The rest will have to be modified manually, creating a relief. It’s tedious, dusty, time-consuming, difficult, and it’s not a fact that brick imitation will actually be learned “at the level.”
Despite all the shortcomings, this method is used. And this is, perhaps, the only option for homemade imitation of brickwork, which can be used for exterior decoration. For these purposes (finishing the facade of a building), by the way, you can cut the brick into two halves. Everything is cheaper than buying tiles.
How to draw brickwork on a wall
If “wet” or “dusty” work is not your thing, but you know how to draw at least a little, you can paint a brick wall. You will need acrylic paints, brushes, a pair of natural sponges, masking tape, and thick paper plates for mixing paints. When thinning paints, remember that acrylic paints darken as they dry. And one more thing: they dry quickly, but freshly applied ones can be removed with a clean cloth soaked in water.

First we prepare workplace: cover the baseboard and adjacent floor with polyethylene or old wallpaper (it’s better to fix it with tape). Use masking tape to outline the boundaries - at the top, on the sides. At the bottom there is a limiter - a plinth, although in order not to get dirty, it can be removed.
Drawing bricks on the wall
- Paint the wall with white semi-matte acrylic paint. Leave to dry.
- Preparing the background paint. In one of the paper plates, mix 1/6 part umber, 1/6 black paint and 4/6 titanium white. Immediately prepare a little paint, apply it to the wall using a sponge, simply applying the surface soaked in paint to the wall. You shouldn’t try to make a solid background - it should be torn and textured. In some places we apply the paint more densely, passing twice, in some places we apply a more transparent layer.

- On a dry background, draw several rows of bricks by hand, not using a ruler. We focus on the standard for masonry: 25 * 6.5 cm, seam thickness - 0.8-1.2 cm. When marking, keep in mind that using this technology it is easier to make the seam a little narrower by painting it, than to try to widen it later.
- To paint the “bricks” you need to mix in different proportions ocher and sienna, receiving different shades“brick” colors - from yellowish-orange to brownish. We got some shade, painted several “bricks” in random places. We mixed a new batch and painted over the other bricks. We apply the paint with a brush, without trying to get a uniform surface or a dense layer of paint - the background layer is visible. The edges of the “bricks” also should not be smooth.
- For a traditional red-brown color, to sienna and red ocher, add a little light ocher and a little white. You can paint several bricks in a row with this color.

- One more shade - to the above composition we will add brown mars and a little water. Apply with a brush or sponge - as desired.
- If you add white and burnt sienna to ocher and sienna, you get another color.
- We paint all the bricks in random order with these shades.
- We dilute white and a little ocher, add water. Apply the composition with a sponge, acting as a tampon.
- We take the old one toothbrush and burnt bone paint. We dip the bristles in paint and spray it on the wall, imitating the heterogeneity and texture of clay bricks.

- We add volume to the bricks: dip a thin brush in a mixture of umber and white. We bring all the bricks from below and to the right or left. Everything is on one side, depending on where the window is located (on the side opposite to the window). The thickness of the liner varies, since the masonry and the bricks themselves cannot be ideal.
It takes much longer to describe than to do it all. A beginner can draw about 30 squares of imitation brickwork in a day. For maximum verisimilitude, there are several secrets, which we will discuss below.
Final touches
To ensure that the brickwork painted on the wall is as close to natural as possible, there are several little secrets:

With some skill and effort, you can ensure that the painted brickwork looks like the natural one. The main rule: imperfection and heterogeneity.
Imitation brick for interior decoration using plaster mortar
The general idea is simple: a layer of plaster or tile adhesive is applied to the wall, and a seam is cut/pressed into it. After processing the edges of the “bricks” and the seams, and painting, the result is a semblance of brickwork of varying degrees of plausibility. Everything is simple, but there are significant differences and nuances.

What and how to make a solution from
The first question that arises is: what kind of solution is needed and from what? There are many recipes. Here are some options:

Regardless of what you make the solution from, it should be semi-dry and should not leak under any circumstances. It will not need to be leveled, so its plasticity is not important to you, and the adhesive ability will be provided by additives - tile adhesive and PVA. To adjust the consistency, add water in small portions.
Surface preparation
The wall on which we will make an imitation of brickwork does not have to be even. It should be free of dust and dirt, crumbling fragments and particles. This is where the requirements end.

The process of preparing the wall is a careful approach: first they make markings
Before starting work, it is better to prime the wall. The type of primer depends on the substrate. If the wall is concrete or loose, walk with “concrete contact”. It will bind crumbling particles and create an adhesive surface on which any composition fits perfectly. If we are decorating plywood, gypsum board or other similar material, we can do without a primer, or we can coat it with diluted PVA.
Technology No. 1. We use thin tape to draw seams
First, we paint the wall to match the color of the seams between the bricks. Some are planning gray-brown, others white-gray. We cover the wall with paint of a suitable shade. Using narrow masking tape (1 cm or slightly less/more), apply markings to the prepared base. The tape will mark the seams between the bricks, so stick it horizontally, at a distance of about 6-6.5 cm from each other. When the horizontal lines are pasted, glue the short vertical ones. They are 23-25 cm apart from each other - this is the length of a standard building brick, but decorative ones can be shorter.
Now we take the solution and apply it to the wall. The layers are unequal, the thickness is 0.3-0.5 cm. We apply it “as it turns out”, without achieving a flat surface, smooth transitions... As it turns out, so be it. We only avoid obvious bald spots through which the wall shines. We filled the area, took a flat trowel (grater), and slightly smoothed out what we got. Leave until slightly dry: so that when you press with your finger, the composition is slightly pressed through.

We pry up the ends of the horizontally pasted strips of adhesive tape in any place (when gluing, leave the “tails”), pull, removing along with the solution adhering to the tape. We remove the entire mesh. The edges of the “bricks” turn out to be torn and uneven. This is fine. Even good.
Take a toothbrush or paint brush with fairly stiff bristles. Use a toothbrush to go along the seams, removing any remaining mortar. At the same time, the edges of the bricks are rounded. Then we take a wider brush and use it to go over the surface, adding naturalness and removing too sharp edges. Leave to dry at room temperature for approximately 48-72 hours. Do not force dry it - it will crack. Although, if you want to have cracks... If the composition was not painted in bulk, it's a matter of painting.
Technology No. 2: cutting the “seams”
This method of simulating brick for interior decoration takes less time: no tape is required. Apply the solution to the surface of the wall. Everything is exactly the same as described above, only the layer can be thicker - up to 0.8-1 cm. After waiting until the solution “sets” a little, we mark the seams. Here again there are options:

The second option is more accurate. But you have to be careful not to make it too smooth. Although, due to the fact that the hand trembles, the seam “walks” slightly, which gives a more believable look.
Having made the horizontal seams, we proceed to cutting the vertical ones - also by hand. The width of the bricks is about 6 cm, the length is around 23-25 cm. Having finished, we wait 12-14 hours. Until the composition has set enough to be picked out. When the concrete begins to crumble under strong pressure, take a wide screwdriver (the usual one with a “spatula”) and use it to pick out the solution between the cut strips.

In progress…
When the seams are cleaned, take a stiff brush or brush and remove the remaining mortar and crumbs. The bristles on the brush should be fairly stiff. If the solution is dry, you can try more drastic measures - a wire brush.
Technology No. 3: saw seams
This method of making imitation brickwork for interior decoration differs only in that instead of a knife we take an old hacksaw blade.
After waiting until the solution sets and does not slide, we use a saw to mark the boundaries of the seams. Here you choose one of the methods described above. But you don’t have to wait any longer: use a hacksaw to paint out the seams little by little. Long horizontal seams are quick to make, but vertical ones are not very convenient, since the fabric is not very suitable for short distances.

This method is good because there is no danger of “over-drying” the solution. You can do the “jointing” as soon as the solution hardens a little. In this state, it is easier to round the edges of the bricks, giving them a natural “old age”. The downside is that you have to get used to it, otherwise you might end up doing something bad.
Making a mold for casting brick tiles from plaster
Another imitation brick for interior decoration in an apartment or house can be cast: you can make it yourself gypsum tiles in the form of bricks. To do this with interesting specimens The bricks are imprinted (a mold is made to form an artificial finishing stone), then gypsum mortar is poured into it. The resulting tiles are used for wall decoration. This technology is good because it allows you to prepare several forms in which you can make bricks different colors for different rooms.
We find interesting shaped bricks and several almost ordinary ones, but with different minor defects. We will use them to cast the mold. It is desirable that there be at least a dozen of them, or better yet, more. “Artificial brickwork” will be more varied.

On the side that we will “multiply”, apply grease or heated wax mixed with kerosene. This is necessary so that the silicone does not stick to the surface. When everything is dry, apply a layer of silicone sealant to the treated side. The layer thickness is 1-1.5 cm. Leave until the silicone is completely polymerized (the time depends on the type, it is written on the package).

When the silicone has hardened, take the foam and coat the mold without removing it from the brick. After the foam has hardened, remove the brick and level the bottom of the mold so that it stands level. Can be used by filling with gypsum mortar. It sets quickly; if you have a dozen molds, in 2-3 days you can make tiles for a couple of squares simulating a brick wall. By the way, gypsum mortar can be painted in bulk. Then new cracks and chips are not a problem - just like a brick.
How and what to paint
Recently, a white brick wall has become fashionable. If you are going to do just this, there are no problems: apply the seams with a brush, use a roller to apply the surface. If you want something that is not too monochromatic, add a little tint to the base color composition - gray, brown, yellow... or even pink or blue. Paint with this paint. Add more white to the remainder and add highlights with this lighter composition using a semi-dry roller, sponge, or brush. If desired, you can apply the top “shadows” with silver, bronze, adding a little gold. Here's how you like it best.

Imitation brick in the bedroom - looks very stylish
If the seams in the imitation brickwork should be darker, go over them first with a brush. Then, using a roller with short or medium pile, we paint the very surface of the bricks. If you take a roller with even shorter pile, dip it in paint of a different shade (lighter or darker - it depends), in bronze, silver, gold, etc. and with this roller, quickly, barely touching, paint over the most protruding parts, it will turn out even more interesting effect. In general, you can experiment. With this approach, imitation brick becomes a design object and the main interior decoration.
Recently, it has become widely used in the decoration of apartments and private houses. relief plaster. A very popular type of it is the imitation of brickwork made of plaster on the wall. It is performed both in the corridor and in any room and not necessarily on all walls, it can be performed on any selected wall. Inexpensive materials and simple construction tools are suitable for this purpose. The technology itself for simulating decorative brickwork is not difficult and can easily be done with your own hands.
Materials and tools
To complete the work, you will need inexpensive materials to imitate brickwork and simple available tools, namely:
- spatula width 200 mm and 80 mm;
- flute tassels 5 and 3.5 cm wide;
- paint roller;
- paint tray;
- building level 2 m long;
- long metal ruler;
- tape measure and pencil;
- cardboard brick template;
- masking tape 1 or 1.5 cm wide;
- tex paint;
- color tex: red-brown, red, orange, black;
- matte acrylic varnish;
- electric drill with whisk;
- kitchen sponge;
- sandpaper No. 180 and 240;
- bucket for mixing the solution;
- container for mixing paint.
Besides of this instrument to imitate brickwork with your own hands, depending on the complexity of the work and the quality of the wall surface, you may need additional tool and materials. The purchased spatulas must be prepared for work: sharpen the sharp corners with sandpaper and sharpen them. To sharpen spatulas, you can use #180 sandpaper.
Brickwork imitation device technology
The technology for applying decorative plaster under brick with your own hands can be divided into several stages:
- wall surface preparation;
- marking and marking the wall according to the size of the bricks and the seams between them, as well as gluing with masking tape;
- applying rotband plaster in separate sections of 1-2 m2 until the material hardens;
- painting the surface like a brick and the seams between them;
- coating the dried painted surface with a protective varnish.
The technology for simulating masonry does not require special skills to do it yourself. In this case, inexpensive materials are used - approximate cost square meter of finished brick plaster 120-150 rub.
Surface preparation
Let's take a closer look at how to make imitation brickwork with your own hands. Before starting to imitate brickwork using plaster, the wall surface must be cleared of wallpaper, old paint and, if possible, level it as much as possible. Suitable for this purpose sandpaper. It is better to putty all large irregularities first. The result should be a smooth, dry and clean surface of the wall, which you can begin to outline under the brickwork with a regular pencil.
Marking
Before marking, you need to decide on the size of the brick and seams. Typically the size of the bricks is 65x250 mm and the seams between them are 10-15 mm wide. For quick marking, it is better to prepare a template from cardboard with outlined contours of the brick and seams. The marking must be done efficiently. First, horizontal lines are drawn, then vertical ones. The width of the seams is determined by the purchased masking tape. Optimally it should be 10-15 mm.
After marking the wall surface, Knauf or any other deep penetration is necessary. You can use a paint roller for this purpose. The primer will not harm the marking in any way; the pencil will still be visible. After the soil has dried, you can begin sealing all seams with masking tape. In this case, all horizontal seams are glued first, then vertical ones. Horizontal strips are glued so that the ends extend onto adjacent walls. And the vertical ones are glued on top of the horizontal strips of tape. After gluing the entire area, you can begin applying Rotband plaster.
 Apply tape along the markings
 Important note. On top, at the junction of the wall and ceiling, there should be a horizontal strip of tape, and all the brickwork is marked from it.
Applying a layer of rotbands
To test the entire color selection technology, it is better to first do all the work on a small sample made of fiberboard or plasterboard. Thus, it is better to choose the required color for the brick and test the work with the rotband. When simulating brickwork from rotband, it is necessary to take into account that the rotband mixture hardens in 25 minutes and it is necessary to knead such an amount to work it out during this time - approximately 1-2 square meters. meters. Gypsum mortar in a small bucket and applied with a spatula to the prepared wall surface in a layer of 3-5 mm. It is better to start from the upper left corner and plaster a certain grip in the form of a rectangle. In this case, whether the surface is smooth or not does not matter much.
 Carefully remove the tape from the wall
 After the solution has been worked out, but no later than 20 minutes of plastering with rotband, it is necessary to remove the tape until it has completely hardened. After two or three batches it will be much easier to do. Until the plaster has completely hardened, various irregularities, cracks, and pits can be applied to its surface using a spatula, which will create an imitation of brickwork in the apartment. After plastering the entire surface of the wall and removing the tape, you need to let the plaster dry for about a day. After this you can start painting.
Brick surface painting
While the plaster is drying you can prepare required amount paints for coloring brick plaster. The dosage of red-brown, red, orange and black can be easily selected when painting a small sample, and then transferred in the required proportions to the entire volume of paint for the entire wall area. Before starting painting, it is necessary to prime the relief surface of the wall with imitation brickwork using a primer. You can use a roller or a wide brush. After drying the surface, you need to start painting the bricks with the addition of the required color.
You can achieve a color scheme that absolutely matches the color of the ceramic brick. Coloring in in this case It is better to do it with a brush, although you can also use a roller. After painting the entire surface, all you have to do is wait until it dries and paint the seams.
 View finished wall made of plaster
 For this purpose it is good to use finishing putty Vetonit LR. It is brought to the required consistency and a little black Tex is added. This thick putty is applied with a narrow brush-flute 3.5 cm wide to all the seams between the bricks. The effect will be very original, no different from natural brickwork. All you have to do is wait for it to dry and apply a protective varnish. You can keep it simple and paint all the seams with white Tex paint. Those who are not satisfied with the red color of the brick can simply paint the entire surface white
Protective varnish coating
After the surface with imitation brickwork has completely dried, it is necessary to apply a protective coating with varnish. This will allow you to carry out wet cleaning in the future without fear of damaging the painted surface. For this purpose, it is better to choose matte acrylic varnish for parquet work. After varnishing and drying, you can consider the job done.
Video about ways to imitate brick from plaster
Brick is a strong, durable material used primarily for the construction of walls, interior and exterior decoration. But it is not always possible to use it - voluminous, thick bricks will make a small room very cramped. Because for finishing works in residential, office premises high-quality imitation brickwork is used. There are a great many options for its execution, they differ in the degree of complexity and similarity to natural brick.
In the interior of which rooms can brickwork decor be used?
Execution of building facades, interior spaces made of brick is always beautiful. But you won’t be able to use real bricks everywhere - they significantly make the floors heavier, and not everyone has the mason skills to make high-quality masonry.
Decor that imitates masonry made of red, white, or any other brick, looks good in almost any room. For spacious rooms, dark, cold, rich colors are suitable, for cramped, dimly lit rooms - lighter, warmer ones.
This design is most often used in loft, industrial, art-believe style interiors, less often in classic, modern, minimalism, Provence. Fake masonry indoors can cover all the walls of the room, frame window openings, door frames, have the appearance of narrow, wide, medium dividing strips. Also, with its help, separate logical zones are highlighted, a fireplace and arched structures are designed.
The more spacious the room being decorated, the larger the brick images are used for it and vice versa.
In the hall
The front or hall is a kind of “face” of the apartment; the entire interior design “dances” from it. Here, brick finishing is acceptable on all walls, with rare inclusions of appropriate decor - painted ivy branches, decorative cracks, etc. An excessively long corridor is zoned with vertical brick lines, arches located at the same distance from each other - this is how an adjustment of its shape and size is achieved , heights.
In the living room
In the hall, most often, not the entire room is decorated with brick props, but only one of its walls. A fireplace or false fireplace looks organic here, looking as if it were made of real brick, with several zoning partitions. If the living room is completely combined with the kitchen, then only the kitchen or living room is finished with bricks. Let’s assume the option of creating a brick dividing strip between separate zones. Bottles, boxes with colored bricks painted with acrylic, pictures painted using the decoupage technique, made using ordinary putty will organically complement the overall picture.
In the bedroom
In the bedroom, not only the walls are decorated with brick decor, but also the podium (if there is one) on which the sleeping area. The same design will allow for beautiful zoning large room, finishing only a mini-office with brick or dressing area. The best way Photo wallpaper is suitable, ceramic tiles are not recommended - they are too cold.
Even a minimally embossed imitation of brick becomes voluminous with proper lighting placement.
In bathroom
There are special requirements for imitation brick in a bathroom - it must be moisture resistant, not destroyed, not deformed when direct hit water. Ceramic or flexible rectangular tiles, polystyrene foam painted with moisture-resistant paint are suitable here. The color depends on the size of the room - the more cramped it is, the lighter the coating is chosen.
During installation, waterproofing materials are used, silicone sealants and etc.
In the kitchen
Imitation brick for this room is decorated kitchen apron, made of plastic, glass, with a pattern printed on it. All materials must be waterproof, which is especially important for the area around the sink, gas stove, easy to clean from grease without the use of harsh abrasives or aggressive detergents.
On the balcony, loggia
Insulated, glass balcony, a spacious loggia can be combined with any room - bedroom, kitchen, living room through the same covering with the main room. As an option: the room is finished with white or yellow painted brick, the balcony is finished with a darker imitation of plaster. The most commonly used here are plastic panels together with insulation made of foam plastic, polyurethane, mineral wool and etc.
In the nursery
Brick decor is rarely used for children's rooms; it looks no less organic than in other rooms. This design is often used in teenage rooms– industrial, loft, pop art and similar styles, almost in their pure form, look most organic there. You can decorate a room in this way with your children, simply by depicting bricks using acrylic paints, watercolors, gouache, markers. The effect of an old brick will be achieved if you draw small cracks here and there with a gel pen.
Soft, flexible tiles - advantages, disadvantages of the material
Soft tiles are one of the most “believable” variations of creating realistic masonry. The flexible version is water resistant, which is important when used in wet areas bathroom or toilet, home pool, greenhouse. This material has significant impact resistance, durability, it is vapor permeable, resistant to mold and mildew, easy to process, does not change color from exposure to the sun, and has a beautiful appearance. Also, the positive properties of flexible tiles include the fact that they can be installed not only on perfectly smooth walls, but also on convex and concave interior elements - arches, internal and external corners, window slopes, brackets, fireplaces, round columns, small architectural forms, having a complex configuration.
Necessary tools, installation steps
To decorate the interior with “soft brick” you will need some tools available in almost every home:
- a metal spatula, 13-17 cm wide, with which you will stir and apply the adhesive;
- spatula 16-19 cm wide, with teeth, about four mm high;
- ruler made of wood, plastic or metal 100-150 cm long;
- building level 100-150 cm long;
- a brightly colored centering cord for marking straight lines;
- large sharp scissors;
- a simple construction pencil for marking;
- a medium-hard brush 10-13 mm wide to smooth the seams between the tiles.
Materials needed:
- the flexible tile itself of a suitable color and size;
- tile adhesive - dry mixture in a paper bag or ready-made mixture in a plastic bucket;
high quality primer.
Step-by-step work process:
- the surface that is decided to be decorated is first thoroughly cleaned of old coatings and leveled;
- after the wall with the leveling compound applied to it has dried, it is primed with an antiseptic so that fungus and mold do not “start up” under the cladding, and adhesion is maximized;
- After the layer has dried, the tiles are installed directly. It is important to do it at a temperature not lower than five to seven degrees, since at a lower temperature the adhesion of the tiles to the wall is reduced. This will negatively affect your appearance finished surface, individual parts can generally fall off quickly;
- Next, the wall should be drawn into identical rectangles, where tile adhesive will subsequently be applied. If you intend to decorate the entire wall completely, it is mandatory to mark the limiting lines at the top and bottom;
- The adhesive composition is not evenly applied everywhere, but only on separate zones measuring 50 by 100 cm. The layer thickness is two to four mm. Application is done with a flat spatula, after which the surface is “traversed” with a notched spatula to create grooves;
- The bricks themselves are usually made with parameters of 25 by 12 cm or 10 by 15 cm - the material is easily cut with simple scissors. When laying in rows, the first level starts with a whole “brick”, the second - with half or one third. Before cutting, the material is marked with a pencil and ruler;
- During the installation process, it is important to maintain the same width of the joints between the tiles - usually nine to thirteen mm, but other values are acceptable. The horizontality of the rows is periodically checked with a level - the tiles should not “walk” or move excessively up or down;
- when the row “rests” on an internal or external corner, the tiles are carefully bent, gluing them like all the others. Rounded, wavy elements, columns, fireplaces are faced in the same way;
- Every time another area of about one square meter is covered with tiles, the seams between the tiles are smoothed out with a wet narrow brush. This must be done before the glue sets and completely hardens;
- no special grout is required for the space between flexible bricks, which significantly reduces the cost of finishing.
Options for rigid facing tiles, their advantages, disadvantages
Rigid tiles are made of gypsum, ceramics, cement, and are mounted on a concrete, plasterboard wall, or other suitable structure. Such decor often contains various pigments, fiber fibers, and plasticizers. The elements are installed using an adhesive composition suitable for a particular option. Finished finishing the appearance is as similar as possible to real bricks, especially if they are painted in a suitable color.
Before starting finishing work, you should take into account that solid tiles have quite a lot of weight, creating additional load on the foundation and walls of the room.
Plaster
Gypsum decor has a very various designs. This material is lightweight, parts can be cast yourself using silicone or plastic molds. Gypsum is not recommended for use in damp rooms, as it is excessively hygroscopic. In the living room or bedroom they are often decorated with fireplaces - the microclimate in such a room will be as favorable as possible. The low price of gypsum allows you to create a noble finish at the lowest cost.
Plaster elements can be used to decorate internal and external walls. To process the corners, shaped parts are taken, giving the finish a neat appearance, protecting the walls from chips and mechanical damage.
For installation, gypsum-based adhesive is used, for
For sealing joints, a special grout is used.
Cement
Cement decor also has a low price and is available in a variety of colors - gray, red-brown, white, black, etc. artificial brick It is used even in winter in unheated rooms, as it consists of one part of high grade Portland cement, two or three parts of sand. It is cast in silicone molds - the solution can be painted at this stage, or using a roller, sponge, brush, decorate it to look like a brick or stone part already ready product, which is a wall element of masonry. Artificial bricks are textured and feel like real ones.
Clinker
Clinker is relatively expensive, so it is rarely used for interior decoration. It is very durable - this is the option that is recommended for lining stoves, fireplaces, external walls building. Clinker tiles contain highly plastic clay, pressed, fired at high temperatures– 1100-1300 degrees. Artificial pigments and plasticizers are not added - this material is the most environmentally friendly, reliable, will last a long time without losing its performance qualities or attractive appearance. Clinker is wear-resistant, has high frost resistance, practically does not absorb water, and is not afraid of sudden temperature changes, strong chemicals, and detergents.
Clinker tiles are very decorative - they are available in glossy and matte, coated with a transparent glaze or with a natural rough surface. The variety of shapes, colors, sizes, textures will allow you to choose it to suit almost any interior style.
Installation and painting of tiles
Glue rigid tiles from various materials can be almost the same. In addition to tools for marking and applying adhesive, you will need a circular saw for sawing tiles, Sander with stone discs. The process of laying rigid tiles is more labor-intensive than flexible ones, due to their heavy weight, the need to carefully seal the seams between individual tiles.
Progress:
- installation is carried out on the most even surface, previously cleaned of previous coatings, dirt, and grease;
- marking is done with a regular pencil, ruler, the recommended distance between tiles is 9-13 mm;
- the composition of the adhesive mass depends on the material used to make the tile;
- laying is usually done from one of the lower corners. Odd rows start with a whole tile, even rows with half;
- The glue is applied to the wall and spread with a notched trowel. For severe clinker tiles it is recommended to apply additional layer solution on the back wall of each element;
- Each subsequent row is checked with a level - while the glue has not hardened, you can make some adjustments. If desired, use direct calibration inserts, which are wooden or silicone strips, about one centimeter wide, inserted between the rows;
- for internal and external corners, special shaped parts are used to make the corners look neat;
- When the installation is completed, the seams need to be filled with grout. To apply it, use a special gun and ready mixture in the tube. As an option, the grout is diluted to the desired degree of thickness, placed in a thick plastic bag, the corner of which is cut off, and the solution is carefully squeezed out into the aisles;
- You should avoid getting grout on the front surface of parts, especially those with a rough surface - it will be extremely difficult to remove;
- To even out the filling of the seams, a special jointing tool is used. This should be done before the grout becomes hard - for about 20 minutes;
- painting is done with a decorative composition of a suitable color.
Characteristics, pros, cons of interior panels
Panels for original design brick-like interiors are made from a variety of materials:
- hardboard;
- glass fiber reinforced concrete;
- Chipboard and others.
They vary in the degree of similarity to real bricks, size, color, thickness, and durability. Installation of most types is very simple - the wall is literally the words are assembled like a puzzle or the parts are laid end to end.
The panels can be wall or ceiling.
PVC, MDF panels
Parts made of polyvinyl chloride are the most popular in modern times due to their environmental friendliness, safety, and relatively affordable cost. In second place are panels made of modified wood-fiber boards. Stores offer the widest range such “antique” decor, “ wild stone"etc. MDF is cut with a jigsaw, hand hacksaw, PVC - with sharp scissors, a knife for cutting paper.
The main advantage of the materials described above is that they can easily be used to finish even the most uneven walls, which do not require any prior preparation, leveling, or applying putty. In cases where it is necessary to hide engineering Communication in spacious rooms, the panels are mounted on a frame made of metal or wood. PVC panels are used in rooms with different temperatures and humidity levels. For sound and heat insulation, a layer of insulation is used in parallel with the panels. MDF is not used in wet rooms - it is suitable for living rooms, the range also includes corner parts.
Embossed panels made of hardboard, fiberglass, fiberboard, gypsum, etc. are mounted in approximately the same way.
Glass fiber reinforced concrete panels
Glass fiber cement parts are durable and beautiful. The material contains high-quality cement and glass fibers (including colored fibers), which greatly increase the strength of the products. When performing external work, reinforcement with metal structures is often used, which increases the total weight of the structure and increases its mechanical resistance to any influences. The material is environmentally friendly and protects the house from radio radiation, but its cost is high and therefore not available to everyone.
Technology, methods of panel fastening
Interior panels are attached to a flat wall using any polymer adhesive, for example, “liquid nails”. For curved, “humpbacked” surfaces, installation will be required metal frame with special hanging system. Heavy MDF panels are additionally mounted with dowels in three to five places. Glass fiber reinforced concrete structures are attached to flat surface using cement tile adhesive.
Brick-look wallpaper
Wallpaper "brick" - the cheapest, most economical, but not too durable option. Their main advantage is that special skills and tools for installation are not required, as well as inviting highly qualified specialists. Effective area the rooms are not reduced at all, and after the work is completed there is practically no waste left. Paper, vinyl wallpapers do not weigh down the structure; even thin drywall. Liquid wallpaper is easily applied to a wall of any curvature; its implementation is reminiscent of installing cement mortar tiles.
Homemade wall decoration options
There can be several ways to decorate a homemade “brick” wall:
- details are drawn by hand directly on the wall surface;
- you can use a stencil, templates made of plastic, plywood;
- made of corrugated cardboard covered with decoupage napkins;
- primer mixture;
- high-quality plaster;
- narrow masking tape;
- stationery knife;
- putty knife;
- containers for diluting compounds;
- a drill with a special attachment, another tool for mixing the solution.
Polystyrene foam is a cheap, easily processed material. You can get regular polystyrene foam from cardboard boxes from under the furniture, household appliances. Blocks of dense polystyrene foam are purchased at construction markets. The work process is simple: bricks of suitable size are cut from of this material, irregularities are sanded with sandpaper. Parts are glued to the wall, ceiling tile adhesive, “liquid nails”, PVA glue, painted with acrylic, other water-based paint. The irregularities are pre-created using a soldering iron, stationery knife.
Tip: the preferred size of bricks is 250 by 120 mm, the distance between them is one or two mm.
Using a stencil to imitate brickwork
The stencil is cut out of a thick sheet of cardboard, rubber, linoleum, and purchased ready-made in the store. Paint and plaster are applied using a smooth spatula, spray can, brush, sponge, or fabric roller. The wall is marked, retreating three to seven centimeters from the floor, leaving space for seams of 10-15 mm. The most common size of a purchased template is 6.5 cm by 20 cm; almost any size can be made at home.
If it is planned not a complete, but a partial imitation of brick, the placement diagram is graphically depicted on paper.
Detailed master class on creating brickwork relief using masking tape and plaster
One of the options for finishing an old or new wall “like a brick” is concrete. To work you will need:
The wall is first cleaned of previous decor - wallpaper, paint, plaster, etc., if necessary, it is leveled, and then primed. At the initial stage, marking is very important - a marking cord or an iron tape measure is used for it. It is advisable to mark relative to pre-filled strictly horizontal profiles under the ceiling.
Next, narrow tape is glued to the wall so that it looks like bricks. Plaster, tile adhesive, and rotband are applied over the adhesive tape and the entire wall in a layer of five to eight millimeters. After the solution has set slightly, the tape is carefully peeled off, the gaps are leveled using a wooden stack and a hard brush.
Instead of plaster, ordinary tile adhesive is often used; all work is recommended to be carried out with gloves.
Conclusion
Decorating an apartment with fake, painted, glued bricks is a very popular type of decoration. Most simple options easy to reproduce with your own hands; for more complex ones, you will need not only the advice of specialists, but also their direct participation. Variations fake brickwork are matched to almost any popular interior style - from classic to loft. You can decorate the entire house with bricks, as well as a small area in the room.