Three-phase air conditioner connection. Installing an air conditioner in an apartment with your own hands: installing a split system. What is the procedure for connecting the air conditioner to the electrical network?

Read also
By controlling the microclimate of personal space, we create conditions that are optimal for rest, work, and activities. Installing a split system will allow you to set a favorable level of temperature and humidity in the simplest way. Agree, in the summer there are many days that require regulation of climatic parameters.
After reading the article we have proposed, you will learn all the details and subtleties of the installation of air conditioning equipment. Carefully selected and systematized information will be useful to both independent home craftsmen and customers of installer services to verify proper performance.
We describe the installation process in detail, listing the nuances of the location and fastening of the blocks. The materials required for installation and connection of the units are listed. Photo and video attachments are a valuable addition to the text, making it easier to perceive information.
When studying information on how to properly install a split system in a private house or apartment, you first need to choose the location of its parts.
To do this, it is necessary to take into account the direction of distribution of the flow of cold/hot air in the room, taking into account the basic technical requirements specified by the equipment manufacturer in the instructions.
The most common options for the location of the indoor unit of a split system are above the bed/sofa. Outdoor - usually taken outside and installed on an area near a window or on balcony slabs
There are certain rules that must be taken into account when choosing a block placement point:
- the distance between the unit and the ceiling should be at least 15-20 cm, although some manufacturers indicate 20-30 cm in the instructions;
- from the side to the wall - at least 30 cm;
- to an obstacle that will impede the flow of outgoing air or disperse it - at least 150 cm.
For the external part of the split system, the location is chosen based on the load-bearing capacity of the walls. Installation is possible near a window, on slabs enclosing a loggia, or on a wall next to a balcony.
For those who live on the lower floors, the unit is installed above the window - as far as possible from passers-by.

Based on the technical requirements for the ventilation façade wall, used as a platform for fixing the outdoor unit of the split system, the possible load capacity should be 2.5 times the weight of the installation unit
For a multi-storey building, especially if the apartment is on the top floor, you will need to involve high-rise specialists or determine the installation point very close to the window, which will provide easy access during installation.
Determining the distance between blocks
Often the choice of location for equipment is regulated by the minimum and maximum distance between its parts. These indicators are mainly indicated by the manufacturer and depend on the model range and characteristics.
Sometimes companies do not indicate the minimum length of the circuit between two units, so installation can be carried out arbitrarily.

The minimum distance between the blocks of the Daikin split system is 1.5-2.5 m, Panasonic - up to 3 m. However, if the blocks are located a meter apart, the length of the route must be at least 5 m (its excess is rolled up into a ring and hidden behind the block)
It is a little easier to figure out the maximum possible distance between two units. The standard indicator is 5 m. It is also possible to increase the length of the route, but in this case it is necessary to count on additional costs due to the need to refuel with freon.
Preparation for work
The decision to install a split system yourself usually comes after asking the specialists for prices. Incredibly high amounts for completing a job that takes 3 hours are justified by the presence of expensive tools and their wear and tear during operation. This is what makes up the bulk of the fee for the master’s services.

If the prices from split system installers are too high, you should do the installation yourself, having thoroughly studied the technology of this type of work
If you look at the recommendations of equipment manufacturers, the instructions often indicate that the preparatory work can be done on your own, but for the installation of pipelines, connecting to the electrical network, and carrying out the vacuum process, it is advisable to invite specialists with the appropriate tools.
Hardware Installation Tools
You can install the cooling unit yourself, because... Most of the tools are in the handyman's suitcase. An exception may be a vacuum pump, but it is not necessary to buy one - it will be possible to make such a unit from old parts.
Some teams of craftsmen do not even use this equipment when laying a route up to 6 m long.

If you couldn’t find a vacuum pump when installing the air conditioner yourself, an alternative option could be a powerful compressor from an old refrigerator or an aquarium blower
During the installation process, an important aspect is maintaining the horizontal position of the block systems. In connection with these requirements, each stage of work must be accompanied by a control check at the construction level.
If a tool is not available, you can rent it at a hardware store.
You will need to prepare the following equipment in advance:
- Hammer. It is used for making holes in the façade through which a route will be laid connecting the external and internal blocks.
- Drill with a set of drills. Used for mounting fasteners.
- Pipe cutter for cutting copper pipes.
- A device for removing burrs after cutting pipes. You can use a reamer, a file and sandpaper.
- Copper pipe roller.
Some people believe that using a reamer does not make sense, especially if the new one does not leave burrs and dents, but in vain.
Only after manipulations with the chamfer remover can the edge of the flared tube be pressed as tightly as possible with the nut, and accordingly, freon leakage is unlikely.

The operation of a device for flaring copper pipes is carried out by deforming the tube according to a selected pattern, as a result of which a cone is formed. At the same time, the original wall thickness and circular cross-section are preserved
According to technical installation rules, a vacuum pump is required - sealing the air conditioning system is carried out with this equipment. After filling the route with refrigerant, the evacuation process is carried out.
Purchasing the necessary materials
You will need quite a lot of components, but all of them are easily available in any specialized store. Do not forget that the materials must be of the highest quality and selected exclusively for the device, functionally aimed at cold.
It is necessary to purchase a wire to supply power and connect the units. The required parameters are always indicated in the passport or equipment installation instructions.
The standard is a four-core power cable with a cross-sectional area of 2 mm 2 or 2.5 mm 2. The length is selected based on the distance of the route, taking into account a small margin.
You will also need to prepare thick-walled seamless pipes made of soft copper intended for cooling devices. Pipes are selected with smaller and larger diameters. More specific specifications are listed in the user manual.
The length is equal to the length of the route plus an additional margin of up to 30 cm. During the transportation of tubes, their edges must be sealed to protect from dust settling inside the product.

The pipes are selected exclusively for the cooling system; their soft copper alloy lends itself well to flaring and ensures proper tightness
Foamed rubber insulation is used to insulate pipes. They sell it in 2 m sections. To implement thermal insulation measures, you will need a length equal to the length of the route. Synthetic insulation is used on two pipe diameters.
As a drainage tube, experts recommend installing a corrugated hose equipped with a plastic spiral inside. You can also use an alternative part - a polypropylene tube. Its length is equal to the length of the track with an additional 80 cm.
You will also need two L-shaped brackets to secure the unit from the outside. The suitable size of the parts is determined by its dimensions, and the safety margin for the load-bearing load should exceed its weight by 5 times. Such an increase in the maximum permissible stress of the part is required to compensate for the loads of wind and snow.
It is better to buy these components from a company that sells spare parts for household split systems.

After purchasing a bracket for attaching the outdoor unit of the air conditioner, you cannot make additional holes in it, because this significantly reduces the safety factor of the part
The following fastening parts are used: anchors, dowels and bolts. Their number, type and parameters are selected based on the type of brackets and mounting plate intended for the indoor unit.
The type of walls where the outer part of the system is to be installed also matters. To camouflage the laid communication line, you will need a plastic box of standard dimensions 60*80 cm.
Installation procedure for split system
Installing an air conditioning system yourself is a very real task, however, there are many nuances in the work and they relate to certain models, so the installation process may have some differences. To study all the requirements, you must first read the instructions specifically for the purchased equipment model.
Stage #1 – installation of outdoor and indoor units
The indoor unit must be installed first. Having decided on its location, the area for the mounting card is marked on the wall. After drilling out the gaps, plastic plugs for the dowels are inserted, the card is hung and secured with dowels.

The most careful fastening should be done in the lower part of the plate, because in this area there are latches that hold the block
After installing the cassette, using a building level, the strict horizontal positioning of the future block is measured. In case of any discrepancy, all completed work will need to be redone.
At this stage, preparatory work for laying the routes will take place. First, the lines of its location are calculated. Then a hole is drilled in the facade wall, taking into account the required slope of more than 1/100.
A hole with a diameter of 5 cm is also drilled with a slope, and the angle of inclination can be increased in comparison with the route. Thus, the condensate formed will better leave the system.
When choosing a back-to-back installation of units, you need to check the hole intended to accommodate the power cable. To do this, you need to check the location of the power ports on the units.
And now it’s time to install the outdoor unit. If we are talking about a multi-story building, then you will need special equipment for high-altitude work.
As in the first case, the block must be strictly horizontal, so a level is also used at the marking stage.

When placing the outdoor unit, it is necessary to take into account the limitation regarding its slope - the maximum permissible slope angle is 45°
At the time of installing the fasteners, each existing hole must be filled with anchor bolts (standard diameter 10*100 mm), regardless of their number. Afterwards, the outdoor block is installed and also fixed with fasteners.
Stage #2 – laying a communication line
Using an electrical wire and two copper tubes, the outdoor and indoor units are connected. Additionally, a drainage system will be laid through the wall, which is responsible for removing condensate. These elements must be correctly selected, connected, laid and secured.
First, you should prepare the copper tubes by cutting them to the required length using a pipe cutter and treating the edges with a reamer to remove burrs and dents after the cutting procedure.
It is not recommended to use other tools, such as a file. After its use, metal shavings get inside the tube, which will circulate throughout the system and ultimately lead to failure of the compressor.

To pass copper tubes through a wall, their edges must be insulated with a plug to protect them from dust.
Thermal insulation of the tubes is carried out by placing polyurethane foam hoses on them. You cannot choose foam rubber as a sealant - it has a short service life. Having completed thermal insulation measures, all joining areas of the material are tightly taped with metallized tape.
Now it’s time to lay the drainage and cable. Each wire must be equipped with a special tip. They are installed on conductors cleared of insulating material and crimped with pliers.
The finished cable is connected to the air conditioner according to the diagram given in the manual for the device.

On both blocks, in an area located slightly above the ports, there is a removable plate intended for connecting copper pipes. Under it there are electrical connectors for the cable.
The drainage tube is connected to a special outlet on the unit indoors and is discharged through a hole in the wall. The tube must be long enough and end at least 60 cm from the wall.
According to the rules, its installation is carried out at an angle towards the exit. Fixation with clamps is required every meter of length to eliminate sagging and prevent condensation accumulation.
Stage #3 – connecting system units
Communications carried out through the wall are connected to the corresponding ports. It is important to remember that the total length of the drainage pipeline cannot be more than 20 m. Copper pipes are laid in a loop to catch oil, which is contained in small quantities in freon.
Drainage can be diverted in two ways: take it to the sewer or to the street. The first method is technically correct, but due to the complexity of reproduction it is not widely used.

When laying the drainage pipe, it is better to avoid sharp turns; sagging is also not allowed - condensation will accumulate in these areas
At the bottom of the internal block of the system there is a tube with a plastic tip. A corrugated hose is put on it and tightened at the connection with a clamp.
A similar procedure is performed for the outside of the device, but many people ignore it. If a polymer pipe is used instead of a hose, an appropriate adapter is selected. It is used to connect the output of the unit and the tube.
To connect copper pipes, you first need to lay them along the wall using a pipe bender. If such a tool is not available, then we suggest that you read the article, which describes in detail how to bend a pipe without special equipment. Read more - read.
The tubes must be given the necessary slope without kinks or sharp creases. First of all, they are connected to the unit indoors. To do this, loosen the nuts on the corresponding ports.
When unwinding, a characteristic hissing sound of escaping nitrogen will be heard. It is pumped in at the time of production to eliminate oxidation of parts. After lowering it, you need to remove the plugs and completely unscrew the nut. Next, the rolling procedure is performed.

During the flaring process, the pipe is held with the hole down to prevent metal shavings from entering the system
The edges of the pipes in a 5 cm area are leveled. Then flaring is carried out to ensure the connection between the inlet and outlet of the blocks. This will create a closed circulation system. Correct installation plays an important role in achieving maximum tightness during the movement of freon.
The flared edge of the pipe is connected to the required outlet and secured with a nut. It is prohibited to use any additional devices here - sealants, gaskets, etc. The copper tubes used provide the necessary sealing.

When connecting copper tubes, it is necessary to apply a force of 60 kg, only then will the copper crimp the fitting monolithically and the contact will be sealed
Similar actions are performed with all four ports. After the connection, the final stage of installing the air conditioning system follows - eliminating air and moisture, as well as possible argon residues that may have accumulated during the installation process.
Stage #4 - vacuuming the system
During installation work, air enters the air conditioner pipes and if it is not removed, it will end up in the air conditioning system. The result is increased load on the compressor and, accordingly, its rapid heating.
Also, water particles negatively affect all parts. Freon contains a proportion of lubricating oil; its hygroscopic consistency becomes less effective when in contact with water. As a result, component wear will accelerate.
To remove air, two methods can be used: a vacuum pump or a small amount of freon liquid, which is drained from a unit located outside. When manufacturing an outdoor unit, manufacturers with a slight surplus.

The “spray” method is repeated several times, with the second attempt being made with the top valve. If the length of the route is 2-3 m, the procedure is carried out 3 times, with a four-meter length - 2 times
An alternative to an expensive vacuum pump is to release excess freon from the outdoor unit system. To do this, unscrew the plugs on its valves. It is necessary to work with a lower port of larger diameter. Under its cover there is a hexagonal connector. Based on its parameters, the appropriate key is selected.
Using a suitable key, turn the valve 90° and after a second return it to its previous position. Thus, a small amount of freon enters the system and increased pressure is created. By pressing your finger for a second on the spool located on the same port, excess freon and gases are released from the system.
After complete removal of air, the spool outlet is tightened with a plug, and the valves are fully opened and freon enters the split system. To check the tightness of the connections, they are coated with soap foam.
It is worth remembering that with independent, insignificant factors do not exist. And everything that was done incorrectly, for example, rolling pipes without cleaning the edges, or an insufficiently fixed connection, ultimately leads to rapid wear of the cooling system components. Therefore, during the installation process you need to be extremely careful with all details.
If you have the necessary experience or knowledge in the installation of split systems, please share it with our readers. Perhaps you know some subtleties that we did not mention in this material? Leave your comments and ask questions in the block below.
Now it’s the turn to connect communications to the already installed blocks. It is worth starting the installation of communications with electrics.
Two electrical cables are laid:
1. From the indoor unit to the outdoor unit - interconnect cable
2. From the indoor unit to the power source
Electrical diagram, both between the blocks and to the power source, may differ quite seriously from the model and manufacturer. Household air conditioners are usually single-phase, and high-power air conditioners are three-phase; in this case, the circuit diagram is also completely different.
Already flared installation kits are available for sale for self-installation of air conditioners from 0.8 to 50 meters. Buying a ready-made kit is more profitable than buying components separately. The kit is also suitable for laying a route during repairs. Included: ready-made tubes for quick connection of an air conditioner in thermal insulation, drainage hose, brackets for the external unit, wires, fasteners. Pickup in Moscow from Lermontovsky Prospekt metro station (8). Delivery throughout Russia.
Standard installation of an air conditioner in Moscow and the Moscow region costs 5,000 rubles including materials. Laying copper routes - from 3000 rubles.
Depending on the power of the air conditioner, it can be built into an existing electrical network or connect a separate line to the air conditioner. It is imperative to install a machine, regardless of whether it is a separate line or a nearby outlet. Wires can be laid together with copper tubes in grooves or decorative boxes.
We need to start by determining exactly how The air conditioner will be connected to the house's electrical network.
There are only two options:
- connecting the air conditioner to the existing electrical network, that is, to the nearest outlet.
- connecting the air conditioner to a separate power line, which is connected to a separate machine.
You can connect to existing wiring in the location closest to the air conditioner if:
- This is a low power air conditioner
- is this a window or mobile air conditioner?
- at high electrical power of the network
- if the air conditioner is installed temporarily
- if on the same power supply line with the air conditioner there is no: washing machine, electric kettle, water heater, electric stove and other energy-intensive appliances
- electrical wires are made of aluminum
- electrical wires have a low cross-sectional area
- no grounding or protection
- Wiring is worn out or damaged
If the air conditioner is connected to the nearest outlet, the network must be equipped with an RCD and differential. automatic - the air conditioner consumes a lot of electricity over a long period of time. When connecting the air conditioner to the network, be sure to install a 20A or higher circuit breaker at the point where it is turned on.
A separate power supply line is a more preferable option for connecting air conditioners. This will protect the existing network and unit from overloads and voltage fluctuations. A separate line will allow you to supply current directly to the air conditioner, therefore this does not affect its location.
Requirements for a separate power supply line:
- availability of a machine on the line
- presence of grounding
- only copper cables
- wire cross-section from 3 X 2.5 and above
It is not advisable to include other household appliances and lighting in the line along with the air conditioner. It is permissible to connect additional systems: heating the air conditioner drainage, heating the external unit. It makes no sense to install an RCD and a differential circuit breaker on a separate power supply line.
It is also necessary to provide power supply from the indoor unit of the air conditioner to the outdoor one. if possible, the cable can be laid together with the freon interconnect route.
When connecting the air conditioner, you must follow operating instructions, which, among other things, indicates exactly how to connect electrical wires. The instructions also provide a detailed wiring diagram for this specific model.
The second solution is to obtain information for installing a specific air conditioner - electrical diagram shown on the inside of the cover of the air conditioner units, or on the blocks themselves. It details how it is necessary to connect the air conditioner units to each other and how to connect the split system to the existing electrical network.
Let's look at the most common sequence for connecting a home air conditioner.
We connect the power wire to the mounting block. In the air conditioner mounting block, connect the power wire strictly according to the diagram on the cover.
Black the wire that comes from the machine is connected to terminal L
Blue the wire is connected to terminal N
Yellow-green the wire is connected to the ground of the air conditioner
The connection of the outdoor unit must be carried out following the user manual or the diagram located on the air conditioner. The split system units are connected to each other using a power cable with a cross-section no less than that indicated on the cover.
Carry out the electrical installation slowly and strictly adhere to the diagram. Place electrical cables in grooves and decorative boxes, not openly, use corrugated pipe suitable diameter. This will allow you to remove or replace the wires if necessary. If you put the drainage together with the cable, do not neglect to hide the cable in a corrugated tube.
Any air conditioner consists of two parts with different functions: a refrigeration circuit, which performs the function of cooling the air, and an electrical part, which controls the devices and elements of the circuit.
This article will look at the electrical circuit of the air conditioner, options for connecting it to the power supply, and how to properly connect the air conditioner to the power supply.
What is the electrical diagram of a split system
An air conditioner electrical diagram is a document that displays the location of electronic components, their connections, as well as information for service center engineers. Anyone who is interested is more interested in the electrical connection diagram of the air conditioner, which includes the location of the main devices of the evaporative and condenser units, terminals for connecting the units to each other and connecting the power supply.
The main elements here are:
- Compressor, with CSR terminals. The arrow shows the protection installed on the compressor winding
- Compressorcapacitor - a capacitor with two terminals connected to the windings of the compressor unit. The third terminal of the capacitor is connected to its starting winding.
- In addition, the diagram shows a fan motor and a capacitor through which two windings of the electric motor are connected.
- The diagram shows an electromagnet that controls the operation of a four-way valve.
Terminal designations in the terminal block:
1(N) – zero.
3 – Supply power to the fan motor when operating at low speeds.
4 – Power supply to the fan motor when it operates at high speeds.
A separate terminal is ground.  Main modules and blocks:
- Power filter through which voltage is supplied to the control board.
- Control board – control unit to which all device modules are connected.
- A compressor power relay is connected to CN 12.
- A drain pump is connected to CN6.
- Terminal block CN 5 is responsible for controlling the fan of the split system.
- A stepper motor for controlling the blinds is connected to the CN 10 pins.
- CN 7 terminals are responsible for connecting the heat exchanger temperature sensor.
- A room temperature sensor is connected to pins 1 and 2 of terminal block CN15.
- A water level sensor in the pan is connected to pins 1 and 3 of terminal block CN15.
- Terminal block CN 13 of the control unit is responsible for connecting the device display unit.
Terminal block (labeled Terminal on the board) for connecting the evaporative and condenser units with a cable. Terminals L and N - power supply of the air conditioner from the electric line. transmission You should know that there is an option to connect the air conditioner to the mains via an external unit.
With this connection, you must follow the instructions. If climate control equipment with a power of up to 4.5 kW is connected, then a four-core copper cable with a cross-section of 2.5 mm 2 must be used. With a separate power supply branch, a 20 A circuit breaker must be installed on the panel. 
Air conditioner connection
Afterwards, they must be connected to each other with a four-core copper cable with a core cross-sectional area of at least 2.5 mm 2. The connection instructions are provided in the schematic diagram, which was discussed in some detail above. The connecting cable can be laid together with the freon line, or maybe in a separate plastic box.
When laying in the same groove together with copper pipes, use a corrugated plastic tube to insulate the cable.
After the inter-unit electrical connection, the indoor unit should be connected to the power supply. The connection diagram for the air conditioner to the electrical network involves receiving power both from the nearest outlet and from a separate line.
The ideal option for connecting sufficiently powerful climate control equipment is a separate power line. This option will not load the existing lines of the apartment electrical system and will allow power to be supplied directly to the internal unit of the split system. The power supply cable can be laid from the panel to the indoor unit using a groove in the wall material or in a special plastic box. 
The shield from which the separate power line will be drawn must be grounded. The connection of the power cable to the terminal block of the panel must be carried out only through an automatic machine, the power of which should be calculated using the formula: the power of the device divided by the voltage. 30% of the reserve should be added to the resulting value.
It should be understood that the power cable for air conditioning equipment can be connected to the outlet only if:
- Climate control equipment has low power.
- The in-house electrical network is laid with a copper cable with a cross-section of at least 2.5 mm 2.
- There are no energy-intensive consumers on the same branch with the air conditioner.
- Supposed to be temporary.
- This power supply branch is equipped with a circuit breaker with an RCD of at least 20 A.
Options for connecting an air conditioner to an existing power line
This issue could not be considered, due to the presence of sockets in the room. But, some owners of low-power climate control equipment are dissatisfied with the stretching wire from the outlet to the consumer, often across the entire wall.
If the outlet is located far enough from the air conditioner, then there is an option to connect the air conditioner to the mains via a switch. We warn you right away: this option is only suitable for low-power climate control equipment and here’s why: the terminals of a conventional switch may simply not withstand the current passing through them. The result is heating, sparking, failure of the switch (at best) or fire. 
It is better to cut a groove in the wall from an existing outlet and lay a power cable along it in a corrugated pipe to the split system unit, and then install a special outlet with a decorative cover into the wall. The socket must withstand a certain current: if the power is 1 kW, then the socket must withstand 9-10 A; from 1 to 3 kW – 16-18 A; from 3 to 4.6 kW – 20 A; from 4.6 to 5.5 - at least 25 A. It is best to entrust the correct choice to a qualified electrician.
If you decide to connect the air conditioner yourself, then do it in compliance with all safety regulations, and in order to be completely sure that the connection process was completed correctly and safely for the climate control equipment and the inhabitants of the home, it is best to seek help from professionals.
In the hot summer, a room with air conditioning becomes a blissful oasis that you don’t want to leave. Realizing all the benefits of cooled air, while the city is melting from the heat, people begin to take care of installing this wonderful device in their home in advance, even in winter. After reading forums with reviews, choosing and purchasing the right model, you are faced with the following installation dilemma: do everything yourself and for free or call a private technician. If you chose the first option, then read the article, where we will tell you how to install an air conditioner in an apartment on your own, and also provide photo and video materials as visual instructions.
There are many types of air conditioners for apartments, but the most famous is called a “split system,” the installation of which will be discussed further. It consists of 2 blocks: an internal one - an evaporator, and an external one - a condenser, which are connected thanks to electrical cables and 2 copper tubes through which freon flows. A plastic tube branches off from the inside, designed to drain condensate.
Video tutorial where you will learn about the necessary tools and the most common mistakes made during installation:
Step-by-step instruction
First you need to install the external unit. It’s good if you have an open balcony in your apartment. This will provide unlimited access to the air conditioner. If you decide to install the air conditioner on a balcony that is glazed, then the condenser is mounted on the outer wall of the house, in which you first make holes. Anchor bolts and reliable brackets will help secure the outer part of the system to the surface. To protect the device from precipitation, build a canopy over it.
Before installing an air conditioner in your apartment with your own hands, read the following tips:
- the mounting surface must be flat and strong;
- when living on the ground floor, mount the block at a height of at least two meters so that it does not become a target for thieves;
- when choosing brackets, keep in mind that they must support a weight that is 2-3 times the weight of the equipment;
- Living on the upper floors, but without a balcony (loggia), you will have to use the services of climbers (pictured below) or a car with a special ladder in order to install air conditioning in the apartment from the facade.

Having installed the outdoor unit, we drill a hole in the wall necessary to connect the cables and pipes with refrigerant that connect the disparate parts of the split system. Next, we install a “waterproofing cup”, where we lay the wires and tubes. The next step is to install the indoor air conditioner unit in the apartment yourself. Before deciding where you will place it, read the recommendations below:
- the footage between the indoor and outdoor units should be no more than seven to thirty meters (the specific figure depends on the model of the system itself);
- the housing located in the apartment must be located at a distance of no less than three meters from other things (in relation to furniture);
- To avoid wind and get sick, refrain from installing the air conditioner above the bed and the place where you work, as well as above radiators, heaters, fireplaces, etc.
Classification of indoor units:
- Ceiling
- Floor-standing
- Wall mounted
When installing wall and ceiling air conditioners, we attach sufficiently strong brackets on which we fix the device. With a floor-standing device, everything is much simpler: it does not need to be fixed at all, but only placed in a specially designated place in the apartment.
Important! If the floor unit is not level, then all the condensation drops will end up on the floor. Place it properly right away, because once the air conditioner is installed, the housing cannot be moved anywhere!
Next comes the process of cutting special holes for wires and tubes that connect the indoor and outdoor units. In many cases, the walls, ceiling, and occasionally the floor are tapped. If this process is complicated for you, then simply put the communications in a plastic box that will not disturb the interior of the apartment.

When connecting blocks with wires and tubes, use fittings. Tubes containing freon must not be untwisted at the joints or bent 2, 3 or more times. Be sure to cut your own line for the drainage hose in order to drain condensate from the indoor unit, for example, to the street. Having connected the system, we vacuum the communications to remove unnecessary moisture and air from them. This process is carried out only with the help of specialized equipment. Next, you need to think about a separate power supply for the air conditioner in the apartment. To do this, you need to install a separate machine in the device (in grooves), and in the distribution panel. Cables are laid in grooves. 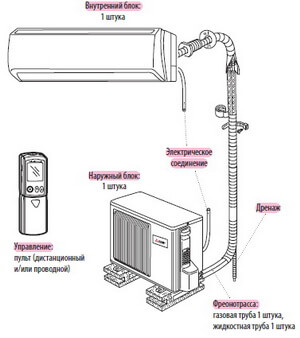
Check if you were able to install the air conditioner yourself at home. To do this, use a specific test program, which is activated when the device is turned on for the first time. A positive result will be when the equipment functions well, without vibration of the body.
In this article, we have provided step-by-step instructions, as well as videos and photos, which clearly explain how to install an air conditioner in an apartment or office on your own. In general, installing such a device is a troublesome and responsible task. If you miss any of the instructions or make a mistake, you can simply lose expensive equipment or ruin repairs that have already been made.
Also read:
Actually, this task is divided into two:
- Connecting an external unit to an internal one
- Connecting the indoor unit to the power supply
And if everything is clear with the first task: the manufacturer even supplies its product with the appropriate cable, then the second part of the process needs to be dealt with in more detail.
If the air conditioner is low-power and the home electrical network is not overloaded with energy-consuming appliances, then connecting the air conditioner to electricity It is done simply: by plugging into a socket. But even in this case connection diagram of the air conditioner to the electrical network must be equipped with a residual current device and a power circuit breaker capable of operating at a current of at least 20 Amps.
Connection of indoor and outdoor units
Air conditioner wiring diagram into a home network can only be implemented if the network is grounded and made on copper (not aluminum!) wires.
If these requirements are not met, it is necessary to connect to a network that already has powerful power-consuming devices (electric kettle, heater, etc.), a high-power air conditioner, or when the apartment or office has a dilapidated electrical network, then it is necessary to make a separate power supply line from the electrical panel to the indoor unit. The conditions are the same:
 Connecting the air conditioner to the electrical panel
 - grounding required
- the line must include a circuit breaker with at least 20 amperes and a residual current device
- connection is possible only with copper wires
The cable and wires must be selected depending on the
Because The circuit must be grounded, then choose a three-core cable. Most often used cable for connecting air conditioner grade VVG according to GOST R 53769-2010.
 Cable for connecting an air conditioner according to GOST R 53769-2010
 Wire for connecting air conditioner choose from the following conditions:
- with an air conditioner power of up to 3 kW, a wire cross-section of 1.5 mm 2 is sufficient
- with an air conditioner power of 3 to 5 kW, the wire cross-section should be 2.5 mm 2
- with an air conditioner power from 5 to 8 kW, the wire cross-section should be 4 mm 2
- with an air conditioner power over 8 kW, the cross-sectional area of the wire is over 4 mm 2
Connecting the air conditioner yourself
The sequence of actions is as follows:
 Connecting the air conditioner yourself
 - A separate machine for the air conditioner is installed on the panel
- We connect the phase wire of the cable (black or brown) to the output terminal of the machine.
- The blue cable wire is attached to the zero bus of the electrical panel
- The yellow or green wire of the cable is set to ground
 Distribution of power supply wires on the indoor unit of the air conditioner
 - On the indoor unit of the air conditioner, the black wire is connected to terminal L
- Blue wire - to terminal N
- The yellow or green wire is connected to the ground terminal
- The connection between the outdoor and indoor units of the air conditioner is carried out using wires of the same cross-section as the connection between the electrical panel and the indoor unit
- The wires connecting the air conditioner units should be placed in a corrugated tube