Requirements for floor screed. SNiP for floor screeds: regulatory documentation and work plan Permissible difference in floor screed SNP
Read also
Floor screed SNiP. Structure building regulations, which include SNiP for floor screed, is currently formed as follows: the basis is the federal law“On technical regulation” (No. 184-FZ dated December 27, 2002). The following is a federal law: Technical regulations on the safety of buildings and structures" (No. 384-FZ dated December 30, 2009)
In most cases, during apartment renovation, it is used cement strainer. On May 20, 2011, the updated set of rules SP 29.13330.2011 “SNiP 2.03.13-88 Floors” was put into effect (see order of the Ministry of Regional Development of Russia No. 785 dated December 27, 2010). It replaced the previous rules, which were published back in 1988 (see SNiP 2.03.13-88).
Purpose and properties of the screed
1. Screeds should be used in cases where it is necessary:
- leveling the surface of the underlying layer;
- covering pipelines;
- distribution of loads across heat and sound insulating layers;
- ensuring standardized heat absorption of the floor;
- creating a slope in the floors on the ceiling iyah.
2. The minimum thickness of the screed for slopes in places adjacent to drains, channels and drains should be: when laying it on floor slabs - 20, on a heat- or sound-insulating layer - 40 mm. The thickness of the screed for covering pipelines should be 10-15 mm greater than the diameter of the pipelines.
3. Screeds should be prescribed:
- for leveling the surface of the underlying layer and covering pipelines - from concrete with a compressive strength class of at least B12.5 or cement-sand mortar with a compressive strength of at least 15 MPa (150 kgf/cm2);
- to create a slope on the floor - from concrete of compressive strength class B7.5 or cement-sand mortar with a compressive strength of at least 10 MPa (100 kgf/cm2);
- for liquid polymer coatings— from concrete with a compressive strength class of at least B15 or cement-sand mortar with a compressive strength of at least 20 MPa (200 kgf/cm2).
4. Lightweight concrete screeds made to ensure normal heat absorption of the floor must correspond to class B5 in terms of compressive strength.
5. Durability lightweight concrete for bending for screeds laid over a layer of compressible heat or soundproofing materials, must be at least 2.5 MPa (25 kgf/cm2).
6. For concentrated loads on the floor of more than 2 kN (200 kgf), a concrete layer should be laid over the heat or sound insulation layer, the thickness of which is determined by calculation.
7. The strength of gypsum screeds (in a dried to constant weight state) must be, MPa (kgf/cm2), not less than:
for self-leveling polymer coatings - 20 (200)
the rest - 10 (100)
Floor screed SNiP Permissible deviations
- Deviation of screed thickness from the design one - no more than 10%
- Screed for parquet, laminate, linoleum (and also according to SP 29.13330.2011 “Floors” - for coverings with a cement-based adhesive layer): clearance when checked with a 2-meter lath - no more than 2mm
- Screed for waterproofing, clearance when checked with a 2-meter strip - no more than 4mm
- Screed for other surfaces: clearance when checked with a 2-meter strip - no more than 6mm
- Screed: deviation from the specified horizontal level no more than the size of the room (in total no more than 50 mm) - 0.20%
- The screed should not have potholes, bulges or cracks. Hairline cracks are acceptable.
When installing screeds, the following requirements must be met:
- Screeds laid over soundproofing pads or backfills, in places adjacent to walls and partitions and other structures, must be laid with a gap of 20-25 mm wide over the entire thickness of the screed and filled with similar soundproofing material: monolithic screeds must be insulated from walls and partitions with strips of waterproofing materials.
- The end surfaces of the laid section of monolithic screeds, after removing the beacon or limiting slats, before laying the mixture in the adjacent section of the screed, must be primed (see clause 4.11) or moistened (see clause 4.12), and the working seam should be smoothed so that it is invisible.
- Smoothing the surface of monolithic screeds should be carried out under coatings on mastics and adhesive layers and under continuous (seamless) polymer coatings before the mixtures set.
- Sealing the joints of prefabricated fiberboard screeds should be done in strips along the entire length of the joints thick paper or adhesive tape 40-60 mm wide
- Laying of additional elements between prefabricated screeds on cement and gypsum binders should be done with a gap of 10-15 mm wide, filled with a mixture similar to the screed material. If the width of the gaps between the prefabricated screed slabs and walls or partitions is less than 0.4 m, the mixture must be laid over a continuous soundproofing layer
Read more about the types of screeds in the article
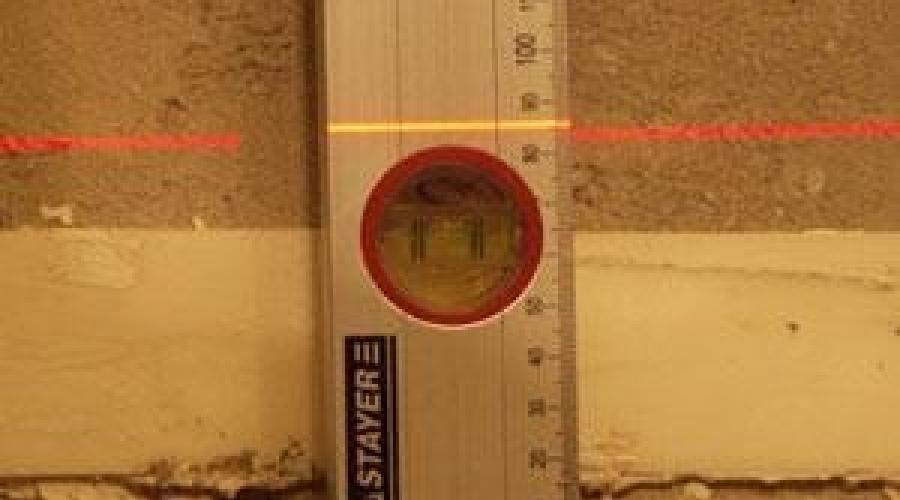
Checking the base for clearance is carried out only to determine its unevenness, and not the slope. Floors can be not only horizontal, but also inclined, for example, on ramps, in showers, etc. Slopes are checked by “shooting” with a level or laser level, and the unevenness (lumpyness) of the base - by the “clearance” rule.
The lumen is checked in two ways.
Method one. The two-meter rule is installed on the floor surface in an arbitrary place, the worker kneels down, bends down and looks to see if there is a gap between the bottom plane of the rule and the base of the floor. If there is a gap, it is measured with a tape measure; a gap of 2 mm is acceptable. If more, then the base needs to be leveled. After the first check for clearance, the rule is shifted approximately 1000 mm to the left, then the same distance to the right and the clearance is checked again. In this way, several checks are made, for example, in the center of the room and at all walls. This method of checking the base is not very accurate, since the rule may end up on a hillock and begin to sway, but it is often sufficient for quality device floor (Fig. 29).
Rice. 29. The first way to check the floor for light
Method two. Under a high-quality floor covering, we attach the same thickness to the rule at both ends wooden spacers. Thus, as a rule, even if it hits the hillocks, it will not swing, as it did in the first method. In this case, there is always clearance under the rule, and the curvature of the floor is calculated by measurements. Let's consider this method using the example shown in Figure 30.
 Rice. 30. The second way to check the floor for transmission
 In the first case, the rule fell on the slopes of two hillocks; measuring the distances and calculations show that the base is quite flat and the height difference does not exceed ±2 mm. However, shifting the rule to the right or left (on bumps or in pits) shows irregularities already of +4 mm and -4 mm, which indicates the inadmissibility of using this base, since the permitted tolerances with any sign should not exceed 2 mm. Conclusion: the base needs to be leveled, despite the fact that the first measurement showed acceptable gaps.
According to Russian regulatory documents, the clearances between the screed and the rail should not exceed for:
- linoleum coverings, PVC tiles, textile carpet materials, piece parquet, parquet boards and boards, laminated flooring - 2 mm;
- coatings from ceramic tiles, artificial and natural stone, mosaic-concrete slabs and mosaic mixture - 4 mm.
When purchasing flooring, always read the instructions and pay attention to the tolerances for unevenness of the base that the manufacturer of the flooring allows. It can be one, two, or three millimeters. Do not try to experiment and exceed the tolerances, even if you are not very interested in the perfect flatness of the floor, as violating the tolerances can lead to the destruction of the floor covering. For example, gaps in laminated floors that are larger than permissible will lead to a “break” of the floor at the joints.
Today there are many ways to perform work related to leveling the subfloor for further installation floor coverings. The most common is floor screed using various cement-based mixtures. This applies to both pouring the rough leveling layer and the finishing screed. All work related to leveling the floor with cement mortars, even if done with your own hands, must meet certain requirements, many of which are regulated in the relevant regulatory document(SNiP).
Whichever of the mixtures used today is used for the specified purposes, it is advisable to adhere to the existing tolerances. We will discuss further what technologies can be used to produce a durable floor screed that meets the requirements using appropriate video materials, which will make it easier to perceive the information.
Requirements for floor screed

Carrying out work related to the installation of carriers building structures, the importance of meeting their specific requirements should be taken into account. This also applies to floor screeds, both rough and finishing. After all, durability will depend on their strength flooring materials, which will be installed later. So, before carrying out the work yourself, it makes sense to familiarize yourself with some of the fundamental requirements set out in latest edition SNiP, which must comply quality basis floor. Which technical specifications are prescribed in SNiP for cement floor screeds, which are important when arranging them with your own hands in residential premises? Here are the main ones:
- minimum thickness;
- bending strength;
- the need for waterproofing;
- minimum layer over pipe communications;
- the need for reinforcement;
- location on the floor map expansion joints.
The minimum layer directly depends on the mixture used. The thickness of the cement-sand composition, according to SNiP, in residential premises should not be less than 30 mm. For ready-made polymer-cement mixtures, especially those with reinforcing fibers included in the composition, smaller deviations are allowed (at least 15 mm). If pipe communications are located under the screed, the minimum layer is 40 mm, regardless of the characteristics of the solution used.
The strength of the coating is difficult to determine without special technical means. Whether or not the basis meets these requirements, which are prescribed in SNiP, can only be determined indirectly. To be sure of the strength of the manufactured surface, you should observe the proportions and quality of the components used to prepare working mixtures and observe technological sequence when carrying out the arrangement, both rough and finishing base.
A waterproofing barrier is needed in those cases, and this is indicated in SNiP, when there is a threat of waterlogging of the screed due to various reasons, as well as when pouring liquid mixtures, in order to ensure proper hydration of the cement included in the mixture. This is necessary for high-quality crystallization of the binder during its maturation, on which the final strength of the structure directly depends.

A screed made using any technology is reinforced if its thickness exceeds 50 mm. This standard is prescribed in SNiP for rooms with a small and medium load on the floor surface, that is, residential. Reinforcement provides the base of the floor with additional strength and protects it from cracking. Indoor screeds less than 50 mm can be reinforced under certain operating conditions (temperature changes above a heated floor system, for example). Rough cement bases they do not need reinforcement, since the main load falls on the overlying finishing layer.
A technological map of the floor, taking into account all the parameters of the screed, is developed when filling large areas. The map is a technological guide, a kind of project, which indicates the sequence of work, the characteristics of the materials used, the location of expansion joints and the distances between them, and other technical information.
When creating a floor map, engineers coordinate all the nuances so that the resulting surface meets the requirements specified in SNiP for the structure in accordance with the expected loads and operational features. When arranging rough and finishing subfloors on non- large areas, in developing technological maps There is no particular need, since the work is not voluminous and does not last long.
When pouring cement screed with their own hands, home craftsmen rarely pay attention to the requirements set out in SNiP. It is more important for them to know the rules for preparing the solution, the technological sequence of work, and the availability of visual information, which can be gleaned from videos of the corresponding content. Especially when we're talking about on the production of a finishing base from ready-made mixtures, it is assumed that manufacturers must ensure that their product complies with the requirements of SNiP and other regulatory documents. For correct execution To lay the screed, including the rough screed, with your own hands, all you have to do is carefully read the manufacturer’s instructions and do the work in accordance with the recommendations.
Basic technologies for screeding with various mixtures
Among the technologies that are used today for arranging different flooring bases functional purpose inside residential premises, the main ones are the following:
- classical concrete pouring and its varieties;
- semi-dry screed German technology;
- production of surfaces for laying floor coverings using ready-made packaged mixtures;
- final leveling with self-leveling mortars.
Each of these technologies has its own priority area of application. When it is better to use what when constructing a floor base with your own hands, we will consider further.
Concrete base and its varieties

Previously, there was no alternative to concrete, so screeds were made only from this material. Nowadays, concrete is used less and less for finishing screeds inside living spaces. However, due to its low cost, concrete remains indispensable for rough pouring, when it is often necessary to form thick leveling layers. Moreover, to form the rough base, a depleted solution with a low content of binder components is used.
Concrete floor screed, the manufacturing technology of which is ideally suited for a rough foundation, has recently begun to be constructed from modified materials, where instead of heavy and cold crushed stone, lightweight fillers with thermal insulation properties. The most used of them are expanded clay concrete and polystyrene concrete. The first is used only to form a rough layer, since expanded clay granules are large in size, which makes it difficult to form an even, smooth surface very problematic.
Polystyrene concrete, where polystyrene foam granules are used as filler, can be leveled more thoroughly, so this material can be used for both rough and finished floors.
Polystyrene concrete, having good strength, has a very low density (200-300 kg/m3), thereby providing high-quality thermal insulation floor surface. This one is awesome polymer material for pouring the base of the floor, it is easy to prepare with your own hands using a regular concrete mixer.
Semi-dry screed

To construct the base of the floor using this technology, which is also called German, a cement-sand mixture with a limited water content is prepared. In addition to the main components, the composition includes plasticizers, polymer additives and fibrous components. To prepare the working material, professionals use special mixers. However, as practice shows, a regular concrete mixer is also suitable for these purposes. So, if you wish, you can prepare such a mixture with your own hands.
The technology for laying semi-dry mixtures is somewhat different. The prepared material is scattered onto the surface not over its entire thickness at once, but layer by layer, while being compacted. When the layer exceeds the level of the beacons, the excess is cut off with a rule and smoothed out with it. How to work with a semi-dry mixture can be seen in this video below, which shows not only the process of forming a horizontal surface, but also its finishing. In the video, smoothing of the main part of the screed surface occurs mechanically. This is usually done over large areas. This can also be done manually (using a metal grater) with the same result. It will just take a little longer.
A screed made using the technology demonstrated in the video has a number of advantages compared to classic liquid pouring of concrete. The following advantages can be highlighted:
- the surface is absolutely flat, that is, suitable for laying any type of floor covering without additional leveling;
- the base does not require strengthening of the top layer (topping), does not form cement dust and does not wear out;
- technological break in work, associated with the setting of the screed is much less, as well as the period of drying and complete crystallization of the binder;
- There is little shrinkage of the material during maturation, so the risk of cracking or delamination is negligible.
Important! The base of the floor, made with semi-dry mixtures, is much stronger than classical concrete pouring due to the compaction of the material, which is included in technological process. Thanks to this, voids, air bubbles and other formations that reduce strength and are characteristic of ordinary concrete or liquid cement-sand mortar.
Packaged screed mixtures
When performing large-scale work, especially on new buildings, on-site prepared mixtures of individual components or ready-mixed concrete made industrially and delivered by concrete truck. If the scale is not so large, especially since the screed is installed somewhere in the apartment on the floors, it is much more convenient to use ready-made packaged mixtures (usually 25 kg bags).
The finished dry substance contains a polymer-cement binder component, often with the addition of fibrous components, and a sand filler made up of grain of different fractions. You can prepare the working solution using either a concrete mixer or construction mixer, according to the proportions that each manufacturer indicates on the packaging. The maximum and minimum thickness of the poured layer, setting and full maturation time and other characteristics of such materials are also always indicated. This ready-made mixtures convenient, especially for those who make screeds with their own hands for the first time. You can see the technology for working with such materials in the following video.
Self-leveling solutions

Self-leveling floors are ready-mixed gypsum base, which are capable of self-levelling, that is, independently distributed over the surface strictly horizontally and forming a flat, smooth surface. Self-leveling mortars are durable, which is why a minimum layer of about 10 mm is allowed. Such compositions are convenient to use for leveling concrete or cement-sand foundations with minor differences in the horizontal plane. This allows you to obtain a surface ready for laying any floor coverings, which quickly gains operational strength, significantly reducing the technological interruption when performing DIY repairs. How professionals use self-leveling mixtures is demonstrated in this video
Floor screed is a thin durable layer in multi-layer building structures, designed to absorb and transfer loads (for example, from those on roofs, cargo, equipment) to the underlying layer of heat or sound insulation. Used when the underlying layer is insufficiently rigid to create flat surface, ensuring the laying of overlying layers (roof waterproofing or surface covering). There are monolithic (cement-sand, asphalt concrete, etc.) and prefabricated, in the form of thin (4-5 cm thick) slabs of gypsum cement or expanded clay concrete (industrial). (Great Soviet Encyclopedia)
Floor screed is a layer of components building materials different types, is performed as an intermediate structure between the base and finishing coat, they can be porcelain stoneware, laminate, parquet, linoleum, polymer coating and others.
Without exaggeration, we can say that the screed is the basis for the above decorative coatings as well as the foundation for a house. The better the screed is made, the better; the screed should be strong, even, without cracks. This is a guarantee that the finishing coating will last longer and will not crumble during use.
Floor screed has many design options and wide choose materials for its implementation, depending on the conditions, location of implementation, intended use, characteristics of the building/floor structure, availability of utilities.
Let's consider options for the most common methods of surface preparation.
Floating screed
Conventional screed (contact, monolithic)
Prefabricated structure

Screed on polyethylene film 100 microns floating screed
Floating screed is not a literal term, floating is separated from the base at the very simple design serves polyethylene film. The technology service we provide is carried out according to this principle. semi-dry screed using German technology. The purpose of creating such a design is to prevent adhesion of the mortar to the surface, lack of adhesion; the floating screed is independent, resistant to vibrations of the base and in contact with the walls. The absence of direct contact with the surface, i.e. during movements (buildings, houses, structures), sudden changes in temperature, humidity, preserves the integrity of the structure from cracks. Floating is also used in thermal insulation structures (water-heated floors), sound insulation materials (EPS) polystyrene, polystyrene, mineral slabs, expanded clay, foamed polyethylene, etc. Listed below possible materials It also works to lighten the weight of the “pie” and significantly reduce the load on the floors.
Regular screed (classic liquid). The most common version of the device. It's regular liquid cement-sand mixture, laid on floor slabs, monolith, without underlying layers.
This method can also include “self-leveling floors” made from self-leveling mixtures. This method is best used where there is already a surface with deviations in the plane, differences, or where the task is to raise the floor level by a small thickness of up to 2-2.5 cm. It is better to level the floor with a “self-leveling floor” of more than 1.5 cm using installed beacons and tighten it with a fork along using the conventional liquid method, since self-leveling mixtures do not level themselves into a perfectly flat horizon.
A prefabricated structure is a method of constructing elements and parts using an assembly method, without wet processes. Prefabricated floors are made from sheathing of a supporting rigid frame along joists, bulk floors using Knauf technology with fine expanded clay bedding and GVL sheets called Knauf-Superpol. Prefabricated floors are raised floors, leveling the floor and raising it to a height is achieved with height-adjustable fasteners and stud supports. In all prefabricated floors, the plane is created by materials such as OSB, DSP boards, boards, chipboards, etc.
Standards SNiP "Floors" SP 29.13330.2011 Floors. Updated version of SNiP 2.03.13-88
CODE OF RULES FLOORINGS
The floor
Updated version of SNiP 2.03.13-88
5. SCREAD (BASE UNDER THE FLOOR COVERING)
5.1. Screeds should be used in cases where it is necessary: leveling the surface of the underlying layer; covering pipelines; distribution of loads across heat and sound insulating layers; ensuring standardized heat absorption; creating a slope in floors on ceilings.
5.2. The minimum thickness of the pie for the slope in the places adjacent to the drains, channels and ladders should be: when laying it on floor slabs - 20, on a heat- or sound-insulating layer - 40 mm. The thickness of the layer for covering pipelines should be 10-15 mm greater than the diameter of the pipelines.
5.3. Screeds should be used: to level the surface of the underlying layer and cover pipelines - from concrete with a compressive strength class of at least B12.5 or cement-sand mortar with a compressive strength of at least 15 MPa (150 kgf/cm2); to create a slope on the floor - from concrete of compressive strength class B7.5 or cement-sand mortar with a compressive strength of at least 10 MPa (100 kgf/cm2); for self-leveling polymer coatings - from concrete with a compressive strength class of at least B15 or cement-sand mortar with a compressive strength of at least 20 MPa (200 kgf/cm2).
5.4. Lightweight concrete, made to ensure normal heat absorption, must correspond to class B5 in terms of compressive strength.
5.5. The bending strength of lightweight concrete for screeds laid over a layer of compressible heat or sound insulating materials must be at least 2.5 MPa (25 kgf/cm2).
5.6. When concentrated loads on the base exceed 2 kN (200 kgf), a concrete layer should be placed over the heat or sound insulation layer, the thickness of which is determined by calculation.
5.7. The strength of gypsum (in a dried to constant weight state) should be, MPa (kgf/cm2), not less than:
for self-leveling polymer coatings - 20 (200)
“rest” - 10 (100)
5.8. Structures made from wood-shaving, cement-bonded and gypsum fiber boards, from rolled gypsum concrete panels based on gypsum-cement-pozzolanic binder, as well as from porous cement mortars should be applied according to albums standard parts and working drawings approved in in the prescribed manner.
5.9. Structures made of wood-fiber boards may be used in structures to ensure standardized heat absorption by the surface of the first floors of residential premises.
5.10. Asphalt concrete screeds may only be used under coverings made of piece tongue-and-groove parquet.