Do-it-yourself technology for laying porcelain tiles on the floor. Detailed instructions with photos and videos. How to lay porcelain tiles on the floor Laying porcelain tiles for flooring
Laying porcelain tiles is a painstaking process that requires a lot of time and effort. You can get a fancy mosaic on the surface after just a few hours of work. However, so that the material does not quickly crack and is not particularly vulnerable to external damage, it must be laid “with feeling, sensibly, with placement,” working not for the result, but for the quality. Regardless of how long this whole process takes.
Laying porcelain stoneware on the floor is always carried out using the same technology. The difference is only the desired result. The same tile can be laid in completely different ways. And such a metamorphosis simply cannot but please.

When starting work, the master or customer must decide for themselves the following questions:
- Choose optimal color material;
- Look at the drawing you like;
- Draw up a sketch of the future coating;
- Understand whether the chosen concept fits with the current or future design of the house.
It often happens that the customer’s wishes do not coincide at all with the capabilities of the premises or the interior design of the house. There is no need to be stubborn here, and you should choose exactly what will fit best into the interior.
According to statistics, porcelain stoneware lasts up to 10 years (this is exactly the data stated by manufacturers, but it is possible that it will last an order of magnitude longer) and can survive any repair.
Therefore, it will be much better to choose a neutral material in classic design, which even with a modern interior will look very stylish. Otherwise, along with each new renovation, the floor covering will have to be changed. And this, in turn, incurs additional considerable costs.
Basics: technology for laying porcelain tiles on the floor
The technology for performing the work involves two methods of laying porcelain stoneware.
Namely, this is done:
- In a standard way;
- Butt.

The first method has long been well known to craftsmen, so it does not raise any questions. All you need to do is be patient and quality tool. Everything else is a matter of technique. It will be possible to lay the slabs in this way in an average-sized room very quickly, which simply cannot but rejoice.
Before starting work, the following points must be approved and clarified:
- Type of drawing applied;
- Method of installation;
- Installation plan;
- The thickness of the applied adhesive composition.
If you decide to lay the tiles end-to-end, you need to prepare the slabs of the same size in advance: otherwise they simply will not fit together.
But, despite this nuance, the technology allows you to get perfect smooth surface without significant financial investments. However, in order to achieve an ideal result, you will have to work hard.
Work should begin after the tiles have been cleaned of the protective layer with which the manufacturers cover them. This can be done using special cleaning products or hot water, under the influence of which the paraffin rebounds almost instantly.
Features: laying porcelain tiles on a heated floor
Warm floors have gained popularity relatively recently, but more people chooses it for his home.

It is quite possible to lay porcelain stoneware on it, but it is important to take into account several basic rules:
- There must be a protective layer between the materials;
- A fireproof layer is a prerequisite;
- Screed over heated floors is not carried out.
In fact, the heated floor is placed in a special box made of metal profile. Thanks to this, the surface rises slightly, but this feature does not have any effect on household members. This is especially good to do in houses with high ceilings.
The difficulty lies in the fact that porcelain stoneware is laid very tightly and, if necessary, it is not possible to simply remove it and then put it back in place.
The masonry is removed without the possibility of return, because during the work it is simply deformed! Therefore, if the heated floor fails, the base will have to be laid again, purchasing new components. And this, in turn, entails very significant expenses, because installing a new porcelain stoneware floor is not a cheap procedure.
Rules for laying porcelain tiles on the floor
Correctly laying porcelain tiles with your own hands will not be difficult if the master followed certain rules. It is, of course, possible to lay the material without them, but no one can guarantee that it will be used for a very long time.

Without exception, all installation methods assume that:
- The material must be placed on a perfectly flat concrete base;
- Let the cement mortar dry well;
- After completion of the work, grouting and cladding must be carried out;
- Drying time is up to several days, depending on the weather outside the window.
Correct installation of porcelain tiles (video)
Porcelain tiles are installed both outdoors and indoors. This material is low maintenance, durable and very easy to use. However, in order to install it correctly, a certain range of skills will be required. Anyone who is truly interested in making their home as comfortable as possible can get them. If possible, you can gain additional knowledge from thematic video lessons, which will not be difficult to find.
Among the materials used as flooring, we can’t help but mention porcelain tiles. Such a floor will have good resistance to physical influences and at the same time have an attractive appearance, which makes this finishing option appropriate in many cases. However, it is important to understand that when working with material it is necessary not only to comply with a number of mandatory rules, but also to have some experience in performing such actions.
In this article we will talk about self-installation porcelain stoneware, we will give detailed instructions, as well as photo and video materials.
Description of material
Porcelain tiles are commonly called artificial finishing material, obtained in the process of pressing and subsequent firing of molded blanks consisting of special mixtures. The composition includes such components as various varieties clay, quartz sand, spar and water. To give the products an aesthetic appearance, various dyes can be included in the tile composition.

Porcelain tiles have the following performance characteristics:
- Good resistance to moisture. It is this property that allows the material to be used as finishing in rooms with high humidity, as well as during facade work.
- The material is resistant to impact chemical elements, and therefore can be used for finishing laboratories, chemical fertilizer warehouses and other premises.
- Resistant to temperature changes.
- Aesthetic appearance.
- Resistance to mechanical stress. This means resistance to abrasion when used as a floor covering, and resistance to fading when the material is used to decorate the façade.
- Durability of use. Thanks to the combination of the above properties, porcelain stoneware finishes are able to perform their functions for a long time.
General rules

Before moving on to the description of laying porcelain tiles on the floor, it is necessary to consider some general rules, in accordance with which work should be carried out.


Another feature is right choice adhesive composition used during installation of the coating. It is mandatory to use only special mixtures that are prepared with the addition of minimal amounts compared to the usual tile adhesive, amount of water.

As in most cases, tiling work must be divided into several separate stages and carried out sequentially.
Preparation
At the preparation stage, it is necessary to decide on the type of porcelain stoneware used. Among the most common options are technical, glazed, matte, polished and satin materials. In addition, the material may differ in the size of the elements and thickness.

At the same stage, it is necessary to dismantle the old coating and prepare the base in accordance with the principles of work mentioned above. Special attention should be given to leveling the plane. If the surface has significant differences in height or other defects, then a concrete screed should be made.
In addition, you should prepare the glue needed for installation. It is important to note here that the mixture should be prepared exactly according to the included instructions. The use of any third-party additives in this case is unacceptable. Please note that the mixture is poured into water, and not vice versa. This common mistake leads to disruption of the technology, which will affect the quality of the coating. The solution is mixed until it acquires a homogeneous and plastic consistency.
After mixing the components, the solution is suitable for use within 2–3 hours.
Before carrying out work, the surface is also primed with special compounds.
Technology

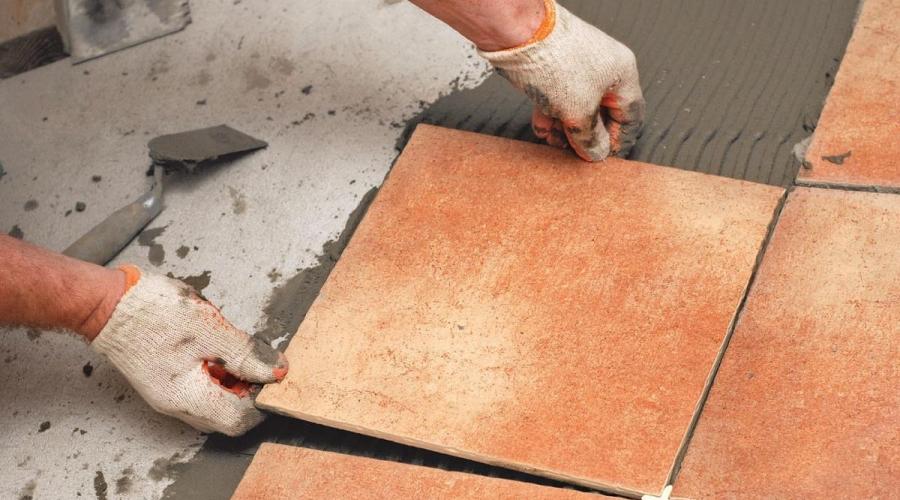
After preparing the surface, you can begin laying porcelain tiles. First the glue is applied. It is most convenient to carry out the work using a special spatula with teeth.
The thickness of the adhesive layer should be no more than 5 mm. Do not apply the solution to large area surfaces. It is better to limit yourself to an area of two or three tiles.
So, a layer of glue is applied, on which the tile is laid, after which, using a mallet, lightly tapping the tile is slightly sunk into the glue. In this case, it is important to maintain the horizontal position of the element, for which it would be appropriate to use a building level.

The next tile is laid nearby. The work is carried out in a similar way, but to ensure uniformity of the seam between the tiles, special plastic crosses are installed. In this way, porcelain stoneware is laid over the entire surface of the floor.
It is important to note that often when placing the outer covering elements it is necessary to cut them. For these purposes, you should use a special cutter. The coating can be used only after the adhesive composition has completely hardened, which, depending on the brand, can take 1–3 days. Excess glue, which may appear during the installation process, must be removed immediately, since after hardening it will be much more difficult to do.
In addition, it is worth considering that before the glue hardens, any mechanical impact on the surface is unacceptable, so laying porcelain stoneware should be done starting from the far corner of the room towards the door. After the glue has hardened, it is necessary to grout the seams using special grouts of a suitable color. This is necessary to achieve absolute tightness of the coating.

At this point, the description of the main stages of installing porcelain tiles on the floor can be considered complete. As can be seen from the material presented, it is quite possible to handle the installation work yourself. It is important to follow all the necessary rules and pay attention to the choice suitable materials and tools. If qualifications are not enough, then you can turn to the services of specialists, but even in this case it is better to know general algorithm actions to be able to control the actions of workers.
Porcelain tiles are used quite often for interior decoration. And this is quite understandable. High quality The material and the resulting result can satisfy any requirement. The work of finishing a room is quite responsible and is usually carried out by professionals, but it is also possible to lay porcelain stoneware with your own hands. In order to avoid making common mistakes, the basic rules for performing such work are outlined below.
General Information and Concepts
The size, color, and shape of porcelain stoneware tiles are extremely varied. But without even using special types porcelain stoneware, it can be laid out in a variety of ways. Some of them are shown in the pictures below.
Choosing any of possible ways laying porcelain tiles on the floor, you can use simple one-color tiles to get beautiful image, especially if you combine different sizes and colors of the material.
However, it should be borne in mind that premises can also be irregular shape, in this case, the installation of porcelain stoneware can be done in accordance with the figure below.
It should be remembered that there are several subtleties associated with laying tiles. They are due to the peculiarities of image perception and are as follows:
- tiles influence visual assessment, big size reduces, and small increases the size of the room;
- For visual increase width of the room, it is better to lay the pattern across, and to visually increase the length - along the room;
- combine different zones can be made into one whole using a through pattern. You can divide into zones using a single drawing.
- light tones of tiles when laying porcelain stoneware on the floor visually enlarge the room;
when placing the tiles at an angle of 45°, the edges of the tiles should be parallel to the diagonals of the room. The fulfillment of this requirement can be seen in the figure below.

The procedure for installing porcelain tiles
The material below can be considered as instructions for installing porcelain stoneware.
To execute necessary work, the following tool is required:
Materials
- porcelain tiles;
- silicone sealant;
- adhesive for porcelain tiles;
- grout for sealing seams;
- crosses;
- primer for treating the base;
- water.
Preparing porcelain tiles for installation
Work should begin by preparing a plan for the installation of porcelain tiles. In this case, you need to determine how to install, the pattern, the method of application and the thickness of the adhesive. It is possible to lay porcelain tiles without a seam, end-to-end. The disadvantage of this method is the use of tiles of strictly the same size, otherwise some of them cannot be used. And also the impossibility of ensuring the same length of seams and uniform filling.
The advantage of this installation method is the possibility of obtaining a uniform surface and saving materials. However, it is considered optimal traditional way laying with seams.
Before you start working with tiles, its surface must be cleaned of the protective layer; it is usually applied by manufacturers to protect the product from damage during transportation. Most often, technical wax is used for protection; it can be removed warm water using cleaning products. Paraffin is easily removed with a spatula.
Preparing the base
If the base where the porcelain tiles will be laid is uneven, then it must first be leveled. To do this, a screed is made on the surface, working surface To lay the tiles, they must be smooth and dry, without voids, cracks and dirt. Glossy, shiny surfaces should be sanded to a matte appearance.
When screeding and bringing the floor into a condition suitable for laying porcelain stoneware on the floor, you must remember bearing capacity ceilings Excessive stress on them can have unpleasant consequences.
Work can be carried out at temperatures above plus 5°C; when the heating is on and when the floor is heated, porcelain tiles cannot be laid.
Glue selection
One of distinctive features Porcelain stoneware has zero water absorption. This is decisive when choosing an adhesive; it should provide increased adhesion to the surface. Therefore the application cement mortar It is undesirable and it is necessary to use adhesive mixtures with the maximum addition of polymers.
When choosing an adhesive, follow the manufacturer's instructions. In addition, it is necessary to take into account the nature of the base and the load in the places where porcelain stoneware is installed; for significant loads, it is better to use mixtures designed for use in such conditions.
Laying technology
When laying porcelain tiles, you need to choose the right tool - you need a comb, rubber hammer, crosses, grout. The size of the material used will determine the choice of trowel - the larger the dimensions of the tile, the larger the teeth of the trowel should be. To obtain a constant seam width, you need to use crosses.

Before laying porcelain tiles on the floor, it is necessary to mark the middle of the floor. For this, a cord is most often used. It is stretched along a long wall. Laying begins from the middle so that the middle of the whole tile or its seam runs along the cord line.
Porcelain tiles are laid symmetrically; whole or cut tiles of equal width are placed along the edges of the tiled surface. That is why the layout must begin from the middle.
On wall ledges and external corners, installation of porcelain tiles must begin with whole tiles, in internal corners cut ones are installed. In the aisles between separate rooms, the seams are placed along the line of transition from one room to another.
The laying surface in niches is distributed so that cut tiles of the same width are in the middle of the surface or symmetrically along its edges.
First, the adhesive solution, well mixed to the consistency of thick sour cream, is applied to a small part of the area and leveled with a smooth and then a notched trowel.

The adhesive composition is also applied to reverse side tiles, after which they must be laid in no more than 15 minutes.
To do this, the tile is placed on its edge and rests against the previously laid one. Then the entire tile is applied to the surface with the adhesive composition, it must be slightly moved away from the adjacent one, the laid tile is slightly pressed into the adhesive composition. The gap between adjacent tiles should not be filled with adhesive. Crosses are used to ensure a constant gap.


The level position of the laid tiles is checked with a level. You can change the position of the tile (move, move, press) within ten minutes. If you have to take a break from laying porcelain tiles on the floor, you should take into account that the previously laid porcelain tiles have settled, and those that are laid later will still settle. So, if they continue to be laid at the same level, then in the future this can lead to differences in levels.

It is necessary to ensure that there are no voids in the adhesive joint. Otherwise, the tile may crack during use.

The glue drying process lasts a day, and the full strength of the seam occurs after 3 days.
Completion of installation
After curing, when the glue is firmly connected to the porcelain stoneware, you can grout the joints. Grout is used for this suitable color. Although there are some nuances here. Contrasting grout will emphasize the pattern, and matching grout will make the cladding surface more neutral and uniform.
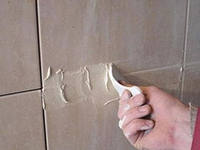
Before grouting, check that the seam is clean. Any foreign material can ruin the seam and make grouting difficult. The work itself is done using special tool- that’s what it’s called grouting.
The size of the seam (cross) for porcelain stoneware 30x30 cm is three to five millimeters. The gaps between the floor and the wall, as well as where pipes pass through the cladding, must be filled with silicone.
The grouting solution must be applied to the cladding diagonally relative to the seams. Remains of joint filler are removed with a clean and damp sponge. You can start regular washing of the tiled surface after two weeks, not earlier.
In more detail, you can see the procedure for laying tiles at the link:
How to assess the quality of work
To assess the quality of work done on a lined surface, the following criteria are used:
This is approximately what the order of work, technology and techniques for laying porcelain tiles with your own hands looks like.
17-09-2014Porcelain tiles are durable material, which is advisable to use for flooring. The loads that will occur during the operation of the floor are not capable of causing damage to porcelain stoneware. You should know that all the capabilities of this material can only be used if it is correct installation. Exactly because of this reason correct styling porcelain tiles on the floor is a process that should be given special attention.

Porcelain tiles are good for laying on the floor, as they are very strong and durable.
How to lay porcelain tiles with your own hands?
You need to start by creating a project. You will need to choose a pattern according to which the tiles will be laid. It will determine how much material you need to purchase. You can lay porcelain tiles on the floor various methods. You can create a mosaic on the floor using porcelain stoneware various colors. Options for laying porcelain stoneware are shown in Fig. 1. From the diagram you will know how many tiles you will need to purchase, as well as what size they should be.
Not everything is included in the image existing options styling All in in this case will depend on the imagination of the owner of the private house or apartment in which the renovation work. Most simple method laying porcelain stoneware on the floor is laid out in rows.

Figure 1. Options for laying porcelain stoneware.
It is important to decide on the installation method. Porcelain tiles can be laid without seams, or you can use the usual laying method - with seams. The choice will determine which tile you need to purchase - rectified or ordinary.
You definitely need to figure it out required amount material per 1 m² and increase it by approximately 15%. During the installation of porcelain tiles there may be unexpected expense material. It happens that you may come across defective tiles.
Laying technology also plays an important role. You will need to decide on:
- thickness of the adhesive composition;
- direction of seams (straight or other);
- the necessary amount of preparatory work.
As a result, a list of tasks that need to be completed will appear.
Return to contents
On what surface can porcelain tiles be laid?
On a wooden floor. Porcelain tiles can be laid not only on concrete floors. If you use special techniques and technologies, this material can easily be laid on a wooden floor.

To do this, you will first need to remove the coating, while placing the logs strictly horizontally. Expanded clay should be poured between the joists to the top. Using self-tapping screws, the board is secured with a gap of 8-10 mm.
A layer of waterproofing is placed on the subfloor. Next, a base is created on which the tiles are laid.
Can use 2 different options. A metal mesh is laid on top of the subfloor and then secured with self-tapping screws. Next, beacons are placed that will be used to pour the cement screed. The screed forms a horizontal plane. In this case, self-leveling mixtures can also be used. After the screed has hardened, it will be possible to install the finishing material.
Alternatively, use a dry screed. Moisture-resistant materials are laid on the waterproofing layer plasterboard sheets. You can also use gypsum fiber sheet. The sheets are placed in several layers and secured to floor surface self-tapping screws. Next, the surface should be primed.

The facing material can be laid on the base that has been prepared in this way. The adhesive must be intended for use with plasterboard sheets.
On plywood sheets. plywood sheet should be located on joists with small pitches. Minimum thickness The sheet layer is 28 mm. The plywood is firmly fixed to the joists, but it is important to ensure that it fits along the entire base. Next, you will need to sand the surface, remove debris from it and seal the seams.
At the end, the plywood is primed 2 times. After the 2nd layer of primer has dried, you can lay out the tiles. To do this, use polyurethane-based glue.
Return to contents
How to choose the right tile?
If you plan to lay porcelain tiles on the floor in the bathroom, living room, toilet or kitchen, then it is recommended to purchase tiles with rough surface. It will be difficult to slip on such tiles and get injured.

The first thing you should pay attention to are 2 things - the caliber of the tile and its tone. Caliber is a discrepancy geometric dimensions material. For example, a tile measuring 400x400 mm may actually have a size of 398x398 mm. This is due to the difference in the properties of materials that are obtained from different deposits.
In most cases, the manufacturer packages the tiles in the same size.
Laying tiles of similar sizes on the floor is not difficult, because the difference can be compensated by the thickness of the joint. If there are large discrepancies, it is impossible to lay tiles. It is for this reason that you will need to purchase tiles of the same caliber.
Differences in color may be due to differences in the properties of the components used.
During the process of assembling a batch, manufacturers select tiles based on tone, but it is still recommended to double-check.
Return to contents
Tools and materials that will be needed
In order for the installation to be done efficiently, you will need to purchase everything necessary tools. The following elements will be needed:
- a container in which you can dilute glue;
- drill with a nozzle for stirring glue;
- tape measure so that you can take measurements;
- building level to check the horizontalness of the material being laid;
- putty knife;
- Master OK.

You will need to choose a special glue, because porcelain stoneware is not able to absorb moisture. The adhesive for this material contains special additives that increase adhesion.
In order for the laying of porcelain tiles to be done efficiently, you will need to use plastic crosses that can create fixed gaps between the porcelain tiles. After installation, the fixtures should be removed.
After fixing the tiles, you will need to fill the resulting seams with a special grout.
Return to contents
How to prepare the base for laying tiles?
For styling ceramic granite You will need to apply glue to the surface of concrete, drywall, plaster or boards, and then lay the tiles. But in order to be able to make a high-quality and durable coating, you will need to first prepare the base.
If the flooring is not very smooth, you will need to level it first. To do this, it is necessary to remove protruding areas of the surface, seal cracks, seams and potholes. Contaminants that are on the surface will also need to be removed.
You should know that tile laying work must be carried out at temperatures above 5°C. Installation is not allowed while underfloor heating or heating is in operation.
Many modern materials for floors have excellent performance and durability. Among them, porcelain tiles, which can become suitable option for finishing any room. A variety of shapes, sizes and shades allows you to choose perfect option for any room. If desired, laying porcelain tiles on the floor with your own hands can be done even by a person without experience.
Surface with porcelain stoneware
Why porcelain tiles?
Choice in favor of this facing material done according to various reasons. Its advantages include the following:
- Resistance to mechanical and chemical influences;
- Water resistance. The material does not absorb moisture, and therefore there is no fear that after a certain period of use it will lose its appearance and swell;
- Frost resistance. Therefore, laying of porcelain tiles is carried out both inside and outside the building;
- Resistance to temperature fluctuations;
- Long service life;
- A wide range of. Stylistic and color design the room doesn't matter. There is sure to be a suitable option for every room.
Attention! It is possible to finish the floor with porcelain stoneware different sizes. Universal material tiles are considered to be 600 x 600 mm, but other models are also presented in manufacturers’ catalogs.
 Main and border tiles
 Choosing a laying scheme
Eat various ways laying porcelain tiles on the floor. Depending on the size of the tile, its shade and shape, you can choose a scheme that emphasizes the advantages of the material and the room.
Before deciding how to lay porcelain tiles on the floor, you should familiarize yourself with possible options layouts. The following options are considered the most common:
- Traditional (straight);
- Diagonally;
- At a run;
- Herringbone;
- Modular;
- With a shift.
Which option is preferable depends on the area of the room and the size of the tile itself. When drawing up a layout diagram, be sure to take into account the size tolerances that any product has. Because of them actual size each element differs from the stated one more or less. However, the deviation is not so significant, and therefore it is easy to level it out in the future by choosing a suitable layout.
 Scheme with a central pattern
 Traditional
The most common way. The tiles are placed in even rows. Here it is important to achieve parallelism in the stacked rows. Suitable solution for square or rectangular tiles. Materials of different colors are often used.
Attention! This is a quick and simple option that can be performed by a person without special training.
For getting desired result, take care of the following points:
- The absence of factory defects on the surface, which are immediately noticeable during direct installation;
- High-quality implementation of all steps: inaccuracies and irregularities are obvious;
- Choosing seamless ceramic tiles.
 Traditional scheme
 Diagonal
A complex option, which anyone with basic skills in such operations can implement into reality. To make the result aesthetically pleasing, it is important to correctly mark the diagonal axes along which the tiles will be laid. Suitable for small sized cladding materials.
Porcelain tiles are decorated with diagonal laying. However, before laying the tiles diagonally, evaluate the possibility of installation on our own.
Attention! Diagonal laying tiles even out porcelain stoneware, hide unevenness and curvature of the base, and visually expand the space.
The rules suggest placing the tiles at an angle of 45 degrees. Square tiles in this case, cutting is easier than rectangular or other options. When starting installation, the squares should be cut in a diagonal direction.
The construction of the flooring begins with the formation of the first row. It consists of a whole tile, the length of which is equal to the length of the diagonal cutting line. The second row is formed using ceramic triangles positioned downwards with the hypotenuse. Subsequent rows are horizontal. It is important to follow the principle of diagonal layout.
 Diagonal solution
 Running
Externally, this method is similar to brickwork. The surface turns out to be original, so they resort to staggered layouts quite often. In this case, rectangular monochromatic tiles look better, as they hide small defects present on the surface.
This method is suitable for a corridor or kitchen; the placement of tiles helps to avoid monotony and transform the room. Those who have laid tiles know that all elements are arranged in horizontal rows. In this case, consistent displacement of the side seams is ensured.
 « Brickwork»
 Herringbone
Another original way. Appearance The laid material resembles parquet. The flooring looks interesting and unusual. For herringbone layout, choose rectangular tiles. The method can be implemented using the same material or with an attachment. Last option involves the use of mosaic tile inserts or elements of the same size, but of a different color.
Advice! To get a beautiful floor, you should buy rectangular tiles with wood imitation. With tiles that look like a natural stone, such flooring looks unnatural.
Modular
It forms an original pattern on the surface, as it involves the use of tiles of different sizes. Before installation begins, a detailed diagram for the entire area of the room. This helps to calculate the required amount of each type of material. The diagram indicates the dimensions of each element and the location of the seams. Features of laying porcelain stoneware using this method make this method relevant for small rooms.
Attention! Manufacturers offer ready-made model kits, including a special mesh and all materials.
 Modular design
 If you don’t know how to lay out tiles correctly, listen to the following tips:
- At small area premises, you should refuse to buy large tiles: they will visually reduce the space;
- To increase the dimensions, the tiles are placed crosswise to make the room wider and lengthwise to lengthen it;
- The end-to-end pattern will unite the zones into a single whole;
- A single drawing will help highlight a specific area;
- Light colors will visually increase the space of the room.
Installation sequence
If you are interested in how to lay porcelain tiles on the floor, be sure to read the recommendations of professionals and watch video tutorials. This will help avoid typical errors which are often committed by people without specialized education.
The technology for laying porcelain tiles on the floor involves sequential steps. By carefully following the recommendations, you can achieve the formation of a high-quality floor covering that can withstand the operational load.
Porcelain tiles are laid on a prepared floor. High requirements for the foundation require a responsible attitude towards preparatory stage. The surface should not be smooth, clean and even. It is recommended to first use a self-leveling mixture.
Attention! The floor is prepared for porcelain stoneware in stages. If laying porcelain tiles with your own hands is done on old tiles, it must be degreased with caustic soda.
To reliably fix the facing material, you need a dry surface. To do this, the base is carefully primed, and then the primer is allowed to dry. If it was planned to install a floor heating system, all laying and commissioning works completed before fixing the tiles.
 Primed base
 After the floor has warmed up the base well, the heating is turned off. The tile is glued only to a cooled surface. Next time heating circuit turn on after the glue has completely dried. Depending on the composition and thickness of the formed layer, this will take up to two weeks.
If porcelain stoneware flooring is formed on wooden base, it is worth laying a special substrate that will level out periodic changes in size wooden base. Otherwise decorative material may crack. What is the price specific type substrates, it is worth checking at the time of purchasing the facing material. The final cost of finishing will actually be calculated after purchasing everything you need.
Having prepared the base, place the slabs over the entire area of the room in accordance with the chosen scheme. Used for fixation suitable composition, designed specifically for porcelain stoneware.
Knowing how to lay porcelain tiles on the floor, if desired, it is easy to complete the entire amount of work on your own. To do this, it is worth familiarizing yourself with existing schemes layout, carefully study the sequence of steps. In this case, covering the floor with porcelain stoneware will be done quickly and efficiently.