Gable roof rafter system drawings. Installation of a gable roof rafter system - do-it-yourself design and installation. Features of layered rafters
Read also
Roofing structures are one of the most difficult components to design and install in a residential building. The roof is the first to take the “blow”, protecting the house from precipitation, wind and cold, therefore the comfort of all household members depends on its tightness, durability, and quality. The basis of a reliable roof is a rafter system, which gives the structure its shape, sets the optimal slope, and also serves to attach waterproofing material. The composition and relative position of the frame elements depend on the roof configuration. In this article we will tell you what types of rafter systems there are, as well as how they differ from each other.
The rafter system is a set of supporting elements that support the geometry of the roof, the frame of the roof structure, giving it rigidity and the required slope. The composition, section thickness, and location of the parts of the “backbone” of the roof are determined using calculations that take into account permanent and temporary loads. The rafter frame performs the following functions that determine the functionality of the roof:
- Sets the geometry, slope. The rafter legs of the frame give the roof the necessary angle of inclination and shape, facilitating the easier removal of snow or precipitation from the surface. It is the frame that determines how many gables or slopes the roof will have, which means it is this structural element that determines its appearance.
- Serves as a basis for attaching waterproofing material. The rafter frame sheathing is used to secure the finishing roof covering.
- Evenly distributes the weight of the roof. The interconnected elements of the rafter system evenly distribute and then redirect the load from the finishing coating and the weight of the snow mass between the load-bearing walls of the structure, preventing distortion or deformation of the structure.
- Ensures the functioning of the roof. The structure of the frame, taking into account the characteristics of the roof and roof covering, provides support, aeration and protection from condensation.
Please note that a well-designed rafter system is the key to the durability, reliability and mechanical strength of the roof, so its design and installation is trusted to professional architects. Experienced craftsmen believe that a high-quality frame is much more important than the final roofing covering, so you should not skimp on it.
Criterias of choice
The design of the rafter system is characterized by a large number of auxiliary elements and increased complexity. It is compiled according to the calculation of permanent and temporary loads acting on the structure, a project that takes into account the selected roofing material, as well as environmental factors. When choosing the type of rafter frame, the following criteria are taken into account:
- Climatic conditions in the region where construction is taking place. In order for the roof to withstand the weight of snow and water during heavy rainfalls, the average annual precipitation in winter and summer is determined.
- Wind load. To select the optimal roof structure, the prevailing wind rose in the construction area is determined, and the average speed of air gusts is also taken into account.
- The nature of the use of space under the roof. At this stage, it is determined whether a residential attic will be equipped in the under-roof space or an unheated attic.
- Type of finishing coating. For each material, the optimal angle of inclination of the slopes is calculated, taking into account its shape and method of fastening.
- Developer's budget. The rafter system is one of the most expensive parts of the roof structure in terms of material and work, so the type is determined by the financial capabilities of the developer.
Experienced craftsmen believe that it is useless to fight nature; you will still be a loser, therefore, when choosing the type of rafter frame, the climatic conditions in the area where construction is taking place are at the forefront. If the region is windy, then the angle of inclination of the slopes is made flat, and if it is snowy, it is steeper.


Materials
The rafter system is an essential element of pitched roofs of any shape and configuration, consisting of vertical supports, horizontal ties and rafter legs that provide support and reliable fastening to the roofing material. The material used to make the frame must be light in weight, high strength, load-bearing capacity, and also resistant to moisture. The most suitable options are:
- Wood. Wood is a natural, environmentally friendly material that is lightweight and durable. For the manufacture of the frame, square bars of 100x100 mm or 150x150 mm, and hardwood boards with a section of 50x150 mm are used. A significant disadvantage of wooden frame elements is that they bend under their own weight when they are long, and also have poor resistance to moisture.
- Metal. Metal rafter systems are more expensive than wooden ones; they are used mainly when there is a large area of slopes and a large weight of the roofing material. The high load-bearing capacity of a metal profile or corner allows you to increase the pitch between frame elements without losing the strength of the structure. To reduce the likelihood of rust spreading, corrosion-resistant types of metal are used.
Note! Wood is considered the most suitable material for the manufacture of rafter frames for the roofs of residential buildings, as it has 3 important qualities: light weight, strength, and breathability. To increase the resistance of wood to moisture, it is necessary to treat the elements of the rafter system with a deeply penetrating antiseptic.
Device
The structure of the roof truss system consists of many interconnected elements that, supporting each other, give the structure rigidity and the necessary strength, and also distribute the weight of the roofing material evenly between the load-bearing supports. The composition of the frame, the cross-sectional size of individual elements and their placement depend on the type of finishing coating, the slope of the slope and the method of using the under-roof space. Typically the frame consists of:
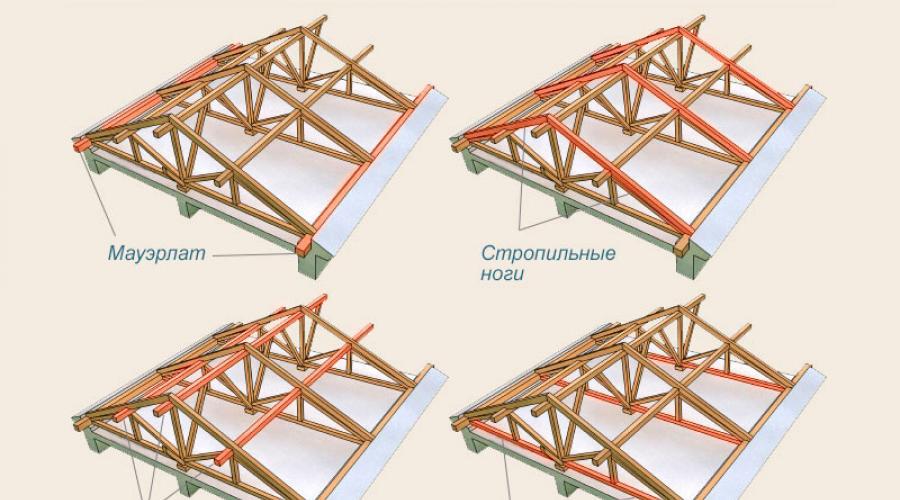
- Mauerlat. Mauerlat is the name given to the rafter beam, which is mounted on top of the upper crown or a number of load-bearing walls of the house. It is made from durable, solid softwood. The Mauerlat is secured using long metal pins or anchor bolts.
- Lezhenya. A wall is called a mauerlat beam located not on external load-bearing walls, but on internal partitions. Central posts are installed on the beam to support the roof ridge.
- Stoeck. Racks are the vertical support elements that support the ridge girder or the central part of the rafter legs of the frame.
- Rafters. The rafter legs rest on the mauerlat and ridge girder, located at an angle to the base of the roof.
- Bolt and tightening. These terms refer to the horizontal frame elements that connect the rafter legs together in pairs. The crossbar is located at the top of the rafters, directly under the ridge; it is thicker and stronger than the tie, which is located much lower.
- Podkosov. The brace is installed at an angle to the rafters to prevent them from bending under their own weight. One end of them rests on the leg, and the other on a stand or puff.
Important! The simplest rafter system consists only of a mauerlat, rafters and a ridge girder. As the complexity of the roof increases, the number of additional elements that strengthen the structure and also compensate for deflection and expansion loads increases.

Kinds
The configuration of the roof frame depends on the architectural features of the structure being covered. The roof must take into account the number of load-bearing supports inside or outside the house in order to evenly distribute the load placed on them. The following types of rafters are distinguished:

Please note that the final appearance of the rafter frame made of wooden or metal elements depends on the number of slopes and the type of roof. The simplest options are considered to be single-pitched and gable roofing, and the most complex are hip, half-hip, and hip roofs.


Video instruction
Erection of the roof is one of the most critical stages of construction. The durability of the building itself and the level of comfort of living in it directly depend on the reliability of the “umbrella” on top, on its resistance to precipitation and any external influences.
Of all the variety of roof designs, the gable roof can be considered one of the most popular, simply due to the relative ease of its construction. However, even behind this “simplicity” lies a lot of different nuances, the need to carry out certain calculations and follow technological rules. However, this publication has the main task: to show that installing gable roof rafters with your own hands is a completely doable task, even for a novice builder.
Let's go through all the stages of the process of installing rafters for such a roof, from the basics of preliminary design to an example of practical implementation.
General structure of a gable roof
Basic Concepts
Structural elements of a gable roof truss system

Let us immediately make a reservation that this diagram, of course, cannot reflect the entire possible variety of designs, but the main parts and components are shown quite clearly on it.
1 - Mauerlat. This is a board or beam that is rigidly attached to the upper end of the external load-bearing walls of the building. Its purpose is to uniformly distribute the load from the entire roof system onto the walls of the house, creating conditions for reliable fastening of the rafter legs at their lower support point.
2 – rafter legs installed in pairs. They become the main load-bearing parts of the entire roof system - it is the rafters that determine the steepness of the slopes, will be the basis for attaching the sheathing, roofing, and if the roof is planned to be insulated, then also the entire thermal insulation “pie”.
To make rafter legs, high-quality boards or timber are used; round timber can also be used. The cross-section of lumber, which will be sufficient to guarantee withstand all possible loads, will be discussed below.
The rafters can end at the mauerlat, but more often they extend beyond the perimeter of the walls of the house, forming a cornice overhang. However, lighter parts can also be used for this - the so-called “fillies”, which are used to extend the rafter legs to the required overhang width.
 To form the eaves overhang, the rafters are extended with “fillies”
 3 - ridge run. It could be a beam, a board, or even a composite structure. The purlin runs along the entire line of the ridge and serves to reliably connect the upper points of paired rafter legs, connecting all rafter pairs in order to impart overall rigidity to the entire roof structure. In various roof options, this purlin can be rigidly supported by racks, or linked only to the connection node of the rafter legs.
4 – tightening (contracts, crossbars). Horizontal reinforcement parts of the system, additionally connecting paired rafter legs to each other. Several puffs located at different heights can be used.
5 – floor beams, which will serve as the basis for installing the floor in the attic and the ceiling on the side of the room.
6 - and this beam simultaneously serves as a bench. This is a beam that runs along the entire length of the roof, which serves as a support for installing additional reinforcement parts for the rafter system. The beam can be installed as shown in the figure (like a floor beam), or it can be rigidly laid on a permanent partition inside the building.
7 – racks (headstocks) – additional vertical supports of the rafter legs, preventing them from bending under the influence of external loads. The racks at the top can rest against the rafters themselves, or into an additional purlin that longitudinally connects the rafter legs at a certain height.

8 – struts. Often, when the rafter legs are long, their load-bearing capacity is not enough, and reinforcement with racks alone does not provide the necessary strength. In these cases, diagonal reinforcing elements are used, resting on the bottom of the beam, creating an additional support point for the rafters. The number of struts and their installation location may vary in roofs of varying degrees of complexity.
Some differences between the hanging and layered gable roof systems
Gable roofs can be divided into two types of structures - with layered and hanging rafters. In addition, combined systems are widely used, in which both construction principles are combined. What is the fundamental difference?
Layered rafter system
This rafter system design is characterized by the presence of support on the internal main partition in the building. At the upper end of this partition, a bench is mounted on which the drains supporting the ridge girder rest. Thus, the rafter legs are “leaned” onto a vertical support, which makes the entire system as strong as possible.

This type of scheme is the most popular because of its reliability and relative ease of implementation. If it is possible to create an additional point of support in the center, then why not take advantage of it? True, if you plan to place living space in the attic, then vertical posts can sometimes become a hindrance. However, their presence is also sometimes “played up”, using, for example, to install an internal light partition.
Depending on the number and placement of internal partitions, the design of the layered rafter system may vary. Some examples are shown in the illustration below:

Fragment “a” shows the simplest option, which, by the way, on short rafter lengths (up to 5 meters) may not even have the shown struts - a row of central posts under the ridge girder is enough
As the width of the building increases, the system naturally becomes more complex, and additional reinforcing elements appear - tie rods and struts (fragment “b”).
Fragment “c” clearly demonstrates that the internal main wall does not have to be located exactly in the center, under the ridge. The option shown in the illustration is also quite possible, but with the condition that the displacement of the bed relative to the ridge does not exceed one meter.
Finally, fragment “d” shows how a rafter system can be supported in a large building, but with two main partitions inside. The distance between such parallel beams can reach up to a third of the width of the building.
Hanging rafter system
Graphically, this roof diagram can be depicted something like this:

It is immediately noticeable that the rafters rest only on the lower part, and then are connected to each other at the ridge. There is no additional support in the center, that is, the rafter legs seem to “hang”, which determines the name of such a system. This feature imposes certain restrictions on the use of hanging rafters - usually this scheme is practiced when the distance between the load-bearing walls to which the Mauerlat is attached is no more than 7 meters. The installed puffs only partially relieve the load from the external walls.
The illustration below shows several options for a hanging system. However, some of them can rather be classified as combined.

Fragment “d” - hanging rafters are connected to each other by a tie at the level of the mauerlat or fixed to a powerful floor beam, forming a triangle with it. There are no other reinforcing parts. A similar scheme is acceptable with a distance between walls of up to 6 meters.
Option “w” is for a house of the same size (up to 6 meters). The tie rod (crossbar) in this case is shifted upward, and is often used for lining the attic ceiling.
Options “e” and “z” are designed for a span between walls of up to 9 meters. Multiple tie-downs may be used (or a top tie-down in combination with a bottom joist). Another approach is to install racks under the ridge girder, similar to the layered system. Only, as a lower point of support, it is not the support on the main partition that is used, but the racks are supported by a tie or a floor beam. It is already difficult to call this option purely “hanging”, since here it is clearly a combination of parts from both designs.
To an even greater extent, this combination of two schemes is expressed in the “and” option, which is designed for large spans, from 9 to 14 meters. Here, in addition to the headstock, diagonal struts are also used. Often such trusses are assembled on the ground, and only then they are lifted and installed in place, connected to each other, thereby forming the entire roof frame.
So, when preparing for the construction of a gable roof, it is necessary to study the principles of the design of a particular system, evaluate their advantages and disadvantages, choose the optimal one for your conditions and draw up a graphical working diagram. It will be needed both when purchasing the necessary material and for carrying out the installation work itself. However, drawing up a drawing must still be preceded by some calculations.
Calculation of the basic parameters of a gable roof rafter system
Let's take another look at the schematic diagram of a gable roof to highlight the parameters that will need to be calculated.

So, in the calculation process we will need to decide on the following values.
The initial data is the length of the side of the house along the gable part (highlighted in blue - F), and the length of the house along the ridge (purple - D). It is assumed that the owners have already decided in advance on the type of roofing - since there will be certain restrictions on the steepness of the roof slopes. (angle a).
- The height of the ridge above the plane of the Mauerlat (H - green), or, conversely, determine the angle of the slope, starting from the planned height of the ridge.
- The length of the rafter leg (blue color - L), and, if necessary, lengthening the rafters to form a cornice overhang of the required width (l).
- Calculate the total loads falling on the rafter system in order to determine the optimal cross-section of lumber for the manufacture of rafters, the pitch of their installation (red color - S) and the permissible length of spans between support points. All these parameters are closely interconnected.
- Once you have these calculated values in hand, it’s easy to draw up a graphical diagram, determine the need and optimal location of reinforcement elements, and calculate the amount of material for their manufacture.
Chainsaw prices
chainsaw
We calculate the steepness of the slope and the height of the ridge
The slope angle can be determined by the owners according to various evaluation criteria:
- For purely aesthetic reasons - when the appearance of the building becomes “of paramount importance”. Many people like roofs with a high ridge, but we must not forget that the wind load on such a roof increases sharply. And there will be immeasurably more materials needed to make a high roof. At the same time, on steep slopes the snow load is reduced to almost zero - it is possible that for “snowy” regions this assessment parameter may become decisive.
- For reasons of beneficial use of the attic space. With a gable roof scheme, in order to achieve the maximum area of the attic, it is necessary to build slopes with a very large steepness, that is, with the same consequences as mentioned above.

- Finally, there may be a completely opposite approach - for reasons of economy, make a roof structure with a minimum height at the ridge. But in this case, you will have to focus on the minimum permissible slope angles for a specific type of roofing. Reducing the slope below the values recommended by the manufacturer means “planting a bomb” in your roof, both for reasons of its strength and durability, and from the standpoint of the waterproofing qualities of the coating.
Calculating the height of the ridge above the plane of the ceiling (mauerlat) is not difficult. The vast majority of components of any roofing system are based on a triangle, which, in turn, obeys strict geometric (more precisely, trigonometric) laws.
So, in our case, the width of the roof along the gable line is known. If the roof is symmetrical, then the ridge will be placed exactly in the middle, and for calculations you can simply divide the width F by two (the base of the triangle f =F/2). For asymmetrical slopes, you will have to project the top of the ridge onto line F, and measure the distances f1 and f2 from it to the edge of the triangle (to the Mauerlat) on each side. Naturally, in this case the slope of the slopes will be different.
N =f×tga
In order not to force the reader to look for tangent values and carry out calculations manually, below is a calculator in which the necessary tabular values have already been entered.
In order for a constructed building to last for many years, it needs both a reliable foundation and a strong roofing system that can withstand the vicissitudes of the weather. The roof must withstand heavy loads with dignity: heavy snowfalls, sharp gusts of wind, heavy downpours. The roof truss system is best suited for this.
Roof trusses and its types
The rafter system is the basis of the roof, which focuses on the load-bearing elements of the structure and also serves as a frame for various types of roofing materials: insulation, waterproofing, various coatings.
The dimensions and design of the rafters depend on:
- purchased material;
- size of the building;
- house dimensions;
- building materials for rafters;
- individual customer preferences;
- roof loads relevant for a particular region.
The rafter system has:
- sheathing - beams laid perpendicularly on the rafter legs;
- ties that absorb tensile forces;
- wooden racks located in a vertical position;
- mauerlat - a beam, the installation of which is carried out along the wall, the rafters rest on it;
- rafter legs are a kind of wooden beams that bear the main load of the roof.
Each of the above factors is very important, since it is necessary to understand what type of rafter system will be optimally suited for a particular situation.
When it comes to low-rise buildings, wood structures are the most common. In many cases, three types of rafter trusses are used: hanging rafters, layered rafters and a mixed rafter system.
Characteristics of hanging rafters
Hanging rafters are the most elementary type of rafter systems, their characteristics:
If the roof of the house has a complex structure, the types of rafters can be alternated. For example, if there are supports or a middle main wall, layered rafters are installed, and if there are no such elements, hanging rafters are installed.
Features of layered rafters
For a layered rafter system, the house must be additionally equipped with a load-bearing wall located in the middle. Layered rafters are distinguished according to the following characteristics:

The design of the combined system is the most complex, since it includes parts of two other types of rafters - hanging and layered. It is used for attic roofing. The walls of the rooms, which are located on the second floor, are formed by vertical supports; these supports also serve as intermediate supports for the rafter beams.
The part of the rafters that connect one end of the racks functions as a crossbar for the slopes located on the side, and for the upper part of the structure they are a tie.
At the same time, the horizontal beams perform the following functions: for the upper slopes - the Mauerlat, for the side slopes - the ridge beam. To increase the strength of the roof, struts are installed that connect the side slopes and vertical posts.
The combined sling system is the most complex and time-consuming to manufacture, but these shortcomings are fully compensated by the increase in the load-bearing qualities of the roof in the absence of unnecessary supports, especially when there is a need to cover significant spans in the building.
 You can increase the load-bearing qualities of the roof using a mixed rafter system
 Roof trusses for various roof types
When constructing a certain building, rafter systems of one type or another are necessarily used, and the type of roof will completely depend on the design of the future structure.
Rafter truss for gable roof
Gable roofing is a common roof construction for residential buildings that have no more than three floors. Preference is given to this particular design due to the technical characteristics of the inclined shape of the rafter system, as well as due to the fact that installation work is carried out easily and simply.
The rafter system of a gable roof includes two rectangular inclined planes. The upper part of the building from the end side resembles a triangle. The main components of a gable roof are the mauerlat and rafter legs. In order to properly distribute the load across the rafters and walls, struts, crossbars and racks are installed, thanks to which you can create a durable, rigid, elementary and lightweight structure for installing a structure for a gable roof.
 A gable roof is considered the simplest roofing system; it is used for residential buildings of no more than three floors
 You can install sparse or solid sheathing on top of the rafters, and then attach bitumen coating, tiles or some other type of material to it. The rafters and the sheathing itself are usually made of beams or boards, which are fastened with nails, bolts or metal fasteners. Metal profiles can be used as rafters, thereby covering significant spans. There is no need to use extra racks and struts.
The installation of a rafter system for a gable roof allows you to evenly distribute the entire existing load along the perimeter of the building. The lower ends of the system focus on the Mauerlat. They are fixed with fasteners or metal brackets. By the angle of inclination of the rafter bars, you can determine at what angle the roof slopes will be inclined.
 The rafter system for a gable roof allows you to evenly distribute the load from the roof along the perimeter of the building
 Rafter system for hip roof
When arranging a system for a hip roof, you will need to install different types of rafters:
- narozhniki (short);
- lateral;
- hip main;
- obliques (diagonal elements that form a slope in the shape of a triangle).
The rafter legs, located on the side, are made of boards, and they are mounted identically to the parts of a traditional pitched roof with a layered or hanging structure. Hip main rafters are layered parts. For sprigs, boards or bars are used, attached not only to the Mauerlat, but also to the diagonal beams.
To install this type of structure, the angle of inclination, as well as the cross-section of the slanting beams, are accurately calculated. The dimensions of the parts also depend on the span length.
 To prevent the hip roof from deforming from heavy loads, you should accurately calculate the angle of inclination of the diagonal beams for the rafters
 Maintain symmetry when installing diagonal beams for rafters, otherwise the roof will deform under significant load.
Rafter system for a sloping roof
A broken roof is a structure with rafters that consist of several individual elements. Moreover, they should be located at different angles relative to the horizon. And since the lower rafter part is almost vertical, the attic space of the building receives additional space, thanks to which it can be used as a living space. The installation of this type of roof is carried out during the construction of a four- or gable rafter structure.
Professionals need to calculate a hipped rafter system, but you can make a gable sloping roof yourself, since its installation is very simple. To do this, it is necessary to install a support frame, which should consist of purlins and racks. Horizontal parts are fixed with hanging rafters. But the supports of the sloping roof are secured to the mauerlat with the shortened legs of the rafters.
 The assembly of rafters for a sloping gable roof can also be carried out by non-professionals, since the installation of such a roof is very simple
 "Cuckoo" in a truss
The so-called cuckoo on the roof is a small protrusion that is located on the attic floor. There is a window here for better illumination of the attic room. The installation of the “cuckoo” is carried out carefully, while monitoring the parameters of the entire structure: depth of cut, angle of inclination and other factors. However, before this, the necessary measurements are made.
The first stage of work begins with the installation of the Mauerlat (beam with a cross-section of 10x10 cm, which is needed to support the slings). The rafter system acts as a skeleton for the roofing material. To impart rigidity to the structure, spacers are used, which are mounted between the two legs of the rafters.
After the installation of the roof truss is completed, sheathing is laid, the type of which depends on the roof covering purchased. Installation of the sheathing is done continuously or with a certain step. Boards, OSB and plywood sheets are usually used for it. In addition, the installation of roofing material must be identical throughout the entire roof.
The main difficulty when installing such a rafter system is the location of the internal corners. Snow can accumulate in these places, which means the load will increase, which is why a continuous sheathing is made.
 A “cuckoo” on the roof is a small protrusion on the attic floor, under which there is an additional window.
 Chalet roof rafter truss
The peculiarity of this design is that the canopies and overhangs are moved outside the house. In addition, there must be rafters and roof beams extending up to three meters on the sides of the building. Each of these elements is secured with a bracket to the wall of the building in the lower part. Next, tie the edges of the beams. They serve as a support for covering the roof of the building.
But when creating large overhangs, it is necessary to install the reinforced belt in parallel with the installation of studs for the Mauerlat. It is necessary to make anchors that help secure the consoles. In this case, the rafters will be perfectly fixed with anchors and, in addition, with mortises.
To carry out the side cornices, a ridge beam is made, after which beams are placed at the level of the mauerlat, which must be identical to the length of the ridge. The truss, and subsequently the building materials for the roof, rest on these structural details.
When designing a building, the angle of the chalet roof is calculated based on the characteristics of the local climate and other factors. With a slope angle of about 45°, the load from snow is not taken into account, since with this option it will not linger on the roof. At the same time, the flat roof will withstand the load from snow, but it is necessary to install a reinforced roof truss. Before installing the chalet roof, a building design is prepared, because the originality of the roof itself, as well as the long eaves and overhangs, oblige this.
 A chalet-style roof is characterized by canopies placed several meters outside the house
 Rafter truss designed for soft roofing
Soft roofing is made in various ways, but there are common characteristics in the technological methods of its construction. Initially, you need to prepare. When arranging a roof for a house made of foam concrete or other material, first install a mauerlat, then in the upper crowns of the building they make cuts for the ceiling beams in increments of up to one meter. The distance between the boards is calculated based on the type of rafter structure.
- Install individual parts of the rafter system. To completely eliminate the risk, the rafter boards are attached to the ground with screws. After the roof truss is created, it is raised to the top of the building.
- All elements of the rafters are secured to the ceiling, internal boards, jibs, and crossbars. Further, this base for the roof will become a single whole structure.
- The next stage is the sheathing, which is installed under the soft roof with small gaps or no gaps at all. Gaps of no more than 1 cm are allowed. Quite often, leveling plywood is installed on top of the boards. Its sheets are laid using the bricklaying method. The resulting joints are not aligned with the gaps between the plywood and the board.
If the length of the sheathing boards is not enough, then the joints of the parts must be located in different places. In this way, you can correctly distribute areas that have been weakened.
Self-production of the rafter system
Before the installation of the rafter system begins, the mauerlat must be secured to the longitudinal walls with anchors. Next you need to decide on the required leg section for the rafters, depending on the distance and their length. If there is a need to increase the length of the rafters, then connect them with various fasteners.
When using different insulation, you need to choose the ideal distance between rafter elements in order to reduce the number of thermal insulation scraps.
Installation of the rafter system must be done in the following order:
- A template is made according to which the truss is assembled. Take 2 boards corresponding to the length of the rafters and connect them together at just one edge with a nail.
 A template for rafters called “scissors” will help you quickly assemble the entire roof rafter system
 - The result is a design called “scissors”. Its free edges are placed on supports at the points of contact between the rafter legs. The result should be the final angle, that is, the angle at which the roof slope will be inclined. It is fixed with several long nails and transverse boards.
- A second template is made, thanks to which the cuts are installed on the rafters. It is made from plywood.
- Special mounting cuts are cut on the rafters (a prepared template is used for these purposes) and connected at an angle of inclination of the slope. You should end up with a triangle going up the stairs to the roof. Next, it must be attached to the Mauerlat.
- Initially, two side gable rafters are installed. Their correct installation in the vertical and horizontal planes occurs due to temporary struts attached to the rafters.
 For proper installation of the entire rafter system, the first pair of rafters is installed on the roof
 - A cord is stretched between these tops of the rafters. It will indicate the future ridge and the level of other rafters located in the gap.
- Raise and install the remaining rafters at the initially calculated distance, which should be at least 60 cm from each other.
- If a bulky rafter structure is envisaged, then it is additionally strengthened with struts, supports, and so on.
 The bulky structure of the rafters is additionally strengthened with struts and supports
 - A ridge beam is installed on special supports, to which not only short, but also diagonal and intermediate elements of the rafters are attached.
 Proper fastening of the ridge beam ensures the reliability of the entire rafter system
Typical components of a standard rafter system
The strength of the rafter structure depends on the ideally selected section of the boards, as well as on the high quality of the rafter assemblies. The connection of parts for the roof structure is done according to established rules.
The main typical units in the rafter system:
- rafter support assembly on the mauerlat;
- ridge;
- unit for combining the top ties and the entire rafter system;
- securing the strut, rack, as well as rafters and beams.
After the design of the rafter system has been chosen, it is necessary to draw up a plan in which to highlight all the nodes. In each design they are made differently, since it depends on various nuances: the type of roof, its size, angle of inclination.
Rafters made from a profile pipe are a metal structure that is assembled using lattice rods. The production of such farms itself is a very labor-intensive process, but also more economical. To make rafters, paired material is used, and gussets are connecting elements. The structure of the rafters from profile pipes is assembled on the ground, using riveting or welding.
Thanks to such systems, any spans are blocked, but the correct calculation must be made. Provided that all welding work is done efficiently, in the future all that remains is to transfer the structural elements to the top of the building and assemble them. Load-bearing rafters made from profile pipes have many advantages, such as:

Crossbar in the rafter system
Crossbar is a fairly broad concept, but in the case of roofs it has a certain meaning. The crossbar is a horizontal beam that connects the rafters. This element prevents the roof from “expanding.” It is made of wood, reinforced concrete, and also metal - it all depends on the type of structure. And the crossbar serves to distribute the load exerted by the rafter system.
It can be fixed in various places between the legs of the slings. There is a direct pattern here - if the crossbar is fixed higher, then the timber for its installation must be selected with a large cross-section.
There are many ways to fix the crossbar to the rafter system:
- bolts;
- nuts;
- studs with washers;
- special fasteners;
- nails;
- mixed fastenings, when different types of fastenings are used in parallel.
The fastening is available with a mortise or overhead. In general, the crossbar is a design unit, as is the entire system of roof slings.
 The crossbar in the rafter system is designed to strengthen the roof structure
 Fastening the rafter system
To ensure the reliability of the rafter system, you must first find out how they are attached to the supporting roof and ridge. If a fastening is made to prevent deformation of the roof when the house shrinks, then the rafters are secured on top with a hinge plate or a nut and bolt, and below with a sliding support.
Hanging rafters need a tighter and more reliable fastening in the ridge, so in this case you can use:
- overhead metal or wooden plates;
- cutting method;
- connection using long nails.
In the layered system, the rafter legs are not connected to each other, since they are attached to the ridge girder.
The rafters are attached to the mauerlat using the cutting method, which is made in the rafter leg. Thanks to this fastening method, the roof support will not weaken. Cutting is also done when installing rafters on floor beams. In this case, a cut is also made in the support beam.
Video: how to make rafters with your own hands
Thus, an ideally selected rafter system and their design characteristics will help create the basis for a reliable roof for your home.
In order for a constructed building to last for many years, it needs both a reliable foundation and a strong roofing system that can withstand the vicissitudes of the weather. The roof must withstand heavy loads with dignity: heavy snowfalls, sharp gusts of wind, heavy downpours. The roof truss system is best suited for this.
Roof trusses and its types
The rafter system is the basis of the roof, which focuses on the load-bearing elements of the structure and also serves as a frame for various types of roofing materials: insulation, waterproofing, various coatings.
The dimensions and design of the rafters depend on:
- purchased material;
- size of the building;
- house dimensions;
- building materials for rafters;
- individual customer preferences;
- roof loads relevant for a particular region.
The rafter system has:
- sheathing - beams laid perpendicularly on the rafter legs;
- ties that absorb tensile forces;
- wooden racks located in a vertical position;
- mauerlat - a beam, the installation of which is carried out along the wall, the rafters rest on it;
- rafter legs are a kind of wooden beams that bear the main load of the roof.
Each of the above factors is very important, since it is necessary to understand what type of rafter system will be optimally suited for a particular situation.
When it comes to low-rise buildings, wood structures are the most common. In many cases, three types of rafter trusses are used: hanging rafters, layered rafters and a mixed rafter system.
Characteristics of hanging rafters
Hanging rafters are the most elementary type of rafter systems, their characteristics:
If the roof of the house has a complex structure, the types of rafters can be alternated. For example, if there are supports or a middle main wall, layered rafters are installed, and if there are no such elements, hanging rafters are installed.
Features of layered rafters
For a layered rafter system, the house must be additionally equipped with a load-bearing wall located in the middle. Layered rafters are distinguished according to the following characteristics:

The design of the combined system is the most complex, since it includes parts of two other types of rafters - hanging and layered. It is used for attic roofing. The walls of the rooms, which are located on the second floor, are formed by vertical supports; these supports also serve as intermediate supports for the rafter beams.
The part of the rafters that connect one end of the racks functions as a crossbar for the slopes located on the side, and for the upper part of the structure they are a tie.
At the same time, the horizontal beams perform the following functions: for the upper slopes - the Mauerlat, for the side slopes - the ridge beam. To increase the strength of the roof, struts are installed that connect the side slopes and vertical posts.
The combined sling system is the most complex and time-consuming to manufacture, but these shortcomings are fully compensated by the increase in the load-bearing qualities of the roof in the absence of unnecessary supports, especially when there is a need to cover significant spans in the building.
You can increase the load-bearing qualities of the roof using a mixed rafter system
Roof trusses for various roof types
When constructing a certain building, rafter systems of one type or another are necessarily used, and the type of roof will completely depend on the design of the future structure.
Rafter truss for gable roof
Gable roofing is a common roof construction for residential buildings that have no more than three floors. Preference is given to this particular design due to the technical characteristics of the inclined shape of the rafter system, as well as due to the fact that installation work is carried out easily and simply.
The rafter system of a gable roof includes two rectangular inclined planes. The upper part of the building from the end side resembles a triangle. The main components of a gable roof are the mauerlat and rafter legs. In order to properly distribute the load across the rafters and walls, struts, crossbars and racks are installed, thanks to which you can create a durable, rigid, elementary and lightweight structure for installing a structure for a gable roof.
A gable roof is considered the simplest roofing system; it is used for residential buildings of no more than three floors
You can install sparse or solid sheathing on top of the rafters, and then attach bitumen coating, tiles or some other type of material to it. The rafters and the sheathing itself are usually made of beams or boards, which are fastened with nails, bolts or metal fasteners. Metal profiles can be used as rafters, thereby covering significant spans. There is no need to use extra racks and struts.
The installation of a rafter system for a gable roof allows you to evenly distribute the entire existing load along the perimeter of the building. The lower ends of the system focus on the Mauerlat. They are fixed with fasteners or metal brackets. By the angle of inclination of the rafter bars, you can determine at what angle the roof slopes will be inclined.
The rafter system for a gable roof allows you to evenly distribute the load from the roof along the perimeter of the building
Rafter system for hip roof
When arranging a system for a hip roof, you will need to install different types of rafters:
- narozhniki (short);
- lateral;
- hip main;
- obliques (diagonal elements that form a slope in the shape of a triangle).
The rafter legs, located on the side, are made of boards, and they are mounted identically to the parts of a traditional pitched roof with a layered or hanging structure. Hip main rafters are layered parts. For sprigs, boards or bars are used, attached not only to the Mauerlat, but also to the diagonal beams.
To install this type of structure, the angle of inclination, as well as the cross-section of the slanting beams, are accurately calculated. The dimensions of the parts also depend on the span length.
To prevent the hip roof from deforming from heavy loads, you should accurately calculate the angle of inclination of the diagonal beams for the rafters
Maintain symmetry when installing diagonal beams for rafters, otherwise the roof will deform under significant load.
Rafter system for a sloping roof
A broken roof is a structure with rafters that consist of several individual elements. Moreover, they should be located at different angles relative to the horizon. And since the lower rafter part is almost vertical, the attic space of the building receives additional space, thanks to which it can be used as a living space. The installation of this type of roof is carried out during the construction of a four- or gable rafter structure.
Professionals need to calculate a hipped rafter system, but you can make a gable sloping roof yourself, since its installation is very simple. To do this, it is necessary to install a support frame, which should consist of purlins and racks. Horizontal parts are fixed with hanging rafters. But the supports of the sloping roof are secured to the mauerlat with the shortened legs of the rafters.
The assembly of rafters for a sloping gable roof can also be carried out by non-professionals, since the installation of such a roof is very simple
"Cuckoo" in a truss
The so-called cuckoo on the roof is a small protrusion that is located on the attic floor. There is a window here for better illumination of the attic room. The installation of the “cuckoo” is carried out carefully, while monitoring the parameters of the entire structure: depth of cut, angle of inclination and other factors. However, before this, the necessary measurements are made.
The first stage of work begins with the installation of the Mauerlat (beam with a cross-section of 10x10 cm, which is needed to support the slings). The rafter system acts as a skeleton for the roofing material. To impart rigidity to the structure, spacers are used, which are mounted between the two legs of the rafters.
After the installation of the roof truss is completed, sheathing is laid, the type of which depends on the roof covering purchased. Installation of the sheathing is done continuously or with a certain step. Boards, OSB and plywood sheets are usually used for it. In addition, the installation of roofing material must be identical throughout the entire roof.
The main difficulty when installing such a rafter system is the location of the internal corners. Snow can accumulate in these places, which means the load will increase, which is why a continuous sheathing is made.
A “cuckoo” on the roof is a small protrusion on the attic floor, under which there is an additional window.
Chalet roof rafter truss
The peculiarity of this design is that the canopies and overhangs are moved outside the house. In addition, there must be rafters and roof beams extending up to three meters on the sides of the building. Each of these elements is secured with a bracket to the wall of the building in the lower part. Next, tie the edges of the beams. They serve as a support for covering the roof of the building.
But when creating large overhangs, it is necessary to install the reinforced belt in parallel with the installation of studs for the Mauerlat. It is necessary to make anchors that help secure the consoles. In this case, the rafters will be perfectly fixed with anchors and, in addition, with mortises.
To carry out the side cornices, a ridge beam is made, after which beams are placed at the level of the mauerlat, which must be identical to the length of the ridge. The truss, and subsequently the building materials for the roof, rest on these structural details.
When designing a building, the angle of the chalet roof is calculated based on the characteristics of the local climate and other factors. With a slope angle of about 45°, the load from snow is not taken into account, since with this option it will not linger on the roof. At the same time, the flat roof will withstand the load from snow, but it is necessary to install a reinforced roof truss. Before installing the chalet roof, a building design is prepared, because the originality of the roof itself, as well as the long eaves and overhangs, oblige this.
A chalet-style roof is characterized by canopies placed several meters outside the house
Rafter truss designed for soft roofing
Soft roofing is made in various ways, but there are common characteristics in the technological methods of its construction. Initially, you need to prepare. When arranging a roof for a house made of foam concrete or other material, first install a mauerlat, then in the upper crowns of the building they make cuts for the ceiling beams in increments of up to one meter. The distance between the boards is calculated based on the type of rafter structure.
- Install individual parts of the rafter system. To completely eliminate the risk, the rafter boards are attached to the ground with screws. After the roof truss is created, it is raised to the top of the building.
- All elements of the rafters are secured to the ceiling, internal boards, jibs, and crossbars. Further, this base for the roof will become a single whole structure.
- The next stage is the sheathing, which is installed under the soft roof with small gaps or no gaps at all. Gaps of no more than 1 cm are allowed. Quite often, leveling plywood is installed on top of the boards. Its sheets are laid using the bricklaying method. The resulting joints are not aligned with the gaps between the plywood and the board.
If the length of the sheathing boards is not enough, then the joints of the parts must be located in different places. In this way, you can correctly distribute areas that have been weakened.
Self-production of the rafter system
Before the installation of the rafter system begins, the mauerlat must be secured to the longitudinal walls with anchors. Next you need to decide on the required leg section for the rafters, depending on the distance and their length. If there is a need to increase the length of the rafters, then connect them with various fasteners.
When using different insulation, you need to choose the ideal distance between rafter elements in order to reduce the number of thermal insulation scraps.
Installation of the rafter system must be done in the following order:
- A template is made according to which the truss is assembled. Take 2 boards corresponding to the length of the rafters and connect them together at just one edge with a nail.
A template for rafters called “scissors” will help you quickly assemble the entire roof rafter system
- The result is a design called “scissors”. Its free edges are placed on supports at the points of contact between the rafter legs. The result should be the final angle, that is, the angle at which the roof slope will be inclined. It is fixed with several long nails and transverse boards.
- A second template is made, thanks to which the cuts are installed on the rafters. It is made from plywood.
- Special mounting cuts are cut on the rafters (a prepared template is used for these purposes) and connected at an angle of inclination of the slope. You should end up with a triangle going up the stairs to the roof. Next, it must be attached to the Mauerlat.
- Initially, two side gable rafters are installed. Their correct installation in the vertical and horizontal planes occurs due to temporary struts attached to the rafters.
For proper installation of the entire rafter system, the first pair of rafters is installed on the roof
- A cord is stretched between these tops of the rafters. It will indicate the future ridge and the level of other rafters located in the gap.
- Raise and install the remaining rafters at the initially calculated distance, which should be at least 60 cm from each other.
- If a bulky rafter structure is envisaged, then it is additionally strengthened with struts, supports, and so on.
The bulky structure of the rafters is additionally strengthened with struts and supports
- A ridge beam is installed on special supports, to which not only short, but also diagonal and intermediate elements of the rafters are attached.
Proper fastening of the ridge beam ensures the reliability of the entire rafter system
Typical components of a standard rafter system
The strength of the rafter structure depends on the ideally selected section of the boards, as well as on the high quality of the rafter assemblies. The connection of parts for the roof structure is done according to established rules.
The main typical units in the rafter system:
- rafter support assembly on the mauerlat;
- ridge;
- unit for combining the top ties and the entire rafter system;
- securing the strut, rack, as well as rafters and beams.
After the design of the rafter system has been chosen, it is necessary to draw up a plan in which to highlight all the nodes. In each design they are made differently, since it depends on various nuances: the type of roof, its size, angle of inclination.
Rafters made from a profile pipe are a metal structure that is assembled using lattice rods. The production of such farms itself is a very labor-intensive process, but also more economical. To make rafters, paired material is used, and gussets are connecting elements. The structure of the rafters from profile pipes is assembled on the ground, using riveting or welding.
Thanks to such systems, any spans are blocked, but the correct calculation must be made. Provided that all welding work is done efficiently, in the future all that remains is to transfer the structural elements to the top of the building and assemble them. Load-bearing rafters made from profile pipes have many advantages, such as:

Crossbar in the rafter system
Crossbar is a fairly broad concept, but in the case of roofs it has a certain meaning. The crossbar is a horizontal beam that connects the rafters. This element prevents the roof from “expanding.” It is made of wood, reinforced concrete, and also metal - it all depends on the type of structure. And the crossbar serves to distribute the load exerted by the rafter system.
It can be fixed in various places between the legs of the slings. There is a direct pattern here - if the crossbar is fixed higher, then the timber for its installation must be selected with a large cross-section.
There are many ways to fix the crossbar to the rafter system:
- bolts;
- nuts;
- studs with washers;
- special fasteners;
- nails;
- mixed fastenings, when different types of fastenings are used in parallel.
The fastening is available with a mortise or overhead. In general, the crossbar is a design unit, as is the entire system of roof slings.
The crossbar in the rafter system is designed to strengthen the roof structure
Fastening the rafter system
To ensure the reliability of the rafter system, you must first find out how they are attached to the supporting roof and ridge. If a fastening is made to prevent deformation of the roof when the house shrinks, then the rafters are secured on top with a hinge plate or a nut and bolt, and below with a sliding support.
Hanging rafters need a tighter and more reliable fastening in the ridge, so in this case you can use:
- overhead metal or wooden plates;
- cutting method;
- connection using long nails.
In the layered system, the rafter legs are not connected to each other, since they are attached to the ridge girder.
The rafters are attached to the mauerlat using the cutting method, which is made in the rafter leg. Thanks to this fastening method, the roof support will not weaken. Cutting is also done when installing rafters on floor beams. In this case, a cut is also made in the support beam.
Video: how to make rafters with your own hands
Thus, an ideally selected rafter system and their design characteristics will help create the basis for a reliable roof for your home.