Rafter roof units. Types and diagrams of rafter systems: overview and recommendations for installing a roof rafter system. Alignment with floor beams
-
The main obstacle for novice developers, even if we're talking about O simple roof, there may be a lack of knowledge about what nodes are rafter system. How to do them in order to get a strong, reliable and stable roof?
The beginning of designing a pitched roof is the selection of a rafter system that should perform the functions load-bearing structure. The type of structure is determined based on the type of roof.
In one case, rafters are beams or boards that act as the “skeleton” of the roof, which supports the weight of the insulation and roofing material. In another they can be composite, and are assembled from individual elements, known as rafter legs.
The board and beams must undergo special impregnation - fireproof and antiseptic. The better this is done, the longer they will last..
Composite frames are divided into two types: layered and hanging. The choice of a specific system, in addition to the architectural preferences of the owners, depends on some roof parameters:
- its functionality,
- number of loads tested, including those associated with climatic features of this region.
Hanging rafters do not have intermediate supports, therefore they create a significant bursting force, which is transmitted to the walls in the horizontal plane. To reduce it, use a tie (wooden or metal), which, connecting the legs, completes the triangular structure. The legs in it work on bending and compression. The tie can be located at the base, and in this case serves as a floor beam (this option is more common when constructing attics), or higher.
The higher the position of the tightening, the more powerful it should be, on the one hand, and on the other, more securely connected to the rafter legs.
Layered types are installed in houses that have a middle load-bearing wall or columnar intermediate supports. They rest with their ends on external walls, and with their middle part on supports or an internal wall. As a result, the elements work on the principle of beams - only in bending. The weight of the rafter system in the case of layered ones with the same width of the house is less: it requires less lumber, and therefore less money costs.
If a single one is installed over several spans roof structure, hanging and layered trusses can alternate: for areas without intermediate supports, hanging ones are installed, and where there are, layered ones.
How to properly install a rafter system
One of the conditions for the reliability of the future structure is correct device rafter system fastening points.

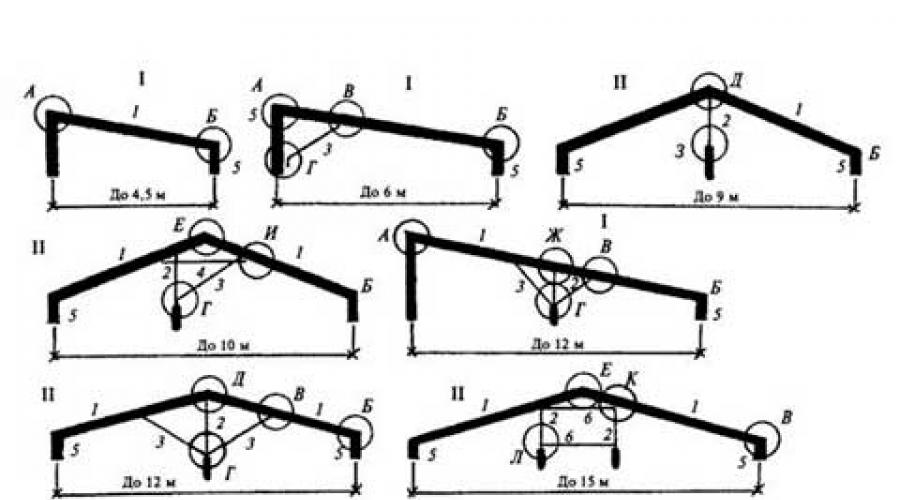
Pitched roof rafters usually have at least three support points. Their number may vary depending on the size of the span. For span widths up to 10 m, one additional support is required, with large values their number is increasing.
The design of the hanging also depends on the width of the span. If it is small, the tightening is usually replaced with a bolt. As the span increases, the tie begins to sag and the legs begin to sag.
With a span size
up to 9 m hanging rafters are supported by a special headstock vertical beam. The ends of the legs are secured to its upper end using staples or clamps, and the headstock is tightened with a clamp.
up to 13 m - strengthening is carried out using struts. Their upper ends rest on the leg, and its length between the supports should not be more than 5.5 m, and their lower ends rest on the headstock.
up to 17 m, the legs in the lower part are strengthened with the help of supports; for the upper part, a truss system is used: the tightening is attached to two headstocks and a crossbar is installed between them.How to properly attach rafters
Whether the rafter system is being replaced or installed in a new house, certain rules must be followed.
Simple fastening of a leg and a beam can even be destructive - when pressure is created on the rafter, its end begins to slide along the beam, which leads to the destruction of the roof .
To avoid slipping and ensure reliability, use the following types connections:
- tooth with a spike
- tooth with emphasis,
- emphasis at the end of the beam.
It is possible to use two teeth - it depends on the angle of inclination. In addition to this connection, metal corners are also used for fastening.
Main components of the roof frame
Beam attachment point

- A tooth with a tenon is made in the heel of the rafters, and a stop is cut out in the beam with the corresponding socket for the tenon.
- The depth of the nest is about 25–30% of the thickness of the beam.
- The notch is made at a distance of 0.25–0.4 m, starting from the edge of the beam that hangs down.
- A single tooth is usually made together with a tenon, which does not allow sideways movement. Therefore, this connection is called “tooth with a tenon and stop.”

In the case of a hollow roof, the angle of inclination of which is less than 35°, the rafter legs are installed so that the supporting area on the beam increases. To do this, use a cut with two teeth:
- in two spikes;
- stop with and without spike;
- two spikes into the lock.
All connections in the structure are made using fasteners:
- metal - screws, nails, bolts with washers, various angles;
- wooden - beams, triangular overlays (kerchiefs), tenons.
To the Mauerlat:
There are two technologies according to which .
Rigid - in this option, the possibility of any influences (shifts, rotations, bending, torsion) between these structural elements is completely excluded. To achieve a similar result:
- when fastening, use corners with a hemmed support beam;
- a saddle is made on the leg, the resulting connection is additionally secured with wire, nails and staples. The nails are nailed from the sides, towards each other at an angle (they cross inside the Mauerlat), then the third nail is driven into vertical position. This is the more common fastening method.
Sliding (hinged)– such a coupling, which has two levels of freedom, is achieved through the use of special fasteners, which allows one of the mating elements to move freely (within specified limits).
The following options for sliding fastening of rafters and mauerlat can be distinguished:
- a cut is made, after which the rafters are laid down on the mauerlat:
- the elements are connected obliquely with two nails towards each other;
- connected with one nail, which is nailed vertically from top to bottom into the body of the base beam through the leg;
- An alternative to nails can be steel plates with holes for nails;
- attach the boards to the mauerlat using a bracket;
- release the rafter leg behind the wall and perform a single fixation with fastening plates;
- They use special steel fasteners - “sleds”.
In all these cases, the foot rests on the Mauerlat, but when moving, the elements of the system are able to move in relation to each other.
This pairing is especially important for wooden houses, erected from timber or logs, which shrink over time. The use of a rigid interface may cause damage to the integrity of the walls.
The rafter system can be “floating” or rigidly fixed. The floating one is mounted on special brackets that allow wooden frame“sit down” simultaneously with the shrinkage of the gables and does not allow them to hang over the ridge log.
Ridge connection unit
There are three connection methods in the ridge part.
Butt-butt
The upper edge of the rafters is cut at the same angle as the angle of the roof, rests against the desired rafter located on the opposite side, it should be cut in the same way. Cutting corners is usually done according to a template. For fixation under the ridge, use two nails (150″) or more. One nail at an angle is hammered into the upper plane of the first and second rafters; they must fit into the cut of the opposite one. The ridge joint is further strengthened by placing a wooden overlay on the side or metal plate, which is attached with bolts or nails.
The rafter system is the skeleton of the roof. It is she who is responsible for the strength of the roof, its reliability and resistance to loads. At self-construction At home, you need to know how to properly make the fastening points of the rafter system so that the roof is reliable and safe.
Construction of the rafter system
The rafter system consists of many elements, each of which performs its own task.
- Mauerlats are responsible for distributing loads on the walls. These beams take the weight of the entire roof and lie on the walls.
- Rafter legs- These are inclined beams that create the required angle of inclination of the roof.
- Purlins are horizontal beams that hold the legs together. There is a ridge run, located at the top, and side ones, located on the slopes.
- The puffs are located horizontally and do not allow the rafter legs to move apart, forming rigid triangles with them.
- Racks and struts(rafter legs) - additional elements on which the rafter legs rest. They rest against the beds.
- The beam is a horizontal beam located under the ridge; the posts and struts rest on it. The purpose of the bench is to redistribute the point load from the racks.
- The ridge is the junction of the roof slopes.
- Lathing - bars or boards that are placed perpendicular to the rafters. Roofing material is laid on it. The purpose of the sheathing is to distribute its weight.
- An overhang is an elongated edge of a slope that protects walls from precipitation. If the lengths rafter legs is not enough to create an overhang, additional elements are used - fillies.
The structure of the rafter system is shown in the figure.
Also included in the roof structure are roof trusses. This is a continuous assembly consisting of rafter legs, braces, racks and struts (braces, jibs). The truss can be not only triangular, but also trapezoidal, segmental or polygonal. Which type of truss to choose depends on the size of the house. If the distance between the walls is 9-18 m, then a triangular truss is suitable. For houses with a width of 12 to 24 m, trapezoidal or segment trusses are used. If the building width is larger (up to 36 m), then polygonal trusses are used.

The main fastening points for the roof truss system are beam, ridge and mauerlat.
Types of rafter systems
Rafters can be hanging or layered.
Hanging ones rest on the walls and create space. To reduce it, ties are made at the base of the rafters, which connect the rafters and form triangles with them. Hanging systems various types used for houses no more than 17 m wide. Depending on the width of the building, they are arranged in different ways.
If the width of the house is no more than 9 m, then the rafters are supported by a vertical beam - the so-called headstock. It is located under the ridge.
If the width of the house is from 9 to 13 m, additional struts are installed, which rest against the rafters at one end and against the headstock at the other.
When the width of the house is 13-17 m, two vertical posts are used, connected at the top by a crossbar (fitting), as in the figure.
Layered rafters rest on a load-bearing wall or columns inside the building. With this method, the rafter has three or more support points. The layered type of rafter system creates less load on the walls of the building and is more durable; it is used for buildings of greater width. Such roofs can be arranged in different ways, depending on the location of the internal walls; they can be symmetrical or asymmetrical.
How the parts of the rafter system are connected
To connect wooden elements together, nails, bolts, studs are used, as well as metal plates and angles to strengthen the nodes. Additionally, wooden blocks or plates are used.
Fastening methods:
- teeth into a spike,
- teeth point blank,
- emphasis at the end of the crossbar.
The use of metal fasteners does not reduce bearing capacity, since their insertion is not required, unlike fastening, for example, using the tooth-to-tenon method.
Rafters can be not only wooden, but also metal. For fastening metal rafters use various corners, brackets, mounting perforated tape, plates, bolts and nuts or self-tapping screws.
Attaching to the Mauerlat
If the wall is concrete, then in its upper part they make reinforced belt rigidity, in which studs are provided. The Mauerlat will be attached to them.
Rafters can be attached to the mauerlat in two ways: rigid and sliding.
The first method is more popular. For fastening, use special corners with a support bar. There are several ways to attach the rafters to the Mauerlat.
- Each rafter is nailed with three nails: two of them should be crossed, and the third should be located vertically.
- Fastening with a bracket: one end of it is driven approximately into the middle of the support beam, and the other is turned 90 degrees and driven into the rafter.
- Fastening with wire rod: a clamp is made from wire folded in 4 rows, with which the rafter is screwed to the beam. Instead of wire, a special perforated tape is also used. Sometimes this method is used in addition to other fastening methods.
- Using corners: the corner is screwed to the mauerlat and the rafter leg. It is better to use corners with two rows of holes and a stiffener.
The disadvantage of the hard method is that when the building settles, the walls may be damaged. Therefore, rigid fastening is used in brick buildings.
The sliding method implies that the rafters are connected to the Mauerlat by such fastening elements that do not interfere with their movement within certain limits. This method is used in wooden buildings, which may settle. Using special fastening methods, it is possible to achieve that the rafter will have one, two or three degrees of freedom. In the latter case, a special hinge is used.
One degree of freedom means that the rafter can rotate in a circle. In this case, they are secured with one nail or screw. The two degrees of freedom are circular rotation and horizontal displacement. To do this, the rafters are attached to the mauerlat with metal brackets. Special corner sleds are also used.

With a sliding connection in small buildings with a not very heavy roof, the fastening is done without cuts. If the building is large, it is recommended to make this knot with a notch on the rafter leg.
Important! The notch is cut precisely on the rafter, and not on the mauerlat, so as not to damage or weaken the beam.
In this case, the fixation can be either rigid (with emphasis on the beam) or movable (with a tooth on outside). Sometimes, instead of cutting out a tooth, an additional block is used.
Ridge connection
After the rafter leg is secured to the Mauerlat, they move on to the ridge attachment point. This connection can be made in three ways: end-to-end, to the ridge girder and overlapping.

For end-to-end fastening, the rafters are cut at the top at an angle equal to the slope of the roof, and connected with nails (150 mm), driving them into the upper planes of the rafters, so that the nails enter the end of the opposite rafter. For strength, a metal plate or wooden plate is attached, which is also nailed or attached with bolts.
When attached to a ridge girder, a ridge beam (purlin) is additionally laid between the rafters; this method is more labor-intensive.
When fastening overlapping, the rafters located on opposite sides overlap each other and touch their side surfaces. They are connected with bolts, nails or studs.
Beam node
The rafters are attached to the beams as follows. the main task fastenings - to prevent the rafters from sliding along the beam, so various techniques are used.
- It is necessary to cut out a tooth and a tenon in the heel of the rafter, and cut out a stop of the appropriate size in the beam.
- The attachment point should be 25-40 cm from the hanging edge of the beam.
- The mounting socket should be 1/4 - 1/3 deep of the beam thickness.
- Together with the tooth, a spike is cut out, which prevents the rafter from moving to the side. This connection is called a “tooth with tenon and stop”.
If the roof is flatter (its angle of inclination is less than 35 degrees), then the rafters are fastened in such a way that the area of their contact with the beam increases. Then use the following methods:

When creating a rafter system for a roof, it is important to remember the following.
- All wooden elements Before installation, they are treated with an antiseptic and fire-resistant compound.
- The thickness of any wooden part should not be less than 5 cm.
- Rafters without posts and struts are not made longer than 4.5 m.
- The Mauerlat must be positioned strictly horizontally.
- It is recommended to make the racks and struts as symmetrical as possible.
- You cannot add elements to the calculated rafter system - this can lead to the appearance of loads where they are not needed.
- At the junction of wood and stone (brick) masonry, waterproofing is needed.

A properly made rafter system is the key to the reliability of the roof. It is the rafters that take on the entire weight of the roofing materials and resist wind loads. Therefore, it is very important to build a rafter system in compliance with technology.
December 12, 2017Specialization: facade finishing, interior decoration, construction of cottages, garages. Experience of an amateur gardener and gardener. We also have experience in repairing cars and motorcycles. Hobbies: playing the guitar and many other things that I don’t have time for :)
Any roof is subjected to various loads every day, as it is affected by wind, precipitation, and also holds roof covering. In order for the roof to cope with all these loads for many decades, it must be properly designed. Therefore, I recommend that everyone who wants to do construction on their own understand what parts and components of the rafter system exist, and what function they perform.
Frame elements
All parts of rafter systems can be divided into two types:
- Basic. These parts form the roof frame, called the rafter system. Not a single roof can do without them;
- Additional. This group includes elements that may be present in some types of roofs, while others do without them. The task additional elements is to increase the rigidity and strength of the frame.

Main nodes
So, the main components and parts of the rafter system include the following elements:
- Mauerlat. This, one might say, is the basis of all roofing systems, since the rafter legs rest on the mauerlat. Its design is extremely simple; in essence, it is ordinary timber(log in log houses), laid along the perimeter of the walls. Its task is to evenly distribute the load from the roof onto the walls of the building.
I must say that gable roof the Mauerlat can not be located along the perimeter, but only on the side walls, since on end walls pediments are located, representing a continuation of the wall;
- Rafter legs (hereinafter SN), or simply rafters. These parts are the load-bearing element that forms the slope and its angle of inclination. They take on the wind and snow load, as well as the weight of the roofing material, and are transferred to the walls through the Mauerlat and other elements.
Rafters can be lateral (main), diagonal (installed at the junction of the slopes hip roofs) and shortened (diagonal rafters rest on the Mauerlat);

- Roof trusses. They are formed by paired (reciprocal) rafter legs. I must say that everyone has roof trusses pitched roofs except for single-pitched ones, since they do not have reciprocal rafters;
- Ridge knot. Is the top roof truss, i.e. formed by the junction of two CHs. The ridge unit, like the trusses themselves, is absent only on shed roofs.

That's all the main components wooden structures roofs that form them.
Additional
Additional details include:
- Run. This is a horizontal beam that connects all CHs within one slope;
- Ridge run. It is the same horizontal beam as a regular purlin, but which runs in the ridge unit, i.e. connects simultaneously two legs of each truss.
It must be said that the ridge girder can be installed in several ways - above the joint of the rafters, in the center of the joint, i.e. the legs rest on the purlin, or under the rafters;
- Tightening (crossbar, contraction). It is a beam that connects two response legs, preventing them from moving apart. We can say that tightening removes the thrust load from load-bearing walls;

- Supports. They can support rafters, all types of purlins or tightening. Supports transfer the load to the internal walls of the building, columns or ceilings;
- Struts (rafter legs). They are inclined supports, which have the same function as the vertical posts. The only thing is that they support only the legs, i.e. are one of the elements wooden trusses. The rafter legs transfer the load to the load-bearing elements of the building or to the ceiling;
- Fillies. These elements form the overhang of the slope if the SNs do not extend beyond the walls. Essentially, they prolong CH, i.e. are their continuation.
These are all the elements that make up the frames of pitched roofs.
A few words about the types of systems
So, we've dealt with the nodes, now let's look at the main types truss structures. There are several of them:
- Single-pitch. As I already said, these structures do not have trusses. The slope angle is formed due to different heights walls on which the SNs are laid, or due to the purlin, which is laid on racks installed on one of the walls;

- Gablesloped. Layered rafters are rafters that are supported by posts or struts that transfer the load to the internal load-bearing elements of the building. The frame of such structures is formed only by trusses, i.e. they do not have diagonal legs.

- Gable hanging. Hanging rafters differ from layered rafters in that they transfer the entire load from the roof only to the outer walls;

- Hip. Unlike gable ones, at the ends instead of vertical gables they have inclined hips, i.e. end slopes. As I said, the hips form diagonal and short legs;

- Broken. They are a gable structure, each CH of which is divided into two parts and is located under different angles. Skates, i.e. The upper legs form a gentle slope, and the lower legs form a steep slope. This design allows you to increase the attic space, as a result of which it can be used as an additional floor.

Typical broken (attic) systems have racks on which the upper and lower SNs rest. The counter posts are connected to each other by ties ( attic beams ceilings).
There are also semi-attic structures, which are essentially ordinary hanging systems gable roof. The only thing is that their fastening with the Mauerlat is usually made sliding (movable), which allows you to increase the deflection of the CH, and thereby reduce the thrust load on the walls.
Despite the fact that the designs of all the above systems are different, they consist of the same parts that we have already become familiar with.
Lastly about fastenings
Finally, I propose to consider how connections are made between the main components such as:
- Rafter/mauerlat;
- Ridge knot.
Other details special attention do not deserve it, since their joining most often occurs by cutting down the mating area (to increase the contact area of the parts) and laying on steel plastic/corners, which are fixed with screws. Sometimes fasteners are not even used, i.e. the parts are attached to each other with screws without any overlays.
Connection of rafters and mauerlat
The attachment point for the leg and the power plate can be made in several ways:
- Using grooves. In this case, grooves are cut out under the Mauerlat into which the CH is inserted. Then it is additionally attached to the Mauerlat on both sides with a steel angle;

- Tooth and thorn. This method is usually used to attach the CH to the tie. Its principle is based on the fact that a tenon is selected at the end of the sawed-down CH, and a groove is selected at the tightening. In addition, the leg itself rests on the so-called tooth, i.e. a protrusion in the tightening that takes on the spacer load.

It must be said that recently the tooth-and-spike type fastening is rarely used, since it is much easier to use special fasteners, the same corners and plates;
- By washing it down. In this case, the CH is sawed down so that a right angle is formed at the junction with the Mauerlat, as a result of which the rafter not only rests on the beam, but also rests against it lateral surface, thus transferring the thrust load. It must be said that instead of sawing, you can fasten a block, as shown in the diagram below.


Connection of rafters and ridge girder
The connection between the CH and the purlin can be made as follows:
- Using a groove. In the CH, two counter cuts are made, as a result of which, after the junction of the rafters, a groove is formed for the ridge girder;
- Hard pinching. The principle is based on the fact that puffs are installed under and above the purlin;

- I started drinking. This is the simplest and most common method, the principle of which is based on sawing down the CH for maximum fit to the beam. In this case, fixation is carried out with a steel angle.
Here, perhaps, are all the main nuances of assembling rafter systems.
Conclusion
We have found out what parts rafter systems consist of, what types they come in and how their main elements are connected. If I missed any points or something is unclear to you, write comments, and I will be happy to answer your questions.
December 12, 2017If you want to express gratitude, add a clarification or objection, or ask the author something - add a comment or say thank you!
At the beginning of planning mansard roof a rafter system is selected that plays the role supporting structure. The required type of rafter system is determined based on the type of roof.
Depending on the chosen system, these may be wooden beams, used as roof frame, restraining the composite building materials of the entire structure, or specific elements that create supports, called rafter legs. Before starting work, the wooden components are impregnated with special compounds that protect the roof from fire and rotting. The durability of the roof directly depends on the quality of this procedure.
Types of rafter systems and the arrangement of their components
The rafter system is divided into two main types: layered and. Since the connection nodes in each system have various characteristics, a certain type of rafters is selected based on the properties of the preferred roof, including its architectural features.
Main factors when choosing the right type systems:

- general functionality of the roof;
- the force of pressure of roofing building materials on the structure;
- the prevalence and frequency of precipitation in the area where the house is located.
U hanging type rafters there are no supports placed in the gaps. For this reason, increased thrust occurs, which is transmitted horizontally to the walls of the building. To reduce this indicator, a tightening element made of wood or metal is introduced into the support assembly, designed to connect the rafter legs. Thus, the nodes of the hanging rafters take on the shape of a triangle. The tightening element is located at the base of the legs, it performs the function of a crossbar (most often used in gable structures roof) and works on bending and compression. The strength of the connection with the base of the supports depends on the height of the tightening element.

The layered type of rafters is often installed in buildings where there is a central support column or load-bearing wall. The rafters rest with their limbs on the sides of the building, and the central part rests on a column or other support inside the house. This design unit is designed for bending operation. Layered supports create less load on the components of the building, so their installation is not as labor-intensive as in the case of hanging rafters. In addition, it does not require large material costs.
There are also roofing options that combine both types of rafters. In this case, each type alternates, that is, areas without load-bearing walls are equipped with hanging rafters, and areas with the necessary supports are equipped with layered ones.
Proper arrangement of the rafter system
The main factor for high roof strength in future construction is competent arrangement all nodes and reference points.
In the case of layered rafters for an attic roof, it is assumed that there are at least 3 support points. This value may change if the span exceeds standard standards. For example, if the span is no more than 10 m, only one additional support will be required.
Knot hanging supports assembled based on the span dimensions. On short spans, the tension element is most often replaced by a crossbar. At large sizes span, the tightening elements sag, and the supports bend.
Thus, hanging type nodes may have the following differences regarding the span size:

Figure 1. Mauerat device diagram.
- 9 m. The supports must be supported using a wooden block installed perpendicular to the attic floor. In the base area it is strengthened with brackets, and the tightening elements are secured with special clamps.
- 13 m. Fastening is carried out using struts, which rest against the base with their tops, and bottom- into a perpendicular beam. The interval between supports should not be more than 5.5 m.
- 17 m. The base needs to be strengthened special devices. A truss structure is used for the top: the tightening elements are attached to two wooden blocks, and a crossbar is mounted between them.
Methods of fastening nodes
Regardless of whether you need to replace an existing rafter system or build it from scratch, you must follow a certain set of rules when attaching its components.
First of all, the simplest fastening of the crossbar and support base should be avoided, as this can have a destructive effect on the entire roofing system.

Figure 2. Attaching the rafter leg to the mauerlat.
In other words, from the load created by building materials or precipitation, the ends of the supports slip off and the rafter system is damaged. This leads to its complete collapse. To prevent such an outcome, it is necessary to increase the reliability of these nodes. This is achieved using the following types of fastening:
- teeth into a tenon;
- teeth point blank;
- emphasis on the end of the crossbar.
Depending on the slope, one or two teeth can be used. To increase the reliability of the connection, you can create additional fasteners using metal corners.
Roof sheathing attachment points
The main fastening points of the rafter system are:
- beam;
- Mauerlat;
- ridge
Beam fastening unit

Figure 3. Scheme of the ridge connection of the rafter system.
Tenons are created in the rafter leg, and a socket is cut out in the crossbar, which corresponds to the cut teeth. In this case, the nest should occupy no more than 30% of the entire thickness of the crossbar.
If lightweight materials were used in the construction of the roof and its slope is less than 35°, the bases of the supports are placed so that their support area is significantly larger than the beam. This can be achieved by using a mortise with two teeth in 2 tenons, a stop (with or without a tenon), and two tenons in the lock.
The system components are fastened either with hardware with metal corners, or with wood blocks, overlays and tenons.
Mauerlat fastening unit
There are 2 technologies for Mauerlat fastening of supports: rigid and sliding (Fig. 1).
In the first case, a strong connection is established between the rafters and the Mauerlat without the possibility of slipping, deflection or jumping out. This is achieved by placing special corners with a support bar. The formed knot must be fastened with reliable wire using hardware. The nails are driven in at a certain angle from the side so that they are in a crossed state in the Mauerlat. The last nail is nailed vertically. This method is the most popular.
In the second case, fastening is carried out using a special mechanism that allows a certain element (in in this case rafter) move in the desired direction (Fig. 2).
To create such a connection, you will need to make a cut on the supports, and then lay them on the Mauerlat. As in the previous case, both parts of the knot are secured with two crossed nails and one vertical on top. The boards are secured to the Mauerlat with metal brackets. After this, the supporting base is released beyond the wall and fastened with plates and slides. Thus, the emphasis is on the Mauerlat, but all components of the rafter system can move within acceptable limits.
This method is most often used when constructing a roofing system. wooden buildings(logs, log house), which tend to subsidence. It is worth remembering that with rigid fastening there is a possibility of damage to the walls of the building.
Ridge attachment point
Such a knot can be created by two methods: butt and overlap (Fig. 3).
The first method involves cutting the top of the supports at the same angle as the roof corner. They rest against opposite supports, which also need to be trimmed. The fastening is created using two nails (150 mm), driven from above at a certain angle, so that they are proportionally located inside each rafter. To increase reliability, the seams between the supports are fastened with wooden plates or metal plates.
The second method is the most popular. It is distinguished from the first method by the overlap joining method. In this case, the supports are connected not by the ends, but by the side parts, after which they are secured with bolts.
The rafter system is the frame of the roof of the house, which carries and evenly distributes the weight roofing pie, sometimes reaching up to 500 kg/m2. The reliability of this unique frame depends on three factors: the accuracy of the calculation, on the basis of which the number and cross-section of the supporting elements are selected, the material from which it is made, as well as the correctness of the fastening technology. Knowing how to properly fasten rafters, you can significantly increase the load-bearing capacity of the frame, making it stronger and more reliable. Installation errors, on the contrary, lead to significant losses in strength and deformation of the roof. In this article we will talk about the main types and methods of fastenings with which you can qualitatively install rafters with your own hands.
The rafter frame of the roof of a house is a system of interconnected supporting elements made of wood or metal that give the structure its shape, slope, and also evenly distribute its weight between the load-bearing walls. Its main component is the rafter legs, which are beams installed at an angle, which are connected in pairs along the slope, forming a ridge at the top point of their connection. There are two main types of rafters:
- Layered. Layered rafters are called supporting elements that have two points of support in the roof structure - on the ridge girder and the mauerlat. A rafter system of this type is used in structures that have one or more load-bearing walls inside on which rafters can be “leaned.” This fastening of the rafters allows you to relieve them through the use of additional vertical supports.
- Hanging. Hanging elements are those that have only one support point, located where the rafters are attached to the wall or mauerlat. A hanging type rafter system experiences load not only in bending, but also in expansion, so it is strengthened by horizontal compensating elements (crossbars, tie rods, tie rods).
Note! In most of the most popular rafter systems, the rafters are attached to the Mauerlat. Mauerlat is a massive beam or beam with a cross-section of 150x150 mm or 200x200 mm, laid along the load-bearing walls of the structure, on which the rafter legs will subsequently rest. It softens the pressure on the walls of the house and also evenly distributes the weight of the roofing pie. You can attach the Mauerlat to the upper chord of the walls using anchor bolts or embedded metal studs.
Main connecting nodes
The rafter frame is called a system because all its elements are closely interconnected and fixed, as a result of which the roof structure acquires a stable shape, rigidity and high load-bearing capacity. Each connecting node between its parts is a vulnerable point that can easily deform under load, so all fastenings must be carried out strictly according to technology. Experienced craftsmen identify the types of connections in the roof structure:
- Attaching the rafters to the ridge beam. This connecting unit is typical only for layered rafter systems, in which the upper part of the rafter leg rests on a ridge purlin fixed to vertical racks. The rafters can be attached to it using metal plates, nails or sliding slide fasteners.
- Fastening the rafters to the mauerlat. The most important fastening point of the rafter frame is considered to be the junction of the mauerlat beam with the rafter legs. You can fix the rafters on it using nails, metal corners or wooden blocks.
- Connecting the rafters to each other. To lengthen the rafter legs if the length of the slope exceeds standard length lumber, they are assembled from several elements connected to each other using nails, glue or metal plates.
- Connection of rafter legs with auxiliary supporting elements. In truss frame construction, rafters can be connected to tie rods, transoms, or struts to increase rigidity, strength, and load-bearing capacity.
Please note that any cuts made to attach rafters to beams, mauerlat or other structural elements frame lead to a decrease in their strength, therefore experienced craftsmen It is recommended to connect them together using corners and overlays.

Fixation methods
When deciding how to attach the rafters to the mauerlat or ridge girder, you need to choose the right fastening fittings. Modern construction market has huge assortment fastenings of various designs and sizes. The main criteria for choosing fasteners are the material used to make the rafters, their cross-section, as well as the type of load to which they are subjected. There are the following methods of fastening rafters:

Experienced craftsmen believe that the most reliable way to fix rafters is to use metal corners that firmly connect the wooden elements to each other, rigidly fixing the angle between them. An angle that covers the joint between the rafter leg and ridge beam or Mauerlat, serves as a kind of spacer between them.
Types of fastenings
Tree - natural material, which in the process of equalizing humidity and drying gives significant shrinkage, due to which linear dimensions structures are changing. That is why experienced craftsmen recommend erecting a roof for timber and log houses a year after construction, when the shrinkage process passes from the active to the passive phase. If you fix the wooden frame elements rigidly, then after drying the roof of the house may become deformed. Therefore, the following types of fastenings are used to connect rafters:

Interestingly, there are several options for combinations of movable and fixed connecting nodes. The most common are rafter systems with one rigid and two sliding fasteners, which provide sufficient mobility with high strength and rigidity of the structure.
Types of fasteners
There is ongoing debate among experienced roofers as to what is the most effective way to attach rafters to floor beams and mauerlat. However, in most cases the problem is that in these conditions it is more practical to use nails or self-tapping screws. Both of these fasteners have their own advantages and disadvantages:
- Nails are good because all you need to hammer them in is a hammer, which is available in every household. However, some craftsmen complain that hammering them in by hand takes too long. It is worth recalling that special jagged nails are used to fix the rafters, which securely adhere to the wood.
- To assemble the rafter frame, galvanized self-tapping screws are used, which are not afraid of corrosion. Due to the thread, they are firmly screwed into the thickness of the wood, securely fixing the elements together. Screwing them in quickly and conveniently with a portable screwdriver. The disadvantage of this type of fastener is that during dismantling, removing screws from wood is long and tedious.
Most experienced roofers agree that to fix rafter legs it is better to use galvanized rough nails, the length of which is 5-3 mm greater than the thickness of the lumber. Properly selected fasteners are the key to high-quality and long-term fixation of the roof frame, which will not be afraid of either mechanical stress or wind load.


Video instruction