Building a brick stove with your own hands. Do-it-yourself heating and cooking stoves. Advantages of bell furnaces

Read also
No one country house cannot do without a stove, as it will both feed and warm. Today, gas mains have been installed in many villages, and it would seem possible to switch to more convenient way heating. However, many homeowners are in no hurry to abandon brick stoves, which provide a completely different, special warmth. In addition, in regions rich in forests, where there are no problems with firewood, it is possible to save on gas by having a brick stove in the house.
To find out how to fold, you need to study in detail the layout and masonry technology. Before you start studying a specific option, you should consider several models, since there are compact and massive structures. You need to choose a stove that will take up less space in the house, but will have all the functions that are in demand in the household.
There are a lot of models of brick stoves. Experienced stove makers can make their own changes to finished projects, since they already know by heart where and how the internal channels through which smoke is removed should pass. Thanks to the correct arrangement of them in the design of the stove, it will heat up evenly and release most of the heat into the room. It is better for novice craftsmen to strictly follow the already drawn up order schemes, without deviating a single step from them, since even one incorrectly placed brick can ruin all this rather labor-intensive work.
Types of brick kilns
Based on their functionality, stoves are divided into three main types - cooking, heating and. Choosing suitable design, Firstly you need to decide what exactly will be required of her.

The hob has a cast iron panel for cooking food and heating water. Typically, such stoves are small in size and are popular for installation in small private homes and in the country. Of course, a cooking stove can, in addition to cooking food, also warm a small room.
 The heating and cooking stove is a multifunctional massive structure
 A heating and cooking stove can warm a house or country house with large area, and its design sometimes includes a bed, and in addition to the stove, an oven, a tank for heating water and a niche for drying vegetables and fruits are built in.

Always compact. It does not include a hob and serves only to heat the premises. Such a structure can warm two rooms if it is placed between them, built into the wall.
Choosing the optimal location for the furnace
By selecting the desired model stove, you need to look after it appropriate place. The structure can be installed against a wall, in the middle of a room, or built into a wall. The choice of location will depend on the size of the stove structure and the desires of the home owner.
- Stove in the middle large room, can divide it into two different zones, for example, a kitchen and a dining room or living room. The hob will go into the kitchen, and a flat wall with well-made masonry will become designer decoration living room. Perhaps, immediately or over time, there will be a desire to add a wall to the stove and completely separate the two rooms - in this case, the partition should be isolated from the stove non-flammable material. You can use asbestos sheets for this or install brickwork.
- It is not advisable to build a stove near external wall, since there it will quickly cool down.
- When installing a stove between two rooms, it must also be separated from the walls with heat-resistant materials.
- The proposed construction site must be carefully measured and be sure to take into account that the foundation should be 100 ÷ 120 mm larger than the base of the furnace. In addition to the base area, you need to calculate the height of the building so that it fits well into the room in all respects.
- To make it easier to work, you need to find an ordering diagram for the selected model.
Having decided on the model and installation location, you can purchase materials for construction and prepare tools.
Tools, building materials for laying a brick stove
Depending on the size of the furnace, it requires different amounts of materials and additional cast iron and steel parts, but the tools needed for masonry are the same.
Tools
Of the tools and equipment for the construction of any furnace you will need:
The “goat” is a scaffold that will make it easier to work at height when the stove is raised above human height. They are convenient because the stove master can not only climb onto them, but also place a container with a solution next to him and even put the tools and building materials necessary for this stage of work.
 “Goats” will be needed when laying the top rows
 Another version of the stand, more compact, is the “tragus”. You need to have two such devices, because if you place them at a certain distance from each other and lay thick boards on top, you will get the same platform. Can also be used separately, as stairs.
 You can get by with a couple of more compact trestles, making temporary plank flooring on them
 The following set of tools will need to be prepared:

1. A pick will be needed to separate and trim the brick.
2. A broom made from sponge, for removing dried sand and pieces of mortar from the finished laid rows of masonry and mopping inside the masonry.
3. Corner - will help bring the corners inside and outside the oven exactly 90 degrees.
4. A plumb line is needed to check the verticality of the walls.
5. A kiln hammer is also required to separate bricks into pieces and chip off small protrusions of hardened mortar.
6. Pliers will be needed for biting, bending and straightening the wire.
7. A rubber hammer is necessary for tapping bricks in masonry if it is difficult for them to fit.
8. A chisel will also be needed for splitting bricks, as well as dismantling old masonry.
9. Trowel (trowel) of different sizes - for applying mortar and removing excess.
10. The rule will be necessary to level the surface of the foundation.
11. A lead scriber is used for marking, especially in cases where it is planned to decorate the stove with tiles.
12. The knocker is a piece of pipe, which is also used for cutting tiles; instead of a hammer, it is used to hit a knife.
13. Wooden spatula - for mixing and grinding the solution.
14. Metal scriber rod for marking.
15. A level is needed to check the horizontality of the rows and the verticality of the walls.
16. A rasp is used to remove sagging and grind in lumps.
17. Jointing is necessary for neatness of the seams if the stove will not be plastered or finished with decorative tiles.
18. Container for mixing the solution.
19. A sieve that will help make the masonry mortar thin.
Construction materials
The amount of materials will depend on the selected furnace, and their list is almost always the same. For purely heating type no hob, oven cabinet, or water tank is required. But usually standard set cast iron and steel elements consists of the following items:

1. Blower door.
2. Door for fireboxes
3. Cleaning doors ovens.
4. Chimney damper.
5. A burner made of several rings.
6. Hob.
7. Grate.
From others metal elements you may need:
1. Oven.
2. Tank for water.
3. Metal corner 50 × 50 mm.
4. Metal strips 3 ÷ 4 mm thick.
5. Steel wire.
Directly for masonry you will need to purchase:
1. Red hardened brick.
2. Fireclay brick.
3. Ingredients for clay mortar or ready-made dry heat-resistant mixture for laying stoves.
4. For the foundation you will need cement, crushed stone, sand, formwork material and a sheet of roofing material for waterproofing.
5. Heat-resistant material will also be needed for protective finishing of the walls of the house and a metal sheet or ceramic tile for the floor.
Prices for refractory bricks
Fire brick
Preparing a site for the construction of a stove
Usually the foundation for the furnace is poured simultaneously with common foundation at home, although they do not strictly bind him to it. However, it often happens that the furnace is erected in a finished building.
Further actions depend on what kind of floor is installed in the room.
- If the foundation is concrete and completely poured, according to the principle of a slab, and the structure of the stove is not designed to be too massive, then you can begin to lay the stove directly on the concrete floor, having first laid a sheet of roofing material under the masonry.
- If the foundation is strip or the floor is wooden, then you will have to build the foundation from scratch.
Foundation
The foundation must be deepened into the ground. To do this, a place for the stove is marked on the floor, and then the boards or thin concrete floor are removed.
- A pit is dug in the exposed soil, 400-500 mm deep.
- At the bottom of the pit, a “cushion” of 100 mm is made of sand, and then of the same thickness - from crushed stone, the layers are well compacted.
- Next, along the perimeter of the pit, formwork is installed for pouring concrete - it should rise above the main floor by 100 ÷ 120 mm
- The lower layer of the foundation, up to about half the height, may consist of crushed stone, sand and cement. It is poured, distributed in an even layer over the entire area, and left to harden.
- After the bottom layer has set well, you can pour the top layer, which will consist of a thinner solution. The space is filled with fully cooked concrete mortar and is leveled by the rule, and the top formwork boards will serve as beacons for this. The foundation must dry well and gain the required strength. To do this, it must be moistened with water, starting from the second day, which will improve the uniformity of maturation of the cement mortar and prevent cracks from forming.

- A fully finished foundation (after 3 ÷ 4 weeks) is covered with roofing felt to create a layer of waterproofing. Then markings are made on this surface - the shape of the stove base is drawn, along which the first row will be laid out.
Dry masonry
- Experienced craftsmen recommend that a novice stove maker take his time laying bricks on the mortar so as not to make mistakes. Especially if this work is being carried out for the first time, it is best to dry out the entire furnace structure.
- By carrying out this process carefully, with a constant eye on the existing diagram, you can understand internal structure chimney channels and the installation of a firebox and vent.
- For dry masonry, you need to prepare auxiliary slats with a thickness of 5 mm, which will determine the distance between the bricks - during the main masonry it will be filled with mortar, forming seams.
- After the entire stove model up to the chimney pipe has been laid out, it is disassembled again, while the bricks of each row can be stacked separately, if there is enough space in the room for this, and numbered, indicating the row and the specific part in it. This is especially important if, when laying dry, the bricks were adjusted to the required size.
- It should immediately be noted that during the final laying, it is also better to first lay out each row dry again, for control, and then immediately fix it with mortar.
- In addition, you need to know that when laying bricks on the mortar, it is applied with a thickness of about 7 mm, then the brick is pressed and, if necessary, tapped rubber mallet. Excess mortar is immediately picked up with a trowel.
- Having laid two or three rows until the solution has set, the seams are decorated with jointing. If suddenly the solution is not wet enough, you can sprinkle it with a little water from a spray bottle.
- We must not forget that during laying, constant monitoring of the vertical and horizontal rows is necessary.
Knowing these nuances, you can proceed directly to the masonry.
The presented video shows a diagram of the construction of a compact heating stove, which is suitable even for a very small room. True, there are no other additional functions included in it:
Video: heating stove for small spaces
Compact "Swedish"
 Convenient, versatile and fairly compact Swedish oven
 Can be called the most accurate and compact oven, suitable for small rooms. This stove can be called a heating and cooking stove, since it has a high body with smoke exhaust channels located inside, which means that when it is fired, the walls will warm up well, releasing heat into the room. At the same time, the design also includes a hob.
The first picture shows a “Swede”, which has a wider pediment than in the second photo, since it is supplemented with an oven, and instead of cleaning windows there is a drying niche above the stove. This version of the stove is twice as wide as the second model.
 This is also a “Swedish”, but of a slightly different design
 The ordering diagram shown below almost completely corresponds to the stove in the presented photo, with some exceptions: instead of two windows for cleaning, there is a niche above the hob, a slightly different location of the pipe - on the other side of the structure, and consistent roundness of the corners. When laid in this order, the stove will look something like this.
The structure is laid out based on the ordering diagram:
 Layout diagram for laying a compact heating and cooking "Swedish"
 Although this diagram shows that they begin to lay out the blower chamber from the first row, after all It’s worth laying it out in a continuous plane and only from the second row can you start working on the blower chamber. But, in order not to create confusion, the description will go exactly according to the diagram, and the first continuous row can be called “zero”.
- So, the formation of the blower chamber begins from the first row.
- A blower door is installed on the second row. The door is secured with wire and temporarily supported with bricks until it is lined with masonry on all sides.

- From the fourth row, two chambers begin to be removed for cleaning and doors are also installed on them.
- A grate is laid on the fifth row.

- The firebox door is also secured with wire to the sixth row, and is also temporarily supported by bricks mounted on the grate, and Also, if necessary, a support is also placed on the front side of the door.

- On the seventh row, the beginning of the vertical smoke exhaust channels is laid.
- On the ninth row, the firebox door is covered with a brick, the wire of which is secured and tucked into the seams between the rows.
- On the eleventh row, a hob is placed on the left opening, and strips of asbestos are placed under its edges. The front lower edge of the cooking chamber is framed by a steel angle.
- From the twelfth to the sixteenth row the cooking chamber is displayed.
- On the seventeenth row, metal strips are laid, and its upper edge is formed with a corner.
- The next two rows are laid solid, leaving only three smoke exhaust channels.
- On the twentieth row, another door is installed, and a cleaning chamber and a drying niche begin to form.
- At 22- ohm row, the chamber door is covered with masonry.
- On the 23rd row, the chamber is completely blocked, and at its end a hole is left that will continue the smoke exhaust channel.
- On 24- ohm a row of metal strips cover the drying niche.
- At 25- ohm install the cleaning chamber door.
- At 27- ohm the door is covered with masonry.
- At 28- ohm The entire chamber is completely blocked.
- At 30- ohm In a row, two valves are installed on the smoke exhaust channels. First, the frame of this part is laid on the mortar, and then the valve is inserted into it.

- From 31st to 35th th a row is laid out a segment.
- From the 35th to the 38th, the construction of the pipe fluff begins.
- Next comes the laying of the pipe, which already has your own numbering. From the first to the 26th row, the shape of the pipe does not change, you just need to very carefully monitor the evenness and internal cleanliness (from solution residues) of the smoke exhaust channels. This part of the pipe is called the riser.
- On the third row, another door is placed on the cleaning chamber.
- At 27- ohm Another chimney valve is installed in a row.
- At 29- ohm they expand the pipe by one row, and by 30- ohm it is brought into its initial form.
- Starting from the 31st row, the narrowest part of the pipe is laid out, which is discharged through the roof.
When a chimney passes through the attic floor, it must be insulated from it with flammable materials - this could be asbestos, mineral wool or expanded clay, poured into a box located around the entire perimeter of the pipe.
The hole in the roof through which the pipe passes must be closed after construction. waterproofing material, which is applied to both the pipe and the roof.
Installation of other oven elements
As mentioned above, there may be other elements built into the oven, so it is worth considering how some of them are installed.
Oven
If the design includes an oven, it is most often installed on the same level as the firebox or hob. This is important for its rapid and uniform heating.
- Metal corners are first installed in the place where it will be installed - they will become reliable supports for the cabinet.

- Next, the oven is wrapped with asbestos cord - this material is heat-resistant and will help the thin metal of the cabinet last longer.

Video: technology for laying an efficient stove with an oven
Prices for masonry mixtures and special-purpose adhesives
Masonry mixtures and special purpose adhesives
Hot water tank
The water heating tank can be installed in different ways. Sometimes it is built into the design of the furnace, in other cases it is placed on top. The main thing is that he is close to smoke exhaust duct, from which the water will receive the necessary thermal energy. In this case, you need to provide a hole for filling the tank with water and a tap from which it can be taken. It is advisable to make the water tank from a stainless alloy, otherwise very soon yellow water will come out of it, unsuitable for water procedures.

Another option for installing this water heating element is to install it at the same level as the hob, above the firebox, when it will only heat up from below. In this case, it is best to place a cast iron or thick steel plate under the tank, otherwise its bottom will burn out very quickly. The container in this installation option is not embedded in the walls of the oven.
The disadvantage of this setup is that less space remains for hob, or the firebox will have to be made deeper, which means the overall dimensions of the stove will increase, which is not always possible in tight spaces.
When choosing a stove model for your home, you need to think through everything in advance - what functions should be implemented in it, its size and design. Based on this, it is worth choosing a building design with an ordering scheme.
It should be noted that laying a stove is a real art, and not even every experienced craftsman always succeeds perfectly. Therefore, if you do not have any skills in this work, then it is better to invite a specialist who will help you do everything correctly.
Brick stoves equipped with a hob are universal - they allow you to heat a house, as well as heat water and cook food. , from the simplest and most compact ones that you can fold with your own hands, to complex multifunctional ones, the laying of which is best left to an experienced stove maker.
It would seem that there is nothing easier than replacing a suitable surface with your own hands brick oven onto a metal insert, resulting in a cooking stove. In reality, everything is much more complicated. Stove - complex device, and the thermophysical processes occurring in it depend on correct location its elements.
Furnaces of this type require special requirements. On the one hand, it must effectively accumulate heat in the thickness of the brickwork, on the other hand, it must take a significant part of the heat to heat the hob. In the summer, when heating the house is not required, the hob should warm up quickly with economical fuel consumption.
Requirements
Theoretically, the hob can be made from any material that can heat up to high temperatures when the stove is fired. In practice, they are used with holes covered with a removable lid.
This design makes it possible to obtain zones on the slab with different temperatures. The thermal conductivity of cast iron, unlike steel, is not very high, so you can heat food on the plane of the stove, as well as cook or stew it over low heat. And by opening the lid, you can achieve direct heating of the cookware with an open flame, which allows you to quickly boil water or fry food in a frying pan.
 The most practical burners shown in the photo, consisting of concentric rings different diameters
- they can be adjusted to the size of the bottom of the dish. In addition, the gaps between the rings compensate for the thermal expansion of cast iron that occurs when overheated, and the plate can withstand multiple heating and cooling cycles without damage. Solid cast iron plates less reliable and require more careful heating.
The most practical burners shown in the photo, consisting of concentric rings different diameters
- they can be adjusted to the size of the bottom of the dish. In addition, the gaps between the rings compensate for the thermal expansion of cast iron that occurs when overheated, and the plate can withstand multiple heating and cooling cycles without damage. Solid cast iron plates less reliable and require more careful heating.
Materials
Which brick is preferable for laying a stove equipped with a hob?
In most cases, on the ordering diagrams of stoves for a home, cottage or bathhouse, you can see two types of brick: ordinary solid ceramic and fire-resistant fireclay - it is most often designated yellow. From fireclay bricks, they lay out with their own hands those parts that experience the greatest thermal loads during combustion: the firebox and the roof of the furnace, part of the smoke duct immediately after combustion chamber.
The main difference between fireclay bricks is its increased heat capacity. It is able to accumulate and release the received heat for a long time more efficiently than ceramic. For masonry heating stove, and especially this is an undeniable plus.
But if the stove is used primarily as a cooking stove, then the increased heat capacity of fireclay is rather a disadvantage: it will absorb a significant part of the heat, and cooking will take more time. In the summer it will be impossible to cook on such a stove - the room will become hot and stuffy.
If the stove is used primarily for cooking, it is recommended to use a minimum amount of fireclay bricks!Kinds
There are many varieties of heating and cooking stoves; every stove maker probably has in stock several tested drawings and diagrams, according to which he carries out the masonry with his own hands. But, one way or another, they are all built on the basis of long-known ones, which are discussed below.
Swedish oven
 "Swedish" was originally intended to perform several functions: heating, cooking a variety of foods, as well as drying and keeping clothes warm. Its design is thought out for the smallest details, the oven is equipped and hob, and an oven, and perfectly heated stove niches. In addition, her smoke channels are made in such a way that the body of the furnace is heated evenly from bottom to top, thanks to which the room maintains a stable temperature.
A distinctive feature of the Swedish stove shown in the photo is the oven. And its function is not limited to baking and baking. The oven is located next to the firebox and separated from it thin layer masonry The firebox arch is formed by a slab located in a niche. Immediately after starting the fire, the cooking surface and the wall between the firebox and the oven warm up well.
In winter time when the oven is fully loaded, the initial The room is heated by convection currents from the stove and oven, after finishing the fire - due to the heated walls of the oven. The hob does not overheat, since air constantly circulates above it.
In summer the stove is used mainly for cooking. In this case, intense convection does not occur, since there is no temperature difference, and a small amount of fuel is sufficient for good heating of the stove. The oven also warms up, creating a high temperature zone at the outlet of the firebox, due to which flue gases go into the canals completely burnt out. The furnace body heats up slightly.
The diagram and drawings of the masonry of a Swedish-type stove with your own hands are shown in the figure.

To lay a classic “Swedish” with your own hands you need:
- solid red brick, grade M 150 - 580 pieces;
- clay-based dry masonry mixture - 200 kg;
- cast iron grate;
- firebox door;
- ash door;
- cast iron stove with two collapsible burners;
- oven welded from sheet metal;
- chimney damper - 2 pcs;
- cleaning - 3 pieces;
- equal-flange steel angle 40 mm - 170 cm;
- steel strip 5x50 mm - 65 cm;
- flat slate 10 mm thick - 1 sheet;
- roofing iron.
 The foundation for the swedish is made solid, from concrete. Under the foundation it is necessary to make a sand and gravel cushion 15-20 cm thick. The height of the foundation itself is at least 30 cm, with two-layer reinforcement made of rods. Before laying begins, the foundation is kept for at least 20 days to gain strength.
Level the foundation using a screed with the floor level. After it dries, it is necessary to thermally insulate the furnace from the concrete, otherwise it will absorb a significant part of the heat.
Do it like this:
- an asbestos sheet 3-4 mm thick with dimensions 30 cm larger than the dimensions of the stove on the sides and back and 60 cm on the firebox side is placed on the foundation;
- a heat reflector is placed on the asbestos - foil or thin galvanization;
- followed by another similar layer of asbestos with the same dimensions;
- sheet of roofing iron with the same indentations as asbestos;
- on top of the iron is technical felt, impregnated with clay milk according to the size of the furnace.
On top of the felt, after it has dried, they begin laying the stove according to the order scheme:
First two rows- solid. They form the base of the oven. Third and fourth- install the blower door, clean and begin to form bottom part smoke circulation and ash pit. In the 5th row install the grate and oven. In the 6th row continue to lay out smoke ducts, install a partition between the oven and the combustion chamber. In the 7th row install the firebox door and secure it in rows 8 and 9, continue to lay out channels. 10 row forms a support for the hob. To install it correctly, you must first lay the brick dry, attach the slab and mark the laying grooves.
For ease of laying, the bricks are numbered, the row is disassembled and, using a grinder, recesses for laying the slab are selected so that there is a gap of 5 mm on all sides. After which the row is assembled onto a masonry mortar, and the slab itself is placed on a clay-asbestos liquid mortar. To prepare it, crushed asbestos is introduced into the masonry mortar, diluted to a creamy consistency. When laying the slab, be sure to check its level. If the burners have different size, the larger one is placed above the firebox, the smaller one - above the oven.
Rules for laying a hob: video
From 12 to 16 row lay out the walls of the niche above the stove and the smoke ducts. On top of row 16 lay a sheet of flat slate to fit the niche, and in rows 17 and 18 they lay it with bricks, forming the ceiling of the furnace. Next laying lead according to the pattern up to row 30, in which a valve is placed, after which they begin laying the required height.
Small cooking stove
At the dacha or at summer kitchen the stove can only be installed for one purpose - cooking. In this case, there is no need to waste material on smoke circulation. An excellent model of a cooking stove is presented in order. 
This multifunctional wood-burning stove performs several functions: you can cook and fry on the hob, bake in the oven, and it is also equipped with a built-in tank for heating water.
The sketch of the facade shows its elements:
- 1 - firebox;
- 2 - ash pan and ash pan;
- 3 - oven;
- 4 - water tank;
- 5 - cleaning door.
The oven is similar in design and type of heating to a Swedish oven, but without smoke channels . The heated smoke goes straight into the chimney, so the stove is heated with a small amount of fuel. The exit to the chimney is located at the rear, which allows you to remove the pipe through the wall yourself, observing fire safety standards.
For such a stove no more than 250 bricks required, which allows you to install it on the floor of the house without building a foundation. In this case, it is also necessary to do thermal insulation, but in the reverse order: lay felt on the floor, soaked in a liquid clay solution, and on it - a sheet of roofing iron. Laying begins on top of the sheet.
First two rows, like the Swedish one, solid. In the 3rd row install cleaning at 4 and 5- the door of the ash pit, forming a smoke circulation and exit to the chimney. In the 6th row They cover the ash pan door, install the oven and water tank. In the 7th row a grate is placed at the bottom of the firebox, from 8 to 10 row lay out a partition between the firebox and the oven, and install the firebox door. 11 row- overlap over the firebox door, oven and tank. Also in the 11th row a recess is made for laying the slab.
The top of the stove is covered with a cast iron hob with two burners. They are selected so that the maximum heating element is located above the firebox. Place the slab with a gap of 5 mm on a clay mortar with the addition of asbestos.
Kuznetsov furnaces
Fundamentally new design ovens are implemented in Unlike channel ovens, they are deprived complex system internal passages, and the circulation of gases occurs in cavities - caps. For this feature, Kuznetsov stoves are called bell stoves. Among his developments are heating, cooking, stoves for baths and cottages.
 In channel furnaces, hot gases pass through labyrinths of passages, gradually releasing heat. This causes uneven heating and sometimes destruction of the furnace elements. If the channels are insufficiently long, for example, in sauna stoves, the gases do not have time to cool, as a result, efficiency decreases, and the stove heats the air.
In bell-type structures, heated smoke rises into the bell - a cavity bounded at the top by the ceiling and with an exit at the bottom. The hot gas at the top of the bell gradually cools, heating the walls of the furnace, and gradually falls down. The circulation of gases in Kuznetsov bell furnaces is shown in the figure.
 For complete heat transfer in Kuznetsov stoves, not one, but two or three caps are made, and their placement can be either vertical - one above the other, for example, in sauna stoves, or horizontal - in models equipped with a stove bench. Heating cooking ovens, as a rule, mean vertical arrangement caps
The hob is located either above the firebox or forms the arch of the lower hood. In the second case, the temperature on it will be more stable. Procedures for do-it-yourself masonry, as well as photos of the most popular designs of Kuznetsov stoves are presented below.
Heating and cooking stove

Kuznetsov stove for a bath

Video: laying Kuznetsov’s heating and cooking stove
Video: Kuznetsov stove for a bath
Heating and cooking stove is an indispensable attribute village house, as well as relaxation areas in the bathhouse or in the country. If you have a diagram, drawings, order and detailed instructions, you can fold it with your own hands, and it will warm the house and delight the owners with a variety of tasty and fresh dishes.
Since ancient times, heating and cooking stoves have been present in houses. They acted as the main component of any rural home. Nowadays, people living in private houses in the city also do not refuse to install this structure. It has not lost its functionality, so it is actively used by many.
Even if the house has a heating system running on gas or electricity, many people do not want to turn it on full power on autumn days when the house becomes cool. In this case, a stove will help ensure a comfortable microclimate in your home. It is enough to throw a few logs into the firebox and your home will quickly become warm.
If you decide to acquire this structure in your home, then the task of its construction must be approached with all seriousness, since the stove is built with the expectation that it will last for decades. It doesn’t matter whether you build a heating stove with your own hands or a stove with a stove. Therefore, if mistakes are made during the construction process, it will be extremely difficult to correct them later.
Speaking about stoves, we note that they are divided into structures for single and two-story houses. The main difference between them is the height. The structure being built may have a slab or be used only for heating. In the second case, there is no slab as a component element. The height of a do-it-yourself oven depends on the number of rows in the design. Next, we will look in detail at how to build a stove with your own hands in a private house.
Materials for masonry
 Calculation of materials is extremely important point when laying a stove with your own hands. In addition, the quality of the structure affects its service life. The stovetop oven we are looking at in this article typically measures 90 x 90 cm at the base. As for its height, the structure does not reach its highest point to the ceiling of the first floor by 2.1 m.
Before you start building a stove with your own hands, need to purchase materials in sufficient quantities that will be used in its construction. During the work you will need:
- red brick M150 in the amount of 1085 pcs.;
- sand-lime brick for the construction of a firebox, 150 pcs. Instead, you can use fireclay;
- sand - 80-100 buckets;
- clay – 200 kg;
- corner 50x50 mm and 40x40 mm;
- steel wire 2 mm - 25 m;
- metal sheet 4 mm 1.5 × 1.5 m;
- roofing felt -3 m;
- asbestos cord 5 mm - 10 m;
- material for wall insulation.
The construction of the foundation also requires the preparation of appropriate materials:
- sand;
- cement;
- fittings;
- crushed stone;
- boards for formwork.
In addition, to build a full-fledged stove with a stove with your own hands, which can be used for heating your home and cooking, you will need to purchase cast iron parts:
- grate - 1 pc.;
- hob with two burners - 1 piece;
- valves - 3 pcs.;
- two doors for the combustion chamber and the blower, 1 pc. each;
- cleaning doors - 5 pcs.
Once the materials have been prepared and the builder has the necessary tools at his disposal, he can proceed to the active phase of work.
Foundation
 Accepting the fact that the structure being built has a large mass, when constructing a foundation with your own hands deepen it no less than 80 cm. However, when carrying out foundation work, one should take into account climatic features area of residence, as well as the depth of freezing. You can find out about this from local builders. Taking into account all these points, a stove built with your own hands according to the chosen scheme will last a long time.
The pit for the foundation being constructed must have square shape. As for its dimensions, they should be 1.2 × 1.2 m. You can easily dig it with your own hands, using hand tools- a shovel.
After completion of the excavation work, the bottom of the pit is compacted. Then at the bottom a sand cushion is arranged, for which it is important to maintain an optimal layer thickness of 10-15 cm. Next, crushed stone is poured in a layer of 15 cm, which, after laying it, must be compacted, and then the formwork must be installed. This must be done with the expectation that it will pass through the entire thickness of the foundation.
Pouring the foundation for the future furnace is carried out in several stages. The first layers may consist of mortar, which is made from cement and pebbles. Upper layer need to be filled with concrete made from sand and cement. Taking into account the weight of the structure, hardening of the foundation must take a long time, at least three weeks. This is important, because otherwise a stove built with your own hands, even in accordance with the selected scheme, will not last long. A crack in the foundation will require repairs.
When the base of the oven with the stove has gained sufficient strength, the formwork is removed, and the upper part of the foundation is covered with waterproofing material– three layers of roofing felt. The first brick laying with your own hands will be done further on it.
 Compared to a fireplace, the design of a stove with your own hands is more complex. Therefore, the construction scheme must be strictly observed.
Due to the fact that the area of the foundation is larger than the base, markings should be made on the waterproofing. After this, you can proceed to laying the first row.
If a vertical layout of rows is used, then it must be remembered that the chimney channels should not be too narrow. Their minimum size- 13 × 13 centimeters.
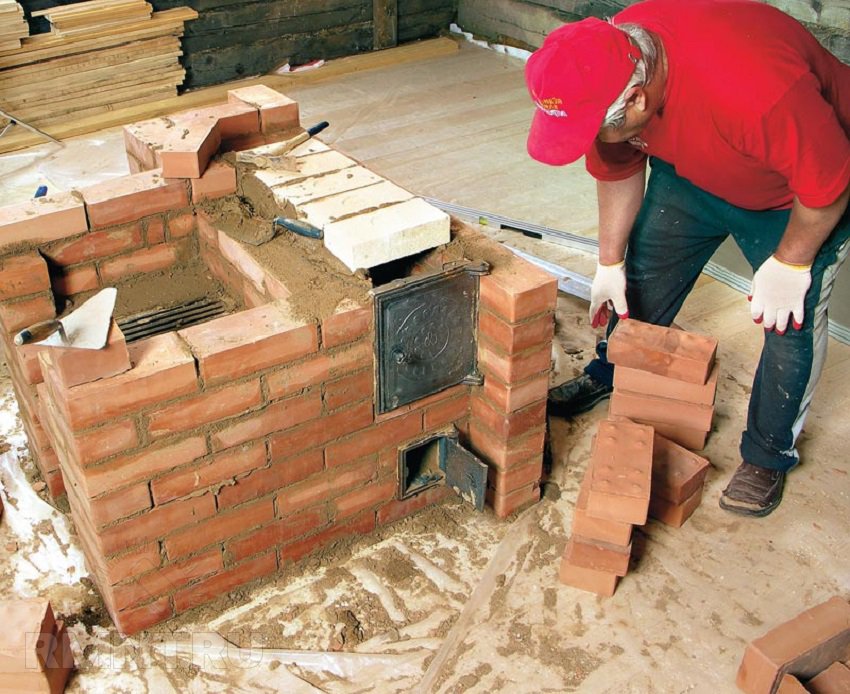
The sequential layout scheme for a heating and cooking furnace assumes the following: already from the first rows of masonry, its layout should include a blower chamber. When laying the second row begins, a blower door is installed, which is wrapped with asbestos cord before being installed in the opening intended for it.
When installing the door, a wire is wound around it, which is clamped between two bricks. When it is completely framed with masonry, the wire is bent to the sides.
When they reach the fourth row of the furnace, holes are marked on it for the circulation of heated air. On the fifth stage, the firebox grate is laid. When constructing the firebox wall and its threshold, it is permissible to use sand-lime brick.
The combustion door is installed on the sixth row. It, just like the blower, is wrapped with asbestos cord.
From 6 to 10 rows you need Special attention pay attention to the shape of the holes that will ensure air movement inside the structure. The tenth row, if possible, must be fastened with a frame welded from a corner. On the 11th row, a hob is placed on a pre-laid asbestos pad.
The corner is laid on the seventeenth row. The 18th row of masonry will lie on it, which will complete the framing of the chamber above the slab.
On the 19th-20th rows of masonry, drying chamber. On the 19th row, the cleaning door is installed.
Once again the metal corner is laid on the 24th row of masonry. On him a continuous row of bricks will be laid, which will become the ceiling of the dryer.
The cleaning door is installed on the 25th row.
On the 30th row, two valves are installed.
All subsequent rows up to the 38th are performed according to the scheme, and the next ones form part of the furnace that goes to the second floor. Note that this part of the furnace has a different numbering in order. Its laying is carried out according to the following scheme:
- The door installation is performed on the 2-3rd row. It is used for cleaning;
- installation of the chimney damper is carried out on the 27th row;
- the part of the stove installed on the second floor should have the shape of a wide chimney. It must be equipped with a valve and a chamber. It is gradually replaced by a narrow pipe, which begins at the level of the 32nd row.
An umbrella is placed on the top of the pipe, which prevents dust and moisture from getting inside it.
Furnace diagrams
Furnaces that are built in private homes with their own hands can currently be divided into two groups:
- modern devices;
- outdated designs.
 Building outdated structures with your own hands is not a problem. However, they have an imperfect design, so most often houses have stoves and stoves, which differ in their functionality.
If you decide to build a stove with a stove in your home or just a heating structure with your own hands, then you need to approach the task of choosing them with all seriousness. Familiarization with the advantages of furnaces of different designs will allow you to make right choice. If a private house already has a stove with an old-style stove, then in this case there is no need to build the structure from scratch. It is enough to remodel it and you will have equipment for heating and cooking at your disposal.
To avoid mistakes during the remodeling process, you should first read the video and various instructions how professionals do this work. It is also necessary to use drawings during work. By applying the acquired knowledge, you can get good result upon completion of the work, you will have a stove with a stove, built with your own hands.
One of the common types of stoves is two-tier. If we talk about its structure, then we note that it consists of two designs- one stands on top of the other. Each part of this structure has dimensions of 165x51x238 cm. When the furnace is operating, the heat transfer in the lower part is 3200 kcal/h, and in the upper part - 2600 kcal/h.
When building such a structure with your own hands, the two structures are separated from each other by masonry made of bricks with voids. This allows you to reduce the weight of the stove and save during its construction a certain amount of material. The lining, which is used to fill the space between the upper and lower oven, also acts as a base for the first structure.

Both the upper and the lower ovens have exactly the same design. In the case under consideration, a ductless smoke circulation system is implemented. Once in the firebox, the gases move into the upper cap, which is equipped with a special nozzle. After the gases cool, they sink to the bottom to the level of the firebox. Then they go into the chimney through the underpass.
For a lower stove, the chimney runs through the top, so the heating surface is smaller. The upper structure includes a separate chimney. The process of its laying does not contain difficult moments. The gas movement pattern is also simple. IN back wall there is a door through which cleaning must be carried out bottom structure. Cleaning the upper structure must be done through the door located in the side wall. Either coal or anthracite can be used as fuel for a two-tier stove. Each of the pipes created in this furnace is additionally equipped with a valve.
A reinforced concrete slab is often used to cover the top of voids. This type of overlap provides stability, and in addition makes the furnace structure as a whole more stable. When performing masonry of such volume, errors must be excluded. Indeed, if they occur, repairs will be extremely difficult.
Great care should be taken in the design of the chimney located in the lower structure of the furnace. If there are leaks in the masonry, then in this case You may experience heat leakage from the wall, which separates the pipes on the second floor. Note that this will also happen when the smoke valves are closed.
Ovens with a stove or any other type can be combined into any array, regardless of whether they have a square or rectangular shape. The type of fuel also does not have special significance. For country house A stove built with your own hands can be an ideal heating option.
 A stove of this design has dimensions of 102x102x238 cm. If we talk about its heat transfer during operation, it is 4200 kcal per hour.
One of its important parts – the firebox – has a greater height in the design of this stove. The symmetrical arrangement is also characteristic of its side openings, which serve to remove gas through the side chambers of the furnace walls located on the sides of the structure. Once there, the gas descends through the chambers, the connection of which is ensured by a special channel located under the firebox.
Gases enter the risers from each side chamber through the lower flaps. Then they rise into the side chambers located at the top. All together they form the top cap, which contains three U-shaped cavities.
The cavities are located parallel to each other. Having got up, the gas will be retained in the middle and rear cavities of the cap, and after cooling it will move to the front plane along the lower part. WITH chimney The front plane is connected by a push-on type. From there the gas will escape into the atmosphere.
The design of this furnace has three hoods: an upper one and 2 large chambers. If we talk about the type of fuel that can be used in the construction of this structure, we note that it can be anything. To lay out the walls of the firebox during the construction of the furnace, refractory bricks should be used.
Stove in the house - good help in creating a comfortable microclimate at minimal cost. She can act as main system home heating or used as an additional heat source. The construction of this structure does not have to be entrusted to a specialist. You can build a stove in your home yourself if you study all the nuances of building a stove. High-quality execution work will allow you to get a stove that will give off heat well and will last for decades.
No one a private house cannot do without a traditional heating and cooking stove made of brick. And although many homes today are equipped gas heating, most owners are in no hurry to give up a brick stove, since it provides special warmth - warmth hearth and home, filling the home with comfort and a sense of calm. In addition, in regions rich in forests you can significantly save on costs. natural gas, having acquired firewood.
The desire to remodel a house, including moving a heating and cooking stove, can often come down to the nuances and subtleties of the stove business. You will learn how to build a stove with your own hands in this material.
There are many types of stoves, but not all are used in private construction.
Types of stoves for private homes:
- Heating(fireplaces, sauna heaters);
- Cooking(oven exclusively for cooking);
- Universal(heating and cooking).
The latter variety is considered universal, therefore it is most common in private construction.

Furnace structure and its properties
After looking at sketches and designs of brick stoves and choosing a specific option, you should pay attention not so much to its external design as to the internal structure. The design of a heating and cooking furnace determines its performance, and ultimately its service life.
The internal design of a heating and cooking stove does not depend on the location of the device itself in the house. The kitchen stove can be located in the middle of the room, in a corner or against a wall.
The main structural elements of a heating and cooking furnace:
- Shantsy (heat-air channels);
- Ash pan (or ashpit);
- Grate (for connecting the firebox with the ash pan);
- Under (slope to the grate);
- Combustion chamber;
- Burnout (smoke exhaust);
- The furnace vault (separates the combustion zone from the post-burning zone in the combustion chamber);
- Vent (hole through which heat enters the heated room);
- Exterior wall;
- Smoke circulation (Channel connecting the combustion chamber to the chimney);
- Overlap;
- Chimney;
- Indentation (the space between the chimney and the stove);
- Smoke valves;
- Heat-dissipating walls.

The heat output of a stove is determined by the amount of thermal energy released by the stove per hour and depends on the amount of fuel used. Heat capacity (the ability to retain heat from burned fuel) is measured in hours. Various ovens have different levels of heat capacity, which also depends on the degree of insulation of walls and ceilings, windows and doors of the house.
The location of the stove in the house affects the amount of heat. A house with a stove in the middle will be warmer.
Russian stove and its structure
A Russian brick stove is installed on a foundation, since its structure is quite massive. In its design, the Russian stove includes a podpechok, used to store fuel, which dries in it and easily flares up when the stove is lit. The bakehouse is closed with a vault-trough, onto which a bedding in a clay solution is poured. The bottom of the cooking chamber is installed on top of the bedding.

The Russian stove has a special design that differs significantly from the traditional heating and cooking stove in terms of heat transfer coefficient and other parameters. During heating, even for a short period, a Russian stove accumulates heat and is capable of releasing it for 24 hours.
To ensure that the Russian stove does not consume excessive amounts of fuel, does not smoke and does not cool down in a matter of hours, when constructing it, it is important to follow the exact masonry technology and dimensions included in the diagram. Bricks forming internal organization ovens are trimmed and polished so that the walls inside the heil are even and smooth.
Also in its design, the Russian stove includes a combustion chamber, which is its heart. The firebox is divided into a cooking chamber or bakery and a firebox (furnace). The floor of the furnace has an inclined design, which must be made exactly according to the drawing when constructing a Russian stove.
The crucible is the main secret that Russian cuisine hides. Some dishes need to simmer in the cooking chamber for a long time after cooking. It is not possible to achieve such an effect or create similar conditions for preparing Russian cuisine using a conventional hob or electric oven.
The main secret that distinguishes the Russian stove from the traditional one is the smoke channel of the simplest design, which is superior in efficiency to the smoke channel devices of other stoves.
Making a Russian stove with your own hands (video)
Design selection
The choice of furnace type depends on its operating conditions:
- Heating and cooking stove. If you plan to use the stove intensively in your home, it is better to choose a heating and cooking stove with a massive device and regular heating. In the construction of such a furnace, its structure, consisting of many cold bricks, is first heated, then heat transfer begins.
- Heating stove. For a house in the mountains or a summer house, where permanent residence not planned, a fireplace will suffice. Although it has a small heat capacity (2 - 3 hours), it is able to warm up a room much faster than a massive stove. This design will allow you to quickly warm up during the cold season.
A brick heating stove can be installed with or without a foundation. Most lightweight design assembled into a quarter of a brick (the brick is placed on its edge). In order to give it strength, a frame of metal corners is used. A massive furnace requires a foundation, which should not be connected to the support of the building. In the case of a separate chimney, it also requires its own foundation.

Deciding on size and power
The heat transfer level of the heating and cooking furnace must exactly meet the possible heat losses, which depend on the temperature outside the house, as well as the degree of insulation of walls, windows, doors, and ceilings.
The size and design of the future furnace is determined by its power.
Furnace structure. Where to begin?

The laying of any stove cannot be started without a design or drawing, which must include the location and dimensions of the structure, as well as the exit of the chimney without disturbing load-bearing elements buildings. It is also necessary to calculate the heat transfer coefficient of the furnace. The diagram or design of the future furnace is drawn up on the basis of this calculation.
It is quite difficult to independently create a project or drawings of a heating and cooking stove, so you can use the services design organization or information on the Internet.
Tools and materials
When the furnace design is approved, you can prepare for its laying.
To fold the stove with your own hands, you need to have on hand:
- Stovemaker's hammer (trowel);
- Master OK;
- Construction level and plumb lines;
- Measuring tape;
- Cement-sand mortar;
- Hand-held power tools (hammer, grinder, etc.);
- Red brick;
- Fireproof brick (burnt);
- Facing brick;
- Mortar for masonry made of clay and sand;
- Heat-insulating and moisture-proof materials;
- Stove fittings and appliances.
Laying a stove with your own hands. All stages
Like anyone construction process, laying a stove with your own hands is done in stages.
Scheme this process includes the following items:
- Construction of the foundation. The foundation can be laid not from a whole brick, but from a broken one. A foundation is not used for all stove structures, but if you are building a Russian or massive stove, you cannot do without its construction.
In no case should the support of the future furnace come into contact with the foundation of the building, since they have different settlements and if they are misaligned, the furnace may crack and its operation may be disrupted, and this is a fire hazard.

The depth of the foundation depends on the weight furnace design and its design, and the support area must exceed dimensions oven at least 5 cm around the entire perimeter. The foundation is leveled with baked brick masonry in two rows on cement mortar to floor level. When forming the first row of masonry, it is necessary to achieve a flat horizontal surface in accordance with the level, since the quality of the design of the entire furnace will depend on it. Next comes a layer of waterproofing, for which you can use ordinary roofing felt or roofing felt; the material is laid in two layers.
- Furnace laying. The first row is laid on top of the waterproofing. Brickwork from each row should be started without mortar, leaving gaps between the bricks equal to the future seams (3 - 5 mm). Next, mortar is laid in place of the corner brick and leveled with a trowel. The brick itself is immersed in water and kept there until all the air is released. The “recessed” brick is removed from the water and correctly laid on the mortar, tapping it with a trowel to level it. Excess solution is removed with a trowel.
To check how correctly it is laid corner brick, it should be checked with a building level horizontally and plumb lines on both sides vertically.
Laying subsequent bricks is done in an identical manner, the only difference being that the vertical joints are filled with mortar during the laying process. Each subsequent row should be laid with an offset of half a brick to bandage the seams. During the masonry process, fittings are installed (door of the blower and combustion chamber, grate, slabs). Openings for fittings and stove appliances must be made slightly larger than the elements themselves, taking into account the difference in the linear expansion values of metal elements and brick.
- Formation of a chimney. The process of laying a pipe is not much different from laying the furnace itself. When passing attic floor it is necessary to maintain a fire distance (38 cm) from the rafter system and other wooden elements to inner wall pipes. If you don't want to lay it out with bricks outer part For a chimney that rises above the roof, you can install a pipe made of asbestos or metal.
Do-it-yourself brick furnace (video)
Conclusion
Developing useful skills in the field of stove making is not an easy task, just like laying a stove with your own hands. For the process of constructing a brick oven, it is important to have the right approach, observing exactly the dimensional relationship between the design of the device and the finished product.
Examples of brick kilns (photos)


This article contains clear, very detailed photo instructions for laying a brick oven with your own hands, tips on how not to make a mistake when choosing necessary materials and how to properly place a stove in a private home for optimal heating of a larger area.
Options for installing a stove in the house
The placement of the stove depends entirely on what exactly the owners expect from it. If it is installed in the house small area and will be used as a fireplace for friendly gatherings, you can use the first scheme. This stove is a good option for cooking barbecue on the grill or kebabs.
Brick kiln placement options
The second scheme is for a house of solid square footage. IN in this case the front side of the fireplace opens into the living room, stove walls both bedrooms are heated, and the heat in the remaining rooms is maintained using heat exchange.
The third scheme with a stove for heating and cooking is a budget housing option for a bachelor or a small family. Pros - warm bed and the possibility of placing a dryer in the hallway.
Important: you should take care in advance external insulation at home, because it greatly increases the efficiency of stove heating.
Selection of bricks, sand, mortar
In order for the stove to serve for a long time, you need to select all the materials correctly. There are three types of bricks:
- Ceramic - can be used to build a stove.
- Silicate ones are generally not suitable in this case, even double M150.
- Fireproof - ideal, but they are often used only for fireboxes and fireplaces, varieties: fireclay, refractory bricks, etc.

Advice: when choosing a brick for a stove, you need to completely abandon the hollow types.
The solution is made from clay. Red clay is suitable if the stove is made of red brick; when using fireclay, a special one is required fireclay clay. Some stove makers still make their own solution from the old fashioned way. river sand with a grain of 1-1.5 mm, clay (in a ratio of 2.5:1) and water. It is advisable to use angular quarry sand without foreign inclusions and the so-called fatty clay. However, it is easier and more reliable to buy a ready-made baking mixture in the store, preparing it according to the instructions.
From the accessories you need to purchase grates, blowers and combustion doors, soot cleaners, valves or dampers.
Preparation, list of tools
Before starting work, you need to determine and mark the place that the new stove will occupy.
The chimney pipe should be no closer than 15 cm from the roof rafters.
If you are doing masonry for the first time, professional stove makers advise you to practice in advance by making a model of the future stove from prepared bricks. Naturally, without a solution. This minimizes possible risks during real masonry, allowing you to learn from your mistakes, which can still be corrected in the layout.
The stove foundation requires preliminary waterproofing; its area must exceed the area of the stove.
When laying a new row, you need to control the absolute verticality of the walls.

To build a brick kiln, the following tools are needed:
- plumb line;
- trowel;
- roulette;
- putty knife;
- Bulgarian;
- knitting wire;
- building level;
- metal strips, corners;
- containers for cement and clay mortar.
Step-by-step instructions with photos for laying a stove
Different stove makers have their own masonry technologies and own secrets, come with years of experience. Here is information about enough in a simple way creating a stove-fireplace for heating two-story house, the process will not seem extremely difficult even to novice stove makers.
Foundation laying
The base course of brickwork will serve as the foundation. It is done with any brick; some stove makers even fill this level with crushed stone.

When laying the base row, cement mortar is used.

The foundation is completely filled with mortar, the layer is leveled.

Construction of the furnace body
The first row of stoves is marked. The horizontal line from which they start when marking is the wall of the room.

A grate is placed where the fireplace is planned to be placed. From this row, the bricks are already laid on the kiln mortar.

An important stage of work is the scrupulous alignment of each new row by level.

Laying the second row. The stove wall, located closest to the wall of the room, is reinforced with additional bricks to increase fire safety.
The place where it will be located in the 2nd row remains empty, the rest of the oven is filled in completely. A door is installed through which the owners will clean out the ash.

The door is installed on the solution and leveled. For a more reliable fixation, it is secured with wire, which must be laid between the bricks.


The grate is laid not on a simple brick, but on a refractory brick. To ensure that it lies at the same level as the bricks, holes are cut in the fireclay bricks.

The size of the brick can be easily adjusted - the excess is measured and carefully cut off.

The large door is mounted next to the installed grille.

The large oven door is similarly secured using wire fasteners.

The first row of fireboxes is placed exactly above the fireplace, it is strengthened metal corners and a strip or thick tin. So that the masonry can lie on them, it is cut using a grinder, then the slots are adjusted manually to the desired size.

The next brick row is laid.

The fireplace grate is laid on the fire-resistant brick along with the brick row.

The door is fixed, the brick is strictly adjusted to it.

The firebox of the new stove and fireplace is ready.

Fire-resistant fireclay bricks are placed above the stove firebox.

The stove body is built.
Creating a chimney
The space left for the chimney is divided into wells. The design requires reinforcement with metal plates.

Brick chimney wells are laid.

Soot cleaners are mounted above the firebox roof.

The wells are divided again, the first rows of walls should be reinforced with strips of metal.

After strengthening, the ceiling of the furnace body is erected. The space associated with the chimney remains empty.

The body cornice is laid out, then the chimneys are laid.

The final stage of work on the first floor. The stove is located at the bottom left, the smoke inside the chimneys moves in a spiral and comes out at the top left. The final division of wells closes tin sheet. In order to compensate for the pressure inside the fireplace stove, 2 brick rows are laid on the tin.

There are two chimneys stretching to the second floor of the house - from the fireplace and the stove itself, they are separated from each other. Each chimney requires the installation of a separate damper.

Floor level of the second floor. Waterproofing is installed here, the chimney is again reinforced with metal corners. To save money and avoid building a heating stove on the second floor, the chimney of the stove under construction is again divided. The smoke will snake through it, managing to warm up the room. In order for the chimney to warm up much faster, it is laid in the area of the second floor with a thickness of 1/4 or 1/2 brick.

A hole for the stove chimney is carefully cut out in the roof.

Before placing the chimney on the roof, it is reinforced with metal corners.

If the chimney is located in close proximity to the roof ridge, it must be laid out at least 0.5 meters above the ridge. If further, then the height of the chimney is allowed equal to the height of the ridge, but not lower. In this case, the wind increases the stove draft, lifting the smoke upward.

Even a small stove in the house means coziness and comfort. Larger stoves require more skill and additional materials, however, the principle of their construction is similar to the method described above.