Building materials for plastic loggia cladding. Installation of plastic windows on the loggia. Preparing the balcony parapet for glazing installation
On the Internet you can find not only a large number, but a huge number of articles on how to install plastic windows in an apartment, but there is no article that would fully describe how to install plastic windows on a balcony or loggia. Therefore, today we want to tell you about insulating balconies, namely, describe the complete sequence of actions for independently glazing a balcony with a metal-plastic window profile.
For what reasons is it worth glazing a balcony or loggia?
To insulate a room
The installation of plastic windows on the balcony is most often carried out in order to insulate the room in which the balcony is located. By installing plastic windows on the balcony and insulating it, there will be, so to speak, a layer between the street and your room, which will significantly affect the warmth in the room in winter.
To expand the room
Many resort to quite rational way– expand the room with a balcony or loggia. Of course, most often this is easier to do with a loggia due to the fact that it has already been made into a room and for insulation you just need to install a window, while a balcony in such a situation requires more costs for this procedure, but the issue is completely solvable.
Make an extra room
Glazing of balconies with plastic windows is also done in order to make another room out of the balcony. Some people make an office on the balcony, some make a living room and relax on it, and some use it as a simple room or storage room.
The reasons to insulate a balcony are quite compelling, so having thought about how long the window profile will be needed and having made all the relevant measurements, we set out to purchase a window. We devoted one of our previous articles to how to choose plastic windows. It is worth paying attention to sliding plastic windows for balconies, which are very convenient and practical to use.

When the window has been purchased and the weather forecast does not predict rain, we begin installing the plastic window on the balcony. If you have a frame installed on your balcony, it must be dismantled. Also get rid of other structures that will interfere with the installation of a plastic window. If necessary, if you have double railings on the balcony, and top bar If it is not fixed firmly enough, it is better to dismantle it.
Separately, we would like to touch upon the fact that some people install sandwich panels on the balcony, and to do this they have to dismantle the railings with the frame. We do not recommend doing this, because this design has quite a significant mass, and even with correct installation, it will vibrate when the doors open and close, as well as when there is a strong gust of wind outside.
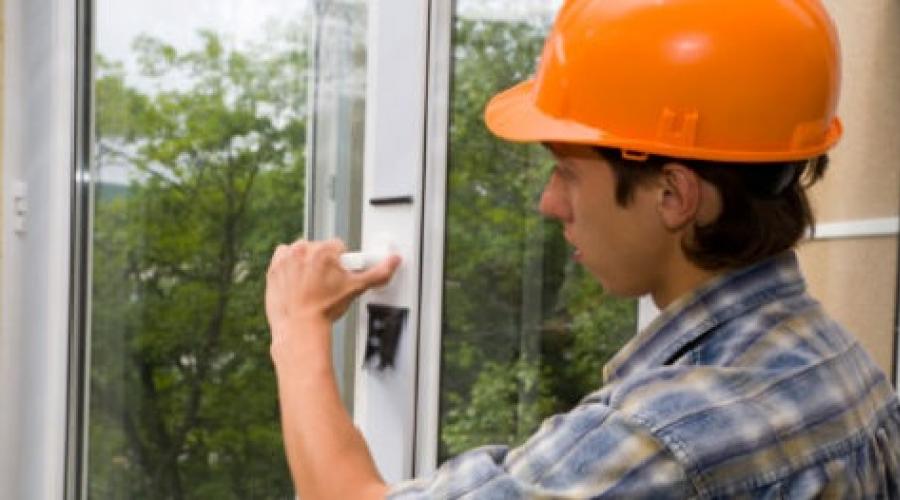
Installation of plastic windows on the balcony
First of all, it is recommended to strengthen the visor, which will be located above window profile. It’s better to do this in advance so that later we don’t have to worry about attaching the visor, pushing it under the top plate and profile. We attach the visor to ceiling slab using dowel nails. Please note that, if necessary, the anchor fasteners securing the frame must be secured through the visor.
If two or more frames are used to glaze a balcony, be sure to apply sealant to the edges of the joints and then connect them using a special connecting strip.
When the canopy is fixed and the window profiles are connected, we fix it on the top and sides of the frame with self-tapping screws anchor plates, with the help of which the profile will be fixed to the walls. Now we proceed directly to the installation.
And here you may have a question: if the width of the railing is greater than the width of the window profile, then how to fasten the frame: closer to the inner edge or to the outer. The answer is clear and categorical: in such a situation, the profile must be secured, aligned with the inner edge. Why!? With this installation technology, the coldest place will be under the window sill, and as a rule, insulation will subsequently be located under the window sill and the problem will be solved. If the window is aligned along the outer edge of the railing or in the middle, then the coldest place will be at the junction of the window sill and the window, where moisture or even ice can form in the cold season and this problem no way to solve it.

After we have installed the profile on the railing, using a level we level it on all sides. If the railings are uneven or there is a distance between the ceiling and the profile, then place special pads under the frame, with which you can adjust the level of the profile. When the profile is leveled, we secure it on all sides. At the top and sides we attach the anchor plates to the wall using dowel nails, and at the bottom we make a hole in the profile and on concrete railings We fasten it with anchors, or with self-tapping screws - if the railing is made of metal.
When the profile is secured, check again that it is evenly installed. Then, using polyurethane foam, we process the bottom seam (between the profile and the railing) and use self-tapping screws to fix the drain to the bottom of the frame. Next, we install external flashings on the sides and seal all existing cracks polyurethane foam.
Now you can hang window sashes and install double-glazed windows in blind window openings. Do not skimp on polyurethane foam - this can negatively affect the thermal insulation of both the room and the profile. The window may fog up, or worse, ice may form on it during frosty weather, or it may blow in from the sides and bottom. Therefore, do not skimp on foam, its excess can be easily cut off, and its shortcomings will bring a lot of inconvenience.
At the very end of installing a plastic window, we install a window sill. Using self-tapping screws, we secure the fasteners for the window sill and thoroughly foam the area between the railing and the profile, after which we install the window sill itself. We attach blinds to plastic windows after finishing the window slopes.
Balconies made of plastic and metal-plastic in terms of their glazing are today the choice of more than half of those who decide to glaze their balcony. There is no need to be surprised here, since it is of this type glazing allows you to achieve the highest possible thermal insulation when using a multi-chamber profile and double-glazed windows.
However, both materials for glazing and its implementation are quite expensive, since installation companies offer complex glazing, providing a considerable markup for metal-plastic and plastic balconies and demanding a high fee for the work.
There are also Alternative option– order windows for your balcony directly from the manufacturer and install them yourself. In some cases, this will save up to 50% of money.
So, in this article we will look at how to mount plastic balcony on one's own.
Preparation for glazing the balcony
Balcony measurements for ordering plastic frames
Before ordering glazing frames, you will need to carry out the necessary measurements and calculations. You should get rid of the old glazing structure - dismantle the frames and fasteners, remove all interfering elements to the base of the parapet and the upper ceiling slab.
Measurements are made as follows:
- Using a tape measure, measure the distance from the ceiling to the parapet, as well as from one wall to another.
- Check the parapet to ensure it is horizontal using a level.
- Check the stove in the same way. If the misalignment is more than 2.5 cm, measures will need to be taken to level the surfaces.
- In addition, you should inspect the bottom one and estimate whether it will withstand additional double-glazed windows and plastic for the balcony, since the weight of the structure is still considerable.
As a rule, this information is enough for the manufacturer to produce frames, and your order will be accepted for processing. In order for the frame to fit exactly into the glazing opening, the dimensions of the frame should be reduced by half a centimeter on each side.
The resulting cracks can later be easily blown out with foam.
In addition to the dimensions, you will need to determine the “intimacy” of the profile and double-glazed windows for future glazing.
The more cameras, the more expensive and heavier it is.
It is better to order good fittings for metal-plastic and plastic balconies, since the frequency of adjustment and the service life of the glazing as a whole will depend on it.
Preparing the balcony parapet for glazing installation
If the parapet is not reliable enough for installation on it plastic frames and double-glazed windows, it will need to be strengthened or a new one built, preferably brick. As was said, the surface of the parapet must be strictly horizontal.
To attach the frames to the parapet, you can provide a fastening metal corner along the perimeter of the opening where the glazing will be installed, while the plane outlined by the corner must be strictly regular and vertical.
However, you don’t have to mount the corner, since the frames will be fastened directly to the supporting structures.
Balconies and loggias
How to properly install plastic windows on a loggia - we increase the level of comfort with our own hands
From the author: hello, dear visitors of our construction portal. To start things off, I want to tell you a little about my mother. You know, she belongs to the type of people who are able to make a chic chair out of a broken stool and two rags, and into an almost royal living room out of a shabby, unpresentable room.
This is exactly what my mother is like. It so happened that she moves quite often, and every time after moving into a new home, our friends wait with impatience and curiosity to see what she will do there. Recently the situation repeated itself - my mother moved to a small apartment, the condition of which was, to put it mildly, not so hot.
The balcony looked especially sad - small and shabby, cold and uncomfortable. Glazed, but the windows were inserted into wooden frames, which have long been half dry. In general, it was a sad picture. But my mother looked at me meaningfully, and I realized that it was time to take up the instrument.
Several days passed, and in this apartment, as usual, our curious acquaintances gathered. They admired the decoration of the rooms, the beautiful tiles in the bathroom, but when it came to the balcony, they were simply amazed. I will say without undue modesty, from a cramped, shabby room we got just a sweetie, a warm and cozy corner.
My friend couldn’t even stand it and asked me in a whisper how much money was spent on creating such comfort, because the glazing alone costs so much. I answered him that it was the glazing that turned out to be quite economical, because I did it myself, without involving a team.
After such an explanation, naturally, I had to quickly teach my friend the basics of this simple matter. So I decided at the same time to write an article for everyone about , how to properly install plastic windows on a loggia or balcony. After all, in fact, there is not much to do, but what is the result! If you add ceiling and floor to the glazing, and then make finishing, then the balcony will delight both you and all your guests. So let's get started.
Types and types of windows

In general, the most popular are two types of windows:
- aluminum - light, durable and sliding, which is quite convenient. In modern multi-storey new buildings, these are the windows most often installed by default. But they have a couple of disadvantages that spoil such a cheerful description. Firstly, they are characterized by single glazing. For cold regions this is a very major drawback; in severe winter conditions such windows will not be a barrier to frost. Secondly, their price is higher than that of another type, which we will talk about below. You can, of course, search and find options at quite low price category. But there is a pitfall here too - cheap windows usually come with the same fittings. And for the price, in general, the quality. Such fittings quickly wear out or break. And given sliding system, we can confidently foresee the appearance of cracks due to windows that do not close completely. In general, if you take aluminum profiles, they are not the cheapest, and only if you live in a relatively friendly climate;
- plastic - of course, not as durable as aluminum, but the difference is not critical. But they have a lot of advantages: thermal insulation, sound insulation, availability of many color solutions, reliability and durability, resistance to moisture, frost and other influences external environment. They require virtually no maintenance; just wipe them when they get dirty. When installing, you can come up with many combinations: windows can be opening or not, opening can be full or partial, horizontal or vertical - in general, for every taste. And to all this comes complete affordable price, especially when compared with previous version. Of course, there were some downsides here too. These include electrostaticity, stagnation of air in the room in the absence of ventilation, as well as the possibility of condensation formation. In addition, the frames of plastic windows are quite wide, which automatically makes the glass unit itself somewhat smaller. But all these shortcomings do not detract from the advantages. Therefore, I personally chose plastic windows and today I will talk about them.
So, we've decided on the profile. Now you need to select the windows themselves. Even within the same species there are quite a lot of differences. For example, the opening method could be:
- rotary;
- folding;
- tilt and turn;
- sliding
I won’t go into detail; everything is clear from the names. Windows specifically for balconies and loggias usually have large non-opening sashes combined with small opening ones. A popular option is a sliding one, but, as in the case of an aluminum profile, the fittings must be of very high quality, otherwise the mechanism will quickly begin to jam.
There is also a difference in the types of glazing. There are two categories: warm and cold. Cold, of course, is cheaper, because such windows have single glass. As mentioned above, this is typical for aluminum profiles, but also “cold” plastic systems meet too. Such glazing will slightly protect against noise and cold, but for this purpose it is not an option.
But “warm” windows are a different matter. The double-glazed windows in them can be two-, three-, five-chamber. Naturally, such protection against frost is the most reliable. After all, try to penetrate through so many layers. Of course, multi-chamber double-glazed windows are more expensive, but in return you will get an additional room in your living space. Believe me, it's worth it.
Double-glazed windows and fittings

We have discussed the general points, now I want to dwell in more detail on which windows are best to install, taking into account the quality individual parts. The most important thing is, of course, the double-glazed window. Since we most likely want to not only close the balcony from the wind, but also make it warmer, we are interested in multi-chamber options.
That is, a double-glazed window must consist of several glasses, between which there is a perforated aluminum frame, as well as insulation with a long service life. These inserts are needed to absorb residual moisture, as well as to protect against its ingress and condensation. To ensure higher thermal protection properties, dried air or argon is pumped between the chambers.
Actually, that's all you need to know about double-glazed windows. Let's move on to the accessories. These seemingly auxiliary details are very important. The fittings consist of mechanisms for adjustment and connection, as well as rods, brackets, handles and hinges.
It is these details that determine how long and well your new windows will last. Therefore, everything must be, firstly, of high quality, and secondly, from well-established manufacturers. I will list five main companies that are worth paying attention to. This is in no way an advertisement, but simply a statement of facts to make your choice easier. So, manufacturers:
- Winkhaus - produce fittings for multi-stage ventilation, as well as devices with which you can open transoms remotely;
- Siegenia-Aubi - this manufacturer focuses on non-standard windows;
- Roto - very a large assortment fittings, including for various ways of opening windows;
- Gretsch-Unitas, better known as G-U, produces fittings with high-quality burglary protection, while windows can be opened both mechanically and using electronic devices;
- Maco - produces devices for electronic control opening windows, and these systems can also serve as alarms.
What is significant is that all these manufacturing companies come from Germany and Austria. We all know about such qualities of Germans as pedantry and the ability to work at a high level. Therefore, the quality of their products most often does not raise questions. Everything is strong, durable and works great. Of course, the prices match. But, think for yourself, it’s better to spend money once and then not worry at all, than to constantly repair windows because of another broken mechanism.
Let's finish talking about accessories for now. Let's now look at the manufacturers who make PVC windows directly. Again, the more famous the company, the more reliable the product. Here leadership is also for German manufacturers, but still there are English and even Russian ones. We list their main advantages:
- REHAU, Germany - the most popular manufacturer. Great design, high reliability and excellent product characteristics;
- KBE, Germany - windows are suitable for installation in any climatic conditions, calmly tolerate aggressive environmental influences;
- ALUPLAST, Germany - they perfectly insulate heat and sound in the room, and also protect against intruders, as they are equipped with a burglary protection system. Bonus - whatever color you choose for the frames, it will stay fresh for years to come;
- VEKA, Germany - a leader along with REHAU, also distinguished by high technical characteristics products;
- Salamander Industrie-Produkte GmbH, Germany - high quality and fittings with improved technical characteristics;
- PROPLEX, Austria - very high level thermal insulation, which is important in many regions of our country;
- MONTBLANC, UK - windows are extremely famous for a long time service, it may be more than fifty years;
- EXPROF, Russia - emphasis is placed on harsh winters, frost resistance is at a good level;
- Laoumann, Russia - the production of windows is based on Austrian technology. There are both budget and luxury models.
So we have figured out in detail the types, types and manufacturers of plastic windows. It's time to go to the store!
How to choose the right window

From all of the above, it is clear that when choosing, you must, first of all, take into account the type of window, manufacturer and number of cameras. But there are a couple more nuances that you need to pay attention to:
- the condition of the finished window - if you see any damage to the plastic, then it is better to refuse not only this particular window, but the entire line in general. The fact is that plastic is easily damaged if it is of poor quality. Moreover, such windows can not only break in the first year of operation, but also be harmful from an environmental point of view. But we are going to put them in an apartment where, perhaps, small children live, who are especially susceptible to various harmful effects. In general, it's better to be safe;
- the material from which the profiles are made - it is best to choose galvanized steel, since in this case there is no fear of rust;
- accessories - we have already said a lot about this, but it would not be superfluous to repeat. It should be metal, not plastic. And very, very high quality;
- An additional heat-saving factor can be a special coating consisting of silver ions. Such glass will reflect heat well;
- if the loggia is on sunny side, or the house opposite is located too close to yours, then you can purchase tinted windows. Tinting will also protect against sun rays, and from neighbor's curiosity;
- if you plan to combine non-opening windows with opening ones, then estimate the size so that all double-glazed windows can be easily washed as with inside balcony and from the outside. If you get too carried away with blind doors, you may subsequently simply not be able to reach some places;
- in the case where the room is located on the first or second floor, it would be useful to provide for the possibility of penetration. To prevent such a situation, you can purchase accessories with an “anti-burglary” function;
- Another point beneficial for safety is the increased strength of the glass. If you are interested in this factor, then choose windows covered with a special impact-resistant film. Even if they try to break such glass, it will not fly out of the frame. It may crack, yes, but it will not allow intruders into the room;
- If there are small children in the house, we recommend choosing window handles that can be locked with a key. Kids are weak and clumsy only at first glance. As soon as a child's curiosity turns on, he immediately becomes capable of many unexpected actions. To turn window handle It definitely won’t be difficult for him, but such a situation is very dangerous for the baby’s life. So it is better to securely fix all locking mechanisms;
- It is also worth paying attention to the freshness of the air in the room. Usually ventilation is provided for this, but if your balcony does not have it, then it is advisable to purchase windows with supply valve. This device allows street air to enter the room, but does not affect temperature and humidity in any way.
Well, we're done with the theoretical part. We sorted out the windows and made a choice. Now it's time to install. Of course, even the most careful choice will not save you if the installation is carried out incorrectly. Therefore, be patient, thoughtful and carefully, step by step, install according to the instructions given below.
Preparation for installation
Like many other repair procedures, installing plastic windows requires careful, although not too complicated, preparation. The first step, of course, is to take measurements of the openings. This is a very responsible procedure. If you make a mistake in the dimensions, the finished window will not fit into place as it should.
We take measurements

If you doubt your abilities, you can call a measurer directly from the company where you are going to place an order. If not, then now I will instruct you how to do it. Main rules:
- measurements must be taken in three places: in the middle of the balcony railing and along its two edges;
- measurements should be made in several options and take into account the smallest value;
- to find out the width of the entire future, you need to measure the length of the fence on which it will be placed. You need to subtract 60–70 mm from the result on each side - this margin will be needed to install profiles connecting the windows;
- height future design is the distance from top floor to the fence. Just as in the case of width, we reduce the result obtained for the margin for installation, but by 25–30 mm.
With these measurements, you can go to the company of your choice and order windows. In the meantime, they are being manufactured, let’s proceed to further procedures. First of all, you need to remove all furniture from the balcony, if there is any there. Otherwise, it will interfere both when preparing the opening and when installing new double-glazed windows.
If your apartment has a loggia, then you have certainly thought about its insulation and subsequent finishing. Of course, the question also arose of how to decorate the loggia so that it would be cozy and beautiful not only inside, but also outside. Let's consider options for finishing the loggia, allowing you to use it both seasonally and as a full-fledged room.
How to decorate the walls, floor and ceiling of the loggia?
If all the work on leveling, insulating and waterproofing the ceiling, walls and floor has been done, it’s time to choose how best to decorate the loggia. Moreover, most often as finishing materials applies wooden lining or plastic panels.
| Plastic panels are light, durable and allow you to turn your loggia into a bright cozy room. They have a wide selection of colors and are even able to imitate various varieties natural wood. With them you don’t have to spend a long time trying out how to cover a loggia, because plastic panels are easy to install and maintain. |  |
Wooden lining is not much more expensive than plastic panels. She is easy to work with. It is able to create coziness, is environmentally friendly and is considered traditional material for finishing both balconies and loggias. | |
 |
 |
||
Preparing the loggia for finishing
1. Installation or replacement of glazing
Finishing a loggia often begins with its glazing. It can be either warm or cold, and even semi-warm.
| Warm PVC glazing | Sliding PVC windows Slidors | Cold aluminum glazing | |
 |
 |
 |
 |
If you want to use the loggia as a full-fledged room, it will do warm glazing using plastic windows. Today, windows made from profiles produced by German companies Rehau, KBE, as well as Novotex from a Russian manufacturer.
If the loggia will be used only in the warm season, glazing can be done using aluminum profile Provedal or give preference to frameless glazing.
There is also an intermediate option of semi-warm glazing. IN in this case The glazing of the loggia is made using the Slidors plastic profile. Data sliding window systems allow you to save space on a small loggia and use it in the warm season as a full-fledged room. Although in the south of Russia loggias glazed in this way are used as full-fledged living quarters. This type of glazing is called semi-warm due to the fact that Slidors plastic windows use single-chamber double-glazed windows or ordinary glass.
2. Installation of sheathing
3. Insulation of the loggia
How to cover a loggia with plastic panels
 Finishing the loggia with panels begins with the installation of guide plastic profiles. There are several types of them: U-shaped, H-shaped, L-shaped, F-shaped, as well as corner skirting boards, ceiling and floor.
The U-profile is used around the perimeter and secures the panels on the sides. An H-shaped profile is used if the strip is short and needs to be extended. The F profile hides the cavity between the plastic strip and the surface. Corner guides and baseboards are respectively secured in place.
It is most convenient to fasten the panels to the sheathing using construction stapler; You can also use self-tapping screws. You can also use nails for fixation, but this is the most inconvenient option.
The interior design of the loggia is no less important than its exterior decoration. Thanks to this, it becomes possible to get another room, even if it does not differ in size. And it’s quite possible to do such work almost alone, saving a lot of money on calling in specialists. It is only important to correctly imagine how to sheathe a loggia. This is what we will talk about.
Advantages and features of PVC panels
PVC panels are very popular in construction market finishing materials. As for the interior decoration of loggias, this most practical material , which is not afraid of moisture, spoilage, damage by rodents and insects. PVC does not fade in the sun, does not crack over time, and is quite durable front surface. Covering the loggia with plastic will give the walls a complete and aesthetic appearance. And if you take into account the variety of colors of PVC panels, you can create an imitation of stone or wooden surface and it won’t be difficult at all.
For interior decoration, plastic with a width of 25, 36 and 50 cm is used. However, keep in mind that narrower plastic is easier to install.

Preparing the loggia for cladding
Before finishing the loggia plastic panels, all previous work should be carried out. There should be a loggia sewn on the outside, glazed and insulated. All cracks through which street air can penetrate must be sealed with foam and sealant. It is recommended to lay a water barrier along the front wall to protect the loggia from dampness. If used as insulation mineral wool, then it should be placed between two layers of a hydrobarrier to protect it from dampness.
First, prepare the walls. They are cleaned of old wallpaper and peelings. If the walls are “humpbacked”, it is advisable to level them. Bulges are especially poorly sheathed. They must either be knocked down with a hammer drill or bypassed when installing the sheathing.
Floor and ceiling installation work is in progress. Mounted on the floor wooden joists on which the slabs are laid. The slabs are usually covered with linoleum or laminate.
The ceiling is usually covered with plastic, as are the walls. It is recommended to fasten plastic panels to the ceiling using galvanized profiles, since the ceiling is most often suspended, although it is also possible to use wooden blocks.

What tools and components will be needed
The interior decoration of the loggia with plastic requires the presence of certain materials, tools and consumables. Without them, it will be impossible to perform high-quality cladding.
To work we will need the following tools:
- Phillips screwdriver;
- hacksaw for cutting metal;
- screwdriver or low-speed drill;
- perforator;
- drill for a hammer drill with a diameter of 6 mm;
- stapler;
- drywall knife for cutting panels;
- building level.
Before sheathing the loggia, you need to prepare the following materials:
- PVC panels;
- plastic profiles: starting (U-shaped), F-shaped, connecting (if the length of the panels is less than the height of the loggia), external corners, ceiling plinths;
- dowels for fastening the sheathing with a length of 80 mm and a diameter of 6 mm;
- screws, staples, nails, fleas with a drill.

Methods for attaching panels to walls
PVC panels can be placed on vertical surfaces in different ways. We list the methods for attaching plastic panels to the wall:
- If the walls are perfectly smooth, then the panels can be fixed to the walls without lathing. For this purpose they are attached for glue type “liquid nails”.
- Fastening on a lathing made of plastic mounting strips. This is enough hard work, since the planks must be installed perfectly level on the wall. Fastening to such panel profiles is carried out using clips that are inserted inside the profiles.
- Panels can be attached to walls on lathing made of galvanized profiles. This kind of lathing is used extremely rarely in practice. Since these profiles are hollow, it is inconvenient to attach them to the wall.
- Fastening on a wooden sheathing. This is the easiest way, thanks to which attaching PVC panels to the wall is simple and as reliable as possible. Humidity at glass loggia it is almost never very high, so you don’t have to worry about the tree warping.
- Wood screws. Their length should be 16-19 mm. Screw in with a screwdriver or Phillips screwdriver. This is the most reliable way fastening panels. If necessary, the screws can be easily unscrewed from the strips, freeing the panels.
- Staples. Hammered using a stapler. This is very quick way fastenings But there is one drawback. If for some reason you have to remove the panels, this will be problematic.
- Kleimers. They are inserted into the panel from the spout side, after which they are nailed to the sheathing or screwed with self-tapping screws. Not the best good option fastenings, since the clamps are made of very thin metal. If the panel is even slightly under tension, the clamps unbend, releasing it.
Methods for fastening panels to sheathing
Let's find out how to attach plastic panels to wood sheathing. For this purpose, the following fasteners are used:

Tip: Do not use nails to attach plastic panels to wood sheathing. When driving nails, you may accidentally hit the edge of the panel with a hammer, breaking it.
Mounting on a wooden sheathing
Let's look at step by step how to cover a loggia with plastic panels with your own hands.
1. On interior walls loggias are filled with dowels wooden sheathing. To do this, use timber 20 mm thick and 50 mm wide. Using a hammer drill, holes are drilled in the wall through the timber, and then dowels are driven into them. First, the upper and lower horizontal strips are filled. Vertical bars emerge from them at the corners, which must be checked using building level. Then horizontal strips are installed in increments of about 40-50 cm. Four horizontal lintels are enough for each wall. The sheathing must be maintained in one plane. If necessary, the slats are adjusted.

Tip: When using thick timber as a sheathing, you can additionally insulate the walls by inserting thin foam plastic (penoplex) between the planks, or attach the sheathing to one previously laid on the walls, or combine both options.
2. Paved electrical wiring, located between the slats. Places for fastening and the switch are prepared (for ease of fastening, additional wooden blocks can be placed there).
3. The loggia is insulated, if necessary. Mineral wool and extruded polystyrene foam are laid between the lathing strips. In the case of mineral wool, do not forget about the vapor barrier that should be used to cover it from above.
4. Plastic profiles are attached to the sheathing. First, it is recommended to secure the outer corners placed around the perimeter of the door or balcony block. They are cut to size and attached to corner beam. Next, vertical U-shaped profiles are fixed at the corners of the loggia. For this it is best to use self-tapping screws. At each corner, two profiles are attached, located at an angle of 90 degrees relative to each other. To attach profiles to a plastic window, fleas with a drill are used. Lastly, all horizontal U-shaped profiles are fixed.
5. Next comes the cladding of the loggia with panels. Work begins from the corner opposite the window. The first panel is trimmed to the right size with a hacksaw, after which its nose is cut off along its entire length. This is necessary to level out the curvature of the sheathing. The panel is first inserted into the upper and lower profiles, after which the cut side is inserted into starting profile. Using a level, the panel is aligned vertically. It is then attached to all horizontal planks.
6. The next panel is inserted into the groove of the previous panel. This is how the entire wall is covered. Last panel, most likely, you will need to trim it to width. This is done with a knife. If there is a window sill in the path of the panel, a cutout is made in the panel for it.
7. The other walls and the front side under the window are sheathed in the same way.
8. In the places where the switch and socket will be located, a cut-out is made in the plastic of the required size. To do this, it is better to use a circular drill bit. Wires are routed through the cut holes.
9. Slopes are made from plastic scraps.
10. All cracks in the corners are filled silicone sealant, which is smoothed out.
11. Ceiling and floor plinths are being installed.
12. A switch and socket are installed.

Even with a little skill, anyone can independently carry out the cladding on their loggia. plastic profile, choosing its color from the available assortment.
Video
The video will clearly demonstrate how to decorate a loggia with plastic panels with your own hands.