DIY table with phosphor. Homemade glowing table. How to make a busy board - step-by-step instructions

Read also
Table with lighting - very interesting and eye-catching element decor rooms.
Thanks to the use of a translucent mirror and multiple sources light is created amazing Effect shining tunnel.
This unusual piece of furniture is also called an infinity table, 3D table and a glowing table.
Classmates
LED strips
When making a table it is used LED Strip Light, which creates the effect of infinity.
The most convenient are self-adhesive tapes.
Operating principle
The LED strip consists of two diodes - single-chip, having one color spectrum, and three-crystal, consisting of three color spectra (green, blue, red).
Radiation crystals mix to form a wide range of colors gamma.
Specifications

- LED type - The main difference between all LED strips is from each other. The most common are SMD LEDs 3028 and SMD 5050.
The abbreviation stands for “surface-mounted device”, and the numbers indicate the dimensions of the LED lamps: 3.0 x 2.8 mm and 5.0 x 5.0 mm. - Density. The more LEDs per one linear meter, the brighter the glow from the tape.
- Glow color LEDs can be anything. The most popular are white, yellow colors, cold and warm tones.
- Moisture protection. IP 20 - open, IP 65 - moisture resistant, IP 68 - the highest degree of moisture protection.
Advantages
- Large light recoil;
- High strength and vibration resistance of tapes;
- Long operational life (about 100 thousand hours);
- Various tones and shades glow of lamps;
- Inertia the tapes are small, which allows you to use the most high brightness from the very moment you turn it on;
- Quantity cycles turning on/off does not in any way affect the service life of LED strips;
- Environmental friendliness;
- Safety;
- Budget price;
- Not susceptible to breakage due to low temperatures temperatures
Note! High temperatures are strictly contraindicated for LED strips.
How to make a backlight computer desk using LED strip, see video:
DIY 3D table
Let's consider making more complex, but the safest and beautiful LED table.
Materials

- Mirror(diameter 60 cm);
- Mirror translucent self-adhesive film;
- Expanded polystyrene(for the body);
- Glass or plexiglass (thickness 4 mm, 65 x 65 cm);
- Metal strip on a roll (for windows);
- Wires;
- Instantaneous Super glue;
- Bilateral scotch;
- power unit 5/5.5V 200/300mA with USB output;
- Self-adhesive tape LED(not less than 1.5 - 2 meters);
- Arduino Uno;
- Programmer for Arduino (for projects);
- USB for powering the microcontroller.
Note! The mirror can be of absolutely any shape: square, circle, oval, D-shaped bar counter, etc.
Tools

- milling cutter(a nozzle is required for making round parts);
- regular or
- soldering iron(you definitely need solder for a soldering iron);
- Dremel;
- scissors;
- knife(for cutting metal and plexiglass);
- pencil, pen, thin marker;
- square(ruler).
Stages of work
Step 1. Cut from a piece of plexiglass circle according to the diameter of our mirror. The edges we clean up we remove the shavings. 
Note! When cutting a circle from plexiglass, you should move the milling machine quickly so that the edge does not melt.
Step 2. Carefully glue the self-adhesive onto the plexiglass film. We glue the plexiglass to the table with tape. We remove the film that is applied to plexiglass, and film with mirror film. Spraying plexiglass water, and even better - soapy solution. We place the mirror film on the glass and expel all the formed bubbles.
Step 3. Protruding edges of the mirror film cut off scissors. We leave the entire structure to dry (at least 12 hours).
Step 4. Carefully attach to the dried mirror plexiglass metal strip using transparent superglue.
Step 5. We glue the LED strip on internal side of the metal strip.
Step 6. We drill holes in the metal strip for wires
Step 7 We polish the received holes.
Step 8 The connection code can be write yourself, or you can use a ready-made one. Scheme connecting the Arduino Uno controller: 
Step 9 From plexiglass you need to cut 10 - 15 small rectangles. Using clear instant adhesive, attach them to facial side of the mirror. They will serve as supports for designs made of glass and metal. Size The rectangles should be such that the strip together with the plexiglass overlaps our mirror.

Step 10 To rectangles install top structure with glass. The glue must be completely dry out. It is advisable to put something heavy on top for the best bonding surfaces.
Step 11 Second (external) film remove from the plexiglass. This design can be used as mirror. We install the structure on a table with a tabletop of the same or smaller diameter

For nutrition tapes can be used Electricity of the net or build a small battery. When powered by a battery, the table will become even more safe and will not depend on the power grid. It can also be installed in suburban home where there is no power supply.
LED strips are safe and durable. To illuminate the table you can use plain or multi-colored LED strip (they differ only in price). Luminous the table will delight the owners and their guests with an unusual design.
How to install lamps to illuminate the desktop in the kitchen, see the following video:
See inaccuracies, incomplete or incorrect information? Do you know how to make an article better?
Would you like to suggest photos on the topic for publication?
Please help us make the site better! Leave a message and your contacts in the comments - we will contact you and together we will make the publication better!
- Tool
- Materials
- Features of assembling a countertop made of pine boards
- Video for step-by-step assembly table
Furniture models that emit a glow always attract us with their unusual appearance. Assembled with your own hands glowing table can become a decoration in a living room, in the kitchen or in a summer cottage. In this instruction we will explain how to make a glowing table from wood with fluorescent inclusions in the tabletop.
To “make” the table glow, we need to acquire the appropriate tools and materials.
We purchase or rent the following power tools.
- An electric drill used to make holes for cotter pins. Using abrasive wheels, we create decorative indentations in the body of the wood with a drill.
- A grinder that is used to bring the surface of the tabletop to a perfectly smooth state.
- Hammer.
- A set of clamps that will be needed to tie together boards.
- Planer necessary for pre-processing wood.
- A jigsaw needed for cutting the ends of a table top.
- A gas burner, which we will use to burn cavities in the wood.
- Related tool(screwdrivers, chisels, saw, tape measure, construction knife And so on).
Materials
To make a luminous wooden table with your own hands, we select the materials necessary for this:
- 4 cypress or pine boards dimensions 1500 x 150 x 40 mm. We will need this wood to make a tabletop that will emit a glow;
- metal legs;
- epoxy resin in two plastic bottles of 118 ml each;
- plastic cups – 6 pcs.;
- fluorescent powder to create a light background – 100 g;
- scotch;
- plywood or plastic sheet - 600 x 1500 mm.
Step-by-step instructions for assembling a glowing table
- We connect the boards with cotter pins and glue them together. We tighten the shield with clamps until the glue completely hardens.
- We process the side edges of the tabletop with a plane and grind them.
- We cut the ends of the table with a jigsaw to one level. Then we polish them.
- Cypress wood has resin chambers in its structure. We clean them with a semicircular chisel without disturbing the natural shape.
- We blow out the cavities with a vacuum cleaner and dry them with a hairdryer.
- Preparing the epoxy filler. Mix the resin and hardener in disposable plastic cups. We also add a phosphor there (we use 10 g of powder per 100 g of resin).
- To avoid resin leakage, cover the table with tape around the perimeter and place pieces of plywood or plastic underneath.
- Fill all cavities and cracks in the tabletop with a fluorescent mixture. Leave the wood material alone for a day. During this time, the solution will completely harden.
- We process the entire surface with a grinder until a perfectly smooth plane is obtained.
- We cover the tabletop with 3 layers of furniture varnish.
- We form a support frame from a board 50 mm wide or more.
- We attach the tabletop to the frame and install the legs. As a result, we get an original luminous table made from wood with our own hands.
Labor and materials costs
Let's calculate how much a luminous table made of cypress boards measuring 600 x 1400 mm will cost. We will take average prices for materials from these online stores.
- 4 cypress boards 1500 x 150 x 40 mm will cost 1000 rubles.
- Epoxy resin Gold Glass, 1.35 kg – 2200 rub.
- Phosphor powder, 200 g – 800 rub.
- Metal legs– 600 rub.
- Fastening accessories – 200 rub.
Total costs will be 4800 rubles. (as of the date of publication of the article).
As practice has shown, we spent no more than 16 hours making this table.
You can also assemble an LED table with your own hands. The invention of microbulbs gives great opportunities For design design furniture. Unlike a fluorescent tabletop, this type of furniture requires a transparent table surface. How to make an LED table is a topic for a separate article. In it we will tell you what materials you need to purchase, what equipment is best to use, and how to make table lighting with LED strip.
- Like
You can make a table for your home from the following materials:
- natural wood;
- plywood;
- laminated chipboard.
Each has its own advantages and disadvantages. Can be made from wood original table, decorating it with carvings. Give an unusual shape to the legs and table top. But the cost and weight of the structure will be high. Plywood is the cheapest material of the above, less durable and more fragile. The material must be additionally coated with varnish or paint, and therefore the product will look less aesthetically pleasing than a similar one made of wood or chipboard.
A product made from chipboard is considered optimal in terms of price and quality. The ease of processing of the material allows you to realize almost any table idea. Since furniture is often made from chipboard in factories, you can use material from finished products. Many homeowners have cabinets that they no longer use. Side walls wardrobe can be used as a tabletop and racks. The thickness of the slab must be at least 16 mm. If the table has drawers, you need to purchase fiberboard. This material used to make the bottom to lighten the structure.
For laminated chipboard, you need to purchase a matching color edging for the ends. When purchasing the material, you can order cutting according to the required parameters and gluing the edges (specialists use professional equipment).
Required Tools
To make a children's desk with your own hands you will need the following tools:
- self-tapping screws;
- PVA glue;
- sandpaper;
- jigsaw;
- drill;
- screwdriver or screwdriver;
- dowels;
- milling machine if you are planning a shaped tabletop;
- square, tape measure and pencil;
- decorative plugs for screws;
- accessories for drawers.
If the table does not have drawers, then the last point is not taken into account. If you plan to make them, you will need handles and roller mechanisms.
Stages of work
To make a table for a schoolchild with your own hands, you need to have a drawing. You can compose it yourself or find a ready-made one. If you plan to purchase laminated chipboard, you should order cutting of the material according to the drawing, as well as gluing the edges. In a carpentry workshop, such services are cheap, and the quality of work is high.
When calculating the height of the supports, it is necessary to take into account the fact that the child is growing. Therefore, you should make them standard, and for convenience, use a chair with an adjustable seat height.
The step-by-step instructions involve the following steps:
- All parts are marked on the chipboard, which are then cut out with a jigsaw. You should choose a thin saw and set high speeds to avoid chipping.
- Making a shaped base involves using a milling machine. The tabletop should be secured so that it does not move. Use a hand router to give the base the required shape.
- All edges need to be cleaned sandpaper.
- When all the elements, including shelves and drawers, are cut out, proceed to gluing the edges. For this you will need construction hair dryer or iron, cotton cloth and respirator. Work must be carried out outdoors or in a well-ventilated area, since PVC releases when heated harmful substances. Gluing is done as follows:
- the tape is applied to chipboard end and heat;
- the glue dissolves quickly, so you need to move the iron or hair dryer quickly;
- after heating, the edge is pressed with a rag to the chipboard and smoothed;
- move to the next section and repeat the actions;
- Instead of a rag, you can use a hard roller.
Table assembly
- When all the table elements are ready, assembly begins. First, the frame is assembled. The tabletop is connected to the racks using confirmations, self-tapping screws or dowels. In the first two cases, a hole is made with a thin drill at the junction of the base and the side elements. Then, using a larger diameter drill, make a recess for the screw, the head of which should be slightly recessed into the surface or be at the same level with it.
- If the table cover will be attached to dowels, the diameter of the hole should be made according to the size of the fastener. It should fit tightly into the opening and ensure high-quality adhesion of the parts. Before connecting the racks to the tabletop, the recesses are coated with PVA glue. After assembly, allow the glue to dry.
- The desk drawers are assembled next. The connection is made using confirmations or self-tapping screws. The bottom is nailed with small nails.
- Before installing the guides, you should carefully measure everything and mark the position of the drawers using a level. One element of the roller mechanism is fixed with self-tapping screws in the table niche, and the second is screwed to the bottom of the drawer. If the loads on the guides will be large, then you need to choose metal products. But plastic slats are suitable for a children's table.
- Handles are installed. The joints are masked with stickers matching the color of the chipboard or with decorative buttons.
Wooden table option
This way you can make a simple desk with drawers from laminated chipboard. Manufacturing from wood involves the following steps:
- The tabletop is assembled from several boards, which are pre-cut to length. The wood must be sanded with sandpaper. The edges should be carefully adjusted to avoid gaps. If a tongue and groove board is used, the tabletop will be solid. In this case, the outermost element is cut with a jigsaw.
- The base can be given any shape. To do this you need to use a milling machine or plane.
- You can connect the boards together using the tongue-and-groove method or using dowels. To ensure greater strength to the base of the table, the joints are coated with PVA glue.
- Then the legs are made. If they are in the shape of pillars, they can be carved.
- If you plan to install boxes, a box is made on one side. To make the structure lighter, plywood is used for the sides and bottom. The front wall is made of wood.
- After all the elements are made, the table is assembled. Fixation of parts is carried out using self-tapping screws or confirmations. The tabletop should be installed on dowels or screws.
- The last stage is painting work. The wood is sanded, cleaned of dust and varnished. If the base has unevenness, you can successfully beat them by making a glowing table. You can make the indentations yourself using a chisel. To make a glow-in-the-dark tabletop you need:
- mix epoxy resin and fluorescent powder in a ratio of 10:1;
- fill all the recesses and let dry;
- coat the wood with clear varnish.
- Before applying the protective layer, you can coat the material with stain. To preserve the structure of the wood, it is advisable to choose transparent varnishes. Shipboard is perfect for these purposes, as it has high mechanical strength.
By making a table with your own hands, you can realize any idea, make workplace original and unique for a child.
Wood is the best material for making garden furniture
The greatest success among summer residents is outdoor garden furniture made of wood. However, not all types of wood are suitable for these purposes. For example, experts advise against pine materials, due to the fact that this raw material is very delicate and sensitive to external factors. It is better to choose furniture made of oak, ash or hornbeam - their wood is hard, durable and easy to care for.
Besides distinctive feature wooden furniture is that it is an absolutely environmentally friendly product, striking in its beauty and variety of textures. Wooden garden furniture is made fairly quickly, the main thing is to use high-quality material for these purposes.


Fits harmoniously into the overall design summer cottage- dinner table. In the garden it will perform well both in brown and in brighter colors. Besides large table The set should include comfortable chairs, sitting in which you will feel quite comfortable.
To make the seats comfortable, it is worth bandaging them with removable cushions. It's also good when the chair can be folded. When not in use, they will take up less space and can easily be hidden in the garage or basement during the winter.


The easiest way to make furniture is from finished material. When disassembled, the boards are easier to process, impregnate and prepare for painting. All you have to do is assemble all the parts into a single structure, according to the drawing.
There are many ways to make garden furniture. The Internet will help you choose the right option for you, where in its vastness you can easily find exactly what you need. Stylish chairs, beautiful tables, comfortable loungers, swings, armchairs - this is just a small list of what you can do with your own hands. Of course, for this you will need some carpentry skills and a good tool, as well as the availability fresh ideas in my head.


How to choose the right style
The most fashionable sets of garden furniture are those made in modern or French style; hi-tech, country and minimalism styles are also quite popular. Country music is characterized by an uneven, rough structure. Often they combine wood and cast iron, finished with metal-plastic.
Forged furniture is appropriate in romantic gardens French style. If you want to introduce a subtle note of Provence or shabby chic into a green corner, it is best to install whitewashed rattan furniture.


Comfortable furniture is one of the main items in any green corner. It can be a companion for morning coffee or lunch - barbecue. Daily rest for fresh air, especially in sunny days- this is a balm not only for the body, but also for the soul!

Leisure furniture
Garden dining furniture isn't everything. To fully enjoy a pleasant holiday among blooming greenery, you also need to buy a complete set of furniture. Sets include a sofa, two armchairs or chairs, plus a low coffee table. The most fashionable designs are those made of rattan, strewn with large pillows.
Soft accessories are mainly covered with cotton. Underneath the fluffy covering fabric is highly elastic polyurethane foam. Armchairs, sofas and chairs often have a cubic shape, making them voluminous and very comfortable.


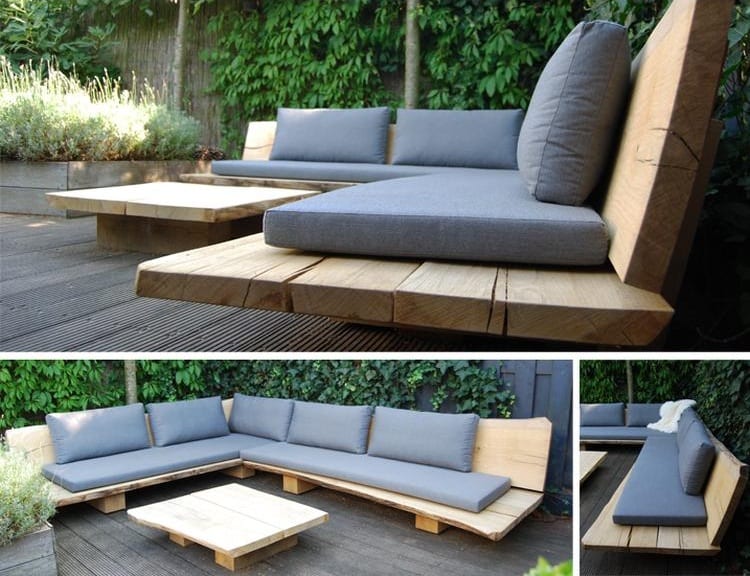
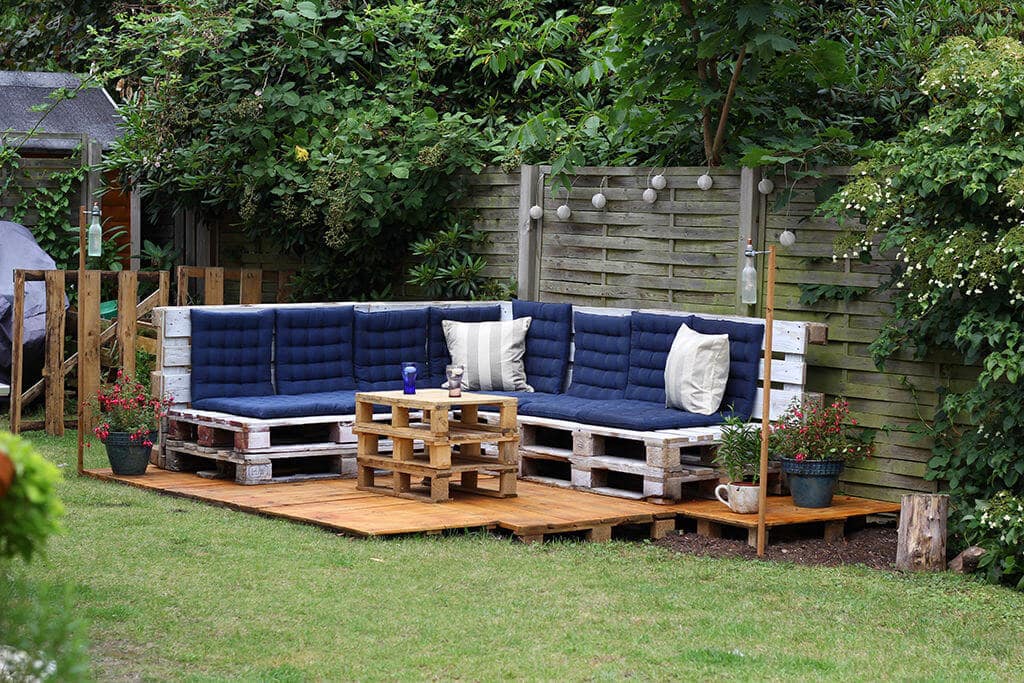
Garden set made from pallets (pallets)
Wooden furniture made from pallets is also quite popular. This design is very easy to knock down, paint and impregnate. You can also sew pillows yourself or buy them at a garden accessories store.
Producing furniture from wooden pallets (pallets) is quite simple and, most importantly, fast. Just 2-3 pallets will be enough to fold one on top to get a coffee table. Impact-resistant glass with machined edges is placed on top of the table. That's it - the coffee table is ready, all that remains is to make the chairs. You can also make them from the same material, only here carpentry skills will come in handy. Using a hacksaw or chainsaw, cut the pallet into two parts, one of which will serve as a seat, the second as a backrest.


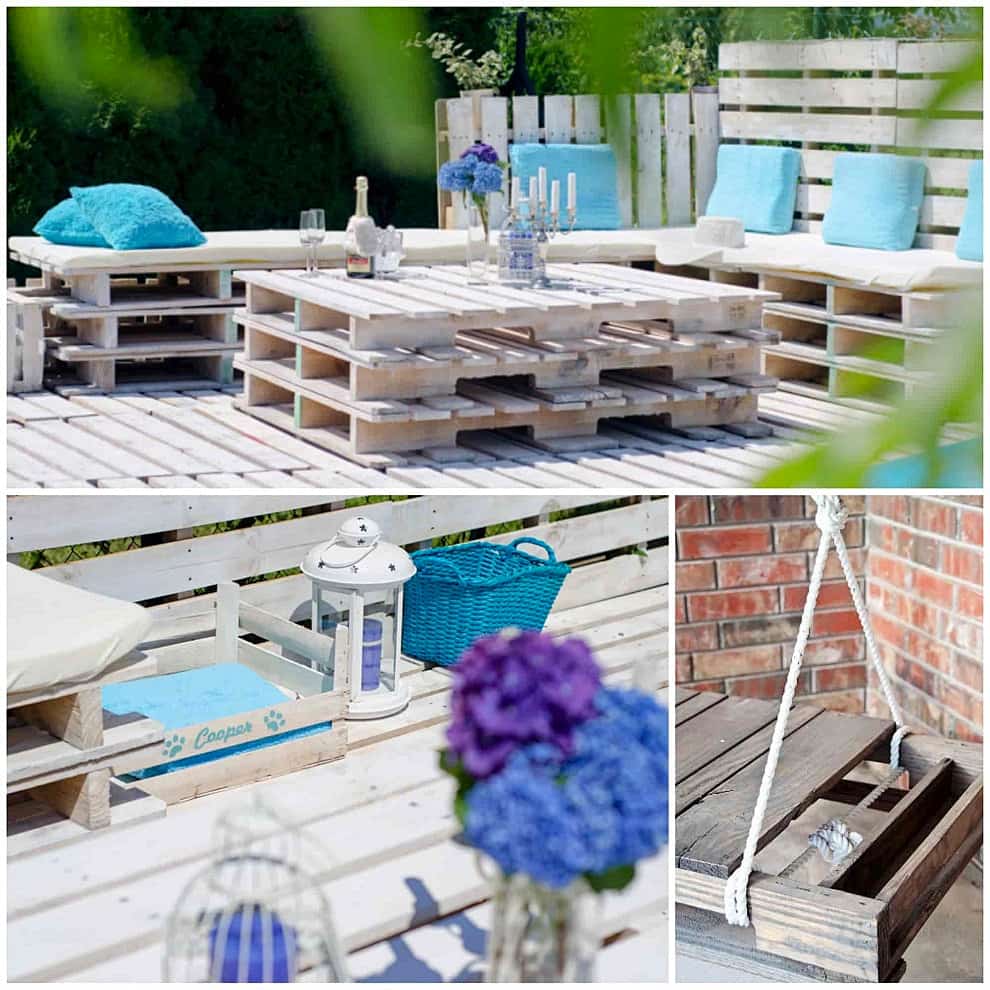
The presence of a sofa, armchair or lounger made from pallets in the garden will emphasize the individuality of the landscape design of your site, creating cozy atmosphere, will make it truly extraordinary and worthy of attention.


If you have a large number of pallets (material can be purchased for a small amount in construction stores), from them you can organize a full-fledged place for relaxation, where you can relax with a large group. In this case, from building a gazebo or open terrace and you can refuse altogether.
Construction pallets (pallets) can be used both painted and unpainted. Their design feature allows you to store something useful between the rows of boards. This space can also be occupied by drawers, providing them with a special mechanism and beautiful hands

Making Lumobeton with your own hands
“Preparing” the material is quite simple, if you have a few necessary tools. The production technology of Lumobeton is similar to the production of other finishing tiles. The main thing is to follow the basic instructions: carry out all the processes step by step and mix the components in the right proportions, to obtain the correct mass.
Necessary equipment for the production of decorative tiles:
- Electric mixer.
- Vibrating table.
- Matrices.
To start the production of Lumobeton, you do not need a large area; all tools can be placed on 20 m2.
Lumobeton includes:
- Quartz sand.
- Dyes.
- Gypsum G16.
- Luminescent pigment.
Having mixed all the necessary components in the required ratio in a mixer, pour the resulting homogeneous mass into silicone molds. 
The next step is to place the forms on a vibration table for 3 to 5 minutes.  Afterwards, we place the molds in a dry place with a temperature of 25–30 °C and keep the molds for 5–8 hours.
After the time has passed, remove the resulting tiles from the molds.  That's it for production decorative stones over. You can congratulate yourself - now you have glowing bricks in your arsenal!
The manufacturing technology of Lumobeton is not complicated, but it requires care and patience. But, at the end of the process, you will be able to completely transform the design of your walls, without spending a lot of money on purchasing material, but getting it for a few pennies. And it looks really cool!
Do-it-yourself busy board for your son
In fact, boys' and girls' toys are up to three years are no different. To all the kids early age I want to twist, move, turn on or take something apart. You can only win back color palette And general theme boards.
For example, a bodyboard for girls usually contains elements of clothing and is made in bright colors. For boys, a busy board can be designed in the form of a boat with a compass and a steering wheel or a road surface with a real traffic light. It’s good if you can make opening windows, behind which you can hide developmental elements.

You can learn more about what the filling of a homemade business board can be from the article: “How to make a development board with locks for your baby.”
The idea of teaching children using ordinary household items first voiced by Montessori. Her idea that a child can acquire all the necessary skills himself if he is immersed in a properly organized environment is still supported and used by many parents and teachers for the development of children.
How to make a busy board - step-by-step instructions
Detailed photo instructions will help you understand that creating a business board is a fairly simple matter.
For the board we will need a base (in our case plywood) 70 cm long and half a meter wide and various elements– roller, mirror, wheels, roller, etc. (see photo).
How to prepare a base with doors

DIY lacing
To make a lacing sneaker, hooks and lace are useful. We draw a sneaker and paint it with bright colors. We drill holes in the places where the hooks will be.
We twist the hooks, the sharp ends protruding from the other side, cut them off with a grinder or hammer them in.
All you have to do is lace up your sneakers and the toy is ready.
Busyboard with roller
Place a roller at the top of the board. It will be attached to the same hooks that were used to make the lacing, and to a threaded knitting needle.
Putting on necessary elements(balls, roller and rubber wheels), secure the ends of the knitting needles with screws and glue.
Child development methods:
- Dienesh logic blocks
- Fold Nikitin's square
- Educational games for boys 3 years old
To complete the work on the bodyboard, all that remains is to screw in the remaining elements and fastenings for the wall.
Busy board is an ideal toy for children 1-2 years old. In addition to the undoubted benefits for fine motor skills and the acquisition of skills necessary for a one-year-old child, another advantage is its accessibility. After all, the materials for making boards can be found in any home, and it takes very little time to create.
Making the main New Year's symbol
It is impossible to imagine this winter holiday without a decorated New Year tree, which is installed in the largest room in the house. If this is not possible, or people deliberately refuse to use a living tree, then you can create one with your own hands from ordinary Christmas tree garlands, placing them on an empty wall.
The garland needs to be attached to the wall with transparent tape, creating the outline of the Christmas tree. Cut out Christmas stars or snowflakes from white paper and glue them onto a stylized Christmas tree in any order. To give such a wall installation a completely festive look, you can lay out gifts below the tree and place New Year’s figurines of Father Frost and the Snow Maiden.
Note: 30 inexpensive, but original and pleasant New Year gifts from AliExpress
Make it spectacular new Year decoration for the home you can use dry tree branches. They need to be wrapped tightly with twine at the base, placed in a suitable container and hung with garlands. Thus, in a large room you can create a whole winter forest by installing such a New Year’s installation in a corner, on a bedside table or on a windowsill.
The children's room is decorated in the same way. Children will love the glowing composition of trees and fairy house, which will act as a magical night light. You can also make the same Christmas tree on the wall in the nursery, using multi-colored paper, tinsel, garlands and unbreakable Christmas tree decorations to decorate it.
Christmas trees can be made from any materials if you put a little imagination and effort into it. The photo shows how impressive small multi-colored fabric Christmas trees in pots look.
To make them you will need:
- salty dough;
- any thick fabric;
- thin wooden or plastic sticks for the base;
- any filler;
- small pots or plastic jars from small packaged products that will need to be painted with acrylic paint of a suitable color.
For salted dough, you need to take equal parts of salt and flour, mix everything, dilute with a little water and knead into a tight dough. Cut two halves from the fabric in the shape of a Christmas tree silhouette, sew them by hand or on a machine, turn them inside out, stuff them with filling, insert a stick into the resulting figure and sew up the bottom. Place the salted dough in the pot and insert the finished Christmas tree into it.
Interesting: DIY New Year's crafts for 2019 Pigs from all sorts of things
Such handicrafts can be placed on all the window sills in the house, creating New Year's compositions from multi-colored rag wood, candles, Christmas decorations, spruce or pine cones, painted with white, gold or silver paint.
The pictures show step by step how to decorate a house for the New Year using lamps in the shape of a New Year tree. For this you will need:
- cardboard;
- colored decorative mesh, which often remains after bouquets of flower shops;
- PVA glue;
- New Year's LED garlands;
- buttons and beads;
- silk ribbons;
- small bells.
Make a cone of suitable size from cardboard. Screw strips of decorative mesh onto it in a spiral, wetting them in a wide cup of glue. When the workpiece dries, take out the cardboard, insert an LED garland inside and decorate the resulting night light in the shape of a Christmas tree with beads, buttons and rhinestones.
This Christmas tree can be placed in different places in the house:
- on the windowsill in the dining room;
- on the refrigerator in the kitchen;
- in the nursery;
- by the bed in the bedroom.
Handmade symbols of the upcoming holiday will bring warmth, comfort and joy to your home. Such trees can become an alternative to the traditional forest beauty, or its spectacular addition.
Note: How to celebrate the New Year 2019 so that it is successful
Having decorated the hall for the upcoming holiday, you should pay attention to other rooms in the house.
Hallway decoration
To create uniformity in the living space, you should introduce at least a small symbolism of the upcoming holiday into each room. We should not forget about the hallway, where every home begins. Usually it's no different large area, so space is most often used to decorate it entrance doors, which are decorated with a New Year's wreath of fir branches and Christmas tree decorations.
The photo shows step-by-step instruction making such jewelry.
To do this, use a ring made of thick cardboard, onto which you can screw decorations that imitate spruce branches with toys. You can also use thick and rigid wire, which is rolled into a ring and then natural spruce branches are attached to it using threads. The resulting wreath is decorated with ribbons, fir cones and Christmas balls. When creating a cardboard or wire frame, you should not forget to make a ring on which the decoration will be hung on the door.
You can also use a variety of garlands and pendants to decorate your living spaces, which you don’t have to buy. You can make them with your own hands from plain paper and even old newspapers.
This photo shows what an interesting wreath can be made from ordinary old newspapers rolled into a cone. The newspapers themselves can be painted white, gold or silver using special paints from aerosol cans, which are inexpensive. When the composition dries, its center should be decorated with a bunch of glass balls.
Wreaths can be made from any materials:
- strips of green felt of different shades;
- wine corks;
- silk ribbons gathered into intricately folded buds;
- old newspapers and even from plastic bottles.
Use as material for New Year's decor You can use any available means, showing your imagination. For example, from the bottoms of half-liter plastic bottles and inexpensive LED garland you can make beautiful glowing snowflakes, from which you can also make a wreath for a door or wall.
To do this, you need to cut out the bottoms, paint them with white paint with a pattern of snowflakes and fasten the two halves above each light bulb using metal staples, Moment glue or thin wire.
Kitchen decoration
Before the holiday, you can not only decorate the hall and the hallway with the nursery. You should also introduce an element of festive decoration into the kitchen space by creating an installation of mugs in the shape of a Christmas tree on a free wall.
This is a room where all family members visit during the day, so it simply needs to be dressed up for the New Year. It should be taken into account that due to the limited space and functionality of the room itself, a real Christmas tree cannot be placed here.
In the kitchen, you can decorate the windowsill by placing small Christmas trees in pots, made by yourself, on it, or by hanging paper garlands and toys on the cabinets self-made. If you choose correctly color scheme If you add such decorations to the style of your kitchen, you can create a spectacular and original decor for such a room using homemade Christmas decorations.
On a note!
On the window you can make a spectacular composition from pictures cut out of white paper.
To create these themed pictures on windows, you can use white paper with an adhesive back. Stencils can be found on the Internet.
A garland of spruce or pine cones gathered on twine will look great on a work apron. On the dining table or on the refrigerator, you can place a vase with a New Year's composition. Along with regular decorations, it can also contain edible things (sweets, cheesecakes, cookies). You can bake shaped shortbread cookies, which will always be a pleasure to treat you to during the day.
To bake it you will need:
- 150 g butter or butter margarine;
- a glass of sugar;
- 3 eggs;
- 400 g flour;
- cinnamon;
- nutmeg;
- orange zest;
- raisins and nuts.
If desired, sugar can be replaced with honey. Knead the shortbread dough from the above ingredients, wrap it in film and keep it in the refrigerator for half an hour. After this, roll out a layer of 3-4 cm and cut out using special molds, which are found in every home. This way you can make snowmen, bears, hearts, Christmas trees, Santa Claus or other figures.
Cookies should be baked in an oven preheated to 180°C for 40-60 minutes, making sure that they do not burn. Such edible toys can be hung on the Christmas tree using silk ribbons or twine. To do this, a special hole should be made in the raw workpieces.
Nursery decoration
You definitely need to decorate the space of the children's room, creating for the child the atmosphere of a magical winter fairy tale. For this, different vertical surfaces are used:
- walls;
- interior doors;
- window.
On the nursery doors with inside A Christmas tree made from garlands will look great. This installation will additionally serve as a night light in the evening.
Children's windows and window sills are decorated in the same way as in the kitchen - with the help of stencils and small Christmas trees made from natural and improvised materials. If the installation is illuminated with garlands, the child will spend hours looking at it and immersed in the atmosphere of a magical winter fairy tale.
What to do if you need one more bed, but you are experiencing some financial difficulties due to which the purchase of a new piece of furniture is postponed indefinitely? In this article we will tell you how to make a bed with drawers from pallets with your own hands, which will be an excellent alternative to factory-made products.
- The most simple design
- Bed with mattress box
- Compact bed
- Bed lighting
- Materials for creating backlight
- Step-by-step instruction
- Multi-story bed option
- Installation on wheels
- Surface treatment
Pallets are an excellent base for DIY beds. From a financial point of view, this option is quite profitable, since ready-made frames They are very expensive in stores. It should be noted that today you can buy new beds to make, or you can find used products. In the second case, the cost source material may be symbolic.
So, let's look at several options for creating beds from boards and pallets.
The simplest design
A bed made of pallets in your simple design may consist of several identical finished blocks, which are carefully fastened together. You only need to buy a mattress of the appropriate size separately. Such a bed can be designed for one or two beds. From timber and pallets you can create a headboard that will match the width of the main bed.
Bed with mattress box
You can make a bed from pallets and solid wood by installing a special box to accommodate a mattress of the required size. For this wooden pallet You should turn it upside down and cut out the middle support.
Then we fix the cut out part between the two side ones so that the letter “P” is formed. The same must be done with the second pallet. After preparing both halves of our bed frame, they need to be connected with timber or boards. The finished box should be installed on two pallets connected to each other.
Compact bed
To make a single or children's bed, you need to install and connect two pallets to each other. You can paint the structure with paint, leatherette or fabric. After this, you will need to place a suitable sized mattress on top and cover it with the selected bedding.
Bed lighting
To give the bed more original look, you can arrange additional lighting. We will tell you how to do it now.
Materials for creating backlight
To create the backlight you will need a small list of materials, including:
- extension cord for two sockets;
- duralight (luminous cord sold in lighting stores);
- strip fastenings;
- self-tapping screws
It is necessary to install the glow cord correctly so that the lighting looks as attractive as possible.
Step-by-step instruction
- Connect the plugs with duralight and insert all the contacts deep into the channels through which the wiring runs.
- Place a special cap on the free end of the glowing cord.
- To each of two pieces of duralight (185 cm each) attach electrical cable.
- Test how the strips work by connecting them to the network.
- Fasten the duralight around the perimeter of the bed frame, maintaining a distance of about 25 cm.
- Secure the cord in the fastenings.
- Check how the backlight works by connecting duralight strips to the network.
- Replace the mattress.
Multi-story bed option
Many people who want to make their own bed from solid wood and pallets choose drawings of a single-story product. At the same time, nothing prevents you from creating a “multi-story” bed, which will be complemented by convenient shelves for placing books and other useful things.
Installation on wheels
Practical and original version is to install a pallet bed on wheels. With their help, you can easily move the sleeping place within the room. Please note that the weight of the bed is quite large, so look for powerful wheels that can withstand high loads.
Surface treatment
In order to extend the life of the bed and give it a finished look, the product can be coated with varnish or paint. It is better to apply the compositions in two or three layers. You can choose any color scheme taking into account the surrounding interior.
Some people choose the natural color of the wood rather than painting the pallets. Remember that only completely new pallets should not be washed or painted, since you do not know what goods were transported on the pallets. Perhaps in the future the organic matter contained in the wood will begin to decompose and smell unpleasant. To avoid this, the wood should be treated with disinfectants.
Now you know how to assemble a bed from pallets with your own hands, so you can go shopping for pallets and stock up the right tools. Choose the best option, come up with a unique design and get to work.
The original “thing”, a luminous table by the author of the development, is positioned as outdoor furniture. This makes a lot of sense, since evening gatherings at a glowing table are really great. However, it seems to us that the development deserves more. After all, this is uniqueness as it is - the table cannot be repeated: the idea - yes, to make a double - no. The pattern of glowing pockets will be different each time: the tables may be similar, but not identical.
The author of the development is Mike Warren, one of the enthusiasts of the Instructables community - a fun, close-knit team that changes the world with its ideas. They do it with pleasure. They share it with people. They are the first among those who sew, plan, solder, craft, fry and do anything else.
Mike Warren created a glowing table and gave it to people. Anyone can make this table with their own hands (or force your dearest spouse). The author of the bright idea kindly provided a whole master class.
How to make a glowing table with your own hands
The most important aspect in creating a glowing table with your own hands is the material. Mike used "pecky cypress" - a cypress tree that has been infected with fungus from the inside. The fungus multiplies in the body of the wood. This causes its segments to rot. Damaged pockets must be removed (this is easy, the wood is softened), the resulting cavities must be filled with a fluorescent composition consisting of resin and phosphor.
Rough wood is supplied to shops and markets. To assemble the table, you will first need to process the boards with a jointer. This must be taken into account when choosing. All edges must be processed: the joints will be tight and even.

And here we are closely confronted with the Russian mentality: the photo shows good equipment, and for Americans this is normal - such equipment is in the house (basement, garage, barn: they have everything there). Our average man not only doesn’t have a hand grinder, but he also doesn’t have a charger for the battery of his favorite car, let alone carpentry stuff? So this stage will have to be ordered: in any woodworking workshop these boards will be brought to the desired condition quickly and inexpensively. The next step, most likely, is best done right there, since after processing the edges you need to adjust all the boards to the same length.


Prev
Next
Rotten wood in the affected areas is carefully removed with a small handy tool (a screwdriver, for example), and then the freed cavities are blown out compressed air. This stage of work is dirty and dusty, so you need to use protective equipment(glasses, respirator).
The process itself

Result (before and after photos)

Now the boards need to be assembled into a table. Docking on a lath (grooves are knocked out in both boards, a lath is inserted into them with glue, and the boards are connected). Mike used “cookies” (glued-in slats are rectangular, triangular, and these are cookies). Next, you need to clamp the joints with anything that can be clamped (the ideal is shown in the photo), and leave for a day to dry (the glue should dry completely). If we don’t want the table to fall apart later, we don’t touch it for 24 hours (despite the hellish impatience of the creator).


Prev
Next
After the glue has dried, the surface needs to be sanded (in the photo with a disc, Mike writes that the fraction is 80; apparently, this is a P 80 disc, emery is electrocorundum; not sure). Then clean thoroughly: impeccable cleanliness is required - not a speck of dust.
We need a super clean surface to pour the resin on.
Mike Warren

Before pouring the resin, it is necessary to secure the surface: some cavities may be through; To prevent the resin from passing through and spreading, the back side of the tabletop must be covered with masking tape and secured at the ends with acrylic strips; press the strips.


Prev
Next
Next is the mystery of the glow itself. You will need resin for pouring (just say: give resin for pouring), easy to mix (proportions 1:1). Mike advises using this so as not to make a mistake with the proportions of catalyst and resin. There will be no advice on the phosphor: just choose which one you like. There are a lot of powders, they different colors, and your table may not glow blue at all. Mike used 100 g of powder per 2 liters of resin, but this ratio is optional - you can take more powder, and the table will glow brighter.
The resin for pouring does not come ready-made: it must be mixed with a catalyst. The resin and catalyst must be poured into different containers. Pour the powder into the resin and mix thoroughly. Then pour in the catalyst and stir vigorously for 2 minutes. This must be done quickly, since after 5-7 minutes an irreversible chemical reaction will begin. A homogeneous composition must be obtained before this moment. We must not forget about safety: do not work with resin without gloves.
It is better to mix the resin in small portions, since its viscosity is insufficient and the powder may settle, resulting in an uneven glow. Ready mixture cavities need to be filled. They can behave differently: in some the resin will be absorbed, but in others it will not - this is normal; you will just need to add resin to where it has been absorbed. Mike spent an hour filling the pockets in the wood. Waxed paper cups can be used as a container for resin (easy to make a spout, convenient to pour).


Prev
Next
After the resin has dried (the next day), you need to remove the acrylic strips and masking tape. Acrylic comes off easily, but with adhesive tape you will have to tinker a little.

The back side of the tabletop also needs to be sanded. Grinding of both sides must be carried out in several stages, changing the abrasive at each step to a finer one (Mike used discs: P 120, P 180, P 220, P 320, P 400). After the surfaces, the ends need to be processed.
After sanding, the tabletop should be varnished (Mike used glossy polyurethane; applied with a foam brush) and allowed to dry completely.

After the layer has dried, it must be sprinkled with water and sanded with fine sandpaper, and then thoroughly cleaned, dried and reapplied with a layer of varnish. And so several times to achieve maximum gloss. Each layer of varnish must be dried completely.
At this point they finish with the tabletop and then work on the fittings - screwing on the legs. And here everyone goes their own way: someone can make the same simple ones to use a table on the site, and someone can screw in something fantastic and turn this table into the center of the room in the house.

After making furniture from epoxy resin gained popularity in the field of residential decoration, the trend has not stopped developing. Recently, very interesting ideas have been appearing that can be considered unique. It's about about illuminating the tabletop as a way of additional decoration.
The idea itself is not new, because pieces of furniture have been illuminated for a long time LED strips or LED lamps. However, backlighting epoxy resin introduced completely new trends in the development of design.
Varieties
Looking ahead, we note that the luminous elements of the tabletop look very beautiful, but this solution cannot be called practical. The fact is that the glow needs to be viewed in the dark, and when you stay in a dark room for a long time, bright elements cause eye fatigue. Thus, an epoxy resin table with lighting will find its use in creating a special atmosphere in the room. You can show off a masterpiece to amazed guests or find relaxation by watching the play of light, but in all these cases, time is limited. Thus, the scope of application of the backlight has been determined.

In fact, guided by the basic principle of the new movement, designers have developed many projects that are simply impossible to imagine. However, every potential owner of such a wonderful table must imagine all the variety of options, so we will try to fill the reader’s imagination as much as possible so that he himself becomes the designer of his future order.
All epoxy tables, in which illuminated elements are found, can be divided into two groups. The criterion for separation is determined by the nature of light.
- The first group includes products in which the resin contains a special powder - phosphor. As is known, luminescence produces a glow when excitation energy is converted. There are several types of luminescence. In particular, a substance can release light energy after irradiation ultraviolet rays, as a result of a chemical reaction, as a result of passing electric current or electron bombardment. Photoluminescence has found practical application in the field of construction, that is, the phosphor in question, under the influence of natural lighting, subsequently becomes a light source.
- The second group is represented by products with electric backlight, these can be incandescent lamps or LED sources. One of the features of epoxy resin is its dielectric properties. All elements electrical circuit can be filled with the composition, and they will be reliably isolated. LED elements have low power, so often the power supply is embedded in resin along with the backlight. Such options are considered “disposable”. Indeed, it is not possible to replace the power supply or LED. More reliable models contain a current converter and are connected to a 220 V network.

Several options
Let us remind you once again that the total number design solutions with illumination there are hundreds, so it is impossible to describe all the variety. Considering that a number of models are created using fundamentally similar technologies, we will present the most popular examples of countertop design.
Anyone who wants to make the interior of an apartment original or add a “zest” to the equipment of their summer cottage, this option is suitable – a table with “backlight”. The product is created using epoxy resin and two types of durable paints. All work - from sanding to cladding - is quite accessible to a beginner in carpentry.
All work - from sanding to cladding - is quite accessible to a beginner in carpentry.


Furniture with a luminescent effect looks unusual and especially interesting.
Making a glowing table with your own hands does not require any special material or labor costs. Handle wooden table top With the help of a special resin, anyone who knows how to hold an instrument in their hands can do it.

When decorating a table, you can come up with your own design based on the quality and texture of the material.

Furniture with a luminescent effect looks unusual and especially interesting.
You are unlikely to see such products on the open market; they are usually made to order and are quite expensive, as handmade. Thick boards or ready-made ones are suitable for production. wooden table with an interesting texture. Applying epoxy resin takes half an hour. After some time, if all processing steps are followed correctly, you will receive a table with a mesmerizing glowing effect.

Making your own furniture for your garden or home is a great way to save your budget.
Deciding on design and construction
When processing, the stage of furniture construction does not matter. To create a glowing effect, use only the tabletop, although you can make furniture entirely with a luminescent surface. Designers agree that it is better to process individual panels - this way the product looks more interesting.

The luminous table can be made stationary or folding.

Making a glowing table with your own hands does not require any special material or labor costs.
Depending on the texture, you can apply some of the resin to the cracks, or cover the entire tabletop, including the edges, with a luminescent compound (with a light blue or other tint). It is necessary to choose a “variegated” option or a relatively evenly glowing one based on your taste and needs.

Designers agree that it is better to process individual panels - this way the product looks more interesting.
Necessary materials
To make a glowing table you will need the following materials:
- boards - 2 pieces (40-50 cm wide, 1-1.2 m long);
- epoxy resin;
- sticky paper;
- luminescent and transparent polyurethane paint;
- sandpaper.

It is necessary to choose a “variegated” option or a relatively evenly glowing one based on your taste and needs.

Anyone who knows how to hold a tool in their hands can treat a wooden tabletop using a special resin.
The tree is selected with noticeable cracks of irregular shape. A board with visible areas where branches have been cut and an uneven texture is welcome. Good for cypress or oak. If the tree is not dry enough, expose it to the sun for a while.

The tree is selected with noticeable cracks of irregular shape.

You need to take enough epoxy resin to fill the cracks several times.

Making your own furniture for your garden or home is a great way to save your budget.
Required Tools
To finish the furniture you will need:
- Sander;
- jigsaw

The table is sanded both before and after the surface is coated with epoxy resin.
The table is sanded both before and after coating the surface with epoxy resin.

Before treating the surface, the tabletop should be assembled from two prepared boards.

After some time, if all processing steps are followed correctly, you will receive a table with a mesmerizing glowing effect.
Manufacturing process: step-by-step instructions
- Before treating the surface, the tabletop should be assembled from two prepared boards. Having connected them, sand the base.
- Pour the prepared mixture of epoxy resin and fluorescent paint onto the table. The composition should fill all the cracks, so repeat the procedure 8-10 times. After this, cover the surface with adhesive paper and leave to dry until the next day.
- After removing the paper, sand the finished surface. After cleaning, coat the base with polyurethane paint.
- Run the sander again over the still damp surface. Remove any remaining resin. If necessary, the edges can be cleaned and the corners rounded with a jigsaw.

A table with a luminous surface can be decorated to your liking
The final stage is decoration
A table with a luminous surface can be decorated to your liking. A thick wooden board looks great both in in simple form(even with visible “defects”), and in combination with carved legs. This can be done using a jigsaw. You can varnish them or use leftover epoxy resin, just like the tabletop, to give a unified style to the product.

You can varnish or use leftover epoxy resin, just like the countertop, to give a unified style to the product.

The luminous table can be made stationary or folding.

After processing, you need to sand the furniture using a machine.
At night, the product will glow in heterogeneous patterns, which creates a “magical”, festive effect, which in itself is a decor.

In the dark, the product will glow in heterogeneous patterns, which creates a “magical” effect.

Depending on the texture, you can apply some of the resin to the cracks, or cover it with a luminescent compound.
If contrast is desired, the supports are coated with paint that differs in color from the main palette.

Creating a festive effect, which in itself is a decor.

Good for cypress or oak.
VIDEO: DIY glowing table