DIY rack made of balusters. A shelf in the kitchen is a guest from the past or a universal piece of furniture in a modern interior. A. Matveychuk, Zavodoukovsk, Tyumen region
A bookcase made by yourself is not only practical and cheap, but the process of creating it will also bring you a lot of pleasure. As you know, a bookcase is a cabinet without walls. It also includes shelves that are high from the floor, which are on wheels, or racks that can withstand light operating loads and are not attached to the floor, walls or ceiling.
What to make a bookcase with your own hands?
A shelf can be made from various more or less durable and workable materials, but novice furniture makers do not need to get carried away with their quantity.
Try to make a simple bookcase with us, the diagram and master class are below in the article.

To make such a product, you need to prepare required material. You don’t need any special skills or higher carpentry qualifications to work on a cabinet. The most important thing is desire, a little free time and small skills acquired in labor lessons at school.
So, for the process of creating a bookcase you will need to use the following materials:
- Hacksaw or jigsaw,
- With a hammer,
- Tape measure and pencil
- Drill,
- Screwdriver and self-tapping screws,
- Sandpaper of different numbers.
First, you should decide for what purpose and for what room the shelf will be made: kitchen, hallway, bathroom, or just for decoration. For the first cases, it is best to take into account the moment of hygienic protection, otherwise spilled liquid, dirt from shoes or wet laundry will soon damage the unprotected tree.
Therefore in in this case you can use slats, boards or sheets of plywood; varnish or waterproof paint to protect against moisture; timber or round blank or square shape for legs.
It is worth paying attention to the fact that if round legs were conceived, but there is no lathe, you can contact the economic department. Affordable material is a number of rolling pins of equal size or shovel handles.
Assembling a bookcase with your own hands

To achieve stability, experts recommend using four solid legs.
Shelf made from prefabricated racks
However, if you have confidence in your personal skills, then you can safely begin building a stable structure from prefabricated racks.
- To begin with, you should decide on the height and number of shelves, as well as the dimensions.
- Then make 3-4 shelves of equal size and mark the four corners of each so that the supports can be secured in the future.
- Measure and cut the legs with special care and accuracy. Because if there are discrepancies even of a millimeter or if the cut angle is uneven, the bookcase will be unstable.
- In the case when each of the legs is monolithic from bottom to top, it is necessary to fix the strips for installing shelves with self-tapping screws.
- If there is a prefabricated structure, then it is necessary to start from the bottom and secure all the quartets step by step, one above the other.
- Upon completion, it is necessary to sand the product and cover all elements with varnish or paint of any color. Eg, wooden shelf white It will harmonize perfectly with any interior.
- Now you need to dry the bookcase in the fresh air.
The renewed demand for whatnots is great news for supporters of the retro style. Today it is popular to buy not only finished goods from semi-antique wood, but also to restore or make them yourself.
Available means
A shoe rack made from scrap materials can also have a beautiful and comfortable appearance, even despite the fact that a minimum of money was spent on its production. Available materials include: cardboard, plywood, pipes, profiles.
To make a shoe rack, you can use an old chest of drawers or nightstand. In this case, it will be enough to show a little imagination and effort.
You can make a strong and comfortable shoe cabinet from profile and tempered glass. To do this, you will need to use an electric drill with metal drills, a grinder, building level, glass cutter, jigsaw, screwdriver.

To make a shelf, you can use a galvanized profile or a simple multi-colored one. A cabinet made using a galvanized profile will be more moisture resistant. And if you use simple material, then this bookcase the best way will be in harmony with the overall design of the room. Of course, in any of the described cases, the cabinet must be attached to the wall.
Product assembly sequence:
- At the very beginning it is worth taking measurements from the future place where it will be located finished design, and then you need to transfer the received information onto paper. The best option it would be possible to draw up a full-fledged drawing.
- Decide on the height of the cabinet so that it is suitable for the hallway, and from this data calculate the number of shelves.
- Then you should choose based on the size, profile and glass for the shelves.
- Next, taking the profile, you need to place it against the wall and secure it with one self-tapping screw.
- Be sure to check the horizontalness of the markings using a building level.
- Use this method to make the entire frame.
- Then place shelves made of pre-prepared tempered glass on the created frame.
In this way you can give your home some uniqueness, while spending a minimum Money, however, with a little effort, imagination and desire.
Video on the topic of the article
Shelf in Provence style with step-by-step execution:
Flower rack:
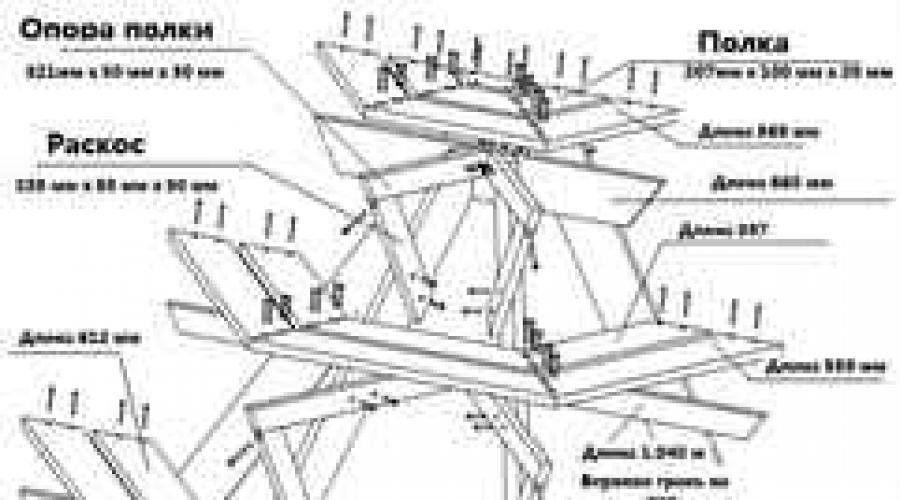
When choosing the dimensions of the shelves, I proceeded primarily from the sizes of the remaining scraps of furniture panels.
After I decided on the dimensions, I marked the blanks and cut out four shelves. In three corners of each I drilled 23 mm holes for the racks. To make the structure stable, I drilled a blind hole in the bottom shelf, in the area of the forward-protruding corner, to attach a fourth additional leg.
I rounded all the corners of the shelves and carefully processed the resulting blanks with sandpaper.
As stands I used four 24 mm cuttings, which I purchased at a hardware store. When purchasing, I had to do some digging to choose the most even ones from all those available. I preliminarily decided on the height of the racks.
The cuttings were very roughly processed, and polishing them took a lot of work in the literal sense of the word. But everything turned out smoothly, and they fit into the holes (023 mm) with almost no gaps.
I built a small fence around the top shelf. To do this, I lowered the racks 70 mm above the shelf and attached two cuttings from the cutting to them on top. On the rear rack, I connected the fencing elements halfway across the tree, and in order to fit them more tightly onto the racks, I drilled 023 mm blind holes from below. It was possible, of course, not to make a fence: just limit yourself to the top shelf, without drilling through holes in it, but here, as they say, the hunt is worse than captivity.
When the parts were adjusted to each other, we could begin gluing the product. Actually, I did not use, but used wood varnish for this purpose. Using a sliver, I thickly coated all the connections of the shelf with this varnish, trying to let it leak inside them. After the varnish had set, I covered the entire shelf with the same varnish in two layers.
About a year has passed since the bookcase was assembled in this way. I must say that during this time nothing came unstuck, nothing fell off - the varnish completely coped with the mission assigned to it.
The bookcase, taking the place designated for it in the corner, fit perfectly into the overall decor of the room.
How to make a bookcase with your own hands: photo for article
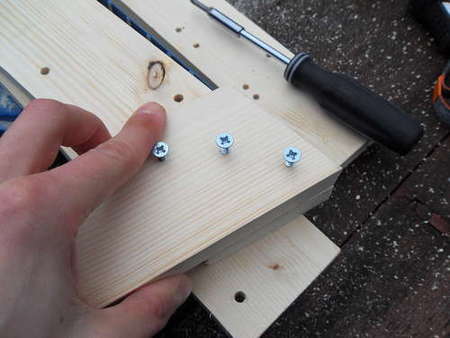
- When assembling the bookcase, I put the prepared shelves on the racks and installed them at the desired height.
- The shelf is assembled “dry”
- I built a small fence along the back edges of the top shelf. I sealed all the connections of the shelf with varnish.
- After painting, the bookcase took on a finished look.
 1 PC. self made homemade felt fabric flowers craft feltro...
14.01 rub.
Free shipping★★ ★★ ★★ ★★ ★★ (4.80) | Orders (268)
 10 pieces. pine needle artificial plant artificial flower thread for...
A DIY shelving unit is not only simple, but also economical. If you have never made something with your own hands before, then a whatnot is the first step for a novice craftsman.
What is a bookcase? This is a furniture option that consists of shelves combined into general design. The shelf can be used for flowers, shoes, personal care products or tools.
There are no restrictions on the use of shelves, except for weighing ones. You should not load the bookcase with too much weight, because it is not a rack.

A bookcase, as you know, is a cabinet without walls.

Long gone are the days when the whatnot was the “highlight” of the living room and the hostesses of secular salons vying with each other to see whose was cooler.
Do you know what the advantages of any “hand-made” product are?
- Savings in its purest form. Often, when buying a ready-made item, you have to overpay for the brand (brand), for poor quality material, purchased in bulk and the work of a master.
- Meets all requirements. You make a bookcase according to certain technical specifications: width, height, number of shelves, material, color. Of course, stores offer a huge variety of options for any furniture. The bookcases were no exception. But most often, products produced on a machine are measured in whole units. You can make an interior item that is ideal in size and style.
You can name other advantages to making a bookcase with your own hands, but all the main ones are highlighted.

It is also shelves height from the floor, sometimes on wheels, or a rack for a relatively small operational load, not attached to the floor, walls or ceiling.

Nowadays, most of the shelves in everyday life are used to place indoor plants.
Deciding on design and construction
The design of the bookcase depends entirely on your desires and capabilities. If we're talking about about the bookcase as a decorative element, then you can choose interesting material: rattan or glass, beech or forged metal.

A multifunctional piece of cabinet furniture that can effectively zone a room and be aesthetically significant in the interior.

Here the openwork of the whatnot works for functionality: plants can be placed on minimum area floors so that they do not shade each other and it is convenient for the owner to care for them.
Naturally, only a true master who knows how to work with this or that material and has the necessary tools can do this with his own hands.


For the same purpose, special shelves for flowers are built, but they are, as a rule, stationary, attached to some kind of base, and the shelf is adjustable.
Speaking of practical applications, making a bookcase with your own hands is quite simple. The design consists of two vertical bases and horizontal shelves between them. There are an incredible variety of mounting options and they depend on the material of manufacture.
- The easiest way is to screw the shelves to the base from the outside. This assembly method is relevant for wooden shelves. If you think that it will not be beautiful, then we can reassure you, there are plugs for self-tapping screws in different colors.
- Each shelf has holes in the corners; posts are inserted into these holes to separate the shelves from each other. Most often, this design is proposed for plastic shelves for baths or shoes. But glass shelves can also be organized in a similar way. Dividing posts can be chrome plated. Although metal can also be assembled into a bookcase in a similar way.
- The variety of fittings allows you to choose fastening elements hidden in the body of the product.

Shelves assembled using hidden mortise carpentry joints are rarely made independently, and are expensive to sell.

Even today the bookcase can become key element interior design.
These are the main examples of whatnot design. You can improvise or use decor. So, forged elements can give the simplest and most inexpensive wooden product not only charm, but also luxury.

The most durable is a wooden shelf assembled with an overlay.
Well-made rustic furniture looks amazing and fits into almost any interior, down to the loft.
Necessary materials
How to make a bookcase with your own hands is clear. You should decide on the materials needed in this matter.
- Assembling a plastic shelf bought in a store is as easy as shelling pears; just assemble the “construction set” according to the instructions and use it with pleasure.
- When working with wood, in addition to the main material, you will need fastening elements (screws, nails, corners). Note that wood is a susceptible material mechanical damage: the tree dries out, the tree rots, insects eat it. To protect your piece of art, you should coat it with varnish or wax. To add color, you can use paint or tints.
- If we are talking about metal, then you should study the issue in more detail. In an apartment, an iron shelf can be used quite rarely. There is stainless steel in the kitchen, stainless steel in the bathroom, stainless steel in the hallway. Ferrous metal is only suitable for a tool.
- Glass can be a material for shelves, both individually and in the overall design.

It may have four or more legs with shelves between them. As a rule, it does not have back or side walls.

Those who want to learn how to make rustic things are faced primarily with two tasks: aging wood while simultaneously increasing its decorative qualities and surface strength and also, as regards rack-mount shelves, adjusting the junction of branch cuts for racks.
Working with all these materials requires certain skills and tools. What can we say about more complex materials?

A type of shelving made from overlay planks is household frameless (with sidewalls made of one board each) shelving-ladders.

Use decorative forging, ropes or leather inserts
Required Tools
What tools will you need to assemble a bookcase with your own hands? , It’s quite hard to say; it depends directly on the material.
When working with plastic:
- hands and intelligence.
If the material is wood:
- screwdriver or drill;
- hammer;
- sandpaper;
- brushes
If the shelf is iron:
- welding machine;
- Bulgarian;
- sandpaper.
Glass shelf:
- glass cutter;
- sandpaper;
- grinder (for cutting jumper pipes).

For the strength of the attached ladder shelf, its shelves must be box-shaped without extension.

Some knowledge about measures to ensure it is useful not only for designing furniture.
It’s not a fact that all the tools will be useful to you, but you shouldn’t start work without having basic technical tools at hand.

Rack-mounted shelves have the highest ratio of strength to the amount of material required for manufacturing.

The same openwork will allow you to express yourself in an object and get a unique thing when minimum consumption material.
Manufacturing process: step-by-step instructions
It’s quite difficult to say how to make a bookcase if you don’t know what material and design option you will choose.
The process looks like this:
- choice of material;
- design choice;
- measuring the height and width of the product;
- production of horizontal shelves (the size should take into account vertical racks
- production of vertical support);
- assembly;
- decoration.
The plan is quite general, but the design of the bookcase is not a standard of skill, but only the first stage.

Rack-mounted shelves are assembled using glue and pins that pass through the shelves and go into deep holes (sockets) along the axis of the racks.

You can make a bookcase from any more or less durable and workable material, but novice furniture makers should not get carried away with their variety.
The final stage is decoration
If you are interested in the question of how to make a bookcase with your own hands, the answer is in front of you. But how to decorate a ready-made bookcase? The easiest way is painting. Select suitable color and paint your wood or metal counter shelf. Use decorative forging, ropes or leather inserts. Wood is combined with metal, textiles, and plants.

Functionally, the shelves of rack-mount shelves can be of any required height and extend to almost the entire width.

A forged or cast bookcase can be a work of art, but is functionally very reliable and durable.
Good luck!

Rack-mounted bookcases have a rather serious drawback from the point of view of an amateur: in order for the bookcase to turn out beautiful and original, you need turned wooden parts.
VIDEO: DIY bookcase
A bookcase is a piece of furniture that consists of several shelves combined into a single structure. Shelves can be made of wood or metal, with shelves open on all sides or partially closed.
This piece of furniture is distinguished by its simple design, so if you have free time and desire, anyone who knows how to work with hand tools can make a bookcase with their own hands from wood or other material.
When creating furniture with your own hands, this applies to all types of furniture, advantages compared to samples industrial production, are:
- The cost of self-made products is significantly less than when purchasing ready-made analogues.
- Possibility of creating furniture in individual style, corresponding to the design ideas of the room or other space where it is supposed to be installed.
- The quality of manufactured furniture is controlled by the manufacturer, so successful operation for a long time is guaranteed.
- A person who makes furniture with his own hands enjoys the work he does and can be proud of its result.
- When making furniture, a person acquires new work skills that will be useful in the future.
- Making furniture with your own hands can be a type of business that provides a certain income to the manufacturer of such products.
Required tools and materials

To make a wooden shelf with your own hands you will need:
- Materials.
For the manufacture of shelves and a shelf frame, it can be used edged board various breeds wood (pine, spruce, birch, oak, aspen and others), as well as sheet material a, made from wood processing waste (chipboard, plywood, OSB sheets).
- Tool.
When making blanks and assembling the structure you will need: a circular saw, electric jigsaw or a hacksaw, a set of chisels and carpentry tools, clamps, plane, fasteners and wood glue.
To process the assembled bookcase - paint brushes, varnish, paints, as well as special tool and substances that make it possible to give the structure an “antique” look, if necessary.
Structures and connections
The design of the shelf depends on the scope of its use, the designer’s flight of fancy and the type of materials used.
This can be a bookcase for books or shoe storage, for arrangement flower pots or children's toys, as well as storage of other items.
When using sheet material as shelves, the frame of the shelf is made of solid wood, and the connection can be made in the form of a cut or using fastening elements (corners and plates), as well as in the “overlay” method.
The “overlay” method is characterized by the fact that the shelves do not lie directly on vertical posts, but are mounted on horizontally located frame elements.
If the frame is made of chipboard, plywood or similar material, then the connection is made only by using fasteners.
The design of the shelves can be different, which is also determined by the scope of use of the shelf, such as: flat shelves used for storage various items and box-shaped things - used for planting flowers and plants.
Shelves can be located in one vertical plane or displaced in relation to each other.
Rack-type shelves are assembled by installing special spikes and then gluing the joints of the structural elements.
Whatnots modular type may have different designs, which depend on the material used in their manufacture. Typically, this is sheet material assembled using fasteners.
How to make a wooden shelf with your own hands

The work of making a wooden shelf yourself can be divided into several stages, these are: preparatory, assembly, decoration and installation.
Preparatory stage
At this stage of the work, a drawing (scheme) of the shelf is selected or developed, and the need for its decoration is determined.
Based on these parameters, the required material is selected.
When the drawing has been developed, the material has been selected and prepared, the tools and other materials that will be required to process the assembled structure are prepared.
Installation of whatnot
Using prepared materials and tools, workpieces are manufactured and processed.
The workpieces are sawed in accordance with the existing drawing or sketch, after which the cut points are cleaned in order to remove irregularities in these places. When using boards, they are planed and sanded.
The shelf is being assembled.
Options for fastening workpieces to each other depend on the material used and must provide the required structural rigidity.
Methods and locations for installing fastening elements should be thought out at the stage of developing a product sketch.
Decoration of the structure
The simplest option for finishing an assembled product is to coat it with varnish or paint. This also applies to lumber. various types, as well as plywood and OSB sheets. When using chipboard, only edge processing is required, for which it is used edge material, glued to these areas of the structure.
When using lumber and trying to make a “antique” shelf, several processing methods can be used, these are:
- Brushing is a method when it is performed mechanical restoration wooden products metal brushes, followed by polishing and treatment with wax-containing substances.
- The use of stains that are used to process the manufactured product.
- Patination is a method by which painting is performed wooden surface paints of various tones in several layers.
- Craquelure is a method of processing painted surfaces special composition, craquelure, which gives the product an “antique” look.
Product Installation
After the shelf is made and decorated, it is installed at the intended location.
Depending on its purpose, the shelf can be rigidly fixed to the surface of the wall or floor, and can also be freely positioned in relation to them.
The mounting option depends on the material that was used in the manufacture of the shelf and the structure of the walls and floor in the room where it is installed.
Nowadays, thanks to the Internet, you can always find drawings of any furniture, including whatnots various designs, which can be used for their self-production. And the variety of materials and technologies allows you to bring any creative ideas to life.
All photos from the article
Along with sideboards, the whatnot has returned from the recent past - a very convenient vintage piece of furniture. It is useful everywhere: in the kitchen, on the balcony, in the bathroom, in the hallway, and is irreplaceable in the country house.
Where the mass necessary little things waiting for a comfortable arrangement on the shelves.

Types of furniture

When choosing a bookcase for household purposes and decoration, pay attention to its shape.
The models are made not only for beauty, but also for maximum convenience, so various options are offered.
- Square or rectangular analogue. Classic version, in most cases suitable for any room configuration.
- A corner wooden shelf will fit perfectly into the corner of the room, without disturbing anyone and taking up a minimum of free space.
- Oval furniture occupies more space, but the lack is compensated by the originality and smoothness of the lines.
- Non-standard analogues complex shape Most often they are made to order, but you can also buy interesting and unusual things in the store.
Installation Methods
Since the item consists of fastened shelves in several tiers without doors, it should be positioned so that all the contents are at hand, but not in the way.
- On one floor stand in the middle, which also serves as a shelf mount. Moreover, shelves are often made different sizes: smallest on top, slightly larger on the bottom. A ready-made or hand-made wooden shelf will fit anywhere. Shelves can be made to rotate around a support.
Note! The most stable and durable model is on four legs. She will withstand even enough heavy objects, for example, flower pots. In the kitchen, she will help the housewife in storing cans of preserves or food.
- Hanging shelves are ideal for small-sized homes, where every centimeter matters. Moreover, several well-chosen models hung around different walls or corners, will visually increase the space.
Purpose

After thinking carefully, you can choose an accessory for one or several purposes at once. Today we are looking at a thing that can be both useful in the household and pleasant to contemplate.
Decorating any room with plants is the desire of most. A DIY flower rack made of wood will fit perfectly into the interior.
Moreover, it is easy to make it from the materials left over after the repair. Plywood, chipboard, slats, profiles or pipes, bars for legs - everything is useful for the process.
To make the product a decoration in itself, you can purchase an exclusive item with many original additions. Carved patterns, bent legs, forged elements, inlay. Of course, the price for many copies is steep, but the demand for designer items often exceeds supply.

This piece of furniture can also become an assistant in the most visited place - the kitchen. There are never enough shelves here; there is always something to fill them with. A do-it-yourself wooden bookcase, made and solemnly presented to your wife, will definitely be a pleasant surprise for her.
There is not always room for a bulky cabinet to store books in small quantities. But the bookcase will serve faithfully here too. thanks to its presence, your favorite book for bedtime will be at arm's length.
Tired of scattered shoes in the hallway? Get a compact bookcase. Moreover, in her case you will not be annoyed by doors that do not exist at all.
Cute wooden shelves in retro style as a worthy place for services, figurines, awards and things dear to the heart are more fashionable today than ever. Friends will appreciate your choice, especially if the product is made with taste.
How to make a bookcase yourself

First of all, prepare everything you need. Special abilities and higher carpentry qualifications are not required for the process of creating a bookcase. What is important is desire, a little free time and basic skills left over from school labor lessons.
Tools
- Hacksaw or jigsaw.
- Hammer.
- Tape measure, pencil.
- Drill.
- Screwdriver and screws.
- Emery cloth of different numbers.
Materials
Here the fact of no small importance is whether the bookcase is being made for the kitchen, hallway, bathroom or purely for decorative purposes. In the first three cases, it is advisable to provide hygienic protection. Otherwise, spilled liquids, dirt from shoes or wet laundry will quickly ruin the unprotected wood.
So, the following will suit us:
- Slats, boards or sheets of plywood.
- Varnish or waterproof paint for protection against moisture.
- Round or square beams or blanks for legs.
Note! If you wanted to make round legs and lathe no, go to the hardware store. An affordable option is several rolling pins of the same diameter or shovel handles.
Product assembly
But if you are confident in your skill and can build robust construction from prefabricated racks, feel free to start working.
- Decide on the height and number of shelves, as well as the dimensions.
- Cut out 3-4 shelves of equal size and mark the four corners of each for fastening the supports.
- Be especially careful when measuring and cutting the legs. Misalignment in millimeter or uneven corner cutting will provoke instability and unreliability of the entire product.
- If each leg is monolithic from bottom to top, fasten the strips with self-tapping screws for installing shelves.
- For a prefabricated structure, start at the bottom and attach all the quartets in stages, one on top of the other.
- When finished, sand and coat all parts with varnish or paint in any color. For example, a white wooden shelf will fit into almost any interior style.