Old village houses (40 photos). Even the oldest village house can be converted into a summer house. New "Dacha Story" from readers Old village house
Read also
Every resident of the metropolis dreams of hiding from the bustle of the city in a cozy village house, sleeping on a feather bed fluffed by a caring grandmother, and having breakfast with fresh milk and buns. But if fresh milk with buns is an impossible dream, then it is quite possible to recreate the rustic comfort not only in a country house, but, if desired, in a city apartment. It is only important to choose a direction in a given style and follow it exactly.
Features of the interior of a village house inside
Village houses differ depending on what territorial area they are located in and what culture they belong to. For example, the decoration of a village house in the Siberian outback will be significantly different from the hut of residents of the south of Russia.
And a traditional Japanese house is incomparable to the provincial style of a French village.
The common features of all rural houses are the naturalness of materials, simplicity of decoration and hand-made household and decorative items. Most often, objects of decorative and applied arts were used, since any thing, even the most exquisite, for example, a knitted tablecloth or embroidered towels, had a very practical use.
In Russian village houses that were located in forest areas, the house itself and pieces of furniture: beds, tables, benches and chests were made of strong, durable wood.
In mountainous areas, solidity was emphasized in the design of the house and in the interior using stone.

Interior styles
- Provence and country
Country style, the style of a simple country house, with functional handmade things, has gained popularity in many countries and has received many directions. American country is based on practicality, functionality and comfort. Brickwork, high-quality furniture, although well-worn, copper dishes and a lot of homespun textiles, including those made using the patchwork technique. The main color is the color of the American prairies - terracotta.
Provincial French Country - Provence style epitomizes the charm of the lavender region of France, filled with the colors of the sea, herbs and flowers. Interior in Provence style is a combination of simplicity and romance. Bright rooms with furniture made of natural wood, as if bleached by the sun. Textiles are durable and delicate in shades of nature: blue, green, white, lemon, sand. A characteristic feature of this style is the presence of ceramics - in the external and internal decoration, decoration of the house.

- Interior in the spirit of France
The interior of a house in a classic French style can be expressed by the phrase “chic without pretension.” The entire furnishings and decoration of the house are exquisite, filled with antiques, but with a touch of slight negligence, expressed in an abandoned shawl, a bouquet of wild flowers in an antique vase or asymmetrically arranged furniture.

Chalet style
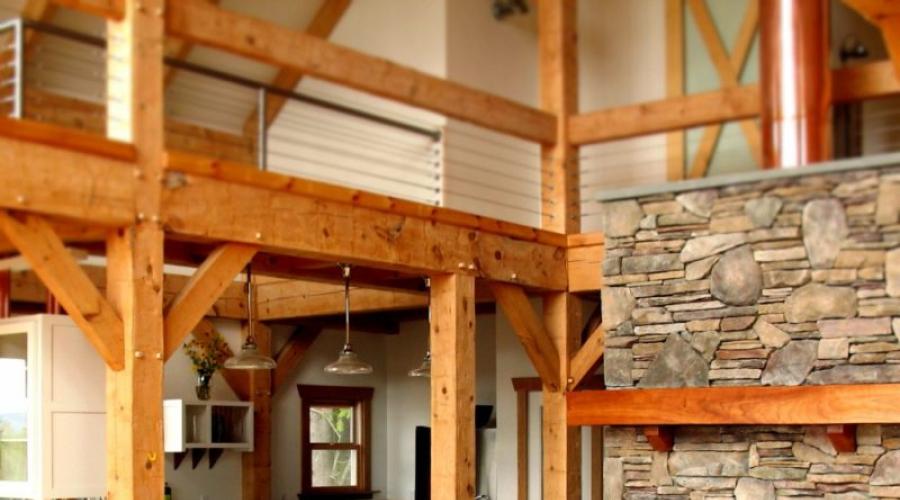
A house for shepherds, this is how the word “chalet” is translated, which gives the name to the interior style. The chalet-style house is a real fortress made of powerful stones and durable logs, with a gently sloping gable roof and huge windows. The main decoration of such a house is the picturesque landscapes outside the windows. This interior is not full of light, because the main finish is natural wood. Interior items are brutal in everything: in structure, in color shades. Soft carpets, furs, leather bring a bit of coziness to the interior.

English style
The distinctive features of the English style are not only good quality, simplicity and restraint, but also luxury:
- finishing of wooden walls requires the presence of stucco;
- classic furniture implies convenience and comfort;
- accessories are varied, with an abundance of exotic gizmos.
The colors of the English style are rich and noble: red, burgundy, chocolate, dark green. Lighting fixtures are characterized by interesting finishes.
Textiles play a big role in home decoration: heavy curtains and light draped curtains, colorful furniture upholstery made of expensive fabric and colorful pillows decorate the house and create an atmosphere of comfort.
It is in this style that paintings serve as wall decoration.

Japanese style
Japanese style is based on the principle of free space, in which sliding structures are present in everything: as walls and windows, in furniture elements.
Japanese home furnishings are designed to live on the floor. Therefore, low furniture is expected. All forms are simple geometric without an abundance of decorative elements.
Authentic objects are used as decoration: fans, lithographs and hieroglyphs.

Mediterranean style
The style of port cities, elegant, romantic and unpretentious, remains one of the most popular for home interiors. Its characteristic features:
- a lot of light and color;
- abundance of stone and wooden furniture;
- handmade textiles of fine workmanship: lace, openwork embroidery;
- stained glass windows and mosaic panels;
- wicker furniture and a variety of house plants and flowers;
- the paintings are bright and colorful;
- windows decorated with light curtains.
The Mediterranean style includes many colors and ethnic shades, therefore it is very democratic, multifunctional and extremely decorative.

Russian style
The basis of a Russian village house is a log hut with a huge Russian stove, with icons in the corner, with an abundance of bleached and unbleached linen.
Furniture and household items are made thoroughly and reliably. There is no frivolous romanticism or deliberate decoration in the interior; everything feels practical and functional.
Decorative elements are based on a mixture of different styles and trends, attracting attention and decorating the room. And this is also an indispensable cleanliness and a hospitable table.

Eclecticism
The time of globalization, when all boundaries are erased, brings to the fore a style that contains all the best that other styles have - eclecticism. In order to create a work of art in the mixed style, you need to choose some neutral style for the canvas and apply bright accents and spots of color to it. It is considered harmonious to use no more than three bright colors and no more than three styles against a classic background. In this style there is a place for the most amazing things: an abstract painting or stuffed animal, unusual furniture or a painted wall.

Mandatory elements of a wooden village house
A village house made of wood is designed for the life of a person engaged in agriculture. Therefore, its main purpose is to create comfort and coziness in a simple way. Furniture for storing things and dishes should be spacious, without decorative frills, and not require polishing or painting.
Textiles for curtains and table linen should be in bright colors and set off the discreet walls. Beds and linens are basic but firm.
A mandatory attribute of a village house should be a chest, preferably not a “remake”, but one that served faithfully to the ancestors.
Dolls made from scraps, rugs made from remnants of fabric, knitted lampshades, curtains with hemlines, lace valances and even embroidered carpets will find a worthy place in a country house.

Advantages of wooden houses
A wooden house is a living organism, with a unique atmosphere, designed to last more than one generation. A wooden house is warm in winter and cool in summer. It maintains a certain level of humidity because wood allows it to “breathe.” Owners of wood smoke inhale medicinal air filled with phytoncides released by the tree.
- The living warmth of a village hearth
All village houses had a hearth with a real fire; this was vital for heating the home and for cooking. There were different sources of heat, but the main ones were and remain relevant today are the stove and fireplace.
- Russian stove
The Russian stove returns to the space of country houses and serves for its intended purpose and as a decorative element. No worthy replacement has been found for this device, which is characteristic of Russian culture.
- Fireplace
A fireplace is a hearth with an open fire that serves to heat the room and attracts the opportunity to admire the flames and is often an accent in modern homes. There are many forms and designs of this device that can decorate a home and create an atmosphere of warmth.

Housewares
In order not to disturb the harmony of a village home, the first thing to do is to give up plastic dishes. The choice is to choose dishes in the style that fills a country house:
copper and ceramic for Provence;
- clay and wooden for Russian style;
- earthenware for English.
Of course, you can use modern products, but stylized in antique or country style.

Appliances for a country house
Household appliances will not disturb the decoration of a village house if they are properly built in and hidden in cabinets. Even the television panel can be covered with painted shutters.

Design in different rooms
- Kitchen
The kitchen is the center of a village house; in the old days it replaced the hall, the hallway, and the living room. Therefore, the traditions of honoring cuisine have been preserved to this day. This room should be bright, the ceilings and walls in which are whitewashed, covered with wallpaper with floral or floral patterns. You can use modern materials and decorate the room with wooden panels. Self-knitted rugs, embroidered table linen, and bouquets of natural dried flowers: wheat ears, oregano, St. John's wort or tansy will add color. You can choose dishes made by designer workshops, clay, ceramic or wooden.
- Living room
The interior design of the guest room of a modern country house is distinguished not only by functionality, but also by comfort. A mandatory component is the presence of upholstered furniture with embroidered pillows, cozy curtains and a fireplace. The carpet will create additional comfort.

- Bedroom
The central place in the bedroom is intended for a large bed made of wood or metal. All bedding should preferably be made from natural high-quality materials. And the best option is a feather bed with a lot of fluffed pillows.
The bedroom furniture, like the bed, is massive, simple and durable. You can give preference to carved or painted furniture in ancient traditions.
- Children's
A nursery in a rustic style will allow kids to grow up in an environment filled with natural materials. The simplicity of the interior and the absence of deliberate decorativeness will only stimulate the development of children's imagination.
- Corridor
The corridor must match the style of the house. Wooden furniture, hangers made by master carvers, wicker storage boxes, stools for convenience, metal accessories and original lighting fixtures should all be aimed at solving practical problems.

How to decorate a village house with your own hands
You can start filling up a village house by bringing in household items left over from your grandparents: a poker, jars, a clock with a walker, wicker baskets or a spinning wheel.
Only a person trained in carpentry can make furniture. If you don’t have such a skill, you can start restoring old furniture.
You can sew textiles for the entire home yourself, even on a mechanical sewing machine: curtains, tablecloths, potholders and even bed linen.

On long winter evenings, gathered in front of a live fire, you can crochet napkins, embroider tablecloths using the cutwork technique, sew patchwork quilts or knit multi-colored rugs.
In summer, harvest dried flowers and make bouquets filled with solar energy from them.
You can paint the furniture yourself using a stencil or decoupage technique.
In a country house, compositions made from natural materials would be appropriate as decorative elements for decorating hangers, beds, and stairs.
In order to return to your roots and raise your children in the spirit of your ancestors, you can create or recreate the interior of a village house. Enjoy the simplicity of the interior and human relationships, see the big in the small and be able to appreciate this small.
Photo gallery
Video
With a lot of undeniable advantages, wooden houses are an expensive pleasure, so not everyone can build or buy such a “nest”. However, a house with “experience” can be inherited or purchased much cheaper, although its condition will be far from satisfactory. Reconstruction of a wooden house will make it suitable for comfortable living and return it to its former appearance. And how to continue and how to finish will be advised by FORUMHOUSE users who have experience working with wood and are engaged in the reconstruction of their own households.
- Roof reconstruction
- Exterior decoration
Problem areas of wooden houses
The age of the bulk of wooden houses of the secondary housing stock is approaching half a century or has already exceeded this figure, which inevitably leads to deterioration of the main components. If errors were made during construction or technology was violated, then certain parts of the structure become completely unusable. The mode of operation is of great importance - did you live in the house permanently, or was it heated from time to time in the winter and serviced with the same frequency. Based on these conditions, the following work may be required:
- complete or partial replacement of the foundation or its strengthening;
- replacement of lower crowns;
- complete or partial replacement of individual elements or large segments of walls;
- repair or replacement of roofing systems;
- exterior finishing.
Even if upon initial inspection it seems that it is easier to demolish than to try to restore, do not despair, it is not for nothing that the leitmotif of the portal’s users is the proverb “The eyes are afraid, but they do.”
The lion's share of houses are visually in terrible condition, but in reality the logs are still strong, and the wood under the layers is beautiful, and reconstruction will take less time and money than new construction.
Reconstruction of an old wooden house: foundation
Old wooden houses are characterized by a strip or column foundation. It is very rare if the tape is poured to the freezing depth; basically, it is a shallow depression, which over time, under the weight of the structure, has sunk considerably into the ground. The scope of work depends on the condition of the foundation. To evaluate it, a thorough inspection of the above-ground part, if any, is carried out, and buried elements are dug up and examined. Portal user and part-time leader of a team involved in the repair and replacement of foundations of wooden buildings, Igor Bekkerev, classified the possible scope of work this way.

Igor Bekkerev FORUMHOUSE member, foreman
The main task of the foundation–This is to transfer the load from the house to the ground. There are different foundation defects, and there are also different repair methods. This may be one type of work, or more often it is necessary to use a complex.
- Insulation of the foundation and blind area;
- Foundation waterproofing;
- Drainage works (water disposal);
- Strengthening the foundation with an armored belt from above;
- Strengthening the foundation with an external armored belt;
- Replacing the foundation with hanging the structure or moving the structure;
- Leveling a foundation or leveling a building on a foundation.
To gain access to the foundation, the box is raised to the required height - it is hung, and less often it is moved. Hydraulic jacks are used for lifting; the walls are lifted one by one, or the entire box at once. Due to the ability of wood to withstand certain deformations when performed correctly, this operation does not compromise the integrity of the house. Based on the condition of the foundation and the intended work, jacks are installed directly on the base (strip foundation) or on the ground, on a previously laid thick board or other support. The number of jacks on the wall depends on the dimensions of the box; cuts are made under the jack in predetermined places.
Usually a team of several people is hired for such work, but one skilled craftsman can raise a wooden house in a short time. A forum member is lucky to have such a professional Arty-CooL, who is engaged in the reconstruction of a log house. in good condition, but it was decided to strengthen it, build it up and immediately fill in a new contour for the extension.

Arty-CooL FORUMHOUSE Member
Today we completed raising the house and replacing the lower crown, the foreman worked alone, I tried to help after work, although I probably distracted him more from work. When replacing the crown, the floor joists were simultaneously cut into the new crown. I finished it in 3 days, that’s how the masters work!

User's family Greens in such a situation, it was done without the involvement of craftsmen - the husband and sons were used as labor. The foundation was shallow, rubble, after hanging the box it was partially dismantled, a new wide strip was poured, and then the basement part was laid out with brick.
Grinata Member of FORUMHOUSE
The foundation there is rubble, very shallow, 40-50 cm, on the outer corner the house apparently began to sag, the rubble was taken out from under the corner and replaced with facing bricks. When we took it out from there, it crumbled into small shards. The lower two crowns are just rubbish, we raked out part of the rubble, put up the formwork, poured it and laid the brickwork.

To strengthen the foundation with an external armored belt, a monolithic reinforced concrete strip is poured around the perimeter. The depth of the tape exceeds the depth of the old foundation by the size of the sand and gravel cushion, the average width is 40-50 cm. The surface of the old foundation is thoroughly cleaned, all flaking elements are removed. To increase adhesion with the new solution, the foundation is impregnated with a primer with high penetrating ability. Reinforcing pins are used as a binder, driven into the old foundation at a distance of 20–25 cm, in several rows. The pins are welded or tied to the new frame, and the solution is poured into the formwork in layers.

The replacement of the foundation is carried out in stages or all at once; in the first case, the old foundation is dismantled in parts, with new fragments gradually poured in. In the second case, everything is dismantled at once, a monolithic tape is poured, pillars are cast or piles are screwed. Forum user under nickname Andryukha052 They suggested a phased replacement, but he preferred a simultaneous one, fearing possible problems with the foundation in the future.

Andryukha052 FORUMHOUSE Member
They suggested removing the logs between the pillars, digging trenches between the pillars and pouring a foundation there, laying masonry between the pillars, and laying the house on the masonry. Then remove the pillars, dig trenches under the pillars and fill - connect the masonry. I didn’t really like this idea; the foundation would consist of several sections. If there is any movement in the ground, everything may crack. Even if nothing happens, I thought it was better to play it safe. Therefore, the house was suspended on U-shaped supports, everything was removed at once, a single strip was poured and a single masonry was made.
Reconstruction of an old house: crowns
The lower crowns of wooden houses rot, gradually becoming saturated with moisture through the foundation. This occurs both due to the lack of a waterproofing layer and due to technology violations. Several forum members encountered a strange method of protecting a log from water, including val-lel.
val-lel FORUMHOUSE Member
My log house– Built in the 50s, the foundation strip actually had waterproofing between the log and the base, but! Along the first crown, the edges of this waterproofing were raised and attached to the log itself, and the segment between the foundation and the crown, with the edges of the waterproofing neatly nailed to it, was« carefully spanked» cement mortar along the entire first crown, both outside and inside, apparently so that the log does not move anywhere.
Replacement of crowns is usually carried out together with foundation work, when hanging the box. If possible, materials are used that are as close as possible to the original ones - logs or timber; some replace rotten parts with brickwork. Arty-CooL used sleepers.

Arty-CooL
I installed the sleepers because I got them for free, and it’s easier to work with them (even though I wasn’t the one who did it), they won’t go anywhere under the weight of the house, and I’ll install galvanized studs into the foundation, and I’ll put the house on them. The cost of concrete by volume of sleepers will definitely be more expensive.

When choosing a material for replacing the crowns, they mainly start from the intended finishing layer - even the brick can be hidden under the siding. If you plan to leave the walls in their original form, the new segments should be as close as possible to the existing ones.
Waterproofing must be laid between the foundation and the new crowns, and the wood is pre-treated with an antiseptic.
Reconstruction of the walls of a wooden house
In addition to crowns, other parts of the structure may need to be replaced when the wood is exposed to moisture. Most often this happens with the upper crowns if the roof leaks and water accumulates in the insulation. It is also common for the wall around windows to get wet, although the wood may appear intact from the outside.

Etanol FORUMHOUSE Member
One point that would be worth paying attention to is the logs under the windows. If the windows are in winter« cried» , the logs could rot. Moreover, I have seen such a thing that a log rotted from the inside, but on the outside it was quite good wood, only the rot was diagnosed by drilling.

serwid FORUMHOUSE Member
This happened to me when I changed the windows in my house to plastic ones. After dismantling the old ones, I had to make inserts, since the log under the window had rotted and was not visible from the outside.
You can identify rot in outwardly normal wood by tapping it with the butt of an ax or a hammer - the rotten filling gives a dull sound, the whole log makes a ringing sound. As an alternative to drilling, an awl is used - it will not go more than a few millimeters into a normal tree; it will sink into a rotten one without resistance.

Replacing one element of a frame or part of a wall is carried out piece by piece - damaged ones are cut out, new ones are inserted, all cracks are necessarily sealed, the wood is pre-treated, as are the insertion points. To save time and money, one of the users did the following.

AlexeyTsvetkov FORUMHOUSE Member
I cut out all the rot from the inside with a chainsaw until« alive» wood, soaked it with an antiseptic 2 times and drove an antiseptic block inside, cut to size« hollows» and stapled with linen wool, then secured with 150 mm self-tapping screws on both sides.
Roof reconstruction
For many, the reconstruction of a wooden house is an opportunity to increase its area not only through an extension, but also by converting an old cold attic - diameter from 150 to 200 mm, with edged board 50x200 mm.

If there is no need for an attic, you can get by with revising the roofing system and replacing elements that have rotted due to leakage or condensation accumulation. Particular attention is paid to the chimney outlet area. In most cases, this is where leaks and damage to ceilings occur.
Considering that old slate does not add charm to the structure, it is usually replaced and insulation of the floors and under-roof space is usually required. When additional rooms are added to the house on a rigid connection, the old roof is completely redone in order to make the entire structure fit for a new one.

Arty-CooL
I plan to add part of the house along the entire length, 2.5-3 meters wide, thereby making the house square, and there will be a single attic roof with living quarters.
Exterior decoration
To preserve the natural beauty of a wooden house, they refuse to use siding and other facing materials. Walls that have darkened over the years, with various deposits on the surface, are put in order - they are cleaned with a brush and impregnated with special bleaching antiseptic compounds.
It is most convenient to carry out the treatment using a grinder and a special attachment - a brush with iron bristles. All dirt and deposits cannot be removed from wood in this way, but it can significantly improve the appearance and reveal the structure. In the future, you can use wood varnish or paint: tints will level the surface, and new elements will no longer attract attention. Like cladding, paints and varnishes are not only decorative, they effectively protect the surface from external influences.
Cozy country interior for pennies!
Background
My sister and I came up with the idea of purchasing a small summer cottage when we were 22 and 25 years old, respectively. We are both passionate about decorating and we wanted to bring to life various interesting ideas, as well as have a place where you can simply relax from the bustle of the city and enjoy being close to nature.
The place was not chosen by chance - overlooking an ancient pine forest, on the other side of which our grandparents once lived and with which our happy childhood is therefore associated.
View of the pine forest from the attic
Buying a house
The plots in this SNT are small - only 3 acres, but we were primarily interested not in the vegetable garden, but in the house. Therefore, we immediately rejected proposals with plots turned into one continuous bed.
... And finally, luck smiled at us - an elderly man responded to an ad written by hand - his old friend was selling a plot of land with a house. When we saw him (the house, not the man) - it was love at first sight! A plank house with an attic and an overgrown garden! We asked for the owner's phone number and immediately agreed on the purchase without haggling on the price (and it turned out to be much lower than we expected!). So we became his happy owners.
Transfiguration. Start
The house was made with love, but it was already very “neglected”. We wanted to breathe new life into it by renovating it without spending a lot of money. We initially decided that this would be a “budget” renovation, and wanted to prove that beautiful and cozy does not mean expensive.
This is what the house looked like at the time of purchase and the start of cleaning: old wallpaper yellowed from time and stains on the roof, an old bed and gray chairs:

Spring bed USSR

The wall opposite the bed (let’s call this place so that it’s convenient to compare later 😉)

This is what the house looked like from the outside

I won’t show even more scary places on the ceiling - so as not to scare you))
Paragraph 1
So, my sister and I started the renovation by cleaning.
We raked out and sorted the trash that was stored in the shelves and “cabinets” - these were old clothes, jars, bottles, etc. We swept up trash, dirt, dust, and of course mouse poop everywhere (tying up our respiratory organs with scarves and wearing masks just in case). Some of the trash was taken to a landfill, some was used for rags, some was sent for washing, and some was left for use or decoration.

We immediately called this place “tea room” - because here, as you can see, there is a small table with a couple of chairs for drinking tea and a gorgeous view from the window (topmost photo of the post)
Point 2
We washed everything with bleach water!
Literally EVERYTHING: floors, walls, ceilings and even furniture.
Point 3
We started painting old furniture in more “cheerful” colors. For example, it was decided to make the bed white.
Acrylic paint was used. And to paint the window frames they used cheap alkyd enamel.

Painting the bed

The chairs are in lavender!

The paint emphasized the structure of the wood
Gradually, a unique “concept” for this mini-room developed - and we called it “lavender tea room”.
I decided to paint one of the doors here like this:

I write in English “lavender tea room”
By the way, we called the main room in the attic “blue bedroom.” It was decided to use a warm, joyful shade of sky blue and, of course, white for combination (association with white clouds in a blue sky).
Point 4
The plywood on the ceiling in places where there were leaks was replaced with new
Point 5
They tore off old wallpaper from the walls and some paper from the ceiling. We washed the walls again with chlorine, dried them and started wallpapering.
The wallpaper for the main wall of the bedroom was white with a blue flower
“Feodosia” - 200 rub./roll
Blue wallpaper (for combination) - 80 RUR/roll
Wallpaper for the ceiling - free (we found old ones in the barn and pasted them on the wrong side)

View from the bedroom to the tea room

Let's roll it into new wallpaper..

Let's continue...

It’s not easy to paste over the ceiling - your hands get numb, but then your hand gets full)
Meanwhile, the walls in the tea room are covered with the remnants of wallpaper stored at home (pink), and the lilac ones were bought for 70 rubles per roll in the store. The “cabinet” door is painted pink.

I'm at the teahouse
Well, you’re probably tired of looking at phone photos of our “flops” and you want to see what came of it all?
We specially arranged a “photo shoot” of the resulting interior using a camera:

Lavender tea room


Teahouse


And now the blue bedroom.
The photos are arranged as if we were turning to the right:

Blue bedroom

Bedroom

Table by the window

Shelves and suitcase for storing linen (decorated by hand)


Sofa opposite the bed

View from the bedroom to the tea room

blue bedroom
And the outside of the house now looks like this (we painted it mint and pink - we tinted it ourselves).
They painted with rollers, using a folding ladder, and leaned out of the windows to paint where the ladder didn’t reach:

House in autumn:


And here my sister Lyalya and I are in the garden near the house. The peony bush has not yet bloomed, but has already grown - we made a “holder” for it from an old chair with a hole in the seat (which we simply tore off), found in the attic of my grandmother’s village.
My story ends, but the story of the house's transformation does not. The plans are to “furnish” the first floor. We will definitely share the result with you!
We are slowly organizing the garden: we dream of a lawn, flowers, a fence and garden furniture.
Thanks everyone for your attention! We hope that we have inspired at least someone else to be creative and create))
A rustic style home will appeal to almost everyone. Even the combination of words evokes warmth, comfort and the crackling of wood in a Russian stove, next to which it is pleasant to spend an evening in peace and quiet. Creating the interior decoration of a house in a rustic style will not be difficult for owners of country real estate. Such decoration is akin to returning to the roots, to the origins of folk culture. Maybe this is why rural interiors give such a feeling of peace that only happens in childhood. For the same reason, they are so popular among residents of city apartments.
It will be a pleasure to cook in such a kitchen.

The interior of the house is made in Provence style

A wooden house will look beautiful both outside and inside
Modern architects and designers use various materials for construction and decoration. The advantages of wood are:
special aesthetics and practicality;
excellent sound insulation, allowing you to listen to music loudly or watch TV, gather noisy companies without disturbing your neighbors;
excellent thermal insulation. Wood retains heat for a long time; such walls and roof will maintain a comfortable room temperature in the cold winter;
maintaining the same level of humidity.

Wood is the basis of rustic style

The fireplace in the living room will warm you on the coldest days
What determines the choice of interior?
The interior of a country house has certain specifics that distinguish it from the design of city apartments.
Distinctive features of a rural interior
When decorating a house in a rustic style, wicker furniture and elements of artistic forging are often used.

The bright living room will be a great place to relax

You can make a wood stove in the kitchen

Wood goes well with the interior
Main directions in design
The design of a village house inside should meet the main goal - to create an atmosphere of peace and genuine comfort, so you should not decorate your dacha, for example, in a minimalist style. Typically, the design of a house in a village is made based on the cultural characteristics of a particular people. In this case, you can choose any ethnic direction: a wooden house in the Provence style on the banks of the Volga will look just as appropriate as in the French province.
So, the most popular directions in decorating a country estate:
English village;
Russian village.

A blue sofa will stand out in the interior

Rustic style is perfect for a garden
Country style design features
Country music creates a warm, calm atmosphere of a country house. Use pastel colors: olive, lavender, sand and others, avoid sharp contrasts. Since textile products are an indispensable attribute of decoration, decorate the living space with napkins, large-checked curtains, and lay a hand-embroidered tablecloth. Choose fabrics not synthetic, but cotton, linen or chintz.
Natural and decorative stone or brick are perfect for wall decoration; you can paint them in a single color. Furniture, dishes and decorative elements should be made from natural materials: glass, wood, stone or paper. Upholstery with small flowers is acceptable for sofas and armchairs.

The interior of the house is made in a rustic style

This living room will become your favorite place to relax.

A large modular wall will perfectly complement the living room interior
Interior decoration of a country estate in Provence style
Another name for the style is “French country”; such interiors are perfect for people who are tired of the bustle of the city and dream of immersing themselves in the atmosphere of a leisurely rural life. The walls are most often whitewashed or painted white, decorated with paintings and fresh or artificial flowers. All textile accessories should be made of bright fabrics with floral patterns. Exquisite, thin forged elements are actively used. The floor should be made of planks and painted in a light color or decorated with stone tiles.
A distinctive feature is the large windows, which are not typical for other similar styles due to climatic conditions. For the same reason, in most of Russia, such a solution is not recommended, since the building will cool too much in winter.

Home decor can be decorated with beautiful curtains

A wooden house will last a very long time
Russian rustic style
A historically established characteristic feature of the direction is the active use of wooden materials. The walls, ceiling and floor are covered with boards, the furniture is made from the same material. Chests with traditional designs are often used. In the modern version of the style, rafters and beams are required.
An indispensable element is a Russian stove or a stylization of it; tiled stoves are often made, which in the past were characteristic of the design of palaces and castles, but fit harmoniously into a country house. To decorate the room, you can use towels, knitted toys, rag dolls, potholders (preferably handmade).

A fireplace in the house would be a great idea.

A wooden house looks very practical

A small house can be turned into a living room
Rustic kitchen interior
When finishing and decorating work, it is necessary to take into account that in the past the kitchen was the central place where most family events took place. The remaining rooms were intended for sleeping. Therefore, when decorating, you need to pay close attention to the kitchen space.
If the size of the room allows, place a wooden corner and a dining table made of the same material.
The kitchen needs to be made light: whitewash the ceiling with lime or water-based paint, cover the walls with plain light wallpaper (floral patterns are possible), it is recommended to lay rugs on the floor. To decorate the room, use herbariums or straw figurines; napkins, curtains and potholders made of natural fabrics; hand embroidery will be a wonderful touch.

The bedroom should be bright

You can make a fireplace in the house and warm yourself while sitting in the living room
Country style living room
The design of the living room, in general, is close to the interior decoration of the kitchen: whitewashed ceiling, light wallpaper. Vases or large pots of flowers are often placed on the windows, so the curtains should be up to the middle of the window. An interesting solution would be windows with internal shutters. An important element of the interior decoration of the living room is the fireplace.
Since the key condition of the interior is natural materials, upholstered furniture should be covered with woven cloth. You can lay knitted napkins on bedside tables and tables, and a rug or carpet on the floor.

A wooden house will be very durable

The combination of wood and tiles in the house

The interior of a house in a village usually looks like this
Bedroom decoration
The central design element around which the composition of the room is assembled is a large wooden or wrought-iron bed with a natural mattress (ideally a feather bed) and a large number of pillows of different sizes. For textiles, you should prefer linen or calico in pastel shades with or without a small pattern. Small rugs or rag rugs are placed on the floor.
It is better to choose bedside tables, wardrobes, chairs, a massive chest of drawers or an impressively sized chest, decorated with carvings. The most important condition is good lighting, preferably natural, so there should be a lot of windows in the room.

A wooden wall will retain heat in the most severe frosts

Wood walls look very beautiful
Creating a rustic style is an exciting process in which you can show all your creativity. Any skills will come in handy. The ability to sew, knit and embroider will help you create designer napkins, tablecloths and curtains. Having learned the technique of wood carving, you can make unique pieces of furniture and decor even from old things. Hand-made accessories in this design are more relevant than in any other stylistic direction. Use your imagination, remember your childhood hobbies, and as a result you will get a village house that fully reflects your personality.
Video: How to arrange a house in the village
50 photos of interior ideas for a house in a village:


This is how it looked before the renovation... Rotten wooden frames, covered on the outside with double film, from the cold and wind... On the left is an old veranda with a sagging porch canopy...

For those who are about to make repairs in their home, it seems...
These were the windows and window sills.

We started putting the house in order from the foundation.

We open the corners of the house one by one, remove the rotten crown logs using a chainsaw, install the formwork, lay large stones and crushed stone, lay the reinforcement so that its ends remain open (for subsequent fastening it to the poured foundation), wrap the crown log with roofing felt and fill it with concrete. There you have it. finished cabinet.

And so on all four corners of the house and its middle, around the perimeter. Total - 8 cabinets. The process is labor-intensive and difficult, but the result is worth it... When the cabinets were finished, we made a pile around the entire perimeter. The continuation of external work was postponed until next summer. We started renovating the house internally...
This is a large room and let's start there. This is what it looked like before the renovation:

This is her right corner... and this, in the photo below, is the left corner. In the process of writing the topic, I will stick to these two corners...


First, we completely tore off all the layers of old wallpaper. The windows were still old, but we were already waiting for specialists to install plastic windows.
The old stove was dismantled...and the stove maker put together a new one.


AND THE RESULT DID NOT KEEP MYSELF WAITING LONG...I decided to close one window completely and make one big one - there will be a dining room there.


After installing the windows, the men began to dismantle the old floor, level the joists and place brick cabinets under them...

Then they laid the floors with old boards (they will last for a very long time, since they are thick and dry), and in places where there were rotten ones, they replaced them with new boards.

I installed a metal profile frame for the walls and ceiling... my mistake was that first you need to do the ceiling, and then the walls, and not vice versa. I found the technique for performing this work on the Internet, I won’t go into detail on it. If you If you have any questions, I will be happy to answer what I know...

Attaching the frame to the ceiling is much more difficult, my neck hurts...

When the metal frame is completely ready, you can sew gypsum boards onto it, preferably in a checkerboard pattern, starting from the ceiling! Don’t forget to spread out the electrical wiring and hide it in the corrugated channel, behind the profile, and install the distributor boxes in a place convenient for you.

In this photo you see wooden blocks, I screwed them on for later mounting of bookshelves. I attach exactly the same ones, only thinner, under the ceiling above the windows (for attaching cornices).
When all the walls and ceiling are covered with gypsum board, we putty with a putty knife and level all the joints between the sheets and the places where the screws are screwed in with this compound...

We lay reinforced mesh along the corners and seams to strengthen the joints, and after everything is dry, we sand it and apply a primer to the walls and ceiling.
And now the most interesting moment - wallpapering. I took white vinyl for the ceiling and with delicate roses for the walls...

When the wallpaper was dry, I mutually agreed
I invited a team of craftsmen to finish their work in this room on the windows (slopes and window sills).

After that, I glued the ceiling plinth, hung the shelves on the wall, put my flowers on the window sills, which the guys from the company had already installed for us...


The carpenter helped install the interior door, only later did I find out that it was upside down... (what difference does it make!) as long as it functions normally...

I pasted over the doorways with a white corner using liquid nails. On the right side there is a new stove that heats all the rooms at once.
The firebox itself is located in the bathroom...

I laid underlayment on the subfloor, then fiberboard and linoleum. Then I screwed the floor skirting boards with self-tapping screws and voila, beauty!!!

Here's the thing about this big room...
Some of you wanted to see more details about the concrete cabinets, so I added the details... So, the slab windows were inserted, the outside of the house was sheathed with flat slate and a heap was made around the house, until next summer...
Now let's continue with exterior work, after the cold winter and spring...next summer.
When all the cabinets are ready, gradually, opening each side of the house from the rubble, we remove the rotten logs of the lower crown, wrap the dry ones with waterproofing,

we install the formwork, lay the reinforcement, connecting it to the ends of the reinforcement of the corner pedestals and fill it with concrete...

