Homemade wood jointing machine. We make a jointer with our own hands in manual and electromechanical versions. Using a hand router as a base for a jointer
Read also
By making a universal thicknesser with your own hands, you can significantly simplify the processing of lumber, saving on purchase professional tool. Thicknessers are used for planing lumber and giving surfaces an ideal, even shape. Homemade machines are versatile in use, allowing you to guarantee high-quality processing lumber and giving them the required shape.
Description of the tool
Thicknessers are machines for processing wood, which allow planing and leveling the surface of lumber to produce boards of a given thickness. This kind of wood processing is carried out when using lumber in construction and making various designs. Planing equipment is in demand on the market and is popular with ordinary homeowners who independently engage in construction at the dacha and in their own home.
Self-made surface planers are distinguished by their simplicity of design, which allows them to be made using an electric planer, grinder and other similar power tools as a basis. You just need to make sure that you have the appropriate diagram, which you should adhere to when making homemade equipment.
Advantages of homemade machines
A do-it-yourself jointing machine is distinguished by its versatility of use. The functionality of such equipment will be sufficient for high-quality wood processing. On homemade machines you can not only plan lumber, but also perform finishing boards, giving them required thickness and a perfectly flat surface.
The advantages of hand-made surface planers include the following:

To make a homemade surface planer with your own hands, you can use an electric planer, which is used to create a machine that allows for high-quality wood processing, including planing, edge processing and chamfering. It is only necessary to select a high-quality project for the manufacture of a homemade thickness planer, which will be the key to producing reliable and universally-usable equipment.
You can find it on the Internet various schemes execution of homemade jointers, which are distinguished by functionality and ease of manufacture. Subsequently, you should adhere to the scheme on hand, selecting the appropriate components and correctly assembling the machine, the functionality of which will fully meet the requirements of homeowners.
Necessary materials
There are many options for making homemade planing machines, which will differ in their basis. The easiest way to make such a tool is using an electric planer or jigsaw.
To perform a surface planer you will need the following:

Plywood and timber will be required to make the base of the machine and manual table, onto which the electric planer and other elements responsible for the functionality and safety of using the equipment will subsequently be attached.
It is necessary to use high-quality wood, which is additionally recommended to be treated with impregnations against rotting.
Step-by-step instruction
Making a surface planer is not difficult, so almost anyone can handle this type of equipment.
The following work will need to be done:

This is the simplest surface planer design that can be done at home. You can find it online various drawings do-it-yourself surface planer from an electric planer, which will differ in their functionality and manufacturing method.

In the future, you can modernize the completed basic design machine by adding additional tools, which expands the functionality of the equipment.
Safe to use equipment
When performing any homemade woodworking machine, you need to take care of the safety of working on the equipment. The cutter should be closed if possible protective devices, and working on a machine where the working cutting element does not have any protection is prohibited. Majority homemade circuits Thickness planer manufacturers have high-quality protection for the electric planer, which eliminates injuries when working with such equipment.
- When working with homemade tools, you must use safety glasses and work gloves. In particular, the latter will be required when working with coarse, dense workpieces, when beating of a homemade surface planer from an electric planer is observed when processing the material.
- The studs used must not have cracks, defects or damage. If cracks or damage are found, the defective parts of the machine should be replaced.
If you follow the simplest safety measures, working with a thickness planer will not present any difficulty, and the machine itself will last for many years. Using homemade machines, it will be possible to perform high-quality wood processing, saving on the purchase of industrial milling cutters.
Knowledge of the rules for working with a surface planer will improve the quality of lumber processing, relieving the homeowner of any difficulties in operating the tool he has made.
The operating rules are as follows:

A correctly assembled thickness planer based on an electric planer functionality, efficiency and productivity will not be inferior to expensive factory equipment. You just need to find a high-quality plan for manufacturing a surface planer on the Internet and then follow the drawings when assembling an electric machine. The easiest way to implement such a tool is based on electric planer, which is mounted on a plywood base. The simplest thicknesser, made independently, will differ in functionality in use, guaranteeing high-quality wood processing.
- Machine design
- Step-by-step instruction
- Alternative option
Jointing is one of the methods for finishing wood. Boards and beams acquire a smooth, polished surface. The jointer has more simple design than the thicknesser analogue. The installation is easy to assemble yourself using available equipment.
Machine design
The jointing machine is equipped with a table. The table has a technological hole; a knife shaft is placed in it, operating from electric drive. During the planing process, lumber is fed onto the shaft using a roller mechanism. Support elements under the workpiece can be tilted at the required angle. The thickness of the board is adjusted by the tabletop by feeding it up and down.
The knife shaft can have a single-sided or double-sided design. In the first case, one plane of the board is processed. The double-sided shaft allows you to joint wood from both sides at the same time. There is equipment with four knives that provide four-sided grinding. These samples are most often installed at large woodworking enterprises. The cleanliness of the processing depends on the diameter of the knife shaft. The larger it is, the higher the quality of grinding.
Two types of knives can be installed on a homemade jointing machine:
- Single-edged. Subject to periodic sharpening.
- Double-edged, disposable. When worn out, replace them with new ones.
Planers differ in shaft rotation speed, tabletop length, and planing width of lumber. The surface of the tabletop is divided into two transverse segments, with the front part located below the back to regulate the thickness of the removed layer of wood. Optimal thickness cut - 0.5 cm. If more removal is necessary, several cycles must be performed.
For sustainability, improvement load-bearing characteristics The jointer bed is made of cast iron, the frame is supplemented with steel plates. The knife shaft is fixed between the two halves of the tabletop. For convenience, the table is equipped with guide rulers.
How to make a jointer tool
The jointer has a simple design, it can be made in a few hours: the process does not require special skills and knowledge. A power planer is useful in carpentry, but the quality of wood processing is inferior to a jointer. Therefore, it is necessary to improve the existing sample to achieve a better result.

An electric planer with a sliding knife guard that can be retracted during jointing is well suited as the main element of future equipment. It is better if the plane is equipped with a fastening with the knives facing upwards.
During the assembly process you will need:
- boards,
- plywood sheet,
- fasteners.
Step-by-step instruction
First you need to make a base of boards. It should have the shape of a box without a bottom or lid. The length of the frame will correspond to the length of the working surface.
At the next stage, a sheet of plywood must be laid on top of the box, a technological hole must be formed, and the plane platform will be installed in it.
Two more similar sheets are laid on top of the plywood, serving as the back and front plates. The sheet that the tree will accept when planing should be 2 mm thicker. It is necessary to maintain parallel placement plywood sheets. This can be verified with a sliver probe. Before fixing the panel to the frame, the edge of the material is processed.

The manual electric planing element is placed on the mount, installed with knives up on bottom sheet plywood.
You will need wood to cut out the mounting lugs. These elements will be threaded through adjusting bolts, setting the machine knife to a given height relative to its base.
On jointer from an electric planer you need to install a side stop from the remaining plywood. After this, you can begin processing lumber.
Alternative option
If you don’t plan to work with long workpieces, you can make a compact household device. This circular saw can be easily equipped with special supports and turns into a full-fledged machine.
First you need to form a box from thick plywood, wood or MDF. The structure is fixed with wood glue or reinforced with self-tapping screws. The role of the countertop is performed by the electric planer platform.
The most complex element with which jointer , - side stop. It will move on special grooves. It is secured by two screws and wing nuts. The cutting tool is held in the box by side fasteners. For convenience, a home electric jointer can be improved by forming in its design an outlet for connecting an industrial vacuum cleaner.
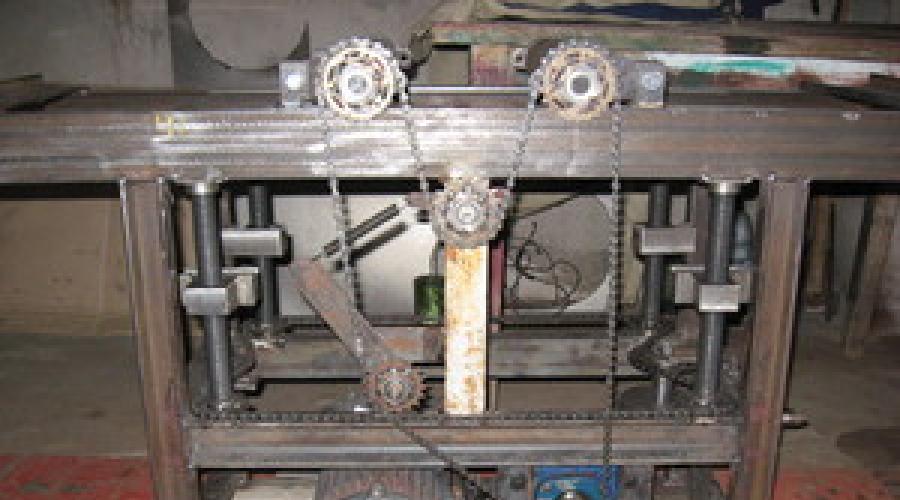
Professional homemade jointer
The figure shows drawings with detailed explanations. Required Electrical engine 1.5 kW, connected to the shaft using a drive belt. You can make the knife shaft yourself or order it from a turner.

During the work it is necessary to weld the frame from metal profile or corner. Then it is welded to the frame base plate and a base for the screw. Side bars are fastened to ensure free movement of the guides. To do this, you need to create technological gaps.
The lead screw is welded to the machine after it is installed on the support. The equipment must be provided with a front plate, consisting of a top part and a guide rail. They are connected to each other by side elements. The end parts of the surfaces must be made parallel, after which they are carefully ground.
To ensure that the dimensions of the sidewalls installed on homemade jointer, were the same, they are processed and provided with holes for the studs. After welding the sidewalls and guide elements, the temporary studs are removed.
On last stage install the knife shaft. At the same time, raise the front tabletop to its level so that the edge of the panel is parallel to the axis of the shaft. The back of the tabletop must be fixed in a stationary position. The center of gravity of this woodworking unit is high. To reduce vibration, it is recommended to additionally strengthen the jointers.
Make a jointer with your own hands, if you have one basic knowledge about the structure of this instrument is not at all difficult. The task is greatly simplified if you have an old electric planer in your arsenal - it will become the main component of a home planer.
The jointer finds wide application in wood processing - with its help it is easy to make the surface smooth, get rid of unevenness and roughness, and give lumber a neat appearance. Having such a multifunctional tool at hand will significantly expand your woodworking capabilities. With a jointer it is easy to assemble furniture yourself, make lining or parquet.
Purpose of the jointer

Working with wood can be not only a pleasant hobby, but also an opportunity to provide all the necessary interior items. If you have specialized tools homemade furniture in quality and appearance will differ little from factory-produced analogues. A jointer is one of these tools; it makes it possible to make the surface of wood perfectly smooth and prepare it for gluing, varnishing or applying a decorative design.
Planer, or jointer- a tool for finishing lumber long length and width. Processing is carried out by removing a small (1-2 mm) layer of material using a rotating shaft into which sharp blades made of hardened metal are mounted.
The principle of operation of a jointer is identical to the operation of a plane, with the difference that the jointer is fixed in place, and the material being processed moves. The increased length of the device allows it to be used to give beautiful view wide flat surfaces
Selection of components for the jointer

In order to assemble a jointer from an electric planer, it is not at all necessary to disassemble it new tool. A plane that was previously used for its intended purpose is quite suitable. Lack of some modern models The problem with such devices is that their plastic casing becomes loose over time and cracks and chips appear on it. It becomes unsafe to work with such a plane, but it fully meets the requirements for creating a jointing machine. All you need to do is turn the plane over and secure it in this form in a pre-prepared workbench.
Choosing an electric planer model is one of important points when assembling the machine. Most models have a planing width of 82 mm, which fully satisfies the needs of home use. More expensive and powerful planes are equipped with a 100 or 110 mm shaft. In the latter case, such parameters make it possible to run boards and beams 10 cm wide through the tool, without leaving untreated areas.
It is worth paying attention to the additional functions of the electric planer: some models are already equipped from the factory special devices, which allow you to turn the tool into a full-fledged jointing machine. This type of planer can be fixed with the sole up, while safety is ensured by a spring-loaded protective cover.
If there is a need to process materials whose width exceeds 110 mm, then doing this with an electric planer will be very inconvenient, since the board will have to be run several times, which increases time and reduces the accuracy of the work. In this case, it is worth considering the possibility of assembling a powerful jointer, the main components of which will be a separate shaft and a powerful electric motor. Although the cost of the shaft is often more than half the price of all materials, having such a tool in your arsenal, you will no longer be limited in your woodworking capabilities.

The planing width of a full-fledged jointer equipped with a shaft ranges from 25 to 85 cm or more, but one must take into account the fact that an increase in this parameter entails an increase in engine energy consumption.
Optimal engine power depends on several parameters:
- shaft width;
- number of knives;
- width of processed lumber.
Direct dependence: than higher value have the listed parameters, the higher the engine power should be. For home machines, 1.5-2 kW motors have proven themselves well. The shaft rotation speed of such machines is 4-4.5 thousand revolutions per minute, the width of the processed material is 25-40 cm.
Assembling a jointer
The jointer is assembled in several stages. First, you should assemble the body of the workbench, into which the electric planer will subsequently be mounted. The body looks like a normal one wooden box without bottom. It is covered on top with a thick sheet of plywood, in which a hole is cut for installing a plane. The plywood will bear the weight of the tool, and to work with the material it must be covered with two more sheets, the thickness of which will differ by 1-2 mm. They are installed on the right and left sides of the plane. Thin plywood in this case, it plays the role of a serving table, and thick plywood acts as a receiving table.

The principle of interaction between the feeding and receiving tables is extremely simple: the lumber, moving along one half of the workbench, reaches the plane, and a layer of chips 1-2 mm thick is removed from it. The already processed wood ends up on the receiving part of the table, where it takes a stable position, thereby allowing the rest of the board to pass over the plane. In addition to the support function, this reduces vibration and makes it possible to provide reliable support during work.
Assembling a jointing machine with a shaft is a little more difficult, but if you have experience, it will not take much time either. Such a machine consists of similar parts - a housing, a feeding and receiving table, and a compartment for collecting chips. Not superfluous in such a model homemade device there will be a speed reducer, which will allow you to reduce the speed of rotation of the shaft to pass problem areas - significant irregularities, knots, etc. Great importance has a calculation and precise fit of all body elements to each other, ensuring reliable engine mounting and perfect alignment desktops.
Safety precautions when working
Joiner, due to the combination hazardous factors – high speed rotation of the shaft and the presence of sharp blades, refers to potentially traumatic equipment. Working with it requires strict adherence to a number of safety rules. Especially it concerns homemade instruments: incorrect calculation of the elements that make them up often leads to fatal consequences. To avoid problems when working with a jointing machine, you need to adhere to the following requirements:

- Before starting work, you need to wait until the shaft reaches maximum speed.
- Under no circumstances should the working tool be inspected, lubricated or cleaned of chips during operation. To do this, you need to stop the machine, turn off the power and only then start servicing.
- During processing small parts, the length of which does not exceed 40 cm and the width - 5 cm, you should use a special vertical stop. It looks like a thick board, which is fixedly attached to the feeding work table.
- To increase operational safety, the jointer shaft can be equipped with a special protective flap. At forward movement material, it moves away, and after processing is completed, it returns to its original position using a spring system. The blades of the shaft remain closed from accidental contact.
- Lighting is of great importance - all work should be carried out under the light of a powerful lamp, or outside.
The jointer is an important attribute designed for carpentry work. External indicators and the principle of its operation are reminiscent of a plane familiar to everyone. However, the jointer has a more elongated shape, which allows it to process large surfaces. There are 2 knives on its sole. This device for processing wood has a plug that allows you to loosen its fastening and timely sharpen or replace a knife or handle.
Making a hand jointer with your own hands is very simple. You just have to learn how to handle basic carpentry tools. By attaching own strength and diligence, you can replenish your arsenal with important equipment.
Tools required for work
To make this carpentry tool yourself, you need to stock up on raw materials. You need strong wood to create a strong last. The best option There will be natural species of oak and larch. Their incredibly hard wood will ensure the equipment has a long service life.
The following tools will be useful:
- hacksaw;
- hammer;
- chisel;
- plywood;
- bolts.

Planing techniques: a - with a plane; b - jointer; c - position of the legs when planing; 1, 2, 3 - pressure on the plane, respectively, at the beginning, middle and end of planing.
Taken wooden beam OK, in its center, using a chisel and a hammer, a rectangular hole is punched through. The sides of such an opening are positioned at an angle of 45°. The finished knife, the dimensions of which correspond to 200 × 65 mm, is fixed on one side of the hole and reinforced with a thin wood plate. It is inserted into the widened opening. The impact plug is located in the middle.
The handle should be comfortable to use, so its shape is selected individually. Make this one important detail can be made from multilayer plywood. The finished element is inserted into the hole and tightly screwed with bolts on both sides. The grooves for them are prepared in advance.
- When choosing a knife for a jointer, you should give preference to a rectangular model.
- To provide maximum convenience the device is equipped with a handle and a blade, each of them must be submitted in duplicate.
- The knife should not stick out on the work surface.
- Parts of short length are processed with a jointer, the length of the block is equal to 500 mm, the angle of the cutting plane corresponds to 45°.
Return to contents
Making a jointer from an electric plane
You can make a jointer with your own hands in another way. For this we take:
- durable box made of natural wood;
- 3 plywood plates of different thicknesses;
- electric plane;
- fasteners (nuts, bolts).
On the eve of such work, drawings are prepared, the dimensions of the future equipment are estimated, and sanded sheets of plywood are adjusted to fit it. Such simple measures will allow you to avoid mistakes in the future and eliminate unnecessary actions during assembly.
The box for the future device can be ready-made or put together yourself. This container should have a rectangular, elongated base without a bottom. The finished box is covered with plywood, in which a hole is cut in advance. The plane is placed here bottom up. 2 sheets are laid on top of the base plywood plate.
The uniqueness of this material used is due to the fact that one of these plywood will be 2 mm thicker than the other. It performs a receiving function; as a result of jointing, a wooden beam is received onto it. The other layer will be 2 mm thinner. This layer performs the promotion function. The blocks move further onto the plane knife.
The lower part of this equipment is raised above the plywood layer, appearing as one plane with the sole and the receiving layer. The feed layer will be 2 mm higher.
The body of the jointer is securely fixed with bolts and nuts, which can always be tightened or loosened.
These simple tips will allow you to quickly and efficiently make an important construction device.
Planing equipment is an essential component of a complete woodworking process. Factory-made products are quite expensive, so a homemade jointing machine is quite suitable for home needs.
The purpose of this tool is to longitudinally level a workpiece made of wood or chipboard (materials painted or containing glue can dull the cutting elements of the equipment). After planing on a jointer, the processed side of the workpiece becomes smooth and even, which is necessary for subsequent calibration on planer or milling.
Industrial options are distinguished by their dimensions and significant weight, which provides suppression of vibration arising from rapidly rotating machine parts (up to 12,000 rpm). The total length of the working surface of such equipment is 2–2.5 m. The width of the table, which determines maximum width of the workpiece being processed is in the range of 400–600 mm.
Simpler jointing machines, which you can make yourself at home, have less weight, size and, accordingly, shaft rotation speed (no more than 6000 rpm). The total length of tabletops on such equipment is 1–1.5 m with a width of 200–300 mm.
Main components of a jointer
- Bed. A massive element that provides structural rigidity, chip removal, and placement of the electric drive.
- Work tables (server and receiver).
- Stop ruler. For planing at an angle.
- Shaft with cutting elements (knives).
- Electric drive. Provides shaft rotation through a belt drive and pulleys.
- Rack or fan type protective mechanism.

Main components of a jointer
Additionally, your jointer can be equipped with a workpiece feeding mechanism and aspiration system removing chips.
Making your own jointer
Before starting any activities to make a machine with your own hands, you will need three things: a project, materials and tools. They are all interconnected, since the project directly depends on what materials are available and what tools are available. If not welding machine and skills to work with it, consider a project that involves welded structure, it makes no sense.

The metal structure can also be assembled using bolted connections. This option will have some positive qualities: The bolt-on jointer can be disassembled if necessary without much effort.
For the carpenter the most convenient option – wooden structure, but it is inferior to metal in rigidity and in the service life of some elements of the machine. In addition, certain nodes cannot be made from wood.
Some components will have to be purchased or ordered. These are parts such as:
- shaft with knives, fixing wedges, a set of bearings, yokes;
- electric motor;
- pulleys;
- belt;
- starting device.
To draw up a project, you need to decide what functions the device will perform. The following options are possible:
- Jointer. A device whose purpose is to plan a part on one side without calibration.
- A two-operation machine that also performs the function of a jointer.
- Multi-operational machine. Such devices can be used for sawing, planing, drilling grooves and milling, like a thickness planer.


The jointer is the easiest to manufacture, requiring less tools, material and skills.
Manufacturing of the bed
The main element of the jointing machine, it will contain work tables, a shaft with knives and a stop ruler. A drive will be installed in the frame body, and chip removal will also be implemented. To make the structure rigid, you will need appropriate material.
- for the upper part on which the countertops are located, a height of 100 mm and a wall thickness of 5 mm is suitable;
- legs and bottom platform can be made from metal corner(50 mm);
- The structure is fastened together by welding or bolting.

Assembly diagram of the machine bed
Shaft with knives
This unit must be purchased assembled. The kit should include:
- knives;
- bearings with housings (yoke);
- wedges with which the knives are fixed.

The quality of the material and the balancing of such elements, made in the factory, are much higher than homemade ones.
This unit can be ordered from a turner, providing him with drawings and specifying the details. It’s good if the turner works at an enterprise and has access to balancing equipment.
Desktops

Industrial jointers are equipped with massive cast tabletops with stiffening ribs to prevent deformation during operation. This is unattainable when making it yourself. Therefore, as optimal solution for arranging a planer platform it is better to use sheet material. Ideally, this should be a flat metal plate 10 mm thick, or, in the worst case scenario, a sheet of plywood.
The plywood must be of sufficient thickness (minimum 10 mm), in addition, you need to pay attention to the quality of the surface - the plane must be flat. It is advisable to use sanded waterproof plywood, without small tubercles or fallen knots. To increase the service life of a plywood tabletop, work surface You can attach a sheet of galvanized metal with your own hands.
The serving table is made 2 times longer than the receiving table. This makes it easier to level the workpiece during jointing.
Electric motor
The main parameters that need to be taken into account when choosing an electric drive for your jointer:
- power;
- number of revolutions;
- operating voltage of the power supply network (220, 380 V).

The longer and larger the diameter of the cutting tool, the more powerful the motor will be needed. You can use a low-power drive, compensating for the lack of power with pulleys, but in this case it will not be possible to achieve the speed required for clean processing.
As an example, consider a shaft with a diameter of 100 mm and a length of 300 mm. For stable long work at speeds of about 6000 per minute you will need a drive with a power of at least 3 kW. If you change the length in the input data, reducing it to 200 mm, you can use a motor with a minimum power of 2 kW.

As for engine speeds: it is more rational to use a drive that has at least 3000 rpm. Otherwise, to obtain sufficient revolutions cutting tool you will have to use pulleys.
The operating voltage of the drive depends on the voltage electrical network In workshop. An engine that runs on 380 V will be more powerful and more reliable than an engine with the same rated power, but designed to operate on a 220 V network. But in a home workshop, 380 V is a rarity, and the connection costs so much that these funds can buy an inexpensive factory jointer.
It should be remembered that this is a homemade jointer for household use, and it does not need to be mercilessly loaded, planing the entire width of the knives at 5 mm per pass. Not every industrial unit (especially a modern one) can withstand such loads.
The shaft with cutting elements is attached to the top of the frame in the middle; the exact location depends on the size of the work tables between which it should be located. The shaft and table top must be located in the same plane so that the top point of the cutting tool knives coincides with the top surface of the receiving table.
The feed table is mounted in the same plane as the receiving table, but 1–2 mm lower. This distance determines the thickness of the chips removed in one pass. The quality of planing depends on how accurately the planes of the surfaces coincide, namely, how smooth the planed workpiece will be.

Machine assembly diagram
There are options for adjustable feed plane height using eccentrics or a screw mechanism.
When assembling a jointing machine with your own hands at home, it is very difficult to efficiently implement such a mechanism. It would be an incredible achievement if this equipment would plan smoothly with fixed worktops.
The electric drive is mounted on the lower platform of the frame. It is advisable to use an adjustable platform to install the engine to ensure more comfortable belt tension. The tension mechanism can be implemented using a technological hole in the platform and a screw with a nut as adjusting elements.
Connecting mechanisms
Rotation is transmitted from the engine to the shaft by means of a belt drive through pulleys. The pulley sizes are selected in accordance with the engine power and speed.
For a drive with a rotation of 3000 rpm, a ratio of 1 to 2 can be considered normal. For example, the diameter of the cutting tool pulley is 100 mm, on the drive it is 200 mm. Optimal ratio when assembling with your own hands, it can be obtained experimentally and largely depends on the quality and balancing of the rotating parts of the jointer.
The drive is connected to the electrical network using starting device, according to the electric motor instructions.
Alternative option
Simpler and quick way To make a planing machine with your own hands is to use a manual electric planer, having previously modernized it a little. Every self-respecting home carpenter must have such a tool. All that needs to be done is to make a device to fix it.
The easiest option for making a machine with your own hands is to use sheet material as a base.