Potato planting dates in different regions of Russia, Ukraine and Belarus. Correct timing for planting potatoes and how to cut tubers When to plant potatoes in unheated greenhouses
Read also
Planting tubers at optimally early dates is one of the conditions for intensive tuber formation and obtaining a high-quality harvest. At early boarding Potato plants on soddy-podzolic soils of the Non-Chernozem Zone create a powerful root system and well-developed tops. They form tubers earlier and reach maturity faster. For harvesting at late plantings, the tubers are small, with a low content of dry matter and starch.
Early planting is of particular importance in areas with a short frost-free period. In the southern regions, late-planted potatoes develop tubers in hot weather when even abundant watering has little effect on the yield and quality. It is recommended to plant potatoes when the soil temperature at a depth of 10 cm rises to 6-8°C. At this temperature, tubers germinate faster and seedlings appear earlier. However, for early potatoes there should not be a strict relationship between the planting date and the degree of soil warming. If you wait until it warms up to the specified temperature, then, for example, on some loamy soils in the northern and northeastern regions of the Non-Chernozem Zone, this will lead to a delay in planting and, consequently, a decrease in the yield of early potatoes. Research has established that when sprouted tubers are planted early in insufficiently warmed soil, the yield is higher than when planted late, but in soil heated to a temperature of 6-8°C. Sprouted tubers have the valuable property of stably tolerating low soil temperatures down to 3-5°C without losing their seed qualities or reducing the rate of plant growth and development. Research conducted at the research institute Agriculture North-East, confirmed that early planting of varieties Priekulskiy early and Falenskiy with sprouted tubers increases yield by 15-20%, increases the content of starch and protein in tubers. At the Ulyanovsk experimental station for potatoes on carbonate leached chernozems, the starchiness of Volzhanin variety tubers at the first planting date was 17.0%, the second - 16.2 and the third (late) - 14.1%.
When determining the planting date for potatoes, it is important to take into account the most favorable period of tuberization for specific farm conditions. In the central regions of the Non-Chernozem Zone, according to average long-term precipitation data, the most favorable conditions for tuberization occur in the second half of June and the first half of July. In this regard, when planting, you need to focus on the period of intensive tuber formation (budding phase) falling on June 20-25. In early and middle early varieties it usually occurs on the 20-22nd day after emergence. Therefore, taking into account the planting-sprouting period, tubers should be planted in the first ten days of May.
In addition to the temperature to start planting, it is important to consider the arable suitability of the soil. When arable ripeness approaches, it crumbles well, volumetric mass It is significantly reduced during spring loosening, which is necessary for the supply of air oxygen to the germinating tubers. This soil condition in the south is established approximately during the sowing period of early grain crops, and in the Non-Chernozem zone 5-7 days later. Here this period usually coincides with the beginning of the leaves on the birch tree (beginning of May).
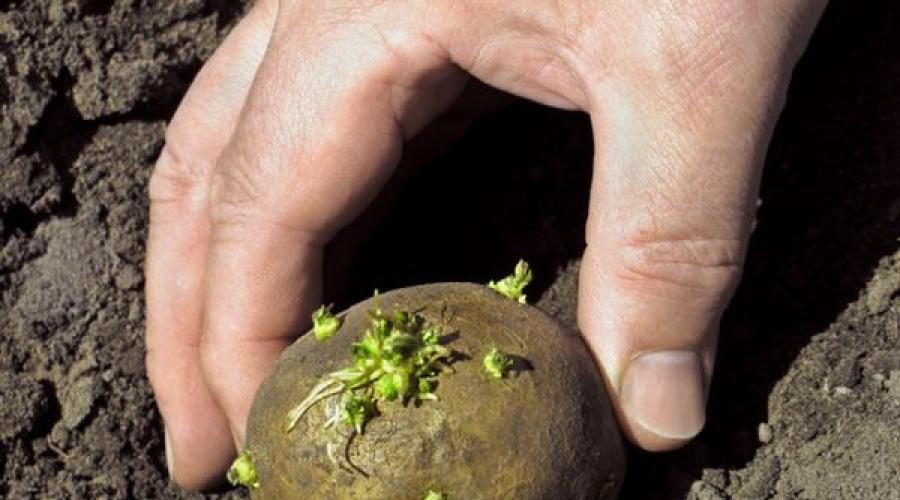
In sprouted open areas tuber sprouts are viable at a temperature of 2-3°C, therefore, by planting such tubers in soil heated to a temperature of 3°C, the harvest can be obtained at the earliest possible date. In this case, it is very important to plant the tubers to a shallower depth, since surface layer The soil warms up earlier and the potatoes do not lack warmth. In the third ten days of April, early May, at a depth of 6-8 cm, the soil temperature increases daily by an average of 0.3-0.4 ° C. Tubers germinated in humid environments and in warm rooms for 30-40 days tolerate planting in insufficiently warmed soil somewhat worse than those germinated in open areas.
Along with the timing on the farm, it is necessary to take into account the soil conditions of individual fields and the purpose of the potatoes. First of all, tubers are planted in areas with light, quickly drying soil, then in moister, cohesive loamy soil. It is more advisable to start planting earlier in fertile or more fertilized fields, since potato plants develop more slowly on such soils and require more time to accumulate a marketable harvest. First of all, the early and mid-early varieties in busy fallow, then early ripening in seed plots.
The most common method of planting is a row planting with a row spacing of 70 cm. In case of excessive moisture (Far East), as well as on peat-bog soils, the row spacing is expanded to 90 cm.
Depending on soil and climatic conditions, ridge or smooth planting is used. When installing disks on the planter, the tubers are buried to form ridges different heights. Hatchers in combination with harrows are used for smooth landings.
In the Non-Chernozem Zone, tubers are usually planted in ridges pre-cut by a cultivator. This method is effective in the northern and forest-steppe regions of the Urals and Siberia, on Far East and in areas with sufficient moisture. The ridges are cut several days in advance or on the day of planting using KON-2.8 P or KRN-4.2 cultivators with simultaneous application. The soil in the ridges warms up faster, creating better water-air and thermal conditions. Cutting ridges on loamy soils significantly improves the conditions for mechanized harvesting.
On loamy soils, due to severe waterlogging, it is impossible to start spring work early, therefore early potatoes can be planted in ridges cut in autumn. In autumn, the ridges are cut for early potatoes in the southern regions. Autumn soil raking with application organic fertilizers allows you to plant tubers 2-3 weeks earlier than in areas with conventional soil cultivation. This technique is especially effective in steppe areas with little snow, where the ridges are less destroyed when the snow melts. Organic fertilizers are scattered after autumn plowing. Then the ridges are cut, incorporating manure or compost into them, which creates a loose ridge where organic matter decomposes well.
Autumn application of organic fertilizers and raking the soil for potatoes is also effective for areas of the northeast and northern regions, characterized by short growing season and lack of warmth. The ridged surface accumulates heat, and during cooling periods it more intensely releases it to the ground layer of air and thereby creates Better conditions for plant growth and development. Tubers are planted in these areas first, as the ridges dry out and warm up faster.
In waterlogged areas of the Far East, potatoes are planted in ridges, which are formed in the fall or spring with a disk bed maker UGD-4.2, which allows planting to begin 7-10 days earlier than with conventional planting.
In areas of insufficient moisture (steppe part of Western and Eastern Siberia, south and southeast) low-ridge and smooth plantings are common, preserving soil moisture reserves. However, when growing potatoes under irrigation, ridge planting is more effective, allowing the tubers to be harvested using combines.
Potato planting depth is the vertical distance in centimeters from the soil surface to the bottom of the furrow where the tubers are located.
Environmental conditions depend on the depth of placement of tubers: temperature, humidity, volumetric mass of the soil, its permeability to air oxygen, which is necessary for the growth and development of plants. By measuring soil temperature at a depth of 6, 9 and 12 cm, it was established that with increasing planting depth, the temperature difference was 3-4°C, which significantly affects the germination of tubers, growth and formation of the potato bush. For example, if 20 days after planting in the shallow planting option, 85% of sprouted plants were noted, then in the deep planting option - 42%. The difference in plant height in shallow and deep plantings reached 3-4 cm and persisted until the tops closed in the rows. During the period of maximum development of the bush in a shallow planting, the assimilation surface of the leaves was 11,900 cm 2 /bush, and in a deep planting - 10,602 cm 2. Shallow-planted plants contained more nitrogen in their leaves and less potassium in their tubers than deep-planted plants.
Observations carried out at NIIKH showed that in the conditions of the South-East the difference in soil temperature at depths of 6, 10, 12, 15, 20 cm reached 6-8 ° C and only from a depth of 15 cm was relatively constant. Therefore, plants on rainfed soil, when planted at a depth of 12-15 cm, developed well and provided a high yield of tubers. On the contrary, in the northern regions on cold soils top scores is achieved by embedding tubers in the top, quickly warmed layer of soil. In the zone of sufficient moisture, the northern and forest-steppe regions of the Urals and Siberia, in the Far East, planting tubers to a depth of 6-8 cm with low-ridge planting and 8-10 cm with ridge planting is most effective. In ridges, the overall depth should be 2-3 cm greater than in a smooth fit. The height of the ridges after planting the tubers should not exceed 12-15 cm, which allows the plants to be hilled during care. Higher ridges expose the tubers of the new crop, contribute to their greening, and severe damage to late blight and other diseases.
B. In the Central Black Earth zone, the Middle Volga region, the southern part of the Urals and Siberia, as well as in the southern regions of the South-East and South-West of the country, where the top layer of soil quickly warms up, the optimal planting depth for food and seed potatoes is 10-14 cm, and with irrigation - 10-12 cm.
In the Non-Black Earth Zone, in order to protect planting tubers and seedlings from frost and snow, which sometimes falls after planting, it is necessary to hill up early potato seedlings. Filling with soil protects them from frost and significantly reduces the contamination of plantations. After freezing, the ridges can be loosened with a harrow if necessary. Sprinkling also has a positive effect: its protective effect is due to the fact that when water cools and freezes at a temperature of 0°C, a lot of heat is released, which protects plants from low temperatures. Sprinkling is carried out before the onset of frost. On small areas create a smoke screen. To do this, piles of garbage are laid out on the edge of the site on the leeward side and when the temperature drops sharply, in morning hours, before sunrise, they set them on fire. If the garbage is very dry, add earth on top to create more smoke. Potato plants damaged by frost must be fed with nitrogen fertilizers at the rate of 1 -1.5 c/ha of ammonium nitrate.
To protect early potato shoots from spring frosts and receiving products, c. In earlier periods, plastic film can be used to cover the plantings. Transparent, light-permeable film is best used for temporary covering of plantings, and black, light-proof film is best used from planting to harvesting tubers.
In studies conducted at the Tselinograd OHI, potatoes of the Priekulsky early variety were covered with translucent film immediately after planting. In one version, frames were installed on the soil, onto which a translucent polyethylene film was stretched; in the other, the potatoes were covered with a film completely spread over the ground [(the edges were sprinkled with a 6-7 cm layer of soil), and they were not removed until the potatoes had fully emerged. The soil temperature under the film on the surface and at a depth of 10 cm was significantly higher than in the area without the film. On sunny days, the difference in temperature on the soil surface under and without film reached 3-7°C in the morning and evening, and up to 20°C in the middle of the day. At a depth of 10 cm, the temperature in areas covered with film was 2-8°C higher than without film.
Thanks to the more favorable soil temperature under the film, potato seedlings appeared 8-15 days earlier than in the option without covering with film. During the germination of potatoes under the film, optimal conditions soil moisture, since water vapor condensed on the surface of the film with inside, and the moisture in the form of drops fell back into the soil. After complete germination, the film was removed. In plants that had become stronger under the film, intensive growth of the above-ground mass was observed. In the third ten days of May, the tops between the rows closed and protected the soil from overheating on hot June days. Plants under temporary film cover were distinguished by powerful development and a larger assimilation surface. Harvesting in areas with film cover began 13-17 days earlier than in other areas. When covering the plantings with film using frames, on average over 3 years the yield was greater by 130.6 c/ha, and when covering with film spread on the ground - by 118.5 c/ha than without covering. The starch content in tubers was 2-1.7% higher.
At NIIKh and the Agrophysical Research Institute, black organic film was used to cover early potato plantings. Before covering with film, the tubers were planted to a depth of 2-3 cm. When shoots appeared, cuts were made in the film to allow the stems to emerge to the surface. Observations of soil temperature and humidity showed that a more favorable temperature and humidity regime is created under the film than without shelter. As a result, plants grow quickly, form stolons and tubers early, and accumulate high yields.
Tubers sprouted in open areas with sprouts up to 1 cm long are planted using potato planting machines SN-4B, SKS-4 and SKM-6. Potatoes sprouted in warm rooms for 30-40 days, as well as combined method, planted with potato planters SAYA-4 and transplanters NRM-6. When manually planting in furrows under a tractor cultivator, the tubers should always be planted with their sprouts facing upward, and they sprout on average 8-10 days earlier than when planted with their sprouts downwards.
Experiments scientific institutions and the practice of advanced farms have shown that, under conditions of sufficient supply of plants with moisture and food, planting thickening accelerates the growth and tuberization of potatoes, increases yield, starch and dry matter content in tubers. In the conditions of the south and southeast, plants with thickened planting better shade the soil, which leads to a decrease in temperature in the tuberization zone by 1.5-3°C. The planting density of early potatoes for May harvest dates in the regions of the south and southeast, June and July - in the conditions of the Chernozem and Non-Chernozem zones should be at least 50-65 thousand bushes per 1 hectare. To do this, potatoes are planted according to the schemes 70X20, 70X25, 70X30 cm. For later harvesting of early potatoes, 40-50 thousand tubers per 1 hectare are planted in late July and early August in the conditions of the middle zone.
IN last years Research has been conducted on the effectiveness of various planting schemes for potato cultivation. It has been established that on well-cultivated sod-podzolic sandy loam and loamy soils of the Non-Chernozem zone, the greatest increase in yield is obtained when planting (60 + 80) X 30 cm.
The advantage of planting with variable row spacing of 60 and 80 cm is less soil compaction in the tuber nest area. During inter-row cultivation and spraying, carried out at least 4-5 times, the tractor wheels pass along wider row spacings (80 cm), and during harvesting, the combine plowshares dig out two rows with a row spacing of 60 cm, along which the tractor wheels did not pass during maintenance. As a result, tubers on ridge slopes are less injured and conditions for soil separation by the working parts of harvesting machines are improved.
To plant potatoes with variable row spacing on the SN-4B planter, the outer coulters are moved inward by 5 cm, and the middle ones are moved apart by 5 cm. When planting, the tractor moves along row spacing 60 cm wide. When caring for the plantings, the tractor moves one row and its wheels move along the middle and butt row spacing, which have a width of 80 cm. To prevent the skipped (outer) bed from becoming overgrown with weeds, during the first pass of the planter, turn off the outer planting apparatus*, forming only three rows.
It has been established that the effectiveness of planting thickening depends on the rate of fertilizer, watering, the size of seed tubers and their germination used in growing early potatoes. With an increase in the rate of fertilizers and watering, the efficiency of thickening the planting of early potatoes increases significantly.
In dry and hot years with insufficient moisture supply to plants, thickening plantings does not increase the yield of early potatoes. Thus, on soddy-podzolic cohesive sandy soils of the Korenevo agricultural enterprise, Moscow region, when unfavorable for tuber formation weather conditions a feeding area of 70X35 cm was more effective than 70X25 cm when planting large (80-100 g) and small (30-50 g) tubers.
Infertile sandy soils have very low moisture capacity and, during short dry periods, do not provide plants with sufficient water. As a result, in areas with dense planting of early potatoes on dry sandy and sandy loam soils In the non-chernozem zone, as well as on other types of soil with insufficient moisture, irrigation is necessary. The efficiency of thickening early potato plantings with irrigation increases significantly.
When planting potatoes, it is very important not only to choose the right area with fertile soil, but also prepare seed material. This is a responsible procedure that requires a lot of attention and dedication. However, it is the prepared material and the correctly chosen planting dates that play almost key role in the subsequent harvest of a rich harvest. In this article we will tell you whether you need to cut potatoes before planting and what crops can be planted next year.
Traditional
Rich potato harvest directly depends on the correct timing of planting. After all, favorable conditions have a great effect on plant growth and tuber formation.
As a rule, in our country these procedures are timed to coincide with the May holidays: thanks to the weekend, people have free time, so necessary for working in the garden.
However, you should not rely solely on this factor, because by this period the soil may not have had time to warm up yet, and the threat of night frosts remains, which negatively affects the germination of tubers.
If planted early, due to insufficient heating of the soil, the development of the plant will be slowed down, but if planted late, moisture will evaporate from the ground. All this will negatively affect the harvest.
If planting dates are not observed, potatoes are affected by fungal diseases, so you need to carefully choose the time for planting tubers in the ground.
It is better to start work at a time when the soil warms up up to 8 degrees to a depth of 10 centimeters. As a rule, at this time there is no longer a threat of severe frosts and the plant begins to fully develop. But the time when the earth will warm up to required temperature, directly depends on the climatic conditions of a particular region.
When to plant potatoes in the middle zone and Bashkiria
The optimal period for planting potatoes in the middle zone is, as a rule, in end of the first ten days of May. It can continue until the beginning of June. But the experience of gardeners shows that even with later It was possible to harvest an excellent harvest, but this requires the accompanying weather conditions.
In Bashkiria in the spring at the beginning of May, as a rule, sharp cold snaps occur, so there is no need to rush to plant tubers in the ground. It is recommended to wait for the onset of stable warmth, which comes after the May holidays. Based on this, the period for planting potatoes in this region is for mid-May, the last one is for June.
 The recommended time for planting potatoes in Bashkiria is mid-May
 Deadlines
The last dates for planting sprouted potato tubers in the ground vary depending on the region. In some areas climatic conditions Allows you to harvest two crops, but that's a separate topic.
In order to reap an excellent harvest and not waste energy in vain, they try to plant planting material before mid-June. But in practice, there are cases of later planting. This can be done if it is possible to provide the plants with water. Otherwise, good tubers will no longer grow in overdried soil.
When planting potatoes too early, there is a risk of seedlings being damaged by frost or plant development being inhibited.
But if planted late, due to lack of moisture, the tubers will not be able to develop normally and reach large sizes.
Preparing for landing
You need to cut the tubers before planting
It is ideal to select tubers for planting medium size. But it often happens that you have to plant quite large potatoes.
The question arises: should it be cut or is it better to use it whole? If you use planting material that is too large, the result will be few tubers in the future harvest, but they will be just as large.
The fact is that sprouts can for a long time feed on the nutrient reserves of the mother potato. But this option is not profitable. In order to optimize the future harvest and reduce costs planting material It's better to cut large potatoes.
When using fine material future harvest it will turn out just as small, since the mother tuber will have few nutrients and the plants will not be able to fully develop.
 Most best option- cut large tubers for planting, and do not use small ones
 How to cut correctly
Potatoes that weigh at least 60 grams are suitable for cutting.
The procedure will look like this:
- Immediately before planting, healthy material is selected;
- The tuber is cut lengthwise or crosswise so that at least one sprout remains on each part (it is better if there are 2-3 of them);
- Immediately after cutting, the potatoes are sent into the ground.
You can cut far before planting not all varieties. Some of them are simply not able to reproduce in this way.
In order to prevent the development of diseases, it is recommended to periodically disinfect the knife used to cut tubers.
There are also opponents to the fact that tubers are worth cut exactly on the day of planting. These people argue that in this way, viruses and pathogenic bacteria can penetrate through an open wound that has not dried.
In addition, the basal buds will not have time to awaken and such a plant will lag behind in its development from those for which the planting material was cut in advance. But here on personal experience It has not yet been possible to check this: in our village no one does this procedure in advance.
How to plant correctly
Planting cut potatoes is no different in its scheme from planting ordinary small ones. The only thing you need to take into account is that some slices may never sprout, so it’s better do some thickening(5-10 percent). Even in this case, seed consumption will be significantly less than when using whole potatoes.
Plants grown from segments develop somewhat weaker. That is why they require special care. The soil should be fertile, well-warmed, and loose. Weeds should be removed, fertilized and fertilized in a timely manner.
It would be advisable to plant green manure on the site. Planting should only be done when the soil is at least warm up to +7 degrees. The planting depth is chosen slightly less than for whole tubers and is 6-8 centimeters.
Why is it necessary to alternate crops in the garden?
Why should the earth rest after potatoes?
Practicing gardeners have already noticed that if you plant potatoes in the same bed every year, then they will productivity is significantly reduced, and the size of the tubers gradually leaves much to be desired. This can be explained by the fact that this plant consumes large quantities of nutrients and microelements of a certain type.

Naturally, after each season the amount of these substances decreases, and the next year’s crop has less and less nutrition. That is why it is recommended, after 1-2 years of potato cultivation, to plant crops in a given place that use a slightly different set of microelements for their development. It is important that the earth has time to rest.
With constant cultivation of potatoes, viruses and pathogens can accumulate in one place and attack the root crop.
Subsequently, a significant part of the harvest will be spoiled. If crops are periodically alternated, then such negative factors are fading away.
What crops can be planted after potatoes?
Practice shows that after potatoes next year you can sow far away not all cultures. The following are best suited for these purposes:
- pumpkin;
- beet;
- spinach;
- radish;
- turnip;
- cucumbers;
- zucchini;
- pumpkin;
- squash;
- legumes

At the same time, it is also important what will grow next to the root crop. It would be best to occupy neighboring beds cabbage, corn, garlic, beans, horseradish or eggplant. It's also a good idea to grow greens nearby.
What cannot be planted
Some crops may be susceptible to the same diseases and pests as potatoes.
That is why they cannot be planted in the same place where this root crop was harvested last season. Such crops include:
- tomatoes;
- pepper;
- eggplants.

All other plants develop normally in areas previously occupied by potatoes. More details in the table above.
Growing potatoes, getting rich and healthy harvest- a whole science. After all, for this you need to accurately determine the timing of planting, select high-quality material and properly cultivate the soil. From cut tubers, finished products are obtained with the same indicators as from whole ones with the right approach.
You should also periodically do crop rotation on your plot, the effectiveness of which has been proven by more than one generation of practicing gardeners.
This popular tuber has not only nutritional, but also healing properties, thanks to amino acids, mineral salts and vitamins. Potatoes are higher in calories than others vegetable crops, but the proteins and easily digestible carbohydrates contained in the fruits have a beneficial effect on human body. Therefore, almost all summer residents strive to grow potato plantations on their plots.
About landing dates
Every year the climate changes, becoming drier, which is a real scourge for the potato crop. Gardeners also know firsthand what return frosts are in the spring and early colds in the fall. Because of them, the potato growing period is not as long as we would like.
Therefore, in order to be able to receive high yields, it is recommended to plant early ripening potato varieties, maintaining the optimal planting period. By choosing early tubers, there is a chance to avoid late blight.
Planting a crop with short term growing season will allow you to get young potatoes in early summer. With proper agricultural technology and early sowing, it is possible to harvest crops from mid-season varieties before the arrival of autumn.
Planting potatoes
Each farmer has his own criteria by which he determines the time of planting. Some rely on moon calendar compiled for each year. Others wait until May, when stable warmth sets in. Still others rely on their intuition.
According to the rules, the timing of planting potatoes is determined by the variety of tubers and regionality. When planting fruits in May, it is difficult to obtain young potatoes in June, even when using early ripening varieties - their growing season lasts 60-80 days.
For some areas (for example, Siberia), the last month of spring is the most suitable time to plant potatoes. But in the southern regions during this period it is time to collect the first harvests.
Experienced farmers consider the readiness of the soil, which must warm up to the required temperature, to be the main criterion determining the time for planting potatoes. In each region this happens at its own time, which varies from year to year.
Potato sowing time by region
- on South ( Krasnodar region) early potatoes are usually planted in March, mid-season varieties - in early April;
- for the middle band ( Leningrad region, Moscow region) end of April is more acceptable;
- in Siberia and the Urals, the appropriate temperature occurs in the first week of May.
When wondering when to plant potatoes in central Russia or any other region, the gardener, first of all, checks how much the soil has warmed up. If the thermometer shows +8 degrees at a depth of 12 cm, you can safely plant tubers.
To confirm that the time has come for landing, it is recommended to remember the ancient folk method. Ancestors always paid attention to the “behavior” of trees. A good indicator in in this case are bird cherry (waiting for it to bloom) and birch (the first leaves should hatch on it).
Secrets of growing
Choosing the right time for planting does not guarantee a good harvest. There are many factors that allow you to grow tuber crops, and all of them must be taken into account:
- seed tubers should be selected of medium size, weighing 50-70 g, undamaged and untouched by diseases;
- Pre-sprouting potatoes will speed up all processes, allowing you to get a harvest earlier than planned;
- the choice of cold-resistant varieties will improve the cultivation of early potatoes;
- cutting the tuber will increase the number of eyes, which ensures a good harvest;
- It is important to choose the right type of planting based on the climate and soil conditions.
Considering these points, as well as the time it will take to plant early potatoes, you don’t have to worry about whether the end result will be successful.
Germination methods
Preliminary preparation is especially important for early potato varieties. There are several ways proper germination tubers practiced by experienced farmers:
- Light method. The tubers are laid out on dry soil, sufficiently warmed by the sun. They are protected from the winds by low sides made of boards. Straw or peat (15 cm layer) is used as a “blanket”. If a decrease in temperature is expected, it is laid on top polyethylene film(not forgetting to open the tubers later when it warms up). In this way, germination lasts 2-3 weeks;
- Wet option. The procedure is carried out on fresh air at a temperature of about 14-16 degrees Celsius. A necessary condition is to maintain humidity within 70-85%. The potatoes are laid out in layers, and each of them is sprinkled with peat and sawdust. The process lasts about 3 weeks, and it is important that the medium is not wet;
- Heated method. In this option, you will need to dig a small pit 40 cm deep. Heated compost is placed at the bottom and covered with a small layer of soil. The tubers are distributed in 2-3 layers, periodically changing them. The whole process will take about a month.
Whichever method of germinating early potatoes the gardener chooses, this event will allow the tubers to better adapt to the beds.
Tuber preparation
Options for planting early potatoes
Among traditional methods There are 4 most popular ones for planting tuber crops. Knowing how to plant early potatoes correctly, it will be easier to avoid many mistakes in the further cultivation of the crop.
- In rows. The most common method is practiced by novice summer residents. The rows are spaced 70 cm apart. The distance between tubers in a line is from 25 to 40 cm (it all depends on the variety). The planting method is simple, but the space is used unevenly, which is a disadvantage;
- Smooth. Unlike the first option, in this one, after planting the potatoes, the plantation is leveled, making the surface flat. This method allows you to slow down the evaporation of moisture from the ground, but complicates the care of the beds, since seedlings may appear unevenly. This method not used on clay soils;
- To the ridge. Having planted potatoes according to the scheme - 50-70 cm between rows and 15-20 cm between tubers, 25 cm ridges are formed within 5 days after sowing. If the soil is characterized by excess moisture, then the mounds can be made higher. This method of planting ensures air circulation and rapid heating of the soil;
- Coming. Tubercles 20 cm high are prepared in advance. In each ridge, 2 rows of planting are placed, so the width of the occupied area will be approximately 1.5-1.6 m (land will be needed for hilling). The tubers are laid out in shallow depressions on the ridges, which will speed up rapid germination. As soon as the shoots appear, they are covered with earth. This procedure is carried out once a week until the tops become full. Such cultivation of ridges ensures good air circulation and prevents weeds from developing.
In those regions where warm spring comes late, tubers do not have to be planted in the ground right away. Seedlings grown in a cellar or greenhouse are an excellent way to get an early harvest of full-fledged potatoes.
If the potatoes don't sprout well
It seems that all the points have been taken into account: air and soil temperature, rules for germinating tubers, conditions have been determined for how to plant early potatoes, but for some reason the seedlings do not appear. Typically, sprouts can be seen within 10-12 days after planting. IN northern latitudes, if May is cool, the process takes up to 3 weeks. But if seedlings do not appear even after this period, you need to look for the reason:
- the temperature regime was not observed;
- soil moisture was not taken into account - it was too wet or, conversely, excessively dry;
- tubers were buried without taking into account the composition of the soil;
- the seeds were planted in unbroken plowed soil (there was no preliminary preparation of the site);
- low-quality potato material was used: diseased, without sprouts, inappropriate sizes, etc.
Advice! If there are moles, mole crickets, and wireworms on the site, they eat up the sprouts, depriving summer residents of their harvest. Before planting potatoes, it is necessary to carry out pest control measures.
A number of measures taken in advance will help increase the germination of tubers:
- preliminary vernalization of planting material;
- the use of biological products for treating tubers;
- It is recommended to disinfect varieties that are not resistant to diseases before planting;
- sorting is carried out not only before germination, but also after it;
- soil preparation is required - harrowing or loosening, with the application of fertilizers;
- Before planting the holes, it is recommended to powder them with wood ash;
- When planting under covering material, compost, straw, and hay should be dried.
If sprouts emerge from the ground but do not sprout well, they should be treated with microdoses of copper to repel pests. Feeding stimulates the growth of eyes in the early stages; in the future, on the contrary, they can slow down the process.
Having figured out in advance how to get an early potato harvest, it will be easier for a novice farmer to plant and grow nutritious tubers on his plot.
Video
Hello, dear garden lovers! Today I want to talk about how to plant potatoes and how to care for it after planting. Early potatoes are the most valuable. For the growth and development of early potato tops, the optimal air temperature is +21 degrees, and the soil temperature for the formation of tubers is +15 (+18) degrees.
Potatoes do not tolerate shade and freezing temperatures. Soil for good growth and development of potatoes should be fertile, moderately moist and loose. Humus (4-7 kg), superphosphate (40-60 grams), potassium chloride (30-40 grams) per 1 square meter. Nitrogen fertilizers must be applied only in the spring - 15-20 grams of ammonium nitrate or 10-15 grams of urea per 1 square meter.
You can see how to SPROUT POTATOES HERE. And HERE To protect our seed from pests, 2 days before planting, the seed tubers should be treated with a 0.2 percent solution of copper sulfate against late blight. - As the soil dries, the area must be harrowed with a rake and the preparation of the beds must begin.
The ridges are made manually with a hoe, raking the soil from the designated row spacing. Before making ridges, you need to mark and set the row spacing.
Planting potatoes should be done with row spacing of at least 70 centimeters, and potatoes in a row are planted at a distance of 30-35 centimeters. - Planting begins when the average daily soil temperature at a depth of 10 centimeters is within +6 (+8) degrees. - Depth of planting tubers when planting in ridges, it should be 4-5 cm from the top of the tuber to the soil surface. And here you can read how to plant potatoes in ridges and not dig up the soil every year. After planting, you need to straighten the ridges and loosen the row spacing. After 5-7 days, it is necessary to pull out all the weeds that have appeared in the ridges, and loosen the row spaces. After another 8-10 days, this event is carried out again. - First hilling of potatoes and first feeding carried out one month after planting.
To do this, it is necessary to add 10 grams of urea, 15-20 grams of superphosphate and 10 grams of potassium chloride per 1 square meter along with irrigation. Second feeding potatoes are carried out at the beginning of flowering, and the dose of potassium fertilizer must be increased to 30 grams per 1 square meter. - During the entire growing season of potatoes, in the conditions of Central Russia and the Middle Volga region, 4-5 waterings are carried out, depending on soil moisture.
The first watering along the furrows is carried out when seedlings appear, the second - after 10-15 days - before flowering, the third - after 12-15 days, when the tuberization process begins. Subsequent waterings are carried out as the soil dries. After each watering, it is necessary to loosen the rows and hill up the ridges. 2 weeks before harvesting, many gardeners mow the tops.
This helps accelerate the ripening of tubers and increase the thickness of the peel, which is the success of good storage. In the article how to plant potatoes talks about the cultivation of potatoes in the regions Middle zone Russia and the Middle Volga region. For regions with other climate characteristics, adjustments are necessary when planting and caring for potatoes. Many gardeners, despite the rather labor-intensive process of caring for potatoes, still prefer to grow them themselves. Purchased potatoes, cultivated on an industrial scale, in most cases do not have good taste, unlike home-grown potatoes.
How to get a rich harvest?
In order to get a rich harvest of tubers, you need to know how to plant potatoes correctly. Listen to the following tips: - it is best to plant potatoes at a time when the soil temperature at a depth of about 10 cm will not be lower than +8...+9 degrees.
Usually, optimal timing for landing are last days April – early May. If you plant potatoes in cold soil, the crop will spend a lot of energy on germination; not every potato is suitable for planting.
The planting material should have small eyes, while the potatoes should be of medium size and should not be soft (flaccid). In order for the crop yield to increase, you need to pay attention to which varieties grow best in a particular type of soil.
Tubers from those bushes that gave maximum yield this year, it is better to select for planting next season; - good results can be achieved if you plant potatoes from another region or at least exchange planting material with a neighbor; - potatoes should be planted different varieties, and they must have different period maturation. This contributes long-term storage harvest, since early ripening varieties usually deteriorate quite quickly.
Therefore, first of all, you need to eat early potatoes, and later ones can be saved for the winter. A prerequisite for obtaining a good harvest is alternating crops. Potatoes are best planted in places where legumes, cucumbers, zucchini or squash, pumpkin, cabbage grew the previous year or onion. But next year, instead of potatoes, it is better to plant pumpkin crops, that is, pumpkin, zucchini or cucumbers.
Planting correctly
Two weeks before planting, bring the planting material into warm room with good lighting. So by the time of planting, sprouts will appear on the tubers. Before planting, you need to disinfect the tubers, for which you should place the potatoes in a solution of boric acid.
The tubers should be kept in the solution for at least half an hour. This will prevent the development of pests that can spoil the crop. You can also increase the yield if you soak the planting material in diluted manure.
To get a good result, potatoes should be left in this solution for two days.
- Place the ridges in the direction from north to south and plant the tubers according to the 80x35 pattern to a depth of about 10 cm; under each tuber you can additionally pour fertilizer, wood ash and humus; cover with a layer of earth or sawdust; level the soil using a rake.
Potatoes should be planted in sunny and open areas. This crop should not be planted in the shade, or in lowlands, where there is a high probability of water stagnation and fog formation. When planting potatoes in areas with close groundwater, tubers should be planted on ridges. If planting is carried out in a dry area, then it should be planted in trenches.
To cut or not?
Should you cut a potato? This is the right of choice for every gardener. Some people believe that if you cut a tuber, it will lose a large amount of nutrients.
In fact, this is not so, because in every potato there is a so-called “top”, in which all the most strong shoots. Therefore, you can save planting material while saving some of the potatoes for food. A negative aspect of cutting tubers is the high probability of infection of healthy potatoes.
This can significantly reduce the yield. Therefore, if you cut off a spoiled part of a potato, periodically disinfect the knife in a solution of potassium permanganate or copper sulfate. If you plan to cut the tuber and plant both halves, then you should cut lengthwise. Otherwise, you will separate the “top” of the potato, which in the future will bring you a harvest, and the second half will either produce a small number of tubers or will not bear fruit at all.
Seedling care
An obligatory point in caring for potato seedlings is hilling the bushes. The change in day and night temperatures can be quite abrupt, which has a detrimental effect on the root system of potatoes and can negatively affect the harvest. Therefore, the sprouted potato bushes need to be hilled up so that only the crown, 2-3 cm in size, remains on the surface.
- Login or register to post comments
More articles about the cottage and garden
How to plant potatoes. Methods for planting potatoes
Perhaps every gardener knows from practice how to plant potatoes. However, is this information complete enough? There are different varieties and methods of planting potatoes, the choice of which may determine not only the difficulty of caring for the crop, but also the harvest itself.
Potatoes are the second bread and an indispensable vegetable. Delicious stewed potatoes has always been an integral dish of the Russian table.
How to plant potatoes. Preparation
Soil preparation and selection Potatoes are a plant that loves light, as well as loose soil, cultivated quite deeply. Loamy and sandy loam soils are suitable for planting.
Before planting potatoes, it is worth choosing the right place where they will be grown, because they are quite demanding on certain factors, such as soil quality and lighting. You should choose a well-lit place for planting, otherwise the plant stems will lengthen and the root crops will become smaller.
The soil should be dug 25-35 cm deep in the fall. It is best, when digging up potato beds, to immediately fertilize them with compost or humus at the rate of 6-8 kg per m².
Do not forget that you can plant a crop in the same place for no more than 2 years in a row, then you need to take a break of 3-4 years. Any plant, one way or another, influences the composition of the soil, selects from it the microelements it needs, and such prolonged placement in the same place attracts pests and can serve as a source of disease.
Potatoes should not be planted in areas where strawberries, tomatoes, eggplants and peppers previously grew. Landing dates Potatoes are planted quite early, but only on condition that the soil has already warmed up to +8°, otherwise the tubers will not take root.
A more accurate period can be determined based on the latitudinal location of your region. Along with potatoes, a place of honor in our grocery basket takes onions. Planting onion sets can be done at approximately the same time, simultaneously with potatoes.
Planting potatoes is possible provided that the soil warms up to a depth of 8-10 cm throughout the day to 5-8 degrees Celsius, and it is physically ready (i.e. not too wet and not too dry). The soil should be especially loose so that it does not cake; after planting, it can be covered with mulch.
It is also worth taking into account the weather factor: the optimal date is the one before which there was no frost for 30 days. The plant produces its first shoots a month after planting; root crops can be harvested 2-3 months after the appearance of these shoots, depending on the variety.
If frosts occur after the first shoots appear, then the shoots themselves must be sprinkled with earth, thus protecting them from the cold. How to plant potatoes - selection and processing Potatoes are widespread, quite difficult to find garden plot where this crop is not grown.
There are quite a lot of potato varieties, but it is worth highlighting the main types of this crop, which differ in terms of ripening time: - early (Alliance, Vyatka, Concord, Yarla, etc.) - the growing season is about 50-60 days; - mid-early (Alisa, Ilyinsky, Nevsky, Robinta) - growing season 60-80 days; - mid-season (Gatchinsky, Diament, Istrinsky, Ogonyok) - growing season 80-100 days; - mid-late (Amadeus, Crystal, Autumn, Fregata) - growing season 100-120 days; - late (Vityaz, Lady Rosetta, Picasso) – growing season of 120 days or more. Seed potatoes - optimal size 10-30 g. Tubers that have undergone vernalization are not afraid of frost and do not need to be covered with soil, and such tubers produce a harvest earlier.
The vernalization process is that the seed material is taken out of storage 2 weeks before planting and placed in 1-2 layers in a barn or room. Healthy tubers should be selected for cultivation: sluggish, black inside are not suitable for planting, just like those , on the sprouts of which there is blackness. Tubers that do not sprout within 4 weeks after germination are also not suitable.
Large tubers should be cut before planting so that each of the resulting parts has either strong or only underdeveloped eyes. The optimal size of planting material is about a teaspoon. Immediately before planting potatoes, tubers that have undergone vernalization can be treated with special preparations that protect against pests. Also, preliminary spraying with immunocytophyte will protect potatoes from diseases early stages, which will significantly affect the development and quantity of the crop.
Methods for planting potatoes Exist various ways planting potatoes and, of course, each of them has its own advantages and disadvantages. The most popular way is planting whole tubers .
Small tubers selected from the previous harvest are taken out two weeks before planting and laid out in a cool room for vernalization. After vernalization, you can plant potatoes using the method you choose, following a few simple rules: - you should select only healthy potatoes without rot and other diseases; - the planting depth should be about 5-8 cm; - it is best to first pollinate the tubers with wood ash.
Planting sprouted tubers with white sprouts less popular, but it is suitable for planting early varieties. In this case, potatoes begin to germinate 2 weeks before planting. Tubers for germination are selected that are large, even and undamaged, and they are germinated at diffused light in a room with a temperature of 16-18° for 3-5 weeks. After this, the tubers are planted on seedlings 1-2 weeks before the planting date, and for this purpose special ridges with grooves of 7 * 10 cm are formed.
The sprouted tubers are placed in these grooves at a distance of half a centimeter from each other, having previously loosened the bottom. Next, the seedlings are covered with a 5-centimeter layer of earth mixed with humus in equal quantities, watered moderately and covered with soil so that a small ridge is formed 3 cm above the edge of the furrow. When 3-4 open leaves appear on the seedlings, the furrows are torn and the sprouted tubers are taken out and carefully separate sprouts with a sufficiently developed root system.
This will be the first seedling. Sprouts that have not formed leaves or have not reached the surface at all should be planted again, having first loosened the bottom of the groove. The selected seedlings are planted in the ground using the chosen method, significantly fertilized and watered at the rate of half a liter per plant.
Watering is necessary if there has been no rain and is not expected during the day. The methods of care and hilling are no different from growing tubers.
As we can see, the methods of planting potatoes differ in the amount of time and labor required, because in the second case it is necessary to grow seedlings from sprouted root crops. But it is the second method that gives an earlier harvest, so when choosing a method it is best to focus on the early fruiting of the variety.
Planting methods are labor-intensive and depend on the degree of soil warming and the selected varieties. Planting methods depending on location Methods of planting potatoes affect, first of all, the difficulty of caring for the crop.
For example, with the square-cluster method, weeding can be completely mechanized, but staggered planting significantly complicates maintenance, but this also has its advantages. Below we will consider in more detail how to plant potatoes: 1.
Square-nested – the area allocated for cultivation is divided into squares with sides of 60-70 cm, and the plants are planted in the corners of these squares. The first hilling is carried out when the seedlings reach 10-12 cm in height, and they do it this way: the stems of the bush are spread in different directions and sprinkled with humus between them, taking into account the fact that the leaves themselves should remain on the surface.2.
Chess method - vegetables are planted in a checkerboard pattern, where the distance between the holes is about 35 cm. This method allows you to plant many more tubers, but caring for it is quite complicated. The checkerboard method is suitable for small areas.3.
Mitlider planting method . The essence of this method is that you first need to form small ridges, about 30 cm wide, the distance between these ridges should be about a meter.
Next, the potatoes are planted on the ridge in a checkerboard pattern, with the condition that the distance between the plants on one side of the row should be about 30 cm. Thanks to this method, caring for the crop is simplified; moreover, provided that the hilling is correct, a groove is formed between the bushes, which simplifies the process watering.4.
Planting in smooth rows - one of the most common methods. Potatoes are planted in rows located at a distance of 60-70 cm from each other, and the distance between the holes in the row ranges from 25 to 40 cm - hilling, watering and harvesting are noticeably simplified.5.
Comb row method planting is very similar to planting in smooth rows, the difference is that initially rows are formed 15-18 cm high and 40-45 cm wide. Vegetables are planted in these rows.
Due to the fact that potatoes are in a favorable climate loose soil, the harvest volume increases. In addition, thanks to this method, the crop can be earthed up less frequently. When choosing one or another method of planting potatoes, pay attention to how close to the surface they lie groundwater.
If they are located in close proximity to the surface, then high ridges make sense. Prevention from pests and diseases Potatoes are a very capricious crop and are not very resistant to pests and diseases, so careful and timely care of the plant is extremely important.
To strengthen the immune system during early planting, it is best to spray plants with immunocytophyte, the solution of which is prepared as follows: 5 tablets are diluted in 125 ml of cold boiled water, after complete dissolution, this preparation is added to 10 liters of water for spraying. The first spraying is carried out when the sprouts reach 15-20 cm in height, the procedure is repeated every 6 weeks. The second treatment should be carried out during the flowering period using fungicides.
The presence of a disease such as late blight delays its development by a couple of weeks. If dark brown spots with a white edge appear on the leaves of a crop, noticeable when moisture gets on the leaf, then it is worth treating the plant with fungicides as early as possible, spraying every week, changing when These are medications to avoid addiction. If the leaves are severely damaged, the yield is reduced by 2-3 times, so protect the plants from pests, mainly from the Colorado potato beetle.
The worst pest for this crop is, of course, Colorado beetle. When fighting it, it is best to use less harmful biological agents: bicol, colorado, phytoferm or bitoxibacillin. They do not cause harm because they are not toxic to animals and humans, and also retain beneficial bacteria.
Preparing the land for plantingAs a rule, everyone who has a summer house plants potatoes, because it is easy, useful, and the harvest will always be useful for the family. First of all, you need to choose the right plot in your dacha or garden where it would be nice to grow potatoes. So, remember the following rules on how to plant potatoes correctly: (See also: How to plant potatoes correctly)
At the same time, do not forget that planting potatoes correctly is not difficult if you remember the basic rules. For example, you cannot fertilize the soil with fresh manure, even if you do not have humus! Preparing potatoes for plantingIt is important to prepare in advance not only the soil, but also the potatoes themselves for planting on the site. Begin preparatory work usually in March-April. Try not to delay this moment too much, so what do you need? First of all, you need to sort out the potatoes:
The options for preparing potatoes for planting are very varied. If you are taught how to plant potatoes, be sure to remember how to prepare them, otherwise the harvest will be weak. The most popular options for preparing tubers for planting in the soil are:
It is worth noting that in order to plant potatoes correctly, they must be protected from disease and weakness. Use for this copper sulfate(1 tsp per 3 liters of water), ready-made or homemade fertilizer (1 tbsp superphosphate, 1 tbsp ammonium nitrate, 10 liters of water), nitrophoska, etc. Just before planting the tubers, stand in ready pits add some ash. (See also: How to boil potatoes) Planting potatoes under hay and strawIt's becoming more and more popular interesting method planting potatoes - under hay or straw. However, you should be more careful with it in regions with low humidity, where forests often burn and temperatures reach dangerous levels, for example, in the Volga region. Meanwhile, planting potatoes under straw is very simple, it is convenient and the yield is excellent. With this option, you can’t dig up the soil: it’s bad for your back and won’t be of any use to the potatoes. However, it is still necessary to prepare the potatoes: select them, warm them up and germinate them. Place potato tubers in rows on a selected plot of land in the garden. Potatoes are placed directly on the surface of the soil, there is no need to dig beds or dig the ground. After this, lay the straw on top of the tubers. The height of the straw can reach 40, 50 or even 70 cm, depending on your capabilities. Potatoes grow well with this planting option, they are very easy to harvest, and removing straw in the fall is also easy. To do this, you can take a rake, collect the straw and take it away or dispose of it. If you decide to plant potatoes under the straw, then you get a number of advantages of this method:
If you are worried about the lack of productivity of the land, then you can lightly sprinkle the potatoes laid on the soil with a mixture of plain soil and fertilizers to improve the yield and protect the tubers from sickness. In general, potatoes grown under straw will last longer than those grown in soil. It is believed that the Colorado potato beetle does not touch potato tubers under straw; this is not always the case, but the risk of this scourge is indeed lower. (See also: How to stew potatoes) Planting potatoes using a walk-behind tractorIf you have a large garden and plan to plant potatoes in large quantities, you should resort to help special equipment. You should plant potatoes with a walk-behind tractor - it’s convenient, fast and much less energy-consuming. With the help of a walk-behind tractor, you can plow the ground in the fall after harvesting potatoes, and hill up beds with potatoes, and plant these potatoes, collect them, weed the area and much more. Anyone who has tried his hand at this with a walk-behind tractor at least once never picks up a shovel! Although in small summer cottages, a walk-behind tractor will only take up space and extra time to work - it’s better to use the old proven method. So, you should start planting potatoes by laying beds in the area allocated for potatoes. In general, with this option, not holes or beds are used, but solid furrows. Using a walk-behind tractor, you should first lay furrows around the perimeter of the plot, and then lay furrows for planting potatoes. Thanks to this preparation, further work it will be much easier and faster. The average distance between 2 furrows for potatoes is 60-70 cm. You have two options for planting potatoes with a walk-behind tractor - you can lay the tubers manually, or you can also use a walk-behind tractor for this. It is convenient that you can fill the beds evenly and evenly with the help of good special equipment. But remember that the wheels of the walk-behind tractor need to be changed depending on your work, for example:
Before planting potatoes, the soil is dug up, unlike the option with straw. It is also worth cultivating the land and fertilizing it useful minerals. In this case, they plow the ground with the same walk-behind tractor that they use to plant potatoes, but they use several options:
It is best to use the first option, because... it is simpler and more convenient. If you plow the ground in a spiral, you will have to level it later, and on a large plot this is a difficult task. But it is worth hilling up the area with a single-row walk-behind tractor or hiller, while the formation of furrows is done using a double-row technique, where one wing stands on an already created furrow, and the second is not a “clean” area, thereby creating a new furrow. The article is the personal opinion of the author and is for informational purposes only. To solve your problem, contact a specialist. We are very glad to see your comments! Rate this article: |