Difficult moments - installing a profile under drywall with your own hands. How to bend drywall and install curved ceilings correctly? How to bend a drywall profile under an arch
When finishing internal surfaces It is often necessary to give the source material a certain, non-standard shape. For these purposes, plasterboard is actively used today, the use of which allows you to create arches, dropped ceilings and others original designs. It is distinguished by its relatively low price, environmental friendliness and a number of other factors that determine its popularity.
How to bend drywall without compromising the integrity of the original material? To create custom designs, it is recommended to purchase special type GKL: arched. However, regular sheets are also suitable for similar purposes.
Features of the material
The material today is actively used in creating various partitions, leveling walls, and organizing arches. Moreover, each of these structures may have niches, transitions and other elements, the manufacture of which requires special knowledge explaining how to correctly bend drywall and give it the required shape.
This material is based on compressed gypsum, which is covered on both sides with layers of paper. It is the presence of such a middle part that determines the high plasticity of the plasterboard sheet. However, despite the many advantages that arched gypsum plasterboard has, it has a number of significant disadvantages:
- When attaching a sheet with self-tapping screws, serious difficulties can arise. This is explained by the fact that the gypsum is additionally reinforced with glass fibers, which increase its strength.
- High price relative to standard types of gypsum boards. That's why arched plasterboard Recommended for use only when creating bent shapes.
Installation of drywall is most often carried out on a pre-prepared structure made of steel profiles. This frame facilitates the process of creating original forms and allows you to secure the source material.
Basic conditions for bending
When bending gypsum plasterboard, it is important to understand that it has a maximum load value, which this material able to withstand. In order to maintain its integrity, certain conditions must be observed when working with it:
- the sheet cannot be bent in the transverse direction;
- the smaller the radius of curvature of the created shape, the thinner the starting material should be;
- when bending with the front part outward, the maximum radius should be more than 100 cm;
- when bending with the front part inward, the radius must exceed 60 cm;
- installation finished design produced in two layers.
If the above conditions are not met, then over time the sheet will return to its original shape, tearing the screws out of the profile.
Frame making
When considering the question of how to bend drywall, one cannot help but note that it is difficult to handle such manipulations. In this regard, steel frames are used in the manufacture of non-standard structures. In particular, they are suitable for creating arches.

The step-by-step process of bending a metal profile is as follows:
- Guides and main posts are prepared.
- The blanks are carefully cut along the entire length into equal parts. The optimal depth is five centimeters.
- Each cut should be parallel to the other. Otherwise the semicircle will turn out uneven.
- The profile is applied to the wall and gradually curves at the required angle. If necessary ready-made form can be created on the floor.
It is important to note that cuts on a metal profile are made either on the inside or outside depending on what type of circle you want to end up with. Fastening to the surface is done using dowels or crabs. Subsequently, drywall is mounted on the frame.
"Dry" and "wet" bending methods
So, how to bend drywall? To do this, two methods are used, differing in approach:
- "dry";
- "wet".
Depending on which bending method was chosen, you will additionally need to prepare the following:
- stationery knife;
- needle roller (awl);
- pencil with ruler;
- brush or roller for wetting;
- putty (gypsum is recommended);
- gloves;
- wooden blocks;
- plywood sheet;
- self-tapping screws;
- metal profiles.
Before starting work, a template is cut out of plywood, on the basis of which the structure will be made in the future.
"Wet" method
The most popular method of bending drywall is the “wet” method. It is relatively simple and does not require special training from the installer. Gypsum absorbs liquid well, while becoming more flexible.

The manufacturing process of a given shape is as follows:
- On source sheet The liquid is evenly applied using a roller or brush. It is recommended to lubricate both sides of it so that the water completely penetrates through the paper layer. In this case, it is necessary to avoid contact of the middle part of the plaster with the liquid.
- The gypsum board becomes ready for use in about 30 minutes.
- One of the ends of the sheet is attached to the template. Then, applying little force to the other end, the material is bent.
- After the second end touches the template, it is also secured.
- The sheet should dry within 24-36 hours.
The described procedure is possible provided that the correspondence between the radius of curvature and the thickness of the material is observed. For these purposes, you can use the following table:
How to bend drywall for an arch? Similar design requires achieving a larger angle, so before wetting on source material it is necessary to make many small punctures. To do this, use a needle roller or an awl. Moreover, punctures are made only from the part that will subsequently bend.
The sheet is placed on the template so that its central part coincides with the axis of the template. In this case, the radius of the latter should not exceed the thickness of the material.
"Dry" method
You can bend drywall using the “dry” method. IN in this case you need to be guided by the following table:
The “dry” method is used only in cases where the required bend has a small radius. The method involves the use of pre-prepared metal frame. The last procedure was described above.
The outer supports of the future frame must have maximum strength, since they will bear the greatest load. A sheet of drywall is attached to the outer profile using self-tapping screws and gradually bends with effort. At the end of this procedure, several self-tapping screws are screwed into the other edge of the gypsum board. The sheet should remain in this position for 48-72 hours.
Drywall cutting
Cutting is used in cases where sharp bends are required or the structure is sufficiently complex shape. The procedure is usually performed with a stationery knife.
Using a tool, cuts are made on one side of the drywall, parallel to each other. The bending radius directly depends on the distance between them. Each cut should end approximately 1-3 mm from the edge of the sheet. While creating non-standard forms You can use the following tips:
- Manufacturing a structure with a smaller radius is possible if you make U-shaped cuts.
- By making V-shaped cuts, you can bend the material in the opposite direction.
Attaching drywall to the profile is carried out, as in other cases, using self-tapping screws.
To create a strong and reliable plasterboard structure, special profiles are used to ensure the highest quality fastening of plasterboard sheets. Simply put, profiles are truly the basis of the entire plasterboard structure. What types of profiles are there for drywall? According to experts, such profiles are divided into two large varieties - partition and ceiling. Today we will get acquainted with the varieties of these fasteners, find out their characteristics, and also consider application options in the form of step-by-step instructions. But first things first.

Key types of plasterboard profiles

So, according to their purpose, all profiles can be of two types:
- rack-mounted;
- guides.
And the representative of each group must perform their specific function. The elements described in the article are marked using Knauf technology; all of them are manufactured in standard sizes:
- UD are ceiling guides;
- CW – partition rack products;
- UW – partition guides;
- CD - ceiling rack.

Figure 1. 1 - UD; 2 - CD; 3 - CW; 4 - UW
Note! If you connect the elements together correctly different types, then you can get various plasterboard structures, including various boxes, partitions, suspended ceilings, etc.

The dimensions and cross-section of these elements are also different.
Variety No. 1. Rack ceiling profiles
Many people know that suspended plasterboard ceilings to mechanical stress. But the profiles must not only be light, but also strong in order to hold the entire structure together with the gypsum board (otherwise, all this may collapse on the heads of the residents). The rigidity of the frame is largely ensured by the ribs of CD profiles.

These types of profiles are rightfully considered the most popular. In most cases, they are used for finishing/construction work. In view of standard sizes There is almost no waste after working with these elements. It is not difficult to guess that these profiles bear the main load of the entire structure. Thanks to them, the reliability and rigidity of the frame is ensured, as well as the quality of fixation of plasterboard sheets. The thickness of such profiles varies, but thin products are less reliable, which is obvious, and require large number fastening elements for installation (we will tell you more about these elements a little later).
As for the length of CD profiles, it can range from 270 to 450 centimeters. But in reality, elements with a length of 300 and 400 centimeters with a cross section of 6x2.7 centimeters are usually used.
Variety No. 2. Guide ceiling profiles
Such profiles are used to create ceilings, walls and various boxes for the purpose of strengthening. The products are installed around the perimeter of walls/ceilings, and rack profiles are also inserted into them.

From the guide ceiling elements, a kind of base is formed for the plane, which will subsequently be sheathed with plasterboard sheets. The length can be 300 or 400 centimeters, while the cross-section is 2.8x2.7 centimeters. All elements are quite thick (thin ones are not used for ceilings), which ensures reliability. The best option and for the construction of wall frames.

Note! If you want, they can make profiles for you according to individual order. In any case, high-quality galvanized steel is used in production, which increases the resistance of elements to exposure environment, temperature changes and other things.
Variety No. 3. Partition profiles for plasterboard
We continue to consider the types of profiles for drywall. So, if we talk about partition products, then, according to experts, there are several varieties, and their use, accordingly, depends on the future thickness of the gypsum plasterboard structure. Thus, UW profiles (in accordance with the same markings of the Knauf company) are used in partitions as guides. Their length varies between 200-400 centimeters, and their width can be 4-15 centimeters.

There are also rack-mount products (or, in other words, CW profiles), which are made with notches that make cable laying easier. They are used in plasterboard partition structures and are load-bearing elements the entire frame.
Such elements are intended for use in vertical structures. The length can range from 276 to 600 centimeters, while the cross-section can be 5x5, 7.5x5 and 10x5 centimeters. By the way, the most popular are profiles whose length is 300 and 400 centimeters.
Separate group – corner, beacon and arched products
As for the arched types of plasterboard profiles, they have holes and cuts necessary to give the profiles flexibility. If we talk about the dimensions, they are the same as those of conventional elements, while the rigidity indicator is much higher. Arched profiles are used to obtain arcs.


It would seem that there is nothing complicated in the formation of arcs, but in reality this is not the case. Although experienced specialists can handle all this with ease.
But with the help of beacon elements, various planes are aligned. For example, when plastering walls/ceilings. The length of such profiles is 300 centimeters. If you plan to create a smooth plane, then you simply cannot do without such an element (for example, to create slopes).

Important information! Beacon profiles for drywall significantly facilitate the difficult work of builders. They are attached to difficult places in order to create a flat surface. Thanks to the material from which these profiles are made, their resistance increases various kinds negative external influences.
Finally, there is more corner profiles. They are used, as the name suggests, to level/strengthen corners (for example, to protect the ends of partitions). Each element has holes with a diameter of 0.5 centimeters, which are necessary for better filling during the application of the putty mixture.

Various fasteners and additional elements

In addition to the profiles themselves, other standard elements are used during the installation process, which should also be prepared in advance. Let's take a closer look at each of these elements.

- Direct (regular) suspension. Designed for attaching a rack or ceiling profile to work surface(see picture No. 1).
- Anchor suspension. It is also used to fasten ceiling profiles, but exclusively to the ceiling. Each element has a rod and a clamp that allows you to adjust the position of the suspension.
- Extension. It is used to connect strips of metal profiles in a variety of combinations.
- Crab type connector. Designed for a cross-shaped connection (and all types of profiles for drywall), and strictly at right angles, structural elements. As a rule, ceiling profiles are connected using a “crab” (of course, in the same plane) during installation of the sheathing.
- Two-level connectors. As you probably guessed from the name, with the help of these fasteners the profiles are attached at right angles, but at different levels.
- The last elements are self-tapping screws and anchor dowels. Designed to connect frame elements to each other or, alternatively, to the main ceiling in the room.
The illustration below shows all the described elements in the order in which they were presented.

What about work tools?
For ease of working with plasterboard sheets, use special tools, allowing you to create designs of the required parameters, and the work is performed more easily and quickly, and the amount of waste is minimized.
In more detail, these tools include:
- metal scissors;
- divider;
- connecting pliers;
- cutter.
Using metal scissors, elements of the required sizes are cut. Pliers, in turn, are intended for connecting segments. By the way, they are in the environment experienced specialists are called staple profiles.


Note! To assemble the structure, the elements in which holes are previously made are connected. This is done using a cutter that punches mounting holes. As for the divider, it is used for corner connection profiles.
Video - What is required to work with drywall?
As you can see, in such a seemingly simple procedure - creating plasterboard structures - literally every little detail is calculated and thought out. All you need is patience and the desire for the result to exceed all your expectations! This concludes the theoretical part and proceeds to practice. First, let's look at how to properly cut plasterboard profiles.

Master Class. How to cut a drywall profile yourself

So, let's get acquainted with the process of cutting plasterboard profiles. To begin with, we note that many people use metal scissors for these purposes, as they consider using an angle grinder too complicated or time-consuming. However, people who have some experience with drywall structures do not think so.

What is the main advantage of using a grinder for cutting metal profiles? First of all, this is that the geometry of the product after cutting remains the same, while after cutting with metal shears the profile is simply deformed (to one degree or another).

Moreover, even if you try to work with metal scissors with the utmost care, the end will end up slightly damaged in any case. This, of course, is not critical, because the defect can always be corrected with the help of pliers. But this will require additional time.

Note! The most unpleasant thing in the cutting procedure is a compressed edge. So, if you crush it, the height of the product will increase, which will cause it to unbend. starting profile when the end is inserted into the groove. This, again, is not critical, but the production culture suffers because of this, which not everyone likes.
Moreover, this way you will cut more slowly. The products will have to be turned over to make cuts on both sides, and then straightened and cut. With the use of an angle grinder, the speed of work increases noticeably, especially if you need many blanks of the same type at once for a particular design.

What should the tool be?
The tool that will be used for cutting the profile deserves special attention. For example, a grinder (angle grinder) with a power of 650 watts will perform well, as well as cutting discs for metal with minimum thickness(from 0.1 to 1.5 centimeters). Thanks to this combination, the metal will go through quickly and without any special effort. Typically, the thinner the disk, the easier it will be for you to cut the product.

However, there is this method and your shortcomings. So, if the work is carried out in an apartment, then nearby objects will have to be protected from hot sawdust and sparks. And in some cases there is simply not enough free space. Finally, “admirers” of the sound of a working grinder - we're talking about about neighbors - they will immediately show up to personally inform you about it.
Note! Once again, it is worth reminding about safety precautions. Use the funds personal protection– work gloves, safety glasses – and handle the tool with extreme care. Try to always stay away from the trajectory of flying sparks. And one more thing - try to always use protective cover for the Bulgarian.
Master Class. How to make a semicircular partition from plasterboard

In yet another step by step instructions we'll look at how to do it plasterboard partition with rounded corner using profiles UW75/CW75. First you need to make markings on the floor, and then transfer them to the ceiling. It is convenient to first mark a right angle (that is, without a fillet as such), and then draw a square (its side is the required radius of the fillet). In order to calculate the length of the profile, you can use the formula:
A = 3.14 x B,
- A is the circumference;
- B is, accordingly, its diameter.
Next, you need to mark the UW profile at 5 centimeters (this parameter will correspond to the width of the side shelf of the CW product). Take a grinder and cut the profile as shown in the image below (that is, you only need to cut the side/bottom flange). By the way, we have already talked about the types of profiles for drywall in the previous sections of this article.

Now you need to align the cut profile in accordance with the pre-marked radius, and in our example, the product is attached to the ceiling using self-tapping screws, and to the floor using dowels. There is no need to skimp on the material - literally every piece should be secured.


When everything is ready, you need to insert a rack profile into each of the five-centimeter sections. In those last elements that will be intended to limit the doorway, it is imperative to insert a beam. Such bars, by the way, can be purchased for all profiles; They are good because they fit closely into the product.


After this, it is necessary to secure all the rack elements to the tex.


After cutting, the plasterboard elements must be placed to the frame and secured with 2.5 centimeter screws. Moreover, fastening should be done in stripes. First of all, the first stripe is completely recorded, then the second, third, fourth, fifth and so on. We recommend starting from the top or bottom, because if you do it from the middle, the profile will sag, making it difficult to tighten the first screw.

To cover all openings in accordance with the technology, L-shaped sheets of plasterboard are used. You must try to ensure that the joints do not fall on those rack profiles that are intended to limit the opening, since here the putty will certainly crack.
The sheet can be pre-cut on the floor, but it is more convenient to do this “on the spot”. It is recommended to take a sheet that faces the opening, screw it, and only then cut through the top with a wood hacksaw or jigsaw. One side is cut through on the side, breaks, then the other side is cut through. This way the work will be more accurate and faster.


How to attach the profile to the walls?
For many this is not a problem. Especially if we are talking about a new room with fairly smooth walls. Fastening is carried out using standard perforated hangers, the algorithm of actions is as follows.
Step one. First you need to secure the hangers to the walls using dowels.
Step two. Then the pendants need to be bent to form the letter “P”.
Step four. The latter has a special hole through which, using fleas, you need to fix the profile.
Step five. First, the profiles are attached, in most cases, to the edges of the walls, then they are leveled and 3 threads are pulled between them. After this, the remaining elements are set and fixed according to the latter.
Video - Arranging a frame for gypsum board
Do-it-yourself plasterboard structures are almost always attached to a metal frame. When installing profiles, you need to focus on the markings, which are carried out at the very beginning of the repair.
To properly mark, arm yourself with some tools.
To carry out marking you need:
- Marking cord (you can find it at any building materials store);
- Marker (for drawing on any surface);
- Square;
- Special construction tape measure;
- Laser level.
First of all, a line is drawn along which a new one will take place plasterboard construction. If smoothing work is being carried out uneven walls, find a protruding point on the wall and place a mark perpendicular to it.
The distance between the wall and the mark will be equal to the width of the profile, plus another three mm. After this, you select one of the corners, another mark is already deposited in it at a similar distance from the wall. Then you take a tape measure and marking line and mark a line on the floor. In this case, the reference point is on these two marks.
On the ceiling the lines are marked in the same way. Lines are drawn directly on the wall, against which there will be rack profiles. The distance between these profiles is 60 cm.
This work requires precision, since the subsequent installation of profiles depends on it.
Connecting profiles to each other
Types of connection:
- Guide connections at the inner corner. Using sharp scissors, cut the shelf to length from one of the profiles; it will be equal to the width of the profile with a margin of 20 mm, for ease of entry plasterboard sheet. You lay and fasten the second profile, which forms an angle, on top of the first.
- Fastening the profile “behind the ear”. Sometimes a section of profile needs to be attached to the base. To do this yourself, you need to remove the shelves. Cut the profile to the required length with a margin of 50 mm, which will fit “on the ear”. After this, the shelves are cut along the line of the border of the allowance to the back. You bend the allowance, the shelves, cut them at a small angle, with access to the pre-made cuts.
- Connections with cuts. Along the fold line of the profile, make cuts to a depth of 40 mm. If you need to get a straight edge, cut along the shelf rather than along the line. You bend and then cut off the back of the profile. Then you connect the profiles.
The angle obtained during the connection is fixed with self-tapping screws.

How to bend a profile
Installing a profile under drywall sometimes requires that it needs to be bent.
Profile bending methods:
- First way. You cut two side parts of the profile, but its base remains intact. The smaller the radius future design, the more often you need to make cuts.
- Second way. In this case, the base and one side flange of the profile are cut. This profile is suitable for the production of elements in the form of a wave, oval elements.
It is often necessary to bend the profile when making arches. When doing this yourself, be careful not to rush so that the profile bends symmetrically.

Bent profile
Bend the profile is a mandatory task if you are making a figured ceiling with your own hands. The more complex the idea, the more difficult it is to install the profile under the drywall.
The easiest way to bend a metal profile is using the notching method. Do not forget that cuts need to be made at equal distances; this work is carried out with great care so as not to break the profile.
Metal scissors – best tool in order to bend the profile correctly.

Profile construction
Whatever design you make, the work is based on a specific algorithm.
Action plan for the construction of the structure:
- Preparation of profiles and drywall sheets;
- Marking;
- Profile cutting;
- Compound;
- Checking the level of all points of the frame.
If communication is carried out in the structure, then it is better to mount a corrugated sleeve here, where the wires and pipes will be hidden.

Installation without profiles
This usually means the glue method. If for some reason it is not possible to assemble the frame, or you think that this extra work, you can attach drywall with glue.
This is done with your own hands, the work is not difficult, but this method is only good if smooth walls. If there are visible irregularities, the sheets will be glued to the bumpy surface, and the aesthetics of such a picture is questionable. Of course, gluing the sheets is easier than building a frame.
This installation is carried out in several stages:
- Studying the configuration of the walls;
- Wall preparation;
- Marking places for glue;
- Transferring markings to plasterboard sheets;
- Drilling mechanical fixation;
- Installation of drywall with glue;
- Adjustment of sheet levels;
- Mechanical fixation.
Whether to put the sheets on glue or make a frame is decided individually in each case, it all depends on the evenness/unevenness of the walls. Adhesive connection made with your own hands can be no less strong.
Profile frames are constructed with the expectation that they can withstand heavy loads under mirrors, chandeliers, and lamps. Therefore, the connections must be strong so that the frame is ready for any load.
Features of installing a profile under plasterboard with your own hands (video)
Popular construction material plasterboard is used to create the perfect smooth surfaces. But now from quality drywall began to carry out design designs of curved shapes - arches, multi-level ceilings, niches. You can create similar decorative components yourself, but first we’ll figure out how to bend the drywall profile to get the desired shape. In addition, you need to learn how to make a strong metal frame to secure the curved part.
For what purposes do you need to bend a plasterboard profile?
Drywall (gypsum plasterboard) is used to create various curly elements. Modern installation suspended floors cannot be built without the use of this material. While creating ceiling design the following elements are used:
- Circles of various diameters
- Regular squares or rectangles
- Waves, steps, sun and many other elements
In addition, the profile will need to be bent in the following cases:
- If formed high arch, the profile can be bent into an arc
- When the ceiling is formed as a single composition with the transition of individual shaped components to the walls
- When installing a niche that has a curved element
- When creating an arched partition with a complex bend
Data-lazy-type="image" data-src="https://remontcap.ru/wp-content/uploads/2017/08/6_3..jpg 320w, https://remontcap.ru/wp-content/ uploads/2017/08/6_3-300x225..jpg 174w, https://remontcap.ru/wp-content/uploads/2017/08/6_3-70x53.jpg 70w" sizes="(max-width: 320px) 100vw , 320px"> 
Any of the above cases suggests that it is necessary to bend plasterboard profile so that the structure is installed based on a given diagram. If you perform all the steps correctly, the profile will be easy to install.
The metal parts of the frame intended for drywall must be bent strictly according to the diagram. Therefore, in order to bend correctly large area profile, study the attached instructions.
Jpg" alt="how to bend a profile for drywall" width="320" height="254" srcset="" data-srcset="https://remontcap.ru/wp-content/uploads/2017/08/20140802161523..jpg 300w" sizes="(max-width: 320px) 100vw, 320px">!} 
Required tools and materials
Working with durable sheets requires the necessary set of accessories. To correctly bend metal parts, make the necessary cut on one of them, and also make them quality installation, we use the following accessories:
- Screwdriver
- Metal screwdriver
- Pencil, tape measure and precise building level
- Special scissors for working with metal
In addition, the following items may be needed:
- Durable metal profiles on which we will fix the gypsum boards
- Various fasteners, such as self-tapping screws
When bending sheets, you need to take care of your own safety; your hands should be covered with protective gloves to avoid various scratches and abrasions. Special safety glasses may also be useful for your work. The procedure for creating structures from profiles of the required shape will take you 20 minutes if you follow the recommendations.
Let's start bending and securing the profile
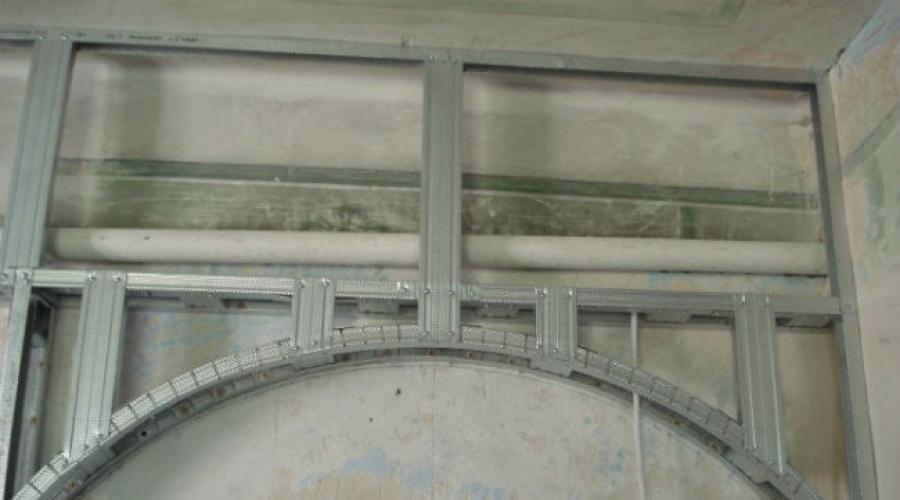
How to bend a drywall profile correctly? The guide profile can be bent, since the rack-mount ones are designed to support the main weight of the future structure. When creating an opening for an arch, you need to use a special arch profile.
All profiles must be bent before their actual installation. Right angle cuts will help give the profile the required form. There are 2 execution methods, depending on what part of the metal profile will be used to install a durable frame:
Data-lazy-type="image" data-src="https://remontcap.ru/wp-content/uploads/2017/08/20140802160235..jpg 320w, https://remontcap.ru/wp-content/ uploads/2017/08/20140802160235-300x246.jpg 300w" sizes="(max-width: 320px) 100vw, 320px">
Jpg" alt="how to bend a profile for drywall" width="320" height="240" srcset="" data-srcset="https://remontcap.ru/wp-content/uploads/2017/08/20140802161546..jpg 300w, https://remontcap.ru/wp-content/uploads/2017/08/20140802161546-174x131..jpg 70w" sizes="(max-width: 320px) 100vw, 320px">!} 
The smaller the radius of the upcoming bend, the more often the cuts need to be made. Often the ceiling is decorated with figures; sometimes the wall can also be decorated with various figures. In this case, the bending must be done after the formation of the first level frame is completed. The profile bending scheme is as follows:
- We make markings for the first frame level. This is necessary, since without this action it is impossible to perform complex figured elements;
- We cut the desired profile to the required length. To perform shortening, you need to use special scissors for metal;
- We make cuts at right angles, one must run parallel to the other, otherwise it will not be possible to bend the element. The step for their implementation may vary, but it is in the range of 50-80 mm;
- We make cuts along the entire length or strictly in the place where the next bend needs to be made;
- We try on the cut material to the finished marking lines;
- We install ready fastener, bending it as it is fixed;
- We fasten all the components, giving them the desired shape.
Before bending begins, the structure is fixed with self-tapping screws. This is an easy way to secure future frame to make it work correct element decor.
To install a structure with many curved shapes, you may need help, since it can be difficult to install a bulky part yourself. You need to watch carefully while working so that everything is done according to the diagram and the desired bend shape is obtained.
When fixing a frame containing curved shapes, each detail must be checked with a building level, because it is very important that all components are placed in a single plane.
