DIY Segway. Collection of electronic parts
Hoverboard inside
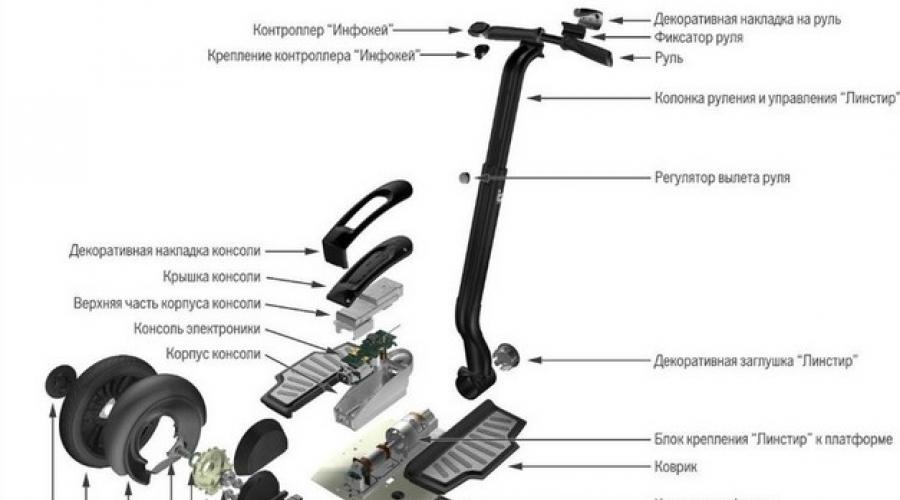
Main details
What does a hoverboard consist of? If you look from the outside, a hoverboard is interesting device. The first is a working platform or board. It is on this that a person stands and, trying to maintain balance, steers, rides or falls. There are two wheels on the sides of the platform, they are what give us the opportunity to ride and move forward or backward.
First, let's look at the platform. The working platform is divided into two parts, the right and left side. Just right for right and left feet. This was done so that it was possible to turn right or left, just by pressing the toe on these platforms.
How does a hoverboard work?

Mini Segway device
Wheels
There are two wheels on the sides. Typically, hoverboards come in 4 types, and they differ in class and wheel size. The first class of hoverboards is a children's hoverboard with wheels with a diameter of 4.5 inches. Small size wheels makes the hoverboard very inconvenient and impassable in some sections of the road.
The next class is the 6.5-inch hoverboard. It already has a larger wheel diameter, but is still intended only for driving on flat surfaces. The 8-inch hoverboard is the golden mean among all hoverboards. He has optimal size wheels that can travel on almost any road.
And the largest is the SUV of all mini-Segways - the 10-inch hoverboard. This is a model that has interesting feature, in addition to large wheels, these wheels have a chamber system. That is, the wheels are inflatable, they have more smooth running, and such hoverboards are more wear-resistant than smaller prototypes.

Frame
The body of all hoverboards is made of different materials, but with the same feature. Everywhere the housing covers the wheels, protecting them from splashes, dirt, water, snow and dust. Hoverboards with small wheels 4.5 and 6 are usually made of ordinary plastic. Since these models are designed for driving on a flat road, and do not develop such high speed, then the engineers decided not to install expensive plastic and thereby not increase the price of the hoverboard.
For hoverboards with 8-inch wheels, the bodies are made of various materials, both from simple plastic and from carbon, impact-resistant magnesium plastic. Such plastic can withstand almost any physical impact and shock. Carbon, for example, is also lightweight material, thereby reducing the load on the electric motors and reducing the rate of battery discharge.

Engines
Once you remove the cover, you should see an electric motor on the sides closer to the wheel. Electric motors come in different capacities. The average among all mini-Segways is 700 watts on both wheels. Or 350 watts per wheel. The fact is that the electric motors of hoverboards operate independently of each other. One wheel can move at one speed, and the other at another, or they can move in different sides, one back, one forward. Thus, this system gives the hoverboard controllability.
It becomes more sensitive to cornering at high speed. You can also turn around 360 degrees. The higher the engine power, the higher the load carried and the higher the speed, but not always. You must understand that the higher the mass of the load on the platform, the lower the speed and the faster the battery discharges. Therefore, hoverboards with powerful engines are more expensive.

Balancing system
The balancing system consists of and includes quite a few components. First of all, these are two gyroscopic sensors, which are located on the right and left sides of the platform. If you remove the housing cover, you can see two auxiliary boards; it is to them that the gyroscopic sensors are connected. Auxiliary boards help process information and send it to the processor.
Further on the right side you can see the main board, this is where the 32-bit processor is located and all control and calculations are carried out. There is also a program there that reacts to any change in the platform on the right or left.
If the platform tilts forward, the processor, having processed the information, sends a signal to electric motors that physically hold the board in a level position. But if the platform tilts more with a certain pressure, the wheel immediately begins to move forward or backward.

It is imperative to remember that all current hoverboards must have two auxiliary boards for gyroscopic sensors and one main board where the processor is located. Older models may have a two-board system, but since the fall of 2015, a change was made to the standard and now all hoverboards and mini-Segways are made with 3 boards.
In Chinese fakes or low-quality hoverboards, there may be one board, the main one. Unfortunately, this mini-Segway has poor handling characteristics. May vibrate or tip over the driver. And subsequently the entire system may fail altogether.
Scheme internal structure Controlling a hoverboard is not as difficult as it seems. The entire system is designed to respond as quickly as possible to any behavior of the platform. The calculation takes place in a split second and with amazing accuracy.

Battery
The hoverboard's power supply system is powered by two or more batteries. Standard inexpensive models usually have a battery with a capacity of 4400 mAh. The battery is responsible for the operation of the entire system as a whole and providing it with electricity, so the battery must be of high quality and branded. Usually two brands of batteries are used - Samsung and LG.
Batteries also differ by class. There are low-level batteries of classes 1C, 2C. Such batteries are usually installed on hoverboards with 4.5 and 6.5 inch wheels. All for the same reason, because these hoverboards are designed for smooth roads, smooth asphalt, marble or floors.

Hoverboards with 8-inch wheels usually use middle-class 3C batteries; this is a more reliable battery model. It will not turn off during a sudden stop or when hitting a curb or a hole.
Large-wheeled 10-inch models usually have 5C class batteries. This hoverboard is capable of driving on almost any road, ground, puddles, or pits. Therefore, the battery needs to be more reliable.
The basic principle of the hoverboard is to maintain balance. At heavy weight The hoverboard driver needs more electricity to maneuver and move.

Other
Many hoverboards also have a Bluetooth system and speakers. With it you can listen to your favorite music and ride with friends. But this system also makes it possible to connect your smartphone to the hoverboard and monitor the condition of your vehicle. You can follow average speed, see how far you have covered. Set the maximum allowed speed and much more.
Many more models have a backlight, it illuminates your path in the dark, and can also flash brightly in time with the music. But you need to remember that music and lighting drain the battery a lot. Many people turn off the backlight altogether to increase the power reserve.
Conclusion
The hoverboard is designed to be compact and lightweight, yet fast, powerful and durable. The main thing is to buy a hoverboard from trusted suppliers who have all the necessary documentation so that you don’t have to disassemble it after an unsuccessful ride.
Is it possible to make a Segway with your own hands? How difficult is it, and what parts are required? Will a homemade device perform all the same functions as a factory-made one? A bunch of similar questions arise in the head of a person who decides to build it with his own hands. The answer to the first question will be simple and clear: anyone who has at least a little understanding of electronics, physics and mechanics can make an “electric scooter” themselves. Moreover, the device will work no worse than one produced on a factory machine.
How to make a Segway with your own hands?
If you look closely at the hoverboard, you can see a rather simple structure in it: it is just a scooter equipped with an automatic balancing system. There are 2 wheels on both sides of the platform. To carry out effective balancing, Segway designs are equipped with an indicator stabilization system. Pulses coming from the tilt sensors are transported to microprocessors, which, in turn, produce electrical signals. As a result, the hoverboard moves in a given direction.
In order to make a Segway with your own hands, you will need the following elements:
- 2 wheels;
- 2 motors;
- steering wheel;
- aluminum blocks;
- support steel or aluminum pipe;
- 2 lead acid batteries;
- aluminum plate;
- resistors;
- emergency brake;
- steel axis 1.2 cm;
- printed circuit board;
- capacitors;
- LiPo battery;
- Gate drivers;
- LED indicators;
- 3 x ATmtga168;
- voltage regulator;
- ADXRS614;
- 8 Mosfets;
- two Springs;
- and ADXL203.
Among the listed names there are: mechanical parts, so electronic elements, and other equipment.
Segway assembly procedure
Assembling a Segway with your own hands is not as difficult as it seems at first glance. If you have all the necessary components, the process takes very little time.
Collection of mechanical parts
- Motors, wheels, gears and batteries can be borrowed from Chinese scooters, and there are no problems at all with finding an engine.
- The large gear located on the steering wheel receives transmission from the small gear on the engine.
- The gear on the wheel (12 inches) is free-wheeling - this requires some modifications to allow the rotating elements to work in both directions.
- A fixed axle, attached by three aluminum blocks (which can be secured with 5mm set screws), forms the base of the platform.
- Using the SolidWorks program, you need to make a drawing of a part that will allow the hoverboard to turn to the sides while tilting the body. After this, the part must be turned on a CNC machine. The machine used the CAMBAM program, which was also used in the manufacture of the box for the emergency brake unit.
- The handlebar is attached to a 2.5cm hollow steel tube.
- To ensure that the steering column is always centered and reverse thrust was more intense, you can use a pair of steel springs.
- The steering wheel is equipped with a special emergency button connected to a relay - this allows you to reduce engine power.
- Motor power supplies - rechargeable batteries at 24 V.
Collection of electronic parts
In order to assemble a Segway with your own hands, it is not enough just to fasten the mechanical parts together. Electronic control is no less important in a hoverboard, because it is a fairly important component of the unit.
- A printed circuit board with a computing function collects information from sensors - gyroscope, accelerometer, potentiometer, and then sets the direction of rotation.
- Without the ATmtga168 processor, the scooter will not be able to work normally. The connection to the computer is made via Bluetooth and RN-41.
- With the help of two H-bridges, control pulses from the base board are converted to the force of the motors. Each bridge is equipped with ATmtga168, the boards communicate with each other via UART.
- All electronics are powered by a separate battery.
- In order to quickly get to the batteries, as well as program the base board and change the parameters of the control loops, you need to make a small box with connectors, equip its body with a trimming potentiometer on top, and also equip it with an electronics power switch.
Segway software
How to make a Segway with your own hands so that it definitely works? Correct - install software(or software). Here are the necessary steps to complete this task:
- The microcontroller software includes a filter for the accelerometer and gyroscope and the PD control loop.
- Kalman and Complemenatry filters will do the job perfectly.
- Write applications using the Java programming language - this will allow you to see the battery charge level, all sensor readings and control parameters.
That, perhaps, is all that is required from a person who decides to make a Segway on his own. Understanding the topic and process, as well as the necessary components, will allow you to build an excellent hoverboard at home.
Nowadays, a small self-propelled platform with two wheels, the so-called Segway, which was invented by Dean Kamen, is becoming increasingly popular. Noticing the difficulty that a wheelchair user had when getting onto a sidewalk, he saw an opportunity to create a vehicle that could help people get around without much effort. Kamen put into practice his idea of creating a self-balancing platform. The first model was tested in 2001 and it was a vehicle with buttons on the handle. It was developed for people with disabilities and allowed them to move independently even over rough terrain. New model became known as the “Segway RT”, and already allowed steering by tilting the lever left or right. In 2004, it began to be sold in Europe and Asia. Price of the most advanced modern models, for example Segway PTi2 - about $5,000. Recently, Chinese and Japanese companies have been creating devices with various modifications and innovative designs. Some even make similar vehicles with only one wheel, but let's look at the classic Segway.


Segway consists of a platform and two wheels placed transversely, driven by two electric motors. The system itself is stabilized by a complex electronic circuit that controls the motors, taking into account not only the driver's inclination, but also the state of the vehicle, which allows it to always remain in an upright, stable position. The driver, standing on the platform, controls the speed by simply moving the handle forward or backward, and when tilting to the right or left - turn. The control board monitors signals from appropriate motion and orientation sensors (similar to those that allow smartphones to change screen orientation) to help the onboard microprocessor accurately orient the platform. Main secret Segway is not so much in the electro-mechanical part, but in the code that takes into account the physics of movement with significant mathematical accuracy in data processing and behavior prediction.

The Segway is equipped with two brushless electric motors made using a neodymium-iron-boron alloy, capable of developing a power of up to 2 kW, thanks to a lithium-polymer battery.
Segway parts
To create a Segway you need two gear motors with wheels, a battery, electronic circuit, platform and steering wheel.

Engine power inexpensive models approximately 250W, which provides speeds of up to 15 km/h, with relatively low consumption current They cannot spin the wheels directly, because the high speed of these motors does not allow them to obtain the necessary traction. Similar to what happens when you use the gears of your bicycle: by increasing the gear ratio, you will lose speed but increase the force applied to the pedal.

The platform is located below the motor axis. The battery, the weight of which is quite high, is also located under the footrest in a symmetrical position, which guarantees that even without a driver on board the Segway remains in vertical position. In addition, internal mechanical stability will be aided by the electronic stability control unit, which is fully active when the driver is present. The presence of a person on the platform raises the center of gravity above the wheel axis, which makes the system unstable - this will already be compensated by the electronics board.
In principle, you can do such a thing yourself by purchasing the required electronics unit on a Chinese website (they are on sale). All parts are installed using screws and nuts (not screws). Special attention Care must be taken to ensure proper chain tension. The batteries are secured via U-shaped clamps with small rubber gaskets to ensure required pressure. It is recommended to add Double-sided tape between the battery and the platform, so that there is no slipping. The control panel must be inserted between two batteries and secured with special spacers.

There may or may not be a control lever - after all, Segway models without it (mini-Segway) are now popular. In general, the thing is interesting and not very expensive, since according to information from friends, the wholesale purchase price in China is only $100.
Let's talk about how you can use Arduino to create a robot that balances like a Segway.
Segway from English. Segway is a two-wheeled standing vehicle equipped with an electric drive. They are also called hoverboards or electric scooters.
Have you ever wondered how a Segway works? In this tutorial we will try to show you how to make an Arduino robot that balances itself just like a Segway.
To balance the robot, the motors must resist the robot falling. This action requires feedback and corrective elements. Feedback element - which provides both acceleration and rotation in all three axes (). Arduino uses this to know the current orientation of the robot. The corrective element is the combination of engine and wheel.

The end result should be something like this:
Robot diagram


L298N Motor Driver Module:

Gear motor direct current with wheel:

A self-balancing robot is essentially an inverted pendulum. It may be better balanced if the center of mass is higher relative to the wheel axles. A higher center of mass means a higher moment of inertia of the mass, which corresponds to a lower angular acceleration (slower fall). That's why we put the battery pack on top. However, the height of the robot was chosen based on the availability of materials :)

The completed version of the self-balancing robot can be seen in the figure above. At the top there are six Ni-Cd batteries for power printed circuit board. In between the motors, a 9-volt battery is used for the motor driver.
Theory
In control theory, holding some variable (in in this case robot position), a special controller called PID (proportional integral derivative) is required. Each of these parameters has a "gain", usually called Kp, Ki and Kd. The PID provides correction between the desired value (or input) and the actual value (or output). The difference between input and output is called "error".
The PID controller reduces the error to the smallest possible value by continuously adjusting the output. In our Arduino self-balancing robot, the input (which is the desired tilt in degrees) is set by software. The MPU6050 reads the robot's current tilt and feeds it to the PID algorithm, which performs calculations to control the motor and keep the robot upright.
The PID requires the Kp, Ki and Kd values to be adjusted to optimal values. Engineers use software such as MATLAB to automatically calculate these values. Unfortunately, we cannot use MATLAB in our case because it will complicate the project even more. Instead, we will adjust the PID values. Here's how to do it:
- Make Kp, Ki and Kd equal to zero.
- Adjust Kp. Too small a Kp will cause the robot to fall because the correction is not enough. Too much Kp causes the robot to go wildly back and forth. A good Kp will make the robot move back and forth quite a bit (or oscillate a little).
- Once Kp is set, adjust Kd. A good Kd value will reduce the oscillations until the robot becomes almost stable. In addition, the correct Kd will hold the robot even if it is pushed.
- Finally, install Ki. When turned on, the robot will oscillate even if Kp and Kd are set, but will stabilize over time. The correct Ki value will reduce the time required to stabilize the robot.
The robot's behavior can be seen in the video below:
Arduino code for self-balancing robot
We needed four external libraries to create our robot. The PID library simplifies the calculation of P, I and D values. The LMotorController library is used to control two motors with the L298N module. The I2Cdev library and the MPU6050_6_Axis_MotionApps20 library are designed to read data from the MPU6050. You can download the code, including libraries, in this repository.
#include
The Kp, Ki, Kd values may or may not work. If they don't, follow the steps above. Note that the tilt in the code is set to 173 degrees. You can change this value if you wish, but note that this is the tilt angle that the robot must maintain. Additionally, if your motors are too fast, you can adjust the motorSpeedFactorLeft and motorSpeedFactorRight values.
That's all for now. See you.
What do we need? To begin with, let’s take wheels from an abdominal exercise machine. Gearbox 12 volts and 160 rpm. Powerbank for 15,000 milliamp hours. To be able to manage vehicle, that is, turn right or left, accelerate and decelerate, we will use modules that we have already used in the manufacture of a homemade lawn mower. This way you can regulate the engine speed. Accordingly, 2 modules, 2 engines, 2 power banks.
The two sets work separately. Suppose we add speed to the right engine, the Segway will turn left. The same thing, but mirrored, when turning right. If you add speed to two motors at the same time, the product will accelerate.
First, let's install the gearboxes. To do this, apply it in the center on plywood sheet, trace the outline and use a cutter to make a recess. In the same way as the gearbox was attached on the left side, we do it on the opposite side.
You need to cut out several of these bars and screw them on the sides. This is necessary so that the plywood does not sag.
We remove the wheels and put them on the axle. As you can see they are different from each other. You need to make two wooden bushings first. We will use a homemade one lathe on wood. The result was two wooden blanks.
Insert the workpiece. Drill a hole and glue the workpiece epoxy resin. (The author made an amendment at the end of the video, read below).
Now we will make the steering wheel. For this we will use a piece sewer pipe. We took the handle from the simulator. We will make holes in the upper part of the plywood and secure the pipe and handle. A Segway's handlebars should be slightly sloping, so we made a hole in the plywood at a slope and trimmed the plastic pipe.
All control modules will be installed on the steering wheel. You need to stretch 8 pieces of wires from the steering wheel to the gearboxes. To prevent them from sticking out from above, we first make a through hole in the pipe and insert the wires.
And now again you need to glue everything with epoxy resin and wait 24 hours. The wheels turned out to be deformed; epoxy turned out to be not a very reliable material. I disassembled the gearboxes, removed the shafts and cut threads on them. I also drilled holes in the wooden bushings. I inserted metal bushings and now it all looks much more reliable. The wheels can also be screwed in very tightly. Plastic pipe did not seem entirely reliable; a shovel handle was inserted inside it to strengthen it.
We put 2 modules in the panel. You need to drill holes in the pipe for the resistors. All that remains is to glue the buttons using hot glue. Route wires to the module, gearboxes, Power banks. Screw on the wheels.

For those who are afraid of connecting the wires incorrectly, everything is described in detail on the modules.
The Segway will also have a bike speedometer. The test version of the homemade Segway is ready. Let's test it.