Do-it-yourself Swedish wall made of metal pipes. DIY wall bars. Installing a ready-made sports corner
Read also
The health of our children is at risk today. Most guys prefer physical activity computer games. A sedentary lifestyle leads to the fact that most of them begin to have problems with posture. Experts recommend teaching your child to exercise from early childhood. Of course, not all parents can afford to equip a full-fledged gym in their apartment. A Swedish wall for children will help you get out of this situation, which can be installed even in small room. Considering what children adore outdoor games, love to climb and tumble on different bars, the wall bars will turn children's pranks into a full-fledged set of physical exercises.
You can buy a wall bar, but it is much cheaper to build it yourself. Your children will be delighted with this simulator. And constant training on it will have an impact beneficial influence for the formation of a child's back.
Swedish wall It’s very easy to do with your own hands. To do this, you will need several long pieces of plastic pipes, tees and a soldering iron for soldering such pipes. Who previously soldered heating using plastic pipes, it won’t be difficult to make such a wall bars. Those who don’t know how, but have a desire to have such a wall bars, can borrow a soldering iron and watch a five-minute training video on YouTube on how to solder such pipes. There is nothing complicated, everything is simple. After training, start making a wall bars with your own hands
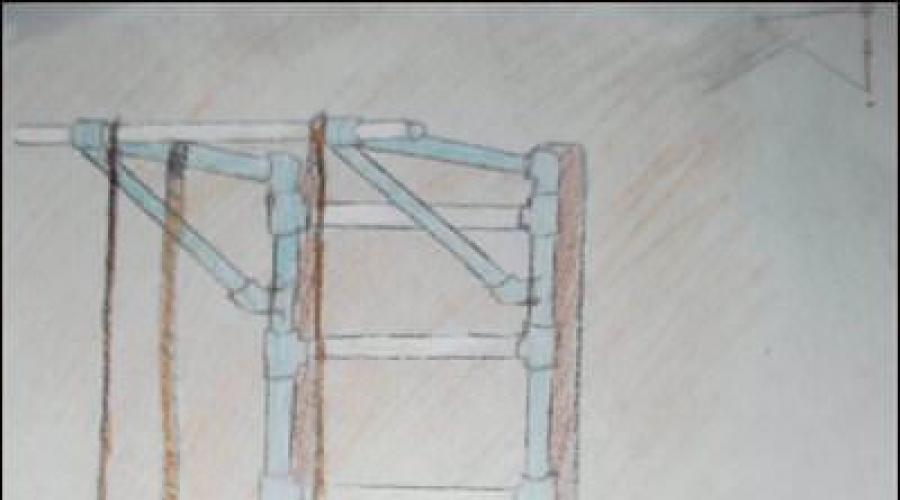
First of all, you need to draw a rough sketch.
DIY wall bars, drawings, sketch

To make your own wall bars for children look more attractive, you can spray paint them.
To secure the simulator to the wall, take 10x200 dowels and sleeves made from pipes. Attach each node separately to the wall.
Do-it-yourself Swedish pipe wall step by step


If you are a fan healthy image life and dream that your child will adopt your life credo from you, then installing a children's sports complex at home will be the most the best solution. The child will be able to warm up without going far from lessons, and also in the cold season, when going out on the horizontal bar in the yard with friends is problematic.
Moreover, sports equipment will help the youngest users develop faster and more harmoniously. Let's talk today about these irreplaceable household accessories, look at what manufacturers offer us today, and also tell you how to make a Swedish ladder with your own hands.

Let's first talk about how the presence of such an unpretentious equipment in the house can change a child's life, taking into account both positive and negative aspects.
Introducing a child to DSC: advantages and disadvantages
Although the Swedish ladder for children can be used from the first years of life, it is suitable for this process stands attentively and carefully. The fact is that young children have a poorly developed sense of self-preservation, and they can get injured simply by expressing their curiosity.
The Swedish ladder is the very first apparatus that will be available to a child. As it grows, you can add more and more complex details.
Advice! Be sure to secure your baby until you are personally convinced that his grip has become reliable and he is confidently holding on to the bars. Be sure to secure yourself with a sports mat that will soften a possible fall and protect you from unnecessary injuries.

Along the way, we must not forget about the psychological formation of a small personality. As soon as the child has become independent, stop hovering over him like a hen.
Do not pay attention to minor falls that will not cause harm to the child's health. Let him learn to rise on his own and strengthen his fighting spirit.

And in order to avoid the risk of injury, take care of high-quality, durable equipment, and allow your child only to use equipment that is appropriate for his age.
- Up to 2 years Children are allowed on children's Swedish stairs equipped with a mat. The height between the crossbars should be around 20 centimeters, that is, accessible for a child’s step.
- From two to three years The child will be happy to ride on the swing. Additionally, low-hanging rings and a rope ladder securely attached to the floor are suitable.

- From three to eight years You can accustom your child to a rope, horizontal bar and playing equipment, such as a basketball hoop, mounted on a ladder under the ceiling.
At an older age, a child interested in sports will be able to independently determine what he needs to supplement his staircase with.
Types of sports equipment for Swedish ladders

Staircase - wall bars
The Swedish ladder itself is a compact structure, firmly attached to the wall. The most interesting thing about it is that it is also the basis of a real sports complex, which can be equipped with various equipment.
Let's list the most common ones:

- Horizontal bar- the most versatile and common projectile. With its help, an athlete can strengthen the muscles of the arms, back, neck, chest, and also use it to stretch and relax tense muscles. Classes on the home horizontal bar will be useful not only for children, but also for stagnant dads, who, remembering their dashing youth, will teach their sons new techniques and exercises.

- – allow you to perform a number of exercises that, in addition to muscles, develop a person’s vestibular apparatus. By exercising on them, you can strengthen your arms, back, stomach, neck and even legs.

- Flexible rope ladder– although complex, but an irreplaceable attribute of a good DSC. Moving along it develops in children not only physics, but also coordination in space. This attribute will certainly be appreciated by dreamers who like to imagine themselves as sea robbers, so run to the store for a spyglass and a pirate hat!

- Rope– is considered the most complex and dangerous projectile installed on the Swedish ladder. That is why you should not allow small children near it. But as soon as the baby can master it, it will help him strengthen the muscles throughout the body and make them much more resilient. If the rope is attached to the ceiling, then the child will get used to heights, and he will not have a fear of it.

- Hammock or nest woven from strong rope– this addition can be safely called a gaming one, but it can also be used for relaxation in between hectic runs around the apartment. They can be made from fabric or large mesh woven from ropes and ropes.

- Trapeze or in common parlance “bungee”- This is another tool for training endurance and coordination. Can be easily used in games.

- Swing– another entertaining attribute that will delight the youngest children.
The remaining shells are log type or support platform For strength exercises we do not consider them, since they have a narrow specific application and are not suitable for all users.
Making a Swedish ladder
Now let's talk about the types of children's sports complexes, and let's figure out how to make a Swedish ladder with your own hands.
Types of stairs
Conventionally, sports stairs can be divided into children's and adults. Both of them can be organized in the form of a complex, firmly attached to load-bearing walls and floors, or a compact exercise machine that can be freely moved around the apartment.

Let's look at them all, and we'll start with options for children:
- First on the list are models that are attached to partitions and walls with powerful anchors. This design very stable, and with good fixation can withstand heavy loads. Such options are very demanding on the strength of the walls - it is best to attach them to brick and concrete foundations, or, as a last resort, to plasterboard partitions, but with the obligatory condition that when installing the wall, special mortgages were installed to give the frame rigidity. If these conditions are not met, the ladder may fall along with the young athlete, damaging furniture and wall decoration along the way.

- The second option is spacer ladders. Stair strings and support pillars Such structures are equipped with retractable spacer locks that wedge the complex between the floor and ceiling. The option also falls into the category of the most stable and safe. Additionally, it is worth noting that the design is portable and does not require drilling the base.
- They are perfect if your walls are not designed for loads, and the floor and ceiling are concrete floors. In this case, the structure is guaranteed to stand even with strong swings. It is worth abandoning this option when there is a suspended ceiling, and the floor is made of sagging boards.

- If the room for a Swedish staircase does not have any supports suitable for DSC, then you can purchase an independent option that does not require fixation. Of course, its stability will be much inferior to the first two options, but it’s better than nothing. The big advantage of such structures is unhindered movement in space.

- Very popular options transform from ordinary stairs into a full-fledged complex, with horizontal bars, rings and rope. Their base is fastened to the wall, and retractable part simply rests on the floor, or is fixed with spacers.
- Such complexes are convenient, first of all, because they take up very little space, while making it possible to place many different projectiles.
Now let's go over the options for home exercise equipment for adults.

- Designs for older users are distinguished primarily by their compactness and versatility. Very often you can find options without ladders, simply suspended from the ceiling.
- When small in size, such simulators replace horizontal bars, parallel bars and other large equipment.

- Such exercise machines may not be attached to walls and ceilings, but can be portable, on legs, as in the photo above. With this complex you can train your arms, back, chest and abdominal muscles.

- Manufacturers are offering increasingly compact, interesting options, suitable for both floor and ceiling exercises.

- Some machines are equipped with a counterweight system for serious weight lifting. Punching bags and other devices for active sports can be hung on them.

- Swedish ladders for adults are often equipped with folding shelves on which the athlete can take a lying position and perform a set of certain physical exercises.
We have named only a small part of home sports equipment. For more details, you can watch the video in this article.
Homemade staircase
As you can imagine, the price of many of the above products can be very high. But what if you want to install DSK? If you are a “hands-on” person, then the problem can be solved! You can assemble a Swedish ladder for a young champion with your own hands, and it’s not that difficult to do.

Here is a list of all the tools and materials that will be required for the job:
|
|
Durable polished boards with a cross section of 40x150 mm, two pieces. We will make bowstrings from them. If you can’t find sanded boards, then take what you have, but you will have to process them yourself. Make sure that there is no rot or cracks on the boards, as they will experience mechanical stress. Additionally, slats of a smaller cross-section may be needed to complicate the design, for example, for a horizontal bar. |
|
|
We will use it to create steps, a horizontal bar and a trapezoid. Give preference to options made from hard wood that can easily support the weight of not only a child, but also an adult. The diameter of the slats must be at least 35 mm. Determine the quantity yourself based on the assumption that the steps will be located at a distance of 20 cm from each other. |
|
|
To secure steps. |
|
|
A strong rope with a diameter of at least 1 centimeter. We use it to create a rope ladder and trapeze. Also suitable as a replacement wooden steps on the Swedish stairs. |
|
|
You can buy gymnastic rings at a sporting goods store and attach them to an existing structure. |
|
|
Powerful steel corners for attaching bowstrings to the wall. Minimal amount- 4 pieces. |
|
|
We use them to connect corners to walls. |
|
|
Using a bolted connection, we connect metal and wooden parts designs. |
|
|
We will use a hammer drill to drill holes in the wall. By installing a drill chuck in it and switching it to drilling mode, you can drill holes in wood. If there is no chuck, then look for an electric drill. |
|
|
We will use drills to drill holes for the steps and bolted connections. You may also need to buy a metal drill to expand the holes in the steel corner to the desired size. |
|
|
We use it for cutting workpieces. |


Additionally, you may need: sandpaper of different grades for sanding structural elements; kit wrenches; screwdriver or Phillips screwdriver; jigsaw; rubber for feet.
You can refuse to use paint and varnish products - just sand the surface well. The fact is that kids love to try everything, and it is not advisable for particles of varnish to get into the stomach, besides, such a coating becomes slippery if you walk on it in socks.

To protect the wood from dirt and give it beautiful shade it is better to use natural impregnations based on natural oils and wax.
So here you go step-by-step instruction How to assemble a simple Swedish ladder:
- We cut both strings to the same height.
- Cut off the protruding external corner to remove the potentially traumatic area.
- We carefully sand the boards. It is better to use a grinder for these purposes so that the work is quick and of high quality, but you can also sand it manually. The procedure begins with a rougher sandpaper, then we reduce its abrasiveness, and finish it with a “zero” number 280 or more.
- We mark the holes for the steps, making sure they are parallel. The distance between them is 20 cm.
- We drill holes. Make them a couple of millimeters smaller than the diameter of the round slats.
- We cut the round rail to length - the working part of the ladder measures 55 centimeters. Consider the reserve that will go into the bowstring bodies. All slats must be the same length
- Mark on the edges of the slats the distance at which they will go into the boards, and slightly sharpen the ends with a knife, without interfering with the marks.
- Lay one string flat on the floor.
- Lubricate the first hole with PVA glue or wood glue, and stick the end of the strip into the hole. Using a wooden or rubber mallet, with sharp short strokes, drive it tightly into the board to the mark. Apply blows not to the step itself, but to the block attached to its end, so as not to “break” it.
- Repeat the procedure with all steps.
- Lubricate the opposite ends of the slats with glue, and place a second string on them at once, having previously directed all the steps along the holes.
- Tap the string with a mallet evenly along its entire length, sealing the connection.
- Now sand all the tips of the steps protruding beyond the borders of the bowstrings.
- Leave the structure to dry for several hours, then treat the wood with impregnations.

Install standard option, or make a horizontal bar for a house with stairs - this is your personal choice. Any wooden structure can be made by a home craftsman, the main thing is to carefully develop the design and use quality materials, capable of withstanding loads. We wish you success in your endeavors!
So: it was on frosty winter days, sitting with a friend in a spacious garage-workshop, warming up by a homemade stove and remembering the damned summer heat, that I had a conversation with a friend about the fact that it would be nice to buy a small apartment for the younger generation sports section.
Having surfed these Internets, we came to the conclusion that it is quite wasteful to give 200 hard-earned American money for an outright pipe-painted hack. It was decided to do something simple, but with my own hands, and, as they say, with my soul.
As shown deductive method— there’s no easier way to make a wall bars: little material is required, it takes up very little space, kids play monkeys on it with great pleasure, it’s perfect for “doing pull-ups a couple of times a day and working out your abs”, and most importantly (as tests have shown) it’s very convenient to hang on it clothes.
Lumber was purchased at a local store, namely: a 50mm by 120mm six-meter pine board, beech shovel handles for crossbars, and a few consumables: sandpaper, a couple of screws, and the like.
We've brought all the necessary stuff to the workshop - we can start. What I have in my apartment, what my friend has, the ceiling height is 2.5 meters: it was decided to make racks 2.38 m - this is so that the ladder attached to the wall in no case rests on the molding, and below so that between the lower end and the floor there was approximately a 6-centimeter gap, so debris would not accumulate in this place, and if anything happened, you wouldn’t have to be tricky with the rug.
The boards, cut to size, were run through an electric jointer and sanded with a belt sander (this stage, unfortunately, was not included in the photo session - my hands were busy, but I think everything is clear). Further using hand router All edges of future racks were chamfered - the rounded corner will last longer during use and is simply beautiful.
After a series of tests, the results showed that optimal distance between the crossbars of the wall bars is 300 mm, which means 8 crossbars are required for one ladder.
Using a core drill with a diameter of 35 mm, according to the markings, we make seats for crossbars, it is important to maintain the same drilling depth so that there is no confusion later during assembly.
As I already said, the crown had a diameter of 35 mm (well, there was no other), and the cuttings, that is, the crossbars, were 40 mm. I had to make a little adjustment and sharpen the ends of the crossbars with a knife so that dad would fit into mom, but it turned out very decently and neatly (I would even say it turned out successfully, because many cuttings had not a round but a slightly oval cross-section and when planted in a nest with a diameter of 40 mm in some unsightly cracks could appear in some places).
It seemed to us that a ladder 100 cm wide would be just right: subtract the thickness of the racks and add the landing depth of the crossbar (all in millimeters): 1000-(50+50)+(20+20)= 940. This means 94 centimeters is the length of the crossbars.
We cut the crossbars on a corner cutter and use a knife to remove the extra millimeters from the ends to fit into the socket of the stand. Using 180 grit sandpaper, we pre-sand the crossbars.
Next, we make through holes in the racks to attach the crossbars to them: the core drill has a guide spike in the center, which leaves a recess slightly larger than the total depth of the drilled socket, since the recess is located strictly in the center of the socket, it is through it that we drill through the racks, For this we use a wood drill with a diameter of 5 mm.
After the drilling procedure, we carefully sand all the visible parts of the racks of the future wall with fine sandpaper of 240 grit, especially painstakingly sand the crossbars - the slightest burr on them can become a potential thorn in the palm.
We begin to assemble the structure: coat it with glue landing nests on one post (to prevent the crossbar from turning when a particularly strong primate interacts with it), insert the crossbars into them, then use a long 4-mm drill to drill the crossbars through the post and, naturally, screw long screws into the finished holes.
The second side is a little more complicated: just like in the first case, we coat the landing sockets on the second rack with glue, and placing the first rack with the already secured crossbars on the table (the side where the screw heads are visible), we place the second rack on top and combine the landing sockets with the corresponding ends of the crossbars.
In principle, the two of us did it in about twenty minutes, the three of us would have been easier, and all because the crossbars had difficulty fitting into the rack and, to be honest, at some point we had to use a sledgehammer. Having driven the ends of the crossbars into the second rack, we drill them on this side and tighten the screws.
Now it’s time to make it beautiful: we cover our ladder with zip guard golden oak wood impregnation and a day later we varnish it. After drying, we take the finished wall home and install it.
For installation, we use ten-centimeter pieces of stainless strip with a width of 25 mm and a thickness of 4 mm. We make three holes in the segments: through the central one we attach them to the back side of the racks, and through the outer ones we fix the entire structure to the wall using anchors. It seemed to us that six such fastenings were enough.
Well, the wall bars are in their place and the kids are already happily climbing to the top, and our plan is to make metal crossbars on which the rope and rings will be attached.
In the basement of the garage there were suitable, smooth and, most importantly, not rusty pipes with a diameter of 3/4 inch. The pipes were cleaned and polished, and “ears” were welded to their ends, one ear transverse to the end of the pipe, and the other in the longitudinal plane, but not to the end but to the surface of the circle.
Holes for fastening are drilled in the ears. One end of the crossbar is attached through an eye to the wall bars using a powerful screw with a hex head.
The opposite side is attached using an anchor to a concrete crossbar running along the ceiling of the corridor; when fastening in this place, slight difficulties arose: the wiring detector showed the presence of it exactly in the place where it was supposed to drill a hole for the anchor: it was necessary to make a hole in the eye of the crossbar a little higher and thus bypass the wire.
Despite the unexpected obstacles, everything turned out great and the metal crossbars were securely fastened, and the rope and rings took their places on them and now the little ones are having a blast in this sports corner to the fullest.
For those who are interested I will voice it bbudget for this event:
- Six-meter board 120 by 50 - 100 hryvnia
- Beech cuttings 8 pieces for 11 hryvnia - 88 hryvnia
- Various fasteners - 30 hryvnia
- Consumables - 30 hryvnia
- Old pipes - free
- Rope and rings - 150 hryvnia
- Experience is priceless
- Or approximately 1600 rubles