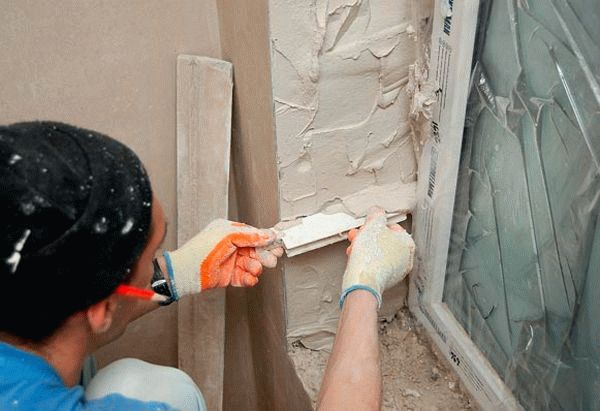
Plastering slopes of windows and doors. Plastering slopes is the basis for high-quality framing of windows and doors. Preparation of putty mixture
Plastering window slopes dates back to the time when windows in their modern form became familiar to humanity. The technology for this type of work is so elementary that even an untrained beginner can easily handle it. Moreover, there are now many more plastic windows than wooden ones, and plastering slopes on such windows is even easier.
Selection of tools

Each master thinks differently about how to plaster slopes and what tools to use for this.
For indoor work, do not use a level that is too large or small; a meter level is best. Also stock up on sealant and a knife.
Before plastering the slopes on the windows, check whether all the gaps are properly filled with foam; you may need to have the installers correct any deficiencies.
If you decide to plaster the slopes with cement mortar, purchase a trowel and a trowel, and to work with Rotband you will need different sized trowels, a wide spatula and a sponge trowel.
Preparatory work

High-quality plastering of slopes with your own hands is impossible without following the following preparatory procedures:
- remove excess polyurethane foam using a knife;
- clean the surfaces with a brush with metal bristles;
- remove dirt and construction debris;
- start priming work (inside a dry room you can use a liquid cement solution or antibacterial substances);
- along the entire perimeter of the window frame to the base of the wall, it is necessary to apply a sealant that will increase waterproofing (for such work, substances containing silicone are used, with its help the windows will not sweat, working with it is simple and comfortable, it is inexpensive and brings a lot of benefits) .
What solutions are used for plastering slopes?

It is necessary to plaster the slopes both indoors and outdoors. For work inside the room, you can use a mixture of sand and alabaster in a ratio of 1:2. A solution based on cement and sand is mixed 1:3, and a mixture of cement, alabaster and sand - 1:1:2.
Plastering slopes with your own hands becomes easier to do thanks to the use of the Rotband dry mixture. The cost of such material is certainly not small, but it lays flat and has insulating and antibacterial properties.
To finish the slopes outside, you can use only cement mortars: they are not afraid of changes in air temperatures, different humidity and chemicals. The main thing is not to forget to mix liquid glass and plasticizer into this mixture.
The process of plastering slopes

Before you begin installing the beacons, calculate at what angle the surface will be installed. Experienced builders call this indicator “dawn angle”, and set it using a protractor. Don’t be too confident in your eye; the result of installing the surface “by eye” will not be very pleasant and will require rework.
Now you can start installing beacons. On the outside, you can use a flat wooden strip or a metal profile, and near the frame you can’t do without an aluminum corner. The external beacon, after completion of all work, can be removed, and the internal ones will be covered with plaster mortar.
The outer beacon is fixed to the surface using nails or self-tapping screws, and the inner beacon is placed on alabaster or cement until completely dry.

If you need to cover an area with a thick layer of mortar, give each one time to set. The maximum permissible density for pouring mortar from cement and sand should not exceed 2 cm, for gypsum mortar - 5 cm.
If you decide to plaster newly installed plastic windows and notice a protective film on them, do not rush to remove it until the slopes are ready. Such work is usually very dusty, and the film will help protect the frame from damage and dirt.
But, if you do remove the protection, apply masking tape or polyethylene to the window.
Do not rush to apply one layer of mass on the second, give each of them time to dry - this will allow you to protect the walls from cracking.

The density of the outermost tier should cover the beacons. After pouring the mortar, all excess mass can be removed using a spatula or plaster corner. As a result of such actions, you can get a flat and smooth surface.
At the next stage, you can begin to grout the slopes with sandpaper and make them smooth.
After this you need to draw the corners. To do this, you will need to remove all external beacons and use a grater and a grater. The grater should be leaned against one surface, and the grater should continue to apply the mixture and level the corner. After this, the same work is carried out on the other side.
The next step is painting. To do this, it is better to buy water-based acrylic paint. If your apartment is dry and warm, the slope does not need to be treated with a primer before painting. But, sometimes (especially in rooms with high humidity), it is still worth covering the surface with an antibacterial primer solution.
Please pay special attention that the plastic may be exposed to the sun and will expand. To prevent the frame from cracking and deformation due to this, use this advice: when you finally level the plaster, use a metal spatula to cut a notch 3-5 mm deep, and then fill it with a colored sealant (to match the cladding) based on silicone. Due to its elasticity, silicone will protect the structure from possible deformation.
In conclusion, I would like to say that it is quite possible to plaster slopes yourself, having a certain amount of knowledge. But, if you have never held construction tools in your hands, let experienced and knowledgeable people solve the problem of “how to plaster slopes.”
The approximate cost of plastering slopes is shown in the table.

| Name cost element |
Unit. | Baz. price, rub.) | |||
| Resource consumption rate | |||||
| Construction labor costs | person/hour | 9,52 | 383,06 | 431,29 | |
| Middle class builders | person/hour | 9,75 | 3,4 | 3,6 | |
| Construction lifts | mash.h | 24,64 | 1,16 | ||
| Ready-made finishing cement-lime mortar | m 3 | 597,93 | 4,4 | ||
| Water | m 3 | 3,6 | 0,35 | ||
| Construction garbage | T | 8,1 | |||
| Cost indicators | |||||
| Payment to workers | rub. | 3646,73 | 4205,08 | ||
| Machine operation | rub. | 28,58 | |||
| Material resources | rub. | 2632,15 | |||
| Total direct costs | rub. | 6307,46 | 6865,81 | ||
The slopes of windows and doors of any building must be made in accordance with the general style concept of the premises or the design of the facade. In order for the decorative coating to adhere well to them and please the owners of the house for a long time, the surface must be prepared and leveled. Perhaps the simplest and most cost-effective option for buildings made of stone or concrete is leveling with plaster, especially since you can do everything yourself. The technology of this process for slopes is generally similar to plastering any surfaces, but there are important nuances that must be taken into account.


Peculiarities
Since the slopes will almost touch the window frames or door frames, you must ensure that the windows and doors are installed correctly before applying the coating. If you have to troubleshoot after completing all the work, then, of course, the plaster layer will suffer, and the whole process will need to be repeated again.


Plastering slopes, in addition to the main tasks of leveling and decorating, performs some related functions:
- additional vapor and moisture insulation;
- improved thermal insulation;
- additional noise protection.
Therefore, it is important to select the right materials and tools and carefully follow the recommendations so that the resulting coating does not crack and lasts a long time.


What will you need for the job?
The main material is plaster mixture. There are two types of plaster most commonly used: gypsum and cement-based.


Features of the cement mixture
There are compositions for rough coating, including coarse sand, and for finishing surface finishing - with fine-grained sand inclusions. Such solutions can be quickly prepared and are quite easy to apply. But you need to take into account that it takes a lot of time for the layer to dry completely, and this will increase the duration of the repair as a whole.


But the diluted mixture sets so slowly that even an inexperienced performer will be able to cope with the work. Another plus is the inexpensive price.
Properties of gypsum plaster


The gypsum-based composition is also easy to prepare, but it dries very quickly, so it requires certain training of the worker. The ability to absorb moisture is also not always beneficial. If the mixture is used in the dry interior of a house or apartment, this property, as well as the ability to release excess moisture, can be considered advantages. But it is still not recommended to coat a surface in direct contact with precipitation with such a composition. In terms of price, such plaster is somewhat more expensive than cement plaster, but if you take into account the more economical consumption, it may end up being even cheaper. There is another option - special acrylic mixtures.


They are universal and can be recommended for any surface. But the cost of materials is such that not everyone can afford to use them.


But you also need to prepare primers in advance: deep penetration and finishing. Putty and sealant may be needed.
Materials
- The following tools should be at hand:
- rule of the required length;
- level at least 1 meter long;
- wide spatula;


- ironer;
- grater;
- construction knife;
- pencil, preferably graphite.


It is necessary to prepare two containers: for water and plaster mixture.
It is most convenient to plaster along beacons, which are usually used as smooth planks, profiles or special metal corners.
They immediately need to be prepared in the required quantity, since if you need to plaster the slopes of a row of windows on one wall, then the beacon frames are fixed on all of them at once on the same level.


If the thickness of the plaster layer is more than 2.8 cm, you will need a reinforcing mesh.
How to plaster?


All work must be carried out at a temperature not lower than 7 degrees. But it is also advisable to take into account the recommendations of material manufacturers on this parameter.
Window finishing

First, you need to pay attention to the fact that the gaps between the window frame and the wall are filled with polyurethane foam, which can collapse under the influence of temperature and humidity changes. In addition, the same factors cause slight deformations of the frame, and this will be enough for the slope coating to crack prematurely. To prevent such troubles, it is recommended to do the following manipulations. Cut off excess foam, use a construction knife or the corner of a spatula to run along the edge of the frame around the entire perimeter to create a shallow groove, which is filled with acrylic sealant. Cover the entire surface of the foam with the same composition; when it dries, a film of additional vapor barrier is formed.


Sometimes the question arises whether to install a window sill before finishing the slopes. On the one hand, it is more convenient to work when the attached beacon strips are supported on it. Another argument in favor of this solution is the ability to perform additional thermal and vapor barrier with the same solution of the area under the window sill. But on the other hand, there is a danger of damaging it during the plastering process.
The width of the slopes depends on the thickness of the walls, and it must be taken into account that the angle between them will differ from 90 degrees. Derivation of the so-called dawn angle creates some complexity. Its value is usually indicated in the project by the developer or designer and is 5 - 7 degrees. This is necessary for better penetration of daylight into the room.


If a specific angle is not specified, it is determined using a simple calculation: 1 cm of deviation to the side of the frame for every 10 cm of slope width. For convenience, you can draw a guide line with a pencil on the window sill, if installed. The upper slope is most often made at a right angle.
Now you need to clean the surface, this can be done with a stiff brush. It is necessary to remove all layers that fall away. If there is old plaster, it is better to tap it to find where it is coming away from the wall. You need to try to remove these areas, otherwise they may fall off during the process or after finishing the work and ruin the whole result.
All holes and potholes must be filled with putty. After the putty has dried, treat the entire surface with a deep penetration primer, this will improve adhesion. If a cement mixture is used, the priming step can be omitted, and the surface can be slightly moistened immediately before applying the plaster.


Securing beacons
When the entire surface has dried properly, beacons are installed. You can prepare a frame, a kind of formwork, which is fixed around the perimeter so that the planks slightly protrude beyond the edge. Or use special corners. If the window sill is already installed, the side strips rest on it. If not, you can screw in a self-tapping screw for support.
Now, in the middle of each slope, profiles or similar strips are installed on the line of the dawn angle. Deviations are verified using a level and plumb line. You can attach it directly to the solution. To do this, throw a small amount of the prepared mixture onto the surface, install the strips accordingly and press firmly. After drying, you can continue working.


Plastering
The required amount of solution is prepared, especially for gypsum compositions, as they harden quickly. In this case, you should strictly adhere to the manufacturers' recommendations.
First, the first layer is poured, filling the entire area between the profiles. Level it with a spatula or small spoon, working from bottom to top. You need to try to achieve a tight fit of the plaster to the surface without the formation of voids, but also not to press too hard, so as not to remove the mortar. The width of the spatula must fully correspond to the size of the slope so that on the side of the frame there is a small gap for free opening of the window.


If there is no tool suitable for the width, you can use a specially prepared plywood template of the required size with a cut out corner.
When the layer dries a little, you will need to remove the beacons. The plaster is carefully cut and the profiles are removed. If special corners were attached to the edges, they can be left. The resulting grooves are filled with solution, and the entire layer is leveled.
If the layer thickness is more than 2.8 cm, a reinforcing metal mesh is fixed and the application of plaster is repeated. Sometimes, to be sure, a third layer is also done, but only after the second has completely dried. The surface is carefully leveled, corners are smoothed with corner spatulas


Now all that remains is to wait for everything to dry properly and sand the slopes with floats. You can secure the result by treating the entire surface with a finishing primer. The final design of the slopes can be achieved using any decorative coating.


How to make slopes on plaster windows? This is the question that owners of their homes face when replacing windows. The repair is not considered complete until the slopes are in order.
The article suggests learning how to plaster slopes on windows to reliably protect the entire structure from moisture and cold entering it. Even a beginner can perform similar work, if he has a strong desire to do the repairs himself, has certain information, and does all operations carefully and carefully.
Why do we need slopes on windows, their types and features
Slopes are the part of the wall located between its corner and the window.
They are:
- Domestic, making up the inner part of the wall.
- External located on the outside of the building.
The functions of these elements include:
- Giving a finished look to the window opening, which will allow it to become its decoration and emphasize the overall style of the room.
- Hiding mounting elements.
- Improving the thermal insulation of a room by moving the “dew point” beyond the boundaries of the room.
The very first to appear were plaster slopes, which are made by applying one or several layers of plaster, followed by covering the top layer with paint. When installing such slopes, a lot of debris and dust appear, and in terms of the timing of the work, they take quite a lot of time.
With the advent of new materials and technologies, plaster slopes began to be replaced by:
- Plastic (see Finishing window slopes with plastic - installation steps). The materials for their manufacture are:
- plastic panel without insulation;
- The sandwich panel is a two-layer material and already contains insulation. This is the warmest type of slopes for windows, which has the longest service life, commensurate with the service life of the metal-plastic structure itself.
- Plasterboard. These are slopes, the material for which is moisture-resistant plasterboard, with its subsequent painting in any color that the customer wishes. As a rule, it is chosen white. The space inside the slope, if necessary, is filled with insulation, which can be polystyrene foam or mineral wool.
The advantages of such materials:
- Low price.
- Speed of work completion.
- The presence of a small amount of debris and dust.
Materials and tools for work
Before plastering the slopes on the windows, you should prepare:
- A building level, up to one meter long, but not very short, it will be inconvenient to work with.
- Aluminum rule.
- Roulette.
- Containers for diluting plaster, water and primer.
- Small spatula.
- Master OK.
- Ironing irons large and small.
- Wide spatula – 45 centimeters.
- A sponge grater for applying gypsum compounds.
- Grater and grater for working with cement mortar.
- Special gun for sealant.
- Sharp construction knife.
- Sprayer or brush for applying primer.
- Corner profiles, window strip.
- A simple pencil.
Tip: To work, you need to make a small goat, on which it will be more convenient to perform all operations. Do not putty from a stepladder or stool, which can be quite dangerous.
The choice of what to plaster the slopes on windows depends on the presence and level of humidity in the room and the placement of the slope - inside or outside the home:
- In rooms with high humidity and for structures located outside, it is better to use cement compounds.
- Work inside the room can be done with lime-gypsum or gypsum mixtures.
In addition to this you will need:
- Polyurethane foam for blowing in cracks in the window block.
- Primer (see Why a primer is needed: technological nuances of finishing work) of deep penetration.
- Headdress.
- Nitrile gloves to protect your hands from the solution.
- Overalls.
- Comfortable shoes.

To properly design a window, it is necessary to properly install all its elements:
- Windowsill.
- Window block.
- Correct tides.
- The slopes themselves.
How to prepare a window for plastering slopes
Before plastering the slopes on the windows, you need to:
- Decide on the type of solution.
- Perform priming work. The use of a primer improves the adhesion of the plaster solution to any slope base. Depending on the material of the side surfaces of the window, which can be very different, the appropriate primer mixture is selected.
- After treatment, the surface must be completely dry.
- Vapor barrier is being carried out. The end elements on the room side are covered with a vapor barrier film or silicone sealant is applied to them. In the absence of this stage, over time the foam will become wet from condensation, which will disrupt its thermal insulation properties, it may begin to crumble and collapse, this will lead to fogging of the window, which will cause a draft.
After installing door and window structures, there is a need for additional finishing work, which involves plastering the slopes. This work can be easily done independently, without the involvement of specialists or the use of complex tools. Naturally, there are numerous rules that help create a truly beautiful surface.
It’s strange, but very little importance is given to the finishing of slopes. It is believed that this design element does not carry a special interior design. Therefore, very often you can see how, next to a new and beautiful window (door), a rather crooked and primitive surface is made, which completely neutralizes any efforts. Although various materials have now appeared that make it possible to hide any imperfections, they require installation skills.
But there is a very simple way, namely, plastering the slopes. Despite its simplicity, it has many advantages:
- Low material cost.
- Simplicity. All work is done independently.
- The ability to create a harmonious part of the interior.
And, despite the fact that this option has been used for many decades, it still enjoys due popularity.
 Plastering slopes is a simple and cheap way to strengthen the wall
Why do you need to plaster slopes?
When it comes to plaster slopes? This happens when a new window or door (most often the entrance) appears in the room. Due to the work being carried out, part of the wall adjacent to the object being installed is destroyed. Therefore, this area must be brought into aesthetic compliance. But, in addition to purely decorative functions, slopes also have a number of important purposes:
- Hiding editing elements.
- Improving the thermal insulation of the room.
- Protection from moisture.
- Protection from extraneous noise.
It is worth noting that plastering window slopes and doorways are similar operations in technology, but have some differences. This is very important to take into account, otherwise some difficulties may arise.
 Plastering doorways and window slopes - processes similar in technique
 Tools and materials for work
Before wondering how to plaster slopes, you need to prepare the necessary tools and purchase materials. For all types of work they will be identical.
You will need the following:
- Level. You should immediately take into account that its size should be at least 1 m.
- Rule. It is necessary to check that it has no curvature or damage to the ribs. Otherwise, it will take a very long time to level the applied solution.
- Roulette. This device should always be at hand.
- Bucket for mixing. In general, any convenient container will do.
- Spatulas – wide, medium and small (trowel). They are convenient for scooping up the mixture and throwing it on the desired area. And also quickly correct small imperfections.
- Large and small ironing board. They will distribute the composition and create a smooth surface.
- Grater. It is better to select based on the plaster used.
- Construction knife. For cutting foam.
- Tube gun. Needed for applying sealant.
- Pencil. It is better not to take a felt-tip pen or marker, they can leave their mark noticeable.
- Brushes and roller. For priming and painting.
Advice! The work ahead will be top notch. Doing them standing or on a stepladder is not very convenient. If possible, it is better to make a structure like a goat. This will allow you to immediately capture a large area and not constantly rearrange the support.
 For ease of plastering, you can use a construction “goat”
 You need to be very careful when purchasing materials. It is important to consider that different types of premises will require a different mixture. How to choose the right plaster?
- For objects with high humidity, as well as for outdoor work, compositions that are made on the basis of cement are used.
- Do-it-yourself plastering of slopes inside rooms is done using gypsum mixtures.
On a note! There is a more modern acrylic material, but it is quite expensive and cannot compete with the above products in this regard. But this does not mean that it cannot be used for slopes. On the contrary, it is universal.
Additionally prepared:
- Polyurethane foam. In fact, it is usually not spared by the window and door installers themselves, but the opposite can also happen.
- Sealant in tubes. It will be needed for better sealing of cracks and cut areas of foam.
- Primer. Binding and pore-closing solution.
- Corner or wooden planks. They serve as beacons.
Problems that may arise
Everything is prepared and waiting in the wings, but many nuances arise that prevent finishing the finishing work. What are the main reasons?
- The installation of the structure itself (windows, doors) was performed poorly. Therefore, all work done by third-party specialists must be carefully accepted, and independent work must be done conscientiously from the very beginning. Otherwise, it will turn out that the plastered areas will have to be broken in order to correct the original defects.
- The electrical cable was not taken into account. Few people pay attention, but in old houses the electrical wire runs under the frame of the front door. Just in the corner of the slopes. It is easily damaged.
- Temperature indicators do not meet the required values:
- for cement mortars - above five degrees;
- for gypsum mixtures - from ten degrees.
Therefore, you should eliminate all secondary causes, and then get to work.
Plastering window slopes
Plastering window slopes with your own hands will require a number of interrelated steps. Each must be completed completely and on time. The final quality depends on this.
Preparation
Before making slopes on plaster windows, you need to perform a number of the following manipulations:
- The required mixture is selected. The required quantity is purchased.
- Everything unnecessary is removed. The polyurethane foam is cut off. This is done flush with the window frame.
- The old composition is being chipped away. It's better to remove it completely. Thus, there is less risk of voids and cracks.
- All dust and dirt are erased. You can do wet cleaning, but then everything should dry well. It is very convenient to use the vacuum cleaner.
- Two layers of primer are applied. The solution is selected based on the wall material. Often this is a concrete slab or brick.
- A vapor barrier is created. This is done in two ways:
- The film is laid. It is secured with self-tapping screws or glued. It is important to achieve complete contact with the surface.
- Coat with sealant. It's much more convenient. Do not forget that the cut foam is completely covered with silicone.
On a note! You need to work quickly with the sealant. Excess is immediately removed. The composition must be initially frost-resistant.
There is another problem with balcony window units. It lies in the fact that the upper part is initially made with a bend. Therefore, you will have to knock down a large area or apply a thick leveling layer (reinforcing it).
 Plastering a balcony block often requires reinforcement of the upper part
 Start of main work
The sequence of general actions looks like this:
- Preparatory work is being carried out.
- The window and its elements are completely covered with plastic film. This is done to protect against dirt and accidental damage.
- Install pre-prepared corners. They will serve for additional reinforcement and also as beacons. They are measured using a level. This must be done carefully.
- A bar is attached that will determine the plane of application of the composition.
 Installing a batten and a beacon on the window allows you to complete the job according to all the rules
 Advice! For greater convenience, you can make a template. It will take into account the width of the slopes, which will make it possible to carry out work faster.
Plastering
You can plaster the slopes on the windows according to the following instructions:
A rule regarding plastic windows should be added:
- The initial work is carried out according to the instructions, but then they do the following: they carry out the angle of the spatula between the slope and the frame. A shallow groove appears.
- It is filled with sealant. This is done in order to avoid the appearance of cracks.
Following this simple technology, it is possible to answer the exciting question: how to plaster slopes on windows. To get a more complete picture of this process, we recommend watching the video:
Features of plastering door slopes
How to plaster door slopes? This activity is different from window work. And has the following features:
- For high-quality execution, two rules are used.
- The mixture is applied according to the scheme used for window structures.
- It is required to install the door correctly - keeping it parallel to the floor. This will make it possible to obtain a more even slope.
- Be sure to install perforated corners.
 Rules for plastering door slopes with your own hands
 Due to the fact that work is often carried out at the entrance to the apartment, one problem arises - most of the wall surface will interact with the frame (metal or wood), which will be exposed to different temperatures.
- This is prevented as follows (the method is similar to that used in window blocks):
- Plastering door slopes begins with the complete removal of the old layer (next to the frame).
- Take a construction knife. It is placed at an angle of five degrees in the upper corner. And pressing, they lower it to the very bottom.
- The entire treated area is primed.
The surface is cleaned a little and filled with sealant. It is immediately erased.
Working with the surface
1. Due to the fact that you have to work with large surfaces, which are often quite damaged, plastering door slopes is divided into two stages.
- The starting coating is made:
- the preparatory stage is carried out;
 Large damage to slopes requires the application of a starting layer of plaster
 2. The finishing layer is formed. Putty is great for this. They do the following:
- Allow time for the first layer to dry completely;
- apply a layer of primer;
- mix putty;
- apply a layer up to 2-3 mm thick;
- it is rubbed with a wet spatula;
- internal and external corners - polished, chamfered;
- painted.
 Finishing of door slopes
 From the above it follows that the plastering of doorways is complemented by small nuances. Indeed, it may seem that they are completely insignificant, but it is their compliance that allows you to create exactly what will meet the expectation.
Bottom line
Now it’s completely clear: how to plaster and what to use to plaster the slopes. It is following the presented rules that will make the work quick and easy, and most importantly, of high quality.
Not all companies specializing in the installation of plastic windows include the installation of slopes in their list of services. Very often, for these purposes, people additionally turn to craftsmen for help, who sometimes demand a fairly high fee for this work.
However, if you have the appropriate tools and some construction skills, you can easily handle the installation of slopes yourself. One of the effective methods of giving slopes an attractive appearance is their plastering. Therefore, further we will consider how to plaster window slopes with your own hands.
Tools and materials for work
If you decide to replace old windows with more modern designs, their installation should be completed with a beautiful frame of the slopes. To do this, you can use not only plastering technology, the sections of walls adjacent to the window can also be finished with plasterboard, siding or special panels that come with the window.
However, plaster allows you to decorate a room to your liking, without being tied to the color and texture of plastic or wooden panels. Plastering technology allows you to use different geometries, with which you can visually enlarge the boundaries of the room, make it brighter and more comfortable.
Before starting work, you need to make sure you have some tools and materials. To do it yourself, you need to prepare:

Figure 1. The principle of working with a grinder: 1 – wall; 2 – solution; 3 – rack; 4 – position of the screed when plastering; 5 – box; 6 – small.
- a drill with a special attachment for mixing the solution;
- trowel for applying the solution;
- set of spatulas;
- a square with a movable rod for measuring the bevel angle;
- level and plumb;
- rule;
- malka;
- hammer;
- grater;
- container for mixing the solution;
- plaster;
- gypsum mixture;
- mounting tape;
- polyurethane foam;
- edged boards;
- nails.
Before applying the solution, it is necessary to make a special device - a grinder. It is a wooden strip about 35 mm wide and 20-25 mm thick. In this case, the length of this device must be equal to the width of the slope along the hypotenuse of the triangle, which is formed by the window opening and the frame.
A rectangular cutout is made on one side of the fish. One end with a cutout is installed on the box, and the other on a rail or rule attached to the outer edge of the slope. Figure 1 shows the principle of working with a small spoon, where: 1 – wall; 2 – solution; 3 – rack; 4 – position of the screed when plastering; 5 – box; 6 – small.
Return to contents
Preparatory work
The most important preparatory procedure before designing the slopes is the high-quality installation of windows. If the window structure is installed even with a slight deviation from a strictly vertical position, then no slope will be able to correct such a defect. In this case, the window installation will have to be done anew, that is, you will need to remove the double-glazed window and dismantle the window frame.
After installing the window, you need to install the window sill. In this case, you must adhere to its strict horizontality. To check the horizontalness of the window sill, you can pour a little ordinary water on it and see if it spreads in any direction.

Before decorating the slopes, you need to inspect the gaps between the window frame and the wall, and also check the tightness of all seams. You can use polyurethane foam to seal cracks. After it hardens, you need to cut off all excess. All work should be carried out very carefully, because it is much easier to end up with a flat surface with small depressions than to build up a slope with plaster to the level of the bumps formed when the polyurethane foam was cut poorly.
Preparatory work also includes protecting the window frame. Protective films with markings usually remain on installed PVC windows. If the entire surface of the frame is covered with it, then nothing else needs to be done to protect it. Otherwise, you will need to apply mounting tape to the missing sections of the frame. Additionally, it is recommended to secure the window sill. To do this, you can use thick plastic film or plain paper, which can be attached to the windowsill with tape.
After this, it is necessary to remove the old layer of plaster. To make this task easier, you can use a hammer drill or a regular chisel with a wide edge. In some cases, the slope is finished on top of the old layer of plaster. In this case, only the whitewash needs to be removed. At the final stage of the preparatory work, the slopes and adjacent surfaces are cleaned of dirt and dust, since the final result will depend on the cleanliness.
Return to contents
Technology for plastering window slopes
Dry gypsum plaster can be used to plaster internal slopes. This mixture is quick-drying. It is better to mix it using a construction mixer. This solution can be applied in a thicker layer than cement-sand plaster, which is a determining factor when it is necessary to fill deep potholes in old slopes.
Sand is added to the cement mixture in a ratio of 1:2 if it is necessary to apply a layer of plaster of more than 30 mm. External window slopes are treated with a cement mixture or façade starting putty with the addition of water-repellent agents.

At the first stage of plastering work, a beacon is installed at the level in the inner corner of the slope (near the window itself): a metal profile of the required length is mounted on the solution.
To limit the outer corner, a wooden strip or rule is installed, which is pressed against the edge of the wall adjacent to the slope. On the wall side it can be secured with clamps, dowels or self-tapping screws. The verticality of such a structure must be checked using a building level. The upper slope is prepared in the same way, from which plastering begins.
Plaster for slopes is applied in 3 layers: a thin spray, a base primer and a finishing layer, the thickness of which should not exceed 2 mm. After the main plaster has been applied, it is pulled together from the bottom up using a rule or a trowel. After a certain time, when the plaster dries a little, the rule is removed, and the remaining areas are sealed with mortar. After this, the corners are processed.
Plastering the corners is done after the slopes and walls have completely dried. The processing of corners is carried out with the same plaster solution using a trowel or a trowel. At the same time, in the corners the mixture is leveled with smooth movements from bottom to top and to the sides.
The plaster layer near the corner should form a flat surface with the wall.