Penoplex plaster for exterior use. Plastering the facade using penoplex - features of the choice of materials and work. Carrying out preparatory procedures
Read also
Plaster on polystyrene foam and penoplex is not particularly different from other surfaces. True, it should be said that there are also some peculiarities here. We will look at how to plaster penoplex in this article. Also in the video in this article you can watch many moments of the work and instructions will be given on all points. Is it possible to plaster Penoplex? The question has been resolved, it is quite possible to do it.
Penoplex plaster is done in several stages. To understand the whole process and know what materials will be required, you need to understand this:
- Preparation of mortar (see How to prepare mortar for plaster correctly);
- Plaster mesh and its attachment to the surface;
- Grouting work on mesh for plastering;
- The layer with which the surface will be leveled;
- Grouting work, which is carried out on a layer for the purpose of leveling;
- Primer;
- Final works.
If we analyze all the stages in more detail, we can come to the conclusion that although the process is labor-intensive and takes a lot of time, it can be divided into several days.
Preparing the plaster solution
The plaster and foam glass do not connect very well. Here the basis must be prepared and applied high-quality coating. To carry out work with polystyrene substances, which also includes polystyrene foam, you need to use ready-made solutions. Various manufacturers, producing dry mixes, have several product ranges. Depending on the company, quality and price will vary.
- But if you have decided to save your money and not spend too much on mixtures, you should not forget that the result of the work, which will be visible at the very end, largely depends on the quality. Do not lose sight of the fact that you cannot use different mixtures on the same site, because they may differ not only in their color palette, but also structure;
- The best option are considered universal mixtures. They can be used as an adhesive base for fixing foam plastic to the wall, and also as protective layer. When buying material, do not be lazy, read the instructions written on the package, perhaps this solution is not suitable for you;
- The universal mixture is used for installing a special mesh to the wall and for other work related to plastering. The material consumption is quite high, so if you plan to process significant volumes, you need to purchase a couple of bags at once. To apply one square meter of plaster mesh you will have to use about four kilograms. To level the wall into a square you will need six kilograms;
- The method of preparing the mixture itself does not cause any particular difficulties and is usually indicated on the packaging. All instructions must be strictly followed to ensure that the material is of maximum quality. To secure the mesh for plastering, it is better to use a mixture that is not of the thickness recommended by the manufacturer, but to do it a little less often. When applying a layer, which is called a leveling layer, the consistency should be thin enough that it almost flows off the tool.
In principle, with the technology for preparing the mixture used for plaster, everything is very clear. Now you can proceed directly to work and secure the mesh, since it is this that serves as the main layer for applying plaster.
We install the plaster mesh to the wall
Plaster on penoplex is applied through a mesh. It significantly enhances the adhesion of surfaces and makes the coating more durable. Before you start plastering main material for insulation, or rather penoplex, it is important to ensure that the plaster itself and the leveling mixture have good adhesion to the surface.
Caution: It does not have good grip properties on its own. If plaster is not applied to it in time, it will begin to crack, or even worse, it will disappear altogether, and all the costs and labor will be in vain. The plaster mesh is designed to prevent this.
- If you are working with external insulation, then it is best to acquire material designed for facade works. Such a network has enough high density, and the higher the real indicator, the better the plaster layer will lay down. But even in such a situation there are some small nuances - if the mesh density is too high, then working with the corners will have to work hard;
- It is better to take a mesh with a density of one hundred and forty to one hundred and sixty grams. Another piece of advice for those who are taking their first steps in finishing: it is better to buy a mesh that is susceptible to alkali due to the fact that the main component in plaster mixture is cement.
Penoplex is an excellent insulation material, which is quite often mounted on external walls building. However, in order for this material to perform its functions efficiently, it is necessary to ensure its protection from external factors environment. Plaster is most often used for these purposes. We will consider the features of its application to penoplex below.
Penoplex: features and advantages of using the material
Penoplex or extruded polystyrene foam is quite widely used as insulation. With its help, it is possible to provide thermal insulation of walls both outside and inside the room, floor, ceiling, interfloor ceilings, foundation, roof, etc.
Among the main advantages of penoplex we note:
- very low thermal conductivity, this characteristic ensures reduction of heat losses in the room;
- resistance to compression, the ability to withstand heavy loads;
- duration of operation;
- convenience and ease of installation;
- affordable price, which fully corresponds to its positive characteristics.

However, this insulation there are certain disadvantages, namely:
- low level of vapor permeability;
- high level of fire safety;
- resistance to rodents.
Plastering walls using penoplex: features of material selection
Before starting work, you should decide on the type of plaster composition that will be used in the process of finishing penoplex. There are several types of plaster solutions:
1. Plaster on mineral based- Cement and various kinds polymer additives. This version of plaster is characterized by low moisture absorption, resistance to fungus and mold, ease of application and work, and affordable cost. These characteristics make this option ideal for use as a finishing material for thermal insulation materials.
2. Plaster on acrylic base- y of this material high elasticity, excellent resistance to precipitation, resistance to ultraviolet radiation. The use of this solution is relevant if the place of its application is under constant or periodic exposure to moisture. Cement plaster, in such places it may become deformed. Price plaster mortar acrylic-based is slightly higher than cement-based.

3. Silicate-based mixtures - this version of plaster is characterized by high efficiency, elasticity, high antistatic properties, vapor permeability, and resistance to precipitation. This version of plaster is used both indoors and for facade finishing.
In addition, when choosing plaster for penoplex, pay attention to the duration of its operation. The best performance characteristics has an acrylic based plaster. Second in this characteristic is silicate type plaster, and less resistant to mechanical stress is mineral-based plaster. The performance indicators of the composition also depend on its texture than textured plaster, the greater its resistance to the external environment.
On construction market There are a large number of manufacturers of plaster that is suitable specifically for penoplex. At the same time, one manufacturer has several options for plaster solutions. Some of them first glue the slabs, while others protect them from external factors. Universal compositions perform both functions. We offer an overview of popular manufacturers of plaster compositions for penoplex:
1. “Ceresit” mixture - has a vapor-permeable composition, but has low elasticity, so it requires additional coloring. Acrylic compositions from this manufacturer differ in exposure to ultraviolet radiation, but the vapor permeability of this composition is at a low level. Silicone composition has a long service life and tolerates well solar radiation. This manufacturer offers several options for compositions for penoplex and they are all different good quality and long service life.

2. Compositions “Ekomix” - used for external and interior work for wall decoration. Among the advantages we note: moisture resistance, environmental safety. However, Finishing work should be carried out exclusively in the warm season, at a temperature of at least 7 degrees Celsius. These materials are also used to get rid of cracks, deformations and chips on previously plastered surfaces.
3. “Stolit” - for the manufacture of this composition, high-quality cement and various kinds of stabilizers and modifiers are used. Therefore, the material is used in a wide temperature range, has good adhesion, resistance to moisture and frost.

Penoplex plaster technology
In order to ensure proper protection of the building from moisture, ultraviolet radiation, high temperature, you should plaster the walls using penoplex. This process consists of the following steps:
- preparing the mixture on a plaster basis;
- installation of a mesh for applying plaster;
- grouting the walls;
- coating walls with primer;
- performing façade plaster using penoplex.

In order to apply the plaster solution to the surface of the insulation, mixtures of different compositions are used. However, all of them are designed to work with polystyrene foam-based materials. Please note that the composition used in the plastering process must be manufactured by one manufacturer. Since some manufacturers create mixtures based on one universal mixture, which only protects the base. Other compositions contain two or more substances, one of which ensures proper adhesion of the plaster mortar to the penoplex, and the second creates a protective layer.
Using a universal composition, it is possible to stick a plaster mesh to the surface of the wall. To glue the mesh onto one square meter insulation, about 4 kg of a universal composition will be required; if plastering also involves leveling the surface, then this value increases to six kilograms.
When preparing a solution for application to insulation, be sure to read the instructions from the manufacturer. If the work is carried out with plaster mesh, then the consistency of the composition should be more liquid than according to the manufacturer’s instructions, thus, it is possible to achieve excellent adhesion between the surface and the plaster.

The composition used for leveling should be such that it easily flows off the surface of the spatula. After preparing the solution for penoplex under plaster, the process of gluing the mesh follows, which primarily performs the function of additional reinforcement.
In addition, this mesh improves the adhesion between the plaster mortar and the insulation. When choosing this material, we recommend giving preference to the mesh, which is used for work outside buildings. Its density should be from one hundred and forty to one hundred and sixty grams per cubic meter. The evenness of the resulting surface depends on the density of the mesh. However, a mesh that is too dense is unsuitable for gluing corners.
Please note: plaster mortars often contain cement, so when choosing a mesh, plastering works, you should choose a material that is resistant to alkaline environments.
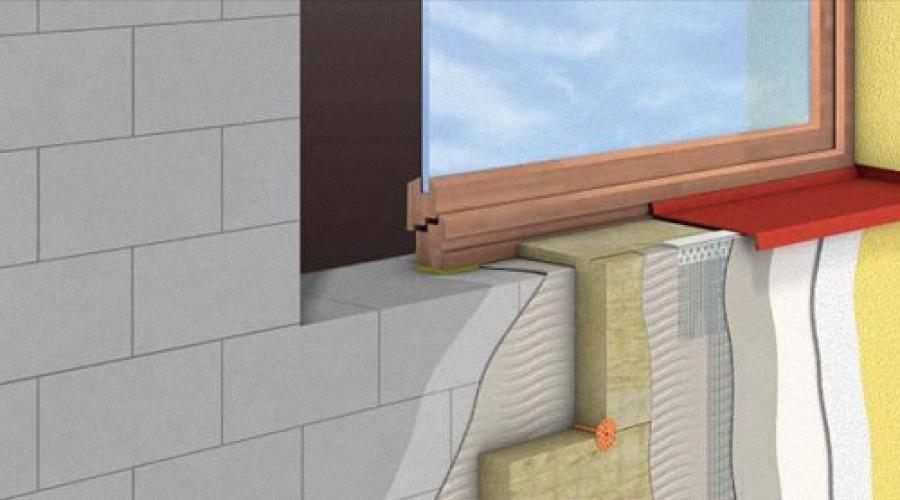
You should start work by gluing the corner areas. In order to stick the mesh, you should cut a strip whose width is no more than 35 cm, and the length depends on the length of the corner. Fold the strip along the central part, dividing it into two halves. Apply the composition for fixing the mesh with a spatula to the surface, while observing optimal thickness its application. It is about 2-3 mm. Place the mesh on the surface, press it and fix it in the correct position.

After gluing the corner areas, the main part of the building should be covered with a mesh. To do this, it is most convenient to cut a mesh 1 m in size. First, using a spatula, apply the composition to the wall, the layer thickness is about 3 cm. Try to apply the composition not completely to the entire surface, but to 90 cm. Step back on each side 5 cm to compensate for joint areas. In order to apply the composition, use a medium spatula, the width of which is 30-35 cm.
Place the mesh on the surface and arrange it from the center to the top and bottom. The mesh should adhere well to the surface and be pressed into it. To completely close the mesh, add a little more mixture using a spatula.
After gluing one vertical strip, proceed to to the neighboring plot. At the same time, the mesh is laid in such a way that an overlap of at least 6-8 cm is obtained. The joints with the corners are also glued with a certain overlap.
Please note that if at least one section of the wall has a space that is not covered by the mesh, it will stand out even after finishing. Therefore, the wall must be completely covered with mesh.

At the next stage of work, the mesh is grouted. For these purposes, a plastic grater with an emery cloth is used. Grouting is performed only after completely dry composition. Drying time is indicated in the manufacturer's instructions. If the weather is warm, then 4-6 hours are enough for the solution to dry, and in cold weather, you should wait at least a day.
In order to rub the composition, make physical efforts. Do the work using circular movements.
Applying plaster to penoplex is the next stage of work. The final layer is leveling. In order to level the surface, it is recommended to use the same universal composition, as when applying a protective layer. In order to apply a layer to level the wall, follow a number of steps:
- for work you will need two spatulas: wide and small, using the first tool the composition is applied to the wall and leveled on it, and the second spatula helps to apply the plaster to the surface of the large spatula;
- using a large spatula, apply the composition to the surface using even movements;
- the layer of plaster should be about three millimeters thick;
- The solution is applied in fragments, and try to ensure that the joints of the fragments do not coincide with the joints of the mesh installed on the surface earlier.

The leveling layer should be rubbed in the same way as the protective layer of plaster.
Please note: the leveling layer must be grouted 24 hours after applying the plaster mortar. It is prohibited to grout after more than four days. Since the process, firstly, will be very complex and will take a lot of time to complete, and secondly, there is a risk of damage to the integrity of the wall.
In order to fix the plaster on the surface of the insulation, a primer is used. Try to choose a composition that contains quartz grains if further work will be associated with the application of another decorative plaster layer. If, in the future, you will paint the facade, then it is enough to use a regular primer intended for exterior work.
To apply the primer, use a roller with short nap. Try to avoid drips on the surface of the walls. After the primer has dried, the process of finishing the walls follows. Its character depends on the individual preferences of the owners of the house. Great option- applying decorative external plaster on penoplex. The application technology of which is described below:
1. Apply the mortar using a medium to large trowel.
2. Try to apply the plaster evenly; the thickness of its application depends on the size of the grains that make up the plaster.
3. In order to form a decorative texture, you should use a sponge with large pores or a special grater.
4. After plastering the entire surface and after forming the texture, leave the plaster until completely dry.

5. Next, the surface is covered with varnish or paint, and the materials used for painting must be intended for use outside the room. They will help protect the plaster from moisture, temperature changes and other negative environmental factors.
In order for the coating to serve you as long as possible, choose quality materials, for its finishing.
The facade of any house requires high-quality finishing. It not only gives the building an attractive appearance, but also protects from various adverse influences of the surrounding world - from precipitation and direct sunlight.
To give the building an aesthetic appearance and protect the building, it is worth using.
There are quite a lot of types of this material; the choice can be made based on different parameters.
For example, if the facade of the building is covered with penoplex, it is worth purchasing just such plaster for penoplex.
A coating of this type is a high-quality finishing hardened layer, which is formed on the basis of a special plaster mortar intended for finishing the facades of buildings and structures.
Important! Properly selected and applied plaster can effectively level the surface of external walls, you can fill potholes and numerous cracks, as well as protect the building and give it a look that is completely consistent with individual taste preferences.
Modern facade plasters are in quite high demand, as this coating is characterized big amount positive qualities and properties.
Among them are the following advantages:
- High strength indicators. Facade plaster is a special shell of a house; thanks to its qualities, it ideally protects the structure from adverse factors.
- Frost resistance– this is an important advantage for most regions of the country. This indicator must be taken into account, since when frost sets in, the coating will simply crack. Facade plaster under penoplex is able to withstand temperatures down to minus 50 degrees.
- Lifetime. The plastering process is quite complex, but all the time and money spent is fully compensated by the optimal durability of the material. Average facade plaster able to last up to 15 years.
- Vapor permeability– ability to remove condensate. This prevents the process of destruction of the finish, as well as the formation of mold and mildew.
- Easy installation and maintenance. If desired, you can apply the plaster yourself, and no special care is required for the material.
Thanks to all the advantages listed above, the plaster not only fits perfectly onto the penoplex, but also performs all its decorative and protective functions.

Facade plaster on penoplex and expanded polystyrene - types and features
During the construction of private country houses Special insulation materials are required. Among large quantity modern materials special attention deserves penoplex. This is easy to use and comes at an affordable price.
Despite these high quality characteristics, even penoplex needs some protection. For this purpose, special plaster is used from such manufacturers as "", "Ecomix", "Stolit".
These compositions are actually high level perform the following quite important functions:
- Effective protection against moisture. Plaster, due to its qualities and properties, protects the insulation from destruction;
- Protection of penoplex from the adverse effects of sunlight;
- Significant improvement in overall appearance building.
As for manufacturers, it is not worth using different mixtures to cover one building, since each of them may have a different composition, which will lead to a decrease in the overall quality of the coating.
Universal plaster is consumed as economically as possible from 4 kg/m 2 for gluing reinforced mesh and up to approximately 6 kg/m2 for complete leveling of the external walls of the building.
The mixture must be diluted sufficiently liquid, it should drain from the spatula. At the beginning of the work, a solution is prepared, after which you can begin gluing the mesh itself on which the penoplex plaster will be installed.
Preparing the surface for application
The process of plastering penoplex is preceded by certain preparatory work. The surface must be carefully leveled, and this can be done by grouting.
If the process is carried out correctly, all bumps and pits can be effectively removed. It is at the grouting stage that the surface of the external walls must be carefully worked on. This is very important requirement, since after applying the plaster, all remaining problems and defects will be revealed to the eye.
Working with mesh
After grouting, work related to fastening is carried out. This is important and mandatory stage during plastering, since without a mesh, the plaster will quickly crack or simply slide off. On at this stage You can use a mesh that is designed specifically for facade work. The mesh density should average 140 – 160 g/m2.
It is the density of the mesh that directly determines how even the layer of plaster will be.. In other words, the higher the density, the better and smoother the plaster layer will be.
NOTE!
Mesh for facade work should be used that is alkali-resistant, since the foam base often contains cement.
The purchased mesh is attached using a special adhesive mixture, which is applied with a thickness of 2-3 mm. The composition is simply applied to the surface and the reinforcing mesh itself is immediately applied.
The product must be pressed into the composition by about half, that is, the adhesive mixture must completely cover the surface of the mesh. The glue must be applied gradually, it is important that it has time to fully set; the mesh itself is attached in small sections.

The mesh must be pressed down with a smooth spatula during application. In this case, the strips must be glued strictly overlapping, and not less than 10 cm. Everything must be glued very carefully, since un-glued compounds or applying the compound only to the joints will appear even through the final finish.
Leveling the surface
 As soon as the layer with the mesh is completely dry, you can grout the surface. Here a specially prepared sandpaper cloth or a construction float is used.
This should be done after the coating has completely dried.. The time of this drying depends entirely on the weather. The higher the temperature and the drier the air, the faster the applied plaster will dry.
If work is carried out in summer time, on average it may take up to three hours. If the finishing of the building is carried out in the cold season, you can start grouting in about a day.
In any case, there is no need to rush, since the plaster will not required quality and appearance. The grouting itself is carried out without any effort; it is enough to carry out special circular movements and counterclockwise. The process ends after all defects are completely smoothed out.
After this, the surface is leveled and another layer of plaster mixture is applied. Penoplex plaster is produced using the same mixture as in the previous stages. When carrying out these processes, you need to use a spatula with which the mixture will be applied. The plaster layer should be approximately 3 mm thick.

Upon completion of this work, final grouting. It begins only after the previous layer has completely dried, this is no less than a day after the last layer has completely hardened.
CAREFULLY!
While waiting for complete drying, you should not go to extremes, since you have to wait more than four days, the coating will become very hard, so it will be very difficult to process it.
Facade plastering technology using insulation
If in the process of finishing the external walls it was decided to use powder putty, first it will need to be carefully diluted. To do this, fill the bucket with water about halfway and carefully add the powder. When falling asleep, you need to constantly use a special construction mixer. As a result of this work, the mixture should become similar to mashed potatoes.
Once the mixture reaches the desired consistency, it should be left for about 5 minutes and it is advisable that it be in a calm state. After that, everything is whipped up and you can immediately get to work. If used, it can be applied to the wall without any preparatory processes.
Here you need to follow certain tips:
- When performing putty, you need to use a wide spatula, on which the mixture is placed using a small and narrow spatula, which is placed in a bucket.
- It is very important to ensure that new site The finishing completely merged with the previously processed one.
- You need to make sure that all joints are invisible.
- Before applying the putty, do not forget to treat the wall with a special primer. It is this that provides additional waterproofing.
- The layer thickness should not be more than 5 mm.
- After the layer has dried, it also needs to be completely wiped down. This process should be carried out no earlier than 3 hours after the mixture was applied.

After work related to puttying, you need to apply a primer. Using this composition, you can effectively remove all dust particles that may be present on the surface of the walls and make the surface as smooth as possible. Upon completion of these works, you can begin painting work.
Surface painting
To give the walls the most complete look, many owners. The most important thing to consider here is the type of putty that was pre-applied. There must be compatibility between it and the paint.
It is very important to avoid paint compositions that contain components such as:
- Acetone;
- Benzene;
- Xylene;
- Toluene;
- Drying oil;
- Resin;
- Coal tars.
These are fairly common components for painting materials, but their use is unacceptable, since each of them is capable of destroying penoplex. The best option for painting walls insulated with penoplex are mineral-based paints.
They are made from lime or cement, and these components, as is known, do not tend to react with insulation. Silicate paints, which do not harm penoplex, are also suitable. No less effective Decoration Materials, which belong to the category of water-based ones.

Also these should be exactly facade paints, since they are characterized by high reliability and resistance to adverse weather conditions.
Useful video
Master class on applying plaster to the surface of insulation:
Summing up
If you decide to carry out the plastering work, subsequent puttying of the facade and painting it yourself, you should definitely follow all the tips and recommendations presented to your attention. It would be a good idea to consult with a professional who will help you choose the best suitable mixture, putty and paint. All formulations used must comply with established requirements.
In contact with
November 12, 2016Specialization: facade finishing, interior finishing, construction of summer houses, garages. Experience of an amateur gardener and gardener. We also have experience in repairing cars and motorcycles. Hobbies: playing the guitar and many other things that I don’t have time for :)
A few words about the features of penoplex
I’ll say right away that it’s more correct to call penoplex extruded polystyrene foam, since the word “Penoplex” is the name of the company that produces this material. This is reminiscent of the situation with copying machines, which in our country are still called “copiers”.
The basis of extruded polystyrene foam, as you might guess, is ordinary polystyrene foam, i.e. Styrofoam. Due to the processing of foam plastic with a special thermally the material acquires the following qualities:
- strength, which is several times higher than the strength of conventional foam;
- uniform structure and smooth surface;
- almost zero moisture absorption;
- higher vapor permeability.

On the one hand, the performance qualities of penoplex are much better than those of expanded polystyrene. But, on the other hand, as a result of these same qualities this material has much worse adhesion than foam.
Therefore, the mistake of many beginners is that they try to putty penoplex using the same technology as polystyrene foam. Moreover, similar recommendations can be found even on some construction resources

. All this leads to the fact that the glue, which is used as putty, lags behind the insulation along with the reinforcing mesh. This raises the question: is it possible to putty penoplex? I’ll say right away that this material was not originally intended for finishing. wet method
. However, our craftsmen have come up with a technology that allows you to achieve high-quality results, in fact, I will introduce you to it below. It makes sense to use penoplex for wall insulation only where its properties, such as strength, are really important. Typically this is ground floors

or low ground floors. In other cases, its use is impractical, since the price of this material is much higher than the cost of expanded polystyrene and mineral mats.
Penoplex putty technology

The process of filling penoplex can be divided into several stages:
Preparation of materials
- So, before you start puttingty, you need to prepare the following materials: glue for polystyrene foam - you shouldn’t skimp on the mixture, so buy glue from famous manufacturers , For example, good option
- is Ceresit CT85 glue;

- adhesive primer;
- fiberglass reinforcement mesh; finishing putty - needed for interior decoration
- , for example, for painting;

plaster perforated corners.
Keep in mind that all materials must be purchased with a small margin.
Surface preparation

The nuances of the penoplex putty technology lies precisely in surface preparation. In other words, how high-quality and durable the finish will be depends on this stage.
- So, preparing the surface of extruded polystyrene foam with your own hands is as follows:

- fill the gaps between the slabs with scraps of insulation or special adhesive foam, if, of course, they are available; then

- The surface of the insulation must be made rough. To do this, treat the penoplex with a metal brush, a foam float or a needle roller. Thanks to this, the adhesion of the surface of the material will significantly improve; Now the surface of the penoplex should be coated with an adhesive primer using a painter.
After the first layer has dried, priming must be repeated; - now you need to prepare the glue and putty the dowel caps using a narrow spatula;

- on all external corners, including slopes, perforated plaster corners. Keep in mind that they must be leveled.
If the dowel head rises above the surface of the insulation, the fastener must be deepened by finishing it off with a hammer. If this is not possible, you need to cut off the dowel head with a mounting knife and install new fasteners nearby, having previously drilled a hole to the required depth.
Here, in fact, are all the nuances of surface preparation.

Reinforcement
The next stage is reinforcement, which, in fact, is putty. Instructions for reinforcing penoplex look like this:
- First of all, prepare the fiberglass mesh - cut it into sheets of the required length. Keep in mind that they should be located with a turn at the corners and at the same time overlap each other at the joints by 10 centimeters;
- Now you need to prepare glue with the consistency of thick dough;
- Reinforcement should begin from the slopes. To do this, apply the solution to the slope and smooth it with a notched trowel;

- then apply the mesh to the surface of the slope and smooth it with a smooth spatula. As a result, the mesh should be completely covered with glue. Try to carefully level the surface of the glue with a spatula so that it is as even and smooth as possible.
For alignment internal corners an angled spatula should be used. - The walls are reinforced using the same scheme;

- After the first layer of glue has dried, you need to apply a second layer. To do this, make the solution more liquid (creamy consistency), and apply it in a thin layer using a wide spatula. This procedure is performed as a regular putty.

This completes the process of rough puttying of extruded polystyrene foam. It should be noted that this technology allows you to achieve quite smoothly and flat surface, but far from ideal.

Therefore, reinforced penoplex on facades must be covered decorative plaster. The latter hides putty defects and also gives the surface a certain texture, which makes the facade more attractive.
Final putty
Finally, let’s look at how to putty penoplex indoors for painting, since it is not always possible to use decorative paint for interior decoration.
Internal insulation leads to the formation of condensation between the insulation and the walls. Therefore, you need to resort to it only in extreme cases, for example, if you need to insulate a wall in an unheated entrance. Internal wall insulation in the apartment itself may be necessary if you do not have permission to change the facade decoration or the wall is adjacent to an unheated elevator shaft.

It must be said that many novice home craftsmen are interested in the forums whether it is possible to putty on polystyrene foam coated with a layer of glue. This procedure is quite acceptable, since the glue combines well with any type of putty. The only thing is in progress finishing putty The following technology must be observed:
- After the second layer of glue has dried, it is imperative to apply a primer according to the scheme described above, i.e. in two layers;
- then apply to the primed surface thin layer finishing putty. Keep in mind that the layer thickness should not exceed 3 mm, otherwise the coating may crack.

The putty is applied with a wide spatula along standard scheme. You can read more about puttying techniques from other articles on our portal devoted to this topic;
- After the putty has hardened, it must be treated with a mesh with fine abrasive - P150. At this stage, all imperfections should be removed to obtain a perfectly smooth surface;

- If the surface turns out to be insufficiently smooth, it must be primed again, first cleared of dust, and covered with a second layer of finishing putty.

To complete the work, you need to sand again with a fine abrasive. If insulation is carried out in unheated room
, for example, in the entrance, putty penoplex should be used with a universal mixture for interior and exterior work.
Conclusion
Penoplex, as we found out, can be putty quite successfully. The main thing is to properly prepare the insulation surface. Otherwise, the work resembles the process of puttying ordinary polystyrene foam.
Additionally, you can watch the video in this article to visually familiarize yourself with the process of filling penoplex. If any of your questions on this topic remain unanswered, write them in the comments, and I will definitely answer you.November 12, 2016
If you want to express gratitude, add a clarification or objection, or ask the author something - add a comment or say thank you! block walls can and should be plastered and puttied for subsequent finishing.
And if they are made of OSB, wood and others non-standard materials? Is it possible to align them in a similar way?
You can count on the fact that the plaster or putty will lie on the surface and stick to it well if the following conditions are met:
- The leveling mixture must match the type of material being coated. For example, there are special putties for wood (see How to putty wood: materials, tools, process technology), metal, silicate bases, as well as universal mixtures suitable for finishing a wide variety of materials.

Note. The putty must also be suitable for the place of application - for interior or exterior use.
- The instructions for puttying surfaces require that they be porous and rough. Most compounds do not apply to a perfectly smooth, glossy base.
Or the adhesion to the surface is not strong enough, as a result of which the putty quickly crumbles. Therefore, such bases are pre-prepared by covering them with a special primer (see Types of construction primers and their area of application) or artificially giving them roughness. - The surface must be strong and stable - not crumble, crumble or delaminate. The same applies to the coating previously applied to it: if it does not adhere well, it is completely cleaned off before puttying.

- Rigidity is one of the requirements for the surface to be finished. It is clear that soft and flexible materials under mechanical stress they become deformed, which will cause instant detachment of the putty. But the necessary rigidity can be created using a reinforcing mesh and a sufficiently thick leveling layer.
Based on these basic requirements, let's consider the possibility of applying putty to some materials that can be considered problematic. Is it worth doing?
Will the price of materials and the cost of work pay off for many years of trouble-free operation of surfaces finished with putty?
How to putty unusual substrates
Let's consider the main types of surfaces that may need to be leveled with plaster or putty mixtures. They are discovered both during the finishing of new and during the renovation of old buildings.
Fiberboard, chipboard, hardboard and other wood-like materials
They are often made from internal partitions or sheathe walls and ceilings. If you plan to wallpaper or paint them later, then leveling and sealing the seams between the sheets is necessary.
Is it possible to putty fiberboard and other materials based on wood waste? Yes, but taking into account the natural ability of wood to absorb moisture and deform when swelling and drying.

What does it mean? That before finishing it is necessary to reduce the absorbency of the material by covering it with a primer based on water-insoluble acrylic resins.
The process itself is no different from puttying drywall or plastered walls:
- The first stage is dust removal of the surface and priming.
- The second stage is the putty itself. First, the joints between the sheets, then the entire plane.
- The third stage is sanding after drying, re-priming and finishing.