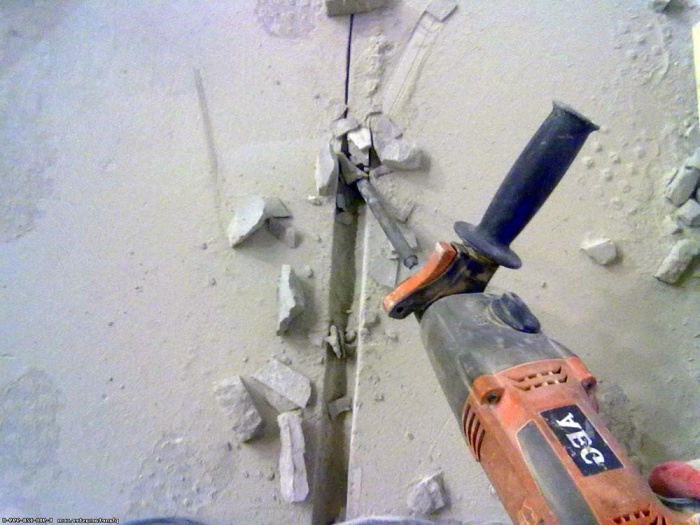
Grooving the ceiling for wiring. Ceiling chipping. Hammer. He's a hammer drill
Many types of repair work in an apartment or house, such as painting, puttying and wallpapering, can be performed without special skills and knowledge. But replacing electrical wiring yourself is much more difficult, especially if it is necessary to groove the ceiling for wiring.
Why do you need to ditch the ceiling?
In any residential premises, electrical wiring is installed in a closed manner. In modern panel and monolithic houses, electrical cables are laid in a special pipe, and distribution boxes, sockets and switches are installed in niches on the concrete surface. The wires that lead to the ceiling lamp are also hidden inside the ceiling.
If during the repair any modernization of the electrical network is carried out (replacing wiring, moving a switch or installing an additional socket), then to lay the cables you will have to make a groove - a special groove in the concrete. In cases where the electrical wiring is damaged, for example, after flooding by neighbors above, it will also require gating to restore it.
Methods for gating the ceiling
The process of cutting grooves in a concrete floor is very labor-intensive and complex. This type of work must always begin with marking the future locations for wiring. Depending on the tools used, ceiling gating is carried out in one of four ways:
- Hammer and chisel. This is the most economical, but at the same time, the longest method, which consists of knocking out small holes along the edges of the future groove and gradually removing layers of material until a furrow 25 mm deep is formed.
- A hammer drill. To do this, in addition to a wide drill, you will need a special attachment for a hammer drill in the form of a shovel. First, using a drill, holes 25 mm deep every 10 cm are made along the marking line. Then the layers of material between the holes are removed using a spatula. This method allows you to groove faster, but the furrows may turn out uneven.
- Bulgarian. Using a grinder with a diamond blade, cuts are made along the marking lines along the edges of the furrow, and then the layer of concrete between them is removed with a chisel or hammer drill. This method allows you to make the groove perfectly even.
- Wall chaser. With this tool, the grooves are made quickly and are perfectly smooth, and dust and debris are collected through a special hole to which the vacuum cleaner pipe is connected. The main disadvantage of this method is the high cost of the wall chaser itself.

Rules for laying wiring
Grooving of the ceiling is carried out according to pre-applied markings, however, when planning the wiring of the electrical network, you should draw up a detailed drawing in advance indicating all switching nodes and connection points, and also take into account the rules and recommendations for laying cables in the groove:
- The wiring is laid at right angles and along the shortest path;
- The distance from the groove to the corner must be at least 100 mm, and to the gas pipe - at least 400 mm;
- In a panel house, the use of a seam between the slabs as a cable channel is prohibited;
- Electrical wiring installation begins with the installation of junction boxes;
- Switching nodes should be located outside the ceiling;
- Crossing cables when laying them is not permissible;
- Only cables of optimal cross-section, which is calculated based on the maximum load, can be laid in the groove.

How and with what to seal the groove
After the groove is made in the concrete ceiling and the cables are laid in it, it is necessary to cover the groove with the wiring. You can do this yourself using a regular spatula. However, in order for the surface after sealing to be perfectly smooth and durable, you must adhere to three simple rules:
- Padding. Before laying the cable in the groove, it is recommended to prime it well. In this case, the primer must be applied in large quantities using a wide brush, which allows it to penetrate deep into the groove.
- Application of the solution. After the primer has completely dried, the groove is additionally moistened with water and the solution is applied using a herringbone spatula, or with criss-cross movements directed towards the groove walls.
- Removing excess solution. After applying the solution, characteristic bumps remain in place of the grooves, which are best removed using a metal trowel, and it must be held at a right angle to the wall.

The material for sealing grooves for wiring is usually a solution based on alabaster or gypsum. However, alabaster hardens much faster, which reduces the time for leveling the surface. The use of gypsum plaster allows you to work with the solution until it hardens completely within 20 minutes.
Before cutting the ceiling to accommodate the wiring, you need to take into account that in residential premises the cable is usually laid in a closed manner in special pipes.
Required Tools
The process of arranging special grooves on a concrete floor is quite labor-intensive and difficult to do independently.
Do-it-yourself chipping of a ceiling structure can be done in several ways, depending on which the working tool is selected:
- a hammer and chisel is the most economical option;
- a hammer drill with attachments in the form of a wide drill and a special blade;
- grinder with diamond blade.
A good result is achieved by using a professional wall chaser, which can quickly produce perfectly straight grooves for electrical wiring on the ceiling.
Step-by-step instruction
The technology of the gating process may differ markedly depending on the structure of the ceiling structure and the selected tool.
Performing work with different devices:
- Using a hammer and chisel, knock out small holes along the edges of the marked groove with gradual layer-by-layer removal of the material until a groove is formed, having a depth of 2.5 cm.
- A household hammer drill with a wide drill is used to make 2.5 cm holes along the marking line every 10 cm. The layers of material between the holes are removed with a special spatula, minimizing all irregularities.
- A grinder with a diamond blade is used to make cuts along the previously made markings. The edges of the resulting furrow are used as a limiter for removing material using a chisel or hammer drill.
The best option involves using a wall chaser equipped with a special hole for collecting dust and debris that appears during work. The vacuum cleaner pipe must be connected to the device.
Electrical wiring must be laid strictly at right angles, using for this purpose the shortest path and a well-prepared ceiling slab.
No repair is complete without installing electrical networks or replacing old wiring. It is often necessary to install new sockets to simplify connecting household appliances to the network. This eliminates the need for splitters. The best solution is to install communications in a concrete wall. To do this, grooves are created. The main thing is to take into account all the subtleties of wiring, as well as the technology for creating grooves of the required size.
Before you groove the walls for wiring, you need to know some of the features of the work. In order for the repair to proceed quickly, you should follow certain rules.
Restrictions
The first thing you should do is not take up a hammer drill, hammer and chisel. First, a wiring plan is created. Before cutting a concrete wall, it is worth remembering the following rules:
- the number of groove turns on the wall should be kept to a minimum;
- You should not make diagonal grooves on the wall, as this can lead to its destruction;
- horizontal furrows are allowed only 150 mm from the floor slab.
It is also worth remembering that the vertical groove should be located at a distance of 10 cm from the doors. You should not create horizontal fines in load-bearing walls, as this also contributes to the destruction of the structure.
Important! Is it possible to groove load-bearing walls? It depends on the region - each has its own redevelopment rules. General rules prohibit this for all standard high-rise buildings.
Features of the procedure
The width and depth of the groove in the wall is determined by the thickness of the cable. In any case, it should be at least 20-30 mm. For example, a cable with three cores 1 cm thick requires a depth of 3-4 cm.
When using a wall chaser, the depth of the furrow in the wall is fixed. If you use a hammer drill or grinder, it will be uneven along the entire length. When using a hammer drill, the wall is first crushed at a right angle, then at an angle of 45 degrees.
When installing socket boxes and switches, a hammer drill with special attachments is used.

There are several ways to make a groove in a wall. The following tools are commonly used:
- Chisel and hammer. The groove in the wall turns out to be uneven, and a lot of effort is spent.
- Bulgarian. The groove in the wall comes out smooth, but quite a lot of dust is generated.
- Impact drill, hammer drill. Clean, fast, almost smooth.
- Wall chaser. This specialized tool has only one serious drawback - the high price.
How to groove concrete walls without dust? Only a wall chaser with an industrial vacuum cleaner connected to it helps with this. Concrete chips formed during the wall slitting process immediately fall into a special chamber, and everything that gets into the work area is sucked up by a vacuum cleaner.

Preparation
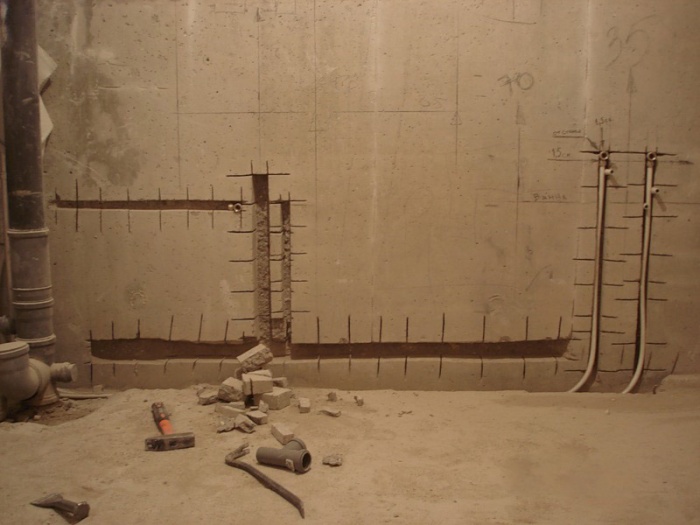
First, it’s worth checking for hidden wiring in the wall along the path of the proposed groove. This is done using a special device (signaling device E-121, “Woodpecker”, etc.). Then markings are applied to the surface of the walls and ceiling. Before you start gating, it is important to curtain the doors with a damp cloth or seal them tightly with film. This will prevent dust from spreading throughout the apartment.
How the groove is created
Chisel and hammer
When using a hammer and chisel, the work is divided into several stages. First, small indentations are marked along the edges of the groove. After this, the chisel is placed across the furrow and a part of the wall is knocked out using a hammer. Next, a surface layer of concrete is knocked out along the intended line.

Hammer
When using a hammer drill, two attachments are used (with a short and a wide drill). A spatula will also come in handy. 25 mm holes are made in the wall along the entire length of the line. A distance of approximately 10-15 mm is left between them. Then, using a spatula, the groove is made. The basic rule is not to place the blade across the furrow. This will help prevent unnecessary pieces of plaster or concrete from chipping off.

Bulgarian
To work with an angle grinder, you need to purchase a diamond blade. First, two cuts are made along the intended line. The concrete located between them is selected with a hammer drill or chisel.
When working with an angle grinder, a lot of dust is produced. To effectively remove dust, you will need a second person using the shop vacuum. Effective dust removal can only occur if an assistant holds the vacuum cleaner near the gating area.

Wall chaser
This tool is a more logical option for using an angle grinder with a vacuum cleaner. Two diamond discs are installed in the device at once. The distance between them is easily adjustable. The depth of the groove in the wall is also adjusted. To do this, it is worth changing the depth of immersion of the disks in the protective casing. The latter is equipped with an outlet into which dust is sucked in when using a vacuum cleaner.

Thanks to this tool, the grooves in the wall are perfectly smooth. The only significant disadvantage of this method is the high cost of the device. Many people rent professional tools when carrying out repairs.
After all the grooves are completed, they are cleaned with a vacuum cleaner or brush. Then they should be primed. Cable laying in the wall also has many subtleties that need to be taken into account before starting repairs.
Ceiling chipping
Is it possible to ditch the ceiling? This should only be done if you have a good tool, the groove is made no more than 10 mm deep, and a layer of plaster has already been applied to the surface. It is not recommended to carry out such work yourself.
A hammer drill cannot be used when making grooves on the ceiling. After working with it, microcracks up to 10 cm deep can form in the slab. The ceiling is a load-bearing slab, so it is dangerous to do grating in a multi-story building.

Pipeline slitting
How to groove concrete walls for pipes? Making such holes is a labor-intensive and costly task. This type of work is relevant during major repairs. In this case, it often becomes necessary to hide the pipeline as deep as possible. The use of a wall chaser here is undeniable. Working with such volumes requires special skills.
Since the gating will be carried out to a fairly large depth, load-bearing walls must be avoided. This will allow you to carry out the procedure taking into account safety requirements, avoiding damage to the reinforcement and the appearance of cracks in the wall. If these nuances are observed, you can tap the wall for wiring without any fear.
How to properly tap concrete walls? Before starting the repair, it is worth considering several subtleties, which are discussed in detail in the video.
Before finishing, you need to take a photo of the walls to remember the location of the grooves. This will be useful for subsequent repairs. Holes for boxes and socket boxes in the walls are created as follows:
- a small hole is drilled in the center of the wall;
- using a crown, a small cut is made, which marks the outline of the future hole;
- 8-10 small holes are drilled along the contour;
- using a crown, the hole in the wall is completed to the end.
When drilling into walls, you may stumble upon reinforcement. Drilling it is strictly prohibited. This will compromise the strength of the supporting structure and the house as a whole. When installing sockets at a low height from the floor, gating work can be minimized by running the wiring under the floor.