DIY stone chess. How to make a chessboard with chess out of paper. Master class with detailed description. Let's start with cells
Read also
Chess is one of the most mysterious and greatest games of all time. Shrouded in ancient mystery, black and white figurines continue to excite the minds of countless people across the planet. The favorite pastime of sultans, kings, shahs, emirs and other powerful people has not lost its relevance today.
Great game
Chess helps you learn to think logically, carefully, and calculate your actions many steps ahead.
There are different variations of materials for the figures and boards: they could be made of gold and other precious metals, black, mahogany or ebony, ivory, crystal, inlaid or decorated with precious stones, mother-of-pearl and semi-precious stones.
In the same way, many versions are known: in the form of fighting armies belonging to a particular historical era, in the form of famous people, various animals, characters from favorite films, etc.
However, the chess order remains unchanged - 32 pieces (16 white / light and 16 black / dark) on a field with a corresponding 64-square cell marking.
There is no need to save up for gold chess, because today they can be made from literally anything. If you know how to carve wood, then it is quite easy to carve wooden figures with your own hands. It’s even easier to cut them out of plywood or glue them from thick paper using a stencil.
Special craftsmen make chess sets from the insides of a computer (the motherboard for the board and chips in the form of figures), from electronic vacuum tubes, from plastic, glass, LEDs or neomagnets, etc. Use your imagination and go ahead.
How to make chess with your own hands: manufacturing options
One of the most popular options for homemade chess technology is cutting them out of plywood.
- Take sketches of the shapes, a ruler, a pencil, a strip, plywood and carbon paper. You will need to transfer the images onto the plywood first. To do this, place copy paper under the sketch and carefully trace all the figures in full using a pencil.
- The next step is to cut out the flat shapes that you have drawn with a jigsaw. The holes will also have to be cut out, having first marked them: their thickness should correspond to the thickness of the plywood, and their length should match the length of the other product. The hole can be made using a drill or awl. It is better to leave a margin of 1 mm at the joints so that the figures fit more tightly.
- You should end up with 32 figures and stands with holes - in the same quantity, and another 30 round parts-blanks for future checkers. All of them will need to be sanded using sandpaper.
- Next, proceed to assembly. Attach the figures to the stands using glue.
- Then separate half of the elements and paint them with black acrylic paint. Leave them for a while to let the paint dry.
- The chessboard can be made from a piece of plywood (4 mm thick is suitable). You will also need slats. Cut out two blanks (400*200), and make frames from the slats - in the same quantity and in the same sizes. Glue plywood blanks to them, and place hinges between the halves so that the board opens and closes well. Using a stencil, apply numbers, letters, and make “cell” markings on the surface of the board. And inside the board you can draw markings for playing backgammon. Paint the side parts with red acrylic paint.
For figures, take plywood 3 mm thick. Make sure there are no cracks or knots on it. Apply the varnish in two layers so that the resulting color is more presentable.
To make chess three-dimensional, you will need more skills and abilities, since wood carving is indispensable. For the light side, you can choose the following species: boxwood, birch, ash, maple, hornbeam, and for the dark side, walnut, ebony, apple tree and others are good. If this is not possible, then it is easier to make all the figures from linden, for example, and then fire them or varnish them.
Using “Dutch” thread, you can do without a lathe. To do this you will need square bars of various sizes: blanks for future figures:
- cut out chess stencils from cardboard and transfer them to the edges of the blanks (for the knight you will need two views - from the side and from the front);
- to get the profile of the figure’s leg, drill it out, holding the workpiece in a vice (different figures will require drills of different sizes);
- cut out the shapes along the marked lines using a jigsaw (watch the profile of adjacent faces and leave bridges on them);
- Having carefully cut out all the figures, remove excess wood and process the surface with a file (you can sand it with sandpaper);
- The finished chess pieces need to be soaked in hot drying oil and coated with the appropriate varnish (the black pieces will first need to be tinted with stain). To make them stand better on the board, you can glue pieces of felt, plush or thin suede to the legs.
Having the desire and imagination, chess can be easily made from paper using the origami technique, from wine peels or bottle caps, and even molded from plasticine.
Some nuances
A chess set can be very large: such pieces are considered to be outdoor or garden pieces. That is, they can be placed as an element of landscape design to play a party or two in the fresh air. There are also mini-kits that are easy to take with you on the road or travel.
But the most common size of the figures is considered to be the classical measurement: the king has a height of about 7-10 cm, and other figures decrease in size, depending on what rank they are. Take into account the height of the base when working.
As you can see, making chess with your own hands is quite simple. It doesn’t matter at all what material or theme you choose for your set, the main thing is that it will be created with love and soul, which means that the “royal game” will reveal its innermost secrets to you a little...
Source: toysew.ru
Source: http://tehnologi.su/kak-sdelat-shahmaty-svoimi-rykami/
DIY chess on the wall
Unusual? Yes. Elegantly? Yes. Comfortable? Yes. Thanks to the new design with shelves for pieces, you can not only enjoy the ancient game at the table, but also hold chess tournaments in front of spectators.
Let's start with cells
1. From 6mm birch plywood, cut four blanks measuring 83x610mm for dark cells A and six blanks measuring 51x610 mm for light cells B (Fig. 1).
Note. We chose birch plywood due to its lack of voids and relatively thick face veneer, allowing for small chamfers on the edges of the cages.
2. Glue together two pieces of 19mm MDF board measuring 152x152mm and 64x152mm to create an L-shaped stop stop. (photo A).
Secure this stop with a clamp in front of the saw blade and adjust its position using a light cell blank IN to cut 51mm lengths. Then make 32 dark cells A 51 mm long.
Use the remainder of the blank for the dark cells as a template for a new setting of the stop stop. In the same way, cut out 32 light cells B, 83 mm long.
With the light cell blank B next to the saw blade, adjust the position of the rip fence until the scrap fence touches the workpiece, as shown on the left. Fix the longitudinal stop and saw off 32 parts from the blank for dark cells A, placing its end against the stop-limiter, as shown on the right.
3. Make small chamfers on the front side of all squares A, B using a sanding block or small plane. Then proceed to tint the dark squares (see the section “How to make chess squares dark”).
Mark the playing field
Press cells A and B one at a time, using a separate clamp for each of them. A piece of MDF board secured with clamps parallel to the edge of the backdrop C will help to align them.
1. To determine the width of the backdrop WITH, match four dark and four light squares in one row A, B, measure the length of the row and add 12 mm. Cut out a backdrop from a 6mm MDF board WITH specified sizes (Fig. 1).
Draw lines parallel to one short and two long edges, 6 mm apart, to mark the boundaries of the playing field. Glue the first row of checkerboards along the top edge of the backdrop, starting with the light colored square in the top left corner (photo C).
2. Cut seven 6mm strips for shelves from walnut boards D. Glue the edge of one shelf to the backdrop C close to the first row of cells A, B (Fig. 1).
Carefully install the clamping device so that cells A and B do not move, and, squeezing its ends with clamps, leave until the glue dries.
The dimensions of cages A, B and shelves D may differ from those shown, so the position of shelf G may change. Mark it on the walls of the case after assembling the playing field A-D.
3. To glue the next row of cells in place A, B, make a clamp by gluing two blocks measuring 38x76x457 mm with a 12 mm spacer at one end (photoD). Continue gluing the cages and shelves D to the back WITH until the playing field is completed. Note. Apply a thin layer of glue to avoid squeezing out excess, which could cause the clamp to stick to the cells.
Chessboard frame
1. Cut out the side walls from 12 mm walnut planks to the specified dimensions. E, top bottom F, shelf G, cornice N, base I and false panel J. Select a 6mm deep tongue on the inside of the sides, top and bottom to insert the backdrop WITH(Fig. 1 and 2). Then cut 12mm rebates along the ends of the side walls.
2. Insert the game board A-D into the tongue of the side wall E, aligning the top row of cells A, B with a shoulder of the upper rebate. Mark the position of the shelf G(photo E). Cut grooves in both side walls to insert the shelf.
3. Dry assemble the housing (without glue) to check all the parts surrounding the playing field and adjust them if necessary. If dry assembly was successful, apply glue and secure the body with clamps.
Quick tip! Gluing the case together will require a lot of clamps, so it is advisable to divide this operation into stages: first glue the shelf and playing field to the side walls, and then insert the top and bottom into place.
Add a figure box
1. Cut out the side walls from 6 mm walnut planks TO, front and back walls L and bottom M (Fig. 3). Make 3mm tongues and grooves in the sides of the box (Fig. 3 And 3a, photoF). Then cut 3mm folds along the ends of the front and back walls, as well as along the perimeter of the bottom. After assembling the box dry, check the connections of the parts, then glue and secure with clamps.
2. When the glue has dried, tilt the saw blade at an angle of 35° and saw the back of the drawer from above (Fig. 3a). With the saw blade vertical again, take the previously cut panel J and make a cross cut in the middle with a depth of 3 mm (Fig. 3). Glue the false panel to the front wall L.
Wrap a piece of masking tape around the drill bit, 19mm from the tip. When the flag touches the board, the desired hole depth has been reached.
With one setting of the sawing machine, you can cut out not only tongues in all walls of the box K, L, but also grooves in the side walls K.
3. Insert the drawers into the body A-G and drill holes for the axle pins that will be installed later. To ensure that the box rotates freely, place a 1.5-2.0 mm thick spacer under it (we used a steel ruler) and secure one side with small wedges.
Using a 6mm center point drill bit, make a hole 19mm deep (Fig. 4, photoG). Then make the same hole on the other side. Drill 3mm holes in bezel J to install knobs (Fig. 3).
Add decorative details
1. Mill fillets with a radius of 10 mm along the ends and leading edge of the cornice N. Glue it on top to the body, aligning the side overhangs (Fig. 1). Mill 10mm fillets on the outer edges of the base I and glue it to the body from below.
3. Apply a colorless coating by spraying (we used semi-matte nitro varnish), and after drying, install the button handles.
Quick tip! Before installing brass axle pins , Insert wooden dowels instead and make sure the drawer rotates freely.
Prepare two 19mm brass pins with a diameter of 6mm and insert them through the holes in the walls E into the axial holes of the box J-M. Finally, secure the remaining mounting strip to the wall N to hang your game board, place chess pieces (no more than 76 mm high) and invite your opponents to the tournament!
How to make chess squares dark
To achieve a deep, rich dark color on light wood such as birch or maple without hiding the grain, use a combination of stain and stain.
Here's how we stained the dark A cells: Using a foam brush or cloth, apply a generous amount of water-soluble Cuban Mahogany aniline dye, let it soak in, and then wipe off the excess liquid. Water causes the lint to rise on the wood, so once dry, we lightly sanded the pieces with 320-grit sandpaper before applying stain again.
After a few hours, when the surface of the parts was completely dry, the stain-gel was generously applied with a cloth swab, allowed to soak in for a few minutes, and then the excess was wiped off and left to dry overnight.
Source: http://stroyboks.ru/cvoimi-rukami/mebel-svoimi-rukami/shahmatyi-na-stene-svoimi-rukami.html
How to make chess with your own hands?
The oldest game, which dates back about 1500 years, has not lost its popularity in our time. Both adults and children love chess. The game, invented in India, quickly spread throughout almost the entire world. I liked it because it requires a logical solution to tasks, has a moment of competition, and many variations. Champion sports competitions attract the attention of the world community.
Variety of chess
Over time, people began to fantasize and make chess with their own hands from different materials. Traditional figures are being replaced by a wide variety of heroes. These include characters from popular films and cartoons, famous athletes and politicians, animals and geometric figures. The size also varies from the minimum, which can be seen with a magnifying glass, to a giant king of 4.5 meters. There are tabletops, travel ones, huge park ones, and gift ones.
The materials from which this popular game is made are also amazing in their diversity. Starting from paper and cardboard figures to gold, decorated with precious stones. Modern craftsmen and designers compete in creative approaches to this process. Chess can be glass, wood, plastic, clay, bone.
Craftsmen make them from computer parts, bolts, car engine parts and other waste materials. Do-it-yourself chess is made by adults and children, professional designers and factory workers. Carpenters and woodcarvers create unique works of art. Jewelers are preparing gift sets for high-ranking persons.
DIY chess made from polymer clay
Polymer clay has become one of the most popular materials for making various crafts in our time. The material is bright, strong and durable. The child will especially enjoy the game if the pieces are not ordinary traditional chess, but characters from their favorite cartoons or fairy tales. How to make chess with your own hands from polymer clay? You can buy the set at a children's art store.
Before sculpting, the clay must be thoroughly kneaded. The longer you knead, the softer the material becomes. A figurine of any character is sculpted, at the request of the child. To cut out small parts you will need a sharp utility knife. When the figure is ready, proceed to the most important moment. To make the clay strong and hard, it needs to be baked in the oven. A temperature of 130 degrees is required for firing.
It is better to place the figures on a ceramic tile; in extreme cases, you can place baking parchment on a metal baking sheet. For dense products, it is advisable to fill the core with another material, for example, crumpled foil. Then the clay has a thinner layer and bakes better. Bake for an average of 20 minutes. More details are indicated in the instructions for use.
Paper figures
Even a child can make chess with their own hands from paper. There are also many manufacturing methods presented here. These are origami, cardboard figures according to patterns, quilling, glued paper, on a solid stand. Let's look at how to quickly make paper figures like a tabletop theater.
Take cardboard in white and, for example, red. Fold in half so that the fold is on top of the design. Using a simple pencil, draw the silhouette of a chess piece. There remains an extra square at the bottom for the base on which the object will stand. A picture is cut out along the contour with sharp scissors and its two parts are glued together. The squares of the base are bent in different directions and glued onto a solid base for strength. That's it, the figurine is ready. The rest are made using a stencil.
Figures made from strips of paper
Nowadays, making crafts using the quilling technique is very popular. Craft stores sell sets of thin strips and hooks from which you can make different pictures. It’s easy to make chess with your own hands from strips of paper. To do this you need PVA glue, quilling strips of two different colors and a holder. Pawns do it simply. Wrap the strip tightly around the hook in layers and glue the edge to the rest. The result is a tightly twisted cylinder, similar to a checker.
The rest of the figures are made based on the imagination of the master. A bishop or an officer is made in the same way as a pawn, only at the end the hook along with the paper is pulled gently upward, resulting in a cone shape. You can attach arms to the queen and glue a separately twisted head to the top of the cone.
For a tour, you can twist several circles of different sizes and glue them to form a turret. The most difficult element will be making a horse figurine. On the previously described cone, place a triangle made using a stencil quilling ruler.
The mane is glued to the back side of the leg, cutting the tape with scissors like a fringe.
Wood models
Beginning amateurs, professional carpenters, and skilled carvers like making chess with their own hands from wood. The traditions of each country can be seen in the figures and board design. There are heroes from Russian fairy tales, Ukrainian Cossacks, Indians with spears, Norwegian Vikings. The craftsmen pay special attention to the design of the board. This could be a table with a drawer for figures, a ship, veneer made from different types of wood, or a typesetting canvas made from cut out squares of different types of wood.
The master decides how to make a chess set from wood with his own hands based on his skills and imagination. A beginner hobbyist can use a thick tree branch for a summer cottage option, making stumps of different sizes with simple patterns cut out. To do this you will need a sharp knife or chisel. If you have a jigsaw or electric saw, you can cut posts of different heights from a block by making small cuts on the sides of the main shapes.
Having made chess with their own hands from wood, professional carvers enter them into competitions and win prizes. The price of some works of art reaches several thousand dollars. Not only the quality of the work performed is valued, but also the transmission of traditions and history of the people, and the originality of execution.
Developing children's creative abilities
From an early age, children love to invent, fantasize, and play. By making chess with children, parents and teachers develop not only creativity in children, but also practical skills and abilities. Working with paper, wood or clay, kids get unforgettable emotions. And if they work together with adults, then children gain valuable experience in communication and work skills. The pleasure of playing such homemade chess cannot be compared with anything.
Learn to fantasize, work with your hands and think through games with your head. All-round development of your children is guaranteed!
Mathematicians have calculated that the number of possible positions of 32 figures on 64 cells is greater than the number of atoms in the Universe. The number of chess sets is, of course, smaller, but their diversity is amazing. The blog “About Chess” offers its own version of the “best of”, leaving the list far from complete...
Since we are on a sports site, we will start with this topic.
Football is represented by a set of American football, the "just" football ones that I found are inferior to this:
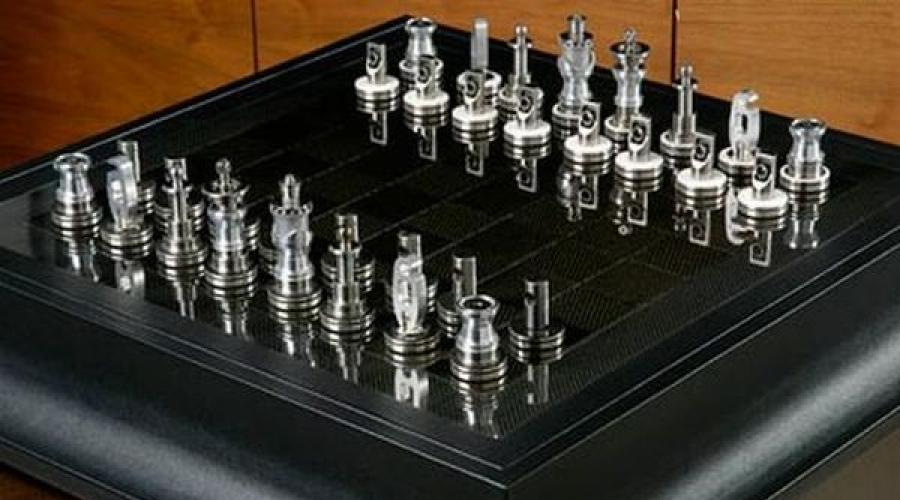
The most automobile:

The kit is made from the same materials as the Renault Formula 1 car: titanium, steel and aluminum. The figures are made in the form of bushings, pendants, a pilot's seat, and the board creates the illusion of a track. The clean, minimalist lines of the Renault Formula 1 kit symbolize the simplicity and austerity of modernity. Cost: $42,000.
Hockey:

Sumo:

Another question that interests many is the maximum price for a set.

The most expensive chess set in the world was sold in Britain by Jewel Royale. It is made of gold, platinum, diamonds, rubies, sapphires, emeralds, black and white pearls. Each figurine is decorated in the middle with a spiral of precious stones. The largest chess piece - the king - costs 100 thousand dollars. Despite the fact that the figures look airy and light, they are quite heavy. So, the king weighs 165.2 grams. The total cost of the kit was $9.8 million.
The cost, perhaps, could rival Faberge chess,

It’s difficult to say the exact cost, but I was estimated at “from $5 million”
Let's continue the money topic.
Sometimes people come up with very strange ideas, and some even implement them. So, one eccentric, apparently a chess lover, decided to make himself a board and pieces out of money. He collected enough change and took out brand new bills from the bank. He began to assemble a chessboard from banknotes, bending the pieces of paper in a certain way, and from coins - chess pieces. The playing field was made up of 20-pound and 50-pound notes, and the rim was made up of 10-pound notes. To prevent the field from starting to unfold on its own, it was kept under pressure for some time.

The figures from the coins turned out to be recognizable. The pawns are 1 penny coins. The cost of the chess was 2402 pounds and 68 pence.
The largest chess set (or rather, one piece) was made by order of Rex Sinquefield in 2012 for the start of the first cup named after him.
The height of the king is almost 4.5 meters, the base is 1.8 meters. The figure is listed in the Guinness Book of Records.
You can even watch how the record was prepared.
The smallest ones, apparently, were made by master Anatoly Konenko:

Miniature wooden chess pieces are turned under a microscope on a miniature lathe. The height of the chess pieces is 2.0 - 3.8 mm. Playing field 17.0 x 17.0 mm. Checkerboard squares from different types of trees. Birch bark ornament. The bumblebee is real.
The theme of alcohol is popular in chess, and there are many “drunk” sets. My choice fell on this one:
I understand that you don’t heed the advice, so I suggest using the most stable chess in the world:

This set was invented and developed by industrial engineer Adin Mumma, who back in 1970 was inspired by the roly-poly toys, or, simply put, tumblers, for this masterpiece. The result of the work was so successful that it was awarded the International Design Award.
A picky chess player will notice that the a1 square here is white, but we will not be so strict and note the beauty and originality of the idea. And after alcoholic chess, who will pay attention to such a trifle?!
Just in case, a video explanation is also included.
It’s impossible to ignore the topic of food, namely sweets, so I consider these the most delicious figures:

You can even make them yourself. The main thing is not to over-salt, then this will be the “spiciest” batch:
However, such games are not a problem for the tough Chelyabinsk chess players who are credited with this set:

Computer scientists also have their own style.
The board is made from the bottom of the motherboard, and 32 pieces are made from chips of various types in two colors - green and black (painted by hand if necessary). Stands in the form of bolts screwed into holes along the edges.
The capacitors that any computer is equipped with are used as pawns. Rooks are transformers. More complex figures use several objects, such as inductors, hard drive elements, batteries, motor parts, etc.
In ten years, I expect a set of buttons from old mobile phones, as well as smartphones, tablets, readers... Or maybe someone has already seen them?
But we already have the most photographic chess:

Anyone who is not a photographer will not understand what the fundamental difference is between Canon and Nikon cameras. But photographers can argue about this for years on specialized forums and in personal meetings. And now, thanks to the Lensrentals Chess set, they can arrange matches between Canon and Nikon on the chessboard.
All thirty-two pieces in the Lensrentals Chess set represent super-expensive camera lenses produced by competitors Nikon and Canon. So people, playing chess with this set, will simultaneously participate in the age-old dispute about whose photographic equipment is better! Whites play for Canon, blacks play for Nikon.
Of course, in the Lensrentals Chess set, the significance of the pieces depends on the size and cost of the corresponding photographic lenses. So, for example, Canon uses the Canon EF 70-200mm f/2.8L IS USM lenses (costing about $2,000) as pawns, the Canon EF 500mm f/4.0 L IS USM ($7,000) as the queen, and for king is the Canon EF 600mm f/4.0 L IS USM ($9,500). In total, this entire set costs over a hundred thousand dollars! But you can’t buy a Lensrentals Chess set (you can only make the same one, but hardly anyone will dare) - the Lensrentals company gives it for rent, demanding $9,221 for a week of using these unusual chess. And, what’s most amazing, she has a lot of clients!
Unless they're lying, of course.
And we smoothly move on to political chess.

The set is beautiful, and, most importantly, inexpensive - only 29,000 rubles. The board is mahogany. The figurines are made of high quality porcelain and hand painted. The height of the king is 13 cm. For some reason, the black king is wearing a white judo kimono. Either an oversight, or the political foresight of the manufacturer.
Where there is politics, there is war.
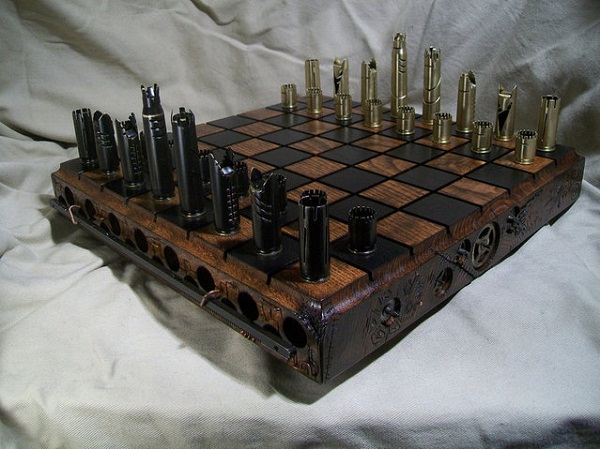
The cost of this kit is $800.
Anti-terrorist:

The creators of the original chess set offer to play out a real war on the board. Namely, the anti-terrorist operation in Afghanistan. So the Terror Chess Set is dedicated to her, having two versions: American and British.
In the “American” Terror Chess Set, the President is the King, the Statue of Liberty is the Queen, and the Twin Towers of the World Trade Center, destroyed during the attack on September 11, 2001, are the Rooks (Towers).
In the "British" version of Terror Chess Set, the King is Prime Minister David Cameron, the Queen is Queen Elizabeth II, and the Tower Rooks are Big Ben. Well, the “enemies” of the USA and Great Britain are always the same. The King is the now deceased Osama bin Laden, the Queen is a woman tightly wrapped in a burqa, the Elephant (in English, Bishop) is a Muslim mullah, the Horse (in English, Knight) is a terrorist with a grenade launcher. Moreover, the chessboard itself in the Terror Chess Set is stylized as a map of Afghanistan.
Naval:

Designer Jim Arnold created the War of 1812 Chess Set, which recreates the famous battle between the USS Constitution and the British HMS Guerierre during the War of 1812, also known as the Second Revolutionary War.
I don’t know who invented these chess and when, but let’s close the topic of politics with an anti-racist set:

Politics sometimes leads to zugundera, and in prison there is a craving for chess. Here is a set made from bread crumbs for prisoners.

This set is kept in the Vorkuta Interdistrict Museum of Local Lore.

Chess players are people too (yes, yes!), and therefore our ranking includes a place for the sexiest chess set:
Children are offered such wonderful figures:
Not only chess, but also various construction sets are useful for the development of children, and here there are three in one: build chess from Lego, play with them, and also remind you of the heroes of “Star Wars:”

For adult fans of this film there is also a corresponding kit:
Dedicated to fans of “Aliens”:
It is impossible to ignore the theme of the animal world; after all, in the game itself there are horses and elephants. Therefore, the most “animal” chess is represented by the inhabitants mainly of the African continent.

As the owner of a cat with the name of the goddess of chess - Kaissa (in everyday life simply Kasya), the set of “cats” against “dogs” must be in our review.
The feathered world is represented only by parrots:
Let's talk a little about geography.

Slavic and northern motifs were used by the master in the manufacture of chess pieces. The chessboard with an openwork pattern has special drawers for storing chess pieces. The work is made from an authentic mammoth tusk found in Yakutia, which is more than 10,000 years old. Author: Klimenko Alexey. Board dimensions 36.3 x 36.3 cm, board height 8 cm, chess field dimensions - 29 x 29 cm, figures height - 5.5 - 8.2 cm Material: Mammoth tusk, oak; Weight: 5.70 kg
British designers have harnessed the iconic look of their capital, which boasts dozens of world-famous buildings, to create the Skyline Chess set.

Let’s finish our “travels” with “Roman” chess:

Do you still remember your school geometry course?

Would you say it’s difficult to play on these? Let's be optimistic!
And there are also three-dimensional, icy, acidic, transparent...
We admire these types of chess more, but prefer to play with regular ones.
Photos and descriptions were used from the sites ruchess.ru (Vladimir Barsky), chessm..ru and others.
Berdnik Galina Stanislavovna, primary school teacher of the KhMAO-Ugra "Laryak boarding school for students with disabilities."
Description: Chess is not only a game that brings children a lot of joy and pleasure, but also an effective and efficient means of their mental development. The process of teaching the basics of the chess game contributes to the development in children of the ability to navigate on a plane, the development of analytical-synthetic activity, thinking, judgments, inferences, teaches the child to remember, compare, generalize, anticipate the results of his activities and Practice has shown that a well-structured process of teaching chess gives a lot and gifted children, and conditionally ordinary, and weak, and children with various functional disorders. Therefore, it is advisable to start teaching wise play as early as possible, but, of course, at a level accessible to the child.
The master class provides a detailed description of making a paper chess game and paper chess pieces using a magnet.
Purpose: ready-made demonstration material is necessary in class when studying any topic on the subject of chess.
Target: Production of demonstration material on the subject of chess.
Tasks:
1. Repeat the concept of “figures on a plane.” Develop design abilities.
2. Development of children's ability to visually model.
3. Cultivate the desire to make a product with your own hands.
4. Cultivate the habit of working independently, carefully, and bringing the work started to its logical conclusion.
5. Develop compositional skills and aesthetic feelings.
Materials and tools:
1. Drawing paper A-4 or whatman paper.
2. Colored paper, corrugated cardboard.
3. Ruler (50cm), pencil, scissors, cutter.
4. Magnets, tape, glue.

Description of making a visual aid
"Chess and chessboard."
1. To make a chessboard, prepare 2 sheets of A-3 drawing paper. The standard sheet size is 42 cm by 29.7 cm.
The photo shows half of the chessboard. For easy storage of the manual, prepare two such parts. They were glued together on the reverse side with a strip of wide tape.
You can also make a chessboard from a single piece of whatman paper. After pencil markings on the base of the squares, prepare shapes from black or gray paper. Make sure that the black square matches the markings on the white sheet of paper.

The color of the chessboard is not fundamentally important. You can combine yellow and brown or yellow and green.
2. A thick white strip of paper was glued to each half of the chessboard. We will place letters and numbers on it to determine the location of the chess pieces.

3. You can print it on a printer, you can write beautifully with a felt-tip pen or marker on a white stripe of a chessboard.

4. Numbers and letters were placed and carefully glued to the appropriate place.

5. For greater aesthetics, we edged the chessboards with a thin strip of corrugated cardboard.

Here, you can take a closer look at the corner of the chess half.

In the same sequence we make the second half of the chessboard. We connect the halves on the wrong side with tape.
Now you can attach it to a metal board using magnets.

6. Let's start making chess pieces.
First print out the pieces used in chess.
Chess pieces templates:

The figures can be of different colors and shapes, for example:

We liked the streamlined shapes in gray and yellow shades more.
Glue the printed thin sheet of paper onto thick cardboard.
Each figure should preferably be “laminated” with wide tape. This will give strength and longevity in the use of didactic material.
Important advice! If you decide to use tape, you first need to glue it directly to the figure, and only then cut it out. Thus, the outline of the figures will be smooth and durable, and the details themselves will look neat.

7. Glue a piece of magnet to the wrong side of each shape. You can use Moment glue.

8. Our pieces are ready to take the starting position of the chess game.

Closer view of the chess troops.


We use this demonstration material in every lesson.

You can call moves, rearrange figures, solve any logical problems. Explain and find ways to solve winning moves.
Thank you everyone for your attention! I will be glad that the material provided is useful.
Chess is one of the oldest and most majestic games. People of all ages and social statuses adore them. This game was invented in India and quickly spread across all continents and countries. Entire generations of people have fallen in love with chess because of its unpredictability and variability. Nowadays, many international competitions are held in this game. Thousands of people from all over the world are fighting for the chess crown.
This game helps develop logical thinking and the ability to calculate your actions in advance. Chess is made from a wide variety of materials. There are figurines made of gold and other precious metals, precious woods, crystal, ivory and other expensive materials. Since most people cannot afford such chess, you can buy ones made from the simplest materials or make them yourself.
Paper chessboard
To make it you will need the following materials:
- two white sheets of A3 paper;
- scotch;
- pencil;
- ruler.
Procedure:

This board is best placed on a table or attached with magnets to a metal board.
Handmade chess
Any variation of the game provides for the presence of 16 white and the same number of black figures. They play on a board divided into 64 equal squares.
Figures can be made from the following materials:
- tree;
- clay;
- paper;
- plywood, etc.
Before you start making, you need to understand how to make a chessboard out of paper.
From plywood
One of the simplest and most popular options for creating chess is cutting out figures from plywood.
The process is as follows:

Instead of classic figures, you can cut out chess pieces with your own hands for children. The objects can be characters from cartoons, fairy tales, and games.
Polymer clay figures
Polymer clay is ideal for making durable and colorful objects. Chess-themed crafts created with its help will look beautiful and original and will serve you for many years.
To make chess, you need to do the following:

Plasticine can also be used as a material for chess..
Wooden chess
 To create wooden figures you will need the skills of a carver or carpenter. For a beginner, you can take a simple branch as a blank and make cylinders out of it. Then cut out simple insignia on them. This work can be done using a chisel or a sharp knife.
If you are a professional carver, then all that limits you is your imagination. Wood carvings can be used to create figurines of stunning beauty and bizarre shape. Chess pieces made by top-class craftsmen are often sold at auctions for huge sums of money.
In addition to chess, wooden checkers also look beautiful. They are made according to pre-designed and selected sizes. You will always want to play several games with these figures. You can also make them from wood, the drawings and dimensions of which will not differ much from checkers.
Paper figures
This option for making figurines is the simplest and cheapest. To implement it you will need to do the following:

If you use a flat board to play on a table, then you don’t need to glue magnets to the figures. Having learned how to make chess, it’s easy to figure out how to make checkers with your own hands from paper. To do this, you need to repeat all the same steps, only with checkerboard patterns.
Products made from strips of paper
Making figurines using the quilling technique is gaining popularity every day. Chess is no exception. In order to roll them from paper strips, you need to take the following steps:

Making chess with your own hands is quite simple and interesting. It doesn't matter which method you choose, the main thing is that it will help you join the great game.
Attention, TODAY only!