Secrets of making homemade wine. Proper wine making at home
Making homemade wine will allow you to try a different taste of this drink. Many people say and even claim that homemade wine is better than branded wine.
First, let's discuss a few important points to remember when preparing wine:
1. To make the perfect homemade wine, you need to use oak barrels (we use carboys).
2. You can use any fruits and berries, which will give us the opportunity to get wine of different taste and aromatic qualities.
3. The grapes should not be washed, as the natural yeast may be washed away.
4. Be sure to free the grapes from cuttings.
How to make wine with your own hands at home from grapes?
Step #1. We take the amount of grapes we need from which you want to make homemade wine. We clear it of cuttings and remove rotten berries. Never wash it!
Step #2. Our task is to obtain juice from grapes. For getting juice can be used a wooden puller, kitchen utensils, or squeeze it out yourself with your hands and feet. The main task is not to crush the seeds in the berries. We recommend squeezing grapes in a container made of: stainless food steel, glass or with an enamel coating. This can be a saucepan or bowl, some people use a bath if you are using a large amount of grapes. The main thing is that there is no direct contact with ferrous metal.


Step #3. After receiving the juice, cover with a lid and wait until the pulp (a mixture of crushed grapes intended for processing into wine) rises, on average 2-3 days in warm weather, 3-4 days when it is cooler. We need to wait for the fermentation process. Stir from time to time and wait until bubbles begin to appear.

Step #4. After fermentation is complete, we take a press (at home you can take a colander and press the raw materials into it in portions with your hands). Once completed you will receive juice. Pour it into a bottle or jars, depending on the amount of grapes you used.

All these steps are basically the same, now we need to decide what kind of wine we want to get:
1. Dry.
2. Semi-sweet.
3. Homemade semi-sweet or sweet wine (popularly called “burchik”). How sweet the wine turns out depends on the amount of glucose that is in the grapes themselves.

Dry wine.
Pour the resulting juice into the bottle from step No. 4, and close it with a special lid with a hole so that you can insert a straw. After this, we lower the tube into a jar of water and observe the process. There should be bubbles. After 14-16 days, open the lid and close the bottle with a regular lid, and wait 30-50 days (depending on the temperature) until it is completely cooked. After a long wait, open the lid and carefully pour it into bottles or start consuming it, leaving the sediment at the bottom untouched. This is how we made dry wine ourselves, about 12-14% vol.
Semi-sweet wine.
Pour the resulting juice into the bottle from step No. 4 and take it at the rate of 1 kilogram of sugar per 10 liters of juice. We close it with a special lid with a hole so that you can insert a tube. After this, he lowers the tube into a jar of water and observe the process. There should be bubbles. After 14-16 days, open the lid and close the bottle with a regular lid, and wait 30-50 days (depending on the temperature) until it is completely cooked. After a long wait, open the lid and carefully pour it into bottles or start consuming it, leaving the sediment at the bottom untouched. This is how we made our own semi-sweet wine, approximately 14-16% vol.
Homemade semi-sweet or sweet wine.
Pour 10 liters of juice obtained in step No. 4 into the bottle. Take 10 liters of warm water so that you can hold your hand there. Add 3-3.5 kilograms of sugar and mix with our juice. We put a mitt on the jar or bottle and make an incision. After 14-16 days, remove the mitten and close it with a regular lid and wait 30-50 days (depending on the temperature) until the sediment completely falls out and the beautiful color of the wine appears. Open the lid and carefully pour into bottles, leaving the sediment at the bottom undisturbed. It's so easy to make homemade wine yourself, about 16% vol.
The main thing in home winemaking is the selection and preparation of raw materials. Good homemade wine is made only from high-quality raw materials. And fruits and berries that have begun to spoil will certainly ruin the taste of the drink. All rotten fruits and berries must be removed. Rinse the fruits in warm running water, chop or squeeze the juice out of them. Grapes and apples can be crushed using crushers made in Italy; fortunately, the Italians have a lot of experience in this. . And highlight.
RHUBARB- an excellent raw material for homemade wine; only the stems are used, and unpeeled ones. It is better to use early rhubarb; older rhubarb can impart bitterness to the wine.
STRAWBERRY– a very tasty berry, which is a shame to use for wine, but in combination with rhubarb juice we get a wonderful, harmonious wine. You can add a little berries, they must be ripe, there is no need to wash them, you just need to remove the rotten berries and the stalk.
RASPBERRY– good in mixtures, for example, with blueberries or blackcurrants.
BLUEBERRY– perfectly complements mixtures of different berries and fruits and gives them color. It contains some benzoic acid, which acts as a useful preservative.
COWBERRY– contains a lot of benzoic acid, so it does not ferment and can be stored for many years. You should not use a lot of lingonberries; they are added to wines one third at a time when the wine, for example, from blueberries, ferments well.
CURRANT– Red is the favorite material of summer resident winemakers. Black and white currants are also great. It is better to mix black currants with other berries. Dry white currant wine is considered the closest to white grape wine and is therefore highly valued by winemakers.
GOOSEBERRY– both white and red are excellent materials for making white and dessert wine.
CHERRY– an excellent material for making strong wines, such as Madeira or port. Sour and black cherries are best suited; they are washed and pitted or the pits are removed from the mash after 5-6 days.
APPLES– are considered a classic of homemade wine. Sour, juicy autumn and winter varieties are best suited. Wine is delicious both from pure apples and from various berry mixtures.
PEERS– it is difficult to preserve the characteristic pear aroma in the prepared drink. It’s worth trying to make sparkling or white wine from sour pears. They will help with this.
PLUMS– are suitable for making wine on their own, but the result will be better if you add other berries. The seeds must be removed and then the juice must be squeezed out using a press. Plum wine does not ferment for long, but the drink remains cloudy for a very long time due to the large amount of pectin in the plum. Therefore, we recommend processing the finished young wine
BLACK ROWAN– an excellent raw material for red wine. Traditionally, black rowan is mixed with apples to produce a ruby color, but delicious wine can be made simply from rowan.
CRANBERRY– added to other wines to increase acidity.
FROM JAM stagnant on the shelf, you can prepare good homemade wine, not only dry, but also strong dessert wines.
In the next article you will learn how to make dry and dessert wine from jam.
Mix berries and fruits!
Be sure to mix different berries and fruits to get more aromatic and full-bodied wines.
Blending gives beautiful color to wines . Homemade apple wine in its natural form is usually pale or dull yellow. A more intense color can be achieved by adding blueberries, chokeberries or elderberries. If it is necessary to improve only the color of the wine, then add 1/10 of the amount of the main raw material. The more dark berries you add, the darker the wine will be. Ferment the berry juice along with the pulp and skin for 6-10 days, then remove the skin and pulp by straining through a sieve, and leave the mash for further fermentation.
Blending improves the taste of wine . We mix more and less sour berries and fruits for a more complete, harmonious taste. If wines have low acidity (3-4 g/l), then they are flat in taste. The optimal acidity in dry table wines ranges from 6 to 9 g/l.
Cranberries, apples, red currants, and lemon with zest are suitable for enhancement.
For example, blueberries and strawberries are not sour enough, but rhubarb, rowan, and red currants are rich in acids. By mixing them together, you can get an excellent result, and a couple of handfuls of raisins will give the wine a pleasant hue.
In any case, the winemaker must understand and expect that by choosing this or that fruit or berry, as a result of fermentation, he may not get what he expected. This is an experiment! Therefore, when selecting and mixing berries, you need to take into account their composition: sugar content, acidity, aroma, color, etc.
Mixing different berries is just one trick. In winemaking, a widely used method is blending. This is mixing ready-made wines in different proportions.
POPULAR CLASSICAL BLENDS
Apple: chokeberry, elderberry, blueberry, black currant, rowan.
black currant: red currant, raspberry
Strawberry: rhubarb, cranberry
Blueberry: raspberries, lingonberries
Homemade grape wine has always enjoyed considerable popularity at any table, so every winemaker, even a beginner, happily tries to create wines according to various recipes, including the classic version - from grapes.
Here is a recipe for excellent grape wine: step by step and easy at home (with photos and instructions).
Choosing the right vintage for wine
In order for grape wine (and not just homemade wine) to be truly tasty and aromatic, it is necessary to use exclusively high-quality and, most importantly, the right product to create it - wine varieties.
The berries of these varieties are characterized by their small size and density on the bunch. Below are some valuable tips from experienced winemakers regarding the selection and preparation of material for wine:

Advice. Grapes collected for making wine should not be washed, because the white coating that forms on them is nothing more than wine yeast. Rinse or even wash grapes only if a starter with high-quality wine yeast is used.
The harvested grapes should be separated from the ridges, sorted, removing all unsuitable ones, including dried and moldy berries. After preliminary selection, the berries are poured in small batches into a deep container and crushed. You can use a regular potato masher or a meat grinder. The berries should be crushed very carefully so that each of them releases all its juice.
Wine making process
Making quality wine is a fairly simple process if you strictly follow all steps of the recipe. The following is a step-by-step process for preparing wine.
Fermentation of pulp
The finished pulp or crushed berries, previously separated from the ridges, are poured into a suitable container and covered tightly with a cotton cloth. Keep in mind that the container should only be 2/3 filled with wine material.
The container with pulp is installed in a room with a strict temperature regime, falling between 18 and 23 degrees. If the temperature is above the second mark, the pulp may ferment too intensely, which will result in it turning into vinegar. If the temperature is below the first mark, the fermentation process may proceed too slowly or may not even begin at all.

So, after a few days, the fermentation process will begin and the must (juice, which is essentially young grape wine) will begin to separate from the pulp. The pulp and wort should be thoroughly mixed every day, otherwise the former will simply turn sour and the taste of the not yet finished product will be spoiled.
Preparation of grape must
5-7 days after the start of fermentation, the pulp should be thoroughly squeezed out, thus separating the wort from it. The first spin is done through a colander, the second through several layers of gauze. The purified wort should ferment. To do this, it is poured into a clean container (it should be filled only 3/4) and tightly closed with a stopper and tube.
Attention! Experienced winemakers believe that separating the pulp from the wort is a mistaken action, which will subsequently deprive the finished product of its valuable deep aroma and delicate aftertaste.
If you want to leave the pulp, you should not squeeze it out to separate the wort: just pour all the product into a new container and close it with a lid with a straw. The tube will serve as a kind of protection against oxygen: one end of it must be lowered into a container of water, the other into wine.

At this stage, it is important to control the strength and sweetness of the wine, which depend, first of all, on the fructose content in the product. You can regulate this indicator by adding this or that amount of sugar. In our area, predominantly varieties with a low fructose content grow, therefore, if sugar is not added during the preparation of wine, it will turn out dry.
The dosage of sugar is usually taken as follows: about 1 tbsp. per 1 liter of semi-finished product. Sugar is added as follows: you need to pour a little wort, heat it and pour sugar into it, stirring the mass until the latter dissolves completely. After this, pour the resulting sweet composition back into the container with wine.
Corking of semi-finished wine
At this stage, you should separate all the sediment from the finished wort (to do this, you just need to drain the wine through a straw, carefully lowering the container with water below the container with wine). Be sure to check the product for the amount of sugar: if you like dry grape wine, you won’t need sugar. Otherwise, be sure to add it to the wine and stir thoroughly.
All that remains is to pour the grape wine into a dark glass bottle and seal it loosely (this is necessary so that the remaining carbon dioxide contained in the wine finds a “way out”).

Product sterilization
This is the last, but no less important stage in making homemade wine. Some winemakers believe that this process should occur naturally: the wine must be left in a dark, cool place for several months (2-3) until the fermentation process stops, having previously installed water seals on each bottle. During this period, you should drain the wine at least several times to remove any sediment.
There is another way to sterilize wine - forced. It is necessary to loosely close the wine bottles, wrap them with cloth and place them in a container filled with water. Place a thermometer in one of the bottles and sterilize the product until its temperature rises to 60 degrees. After this, all the yeast will die and the fermentation process will stop completely. The remaining carbon dioxide will also escape through a loosely closed plug.
Afterwards, you can tightly cork the bottles and send them to a cool, dry place. A product that has gone through all the preparatory stages correctly will be able to gain all that wonderful aroma and depth of taste for which many people love grape wine so much. Good luck!
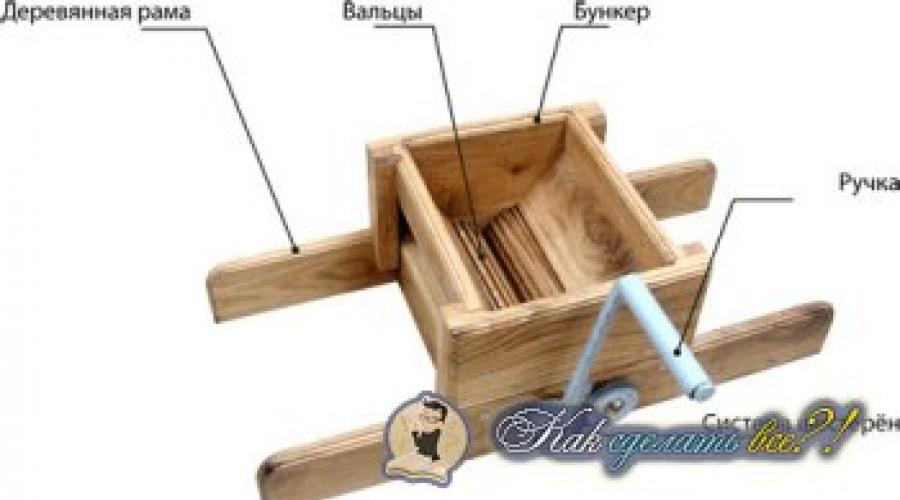
You always have to do something for the first time. If you decide to try your hand at winemaking, you need to get acquainted with the small nuances of the process. There are few of them, but they must be followed. The most important thing is absolutely clean dishes; wooden, glass and ceramic vessels are used for cooking. So, how to make wine at home?
Navigation
Where to start
Glass bottles and cylinders have positive and negative qualities. The advantages include the volume of containers, ranging from three liters to sixty. They are convenient for transportation (braided bottles are currently produced). It is good to store the finished product in them. The disadvantage is that it is necessary to pour the wine frequently to aerate it and enrich it with oxygen. Also, glassware is subject to temperature changes, which will create some inconvenience. Therefore, craftsmen tend to work with wooden barrels and kegs. Such dishes perfectly maintain the required temperature, the fermentation of the wort in such a container proceeds calmly, no sunlight penetrates through its walls at all, and air penetrates quite easily. Wine matures faster in these containers. The barrels are processed and cleaned. The last step before starting cooking is fumigating the barrels with sulfur. Ceramic dishes are used very rarely for making wine.
Main stages of winemaking
Wines are prepared from different berries and fruits, divided into red, white, semi-sweet. The technology for preparing this delicious drink has not changed since its inception. The process is improved over time, adjustments are made to it, and experiments are carried out. These actions are aimed at only one thing - improving taste. The basis is a four-stage procedure:
- collection of raw materials and their preparation for use;
- grinding components;
- fermentation of the desired composition;
- clarification of the final product.
Fruits and berries that are clearly overripe are suitable for wine. At the same time, they are subjected to careful inspection and selection. Raw material with rot, mold, or signs of disease is completely unsuitable. It cannot be processed, since it obviously dooms the manufactured product to failure. It is washed well and thoroughly, the stalks and seeds are removed. The exception is grapes. If there is a white coating on the fruit, do not rush to get rid of it, as this is wine yeast that promotes good fermentation. The wine will be aromatic.
The prepared ingredients are crushed, squeezing the juice out of the pulp, using any suitable method.
The most crucial moment in the preparation of any wine comes. In addition, it takes the longest time. This is the fermentation process. The resulting wort is placed in a prepared container and sugar is added. Instead, you can add wine starter. The container is covered with either a cloth or a lid. In this state, the contents are kept warm for several days (up to ten, no more). A special feature in home winemaking is scrupulous monitoring of the temperature, which must follow certain parameters: not lower than twenty-two degrees and not higher than thirty-five. If you miss this moment, fermentation will slow down and the wort will turn into vinegar. This base is not suitable for making wine.
At the end of fermentation (visually this is determined by the color of the pulp, it becomes whitish, and it floats), the fermented components are squeezed out. The resulting mass is filtered. Waste is thrown away. True, many winemakers reuse waste material. It is filled with water a second time and left to ferment. The strained liquid is poured into prepared jars and syrup is added. The bottle is covered with a rubber glove and left warm for the required time to complete the fermentation process. The final fermentation period varies from several days to three months. The container with wine should be kept in a dark room all this time.
The final stage begins - clarification of the wine. If no traces of fermentation are visible, and the glove is hanging down, then you can begin to create a clear, sparkling drink. This will take some more time. The container with wine is placed in a cool and dark place, and kept like that for a month or a little more. Carefully, trying not to mix the liquid with sediment, pour into containers. Then it is filtered again and bottled; they must be dry.
The process of making wine with your own hands
Red wine is made from scarlet fruits of varying saturation. In this case, dark grapes are used. We need the following components:
- grapes (9-10 kg);
- sugar (3 kg);
- water (5 l).
The quantity can be changed depending on the desired yield of the drink, the main thing is to maintain the proportion of grapes: sugar: water (3: 1: 1.5).
We remove the grapes from the grape bunches, sort them out, and carefully press them: with our hands and even with our feet. We fill the container two-thirds with the products obtained from pressure and fill it with water. Monitor its temperature (it should reach 23 degrees). There should be free space in the container, since the mass rises during fermentation. Keep the contents for several days (no more than five) in covered bottles, systematically stirring the wort.
Next, squeeze out the pulp (don’t forget that it should turn white), strain the liquid, strain it and pour it into dry containers. Add sugar syrup. It is prepared in different sweetnesses (a matter of taste). For sour water, we take 200 g of sugar per liter of water, for sweeter water - one kilogram. Cook the syrup over low heat, stirring constantly, cook for half an hour. After cooling, mix with juice, stir, put on the same glove and leave to ferment. We clean and remove the finished wine for some time to age.
You can prepare a white, sunny drink from light-colored fruits. If you want to make apple wine, you will need fruit, sugar and water in quantities similar to the previous recipe. The fruits are washed, the stalk and seeds are cut out, cut into slices and passed through a press. Place the prepared raw materials in containers. A small nuance - add two to three sliced apples to each container. Syrup prepared from a glass of sugar and a liter of water is poured into the infused mass for thirty minutes. Cover the bottles with a rubber glove or a special lid and leave them in this state for ten days. Periodic stirring of the contents is necessary. The fermented drink is filtered and kept in a cold place for two months. Clarify, pour and enjoy.
Semi-sweet wine, prepared independently, has its own differences and characteristics. The sugar content in this drink is more than 20%, and the alcohol content is not higher than 12 degrees. The prepared drink is incredibly aromatic and delicate in taste. It also differs in its fermentation properties. For its production, grape varieties with fleshy pulp are selected. You should pay attention to the time of collection of raw materials; this usually occurs in dry, warm weather. Another difference in preparation is that they do not use sugar syrup. The wort is boiled and sugar is added to suit the manufacturer's taste. All other processes are similar to other methods of preparing wine.
It is advisable for a novice winemaker to stock up on the necessary accessories:
- special lid for fermentation;
- thermometer for temperature control;
- device for taking wine samples;
- siphon with filter;
- sealing wax for sealing the container;
- vinometer - sugar meter.
And remember, wine is not a means of intoxication, it is intended to enjoy the fragrance, bouquet of aroma, sensation and color palette.
Home winemaking in the vastness of our Motherland is a fairly common thing. Many have dachas where berries and fruits grow, some have a private house with their own garden. And the abundance of the harvest is sometimes such that there is literally nowhere to put the fruits. So our people (especially the older generation) prefer to prepare them. Such skillful preparations (so that fruits and berries do not disappear) include homemade wine. The recipe for its preparation is quite simple. The main thing here is adherence to certain technologies and cooking tips that have been developed over decades, and a sufficient amount of raw materials. Moreover, they manage to make homemade wine without yeast from almost any berries and fruits, sometimes even mixing them as part of the wort. Let's try it too?
Equipment
Any, even the simplest homemade wine recipe begins with preparing equipment for fermentation. If you already have it, then good, if not, then we’ll select it. First of all, we need a container so that the wort ferments well in it, so to speak, in comfortable conditions.
Fermentation vessels
Many people who regularly make homemade wine on their own (a recipe, and more than one, will be given below) advise under no circumstances to use metal utensils for these purposes. An exception may be an enamel pan, which is necessary in some cases for boiling wort. Generations of experience show that a glass container or wooden barrel is best suited for the fermentation process. With the advent of food-grade plastic, some winemakers began to use containers made from it, and they say that this is also good. Moreover, it is quite difficult to get a wooden barrel or a large glass bottle in urban areas.
But a plastic container (for example, for drinking water) is as easy as shelling pears. The dishes should be of fairly impressive volume and with a narrow neck if possible. By the way, you need to stir the future drink with a wooden or, in extreme cases, a plastic spoon. In addition to the container, we will need to make a water seal so that excess air does not enter the fermenting wine. Making such a thing is very simple - the Internet is full of descriptions.
We seal the neck tightly (some cover it, for example, with plasticine or putty) and remove a plastic tube from it (can be used for a dropper). We insert the tube into a jar of water standing at some distance, and the water seal is ready. This is, of course, the most primitive option. There are both homemade and branded ones, which you can also purchase if you don’t trust the “old-fashioned” methods.

Raw materials for wine

Fruit and berry
Well, now we should move directly to how to make homemade wine. The recipe uses a mixture of fruits and berries growing in the garden as raw materials. The result is an ordinary fruit and berry wine, not too strong and moderately sweet.
Preparing the pulp
Pulp is a preliminary product for making homemade wine. The recipe for its preparation is simple. We divide the available fruits and berries into hard and soft. Cut hard ones (for example, apples and pears) into slices and remove seeds and seeds. Then, using a meat grinder or blender, prepare a mixture that is as homogeneous as possible. Remove the seeds from soft berries and crush them. Then, in order to get maximum juice, we subject the pulp to heat treatment. Pour the pulp into a large enamel pan and add water 15% of the weight of the fruit. Heat to 60 degrees and, stirring at this temperature, hold for 30 minutes. This is the first method. Second: in order not to heat the pulp, you need to put it in a warm place to ferment for 2 days. And you can start making juice.

Getting juice from pulp
It is best to use a press, even if it is a homemade, small one. For these purposes, you also need a linen bag that fits the size of the press container. We put the fruit pulp, previously prepared, into a bag and under a press, squeezing out the liquid. When the juice stops flowing into the appropriate container, remove the pulp and transfer it back to the enamel pan, adding 10% water by weight. Let it sit for several hours, stir and repeat the operation with the press. Then it is recommended to further filter the juice obtained in this way, since it may contain small pieces of pulp.
Adding sugar and water

Fermentation
The process itself has been described many times in the relevant literature, so we will not dwell on it in detail. Usually it is carried out for 20 days at the appropriate temperature. We use natural yeast that lives on the berries. But if fermentation has not started after a few days, then you can add a little special wine (worse - ordinary bread). Otherwise the wort will sour.
From currants
Making currant wine at home is quite simple. For 3 kilograms of black currants you need to take 3 kilograms of sugar, 5 liters of water. We sort the berries, but do not wash them, grind them in a blender, mix them with sugar and water and pour them into a bottle. Proven method: put a medical glove on the neck, wrap the bottle in a black sun bag and leave to ferment (temperature 20-24 degrees). When the glove rises, you need to carefully pierce one of its fingers with a needle. Currant wine at home is ready in three months. Drain and bottle, place in the refrigerator, and then store in a cool, dark place. Wine strength is 10-14 degrees.
Homemade strawberry wine
It is prepared in much the same way as from currants. For 3 kg of berries we take 2 kilograms of sugar and 3 liters of water. You can add a small handful of raisins to enhance fermentation. Homemade strawberry wine is ready on average in a month and a half, but it would be better to keep it for another couple of months to ripen. Then its taste will improve.

Homemade mulberry wine recipe
Everything looks simple here too. We use the option with a medical glove. For 2 kg of berries we take 1.5 kg of sugar and 5 liters of water. Add a handful of raisins and 5 grams of citric acid. Otherwise, the cooking process remains unchanged.