Homemade chair for a 5 year old child. DIY wooden children's chair: easy, simple and quick. Plywood construction
Read also
The baby is growing by leaps and bounds, and all the time he really wants to be like adults. A table and a chair are one of those things that are not only “like an adult’s,” but are also highly functional. Most of these products in stores are either sold at a very high price, or are made of low-quality plastic with specific smell and short-lived chipboard. But there is good way out from the position for parents - these pieces of furniture are easy to make yourself.

Required materials and tools
There are not so few materials for making a children's table and chair from wood yourself; they are available and can be bought at any construction supermarket. As the main material, you can use not only natural wood, but also plywood or chipboard. But, of course, much more durable and durable material- tree. It is environmentally safe and does not emit toxic fumes and does not cause various allergic reactions.

List necessary materials for the table includes a quite affordable assortment.
- Tabletop. You can work out its dimensions yourself. The tabletop, like some other parts, is best made to order. Classic square or rectangular shapes are welcome. Round children's table is not a common practice.
- Four wooden legs. It is also recommended to buy them to order. Now such products can be ordered in carpentry workshops and even in some construction stores.
- Boards for the power body. They must be purchased in quantities of 4 pieces.
- Screws, nails or tenons with glue of your choice.


You also need to purchase material for a hand-assembled chair.
- Boards for back and seat.
- Bars for handles. They are purchased optionally, depending on whether you plan to make armrest handles or not.
- Four legs. They should be small, but carefully sanded.
- Screws or nails of suitable sizes.


In addition to these things, you will need tools that will be needed for both the high chair and the table:
- electric drill;
- wood glue;
- sandpaper;
- roulette;
- ruler;
- pencil;
- hammer.

Construction schemes
When purchasing wood materials, you must check their quality. The bars and boards must be free of nicks, cracks or small protruding burrs. The wood should not be damp, rotten or infested with pests. Table. The design of the table itself is not complicated, so the absence of drawings is allowed; the main thing is to carefully connect and “fit” the parts of the future product to each other. Initially, you need to count on the fact that the height of the table will be no more than 50 cm. This height will be the most optimal for a child. It is important to consider that the dimensions of the table and chair should be comparable.

The design of the table itself may be different, but we will focus on the classic square version with 4 legs. A special feature of the table design are its legs. They should be quite thick and stable. The cross-section of each leg should be within 5x5 cm. Chair. As a rule, the design of all chairs with a back (this is what we are considering in this article) is identical; differences can only be in the shape and size of the back. You can also experiment with the shape of the seat. It can be classic square, polygonal, round, carved or upholstered.

Not so popular self-production, but quite real tables and chairs, assembled without the use of screws, nails or other fastening materials. The parts are fastened using a special technique for fastening wooden blocks at the joints. Such work requires experience and skills, so it is not entirely suitable for non-professionals. There are a large number of options regarding the fastening of the structure - various screws, nails, types of glue and even spikes.

Upon completion of the process of constructing the table and chair, it is imperative, as in the beginning, to check them for the presence of protruding pieces of wood and cracks. All sharp corners should be smoothed out as much as possible and uneven surfaces. But more about this below.
How to do it yourself?
Let's take a closer look at the furniture manufacturing process.
Chair
- Preparing the legs. Because child chair The box is furniture with small dimensions, then, accordingly, its parts should be small. In particular, the length of the legs should not be more than 30 cm for a 70 cm high chair. All legs need to be cut down and adjusted sandpaper up to one length. Of course, the planks must also be sanded.
- Prepare the strips for the legs and jumpers for the seat. This is done for subsequent sustainable and robust construction chair.
- Connect the entire structure. At this stage, you need to carefully check all the connections of the parts.
- Glue the structure. The best way to do this is to use furniture glue, but superglue from the hardware store will work just fine.
- Securing the seat and legs. This can be done with self-tapping screws or a simple hammer and nails. Lately, spikes have gained relative popularity. The part is “slung” onto the spikes and the whole thing is held together with glue. It turns out to be a fairly reliable mount.
- Processing with sandpaper. This process is necessary in order to remove all potentially dangerous nicks on the wood and give the high chair a pleasant appearance.


Table
- First of all, you need to use a tape measure to measure the length of all the legs. If there is a difference in their length, then they need to be adjusted. A child's wobbly table can cause a lot of inconvenience, especially when feeding the child. This is done using a hacksaw.
- Drill slots in each of the legs with an electric drill. You need to make a groove at the end of the part, and then make it rectangular.
- Measuring the depth of the grooves. Next, you need to measure a distance on each of the bars equal to the depth of the grooves.
- Correction. To do this, you need to saw each of the wooden blocks on all sides, and remove the excess with a knife or sandpaper.
- Connecting parts. At this stage it is important to check the accuracy of the angles, they should all be straight.
- Bonding the structure. The final stage, in which all the parts, if they are tightly connected to each other, are glued together with wood glue. For greater structural stability, you can use a hammer and nails.


Furniture decoration
The main thing when decorating children's furniture is the safety of the coatings. Paints and varnish should be purchased from a reliable manufacturer and tested on a piece of wood in advance. Relatively recently, domestic and Western manufacturers released a special varnish for children's furniture. According to the manufacturers, it is safe to apply and does not emit harmful fumes after drying. The most common design option for a chair after painting is stencil designs. They can be applied with a regular small brush from an art supply store. The same applies to a wide variety of stickers on furniture.

Paint colors should be bright, but not toxic. Primary colors are welcome - blue, red and yellow. As drawings, you can choose various folk ornaments, simplified drawings of animals, symbolic symbols such as stars, hearts (for girls), cars (for boys), and even letters and inscriptions. Your child may be delighted and inspired by the opportunity to decorate their future furniture themselves. A good option in this case, the prints of his palms are. Special craftsmen with golden hands can experiment with carving. You can decorate the back of a chair with it. To do this, you first need to draw a drawing with a pencil, and then begin the work itself with a jigsaw. If you initially plan to do the carving, it is best to do it before you assemble the chair.

Children's things are very often exposed to various mechanical and other influences, so it would be better to protect the surface and apply several layers of varnish. In extreme cases and when there is an urgent need to protect the table surface, you can use epoxy resin, which, when hardened, forms a thick film similar to a glass surface. But this should only be done if the table will be used for drawing or will be frequently exposed to wet cleaning with chemicals.
Furniture for a children's room should be of high quality, environmentally friendly, and hypoallergenic. But many manufacturers do not pay attention to increased requirements for children's furniture - materials used Low quality, make the fastenings unreliable. Using such furniture may harm your child. That's why some parents come to the conclusion that it is worth making a children's table and high chair with their own hands. Moreover, assembling it is not so difficult.

Materials
Of course, when choosing material for children's furniture, you should opt for natural solid wood. Wooden table and the chair will not only be a decoration in the children's room, but will also be environmentally friendly, will not cause allergies, and will become practical items furniture.

It is better to make a table and chair from beech wood. It is easy to process and does not release resin. But how a budget option Pine or birch are quite suitable, but they need to be deresined, since the resin is unsafe for a child, and it can ruin clothes.

Plywood, like the most cheap material, is also quite acceptable when making a highchair. It can easily bear the weight of a child, is lightweight, and can be easily processed.

Chipboard is a very fragile material and can only be suitable for a tabletop.

Alternatively, you can build at a dacha in the zone playground table and chair from plastic bottles. In this case, there is practically no need to invest money, and when exposed to weather conditions There will be nothing for such a kit.

Preparation
Initially, you need to make detailed drawings with all dimensions. Please note that when planning furniture for a child you cannot do sharp corners, about which a child can get hurt during active games.

If you're not entirely sure about stability, make a 1:1 scale model out of cardboard before making parts out of wood.

To fasten parts together, you can use spikes and glue, but for the reliability of the structure it is better to use self-tapping screws and corners of various shapes.

Material processing
Before assembly, all parts must be processed. To do this, you can use an electric planer, or sand the wood with sandpaper.

Then you can treat it with various dyes such as stain, rather than simply highlight the texture of the wood or paint it.

If you want to varnish your products, it is better to choose one based on turpentine. It does not contain toxic substances, and will not harm your child’s health. After you have coated the parts with varnish, you need to sand it down with sandpaper. And then cover with a finishing layer of varnish. In this case, the wood will be well protected, and the shine will not disappear for many years.

Making a regular chair and table
To assemble a regular chair, we need to cut out the following parts:
- Short legs - 2 pieces, length 25 cm, cross-section 3.3 x 3.8 cm.
- Long legs - 2 pieces, height 53 cm, cross-section 3.3x3.8 cm.
- Back - 1 piece, size 10x30 cm.
- Seat - 1 piece, size 30x30 cm.

Crossbars for tying a chair under the seat - 2 pieces, 25.7 cm long, 2 pieces 25.2 cm long.

In this case, the legs should have a narrowing from the middle of the chair. For long ones, reduce the thickness towards the top to 1.9 cm, and short ones - towards the bottom to 2.4 cm. This is necessary so that the front legs do not interfere with the legs, and the back is at a slight angle.

First, we attach the rear legs; to do this, we screw the crossbar between them with self-tapping screws. We do the same with the front ones and fasten them together.

Then we screw the back. We check that all details are clear horizontal mount. Otherwise, the aesthetic appearance of the chair will not be very good.

At the end of the assembly, screw the seat.

For the table we need 4 legs, a frame made from the same block. We make them from a block and the table top is made from plywood or chipboard. The sizes here depend on your wishes and the height of the child.

We assemble the harness, attach the legs to the corners and screw the tabletop on top. The table is ready. The size of the screw must be carefully selected, otherwise you can drill right through the tabletop, which will ruin the aesthetic appearance and may injure your child.

Making a chair from plywood
Since plywood is easy to process. It is easy to make a carved chair out of it.

In order to make it you will need:
- Sheet of plywood, 8 mm thick.
- Drill, jigsaw.
- Drill, screws.
- Sandpaper.
- PVA glue.
- Colorless varnish based on turpentine.

Based on our dimensions, we transfer the drawing of the chair onto a sheet of plywood. You can use a jigsaw to cut unusually shaped holes, which will give interesting view high chair.

In order for the sides of the chair to be completely identical, you must first cut out one, then trace it on a sheet of plywood so that the second side wall completely coincided with the first one.

You can make them in the form of an elephant. It will work out original design high chair.

After all the parts are cut out, the sections must be carefully sanded using sandpaper.

We assemble the chair, to do this we attach the seat and back with glue, and secure everything with self-tapping screws.

We coat the chair with varnish.

Making a baby high chair
The simplest model of this chair is a transformer, which can easily be folded into a separate small table and a chair.

We make the base from solid wood, the back and seat of the chair from plywood. The tabletop is made of laminated chipboard.

We will need a wooden block with a section of 20x40 mm, laminated chipboard, size 200x340 for the table top on the chair and 450x380 mm on the table, plywood for the seat. In the absence of laminated chipboard, countertops can also be made from plywood.

First we assemble the table. We make two frames from the bars. We connect them with crossbars so that later the chair legs can be inserted between them. Screw the tabletop.

The chair is made in the same way as a regular chair, only we use plywood for the seat and back, onto which you can sew an oilcloth cover and insert foam rubber for softness. This will make it easy to wash the high chair if your baby gets it dirty with food, and will not allow the foam rubber to get wet.

Other types

You can also make garden furniture from plastic bottles. To do this, select bottles of the same size. A 1 liter capacity is quite sufficient for a child. We wrap it with tape to form a seat. To ensure a smooth surface, cover wooden box. All that remains is to sew a leatherette cover, and an excellent stool for the garden is ready.

How to decorate
Even the best quality handmade furniture may not please your child. Therefore, it needs to be decorated. You can use different methods for this.

Bright paint. This is the simplest method. Before varnishing, you can paint the table and chair with bright paint, thereby attracting the child’s attention.

If you have the ability to draw, you can draw various cartoon characters or simply apply a child's drawing.

If your chair does not look very beautiful, but is reliable, then all the flaws can be hidden by sewing a fabric cover. It can always be washed if necessary.

Another method of decorating a chair is stickers. You can buy them ready-made or make them yourself from self-adhesive film using a stencil.

Design
You can make any chairs and tables with your own hands, as long as your imagination and ability to use tools is enough.
Purchased furniture for a child’s room, especially from natural materials, can be quite expensive. In a store or online, you don’t always find exactly the option you like. High chair and you can create a wooden table yourself. The work will not be difficult if you prepare all the necessary parts and tools, use your ingenuity and imagination. The reward for the work is a unique product, as comfortable as possible for the baby and practical in home life.
You can create a children's high chair and table from wood yourself.
A DIY chair will cost much less, and one made according to your own sketch will meet the intended parameters and the required degree of comfort for the baby.

The reward for the work is a unique product, as comfortable as possible for the baby and practical in home life.
All details from natural wood can be purchased in specialized departments construction stores. They will select boards and bars of the required sizes for you.

A DIY chair will cost much less.
A children's highchair, created with one's own hands, is high-quality furniture for a child. In the process of work, you take into account the dimensions of the seat and backrest, which are as comfortable as possible for a growing baby, and check the strength of the structure directly at home.

All natural wood parts can be purchased in specialized departments of construction stores.
A wooden chair you created with your own hands can be decorated to your liking, and not be satisfied with ready-made solution purchased furniture.

They will select boards and bars of the required sizes for you.
Required materials and tools
To create a chair you will need various materials. They will be used to make individual parts. First of all, this wooden blocks and boards from which the frame, seat and back are assembled. Instead of natural solid wood, you can use chipboard or plywood, but these materials are not durable. For fastenings, take sufficient self-tapping screws. You will need medium-hard sandpaper.

A child's highchair, created with one's own hands, is high-quality furniture for a child.
Dimensions of bars (length):
- support legs – up to 20 cm;
- seat frame connecting strips – up to 20 cm;
- backrest lintels – up to 20 cm.

A wooden chair made by yourself can be decorated to your liking.
During the manufacturing process, the thickest bars with a cross-section of 5x5 cm are used for the legs. For the planks, parts are taken with a diameter half the size of the supporting ones.

For the planks, take parts with a diameter half the size of the supporting ones.
The parameters of the seat board (height and width) should also not exceed 20 cm. The back part may be slightly higher, but preferably no more than 30 cm.
- they are less durable;
- The environmental friendliness of such products has not been 100% proven.

The parameters of the seat board (height and width) should also not exceed 20 cm.
To make a chair with your own hands, you need the right tools:
- screwdriver;
- screwdriver;
- jigsaw;
- wood hacksaw.

The dorsal part may be slightly higher, but preferably no more than 30 cm.
The assembled chair “will require” original decor. In addition to the carved option, you can use paint or other materials to apply a design or appliqué. To accurately apply the image you will need a stencil.

The assembled chair will “require” original decor.
Deciding on design and construction
For a wooden product, you can come up with any option. A highchair is usually made with straight supports and the following forms of the back structure:
- solid square or rectangular;
- wide truncated cone;
- straight through (with jumper bar).

To accurately apply the image you will need a stencil.
Creating a product with your own hands requires careful preparation. You must first make a sketch of the project. Visually draw a diagram of the connections of all parts separately with calculations of sections and lengths. Following the sketches, you will recreate the model in reality with exact parameters. A chair that has all the right dimensions will fit the baby and will not create any inconvenience.

For a wooden product, you can come up with any option.
Certain models are created with the expectation that the child will sit at a common table with other family members. In this case, high legs are chosen for the product, which are not attached exactly vertically in relation to the seat and floor, but more widely. Bottom part such a chair will look like a truncated cone, connected for stability by wooden blocks around the perimeter. The top part will be approximately 30-35 cm below the table level.

A children's high chair is usually made with straight supports and the following forms of the back structure
If you have certain skills, you can assemble a folding product. Such items can be easily removed if necessary into storage areas.

For selected design solution parts are processed in accordance with it.
Manufacturing process: step-by-step instructions
After preparing a drawing with exact parameters, we begin to assemble a simple children's high chair.
- Calculate the length of the legs exactly according to the diagram, saw off the excess with a hacksaw.
- Cut out the jumper bars to size that will secure the frame in the seat area.
- Connect them with supporting structure. Add furniture glue for reinforcement.
- Attach the pre-sized back and seat using self-tapping screws.
- All wood parts must be cleaned with sandpaper to avoid roughness and burrs.

A chair that has all the right dimensions will fit the baby and will not create any inconvenience.
If the parts are disproportionate, “adjust” them according to the design diagram using a hacksaw. To make the chair you created with your own hands comfortable, ask your baby to sit on it, ask how comfortable he is.
If all sizes were determined correctly, the child will like it New furniture. To ensure the parts are smooth, sand the surface again.

Certain models are created with the expectation that the child will sit at a common table with other family members.
To varnish the product, use only safe compounds - a special coating for children's furniture, environmentally friendly and having the appropriate certificate.

The top part will be approximately 30-35 cm below the table level.
After exterior finishing varnish, let the chair dry thoroughly for a day or two. Then you can start decorative finishing, if such is intended. If it involves carving, then varnishing is done after completion artistic treatment and sanding parts.
Decorating a chair
Use a jigsaw for carving. You can make a decoration in the form of a flower by cutting it in the center of the back, or any geometric figure. First, mark the area of the future decoration with a pencil so that the carving is even. Parts such as legs and back can be carved. The corners of the seat can be rounded using a jigsaw and sandpaper.

During the manufacturing process, the thickest bars with a cross section of 5x5 cm are used for the legs.
The top can also be made not strictly rectangular, but a truncated cone, rounded, compound. IN latest version You will need additional bars and cross bars - one or two. They are secured using special holes at the junction with the dorsal frame. This is a rather labor-intensive process, but if you wish, you can choose this option.

For fastenings, take sufficient self-tapping screws.
All steps for processing parts must be performed before the chair is assembled - this way the work process will be faster, more convenient and neater.

If you have certain skills, you can assemble a folding product.
To make a home-made piece of children's furniture look more interesting, you can apply a design to the back and seat. To do this you need to use safe paints. The color scheme should be bright and cheerful. Looks great on wood furniture simple ornaments, plant patterns, imitation of children's toys, for example, cars.

Instead of natural solid wood, you can use chipboard or plywood, but these materials are not durable.
Due to the fact that the size of the product is small, a large pattern will become a kind of accent that attracts the child’s attention - he will like to sit on such a beautiful chair, play games or have breakfast.

You can use appliqués for decoration – there are plenty of adhesive bright films on sale.
The image will turn out smooth if you use a stencil pre-cut from paper or thick plastic.
You can use appliqués for decoration – there are plenty of adhesive bright films on sale. Whether the image will be monochromatic or multi-colored depends on your imagination.

First of all, these are wooden blocks and boards from which the frame, seat and back are assembled.
It is not recommended to use bulky (protruding) parts, both small and large, in finishing the seat or back of a children's chair. Firstly, it is inconvenient for the child, and secondly, they quickly fall off with frequent use of the product.

To create a chair you will need various materials.
VIDEO: DIY high chair
If we're talking about about furniture intended for children, First of all, you need to take care of her convenience, reliability, strength and security, including environmental ones.
The best option - wooden chair. Of course, modern wooden chairs, commercially available differ high cost if they are made from really valuable and high quality breeds wood
Why not do DIY chair for a child? With the help of this article you can choose the best materials for a children's high chair, get detailed instructions and recommendations for its production and decoration
Types of high chairs
What are there chairs for children? Modern manufacturers offer a large assortment chairs designed for children of different ages.
They may differ in purpose, design used material and other criteria.
Many models can be manufacture on one's own.
The most common and practical Highchairs for children include the following: kinds:
- Simple chair - an ordinary children's highchair with a backrest, instructions for making which are available in this article.
- Folding chair - A universal chair with rich functionality. It is assumed that you can change the angle of the backrest, adjust the footrests, attach a table top, etc.
- Swing chair – The name of the chair speaks for itself. All children, without exception, enjoy swinging on such a chair. IN modern models The seat can be used as a rocking chair.
- Transformer – This is a chair and table set that can be installed and used in different ways. When assembled, the transformer is convenient; when disassembled, it performs the function simple chair and tables, standing separately.
Some models provide regulation leg heights and backrest position, and high chair "grows up" together with the baby.
If you have small experience in the field of carpentry, it is better to limit ourselves to manufacturing ordinary highchair without additional functions. Main - understand the basics and the principle of operation, and in the future you can start creating more complex models chairs.
What material is it made from?
- natural tree;
- plywood;
- Chipboard.
Very widespread is the creation of children's furniture (chairs, cribs, tables, etc.) from plastic pipes After assembly and decoration you get enough attractive And unusual designs, however, their reliability and durability is highly doubtful.
It is recommended to choose wood as the main material for the children's chair, plywood or chipboard, since these materials are absolutely safe for a child, are characterized long lasting operational life and others positive properties. With the help of this article you can make a high chair from tree.
Important! Before you begin assembling the chair, the ends of all chipboard parts should be covered furniture edge. It not only performs a decorative function, but also prevents the release of formaldehyde.
Dimensions and drawing
For manufacturing chair according to this drawing, it is necessary to prepare the following elements designs:
- 1 – top crossbar(1.9 x 4.1 x 16.5 cm);
- 2 – two rear legs (3 x 3 x 55 cm);
- 3 – crossbar carved type (1.4 x 4.1 x 16.5 cm);
- 4, 6 – planks, located in the middle and bottom (1.4 x 2.9 x 16.5 cm);
- 5 – seat from two boards (1.4 x 10.5 x 26.3 cm);
- 7 – two kings and two strips located On the sides(1.4 x 2.9 x 17.7 cm);
- 8 – two front legs (3 x 3 x 30.5 cm);
- 9 – two kings and two planks, located at the front (1.4 x 2.9 x 19.5 cm).
The legs of the chair should gradually become narrower: rear – up to 1.9 cm, starting from the middle of the chair to the top, front – up to 2.4 cm, starting from the middle of the chair to the bottom.
Advice: To make it as easy as possible to mount the strips and drawers, only the outer edges of the parts should be reduced. Thus, the internal edges will be parallel to each other.
Description of work stages
 At manufacturing child's highchair, it is important to pay attention to it security: avoid the formation of sharp corners, cracks, cracks cracks, gaps between structural elements, as well as roughness and other defects.
To give attractive appearance the top crossbar, it can be rounded. carved the crossbar can be designed in any way with all sorts of patterns, but without sharp corners.
Fastening details in in this case will be performed using wooden thorns and glue, but you can use other methods using nails, furniture dowels or self-tapping screws.
In the case of spikes, the most durable ones are used secret elements rectangular shape, which is inserted into holes pre-treated with glue.
To further secure the spikes, you can use through pins (6–35 mm in diameter).
Chair assembly:
Step 1. First of all, you need to fasten the rear legs chairs and adjacent crossbars.
Step 2. Attach the remaining front legs to the structure crossbars and kings.

Step 3. Attach the upper one to the rear legs, carved and the middle crossbar (attached at the same level as the seat).
Step 4. So that all places where parts are connected are glued together as much as possible durable, take advantage special tool– carpentry clamp. It is designed to press the parts tightly against each other.
Step 5. When all bottom slats and legs are firmly connected together, attach to the base of the chair seat, consisting of two planks. For added security and strength, secure the boards after the glue has dried. dowels, pre-drilling holes for them. If the seat boards partially protrude beyond the base, the excess ends must be removed using chisels.

Important! Using a clamp, be careful to ensure that the parts are connected at right angles. You can control this moment using a carpenter's square.
How to decorate a chair
 New furniture, even the highest quality, made by your own hands, is unlikely to attract the attention of a child without interesting registration There are tons of options decorate children's chair made of wood.
To do some methods decoration you can even attract the future owner of the chair. For example, you can paint a chair together with the child at his discretion.
Most common ideas staining:
- Using multiple bright shades;
- Imitation rainbows;
- Application patterns;
- Picture of loved ones characters from fairy tales, cartoons, etc.
The second option for decorating a chair is special case, which you can purchase or also make yourself. There are no restrictions in this regard either. The cover can be the most ordinary - from fabric plain or with drawings and others decorative elements. You can also imagine in the form of a bird, animal, flowers, cars, and also make original ones.
Another idea - gluing on the sides of the seat there are bright strips of fabric, decoration backrests with all kinds of elements ( ribbons, artificial flowers, beads, etc.). Show fantasy, and most importantly, don’t forget to ask for opinions child.
And for inspiration - a few examples design children's chairs:


For more information on how to make a children's chair out of wood with your own hands, see video:
At large quantities modern materials, wood still does not lose its relevance. This is especially true for furniture for children. Of course, you can buy a children's wooden chair in a store, but they are often made of plywood and are not of high quality. And children's wooden adjustable chairs made from good hardwood are very expensive. To give your child a durable, beautiful and comfortable high chair without spending a lot of money, you should make it yourself. There is a wide variety of models, but the article will discuss three main ones: a regular high chair, a transformer and a high chair for feeding.
DIY wooden children's chair
Before you start manufacturing, you must remember that children's furniture must be safe for health. It should not have sharp corners, it should have perfect smooth surface, without gaps, cracks and gaps, and must also be durable and reliable.
The optimal height of the back of a children's high chair is 55 cm, the seat is 32 cm. You can attach the parts different ways: for self-tapping screws, nails, dowels (at least 2 pieces for each joint) or wooden tenons. Let's consider the last option.
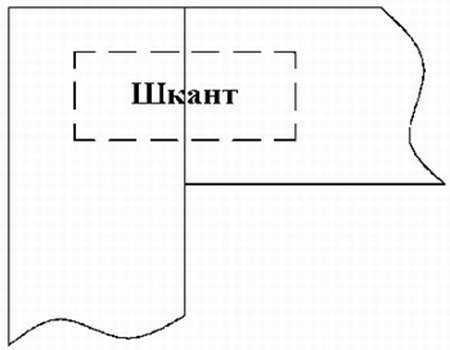
To fasten the structure, strong hidden rectangular tenons are used, which are placed in the grooves with glue. For maximum reliability, the tenons, in addition to glue, are fixed in the grooves with through dowels with a diameter of 6 to 35 mm.
List of parts and materials
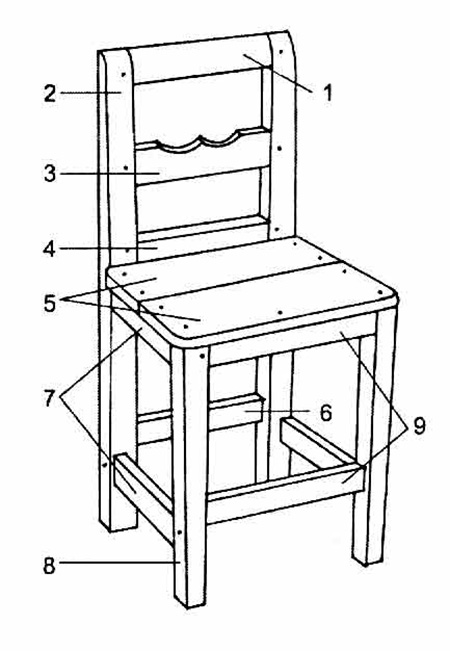
- Top crossbar(1) 1.9x4.1x16.5 cm - 1 pc.
- Back leg(2) 3x3x55 cm - 2 pcs.
- Carved crossbar(3) 1.4x4.1x16.5 cm - 1 pc.
- Middle crossbar (4) 1.4x2.9x16.5 cm - 1 pc.
- Boards for the seat (5) 1.4x10.5x26.3 cm - 2 pcs.
- Bottom crossbar (6) 1.4x2.9x16.5 cm - 1 pc.
- Side crossbar and drawer (7) 1.4x2.9x17.7 cm - 4 pcs.
- Front leg (8) 3x3x30.5 cm - 2 pcs.
- Front crossbar and drawer (9) 1.4x2.9x19.5 cm - 2 pcs.
For the rear and front legs, straight-layered pine bars with a cross-section of 3x3 cm are used. Starting from the seat upward, the rear legs should narrow to 1.9 cm. And the front legs - from the seat to the bottom to 2.4x2.4 cm.
Important! Only the outer edges can be planed. This is necessary so that the inner edges of all legs remain parallel to each other, which will ensure easy installation of the drawers and crossbars.
U top crossbar the front edge should be rounded, and the carved edge can have any pattern, but it is advisable to avoid sharp corners.
The middle crossbar is installed so that its lower edge is flush with the seat.
First of all, the back pair of legs is glued together, as well as all the crossbars. Next, a pair of front legs and a crossbar are connected, after which they are connected to each other with drawers and crossbars.

All gluing points are compressed with clamps, but with obligatory control of right angles. To do this, you can use a carpenter's square. The seat planks are attached last. Their reliability is especially important, so after completely dry glue, they are further strengthened wooden dowels for which holes need to be drilled. The protruding ends are removed with a chisel.

Children's wooden transforming chair
Is a kit children's table and a high chair that can be transformed into different positions. This is a single desk for studying and a comfortable chair for feeding. It folds up quite compactly, which is especially important for small apartments.

Necessary parts for the high chair:
- legs 39 cm - 4 pcs.;
- rounded corners - 4 pcs.;
- upper crossbars 22 cm - 2 pcs.;
- crossbars 34 cm - 2 pcs.;
- diameter 30 cm - 3 pcs.;
- seat base 20x30 cm - 1 pc.
Details for the table:
- legs 50 cm - 4 pcs.;
- strips 41 cm - 4 pcs.;
- diameter 34 cm - 4 pcs.;
- table top 45x38 cm - 1 piece.
For legs, slats, crossbars and crossbars, it is best to use timber with a cross-section of 2x4 cm, and for the tabletop and seat, plywood 1.8 cm thick is suitable. Rounded corners are cut from boards 2 cm thick. As mentioned above, the wood must be well dried and have no knots or cracks.
Making a chair frame
All parts will be attached to each other with glue, but to ensure higher strength, wooden dowels measuring 2x5 cm should also be used. They can be easily made with your own hands from plywood 8 mm thick.
For each dowel, a special groove is made at the connection points. First, using a drill (6 mm drill), the ends are drilled in the place where the dowel will be laid, and then the groove is directly selected with a chisel 8 mm thick. But before installing it, all connections must be coated with glue.
Thus, the side parts of the future chair are assembled, tightened with clamps (making sure that the angle is exactly 90 degrees) and left until the glue dries completely. Below is a drawing of a children's wooden chair.

After this, they must be sanded well until the surface is smooth.
Making the back and seat
The back and seat are made 25x30 cm in size from 2-3 sheets of plywood glued together. It is advisable to round all corners. Foam rubber is glued to them and everything is covered with a fabric cover. Before installing them on the chair frame, they are fastened together with metal brackets.
Now let's start assembling the chair. First, two finished sidewalls are connected using planks. Fastening is carried out using the technology already described. The seat itself rests on slats, and to secure it you will need cylindrical dowels or screws. Then the lower strips and the back strip are installed, on which the backrest will be mounted. After all work has been completed, the chair should be left to dry.
In addition to the main table, you can also make a small tabletop. It is especially convenient for feeding or playing with small children. To make it you will need plywood sheet, from which the tabletop is cut required size. It is attached to the armrests using glue and dowels. But it makes more sense to attach it with self-tapping screws; this will allow you to easily dismantle it if desired.
Making a table
The technology for assembling the table is absolutely identical to assembling the chair. Therefore, there is no need to describe it in detail; you just need to pay attention to the main stages. First, the side parts of the table are assembled and sanded, then they are connected by transverse strips and sanded again.

When the children's wooden transforming chair is ready, it is coated with several layers of varnish.
High children's wooden feeding chair
Making furniture with your own hands is a labor-intensive process. Nowadays it’s easier to buy ready-made or order it than to make it yourself. But there are times when an item is needed for a short time or there is no way to pay a lot of money for it. One option is a high chair for feeding your baby. The tip below will tell you how to make one from an old chair with your own hands.
Children's wooden chair assembly diagram

To make it you need the simplest chair with a backrest. It is very good if it has. It is important that it has crossbars between the legs and is strong and reliable. In the future, turning it over, the back will serve as the front legs of the future chair. Next, you will need strong wooden slats the size of the height of the chair; we fix them as shown in the figure. So, we get a back pair of legs, which are fastened together with a strap. To achieve maximum stability, the rear legs must be attached at an angle that is selected individually. Then all the legs are fastened together with horizontal strips.
The frame of the future chair is ready. You can make it more convenient to use by attaching smoothly sanded boards or a sheet of plywood as a seat. A soft seat is placed on top of it. Small smooth boards are used for the back and tabletop.
That's all, the chair is ready.
It doesn’t matter how the children’s wooden highchair is assembled, the main thing is that it should be comfortable and safe for the child. To ensure that the finished chair and table have an aesthetic appearance and last as long as possible, they are coated with a protective paint and varnish composition in several layers. Besides this, everything wooden parts can be decorated with bright designs, which are applied with a simple brush or sponge through a stencil.
For seat upholstery it is optimal to use artificial leather, so it is easy to clean. This is especially true for young children. It is desirable that the back of the chair also has soft upholstery made of waterproof fabric.
All wooden parts, before assembly, must be carefully sanded with sandpaper, first coarse-grained, then fine-grained, until a perfectly smooth surface is obtained.
If the chair is assembled with self-tapping screws, their caps are recessed and closed with plastic plugs matched to the color.
In addition, you can get creative and make the chair colorful and interesting for a child, choosing a bright one upholstery fabric, and painting all wooden parts oil paint bright colors.
Or you can entrust the design to the future owner of the chair itself.

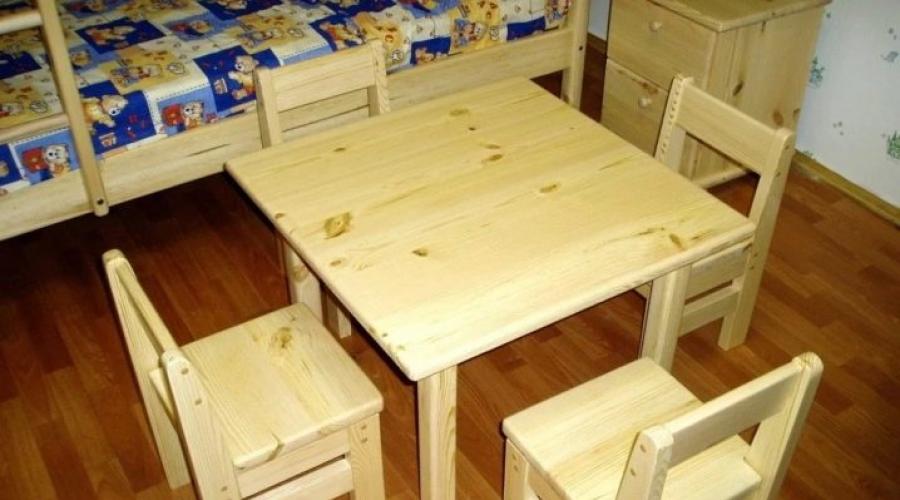
Children's wooden chairs photo


