Homemade boiler for water heating. Making long-burning solid fuel boilers with your own hands: drawings and assembly process Drawing of a boiler for heating a house with your own hands

Read also
In this publication we will tell you how to make a heating boiler with your own hands, and which options are available for self-production. The main part, the heart of any heating system is the boiler. The variety of their types and designs can amaze every imagination. And, we must pay tribute, many modern boilers are both economical and efficient devices. They have fine adjustments, are equipped with automation and can work without human intervention. Some models can even send an SMS to the owner and “report” on the thermal situation in the house, and the owner can order the desired temperature for his arrival using a mobile phone or via an Internet connection. But there are times when it is profitable to make a heating boiler with your own hands. For example, for heating a country house or.
The Internet is literally overloaded with various information on making heating boilers yourself. Completely unexpected components are used that were never intended to be part of the boiler; some technical solutions can compete with the inventions of design bureaus; The efficiency of some boilers is not inferior to the best boilers from famous manufacturers. But unfortunately, there is a lot of “junk” information on the Internet that cannot help in any way, and in some cases can even do harm. The authors of some reviews boastfully claim that nothing is easier than making a heating boiler yourself, although in reality this is not an easy task. The purpose of this article is to understand which heating boilers are worthy of making them yourself and what are the features of the technological process of their manufacture.
Types of heating boilers and the possibility of making them yourself
The task of a heating boiler is to heat the coolant using some fuel and transfer it to the heating system, which already distributes heat to consumers. It is based on the type of fuel used that boilers are divided into several large classes. Let's look at these classes and immediately determine the feasibility of making them yourself.
- – is currently the most cost-effective type of fuel. Modern gas boilers have high efficiency, are easy to control, and operate without human intervention. Making gas boilers yourself is possible, but is strictly not recommended. Firstly, due to the fact that gas is a dangerous type of fuel and any unauthorized intervention can lead to dire consequences, and secondly, no gas supply organization will give permission to operate a homemade gas boiler. And he will do the right thing.

- used where there is no gasification or other types of fuel. These boilers have very high efficiency, they are easy to automate, but their use is associated with certain difficulties in storing large quantities of fuel: diesel fuel or fuel oil. Self-production of liquid fuel boilers is prohibited; no fire inspector will sign when putting a house into operation if it is equipped with uncertified equipment. And, probably, few people would want to live on a powder keg.

- have a clear advantage over all others in the simplicity of their design, small overall dimensions, and ease of operation. These boilers are relatively easy to make yourself. But all these advantages are offset by high electricity prices. Unfortunately, heating with electricity is not economically viable. This is understandable, because a significant part of electricity is obtained by burning hydrocarbon fuels. Another significant limitation is that power supply organizations will not always give permission to allocate large power.
 The only obstacle to the widespread adoption of electric boilers is high electricity prices
 - , despite the assurances of skeptics about their imminent fade into the background, they continue to work successfully to this day. Moreover, they experience a real rebirth. They use firewood, coal, peat briquettes, oil shale and other types of solid fuel as fuel. Very interesting are boilers that use a special type of fuel - pellets made from wood waste. These boilers can be automated and have high efficiency, but the production and logistics of pellets is still at an embryonic level. For self-production, solid fuel boilers are most suitable, so we will consider them. But one of the representatives of solid fuel boilers - pyrolysis - deserves special attention.
 It’s too early for solid fuel boilers to go “to the dustbin of history”
 Solid fuel pyrolysis heating boilers
Classic solid fuel boiler is a container of a certain volume made of metal: steel or cast iron. Solid fuel is burned in it, and thermal energy is released and transferred to the coolant using heat exchangers. At the same time, outside air is constantly supplied to the combustion chamber to maintain fuel combustion. If you cover the air supply, the combustion process will slow down, and if you open it, it will go faster - this is how the power of classic solid fuel boilers is regulated.
There are boilers suitable only for a certain type of fuel: wood, coal, pellets, but there are models that operate on any fuel. Solid fuel boilers can be either natural draft or forced draft. The efficiency of a well-designed and executed classic solid fuel boiler can reach 71-79%.

The advantages of such boilers are:
- Availability and low price of fuel.
- Possibility to use several types of fuel.
- Ability to burn waste from wood processing and agricultural processing.
- Full autonomy of operation, independence from electricity.
However, classic solid fuel boilers also have a number of disadvantages that cannot be ignored:
- On one load of fuel, boilers operate for no more than 4-6 hours.
- The need to store large reserves of fuel requires additional space.
- Loading is mostly done manually.
- Classic solid fuel boilers require constant cleaning from combustion products.
- The combustion process has inertia and is difficult to control.
In the category of solid fuel boilers, it is worth highlighting the so-called ones in a separate group, the operation of which occurs due to the separate combustion of fuel and the decay products coming out of it - pyrolysis gases. Let's look at the operation of such a boiler using an example.

Fuel (most often firewood) is loaded into the gasification chamber through the upper loading door. The chimney throttle is fully opened and the wood is set on fire. At the same time, a fan is turned on, which supplies air to the chamber. Naturally, the wood begins to burn as in a regular solid fuel boiler.
After the firewood has flared up, close the top door and block the chimney choke. Air continues to flow to the fuel, but in limited quantities, so the firewood begins to melt at temperatures from 200 to 800 °C. Under these conditions, a pyrolysis reaction occurs: the decomposition of wood into a solid part in the form of coal and a light part - pyrolysis gases, which are fed through a nozzle into the combustion chamber. The heated mixture is also supplied there through the secondary air supply channel. At high temperatures, pyrolysis gases ignite and are oxidized by the supplied air. Their combustion temperature is about 1100 °C.
Hot gases pass through multiple smoke channels, which are located in the heating system coolant medium - water. Thermal energy is transferred. The high temperature in the combustion chamber supports the pyrolysis process in the gasification chamber. If it is necessary to add firewood to the gasifying chamber, then completely open the chimney throttle, wait a few minutes so that the chamber is ventilated from pyrolysis gases and the normal combustion process begins. After this, open the door, add firewood, close the door and the chimney damper (throttle). The process of pyrolysis and afterburning of gases in the lower chamber resumes.
Attention: in boilers with primary and secondary air injection, the loading door can only be opened after opening the chimney damper and pausing. Otherwise, when the door is opened, the pyrolysis gases accumulated in the gasification chamber may ignite. Pyrolysis boilers do not have this disadvantage, not with air injection, but with a smoke exhauster, where a vacuum is created in the chambers.
Pyrolysis heating boilers have the following advantages:
- In pyrolysis boilers, complete combustion of fuel occurs, which makes it possible to clean the ash pan and high-temperature gas ducts much less frequently.

- The combustion of pyrolysis gases can be easily controlled, which allows automated boiler control.
- The combustion process in a gasified chamber is controlled by the supply of primary air. The combustion is slow, and this allows you to work from 5-7 hours to several days on one stack of firewood (for top-burning boilers).
- Large uncut wood can be burned in pyrolysis boilers.
- Wood waste, plywood scraps, chipboard, fibreboard, MDF can be used as fuel.
- Pyrolysis boilers emit 3 times less harmful substances into the atmosphere.
Disadvantages of pyrolysis boilers:
- Electricity is required to operate a fan or smoke exhauster, so care should be taken to equip the boiler with a powerful uninterruptible power supply.
- When the fuel moisture content is more than 20%, the boiler efficiency drops sharply.
- In the case of low loads, changes in the operation of the boiler are possible, which affects the deposition of tar in the flue channels. For a constant boiler load, a heat accumulator may be required to store thermal energy.

- To prevent condensation from forming in the boiler flues, it is necessary to maintain a return temperature of at least 60 °C. Condensation leads to accelerated low-temperature corrosion of the boiler.
- Impossibility of organizing automatic fuel supply.
- Pyrolysis boilers are very material-intensive, so they cost 1.5-2 times higher than classic solid fuel boilers.
Since high-temperature combustion occurs in pyrolysis boilers (1100-1200 °C), the lower part of the gasification chamber and the entire combustion chamber, including the door, must be specially protected using a lining - a special heat-resistant lining. Given the high temperatures, the lining is made either with fireclay bricks or with special heat-resistant mullite-corundum concrete.
What functions does the lining perform:

- Protection of the metal surfaces of the boiler chambers from exposure to high temperatures, which prevents the metal from burning out.
- For the successful reaction of gas release and combustion of pyrolysis gases, a certain temperature regime is required. When a flame comes into contact with a cooled metal, copious amounts of condensation may occur, and the lining allows the reaction temperature to be kept constant.
Prices for the range of heating boilers
Heating boilers
DIY heating boiler
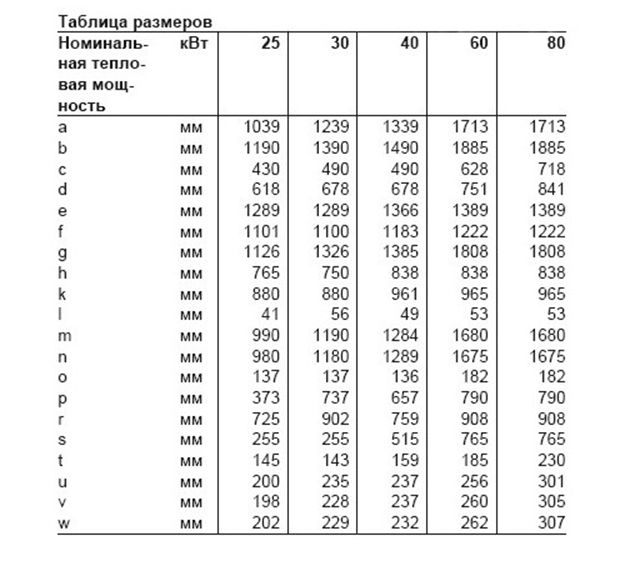
Before you start manufacturing a pyrolysis boiler, you need to accurately determine its dimensions, which largely depend on the required power. Insufficient boiler power will not allow you to compensate for all heat losses, and excess power will require dumping the excess into heat accumulator.
Usually, in calculations it is assumed that heating 10 m 2 of housing area requires 1 kilowatt of boiler power. Let's say you need to heat 250 m2 of a country house. It turns out that the boiler must have a power of at least 25 kW. The following figures show the boiler drawing and the correspondence table sizes - power boiler


Necessary tools and materials for making a boiler
To make a pyrolysis boiler you will need the following tool:
- Electric drill with a set of metal drills of different diameters.
- Angle grinder (grinder) for a wheel with a diameter of 230 mm.
- Angle grinder for 125 mm wheel.
- To make large-diameter holes, a gas cutter or (ideally) a plasma cutter is desirable. If they are not there, then with a certain skill this can be done with a grinder.

- Standard set of plumbing tools: hammer, chisels, files, clamps and more.
Materials for making the boiler:
- For the manufacture of the gasification chamber and combustion chamber, it is better to use 5 mm sheet steel, and 4 mm for the outer cladding. In total, you will need approximately 7-10 m2 of sheet, depending on the specific model. In extreme cases, you can get by with a 4 mm sheet for the entire boiler.
- Pipe with a diameter of 57 mm, a wall thickness of 3.5 mm for heat exchangers - 8-10 m.
- Pipe with a diameter of 159 mm with a wall thickness of 4.5 mm for the hog (horizontal outlet from the boiler) - 0.5 m.
- Fireclay refractory brick SHA -8 – 15-25 pcs.

- Pipe with a diameter of 32 mm with a wall thickness of 4.5 mm - 2 m.
- Profile pipe 60*30*2 mm – 2 m.
- Profile pipe 80*40*2 mm – 2 m.
- Steel strip 30*4 mm – 2 m.
- Electrodes – 5-6 packs.
- Cutting wheels 230 mm – 10 pcs.
- Cutting wheels 125 mm – 10 pcs.
- Grinding wheels 125 mm – 5 pcs.
- Centrifugal blower fan.

- Temperature sensor.
The above list is very approximate and is not an exact instruction for execution. Everything must be purchased on the basis of individual calculations. You will probably have to buy something in addition, and something will remain in surplus.
Manufacturing of a pyrolysis boiler
It is best to draw up an optimal plan for cutting a steel sheet into blanks in advance, according to existing drawings, and cut it into rectangular blanks immediately when purchasing from a metal warehouse. This service, of course, costs money, but provides advantages in time and quality. It is almost impossible to make such an even cut with a grinder as when chopping. The standard dimensions of hot-rolled steel sheet with a thickness of 3-5 mm are 1.5 * 6 m.

Let us note the main stages of manufacturing a pyrolysis boiler:
- After cutting the blanks, you can begin to manufacture the interior of the boiler, namely welding the chambers: gasification and combustion. It is better to do the installation in two halves.

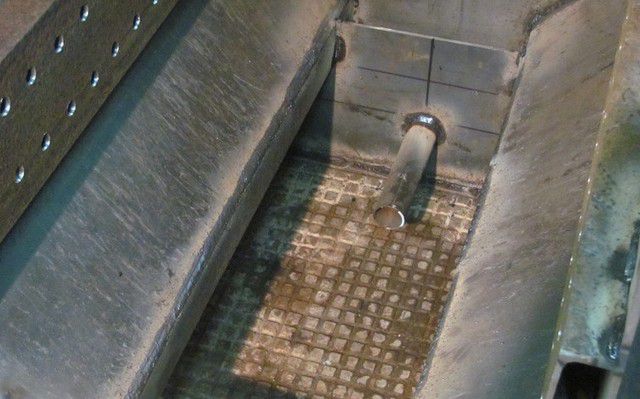
- After the frame of the chambers is welded, the back wall and air ducts in the gasification chamber can be welded. In the photo they are made from a channel, but this is completely optional; a profile pipe 60*30*2 mm is sufficient, in which holes with a diameter of 10 mm are pre-drilled. Pay attention to the cutout in the back wall for the chimney duct.

- A secondary air supply tube is led into the combustion chamber, which is connected to the boiler facade using a 20*20 mm profile pipe.
- It's time to prepare the heat exchanger. To do this, in the prepared plate, according to the markings, holes are burned with a gas cutter for gas pipes with a diameter of 57 cm. If there is no cutter, you can burn with a high current using an electrode, but this method is worse.
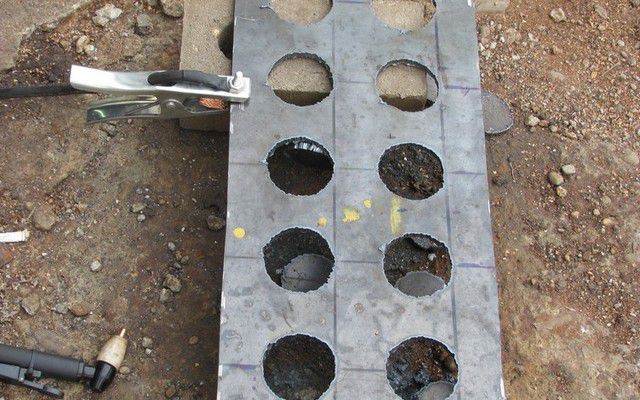
- The heat exchanger pipes are cut and placed on the support plates. After checking the dimensions, all joints are scalded. The heat exchanger is ready.
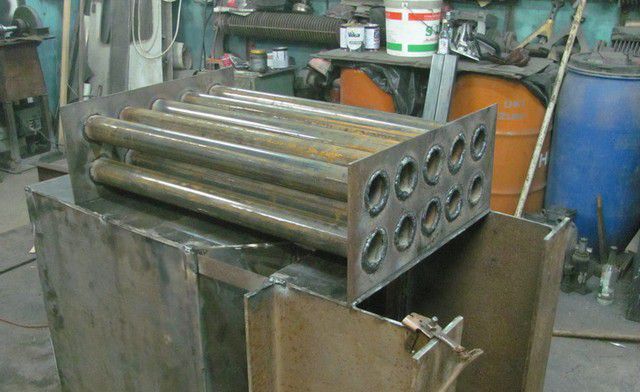
- The heat exchanger is welded into its regular place. At the same stage, the chimney throttle valve is manufactured and installed.

- The front wall of the boiler chambers is welded; holes are first made in it for the primary and secondary air supply tubes.

- The back cover and bur are welded at the place of the throttle valve and the gas duct outlet.

- The interior of the boiler has been assembled. Now you need to carefully clean the welds with a grinding disc and check their quality.
- 4 mm sheet steel is used as the external casing of the boiler. To attach it, pieces of angle No. 25 are welded onto the boiler body.

- On a pre-marked and cut sheet of sheathing, through holes with a diameter of 10-12 mm are made at the location of the corners.

- All holes are scalded so that the sheathing sheet is securely fastened to the base.

- All sides of the boiler except the top cover are sheathed in a similar way. All joints are thoroughly boiled and cleaned.

- Now is the time to check the tightness of all welds. To do this, all inlet, outlet and coolant drain openings are plugged and the boiler is filled with water through the top cover. Check for leaks. If a leak is found, the area is marked with chalk for further correction.

- To inspect the chimneys, a tunnel is made for the top cover, isolated from the water jacket of the boiler, and only then the top part of the boiler is welded.

- The air dampers are adjusted using threaded rods.

- All air holes are covered with a common casing, from which a common air duct is removed from the profile pipe.
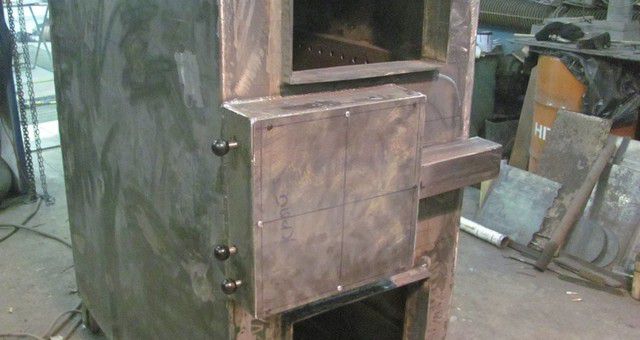
- Doors for the boiler chambers are made and hung. Either cast iron plates or fireclay bricks can be used as door lining. The seal is made with ceramic cord.

- The lining of the lower part of the gasification chamber up to the air ducts is made of fireclay bricks. To do this, the brick is sawed using a grinder with a stone-cutting disc. The brick is brought to the required size manually using a grinding stone.

- The generated power of the pyrolysis boiler depends on the geometric dimensions of the gap in the lower part of the gasification chamber. Therefore, when manufacturing lining stones, it is necessary to take into account the dimensions given in the table so that the boiler capacity corresponds to the design one.

- A flange is welded onto the profile pipe of the main air duct, and then a centrifugal fan is attached.

- Fireclay bricks are used to line the combustion chamber.

- To improve heat transfer of the boiler, it is recommended to place so-called swirlers (turbulators) in the heat exchanger flue channels, which, firstly, slow down the movement of hot gases and thereby improve heat transfer, and, secondly, serve to clean the flue pipes of deposits.

- For cleaning, the swirlers are attached to a rocker arm, which is connected to a lever extended outward. By rocking the lever you can quickly clean the channels.

- Before starting the boiler, check its tightness and pressurize it with a pressure of 4 bar. To do this, all openings in the boiler are plugged, except for the supply and return of the heating system. The boiler is completely filled with water and the pressure tester is connected to it.

- The pressure tester brings the pressure up to 3 bar. If the pressure immediately drops, it means there is a leak somewhere that needs to be detected and eliminated. If the pressure does not change within half an hour, then we can assume that the boiler is sealed and can be integrated into the heating system.
- To ensure trouble-free operation of the boiler, a boiler safety group is mounted on the supply pipe to the heating system through a threaded fitting, which includes an emergency valve, automatic air vent and a pressure gauge. If emergency situations occur, the valve, set to a pressure of 3 bar, will release excess pressure.

- It is advisable to equip a pyrolysis boiler with an automation unit, which, using temperature sensors, will monitor the operating mode of the boiler and, if necessary, stop and start it. How automatic control is implemented in boilers is shown in the video.
Video: Automation for a pyrolysis boiler
Putting the pyrolysis boiler into operation
Before making the first start to the otla, it is necessary to connect it with and fill it with water. It is strictly forbidden to start an empty boiler - this will lead to overheating. In addition, each boiler must have a thermometer that monitors the temperature of the coolant, which is screwed into a specially designated place. All boiler designs must have holes for a thermometer, as well as temperature sensors.
- The fan is connected to the power supply through a switch, and its operation is checked. All air dampers are placed in the middle position.
- Paper is placed at the bottom of the gasification chamber so that it looks out from under the nozzle into the combustion chamber, and firewood is already placed on it. The first load of firewood should not be large, a few small logs are enough. The gasification chamber door closes tightly.
- The throttle valve of the gasification chamber chimney opens completely, the fan turns on and the paper is set on fire.
- When the wood burning becomes confident, after a few minutes, the chimney throttle valve closes. Firewood should go into slow burning (smoldering) mode, which is accompanied by the release of pyrolysis gases. Through the lower door of the combustion chamber, the ignition of the combustion torch of pyrolysis gases is controlled. If it does not ignite, you should try to reduce the air supply to the gasification chamber and increase it to the combustion chamber.
- After the flame ignites, the dampers regulate its intensity and color. The white-yellow color of the flame indicates the correct setting of the boiler.
- The combustion compartment door is closed and the time required for the boiler to bring the water to a boil is noted. The temperature rise is monitored using a thermometer. As soon as the water reaches 100 °C, the fan is turned off. The torch in the combustion chamber should go out. The water temperature should then decrease.
- When the chimney throttle valve is opened, the flame in the combustion chamber should also go out.
Conclusion
- Long-burning pyrolysis boilers are complex devices, so their independent production should be carried out only according to the technical drawings
Having decided to build a boiler for heating a private house with your own hands, you will have to deal with several issues. They start with choosing the fuel to use. There are quite a lot of options here:
 There are developments (rather theoretical), such as combinations of several types of fuel for different stages of heating, combined in one design. They are practically not used due to the complexity of calculations and lack of experience in practical use. Often, universal “multi-fuel” boilers are designed that operate on different types of fuel of the same type (solid or liquid). They have lower efficiency compared to those adapted for a specific fuel, but due to their versatility they are popular among home-made workers.
 The low prevalence of homemade gas boilers is explained by the high explosiveness of gas and the difficulty of obtaining permits. Technically, homemade differs from its counterparts only in the design of the burner and increased safety measures. When calculating the boiler efficiency, it is necessary to take into account the real (not theoretical) calorific value (calorific value) of the gas. The piping of a gas heating boiler is practically not made by hand - they use standard purchased elements - filters, expansion tank, explosion valve.
 Biogas for homemade boilers is gaining well-deserved popularity, constrained by the need to be in close proximity to a biogas reactor. The use of pyrolysis gas occurs in solid fuel boilers of the same name, where it is a by-product of oxygen-free combustion, and is not considered within the framework of this “gas” block.
Most do-it-yourselfers make gas boilers with one heating circuit, citing difficulties in designing a double-circuit system.
Although if you look carefully, it will become clear that making and installing a double-circuit gas boiler with your own hands, with the appropriate qualifications, is not particularly difficult
Electricity as an energy carrier
 Electric heaters are the most common group of homemade boilers. This is due to the relative ease of manufacture, a large selection of different water heating elements, and good elaboration of the issue in practice. When making it yourself, you need to decide what type of heating will be used - active, using heating elements, or reactive, using a reactor. Heating of the prepared water occurs when current passes through it.
 It is much more difficult to build a reactor-type electric heating boiler with your own hands, due to the use of chemically inert electrodes and prepared water (coolant) with ohmic resistance. Craftsmen who make heating boilers with their own hands try to use direct electric heating of water, obtaining acceptable efficiency, small dimensions and low cost of components. By and large, you need a pump, a heating element, a tank of acceptable dimensions, and automation elements. There are many different diagrams and instructions on the Internet on how to assemble and install heating boilers with your own hands.
Use of waste oil
 The operating principle is similar to liquid fuel boilers. In addition to their main function - heating water, they perform another important role - the disposal of waste oil in canteens, bars and cafes. By assembling a heating boiler using waste oil with our own hands, we help our environment while using a free source of energy.
Solid fuel boilers
 When assembling homemade boilers for heating a private home, you need to know that heating the coolant, in most designs, is based on direct heating of water when burning fuel. Heating similar to condensing boilers is not used in homemade devices.
After natural gas, the highest calorific value is found in coal, pellets, and also:

Pellets in homemade boilers
 Using the usual pellet combustion mode in home-made boilers is not economically feasible, since high efficiency can only be achieved using a special type of purchased burner - a pellet burner. Its price is currently unaffordable for DIYers, as well as the relatively high cost of pellets, which significantly hinders the production of boilers of this type.
Self-construction principles
The design of a boiler can be roughly divided into four parts: theoretical calculations, drawing up a diagram of the future boiler (or correcting an existing diagram), purchasing the necessary components and direct assembly and commissioning.
 The key point in independent design is calculating the parameters of the future boiler. Using well-known formulas, the volume of heated space in cubic meters is calculated. The next step is to calculate the output power of the boiler, regardless of the type of fuel. When calculating power, it is necessary to use a correction factor that takes into account the thermal insulation of the room.
Knowing the required power, you can determine the type of fuel and, accordingly, the design of the boiler.
Specific diagrams and calculations are not given in the article - this is the material of a separate brochure. The format of this material provides only preliminary familiarization and theoretical justification for independent modeling. The general direction of searching for the reference information necessary for design is given.
Heating systems and equipment are quite expensive. Not every family can afford to purchase a new boiler for installation in their dacha. You will have to spend a significant amount on its purchase and subsequent installation. However, if you wish, you can always make a wood-burning boiler with your own hands that can heat your living space.
In terms of their design, homemade wood-burning boilers can be different. The efficiency of heating and ease of operation depend on their design. Having decided to do everything yourself, you should first pay attention to the simplest design. Pyrolysis wood boilers require certain knowledge and skills. Although their efficiency is much higher.
Ordinary boiler
First, let's look at how to make a simple one with your own hands. The model consists of two cylinders placed inside each other. The first is used as a firebox. When positioned horizontally, it can be lined with fire-resistant bricks from the inside.
The second acts as a convection carrier or is used to heat the coolant. Firewood is placed directly into the firebox.
Available materials
To reduce the amount of welding work, you can use a thick-walled pipe or barrel. It is also possible to use other available materials.
A rectangular firebox welded from a thick sheet can be easily placed inside a cylindrical container.
Design Features
The wood-burning boiler is equipped with a vent for fresh air and a chimney for exhaust gases. The ash pit is located at the bottom of the chimney and allows the bottom row of wood to smolder, generating additional heat. Firewood is inserted through the top. A special hatch is prepared for this purpose.

To ensure that each pile of firewood burns for as long as possible, a special load is often provided, shaped like a disk with blades and a hole with a diameter of 20 mm. When the load is pressed, the burning fuel is compressed. In this case, the volume of incoming air is significantly reduced, since it can only pass through the existing hole.
Connection method
Such a boiler can be connected to the heating system in two ways:

- cutting water pipes directly into the barrel. Circulating between the pipes, it will heat up, so that later, when it enters the heating system, it heats the radiators;
- cutting the chimney into the coolant tank. Exhaust hot gases will enter the container, gradually heating the coolant.
Pyrolysis boiler
The operating principle of solid fuel pyrolysis boilers operating on wood is based on the destruction of wood under the influence of high temperature and low oxygen content. They are used for long-term heating of premises for various purposes.

Such a boiler consists of two chambers. The first is used to load fuel. The second one receives exhaust gases and secondary air for long-term combustion. Making such a unit with your own hands is more difficult than a regular one, but it is possible.
Main elements of the device
A wood-burning boiler is made from a metal barrel. Preferably with a capacity of 200 liters. The lid of the barrel is cut off and the side is welded to it. A round piston is made from a massive billet or any other weighting material. Its diameter should be slightly smaller than the internal diameter of the barrel.

A hole is cut in the cover to install an air duct pipe with a diameter of 100 mm. The height of the pipe should be at least 20 cm higher than the barrel. A chimney pipe is welded into the side of the barrel. It also uses rolled steel with a diameter of 100 mm.
The air pipe is welded to the piston. A damper is provided at the upper end of the pipe to regulate the amount of incoming air. Ribs are welded to the bottom of the piston and are used to compact the fuel mass.
During operation of the boiler, firewood is loaded directly into the firebox and ignited. A cap with a piston is installed on top. As the fuel burns, the piston will move down, increasing pressure in the lower chamber. Due to this and the minimal amount of oxygen, the firewood will begin to slowly smolder.

The gas released during pyrolysis will enter the upper chamber, the temperature in which can reach 900C. Through the chimney, the remaining combustion products are removed into the atmosphere.
Such home-made boilers, manufactured according to all the rules, are capable of working for more than a day on one bed due to prolonged burning.
Preparing material and tools
When starting to make a wood-burning boiler with your own hands and trying to complete everything in the shortest possible time, you should take care of the availability of:

- diagrams of the future boiler;
- steel pipes of various lengths, diameters (400, 500, 100 and 150 mm);
- steel sheet with a thickness of at least 4 mm;
- rolled products for making legs;
- two hundred liter barrel;
- heat-resistant mixture used for laying stoves and fireplaces;
- welding machine;
- electrodes of a suitable brand and size. As a rule, electrodes with a diameter of 3–4 mm are used to perform welding work;
- Bulgarians.
Build process
The process of creating a boiler includes several stages. When manufacturing each element, it is worth taking into account the special operating conditions of the product being manufactured.
We cut a section from a thick-walled pipe with a diameter of 100 mm, the length of which will be equal to the height of the firebox. We weld a bolt to the bottom. From a steel sheet we cut out a circle with the same diameter as the pipe or larger. We drill a hole in the circle large enough to pass the bolt welded to the pipe. We connect the circle and the air duct pipe by tightening the nut onto the bolt.

As a result, we will get an air supply pipe, the lower part of which can be closed by a freely moving metal circle. During operation, this will allow you to regulate the intensity of firewood combustion and, consequently, the temperature in the room.
Using a grinder and a metal disc, we make vertical slits approximately 10 mm thick in the pipe. Through them, air will flow into the combustion chamber.
Housing (firebox)
The body will require a cylinder with a sealed bottom with a diameter of 400 mm and a length of 1000 mm. The dimensions may be different, depending on the available free space, but sufficient for laying firewood. You can use a ready-made barrel or weld the bottom to a thick-walled steel cylinder.

Sometimes heating boilers are made from gas cylinders for a longer service life.
Chimney
In the upper part of the body we form a hole for the removal of gases. Its diameter must be at least 100 mm. We weld a pipe to the hole through which the exhaust gases will be removed.

The length of the pipe is selected depending on design considerations.
Connecting the housing and the air supply device
We cut a hole in the bottom of the housing with a diameter equal to the diameter of the air supply pipe. We insert the pipe inside the body so that the air vent extends beyond the bottom.
The air supply pipe should end a few centimeters before the start of the chimney.
From a metal sheet 10 mm thick, cut out a circle, the size of which is slightly smaller than the diameter of the body. We weld a handle made of reinforcement or steel wire to it.

This will greatly simplify the subsequent operation of the boiler.
Convection hood
We make a cylinder from sheet steel or cut a piece of pipe, the diameter of which is several centimeters larger than the outer diameter of the firebox (body). You can use a pipe with a diameter of 500 mm. We connect the convection casing and firebox together.
This can be done using metal jumpers welded to the inner surface of the casing and the outer surface of the firebox, if the gap is large enough. With a smaller gap, you can weld the casing to the firebox around the entire perimeter.
From a steel sheet we cut out a circle with the same diameter as the firebox or a little larger. We weld the handles to it using electrodes, wire or other available means.

Considering that the handles can become very hot during operation of the boiler, it is worth providing special protection made of material with low thermal conductivity.
Legs
To ensure long burning, we weld the legs to the bottom. Their height should be sufficient to raise the wood-burning boiler at least 25 cm above the floor level. To do this, you can use various rolled products (channels, angles).

Congratulations, you have made a wood-burning . You can start heating your home. To do this, just load the wood and light it by opening the lid and heat dissipation disk.
Despite the huge number of heating devices on the market, a popular option is a long-burning solid fuel boiler.
Homemade TT long-burning boiler
This unit can be used as the main source of heating in remote areas where gasification and electrification are not provided. Reliable, efficient and economical, it is an excellent solution for heating a country house, a cottage in the city or a summer cottage.
Unlike a conventional boiler, where the main heat comes from the flame itself, a long-burning TT boiler works on a completely different principle. This article will talk about how to properly make a long-burning solid fuel boiler with your own hands, and the drawings and installation diagram will help you not make mistakes and do everything technologically correctly!
In conventional solid fuel units, one fill is enough for 6-7 hours of combustion. Accordingly, if the next portion of resources is not added to the firebox, the temperature in the room will immediately begin to decrease. This occurs due to the fact that the main heat circulates throughout the room according to the principle of free gas movement. Heated by the flame, the air rises and goes out.
The thermal resource of a long-burning boiler is enough for about 1-2 days from one load of firewood. Some models can maintain heat for up to 7 days.
How is such economy and efficiency achieved?

A long-burning TT boiler differs from a conventional boiler by the presence of two combustion chambers at once. In the first, the fuel itself is burned as standard, and in the second, the gases released during this process are burned.
A major role in this process is played by the timely supply of oxygen, which is provided by the fan.
This principle was implemented relatively recently. In 2000, the Lithuanian company Stropuva first presented this technology, which immediately gained respect and popularity.

Today this is the cheapest and most practical way to heat a country house, where gasification is not provided and there are power outages.
Such units operate on the principle of burning top fuel. As a standard, in all stoves the firebox is located at the bottom, which allows you to take cold air from the floor, heat it and raise it up.
The operating principle of this boiler is somewhat similar to a pyrolysis boiler. The main heat here is released not from the combustion of solid fuel, but from the gases released as a result of this process.
The combustion process itself takes place in a closed space. Through a telescopic pipe, the released gas enters the second chamber, where it is completely burned and mixed with cold air, which is pumped up by a fan.

This is a continuous process that continues until the fuel is completely burned out. The temperature during such combustion is very high - about 1200 degrees.
As mentioned above, this boiler has two chambers: a large main one and a small one. The fuel itself is placed in the large chamber. Its volume can reach 500 cubic dm.
The combustion resource can be any solid fuel: sawdust, coal, firewood, pallets.
A constant flow of air is provided by the built-in fan. The advantage of this method is that solid fuel is consumed extremely slowly.
This significantly increases the efficiency of such a heating device. Why does wood burn out so slowly compared to a standard stove?
The bottom line is that only the top layer burns out, since the air is pumped by a fan from above. Moreover, the fan adds air only after the top layer has completely burned out.
There are many models on the market today that work on the same principle, but, depending on the dimensions, material, additional options, they have different efficiency and cost-effectiveness.

Universal TT boilers operate on absolutely any fuel, which will greatly simplify their operation for owners. A more budget-friendly option is a long-burning wood-burning TT boiler. It runs exclusively on wood and no other fuel option can be used in it.
Design Feature
Any long-burning boiler is equipped with an impressively sized chamber into which fuel is placed. The larger the chamber the boiler is equipped with, the longer the wood will burn.
Today you can find two technologies implemented in long-burning TT boilers, which successfully compete with each other. This is the Buleryan principle and the Stropuv method.
Due to the high price of Stropuv and the complexity of the design, this method is not so popular in Russia. But using the Buleryan method, craftsmen with great dedication construct units for heating dachas and country houses.

A boiler using the Buleryan method looks like this: a metal body, inside of which there are two chambers. In the lower chamber, fuel is burned, and in the second, gas flowing through the tube from the first chamber is burned.
The door for loading fuel is located in the upper part of the boiler body, since the entire lower part is reserved for a large storage of resources.
At the top of the boiler there is a smoke pipe, which connects to the chimney. An ash chamber is built into the lower part, through which the boiler is cleaned.
One more nuance should be mentioned. In standard furnaces, the ash pan acts as a blower through which the air necessary for combustion is blown in. Here the ash chamber is absolutely sealed, since air enters through the upper air chamber, which plays the role of a recuperator.
The supply of oxygen to the boiler is regulated by a damper located at the top of the air chamber. As the wood burns, the fuel gradually settles and the distributor lowers. This ensures a continuous supply of oxygen.
When loading fuel again, simply pull it up and return it to its original position. By the position of this lever, you can easily determine how much fuel is left in the boiler and when to load it next.
Separately, it should be said about the environmental friendliness of this heating option. Due to the complete combustion of fuel and gases, virtually no carbon dioxide is released into the atmosphere.


Main elements of the TT boiler:
- Combustion chamber. This is the main element of any boiler and furnace where direct combustion of fuel occurs.
- Gas combustion chamber. Hot gases from smoldering wood enter here.
- Ash pit - ashes are collected here. This unit must be systematically cleaned to maintain the boiler in good technical condition.
- A chimney is a unit through which combustion products are discharged outside.

All these components are enclosed in a steel case, which is made of sheet metal 5-6 mm thick.
Advantages and disadvantages
Due to its large dimensions and complexity of the design, it is rational to use such a unit for heating a large cottage. But for a small dacha this option is not suitable, since it does not justify the cost-effectiveness.
pros
- high efficiency (about 95%);
- autonomy of the heating system;
- efficiency;
- reliability and durability;
- high efficiency;
- fuel availability;
- an environmentally friendly option for heating your home;
- versatility of fuel (coals, firewood, sawdust, pellets).
Minuses
- cumbersome design;
- a special room must be equipped for the device;
- complexity of design and installation;
- the need for constant cleaning.
It is not necessary to buy a long-burning boiler ready-made, because its price is several times higher than conventional stoves. You can make such a design yourself if you have at least a little experience in construction and repair.

A homemade design, compared to a factory-made analogue, has a number of advantages:
- low cost;
- the ability to make the boiler universal for any type of fuel;
- possibility of improving the design and adding power.
The only difficulty is giving the boiler a cylindrical shape. It is very difficult to give metal such a shape without a rolling machine.
But there is a good solution. You can use empty propane tanks or any pipe of suitable diameter. You should choose pipes with a wall thickness of at least 5 mm.
For a village or a small dacha, you can build a small brick stove and enjoy its efficiency. But for a large cottage, this option will be less practical, as it will require a large supply of firewood for the winter. Caring for a conventional stove, compared to a long-burning boiler, is much more difficult, and large temperature changes in rooms remote from the stove do not allow organizing a comfortable microclimate in the house.
If you do not have enough money to create a full-fledged heating system for your home, or the construction of such a system itself is impractical, it would be much more reasonable in this situation to make a long-burning solid fuel boiler with your own hands and not worry about its safety and aesthetic appearance.

For the operation of a TT boiler, the diagram of which we attach below, any solid fuel is suitable:
- hard and brown coal;
- anthracite;
- firewood;
- wood pellets;
- briquettes;
- sawdust;
- slates with peat.
There are no special instructions on the quality of fuel - any will do. But keep in mind that with high fuel moisture, the boiler will not provide a high efficiency.
Security measures!
In order for such a boiler to truly be an effective and economical heating option, to serve for a long time and not cause burns or accidents in the house, take into account the main points of fire safety.

- It is necessary to monitor the temperature in the system and prevent it from overheating.
- Do not install a shut-off valve on the pipeline.
- Do not keep flammable objects near the boiler.
- It is necessary to monitor the ventilation in the room.
- A separate room must be equipped for the boiler.
At the preparatory stage, consider the place where the boiler will be installed.
Ideally, of course, to equip a separate boiler room, because the operation of a long-burning TT boiler is somewhat different from the usual wood-burning brick stove. And externally, this unit will not be pleasing to the eye or serve as a decoration for the house.
Considering that solid fuel does create a certain amount of dirt, it is better to install a long-burning TT boiler in a non-residential area.
But if its power is small (does not exceed 30-35 kW), then you can simply separate (zone) the main room from the “boiler room” using a brick wall.
Be sure to provide a ventilation system in the room where this boiler will be used. Oxygen must be supplied from the street on a constant basis.
Step-by-step instructions for creating a long-burning solid fuel boiler with your own hands
The project of a solid fuel boiler is not an easy task and it will not be easy for a beginner to cope with it. Before starting construction, prepare drawings and sketches.

Also prepare the following tools:
- Welding machine.
- Tools for working with metal: pliers, grinding wheel.
- Electric drill.
- Construction level and tape measure.
- Marker.
- Bulgarian.
- Gloves and eye protection.
Attention! When carrying out work on the manufacture of a homemade TT boiler for long burning, you should be very careful and have at least basic practice with a welding machine. Be sure to use protection when welding.
Materials you will need:
- Empty gas cylinder.
- Sheet metal.
- Asbestos cord.
- Steel pipe with a cross section of 60 mm.
- Metal hinges and handles.
- Metal corner or blades.
- Metal hood.
- Basalt fiber for the passage of the smoke exhaust pipe.
Before starting production, we suggest you read the video instructions on how to properly cut an empty gas cylinder, watch carefully and do not neglect safety measures!
Step 1. Marking the body and making the body
Using a marker, mark the propane tank according to the dimensions of the drawing.
We make a small rectangular hole for the ash pan door, through which the boiler will be cleaned.
On the top of the balloon (along the entire perimeter) we draw a straight line to cut off the top.
Using a grinder, cut off the top along the line.

Now we make markings in the center for the hole through which the pipe will pass. The hole, accordingly, must be larger than the diameter of the pipe.
We cut a hole in the lid and weld a metal ring that will tightly fit around the pipe inserted into the cylinder.

We weld a small ring of sheet metal (4-5 mm) from the outside and inside of the cylinder itself, on which the lid will be placed.
Step 2. Making the pipe
We take a metal pipe with a length of 80 to 100 cm. If you are not using a standard propane cylinder, but are welding the body for the boiler yourself, keep in mind that the height of the pipe should be 20-25 cm higher. After all, the essence of the work is that as the fuel burns out, the pipe inside the housing will go down.
We weld a metal circle – an air distributor – to the pipe in its lower part.

We cut out fasteners from sheet metal, which we weld securely along the cut line of the cylinder, after laying an asbestos cord.

We fasten the cut top so that it can be easily removed and put back. Make handles from metal and, for ease of removal, also weld them to the body.
Step 3. Making a pipe to the chimney
We make markings on the cylinder in its upper part for the opening of the pipe.

Using a grinder, we cut out and weld a pipe to remove combustion products.
Then a steel smoke exhaust pipe is connected to this pipe.
Step 4. Making an ash pan
Using the previously made markings, we cut out a hole for the ash chamber using a grinder.

We make a door separately from sheet metal, which will then need to be screwed onto brackets to the boiler body.

For convenience, you can make a small loop of thick wire or reinforcing rod and screw it on as a handle.
Step 5. Prepare the air supply system
Measure the inner diameter of the cylinder body. Now draw a circle on the sheet metal, the diameter of which will be 5 mm less than the inner diameter of the cylinder.
Using a grinder, cut out this circle.

Take a metal corner and cut it into 6 equal parts. The size of each part is equal to ½ the diameter of the metal circle. An impeller with old blades is still good for these purposes.

We weld the metal circles in the same direction counterclockwise.
Step 6. Making a heat exchanger
We will make a heat exchanger designed on the principle of a water circuit.

The size of this heat exchanger depends on your personal preference. The larger it is, the more firewood you can put in it, which means the longer burning time your boiler will have.
From sheet metal 5-6 mm thick, we cut out sheets according to the diagram and weld them into a reliable housing, inside which our gas cylinder will be located.
In the upper and lower parts of the housing we make pipes for connecting the supply and return lines.
In the central part it is necessary to provide a hole through which fuel will be inserted. We mark using a marker and cut out with a grinder.
Step 7. General assembly and installation of the boiler
We attach the ash pan door to the firebox.
We mark on the heat exchanger body the place where access to the ash pan will be made and cut it out using a grinder. We also equip this opening with a door, which should close very tightly, blocking the access of oxygen to the housing.

We insert the cylinder inside the heat exchanger.
Using a welding machine, we weld the tank on top, resulting in an absolutely sealed housing, inside of which there is a round firebox.
The essence of a long-burning TT boiler is a limited air supply from above, the function of which is performed by an oxygen supply system.
Fuel (firewood, coal, briquettes) should be loaded very tightly so that there is as little space as possible between the layers. If the firewood is different in size and it is not possible to pack it tightly, then between the layers you can fill it with wood chips and paper. The denser this solid fuel mixture is, the longer the wood will burn.

- we take out the air supply restrictor from the housing;
- We load fuel through a special door. It is better to spray the fuel with a special ignition fluid beforehand;
- put back the restrictor pipe;
- throw a lit match inside the cauldron;
- After you are sure that the fuel gradually begins to smolder, close the door tightly.
As the wood burns, the pipe inside the cylinder will gradually lower. By its height you can always find out how much firewood you currently have inside.
Step 8. Lighting the boiler
You can build such a simple boiler right outside in the warm season and test it outdoors, equipping it with a temporary chimney.

If the area of the room exceeds 30-40 square meters, then you can weld two cylinders vertically, thus increasing the amount of firewood.
Step 9. Installing the boiler indoors
Take the issue of boiler fire safety very seriously.
It is better to allocate a separate room for it or make a small fence from residents to prevent burns. After all, the boiler body is metal and, unlike a stone stove, there is a high probability of getting burned.
Install in a place where there is a possibility of chimney outlets. There are two ways to remove the chimney: through the roof or.
Keep in mind that you must have direct access to the boiler, so nothing should stand at a distance of 50 cm next to it.
- Make a brick base for the boiler, laying solid brick in 2 rows. Check the slope of the base with a building level.
- Maintain distance from walls (regulated by SNiP). The distance from the combustion door to the wall must be at least 125 cm. The distance between the side parts and the back of the boiler and the wall must be at least 700 mm.
- If the walls in the house are made of wood or any other flammable material, it is necessary to protect the junction of the boiler with the ceilings with sheet metal or basalt. You can use ordinary brick as thermal insulation, which should be used to line the perimeter of the junction of the boiler with the wall.
Where the chimney exits through a wall or roof, it is also necessary to ensure proper thermal insulation. Basalt fiber is suitable for this, which should be laid tightly between the chimney pipe and the ceiling.
- Place the boiler on the prepared foundation and again check with a level how level the device is. Please note that the gas outlet pipe must be at the same level as the chimney pipe. If the line is not horizontal, traction may be disrupted during operation.
Step 10. Connect the boiler to the chimney.
Attention! It is necessary to lubricate the joints of all parts of the chimney with sealant.
We connect the chimney pipe to the TT pipe of the boiler. The diameter of the chimney must be no less than the TT pipe of the boiler. If these parameters are not met, the gas outlet capacity will decrease.

As you can see, by doing everything with your own hands you can get excellent results; everything is not as complicated as it seemed at first glance! If you strictly followed the instructions, you will quickly appreciate the high performance and efficiency of a long-burning solid fuel boiler, which is many times superior to its competitors with an open flame principle. This will allow you to maintain a comfortable microclimate in your home with minimal maintenance.
DIY solid fuel boiler - video instructions
Everyone has thought about how they can save money on heating their home. The best heating method is a boiler, because you can cook it yourself. This article is intended for those who do not know how to weld a heating boiler with their own hands and like to independently make devices that increase the level of comfort in their own home.
How to choose the right manufacturing method
Before contacting specialists or searching the Internet for manufacturing methods, you need to decide on its purpose. After all, the type of its design will depend on its role. First, you need to understand that all DIY boilers are based on a single principle: the device heats the coolant, and the heat exchanger receives heat from the burning fuel.
In order to achieve maximum heating efficiency, design and fuel combustion must be taken into account. Based on simple physical laws, we can conclude that the large amount of heat transferred per unit time directly depends on the size of the heat carrier capacity and the area of the transmitting tube. Considering the completeness of fuel combustion, it is necessary to allow a maximum flow of oxygen to the fuel in order to prevent the outflow of pyrolysis gas, which transfers a lot of heat.
Boiler design
The design and appearance of the boiler will depend on several technical parameters:
- Before you begin assembling the heating element, you need to make sure that the material is available. In the best case, you should choose a stainless, heat-resistant type of metal, but an ordinary iron sheet can also do (in practice, it is very easy to find cheap material).
- The next important factor in creation will be the choice of steel processing capabilities. Not everyone has equipment in their garage for smelting cast iron steel, which usually costs more than a boiler, so the processing style is limited only by your imagination. The traditional manufacturing method is cutting a steel sheet with a grinder, electric welding or gas cutter.
- The design of the stove is also influenced by the type of fuel you are going to use for heating.
- You also need to calculate the correct way to circulate the coolant, namely, maximize the diameter of the circuits and pipes and increase the height of the water tank. The large diameter makes it possible to reduce water resistance and obtain a high coolant transfer rate without the use of special pumps.
The assembly of a homemade boiler will be slightly different from a factory one for one simple reason: if electricity stops being supplied to the heated water tank, you can expect problems with the water supply. These factors can lead to the destruction of a homemade heater due to vapor pressure. Therefore, it should be assembled by hand with a smaller pipe diameter and water tank height.
A variety of homemade heating boilers and methods for installing them
When making a home boiler with your own hands, you should choose its type depending on the materials and heating method. Next you will learn about wood, electric, pyrolysis and oil types of boilers.
Wood boilers
If we consider a simple version of making a boiler, it looks like two cylinders of different diameters placed one inside the other. The outer water cylinder is for storing water, and the inner one is for the solid fuel stove. Since the space between the pipes is clogged with water, you can choose any diameter for the pipes, but it is advisable to make it larger to reduce welding. The main disadvantage of a wood-burning boiler is its low efficiency, but the ease of its manufacture and further use makes it one of the most popular home-made heating products.
To assemble the boiler, you will need the following tools: gloves for your hands, overalls and a welding mask, a drill with metal drills, electrodes and a welding machine, as well as measuring instruments (tape measure, level, etc.). From materials we will need sheets 5 millimeters thick, throttle valves, doors for the boiler, cast iron grate and corners.
Rice. 1The process of constructing a wood heating boiler step by step:
- Take two barrels of different diameters and widths, no more than 4 millimeters each.
- Cut holes for the ash pan and water container in both barrels using a grinder.
- Place the cylinders inside each other and weld a lid over them.
- Weld the firebox and ash pan together and close the door.
- Weld pipes to the barrels for water circulation and connection to the generator.
- Attach a pan inside the stove.
- Make a hole for the chimney in the barrel and install the pipe.
- Upon completion of work, check it for leaks (check for leaks).
- Mount and connect to the network.
 Rice. 2
Pyrolysis heating boilers
In order to save on materials and energy spent on boiler operation, this type of unit should be used. The principle of operation of the boiler is a mixture of air and pyrolysis gas, which ignites and produces more heat. The cost of materials for the manufacture of a pyrolysis boiler is an order of magnitude higher than that of a wood-burning boiler, but after a couple of heating seasons the device pays for itself.
The design of a pyrolysis water unit will consist of several sectors: power supply regulators, an opening, smoke channels, a fan, a combustion chamber and pipes. When manufacturing it, it is necessary to adhere to the exact drawing due to the complexity of assembling the structure. High heating capacity and efficiency make it possible to reduce energy consumption and set the power to 25-30 kW, unlike other boilers (40-50 kW).
 Rice. 3
To assemble it, we will need an electric drill, a temperature sensor, a 230 mm cutting wheel, a grinder, electrodes and a welding machine, as well as 2 mm thick steel strips and a fan.
Construction:
- Cut the fuel hole slightly higher than the combustion tank.
- Install a restrictor that controls the air supply.
- Cut a special hole in the boiler for the limiter.
- Weld a stopper from a pipe 65-70 mm thick.
- Make a rectangular opening for loading and cover it securely with a steel plate.
- Cut a hole to remove ash.
- It is advisable to make the outlet pipe with a bend in order to increase the amount of heat generated.
- Install a valve outside the structure to regulate the amount of coolant.
- Carry out a tight test and install.
 Rice. 4
Waste oil heating boilers
A rather unusual boiler design, which involves the use of oil as fuel for heating. During operation, the heater evaporates oil, which, in turn, drips into the pan and turns into a flammable gas. This gas plays the role of a heat exchanger. This type of boiler is universal and easy to use, as well as economical: ordinary diesel fuel can be used as fuel.
Since the combustion process in such a unit occurs twice, two combustion chambers should be installed. The used oil burns in the first chamber, and then passes into the second chamber in the form of a flammable gas, and, mixing with oxygen, produces a combustion process, which generates heat. Due to operation at high temperatures, it is not recommended to install it near windows or in drafts, however, it is very safe to use.
 Rice. 5
- The first chamber is made to supply air, so we make it so that it is adjustable: we install a damper that opens and closes as much as possible;
- The second chamber, intended for processed oil for combustion, should be dismountable in order to, if possible, clean it of ash and rust;
- Weld a strictly vertical chimney (without any slopes) at least four meters long;
- Cut off the lower and upper parts of the cylinder and make a collapsible chamber for combustible oil from the remaining halves;
- Weld the legs to the bottom of the cylinder and cut a hole for the pipe from below;
- We make several holes for ventilation in the pipe and weld it to the newly made tank;
- We weld this cylinder to the pipes and connect them to the pipes;
- Install.
 Rice. 6
Electric heating boiler
Another common type of boiler is electric. Its popularity among craftsmen is due to its cost-effectiveness and ease of assembly. It is mounted in a pipe running vertically upward, and the heating element is connected inside it. From the return pipeline there is a branch pipe from the return pipeline, to which the supply is connected from above. The design of the electric boiler could be limited to this.
 Rice. 7
However, for it to work correctly, it is necessary to take into account some nuances, namely the type of fuel. After all, do-it-yourself electric heating is one of the most expensive these days, so installing an electric boiler entails impressive material costs.
 Rice. 8
When assembling the boiler body, it must be assembled with double walls, between which a heat-insulating material (usually sand) flows. A partition is welded between the ash and combustion bins, and ribs are welded onto the internal walls, which connect the external and internal walls. It is advisable to install windows on the front side of the case by cutting out gaps with a grinder. Also, do not forget about installing doors for cleaning the tank and the chimney going straight up.
I hope these recommendations helped you understand the types and purposes of boilers, and also answered the question of how to weld a heating boiler. To make it yourself, you need to spend money, but after a couple of heating seasons you will start saving a lot!