Homemade disc hiller for walk-behind tractor. Hiller: making and setting up yourself - for manual traction and walk-behind tractor. Where can I find the drawings
Hilling is one of the most common types of work, and is carried out everywhere there. Where proper care is needed for various crops, such as potatoes. This type of work is not possible without such attachments as a hiller. In this material, we will tell you how to make a hiller for a walk-behind tractor with your own hands, provide the necessary drawings, as well as a selection of video clips.
Types of hillers
Making a hiller for a walk-behind tractor with your own hands
Today, there are a lot of disc hillers on sale from different manufacturers. But often their price scares away. Much more practical. He will make a hiller for the walk-behind tractor with his own hands.
The hiller consists of the following parts:
2 racks
2 screw lanyards
T-shaped leash
Before production. It is necessary to find a suitable material; for the disks, steel sheets 2-3 mm thick, which are given a convex shape, can serve.
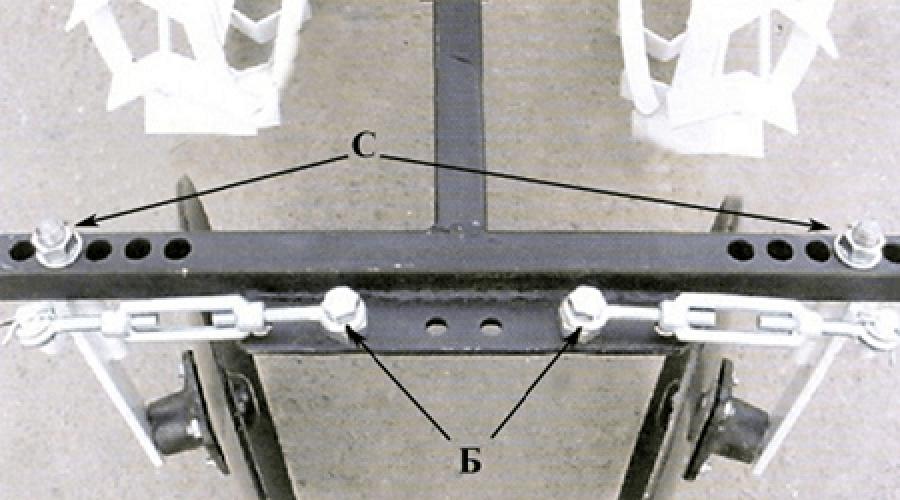
Screw lanyards perform the function of adjusting the angle of rotation of the disks along the vertical axis. Adjusting the discs to the required row spacing is quite simple; this is done by moving the vertical posts. These racks “C” are shown in the photo below, where you can also see how, with the help of bolts “B”, the angle of attack of the disks relative to the movement of the walk-behind tractor is adjusted.

Important! To prevent the walk-behind tractor from being pulled to the side during operation, the hiller discs. Must be installed strictly symmetrically.
Hiller drawings for walk-behind tractor
When assembling manufactured parts, adhere to their dimensions indicated in the drawing. The drawings below describe quite clearly all the nuances of the hiller design, dimensions, and there should not be any difficulties in making the hiller with your own hands.


To attach the hiller to the walk-behind tractor, we use a hitch bracket without a beam. We attach the leash of the assembled hiller to the bracket with two bolts and a stopper. We insert the stopper inside the square pipe and press it from the outside. Using two bolts, you need to rotate the hitch bracket and align the leash along the longitudinal axis. We fix the position with nuts.
Do-it-yourself hiller for walk-behind tractor video
In the video clips below, craftsmen share their experience, not only in making the hiller, but also tips for working and setting up.
Growing potatoes requires a lot of effort and time. During the season, potato bushes need to be hilled several times: cover the stems with loose soil to provide the roots with free access to air and retain moisture. Thanks to hilling, side shoots (stolons) develop better and more new tubers are formed.
The use of small-scale mechanization greatly facilitates this process. There are many types of attachments for walk-behind tractors or mini-tractors, as well as various hand tools designed for hilling.
Types of hillers
The easiest way is to use a hoe or hoe to loosen the soil between the rows and pour soil under the bushes, forming mounds. But it is much more convenient to form ridges with a manual potato hiller. By attaching such a device to a walk-behind tractor or electric cultivator, you can quickly process even fairly large areas.
In one pass, a manual hiller is used to process one side of two adjacent rows, and if the working element is attached to a walk-behind tractor, then several at once. In a small area it is more convenient to use a hand tool.
Specialized stores sell various models of hillers, each of them has its own principle of operation. When choosing a tool for yourself, you need to take into account the size of the area being processed, and if you have a walk-behind tractor or other unit, the brand and characteristics.
Depending on the principle of operation, hillers are:
- disk;
- plow
According to the design of the working element, hillers are classified as follows:
- models with a constant working width (the distance between the discs or plowshares);
- models with adjustable working width.
Figure 1 and Figure 2 show manual hillers. These models are usually equipped with one working element and comfortable handles (for two people to work together).
 Fig 1. Disc hiller
 Fig 2. Plow with adjustable angle of attack
 Figure 3 shows a mounted disk device with a connecting unit to a motor-cultivator or mini-tractor. Such hillers may have one or several pairs of disks (or several plows) mounted on a special beam. The number of working elements depends on the power of the machine.
 Fig 3. Walk-behind tractor with disk hiller and adjustable working width
 Self-production of hillers
Purchasing such equipment will not be cheap. Having skills in plumbing and the necessary tools, you can save money by making a potato hiller from scrap materials.
Let's take a closer look at the design features of hillers, which you can make yourself.
The most popular among gardeners are disk models, the main element of which is a pair of concave metal disks installed at an angle relative to each other. In turn, hillers of this type can be with a fixed or adjustable distance between the disks and an angle of inclination relative to the vertical stand. The discs are mounted directly on the axle or with the help of plain bearings, which greatly facilitates the work.
Hillers with plows (lister) are considered the simplest, and therefore the most reliable in operation. They come with a constant distance between the shares or with installed spacer bars, with which you can change the working width (photo, Fig. 4). This type of hiller has a drawback - they require a more powerful cultivator than disk ones.

 Rice. 4. Plow with adjustable working width
 Making a manual disc-type hiller

 Rice. 5. Assembly diagram of a manual disk hiller
 When starting work, you should first make a drawing of a disk-type hiller, guided by a detailed assembly diagram and specifying the exact dimensions.
To make such a device you will need the following tools:
- gas cutter - for cutting parts from sheet metal and steel profiles;
- gas welding station - for connecting parts with welds;
- gas burner - for heating areas of metal parts before bending them;
- vices and other metalwork tools;
- a powerful drill and a set of carbide drills for metal;
- angle grinder (grinder) - for cleaning welds;
- pipe bender – desirable, but not required.
Assembly diagram of a manual disk hiller
Earth with potato sprouts; 2. Discs – 2 pcs.; 3. Cam-type mechanism – 2 pcs.; 4. Bracket – 2 pcs.; 5. Stand – 2 pcs.; 6. Scraper – 2 pcs.; 7. Bridge beam – 1 pc.; 8. Locking bolt – 2 pcs.; 9. Handle-beam – 1 pc.
The bridge beam is made of a pipe with a diameter of 32 mm with a wall thickness of at least 2.5 mm.
Stand (item 5, fig. 5)

 Rice. 6. Stand for disc hiller
 Bushing – 2 pcs. Thick-walled steel pipe with a diameter of 45 mm (45x6.5);
Jumper – 1 pc. Steel pipe with a diameter of 32 mm (32x2.5):
Nut M10 – 2 pcs.
Handle-beam (pos. 9, fig. 5)
 Rice. 7. Handle-beam
 Bushing – 1 pc. (steel pipe 45×6.5, length 120 mm);
Nut Ml0 – 2 pcs.;
Communication – 2 pcs. (steel pipe 21×2.5, length 1400 mm);
Jib - 1 piece (steel pipe 21×2.5, length 700 mm);
Crossbar – 1 pc. (steel pipe 21×2.5);
Handle – 1 pc. (steel pipe 21×2.5, length 450 mm).
Scheme for adjusting the working width of the disc hiller

 Rice. 8. Scheme for adjusting the working width of the disc hiller
 Type a – camber; view b – toe-in
Description of the assembly process
The main structural element is two concave metal disks connected to each other with a diameter of 370 to 700 mm with pointed edges. They must be made of steel sheet with a thickness of at least 2 mm. Craftsmen solve this problem in different ways; some even adapt lids from large pots that have failed. Others cut off the bottom and top of the heating tank of an old boiler; you can remove the discs from a seeder that has served its purpose. It is acceptable to use old saw blades of large diameter. But it is best, of course, to make the disks from stainless steel and give them the desired shape in production.
The simplest option is to fasten the discs using bushings welded together (two sections of pipe with a diameter of 25 mm and a length of 50–80 mm). In this case, the distances between the lower points and the angles of inclination of the disks always remain unchanged. The disks rotate due to the sliding of the axes in bushings filled with lubricant (bolts of suitable diameter and length are selected for the axes). With such a design, the row spacing will have to be made equal to this distance.
If you weld hubs to the disks, each of which will have two plain bearings installed (203, single-row ball bearings are suitable), and the axes of the disks are combined with the racks using homemade cam mechanisms, then the disks will be able to rotate freely, which will greatly facilitate the work. A steel scraper mounted on an axis on the concave side of each disk will clear it of adhering soil during operation.
Several through holes are drilled on the bridge beam with a pitch of 50 mm to adjust the distance between the disks to the size of the row spacing. You can work with such a mechanism alone, but it’s easier and more convenient for two people. It is advisable to make front and rear pulls. Then one person will push the device from behind, and a partner will guide and pull it forward.
In Fig. 6, 7, 8 respectively show how the vertical posts are arranged and what the row handle looks like. In Fig. 8 – fastening of disks and methods of their adjustment.
Installing a homemade hiller on a walk-behind tractor
The hiller installed on the walk-behind tractor must be equipped with a coupling unit with the unit. It must be made taking into account the connecting dimensions of the mating part, and pins must be provided that will firmly connect the attachment to the unit. All parts of the clutch assembly must be made of high-carbon steel sheet with a thickness of at least 5-7 mm. Bolts of suitable diameter and length can be used as pins.
Diagram of a disk hiller designed for installation on a mechanical or electric cultivator

 Rice. 9. Diagram of a disk hiller for installation on a mechanical cultivator
 In order to be able to adjust the angle of rotation of the disks, two lanyards are installed on the beam (see Fig. 10). To change the distance between the disks, a number of holes are drilled in the beam for bolted connections. The design must be completely symmetrical, otherwise during operation it will be difficult to maintain straight movement, the hiller will begin to move to the side.
In Fig. Figure 10 shows the location of the lanyards and special bolts (B and C), with the help of which the position of the disks is adjusted.
 Rice. 10. Adjustment with lanyards
 Making a plow hiller
You can also make a lister (plow) type hiller for potatoes with fixed “wings” and an adjustable distance between them.
Drawing of a plow for a hiller with an adjustable width between the shares, recommended for self-production.
 Figure 11. Drawing of a plow-type hiller
 If you equip such an element with two rods: rear and front, it will be suitable for manual work. As an attachment, the plow can be mounted on a bridge beam with a connecting unit (to a motorized or electric cultivator).
Anyone who uses walk-behind tractors knows that it is not always possible to purchase the necessary attachments for the unit. Many of them are expensive, and some are not very convenient to use in the country house or garden. An individual approach is often important here. Therefore, do-it-yourself disk hillers for a walk-behind tractor, drawings, videos of which are available in large quantities on the Internet, will help those who wish to implement individually, in their own way, the problem of mechanizing the hilling of their plantings.
To make it easier to understand how to make a mounted hiller on a unit, let’s first look at how to make manual hiller for potatoes.
As can be seen from the drawing, to make work easier without a motor, you also need to try. But not as much as it seems. First of all, you need tools for work:
- hammer;
- vice;
- welding machines, preferably both electric and autogenous;
- calipers;
- taps for cutting internal threads;
- tap driver;
- grinding machine with replaceable discs;
- gas burner for heating the metal when it needs to be bent;
- Workbench;
- all kinds of auxiliary tools.
Disc hiller
Let's get started on how to make a potato hiller with your own hands. The drawing shows that the main tool is moldboard discs. They must be within 400 mm. This is optimal. Because we usually plant potatoes at a depth of 60-80 mm, and the roots then grow approximately 200 mm. It turns out that by walking between the rows with inclined disks of the specified size, we completely hill up the row of potatoes.
So, we make 2 disks from a steel sheet 2 mm thick, with a diameter of 400. Some are made from old pot lids. Let be. But it is advisable to make high-quality disks that will last a long time. Can be taken from scrapped agricultural machinery. But best of all is alloyed stainless steel. We sharpen the edges of the disks, where the cutting edges will be. Now we are making a bridge with racks on which the disks will be attached. We calculate the sizes. We put a connecting fastener for pipes on both sides of a strong steel pipe (sold everywhere). The free ends of the fasteners are directed downwards. From above we drill the pipe through the holes in the mount. We drill each fastener from both sides. Secure with bolts and nuts.
If you want to make grips of different widths, then drill two more holes on both sides. To change the grip width, simply move the posts further or closer to the ends of the bridge and secure them through the holes. Then we insert tubes - racks - into the fastenings from below. We also drill and fasten in the joint. Two bolts with nuts for each rack. Then at the bottom of each rack we make a mechanism for inclined movable disks. First we attach the bracket for the disk. Moreover, we also do 2–3 pipe drilling positions. To be able to change the inclination of the disks.
On the other side of the bracket we weld a short thick steel rod. At its other end - in the bushing ring - press a closed type sliding bearing. Pre-weld a wide washer with holes for fastening the disk to the inside of the bushing. Weld the same wide washers with holes in the center of each disk. We secure the disks with bolts and nuts. We ended up with two movable disks tilted at a certain angle, attached to racks on one bridge. You can come up with an additional device for tilting the disks to the right - to the left. To do this, you need to select a hinged mounting mechanism for the bracket. These are also on sale. Yes, you can find it in old parts of agricultural machinery.
Attaching the hiller
Hiller for walk-behind tractor must be connected and hung to the unit in such a way as shown in this drawing:

From the drawing you can see that we need to connect the device to the walk-behind tractor to the bridge through brackets and strong steel tubes. Reinforce the connection with a crossbar. Turn on the engine. The wheels are moving. You hold on to the handles of the walk-behind tractor. Carried away by the movement, the planting tool he created with his own hands comes into action. The discs just need to be made at symmetrical angles so that they don’t lead in one direction when hilling. The considered tool option is not the only one. There are others too. Let's look at them one by one.
Lister model
This homemade hiller for a walk-behind tractor is interesting because it is easy to make in a rigid, non-sliding version. Here is a photo of such a hiller:

In order to do this, you need little time and material. Cut from 2
millimeter steel blank according to the drawing, a certain configuration. Let's sharpen the future bottom edge. Let's bend it in the middle. How to bend? Through a fixed pipe. Complete the fold by punching the leading edge with a hammer. Then we spread the wings of the hiller. We fix the width between the wings with a steel cross member welded between them at the back. We punch through the bottom of the product so that the wings turn out to be ploughshare-like. From the inside in front of the hiller, we weld a stand with several holes drilled so that you can adjust the depth (higher, lower) of the hiller’s immersion into the soil. We bolt the rod going to the walk-behind tractor to the stand. We attach the bar to the walk-behind tractor.
The same list model, made in a sliding version:

The hiller lies bottom up, so its structure is visible. Apparently, the hiller is factory-made. You can do exactly the same thing manually. Instead of a cross member tightly connecting the wings, three connection elements are used here: in the middle, welded in front, a rod with holes; two cross members from the wings, overlapping onto the middle rod. The connection point is secured with a bolt and nut. The diagonal cross members are attached to the fenders using a welded eye, so the cross members can be moved. By moving the bolt closer or further along the rod, you can adjust the width of the wings. Everything else with a sliding lister hiller is done in the same way as with a non-sliding one. Of course, a sliding one is better. It turns out that you can adjust not only the depth, but also the width of the hilling.
There is another option. For processing two rows at once. This improvement speeds up the work process. The walk-behind tractor saves time, effort and fuel. A dual device is made in this way. Two homemade hillers with stands are attached to a square horizontal rod. There are plenty of such metal products. You can always find the right thing. We attach the hiller stands to the rod like this. We cut out (or saw out) a strip of two-millimeter steel. At the ends of the strip we make long rectangular slits.
We bend the metal in the middle, so that the middle goes around the square bar at a right angle from behind. We thread the hiller stand into the resulting double eyelet at the front. A hole for the bolt is pre-drilled in the mount. We make holes on the rod on the right and left, at the same distance from each other. We manually cut the threads for the bolt in the holes using a tap with a crank. By screwing the bolt into the rear part of the mount through the thread in the rod, we tighten the hiller stand inserted into the lugs of the mount. Because the bolt will rest against the front of the bar and begin to move the bar forward, pulling on the bent mount, securing the rack.

Double lister hiller
Hilling and digging up a plot of land is quite hard work that takes a lot of strength and health.
Many summer residents and owners of land plots use such a convenient device as a walk-behind tractor on their farm. They can easily dig up the entire area in a matter of hours. And if you attach various devices to it, for example, a hiller, a lawn mower, potato planters and much more, then the work will be greatly simplified.
In this article we will look at how to make such a convenient tool as a disk hiller for a walk-behind tractor. The first thing you need to do is find out what models of this tool there are, and only then find out how you can make it yourself. There are 4 varieties of this device.
Hiller models
Lister type hiller
The design of this device is considered the simplest. It has a fixed working width.
Consists of two attached, branched and fixed wings. Due to the fact that the wings are stationary, it is impossible to set the size of the working width by adjusting the device to the dimensions of the row spacing. It is for this reason that when working with this hiller, you have to adjust the row spacing itself to the size of the hiller, and not vice versa.
Basically, all manufacturers produce models with a working width of 25-30 cm. This is not very convenient, because the technology for growing and planting potatoes has dimensions of width between rows of 60 cm.
This design has special racks with a thin structure that prevent overloading of the walk-behind tractor while loosening the hiller in deep layers of hard soil.
There are devices whose design has a streamlined appearance. This is the most convenient because such models can be adjusted to any row spacing size.
With variable working width
 This device is considered the most convenient because it has an adjustment mechanism that allows you to quickly change the position of the wings. Thanks to this property, it can be easily adjusted to any size beds.
However, they have one very unpleasant drawback - they are very difficult to work with. This is due to the fact that when loosening, the wings of the device push the soil in different directions, a small amount of which is poured back into the furrow.
As a result, your arms and back begin to get tired, and most of the engine power is wasted. But still, despite these shortcomings, these models are popular and are in great demand among many landowners.
Disc variety
 This type of tool has the following advantages:
- goes well with the walk-behind tractor. If the disc hiller is used at a reduced speed of the walk-behind tractor, the power of the tool becomes even greater. Due to this, the efficiency of digging up the soil increases and also has a beneficial effect on the working process of the tool;
- convenient use. When loosening or digging with this device you do not need to exert much force. He moves forward on his own and there is no need to put additional emphasis behind him;
- universal purpose. This tool can be used to loosen the soil, both before planting potatoes (read about how to make a manual hiller for potatoes), and after planting during active cultivation for additional loosening.
If you choose from the models offered in stores, it is best to choose hillers made of alloy metal, the design of which has rolling bearings, a large diameter and thickness of the disk elements.
Propeller hillers
 The whole principle of operation consists of the operation of the propeller elements. Under their influence, the first thing to do is dig up the earth and clear out the weeds, and only then loosen the single-row beds themselves.
These models are mainly used for front-wheel drive motor cultivators (read about the types of cultivators) and walk-behind tractors with two gears. This is because in second gears the power level rises to 180 rpm.
When the power level reaches its maximum, this tool can be used not only for hilling the soil, but also for transferring soil from bed to bed.
Disk type device
 The disc-type hiller device consists of a frame on two wheels and two suspended disc elements. If we consider all the constituent elements in more detail, we can highlight the following:
- T-type leash;
- screw tarleps – 2 pieces. Due to these elements, the vertical rotation angle of the disk elements is adjusted;
- racks - 2 pieces;
- disks – 2 pieces.
Adjustment of the racks provides a convenient change in the distance between the edges of the disk devices. For this reason, you can choose the width size you need - from 35 cm to 70 cm.
If you need to set the same size of rotation angles for the disk elements, then you need to adjust the tarlaps. Without this, the hiller will constantly pull to the side. But the level of inclination of the disk elements is not adjustable and basically always remains at the same level.
How does he work?
 The device is attached to the walk-behind tractor on the clutch bracket without a tractor. This is accomplished by a locking element with two bolts and flat washers. The most convenient working process with it is carried out in the first lower gears.
The operating principle of these hillers is as follows: the disc elements rake the soil while moving and make a roller during hilling, covering the plants with soil.
The rotational movements of the disc elements ensure crushing of the soil and additionally loosen it.
Good to know: if a two-row hiller is used for hilling potatoes, then it is necessary to install two devices on the clutch at a distance that will be equal to the row spacing.
In addition, this tool has the following advantages:
- due to it, high and even ridges of row spacing are obtained;
- ease and convenience when working;
- low energy consumption.
However, not everything is so good; there are also negative aspects. These devices cost 3 and sometimes even 4 times more than other types. Of course, the cost is influenced by a number of factors:
- size of the diameter and thickness of the disk elements;
- the material from which the tool is made – plain or alloy steel;
- adjustment devices.
When purchasing, you must take into account all the nuances. If it seems that this device is too expensive, then you can make it yourself. Moreover, manufacturing is not entirely that difficult.
Drawing
Before you start making your own disc hiller, you need to familiarize yourself with the drawings of this tool.
Thanks to them, you can make this tool with the greatest precision the first time, and it will last for a long time.
Manufacturing methods
Hillers can be made in two ways:
- With fixed working width.
- With adjustable or variable working width.
Let us consider these manufacturing methods in more detail.
What can be used from scrap materials
 For a lister device, you will need a sheet of steel with a thickness of 3 mm. But for a disk device you will need a little more:
- lids for simple pans with parameters 50-60 cm - 2 pieces;
- tarlaps - 2 pieces;
- racks - 2 pieces;
- one leash in the shape of the letter T.
Self-production
Lister hiller
 In order to make this device, you need to cut two equal parts from a sheet of steel with a thickness of 2 mm. Then you need to bend them so that their radii coincide.
Then their seams are welded and processed to create a perfectly smooth surface. IN In the future, these tools can be used for single-row tillage. You can make two such devices, which can later be used for double-row processing of potatoes.
Disc hiller
 Manufacturing stages:
- Old lids need to be sharpened along the edges.
- Next, using a hammer, we bend the disk elements: one side should be convex, the other concave. This is done so that the device can calmly rake the soil and sprinkle the plants with it.
- Tarleps, racks and a T-shaped leash must be fastened together with special fastening bolts and welded.
- Disc wheels are connected by adapters.
- Disc elements must be installed so that the space between them is the same as the distance between the rows.
- The tarlap allows for regulation of the vertical rotation angle of the disk elements.
- As a result, the entire device is fastened through a leash to the walk-behind tractor bracket using bolts with flat washers and a locking element.
So, the disk hiller is assembled. It turns out that you can easily assemble it yourself using scrap materials. In this case, you can save a decent amount of money.
A disc hiller for a walk-behind tractor is a convenient and necessary thing in agriculture for hilling, loosening, planting potatoes and other agricultural plants.
It will provide convenient and comfortable work when digging up large areas of land. You can easily make it yourself. The main thing during manufacturing is to follow the entire sequence of actions. As a result, you will get a convenient tool that will serve you for a long time.
From this video you can learn about hilling discs and how to set them up:
In order to simplify and facilitate the technology of growing potatoes as much as possible, it is advisable to make a hiller with your own hands. It is very necessary on the farm, since potatoes have long been the basis of our diet. This simple agricultural device can be of great help to gardeners.
A hiller is necessary to simplify the procedure for growing potatoes.
Timely and high-quality hilling is an indispensable condition for obtaining a high yield. Potato seeds, after being covered with a thick layer of soil, can develop in the most favorable conditions. Previously, hilling in gardens and dachas was carried out exclusively by hand during weeding. Now, thanks to the availability of walk-behind tractors, this process has been greatly simplified and takes much less time.
In addition to its direct purpose, the hiller can be used to control weeds, and the lister design can be successfully used when planting potatoes and other row crops. For work in field conditions, there are cultivators with a large working width, coupled with tractors. On small plots of land, hillers for walk-behind tractors or manual versions of agricultural machines are widely used.
The principle of operation of hillers

The hiller allows you to dig a furrow of the required depth with a dump of black soil on both sides.
In terms of its importance in processing potato plantations, the hiller ranks second after the plow. The design of its working body allows you to dig a furrow of the required depth with a dump of black soil on both sides of it. When planting, the groove must be made larger, since potatoes need a thick layer of soil on top. Then the tubers are evenly laid out and the row is filled up. During hilling, it is not necessary to provide a large depth, which significantly reduces the load on the walk-behind tractor engine.
Weed control will occur both between the rows and on the potatoes themselves. The working parts of the hiller, cutting off the soil in the inter-row space, will simultaneously weed it, and the soil that the mouldboard wings will feed onto the row will completely cover the crops and weeds.
If this is only good for potatoes, then for unwanted plants it is guaranteed destruction.
Types of hillers and their features
- Existing hillers can be divided into several categories based on design features and technology of application:
- Lister (head) hiller.
- Point hiller with adjustable working width.

Hiller with propeller-type working parts.
The disc hiller is superior in efficiency to lister and adjustable models.
The main disadvantages include the need to take into account the working width of the unit when planting. Potatoes are very demanding of unhindered access to oxygen. In field conditions, the row spacing for it is taken to be 70 cm. In summer cottages and garden plots, it is from 50 to 60 cm. In this case, the working grip of the hiller does not exceed 30 cm.
The racks of the working buildings are made of thin-walled metal. This engineering solution is one of the options for protecting the walk-behind tractor from overload. Even in cases where its power does not exceed 3.5 liters. With. and the weight is 30 kg, if an excess load occurs, the stand will bend and prevent breakage.
Recently, hillers with a streamlined working surface have become widespread. This innovation significantly reduces the load on the walk-behind tractor engine and does not cause excessive drying of the soil.
Point hiller with adjustable working width. At the moment it is one of the most popular. The presence of an adjustment mechanism allows you to change the distance between the ends of the dump wings. This technical solution makes it possible to configure the unit to work at any row spacing. However, it is necessary to take into account a number of significant disadvantages.

The main feature of the lister hiller is the constant working width of the working body.
During movement in the working position, part of the soil will fall back into the furrow after passing through the body. Operating such a unit will require a lot of physical effort and will cause you to get tired quickly. As the distance between the dumps increases, the load on the walk-behind tractor will increase significantly. Based on this, to use such an agricultural implement you will need equipment with a power of at least 4 hp. With. and weighing more than 30 kg. In addition, the presence of an adjustment mechanism increases the weight of the structure and reduces its reliability.
Disc hiller. It is superior in efficiency to lister and regulated samples, but at the same time has a higher cost. The price will depend on the following factors:
- disk size and thickness;
- quality of steel used;
- presence of a regulatory mechanism;
- use of bearings or bushings.
This hiller is most successfully combined with walk-behind tractors that have at least two forward gears. Operating at a reduced speed ensures optimal use of engine power and minimal effort when operating the unit as a whole.
Hiller can be used at all stages of potato growth and development.
When purchasing, you should give preference to models made of high-strength alloy steel, with large thick disks mounted on bearings.
Hiller with propeller-type working parts. Such a unit has working parts, the design of which allows you to crush the soil and destroy weeds. After this, the softened soil is transferred to a row of potatoes. Propeller hillers should be used in conjunction with walk-behind tractors that have at least two forward gears. Working in first gear will allow for loosening and weeding. When the second one is turned on, hilling will also take place.
Making a hiller with your own hands

The design of a hiller of any type is not particularly complex or intricate. Making such a device at home is a real task and will save a lot of money.
When producing a lister hiller, at the first stage, templates for the hiller body are made. After this, sheet metal with a thickness of at least 2 mm is selected. Using templates, both halves of the body are cut out and bent until the curvature of the planes completely coincides. The workpieces are combined and welded at least twice. The weld seam should be cleaned with a grinder before each pass.
Then they move on to making the wings of the hiller. To do this, use metal of the same thickness. The planes are marked, cut and bent using the same technology. Mounting to the body can be done in two options to choose from. The wings can be welded or bolted on. The second option will allow you to replace the damaged part without cutting the metal.
When working together with a low-power, lightweight walk-behind tractor, the housing stand is made of a pipe with a small wall thickness. It is bent forward at the bottom and welded to the body of the hiller. If necessary, holes are drilled in the upper part of the rack for installation of fasteners.
Features of assembling a hiller with disk working bodies
Let's consider a hiller with disk working parts. In order for the assembly of a homemade hiller with disk working parts to be successful, it is necessary to select two disks in advance. Ideally, they should have a convex spherical shape and a thickness of at least 2 mm. An equally important condition is their identical size. Discs of different diameters will cause the walk-behind tractor to turn to the side during operation. It is best to use spare parts from old agricultural machinery. They can be removed from a disc harrow, plougher, or, at worst, from the coulters of a grain seeder.
In the latter case, you can also get hold of bearings of the required size. Two racks are made from a thick-walled pipe for installing working parts. At the lower ends, axles are welded for fastening bearings that work together with the disks. The design of the hiller should allow for adjustment to different row spacings. For this purpose, it is necessary to use a strong metal channel 1.2 - 1.4 m long as a frame, horizontally fixed behind the walk-behind tractor.
To install the racks on the frame, you will need two brackets that will allow you to change the angle of attack of the disks during operation. They are attached to the channel using a pair of brackets with threaded ends. The presence of such fasteners will allow you to easily and quickly move the racks along the frame and set the required working width. Adjustment of the depth of travel of the disks is carried out by raising or lowering the rack relative to the bracket. Installation of a channel on the suspension of a walk-behind tractor depends on its brand and is done individually.