Homemade rails. Make your own railroad layout. Tools and materials

You can make a model railway with your own hands, but this will require extensive preparation. When building a model, knowledge in the field of the structure and operation of the railway is required; this can be read in books that are used for training in higher educational institutions, technical schools, as well as in instructions such as “Rules for the technical operation of the railway”, “Instructions for the railway alarm." There are periodicals such as “Lokotrans”, “Semaphore”, “Railway Business”. In these magazines you can find useful information about the railways of Russia and the world, and some publications have sections dedicated to railway modelling. There you can find descriptions of technologies, working methods, patterns of rolling stock models, and expert advice.
When building a model with your own hands, you need skills in working with various tools: for working with wood - work with a jigsaw, files, for measurements and markings - the ability to use a square, ruler, caliper. To work with electronic devices - correctly mold parts, connect wires, solder, measure current and voltage. If you don’t have the skills to do the job, then it’s worth studying the technique and practicing before starting to build a model railroad. For training, you can purchase cheap materials and tools, and then use high-quality raw materials and tools when building the model.
The construction of a model begins with the creation of a work plan, a route diagram, an approximate map of the terrain - with the planning and design of a railway line with your own hands. After the project is ready, the first step is to build a base for the model - a sub-model. In the future, a layout will be located on it, and it will be used as an external surface on which tracks, stations, depots, forests, mountains, rivers will be located, but also an internal part for wires and various devices that ensure the operation of the layout.
Paths are laid on the sub-model. Railway rails and sleepers can be bought in a store, but using special machines you can make them yourself. Few modellers are involved in such production. After laying the tracks and connecting the electrical part of the model, relief and vegetation are created, and models of residential buildings, factories, and train stations are installed.
There are some details on the model, objects you can make with your own hands, or you can buy them in stores. If purchased models are not satisfied with their appearance or do not have sufficient detail, then they can be modified independently. Some modellers use this technique.
Models of houses, plants, lighting poles, traffic lights - all these layout elements can be made independently, at home. You can find more information about how this is done in the articles in the “Layouts and Modules” section of the site.
In addition, the construction of a model is not only the production of individual railway infrastructure objects, it is the unification of all components of the model using a single, identical scale, era, theme of the model and time of year.
Have you thought about how to make a model railway with your own hands? To implement such an idea, you will need to stock up on a huge amount of patience, since such work cannot be rushed. In addition, before construction you will have to study a lot of theoretical information and draw up competent drawings. Read more about all these nuances in our article. Be sure that very soon you will be able to build your own railway to decorate your apartment.
Main types and features of modeling
A miniature railway is a piece of furniture that will delight the eyes of not only children, but also adults. If you are interested in making your own railroad tracks, it means that most likely you had a similar toy as a child and you decided to bring your memories to life. Or you just want to please your household with an unusual handmade decoration. Be that as it may, in the following sections you will find detailed instructions that describe each stage of working on the layout in detail.
To make a truly beautiful layout, you will need to work quite a lot, because even the smallest detail of the composition requires close attention. If you have ever studied the structure of real railways, then it will be much easier for you to realize your idea. However, do not be discouraged if you do not have the necessary skills, since all the necessary information can be found on the Internet without much difficulty. For example, our article will present several original ideas that will allow you to make a high-quality and unusual layout for your home.
As for the main types of layouts, they are quite difficult to classify. If we talk about scale, you can find small, medium and huge layouts that fill almost the entire space of the room. Some compositions are used to have a toy train ride on them. Others serve as part of the interior. Quite often on the models you can find various elements of nature: rivers, mountains, forests and fields, and sometimes they may simply be absent, and the railway itself is located on a regular plane. In general, there are quite a few options for making a layout, especially for a person who will be doing this for the first time.
What materials will be needed for the job?
Have you decided to make a model railway at home with your own hands? First you need to decide on the materials that you will use during the construction process. This can only be done if you carefully study the options for ready-made layouts, photographs of which are presented in our article. In this list you can find the most commonly used materials in construction and their purpose:

- plywood sheet - suitable as the main plane for the layout;
- construction foam is an ideal option for creating mountains with a tunnel;
- boards and cardboard - suitable for creating decorative objects.
It is worth noting that the possibility of using various materials is limited only by the skill and imagination of the master himself. For example, if you are good with plaster, you can easily make several objects out of it for a model. Do you know how to design bridges? Why not add such a design to your composition. What about real water in the model, which will symbolize the river?
Also, we should not forget that some elements can be purchased in stores rather than made by hand. For example, it will be quite difficult for a novice designer to make a figurine of a person from scrap materials, but such an element can be ordered on the Internet at a very modest price. Or you can display your collection of sports cars on the layout so that it no longer collects dust on the shelf, but pleases the eyes of your guests and family members.
List of required tools
We have already said that the easiest way to make a base for a model railway with your own hands is from a large sheet of plywood. You can purchase such material at a furniture store or remove it from an old unnecessary bed. However, what tools might a designer need during his work? As a rule, they directly depend on the materials you decide to use. Although in the list below you will find the most commonly used tools, as well as their “scope of activity”.
- An electric jigsaw is indispensable for working with plywood sheets and wood.
- Construction adhesive is ideal for attaching small parts.
- Sandpaper - suitable for processing uneven surfaces.
In the process of work, you will need quite a lot of different tools that are related to the materials for work. For example, if you want to paint a layout with different colors, you will need brushes of different thicknesses. Decided to add a couple of metal parts? Don't forget to get a grinder with discs and a welding machine with electrodes.
As you can see, the list of tools for work can be quite extensive, so it is recommended to find everything you need in advance so that you don’t have to be distracted by anything during the work process. If you don’t have a tool at home, you can ask your friends for it, but under no circumstances resort to alternative options (screws instead of nails). Making a model is a very delicate work that requires compliance with certain rules.
Design or drawing
How to make a model of a railway at home step by step and with your own hands? In the following sections you will find detailed information on this matter. However, before you start building anything with your own hands, you need to correctly draw up drawings of the future product that would take into account all the features of the composition.
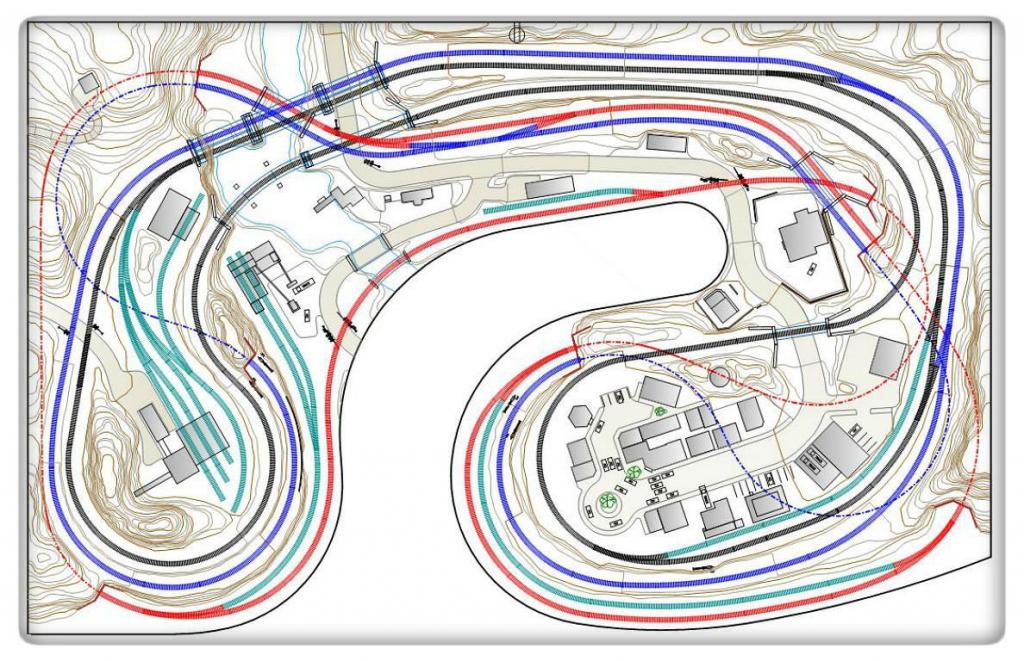
First of all, you need to decide on the dimensions of the layout. It is worth understanding that the larger the area of the product, the more small parts you will have to add to it. A beginner designer should first learn how to make small layouts, and only then move on to larger compositions. Although if you are confident in your abilities or work under the guidance of a real professional, then you can forget about this rule.
However, we should not forget that not only the quality of the future structure, but also its decorative appearance depends on a correctly drawn up drawing. As a rule, people start making mock-ups when they already have a specific idea. For example, a master wants to include in the composition several mountains with a tunnel, a river, a bridge, and also a small village in the middle. Such a layout may require quite a lot of details, but it will look quite decent.
We make a sub-model
We make a model of the railway with our own hands. The first stage will be the manufacture of a sub-model on which all the main elements will be placed. It is highly recommended to use a sheet of plywood as a building material, since it has fairly good strength and is light in weight, which will allow you to drag the layout even alone. You can purchase such a product at any furniture store, but if you want to save money, then go to a construction base, where a sheet of plywood of the required size will be cut right in front of the buyer.

Once the plywood sheet is ready, it must be carefully processed so as not to be damaged by sharp edges during operation. For this purpose, you can use an electric jigsaw with a special attachment or medium-grit sandpaper. Try to process the plywood as carefully as possible, since this may not be possible later. In addition, it is much easier to apply paint and glue small parts to a smooth surface. And if you want to cover the layout with a water-repellent coating, then sanding the sheet of plywood is a must.
Working with landscape
The next stage of making a model railway with your own hands from plywood is working on the landscape. This stage can be called the most difficult, since the quality of the future design depends on its correct implementation. If you cannot implement your idea the first time, then do not despair. You can throw away the plywood sheet at any time and buy another one. Luckily they are quite inexpensive.

A variety of methods can be used to work on the landscape. For example, mountains can be made from ordinary construction foam by releasing it from a can in the required quantity. If you intend that a tunnel will pass through such a natural element, then you should take this into account in advance by placing a plastic or cardboard pipe on the model. Once you use the foam, you won't even need to take it out. Let it lie inside the mountains, and the seams can be disguised with almost anything.
Another indispensable material for landscape work is gypsum or construction putty. Unlike foam, such material is much easier to modify to the desired shape, but it is most often used as a decorative element rather than the main one. Firstly, gypsum weighs quite a lot, so you shouldn’t make large objects out of it. Secondly, over time, the putty may crack, especially if a water-repellent mixture is not used during construction. In general, there are a huge number of options for working on the landscape, so you should approach their choice wisely.
Sanding and painting work
The next stage of building a model railway with your own hands is sanding and painting work. If you used wood for construction, then you can eliminate all unevenness using regular sandpaper. The easiest way to trim dried construction foam is with putty, applying it to all uneven areas. After this, the mountains will become quite smooth. If you're not happy with this, don't be afraid to chip off a couple of pieces of putty to give the natural formation a more natural look.

As soon as the landscape takes the desired shape, we open several cans of acrylic paints, pick up brushes and begin to create. It is best to have before your eyes an image of real mountains with vegetation in order to better understand which colors from the palette should be used first. Don't be afraid to apply several layers of paint, as this will only give the future composition a natural look. For example, you can paint the stones gray, then add a little white paint on top, thereby depicting snow on the top.
Laying the railway
We are still making a model of the railway with our own hands and are gradually approaching the longest stage of construction - laying the railway track. As a rule, most craftsmen prefer to purchase ready-made material in toy stores, since making a railroad with your own hands can take an unrealistically long time. In addition, plastic parts are quite cheap and you won’t mind breaking them if used carelessly. This is especially true for those people who have children in their family.

The railway is attached to the model using ordinary construction glue. You should not use too long parts during work, as this can give the road an unnatural straightness. It is best to make it have more turns and elevations. Remember not to use too much glue to attach parts to the surface. Also on any tube you will find information that for good fixation, a huge role is played by the force of pressing the part to the surface, and not by a long time of pressing.
Creation of scenery
Once the main element of our layout is done, we can begin creating various decorative elements. You can purchase such parts in toy stores or make them yourself from building materials if you have a talent for this. For example, on some layouts you can see ordinary medical cotton wool, which plays the role of snow, although most professional designers still prefer to use a special mixture, which is sold in small cans in Christmas stores.

The same applies to the remaining elements of the composition. You can make your own lanterns for a railroad model from ordinary plasticine or buy ready-made decorations in a store. By the way, if you are planning to make a model for Christmas, then it would be a very good idea to replace the standard street lighting with New Year's garlands, but such a solution should be foreseen in advance by cutting several dozen holes in the plywood for the light bulbs - this way the wires will be at the bottom, attached with electrical tape.
Video and conclusion
We hope you now have a better understanding of what it takes to make a mini-model railroad with your own hands. If the information from our article seemed not enough to you, or you still have some questions, then we recommend watching a short video in which a master demonstrates the entire process of making a landscape with his own hands. Such video material will be useful both for a novice designer and for a true master of his craft. If you watch it in its entirety, you will certainly learn how to make beautiful mountains and other natural objects using scrap materials.

Most modelers who are keen on copying railway equipment have to deal with kits produced by Pico (GDR). They are all good, but the total length of the paths that can be assembled from one set can only satisfy at first. What to do if you get a taste for it and decide to take up railway model making seriously? Buy more and more sets to take only pieces of canvas from them? Far from the most rational way.
It will be much better if you approach the problem like a true modeler and take on the matter yourself. We recommend using the original method of making tracks, proposed and successfully tested by A. Kerget from Kaliningrad.
For the manufacture of rails, a ready-made copper busbar with a cross-section of 2X3 mm is best suited. This “wire” is widely used for stator windings of electric motors and for power transformers. Having cut the bus to the required length, remove the insulation from it. To do this, the conductor is placed on the anvil and gently tapped on all sides with gentle blows of a light hammer. Now it is enough to scrape the corners with a sharp knife to clean the workpiece.
The next step, leveling, is done using a heavier hammer on the same anvil. The main thing here is not to flatten the wire. Final alignment is done manually.
Sleepers are 4X30 mm strips of foil fiberglass laminate. It is enough just to remove burrs from the workpieces and clean the edges.


Now it’s time to assemble the canvas. If the railway is intended to be non-stationary, then it is better to use sections 500 or 1000 mm long. For a half-meter track, you will need 60 fiberglass strips (the sleeper installation pitch is 8.0 mm). To accurately reproduce the track dimensions, you will have to cut an auxiliary calibration block from hard wood or metal. Having wound the rail blanks to the block (the distance between the individual windings is equal to the pitch between the rails), we successively press the sleeper blanks with the foil up, moisten the seams with flux and solder them. It is best to use a 65 W soldering iron, radio solder and flux composed of 1 part rosin and 3 parts industrial alcohol. Soldering must be done quickly so that the thin foil does not peel off from the textolite base. All that remains is to wash off the remaining flux - the section of the path will be ready. Check the straightness of the rails again. It is completely pointless to edit them as assembled, and in case of failure it is easier to reassemble them. To insulate the current-carrying wire bars, the foil on the sleepers is cut in the middle along the sheet.
Contact connections of joints. The tenon part is formed by filing the rails, and before making the contact socket you will first have to unsolder the two outer sleepers. Having measured 8 mm from the nearest of the remaining sleepers, the rail is cut off, the remaining section is sawn down to a section of 1.0X2.5 mm. We bend a groove from tinned tin from cans (on a mandrel made of two compressed hacksaw blades). The outer dimensions of the groove, bent from an 8X18 mm blank, must exactly repeat the cross-section of the main rail. Then we mount it on a shortened conductor and solder it together with one removed sleeper. The second can be soldered only after the free section of the groove is pressed from below in accordance with the mating tenon part of the contact connection.
If you and your child are planning to make a toy with your own hands, then try building your own railroad. Children love toys with many details. A railroad set together with an adult can become a favorite toy. To make it you will need very few items that can be found in any home. And in the end you will get a unique and bright thing that will delight your child and remind you of the time spent with you. If you don't know how to make a railroad yourself, but want to try, then it's time to learn.
Tools and materials
- Sheets of thick cardboard
- Ruler
- Simple pencil
- Paper scissors
- Stationery knife
- PVA glue
- Acrylic paints
Step-by-step instruction
There are several ways to make a toy railroad, but it’s best to start with the simplest one.
- Determine the approximate size of the future railway. The length of the rails will depend on it. The rails need to be cut out of thick cardboard. You can use boxes from shoes, furniture or equipment. Lay a sheet of cardboard on the floor and draw stripes of the selected length on it. Surely, your railway will have bends, so you will need not only straight, but also curved strips for turns. Thus, you can make a ring road, which is much more interesting to play with.
- Paint the future rails with gray paint, as it looks most like metal. Choose acrylic paints, as they do not wash off the surface of the paper.
- Prepare the sleepers. To do this, you need to cut a sufficient number of small strips of cardboard. At both ends of the sleepers you need to mark the points where the rails will be laid. It is best to coat the sleepers with brown or red paint, since they are made of wood.
- Place the painted rail blanks in the correct order and turn them over with the bottom side up. On this side you need to glue the prepared sleepers at the same distance from each other.
- Now it's time to move on to making the train. For carriages and locomotives, it is most convenient to use small cardboard juice or milk boxes. If there are no such boxes, then you can glue them together from pieces of cardboard yourself. For the locomotive you will need two boxes, which need to be glued together so that one box is located vertically and the other horizontally.
- The locomotive and carriages are usually painted the same color, but you can use any colors or designs you like. After the paint has dried, don't forget to paint the windows.
- Painted wheels need to be glued to the cars, and the cars themselves need to be connected to each other with strips of cardboard. The train is now ready to be placed on the railway.
- To make the toy even more interesting, make a station or several stations out of a cardboard box. They can be painted realistically. From leftover cardboard you can cut out silhouettes of people, trees, houses, roadside posts and color them with felt-tip pens and paints.
How to distribute roles
Now you know how to make a railway with your child. Let him actively participate in the process. The child can be trusted to color the parts and glue the parts of the railway together. And it is better to do all operations with scissors and a stationery knife yourself so that the child does not cut himself. If you want to trust your child to cut out some of the pieces, give him or her scissors with rounded ends that are designed for small children.