Homemade drills for poles. Hand drill for poles: making it yourself. Method of fastening knives
(Last Updated On: 10/03/2017)
Drill on homestead farms and on construction site always in demand, because it allows you to make smooth and deep holes for installing fences, formwork, etc. At the same time, it is not at all necessary to buy a drill in a store, paying a lot of money for it; you can make a drill for poles with your own hands, saving money and practicing your engineering ingenuity. The pole drill has a very simple configuration, so self-production should not cause any serious difficulties.
Do-it-yourself pole drill - necessary elements
In order to start making a homemade drill, you must first learn which components it consists. The design of the drill includes the following elements:
- cutter - the main working tool of the drill, responsible for drilling a hole;
- rod - a metal composite structure that grows as the drill is immersed in the ground;
- handle for rotating the drill.
- welding machine– a simple household appliance will be quite sufficient;
- lathe - here it is better to find a familiar mechanic who can quickly and efficiently process the workpiece;
- motor with emery for grinding parts;
- powerful electric drill with a set of drills for working with metal;
- Sheet steel;
- steel bar;
- a piece of pipe for making a storage tank.
To make a drill for poles with your own hands, you can do without a drawing. You can sketch out a drill diagram and make it by eye.
We make a drill for poles with our own hands step by step
The first thing you need to do is cut steel sheet. Circles are cut from it various diameters, which will be used to make cutters. Different diameter needed to make the drill more versatile. Workpieces should be cut so that their diameter is 5 mm larger required size holes. Then all the workpieces need to be drilled in the center. The hole should be slightly larger in diameter than the rod that will run through the center.
Now you need to contact a specialist working at lathe– steel bushings with perforation in the center, in which threads are cut, are required. It is not recommended to make these bushings yourself using improvised tools - they are necessary for attaching the cutting elements to the central rod, so the performance and reliability of the drill will largely depend on their strength.
Now we turn the round blanks into spiral-shaped ones. To do this, you need to cut a small segment in the workpiece, then secure the ends in a vice and stretch them to the sides. Due to stretching, the workpiece will stretch into a spiral. You should not be too zealous - firstly, the overstretched workpiece becomes too thin, and secondly, the metal loses its strength. After stretching, you need to sharpen the outer edge of the resulting spiral so that it cuts the ground easier and more efficiently.
Now we prepare the rod for attaching the cutters. To do this, shallow (about 3 mm) cuts are made on the rod at a distance of approximately 8 cm from the edge using sandpaper. You also need to sharpen the end of the rod so that it fits better into the ground, and cut a shallow spiral on it. And to make it easier to work with dense soil, you can weld a metal drill to the end of the rod - this will be an effective and reliable solution.
The drill rod can be made from pipe sections, providing for the possibility of fastening them together. You need to attach a handle to the last segment to rotate the drill. After completing all the procedures, you should paint the drill with a special paint that will protect the post drill from corrosion.
Absolutely the owner land plot at least once I was faced with the need to dig holes for posts and various supports for decoration appearance plot. It happens that you need to make a narrow hole in a not quite convenient location. It will be difficult to handle with a simple shovel, and you will have to borrow a manual pole drill from your friends or even call a specialist who can deftly handle the tool.
Hand drill design
 The garden auger is very useful device for any summer resident. It is very compact, convenient and easy to use. As a rule, it is made of solid metal. It effortlessly splits small stones and plant rhizomes into pieces.
With the help of such a device, you can easily dig a hole by rotating it around its axis like a corkscrew.
The main purpose of the drill is to dig holes for posts. Small wells are made by the cutting part of the device, which can be of various shapes:
- Two-blade;
- In the form of half-discs;
- Helical;
- Screw-shaped;
- Multi-tiered;
- Solid or removable.
 There are models that start with small blades and their top portion is gradually increased to large sizes. A factory drill is not functional and effective in all situations, because the tool simply will not be able to penetrate the soil to the required depth, or its attachments will not be of the required diameter.
Although the cost of a factory drill for poles is relatively affordable, it is quite possible to make useful tool independently, and at the same time he will answer everyone necessary requirements. The technology for making a drill with your own hands is very simple, and its cost will be much cheaper than a factory one. You just need to decide on the parameters of the product.
Let's look at a few various designs, which are responsible for the efficiency and functionality of the drill:

Materials and tools
In order to make a hand drill for poles, as a rule, you do not need much effort. But the craftsman needs materials and components to create the product.
List of required parts:
- Nut and bolt M20;
- Disks with a diameter of 100−150 mm - 2 pieces;
- Drill with tip (20 mm in diameter);
- Metal pipe sections: two 500 mm and one 400 mm. The wall thickness should be 3.5 mm, outside diameter- 40 mm.
 The wall thickness of the metal pipe must be exactly this in order to ready product it was durable and could work with any, even fairly hard, soil. The discs can be taken from a circular saw or you can make them yourself. For homemade disks You will need sheets of metal with a thickness of at least 3 mm.
From tools when creating a product you will need:
- Bulgarian;
- hammer;
- welding machine;
- drill;
- metal drills;
- blade sharpener.
If you do not have a tip with a drill, you can replace it with a drill with a cone-shaped shank. Its diameter must match the screw. In order to avoid injury, it is recommended to use soft bicycle handles.
Step-by-step production of a drill
 On metal sheet draw a circle, marking the center. This will be the blade. Next, this circle needs to be cut out using a grinder, and then a cut line must be drawn that runs along the diameter line. Then we draw a cutting line, which should correspond to the circumference of the collar. The resulting disk must be divided into two parts and holes for the knobs must be cut.
At the end of the pipe, which will act as a wrench, we use a grinder to cut four longitudinal lines, 3-4 cm in length. After this, you need to form a tip from them using a hammer, while you need to collect the cuts at the very center of the pipe. The resulting tip must be processed by welding and ensure that the knob does not become clogged with soil during operation.
 The next step is to connect the knob to the disk by welding. This is done at a distance of 5 cm between them and at an angle to the plane of rotation of 20 degrees.
Next we proceed to the extension pipe, which should be equipped with a handle. This part must be welded in the letter “T” and be sure to weld the amplifiers to it in the form of a “kerchief”. The workpiece is threaded through the knob, and a hole is made through it so that the parts can be fastened with a pin. Several such holes need to be made in order to be able to adjust the length of the product.
The work ends with sharpening the blades. The edge of the cutter must be processed in such a way that when rotating, the tip of the blade is directed downward.
Protective covering
 To avoid rust on the parts of a homemade pole drill, you need to thoroughly clean them sandpaper and treat with a primer and phosphating solution. After this treatment, the finished product can be painted.
When using the device, you need to disassemble it after each use and clean all connections from dust and dirt, and also coat them with a special lubricant that repels water. Don't miss this moment, because proper care behind the tool will be a good prevention of bolt jamming and will allow it to work smoothly for a very long time.
Ways to improve the tool
 When drilling holes, the master may encounter big amount rhizomes of plants that lie tightly in the soil. The sharp edges of the blades will make working with the drill much easier. For ease of use, you can cut several teeth on the sloping area of the blade or round off its cutting area.
The design can be improved and removable drill bits. Thanks to them, it will be possible to drill holes of any diameter. In addition to the manufacture of spare parts, it is necessary to provide for their attachment to the collar. The easiest way is to connect them with two iron plates, which are secured by welding.
In the mounting plates, as well as in the blades, you need to drill two holes for the sides. The cutters are fastened with M6 bolts. To ensure that the bolts do not interfere with work, they must be screwed in with the threads facing up.
 There is another way to improve homemade drill for pillars. You can increase the efficiency of the lower end of the knob. To do this, you need to cut out a narrow metal plate (10x2 cm) and grind it into a cone shape using a grinder, making a kind of point.
There is no need to make cuts in the collar; turned metal plates are inserted into its end, fixed by welding and flattened. The result should be a peak.
There is another method for making a pike. A metal plate is cut to a length of about 17 cm and a screw is made from it, similar to a corkscrew. Further, the algorithm of actions is the same as in the described first option.
 Can act as a screw suitable drill, which can easily handle wood as well as metal. Such a tool will penetrate the ground much easier and will drill a hole to the required depth without any problems.
Builders who work on dense deep layers of soil will need one piece of advice. You need to weld a flat cutter between the pick and the cutter small size . Thanks to this design, it will be possible to loosen the earth and center it when drilling. For such a part you will need 2 metal plates 3x8 cm. This trick will significantly speed up working with the tool.
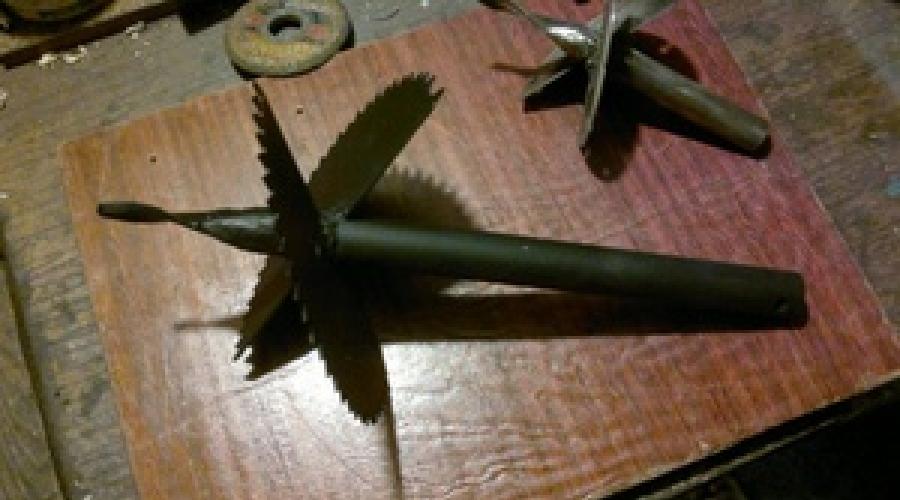
Milling cutters can also be made from grinder discs, which are designed for working with stone. The circles need to be cut along the radius and the hole in the center should be expanded according to the diameter of the knob. Bending the disk with the sides apart gives the appearance of a corkscrew or auger. All that remains is to weld the part in the manner described above.
 It is very easy to make a cutter from a disk from circular saw. The teeth of this model can easily cope with plant rhizomes and hard soil.
The master can choose how to modernize his drill independently. It is worth saying that making a drill for poles with your own hands is not a complicated process at all and requires minimal physical and financial costs from the master. The entire manufacturing process takes two hours at most.
Finally there is one important advice : before the drilling process, it is best to loosen the soil with a shovel, then the device will fit into it more easily and the work will go much faster. The recommendations given will certainly help the master make a functional and effective tool, which will serve him for decades and become a very good assistant.
Digging holes under posts with a shovel with your own hands is a labor-intensive and time-consuming process. This may take more than one day if the decision is made to build a fence. The way out of this difficult situation is to do everything with the help of garden borer. The device is simple and does not require the use of energy, that is, it is clean hand tool. It's easy to work with, no big effort required. As practice shows, in 15 minutes you can dig a hole in the ground with a diameter of 20 cm and a depth of one meter. That is, in just a couple of hours you can completely prepare places for installing poles.
Today manufacturers garden tools offer enough a wide range of hand drills. They cost differently, but if the work they do is one-time, then maybe it’s worth making it yourself. How difficult is this creative process? Basically, for anyone home handyman who is comfortable with simple plumbing tools and can handle electric welding, this task quite doable. Let's look at how you can make a garden hand drill from scrap materials.
Required materials and tools
What materials will be required for this:
- Metal pipe with a diameter of 20-25 mm.
- Strip 3-5 mm thick.
- A metal sheet 3-4 mm or a disk from a circular saw, you can use a cutter.
- Bolts with M6 nuts, if a drill with removable knives will be manufactured.

Tools:
- Welding machine complete with electrodes;
- Hammer;
- Hacksaw or grinder;
- Roulette.
Attention! Pay attention to the internal diameter of the cutter; it should be slightly larger than the external diameter of the pipe by approximately 5-7 mm.
Manufacturing process
First of all, the length is determined hand drill for pillars. Approximately, you can take it within 1.5 m. Therefore, a piece of this size is cut from the pipe. Pruning is done with a grinder.

Very important element- this is the tip of the drill. It serves as a guiding element. But if you come to the issue of ease of drilling soil (especially hard), then it’s worth making a small drill from the tip. Therefore, it is better to make the element itself from a metal strip 5 mm thick. How to do it right.
- A 10 cm long piece is cut from a strip 5 mm thick and 20 mm wide.
- One end of it is sharpened into a cone. This can be done with a grinder by putting an emery disc on it.
- The other end is ground on both sides so that it can easily fit into the pipe. Turning length - 5 cm.
- The tip is inserted into the pipe and electrically welded on all sides.
- You can change the design of the tip (improve it) by making a small drill out of it. To do this, you will have to heat the device and shape it into a screw, something like a corkscrew.
It is the corkscrew design that will help increase the element’s ability to bite into hard soil. Here it is important to accurately establish the direction of twist. It should coincide with the angle of inclination of the main drill knives. Typically, the tool is twisted clockwise, which means that the sharp edge should be located on the right side.

There is another option for making a drill tip with your own hands. To do this, you will have to cut the end of the pipe longitudinally to a depth of 3-5 cm. This is done with a grinder. There should be four or five cuts, with the same distance (or approximately the same) left between them. Now, using a hammer, you need to adjust the edges of the cuts to the center of the pipe diameter. After that, the joints of the cut strips are scalded with electrodes, and the end of the device is sharpened with a grinder.
Now you can proceed to installing the main knives. You can make them yourself from various cutting working tools. The cutters and disks from the circular saw were listed above. Basically, this list is longer. If cutting discs were not found, then knives can be made from sheet steel 3-4 mm thick. You simply cut a circle out of a sheet of the required diameter; by the way, this can be done with a grinder or electric welding. Then a hole is made in it with a diameter slightly larger than the diameter of the pipe. And after that the steel circle is cut into two even halves.

You can first cut the circle in half, and then cut semicircles on the two halves for the pipe. The important thing here is to finish the process by sanding down all the raw edges. The outer edges of the half-discs are sharpened to a certain sharpness. After which both knives are welded to the pipe. There are a couple of recommendations here:
- The distance from the place where the tip is welded to the place where the knives are installed is 10-15 cm.
- The knives themselves are installed one above the other, the distance between them is 5 cm, the installation angle is approximately 20°.
- The discs must be welded so that their working edge is directed downwards, that is, when drilling, the drill should easily crash into the ground.

All that remains is to weld a small piece of pipe perpendicular to the drill pipe. This will be the handle. Its length is 50 cm, but here everyone chooses it for themselves. To prevent the effort of human hands from breaking the weld between two pipes, it is necessary to weld gussets cut from a metal sheet on both sides.
The design of the drill can be modified, or rather, improved. Sometimes it becomes necessary to dig holes for posts longer than 1.5 m. Therefore, it is recommended to add a couple of additional pipes to the tool, which will increase the length of the tool itself. How to make these elements correctly.
- Firstly: it is necessary to modify the drill handle, making it removable. Therefore, it is not welded tightly, but made in the shape of the letter “T”. In this case, the section of pipe that will be inserted into the drill barrel must have a diameter less than the diameter of the barrel. And at the same time, the handle should fit into the barrel unhindered, but not so much as to reduce the strength characteristics of the tool itself.
- Secondly: you need to make two through holes in the handle barrel, located perpendicular to each other. The distance between them is 5-6 cm.
- Thirdly: exactly the same holes with a diameter of 7 mm must be made on the drill barrel at the entry point of the handle. It turns out that both elements will be connected with two M6 bolts.
- Fourth: several pipes 1.5 m long are prepared, corresponding to the diameter of the handle barrel, in which the same holes are drilled at both ends. Locations are the same as on the handle barrel.

To lengthen a hand drill two or three times, you need to unscrew the fastening bolts, remove the handle, insert the pipe into the pipe, secure them with bolts, install a handle on the free end of the extended drill, attaching it with two bolts.
As for the diameter of the holes for the posts, this can also be changed if the knives are made removable. To do this, at the place where the knives are installed, it is necessary to weld two shelves cut from a strip 5 mm thick. You can make the shelf in the form of a circle with an internal hole for the tool pipe. A circle with a diameter of 8-10 cm is cut out of a sheet of iron, a hole is made in it for the pipe, and this element is installed and welded to the trunk. You must first make four through holes in it, two on each side. Removable knives will be attached to them.

Attention! Removable knives are fastened with M6 bolts. Installation of bolts should be done with the thread upward towards the handle. They simply in this position will not interfere with the process of drilling the soil.
You can increase the efficiency of the drill if you install between the knives and the tip additional element. This is, in fact, a flat cutter that will loosen the soil before inserting the knives and center the drill itself. A small addition will make it possible to increase the drilling speed, especially in hard soils, and in places where there is in the ground a large number of plant roots.

It’s not difficult to make such a flat cutter with your own hands. To do this, you will need a plate 4-5 mm thick and 30 mm wide. Two pieces of 80 mm length are cut out of it. They are welded opposite each other to the drill barrel. The right edge of the additional knives becomes sharper. To prevent heavy loads from breaking the flat cutter, you can add two metal gussets to their fastening.
In principle, this is how you can make a hand drill with your own hands for digging holes for pillars. Let's face it, it won't take very long to make this tool, about two hours, no more.
Installing a pole is not like that simple task, especially dig a recess under it. A pit is needed in various construction work ah, such as arranging a foundation or a fence. You can’t do it with an ordinary shovel, so they use a special tool - a drill (pit drill, earth drill, etc.). A post drill, like any other tool, has its own characteristics.
A hand drill will help you make a hole of the required size
Types of drills
A drill is a type of construction equipment whose function is to make a hole the right size. It is used in different areas. For example, in the construction of bridges and fences, for gardening work(when planting trees and other vegetation).
Drills can be divided into several main types, which differ in size, purpose and power.
They can be divided into:
- Hand drills. They are often used in everyday life by both beginners and advanced summer residents.
- Designs with automatic drive. Modernized hand drills. A motor is installed on them.
- Mounted. These are the same mechanized drills, only with the possibility of installation on special agricultural equipment (tractors, walk-behind tractors, etc.).
The first ones have the weakest design and purpose. They drill holes of small diameter and depth. Without the effort of the worker, such a tool is useless. But its advantage lies in its compactness, since it is small and light. It is quite convenient to transport it. With this tool you can easily make a hole for a fence or seedlings.
In this video we will look at how to make a hand drill:
It consists of a rod and a T-shaped handle on top of the structure. There is a metal tip at the bottom that performs the function of centering the tool. A little higher is the drilling mechanism itself, designed in a spiral shape. Often consists of 2-3 rows of metal round cutters. As an alternative, use a saw blade as the cutting part.
As a rule, such a tool can make a hole up to 2 meters with a diameter of up to 30 cm. The drill is made collapsible for more convenient transportation. The metal pipe is made of two parts (collapsible). The blades are also often made removable with bolts.
Power drills are made with a drive system. The design is more complex, but most summer residents can make such a manual drill for poles on their own. The drill also has metal pipe with handle, tip and cutting part. But an additional motor with a gearbox and drive part is installed. The screw (cutting) part moves due to rotational movements, transmitted through gears from a gearbox with a motor.
This design is more powerful, but its strength depends directly on the performance and strength of the motor. The hole can be made deeper, up to 3 meters.
Mounted drills are designed to perform more difficult work. The width and length of the holes are much larger. They are often used for the construction of bridges, train stations and other industrial purposes. With their help, you can make sheet piling fences for pits and trenches. Thanks to attachments, the cost of construction work is significantly reduced, as they have greater productivity and power.
Nuances of choosing a model
Today there are a huge number of purchased models, and often make right choice pretty hard.
When purchasing, first of all, you need to pay attention to specifications, namely:
- maximum pit depth;
- drilling width;
- work productivity (drilling speed and number of holes over a certain period);
- drill power.
When renting, it is also necessary to take into account the cost of delivering the drill to Right place. Before buying a rotator for the ground, you should pay attention Special attention knives. They need to be very sharp and preferably self-sharpening. They must be made of high-quality metal, as they will break stones, soil, cut grass, etc.
Caring for the bracelet
First you need to understand the main rule - to use the tool exclusively for its intended purpose. You can make a hole only when you are sure that the drill is intended for a certain type of soil. If he is unable to work on such ground, he will most likely break on the first try.
You need to carefully read the instructions and technical specifications and not demand more from the tool than it is capable of performing. It is also necessary to study technical features work. For example, with a hand-held hole drill you can make no more than 35 holes per day.
When working, the additionally installed tripod system greatly helps. It fixes the drill and makes it easier to pull it off the ground. And a special lever will help you get it out. It is clamped, and the drill is turned counterclockwise and removed. For long-lasting operation, it is recommended to lubricate the drill with anti-corrosion substances, and also paint it to secure the result.
Preparation for drilling
Fence holes will begin to be made only after the necessary preparatory work Location on. At the same time, you need to make the appropriate markings. Separately on the site you need to make wells for supports for gates and gates, if this is provided for by the layout of the building.
To install fence supports, they must be lowered to the appropriate depth. Not everyone knows what it should be. As a result, incorrectly installed supports cause the fence to fall over time, or their shape becomes deformed.
Make your own hand drill
You can do this job correctly with a few tips:
- To install the pole, you need to drill a well. Its diameter should be slightly larger than the diameter of the pillar. In this case, there is no need to make excessively wide holes, as they greatly loosen the soil. And when you make the width of the pit the same as the width of the support, then it will not be possible to mount it in this way.
- The number of holes required for the fence can be calculated without any problems. To do this, the perimeter of the fence should be divided into the number of sections. Add to the resulting number two more holes for the gate and two for the wicket.
- The depth of the holes must correspond to the weight, length and width of the pile. It is also necessary to pay attention to the type of soil, The groundwater. If the soil is unstable, then the depth of the holes should be at least 1.2-1.5 meters.
The depth of the hole should be greater than the possible depth of soil freezing in severe frosts. If the soil is dense, then the hole can be made up to 1 meter. In this case, the support itself must be at least 1/3 in the ground. This way the fence will be very strong and reliable.
Required Tools
Not everyone can make a well, and this work is not easy. Each hole must be the same diameter and depth, which usually takes a lot of time. Great importance has a choice the right tool. You can make such a well using various equipment: a specially converted shovel, a hand drill, an automated drill or a mounted installation.
Pros and cons of a shovel
A shovel is the cheapest tool, but its effectiveness is low. Dig deep hole With such equipment it will not work, just as it will not work either narrow or too wide. In addition, the diameter of the holes will always be slightly different. But if the fence is planned to be made of brick, then a shovel will ideal option. If the tool is damaged, it can easily be replaced with another one, since the cost is low.
Advantages and disadvantages of a garden auger
Such equipment is quite popular, although every household does not have it. In most cases, it is used for digging holes for planting vegetation and for other needs in the country. It is relatively heavy when compared to a shovel, but the quality of the work is much higher.
Its design includes three parts: auger, drill handle and metal rod. A tip is also attached to the bottom of the metal rod, which performs the function of centering the drill. The diameter of the cutting part is about 15-20 cm, weight is 10-15 kg.
If you buy such a tool, you need to pay attention to whether it is sharpened accordingly. If not, then it needs to be sharpened before work. For this, it is better to use a grinder, but you can also do it with a hand file, although this is ineffective.
The tool can be used not only for making holes for fences. Often also used for planting trees, making holes for foundation piles and other work. You don't need any special skills to use it, so anyone can do it. In addition, it serves garden auger enough long time at correct operation and prevention.
Autodrill with drive
Making holes with a motor drill is very fast, but the method is quite expensive. The design consists of a drive (motor, gearbox, gear system) and an auger drill attached to it. Purchased options run on gasoline diesel fuel or electricity. This depends on the device manufacturer.
With the help of such equipment, you can drill holes up to 3 meters deep and do it in a matter of minutes. But along with its advantages, an automatic drill also has its disadvantages:
- loud noise during operation;
- if the motor is electric, you need to constantly be close to the outlet;
- Buying gasoline to run the engine will not be cheap.
To build a fence, you need to make holes to a depth of at least 80 cm. And if you multiply it by the number of pillars, the figure turns out to be quite large. A hand drill will take a long time to complete the job. Another thing is a motor drill with an automatic drive.
For drilling more deep holes will be needed attachments, which is installed on cars. Often they make holes for artesian wells. They are not used for fence purposes.
Effective work
In order for drilling to be effective, you should remember some nuances. For example, you need to make a large number of holes for a fence, but you need to save money. In this case, it is better to choose a garden auger, but with a well-sharpened cutting part. The tip and side edges also need sharpening. Only after this can you proceed to work. In a pre-marked place, the drill is placed in vertical position, after this, holes are drilled for the fence posts.
When there is a lot of clay and sand in the ground, then after a few turns it will be difficult to drill. To solve the problem, you need to pull out the drill and pour a bucket of water into it. After 15 minutes, you can continue drilling the hole under the pillars. Then the work will be much easier to do. If the drill is stuck in the hole, it must be loosened from side to side and then pulled out. It will be easier to do this. There may be a lot of soil on the auger. You need to remove it with a knife, then add more water and continue drilling.
The choice of purchased inventory is very important point for successful hole making. The quality of the work performed, its speed and practicality will depend on the characteristics of the tool.
To do this, you need to listen to some recommendations:
- When purchasing, first of all you need to pay attention to the spiral. It must be sharpened.
- The flat spiral is suitable for drilling small holes.
- Hand drills for wells, poles, and fences should be selected carefully. You need to pay attention to the speed of work. It must be optimal.
- If you need to do more serious work, then it is better to buy an auger drill.
- Having a container for collecting soil makes the work much easier.
Drilling a hole is a rather complex process. For this it is better to use automated designs. But if the budget is limited, then purchasing a hand drill will be simply necessary. Besides small fence can be done with such equipment.

Construction of a full-fledged columnar foundation– the work is complex and requires experience and professional tools. To drill wells, you can use special equipment or make a drill yourself. This is especially true for large volumes of construction.
Drill design
drill application technology
The drill is designed to form wells in the ground to the depth of installation of a columnar foundation. For this purpose, the design provides a cutting part, which can have different shape. It is important that during rotation the soil is excavated and accumulated in the receiver.
At the first stage, you need to choose the right configuration. There are several differences in the design that will subsequently determine the functionality of the drill:
- Baking powder. It can be in the form of two inclined planes or in the form of an auger - a spiral-shaped knife located on a rod.
- Availability of a soil receiver. It is designed to collect soil and remove it after filling. Convenient for forming wells large diameter from 35 cm.
- Plow for forming a lower expanded zone in the soil. This is necessary to strengthen the future columnar foundation. The element is required when constructing buildings with a large mass.
The manufacture of a drill should begin with drawing up a drawing. It directly depends on the design requirements.
Types of drills
One of the determining criteria is the shape of the cutting planes and their location on the rod. If the amount of work is relatively small and the diameter of the well does not exceed 20 cm, you can make an auger model.

This design is relatively simple to manufacture, and there is wide choose cutting part material. However, the features of its use should be taken into account:
- To remove soil, it is necessary to remove the drill from the well each time.
- It is not possible to form an extended area at the bottom of the foundation.
- When filling the auger planes with soil, great efforts will be required to remove the soil.
An alternative to this model is a device with replaceable blades. They are installed on special mounting platforms located at an angle relative to each other.

Replaceable knives
 This shape allows you to make wells of different diameters using the same drill. It should also be noted the minimal labor intensity of manufacturing and the possibility of installing new cutting parts to replace failed ones. The disadvantages of a product with replaceable blades are the same as those of the auger model - low performance and the possibility of drilling wells with a standardized diameter along the entire length.
A drill whose cutting part is made in the shape of a cylinder does not have these disadvantages. His Bottom part has two planes located at an angle. The soil is collected in a receptacle that has sufficient capacity.
A special feature is the mounted plow, which is designed to expand the diameter of the well at its base. It can be installed on all of the models described above, but it is for this particular plow that it is most effective.
Self-production
After selection optimal scheme Borax, you can proceed directly to its manufacture. For this you will need Consumables, welding machine and cutting tool- or a hacksaw for metal.

The simplest manufacturing option is a scheme with interchangeable blades. As their source material production, you can take metal discs of various diameters - from 160 to 350 mm. The size of the internal mounting hole must be different. This is the main advantage of replaceable blades.
For production you will need following materials:
- Barbell. It is made from a round or square pipe. They weld to it mounting plates for installing two halves of disks, as well as a platform for attaching the handle.
- Handle. Made from the same pipe as the bar. For connection, it is best to weld the flange onto the 4 mounting bolts.
- Disks. Their thickness must be at least 2.3 mm. This is necessary for structural rigidity. They are cut into two halves, in each of which mounting holes are made for attaching to the plates on the rod.
The angle between the planes of the disk halves should be 30°. This will ensure optimal cutting of the soil layer without much effort. If a structure with a plow is manufactured, it is recommended to order its cutting part separately or purchase a ready-made model.