Homemade product for finishing a plasterboard shelf. Making shelves from plasterboard is easy. How to make do-it-yourself plasterboard shelves (video) Do-it-yourself plasterboard shelf
For storing things and various decorative items there are different cabinets, special modules, chests of drawers, shelves and the like. That's what we'll talk about shelves in this article. Even a small family living in a house or apartment needs to place their belongings, dishes, interior items, and the like.
There are different storage modules for this, but there are always not enough of them. This problem can be solved by purchasing furniture for storage, but not everyone has enough space to place, for example, a wardrobe or chest of drawers. Therefore, many people decide to order furniture by custom sizes for their premises, but such a service is expensive.
A sheet of plasterboard can be from 2 to 4.5 meters long, and its width can be from 1.2 to 1.3 meters.
The thickness of the drywall should not exceed the permissible limit, and this limit ranges from 6 to 24 millimeters.
These characteristics allow you to select the required sheet size, which will be designed for different loads.
The design and functionality of the shelf in the future depends on the choice of drywall.
Installation of plasterboard shelves
We begin installation of the frame. For the construction of plasterboard shelves, a UD profile is used, it is not wide.
Due to the fact that the profile is not heavy, the resulting structures are not bulky and light.
First you need to measure the distance where the plasterboard shelf will be.
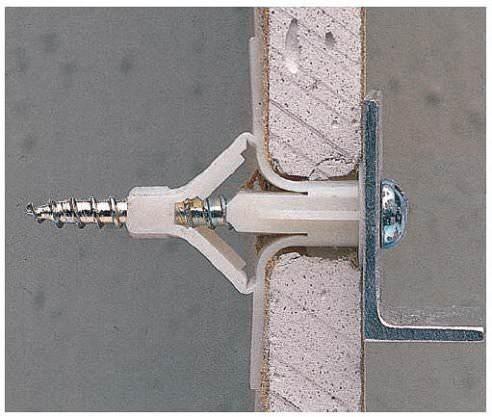
After you take the measurements, you need to attach the profile to the wall using a level. The profile is nailed using 6×40 metal dowels, and nylon dowels can also be used as fastening.
You need to remember that you need to strengthen the frame of the shelves so that the structure is strong and reliable.
After metal structure ready, then proceed to .
This work is considered not as difficult as installing metal profiles. Attach sheets of drywall to metal or nylon screws. The size of the screws is twenty-five millimeters.
Sheathing a metal frame is not difficult, but you should make sure that its sheets are not skewed, otherwise this can lead to fragility of the shelf. At all stages of the construction of shelves, it is necessary to compare all design parameters with the drawing, and to avoid distortions of the drywall sheets, it is necessary to use a level.
The also illuminated one is still an additional source of lighting. can have any light and any intensity, and it depends on your idea or the designer’s idea.
To install the lamps on the shelf, you will need the following tools:
- Crown round shape, for cutting holes;
The diameter of the crown depends on the size of the lamp. Determine the location for the lamp in advance.
 Installing the lamp is not difficult, but you will have to work hard with the wiring. If you do not have skills, then it is better to use the services of a professional.
You can also install an LED strip to illuminate the shelf, because it can be laid anywhere, even in hard to reach places. This strip illuminates the shelves evenly and can serve as a full-fledged lighting source.
LED strip has a wide range of colors and is energy-saving.
Finishing work
The final work on the construction of a plasterboard shelf is putty and further decoration.
Before  Once you start decorating the shelf, you need to fasten the shelves together with metal and plastic corners.
- The inner corners of the shelf are glued reinforced mesh to avoid cracks in the future.
- Then the shelf is puttied and the putty is applied in a number of layers.
- If the shelf will be painted a different color in the future, its surface must be sanded and then primed.
 You can see the options for finished shelves in the photographs on the Internet.
Over time, there are more and more things in the apartment, but the space does not increase. Great solution in this situation there will be shelves made of drywall.
Availability in the house niches or plasterboard shelves on the wall will help:
- make practical use of the available space in the house;
- avoid piling up furniture along the walls;
- significantly improve the design of any room - from the living room to the kitchen;
- equip niches or shelves with lighting, which will provide additional illumination inner space in the house;
- create both a functional and decorative element in the living room. On the shelves you can place both souvenirs and dishes or other things necessary for everyday life.
There will be a shelf the best solution than buying bulky furniture, and it will cost much less than ordering custom-made cabinets. Almost anyone can make shelves from plasterboard with their own hands. The main thing is to follow the installation technology - and your apartment will sparkle with new elements.
Drywall is a universal construction material, which is used for a wide variety of purposes: cladding walls and ceilings, constructing partitions, allows you to create built-in shelves, niches and cabinets, and various ceiling structures.
Such popularity of the material came due to its following qualities:
- ease of installation;
- a wide selection of both sheet options and thicknesses;
- allows you to make an unusual and original design;
- environmental friendliness;
- availability.
Drywall sheets
The advantages of drywall also include the fact that it can be finished in a wide variety of ways: paint, wallpaper, use decorative stucco or use artificial stone.
Thanks to this, plasterboard shelves will be able to have the most varied look and will fit perfectly into the design of the living room or any other room.
Design selection
Plasterboard shelves can have different designs:
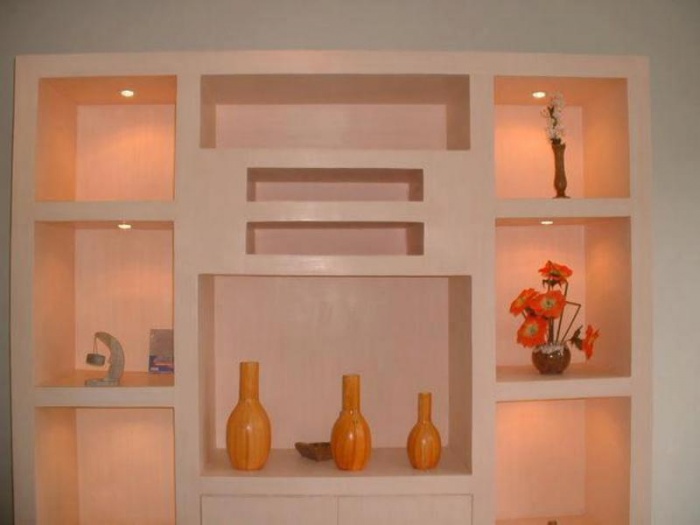
- open. They are most often used as decorative elements interior Great option for the living room;
- closed. They carry rather a functional load and are often installed in bedrooms or corridors. Usually they are made very roomy.
According to localization, plasterboard shelves can be:
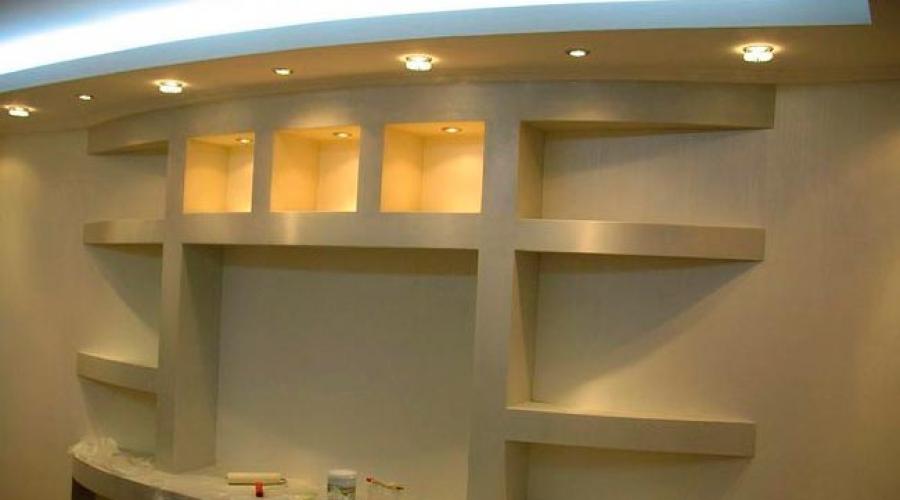
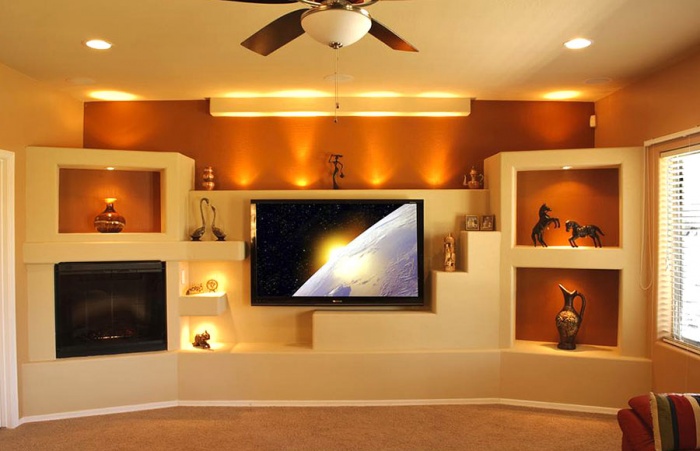
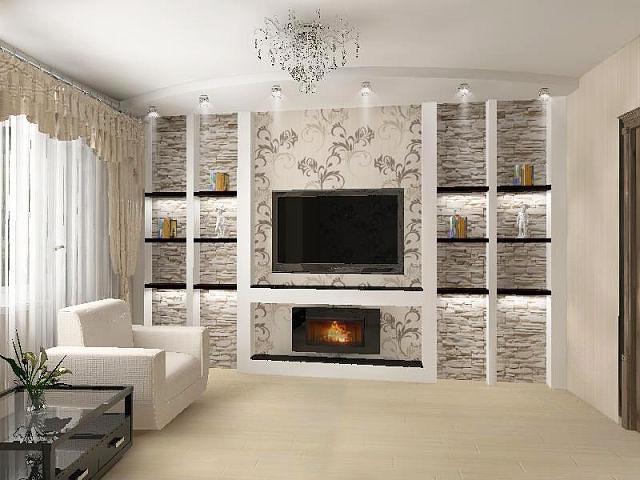
- centers. They are located in the center of the room. They often contain a whole ensemble of niches and shelves. They look very nice in the living room, since very often the central element of such a design is the TV;
- corner shelves made of plasterboard. They are used if the room is small in size. They can be decorative and functional.
In addition, you can make your own plasterboard shelves like this:
- with backlight. Depending on the size of the niches, built-in lamps can be either single or multiple. Built-in lamps can significantly improve the illumination of the living room or any other room;
Note! Can be used as a backlight not only Spotlights, but also LED strips along its perimeter. At creative approach you can create an indescribable play of light and colors.
- without backlight. They are no less common than illuminated niches. Their design and arrangement, for obvious reasons, are much simpler than those of illuminated shelves.
The design of a plasterboard shelf can also be:
- decorative. In such a situation, it will be light and will not have additional fastenings;
- functional. If you plan to place a significant load on a shelf or niche (installing a TV, dishes, etc.), then it should be strengthened additional elements frame.
When decorating a plasterboard shelf, you can use a wide variety of finishing methods, and also decorate the niche inside with mirrors. With lighting, you can make a unique shelf that will become a real highlight of the living room or bedroom. This will create a romantic and fairy-tale atmosphere in your home!
Creating a shelf project
Constructing a plasterboard shelf with your own hands requires creating a drawing future design. Remember, it is better to measure seven times and cut once. Therefore, everything needs to be taken into account at the stage of creating the diagram, so that when installing a niche, you can avoid unpleasant moments when something does not fit together.
A drawing of a plasterboard niche is created as follows:
- choice of shelf design. Here you should consider whether the shelf will have a partition, the number of elements, etc.;
- decide on the location of future installation in the room;
Note! The shelf should fit into the space of the room, be functional and practical. Therefore, when choosing its design and location, rely on the existing design in the room.
- draw the dimensions of the room to scale;
- indicate the location of the niche, as well as all its dimensions: depth, width and height;
- the diagram must necessarily reflect the partition of the niche;
- if the shelf will contain lighting, put it on the drawing in the places where it is planned.
 Shelf drawing
Note! The drawing should be made taking into account the thickness of the plasterboard sheets and metal frame.
Having created correct drawing, you will be able to evaluate the profitability of the chosen location, calculate the number required material, and also avoid various inconsistencies at the stage of fastening and mounting the frame. All this will allow you to make the perfect shelf, as intended.
In addition, the drawing can be transferred to whatman paper and attached to the place of further attachment to make sure that the design will be appropriate in the chosen location. Thus, plasterboard shelves will be an excellent addition to the design of your living room or bedroom.
Materials and tools
To create a plasterboard shelf you will need the following materials:
- guides and rack profiles;
- arched profile - if a curved niche design will be used;
- cross beams to strengthen the frame - if the shelf will bear a significant load;
- dowels and screws;
- plasterboard sheets. Their type should be selected based on the purpose of the room. Can be used in the living room and bedroom standard sheets, but in the kitchen, bath and toilet it is better to use moisture-resistant ones;
- materials for final finishing: primer, putty, mounting mesh.
Remember that to achieve the highest quality results, experts recommend using materials of the same brand. Today is the most the best manufacturer on construction market counts German company Knauf.
From the list construction tools you will need:
 Materials and tools
- hammer drill, screwdriver and electric planer;
- Bulgarian;
- building level and plumb lines;
- pencil and tape measure;
- hammer, pliers, drywall knife, metal scissors;
- spatula, brush and sandpaper.
This set of tools will help you quickly and efficiently make plasterboard shelves with your own hands.
Preparatory work
Before attaching a metal frame for a plasterboard niche, it is necessary to carry out a series of preparatory work which include the following procedures:
- remove all irregularities from the wall that may interfere with the smooth mounting of the metal guides;
- cover all holes and cracks in the starting wall to increase its strength;
- treat the walls with a deep penetration primer to prevent further crumbling of the plaster of the starting wall;
- transfer the drawing to the wall at the future location of the niche in the wall.
 Primer of walls
It should be noted that when finishing walls with plasterboard, it is recommended to simultaneously plan plasterboard shelves in order to do all the necessary preparatory work at once.
When all the preparation work work surface have been successfully completed, you can begin installing the frame.
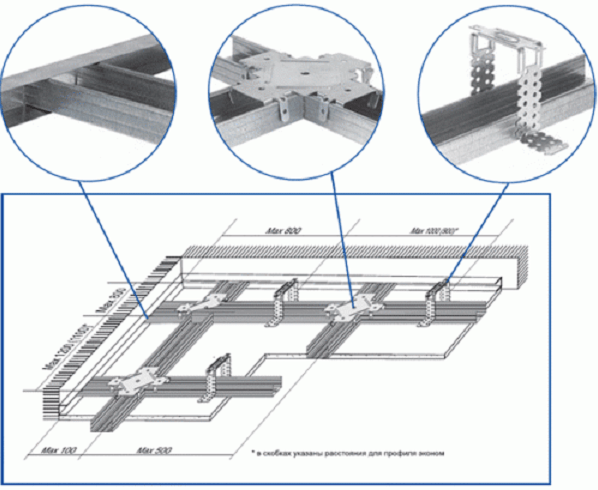
Installation of a metal frame
There are several ways to attach a frame for plasterboard niches:
- simultaneously with the construction of the frame for the walls;
- separate design.
The first method involves the following operations:
- install guides along the drawn lines of the diagram;
- we fix them with self-tapping screws;
- we install rack profiles and further fasten them with self-tapping screws;
- in the place of the proposed shelf we make a niche from guide profiles around the perimeter;
- We create the depth of the shelf using rack profiles.
 Ready frame shelves along with wall structure
Note! If a load is expected on such a shelf, then at this stage the structure should be strengthened. To do this, we attach additional hangers in the corners of the frame. Such a partition will be very strong and will not damage the shelf under high loads. This will make the frame more rigid and stable.
The second option involves mounting the shelf separately from the wall. To do this you will need to do the following:
- preparing the basis for the niche;
- the base is created from a guide profile;
- apply it to the drawn lines and secure with self-tapping screws;
Note! When marking and fastening profiles, be sure to use a level. Thanks to this, you will avoid distortion of the structure.
- Next, we attach the rack profiles with self-tapping screws. This creates the future partition. With its help, in the future it will be possible to divide the shelf into several sections;
- if necessary, special ones should also be used in the corners of the structure fastenings(jumpers) to stabilize it.
 Ready-made separate frame for a shelf
At this stage, with the planned illumination, we carry out electric wires for further connection.
Upon completion of the work you will receive a finished metal carcass either for one shelf or for an entire wall with a niche.
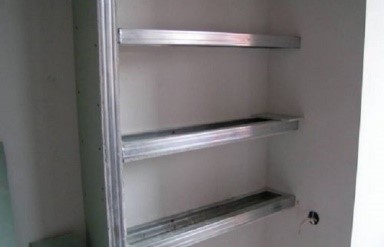
sewing the frame with plasterboard
Upon completion of installation of the frame, it should be sheathed with plasterboard sheets. To do this you must do the following:
- if the niche is built into the wall, then first we cover the entire wall with solid sheets, and only then we attach the pieces to form partitions;
- if the niche was mounted separately, then first cut the drywall into required size pieces;
- First we cover the outer walls of the shelf. To do this, place the pieces in Right place and if they fit perfectly, we fasten them with self-tapping screws. The partition can be sheathed either in one piece or in several;
Note! It is not important to use cut-up whole sheets for sheathing the shelves. The partition can also be sheathed with pieces that remain after finishing the walls or ceiling with plasterboard.
- Next, we fasten the inside of the niche;
- if there is lighting, then we cut out holes in the pieces for it and attach them with already inserted spotlights.
It would also be appropriate to mount it in inner part mirror shelves.
 Ready niche
Shelves are appropriate almost everywhere - both in spacious apartments and in apartments whose area is extremely small. And they are especially relevant in small areas, as they allow you to use the wall space to the maximum for storing things. Shelves on a plasterboard wall are one of the easiest and most aesthetic ways to create a new comfortable space.

Shelves made of plasterboard are appropriate in any room. They can be done:
- in the bedroom;
- in the living room;
- in the nursery;
- in the kitchen.
To place the shelves, do the following:
- on the wall;
- in a niche.
The most important advantage of DIY plasterboard shelves is that they can have a wide variety of shapes. Everything in this case depends solely on the general concept of the room and the imagination of the shelf creator.


Drywall is valuable precisely because a shelf from it can be made of any intricate shape, including radial semicircular designs and complex geometric figures. This allows you to create unusual exclusive interiors with your own hands.
Features of drywall
Why is it worth making your own shelves from plasterboard? The thing is that this material has many advantages, because it is one of those rare materials that, in terms of its hygienic qualities, is absolutely safe and ideal for finishing interior spaces with your own hands.


Advantages
Pros of drywall:
- does not contain toxic substances harmful to health, hypoallergenic;
- has soundproofing properties;
- fire resistant;
- non-flammable and fireproof;
- is able to breathe - absorb moisture or release it, which allows you to create comfortable climatic conditions in the room;
- easy to process - easy to cut;
- easy to install.
Flaws
Cons of drywall:
- the material does not withstand prolonged exposure to humidity and becomes deformed;
- requires careful installation, especially when it comes to complex geometric designs– careless execution can lead to deformation of the structure;
- the material does not like shocks and falls heavy objects and may be damaged.
Important: Plasterboard shelves require the use of special fasteners in order to increase their load capacity and stability. Inside structures, especially if they are shelves under household appliances and TV, it is worth placing a mortgage in the form of a sheet of plywood.
Plasterboard structures after assembly require decorative design. Drywall should not be left as is. Shelves and other products made from it must be painted. The seams between the sheets of drywall are masked carefully. To do this, the seams are taped and covered with putty, achieving the illusion of a single whole. If the putty work is done carelessly, the seams will be visible and the product will lose its aesthetic appearance.
Varieties


Drywall can be:
- waterproof;
- fire resistant.
Waterproof drywall contains substances that prevent mold and mildew from growing on it. From this plasterboard you can make your own shelves for the bathroom and loggia. Again, it must be taken into account that moisture resistant drywall If it gets exposed to water for a long time, it will get wet and become deformed. Therefore, the shelves should be out of reach of water. And they must be covered with moisture-resistant paint or ceramic tiles. The latter reliably protects the drywall from getting wet.
There is a particularly durable drywall - tongue-and-groove. It even has seismic resistance, so it can be used to make shelves of special strength for heavy equipment. However, such drywall is expensive and is not sold everywhere.
Preparation
In order to make a shelf on the wall, you will need tools and the most basic skills to work with them.
Tools and materials for work:
- jigsaw;
- screwdriver or drill;
- level;
- Bulgarian;
- hacksaw;
- roulette;
- hammer.

Materials you will need:
- self-tapping screws;
- metal profile;
- guide rails;
- reinforcing mesh;
- putty.
Before you start making a shelf, you need to decide on its sketch and develop a concept for its placement in the room.
After the sketch is done detailed drawing, where all sizes are shown in actual size. Based on the drawing made, the space for the shelves, which are to be made with your own hands, is measured. The necessary parts are also cut out.
Important: Before starting work, drywall must be stored correctly. Sheets of material must be kept flat on top of each other. This will prevent them from deforming. Deformed sheets will result in a shelf with flaws. In addition, it will not have the necessary strength.
Do it yourself (instructions)


The basis of any plasterboard shelf is the frame. Otherwise, the shelf will not be a supporting structure. Only the metal frame makes the shelf strong and stable. The frame is assembled from a metal profile with your own hands using self-tapping screws. The metal profile is cut with a grinder to a certain length, according to the dimensions of the future shelf.
Mark the locations of the shelves on the wall. After this, the assembled frame, which is an exact copy design of the shelf itself, fixed to the wall with self-tapping screws.
Important: if you need a particularly strong shelf, then you need to use thick plasterboard with a thickness of 18 mm or more. In this case, butterfly screws are used instead of self-tapping screws. Traverses and frames will also strengthen the structure.
To create volume on the shelf, guides are attached. These are slats in the longitudinal and transverse directions. If the shelf is expected to support a weight of 15 kg, then it is better to use additional floor supports or ceiling cables.

After this, you need to cover the frame with plasterboard. Sheathing begins with vertical parts. Drywall is fastened with self-tapping screws, trying to accurately fit the parts. The joints are then covered with tape and carefully puttied. It is necessary to ensure that after applying and leveling the putty, the joints are completely invisible and the surface appears perfectly smooth. If the joints are visible, you need to repeat the operation and treat the area with sandpaper.
Important: the greater the expected load on the shelf, the more often it is necessary to attach a sheet of drywall to the profile. The joints of the sheets are located in the middle of the profiles and covered with reinforced mesh.
If you plan to organize lighting for a shelf made by yourself, then holes for the lamps must be made before installing the drywall.
Once the shelves are assembled, you can paint them with any paint of your choice that matches the concept of the room.
How to make a niche shelf from plasterboard with your own hands (video)
Painting
How to choose paint
Suitable for painting:
- water-based paint;
- acrylic paint;
- alkyd enamel.

Water-based paint is not waterproof. It can be used to paint parts in dry rooms, such as the bedroom, living room, hallway, kitchen. Alkyd and acrylic paint waterproof and durable, so they can be used for painting products that are expected to bear heavy loads in difficult rooms.
Surface preparation
Drywall is puttied before painting. After this, the shelves must be coated with primer. For durability of the structure, it is better to choose an acrylic primer. After the primer has dried, you can begin painting the product.
Stages of work
Initially, you need to carefully paint all the corners and joints of the material. For this it is best to use a thin small brush. It is better to paint the surfaces of the shelves with a wide brush. If the shelves have a large surface, you can use a roller - then the painting will look smoother and more aesthetically pleasing. The paint is applied in 2 layers, each layer after the previous one has completely dried.
Important: A room in which the plasterboard shelves are painted the same color as the main wall looks very beautiful and stylish. This gives the design some integrity.
Conclusion
Hand-made plasterboard shelves, if carefully executed, will decorate any room and give it a non-standard look. So don't be afraid to experiment. Good luck!
People are faced with the problem of lack of space in their apartment for things and accessories. By making plasterboard shelves with your own hands, you solve this problem. Built-in plasterboard shelves give you a chance to realize design ideas into the interior of a house or apartment. The main thing is to think through each stage to the smallest detail and complement the interior with a design that will give comfort and help organize the space correctly.  Design and design of plasterboard shelves Of course, people turn to specialists for help, but this will require additional expenses. But it’s better to make shelves from plasterboard with your own hands, this will allow you to pour a piece of the owner’s soul into the living space. And also gain a new skill that will be useful in life.
IN modern interiors There are also additional racks and shelves that will allow each item to find a place. Why choose? This will become clear if you look at the photo, because ideas allow you to select an option for each property owner individually.  Design option for plasterboard shelves
Advantages of the material
Of course, the frequency of choice falls on this type of material for various reasons:

These are just some of the advantages that are decisive in the process of choosing a material for creating shelves with your own hands.
Sequence of work
So that the process for a house or apartment is not complicated, it is necessary step-by-step instruction, on the basis of which we must work.  Drawing with dimensions for installing a plasterboard shelf In order for everything to work out quickly and to please you with the result, you need to follow the instructions one by one. The order of work is as follows:

Carrying out work with gypsum plasterboard shelves in in the right order, the property owner will in any case be satisfied with the result and will qualitatively arrange the space of the premises.
Read also
Installation of a plasterboard shower cabin
Creating a Project
The step-by-step guide indicates that the first step is to create a project for the future shelf. This can be done in several ways:

Whichever option you decide to use, in any case, creating a drawing is very important process. Using a detailed diagram you can create perfect design without flaws.
Frame installation
Installation of the frame under the gypsum plasterboard shelf is carried out in several stages:

Surface marking
So that the sheathing under the gypsum plasterboard shelf is strong and lasts long years, should Special attention pay attention to marking the wall or partition on which the fastening will be carried out. This must be done using a level, which will allow you to determine the differences in surface heights, and therefore the frequency of screwing.  Drawing with the dimensions of the shelves for marking the wall surface. The surface should be marked with a special marker or an ordinary pencil. When marking, it is necessary to take into account the load that the shelf will bear.
Load calculation
Calculating the load is quite simple. You need to decide for what purpose the niche is being established. If this is a TV shelf made of plasterboard, then the strength level of the frame should be high. It is best to make additional fastening of the frame with jumpers from profiles.
If this is a shelf for shoes, then it is enough to create a regular sheathing for drywall, securely fixing the profiles together. If we're talking about about a niche for various decorative ornaments, pictures that weigh little can be collected lightweight design without the use of additional fasteners.  Niche design with plasterboard shelves

In any case, the issue of calculating the load must be taken into account, because the reliability and durability of the structure depends on this.
Frame assembly
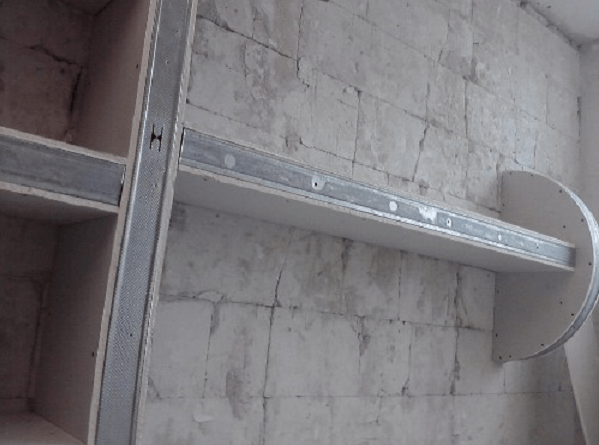
Most often, profiles that serve as guides are taken as the basis for the frame. This is justified by the fact that there are few different sections on such a beam. And this will allow you to create a neat and beautiful design. To bend the profile to shape, you need to make cuts. How more complex form design, the more cuts will be required. Implement this process You can use scissors or a metal knife.  The process of attaching guide profiles to the wall


The prepared segments are combined with each other of a pre-calculated length. Each fastener must be tightly screwed. The steps should be performed one by one to ensure that the frame is strong and durable.  Assembled frame under plasterboard shelves
The process of fixing the profiles depends on the shape of the structure. The main thing is to choose quality and durable materials. After all, the reliability of shelves and niches depends on this factor.
Wall mount
Fixing a hanging shelf on the wall is quite simple. After all, there are pre-applied markings on the surface. If necessary, you can vary the distance during the process. The greater the load on, the more often you need to screw in dowels or screws when attaching shelves in the kitchen, in the rooms or in the bathroom.  Fixed on the wall hanging shelves from gypsum board
Progress and innovations in the construction industry force the use of increasingly cheaper and safe materials, sometimes taking a completely unexpected approach. Let us recall, for example, the buildings of the 50s of the last century - solid wood panels, timber, boards, ceramic and sand-lime brick. Since the 70s, chipboard, fiberboard, and alabaster blocks have appeared. Now the time has come for plasterboard sheets, metal profiles and all kinds of structures made from them. Why not try making your own plasterboard shelves.
As a material for homemade products, gypsum board is quite suitable for plasterboard shelves, despite its apparent fragility. Among the closest competitors are plywood, panels made of solid wood, particle boards and fiber boards, gypsum board sheets have lower specific strength and require increased accuracy in work.
But its main advantages are:
- The plasterboard sheet maintains an ideal surface plane and dimensional stability over a long service life;
- The price of gypsum plasterboard is significantly less than a sheet of plywood or OSB of equal area, not to mention solid wood;
- The material can be perfectly cut, drilled, puttied, painted, sanded, and at the same time is absolutely harmless to human health.
At the same time, working with the material, even in the case easy to manufacture DIY plasterboard shelves require the worker to think through the design in advance so that when assembled the shelf can withstand the planned load.
Important ! Techniques for processing drywall sheets are fundamentally different from processing wood or OSB. If you don’t have enough experience working with gypsum boards, rehearse any problematic operation using scraps or waste.
Which plasterboard shelf design should you prefer?
If you have certain skills, you can make more than just a shelf or stand from plasterboard. You can easily assemble the most intricate designs from it, as is easily demonstrated by the photo of do-it-yourself plasterboard shelves.
The main principle of constructing plasterboard shelves
In wooden or plastic products shelf material of the product usually provides decorative surface design and works as a solid foundation, taking all the loads from things or objects located on the shelf.
WITH plasterboard sheet you can do the same, but the strength of a single sheet of drywall, even 18mm thick, may not be enough. In this case, the shelf is made of two sheets, and if the length of the product exceeds a meter, it is even possible to use plywood or wooden insert. For a small decorative shelf of 40-50cm for a vase or a dozen books, a single sheet of plasterboard 12-15mm thick can be used. The shelf must be secured along the entire line of contact between the sheet and the walls using self-tapping screws, but the appearance of such a shelf does not cause much enthusiasm due to the difficulties in processing the end edges.
Advice ! Even for small, cantilevered shelves, use the frame design of the product. This will ensure its strength under any form of loading.
The separation principle is always used in plasterboard structures:
- The plasterboard sheet provides only decorative functions; the gypsum board’s own strength is only sufficient to resist loads directed parallel to the plane of the sheet. All other forces must be transferred to the reinforcing system from wooden slats or metal profile.
- GCR is always attached to solid foundation frame using screws or glue. Exactly frame construction will ensure the lightness and strength of the product - shelf, cabinet or wall.
This makes working with drywall much easier. Myself metallic profile for the frame, the shelf is made of thin sheet galvanized metal, easily cut with metal scissors, bent and curved in the most intricate ways.
Options for plasterboard shelves
Thanks to the wide range of reinforcing profiles, you can quite simply select and assemble the shelf frame on your own:
- corner shelf made of plasterboard, several options possible, combined into one small project;
- Very practical shelf from plasterboard for a TV.
Among the many options, you should choose a scheme with minimum quantity joints and connections.
Important ! When working with drywall, a layer of fine alabaster dust is formed, even with certain guarantees of the safety of the material, try to remove waste and calcium sulfate shavings more often with a vacuum cleaner or a damp sponge.
The sequence of making shelves with your own hands
Most often, the corner areas of the premises remain free in the house, so to give a more sophisticated look or for utilitarian reasons, you can always make several shelves on the wall from plasterboard with your own hands.

For work we use a sheet of plasterboard, a 25x50 metal profile, putty for sealing seams and gypsum-metal fastening screws.
Unlike wood or metal, where the product is made separately and then hung on the wall, when using plasterboard, the shelf structure is formed as a single unit, with supports, load-bearing frame and wall mounting.
Determining dimensions and connecting points
On the wall, draw with a pencil the attachment points, the length of the load-bearing surface of the shelves and the connection points of the frame elements. After that, fragments of wall mounting are cut out of the profile and secured according to the markings with self-tapping screws.

Installation of vertical racks
Next they are “sewn on” vertical racks profiles along the edges of the shelves. By using building level and the plumb line are carefully aligned horizontally and vertically external elements frame of each shelf. We sew up the vertical support post on both sides with sheets of plasterboard, cut to the size of the opening with a small allowance for processing of 1-2mm.

Installation of drywall sheets
Along the leveled horizons of the shelves, we cut out the remaining sections of the frame and secure them in the structure. We sew up the planes of the shelves with sheets of plasterboard, first the lower horizontal surface, then the upper.
Advice! Drywall sheets for the upper plane of the shelf can be cut a couple of centimeters larger, this will allow using ceiling plinth perform additional decoration of the end surface of the shelf.
After sticking the decor, carefully putty all the cracks and joints in the structure, and after drying, sand the surface for painting with water-based paint.

This method is universal and makes it easy to produce the most simple shelves from plasterboard in the bathroom.

After some practice, a complex but attractive version of a plasterboard shelf in the bedroom is quite possible.

Features of constructing a frame for the load-bearing structure of the shelf
As you can see above, working with drywall does not present any particular difficulties for neat and thoughtful people. The construction of even the most complex shelves or cabinets is more reminiscent of the “Lego principle”, and even a novice master can do it. But for professional work With shelves or partitions, there are a few things to consider.
Drywall sheets cut into thin strips are prone to breaking even under light load. Therefore, when starting any dizzying project, avoid using thin and long strips of material to cover the frame. For example, a piece of gypsum board with an aspect ratio of 1:5 or more is almost guaranteed to burst either when fastening it to the frame, or under load, after all the work is completed.
Thickness frame elements Compare with the overall dimensions of the structure. An example is a very competent construction of the size of the windows and the thickness of the racks of a plasterboard shelf for a TV. Thanks to optimal thickness vertical and horizontal partitions, this design is highly stable and will withstand significant loads.

The most difficult option, from the point of view of fastening, can be considered the installation of a single shelf on the wall without the use of additional support posts. Often, to ensure longitudinal and vertical stability, additional shelves are installed side awnings. If you show some imagination, they will not only not spoil the appearance of the shelf, but will also give it a more attractive look.
As a rule, a structure made of plasterboard is heavier than one made of wood board or plastic, so it should be used to hang it on the wall. maximum amount attachment points. If you need to fix the shelf on a wall lined with plasterboard, use a special fastener.
