DIY garden drill for poles. Using a hand held post auger in gardening. Split drill pipe
Read also
Construction of a full-fledged columnar foundation– the work is complex and requires experience and professional tools. To drill wells, you can use special equipment or make a drill yourself. This is especially true for large volumes of construction.
Drill design
drill application technology
The drill is designed to form wells in the ground to the depth of installation of a columnar foundation. For this purpose, the design provides a cutting part, which can have different shape. It is important that during rotation the soil is excavated and accumulated in the receiver.
At the first stage, you need to choose the right configuration. There are several differences in the design that will subsequently determine the functionality of the drill:
- Baking powder. It can be in the form of two inclined planes or in the form of an auger - a spiral-shaped knife located on a rod.
- Availability of a soil receiver. It is designed to collect soil and remove it after filling. Convenient for forming wells large diameter from 35 cm.
- Plow for forming a lower expanded zone in the soil. This is necessary to strengthen the future columnar foundation. The element is required when constructing buildings with a large mass.
The manufacture of a drill should begin with drawing up a drawing. It directly depends on the design requirements.
Types of drills
One of the determining criteria is the shape of the cutting planes and their location on the rod. If the amount of work is relatively small and the diameter of the well does not exceed 20 cm, you can make an auger model.

This design is relatively simple to manufacture, and there is wide choose cutting part material. However, the features of its use should be taken into account:
- To remove soil, it is necessary to remove the drill from the well each time.
- It is not possible to form an extended area at the bottom of the foundation.
- When filling the auger planes with soil, great efforts will be required to remove the soil.
An alternative to this model is a device with replaceable blades. They are installed on special mounting platforms located at an angle relative to each other.

Replaceable knives
 This shape allows you to make holes of different diameters using the same drill. It should also be noted the minimal labor intensity of manufacturing and the possibility of installing new cutting parts to replace failed ones. The disadvantages of a product with replaceable blades are the same as those of the auger model - low performance and the possibility of drilling wells with a standardized diameter along the entire length.
A drill whose cutting part is made in the shape of a cylinder does not have these disadvantages. His Bottom part has two planes located at an angle. The soil is collected in a receptacle that has sufficient capacity.
A special feature is the mounted plow, which is designed to expand the diameter of the well at its base. It can be installed on all of the models described above, but it is for this particular plow that it is most effective.
Self-production
After selection optimal scheme Borax, you can proceed directly to its manufacture. For this you will need Consumables, welding machine and cutting tool- or a hacksaw for metal.

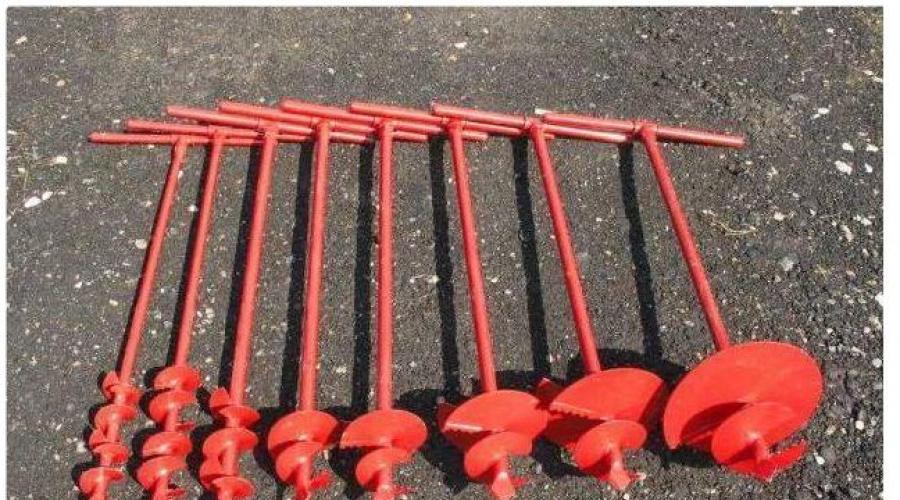
The simplest manufacturing option is a scheme with interchangeable blades. As their source material manufacturing, you can take discs for metal various diameters– from 160 to 350 mm. The size of the internal mounting hole must be different. This is the main advantage of replaceable blades.
For manufacturing you will need the following materials:
- Barbell. It is made from a round or square pipe. They weld to it mounting plates for installing two halves of disks, as well as a platform for attaching the handle.
- Handle. Made from the same pipe as the bar. For connection, it is best to weld the flange onto the 4 mounting bolts.
- Disks. Their thickness must be at least 2.3 mm. This is necessary for structural rigidity. They are cut into two halves, in each of which mounting holes are made for attaching to the plates on the rod.
The angle between the planes of the disk halves should be 30°. This will ensure optimal cutting of the soil layer without much effort. If a structure with a plow is manufactured, it is recommended to order its cutting part separately or purchase a ready-made model.
Pillar – main architectural element many types of fences and buildings. To install it you need special tool, hand drill for poles. With its help, holes are selected in the ground into which the pillars are installed.
If necessary, motorized drills are used to make a large number of holes, but in private construction, in particular, during self-construction fences are used manual options such a tool. There are a lot of industrially produced models, but nothing prevents you from making your own drill that will satisfy local needs. And it will cost less than store-bought.
At least minimal skills in working with a welding machine and its availability are required.
Alternative option– production of custom-made tools according to the selected project. In this case, you will need to find performers and a suitable drawing.
Construction of an earth drill
Fundamentally, each drill consists of three main elements:
- Pike, which plunges into the ground first and centers the entire tool during the first stages of drilling. Some versions of auger drills and designs with an earth receiver are not equipped with a lance.
- Cutting part, made in the form of a screw, half disks or having another configuration.
- Solid or segmented rod, to the bottom of which the working elements are attached, and to the top - a handle or pin for connecting to a motorized unit.
The different types and combinations of these elements make the difference between drill types. The garden auger is equipped with a peak and two blades, mounted on the main rod at a certain angle (usually 35-40 degrees to the perpendicular to the axis). This is not the most productive tool used for making planting holes or holes for small supports.
Auger drill– specific option for fast device wells for fencing supports. It is equipped with a spiral blade with several turns for removing soil, which is cut by a blade at the bottom of the auger.
The cutting edge of the blade should always remain the lowest point of the auger. Otherwise, the device will not be able to drill into the ground. Therefore, models with two to four semicircular blades are suitable only for making shallow holes for planting plants. The soil is directly cut by only one corner of one blade.
Drill with earth receiver It is a piece of large-diameter pipe, in the lower inner part of which blades are fixed, most often equipped with teeth. As the drill rotates, they fill the volume of the pipe above them, after which the tool is removed from the ground.
Drill for TISE piles is a tool of the previous type, equipped with a folding blade for creating channel extensions for pouring pile foundations. Sometimes, instead of a cutting part, the earth receiver is equipped with a blind bottom for collecting soil selected by a folding blade.
Making a drill
The main tools for self-made The drill is used by an angle grinder and a welding machine. The process begins with the selection and preparation of the main axis of the tool. A round (26.8-48 mm in diameter) or profile (20×20-35×35) pipe is suitable for this role.
It is impossible to make a screw from a profile square pipe garden auger with your own hands. For it, exclusively pipes with a round cross-section are used.
The required length is calculated by adding 50-60 cm to the depth of the future well. If the final value exceeds one and a half meters, you will need to make the bar collapsible. The connection mechanism can be any (threaded, cotter pin, or other), the main thing is that it can withstand the loads during rotation with resistance.
The pike is usually made separately. From a piece of pipe whose inner diameter is equal to the outer one, you can simply make a sharp tip or flatten the pipe, and then roll it into a spiral of one or two turns or sharpen it like the tip of a wood drill. Other options include soldering a narrow spiral screw. Good results are shown by using a 40-diameter wood drill. In this case, the diameter of the end drill must exceed outside diameter rods.
After the lance is welded to the axial rod (or its lower segment), you can begin constructing the main cutting part. For this, an old saw blade from circular saw, the diameter of which corresponds to the parameters required hole, cut into two equal halves. The resulting blades are welded to the main rod above the peak. The preferred angle to the perpendicular to the axis is 30-40 degrees, to the vertical - strictly 90. The cutting edges are sharpened.
Another, more productive option is to make a screw. For him from sheet iron Circles are cut, the diameter of which corresponds to the parameters of the required recess. The number of disks is equal to the number of turns of the future spiral (at least three). The blanks are stacked, after which a hole is drilled in their center, commensurate with the outer diameter of the pipe.
Afterwards, a small segment is cut out of the disks. The resulting parts must be welded to form a spring. Then it is stretched on a winch, the seams between the turns are welded with reverse side and attached to the axle.
The final touch is the handle. It is made from a piece of the same pipe that was used for the axial rod or a diameter more suitable for the hand. The mounting method depends on personal preference. The handle can be welded to the axle, reinforced with additional crossbars, or made removable.
Materials used
Depending on the type of drill being manufactured, they are used various materials, but the basis is always round or profile pipes and sheet metal (waste saw blades).
Pieces of pipe, parts of broken wood drills, metal plates. Or models are made without peaks. Studs and nuts are used to connect the rod segments.
In general, the range of necessary and acceptable materials depends on the chosen design. It must be thought through before starting work.
Cutting elements and their fastening
The cutting part of earth drills can be removable or non-removable. However, detachable mounting is only permissible on versions with half blades or saw blades or sheet metal. To do this, shelves are attached to the main rod, located at the same angle as the blades. 2-3 holes are drilled in the shelves, to which the cutting parts are attached using bolts and nuts.
Replacement bits can also be made for drills with an earth receiver. To do this, in the reinforcing arc that attaches the bucket to the rod, it is necessary to make a flattening, drill a hole and cut a thread in it.
The screw cutting parts are rigidly attached to the axis. To drill holes of different diameters, it makes sense to make several attachments for one handle.
Some modifications
- Straight crushing blades between the lance and the cutting edge.
- Multi-tier arrangement of blades with gradually increasing diameter.
- Power ribs between the corners of the blades and/or the axial rod.
- Drain box to choose from more soil in one run.
- Additional blade with 2-3 teeth for easier drilling in dense soils.
- Removable blades for quick replacement during work.
- And many others, the number of which is limited only by personal ingenuity.
Video
Drill for TISE piles
The fundamental difference between a drill for a device pile foundations consists in the presence of a folding blade and a container - a land receiver. It is often manufactured as a separate tool along with an auger drill for the actual wells.
The blade folding mechanism is a rod that moves a small piece of larger diameter pipe that is placed on the main rod. This movement activates a system of levers that lowers the blade.
Auger drill
To make multiple holes, it is better to use an auger drill. For one-time projects, a fishing ice pick is quite suitable. But for the mass installation of holes, it is better to purchase or make an appropriate drill from pipes and other materials.
In a “working” auger drill, only one edge of the blades protrudes. The second can be equipped with a comb with several teeth located slightly below the cutting plane.
If you have the time and money, using a motorized block and a special bed will help significantly speed up drilling holes for fence posts.
Blueprints
The abundance of designs allows you to create a highly specialized tool for personal needs. Let's look at some drawings of such options.
Shovel drill
When planting plants, the drilling depth is not critical. Therefore, you can donate an old shovel to make hole preparation easier. You should retreat 30 mm from the lower center point. Draw lines from it to the edges at an angle of 10-20 degrees. Then step back 30 mm from each edge and draw vertical lines. The bayonet segments located between the verticals and the lines diverging from the center are cut out.
Then cut the marked 30mm from the bottom center point. Now all that remains is to bend the lower and side parts of the bayonet in opposite directions along the marked lines. The earth drill with your own hands is ready.
A hand drill is an indispensable thing for personal plot. Drill holes to install fence posts or bored piles under the foundation, make holes in the garden soil for planting plants. This hand tools there will always be a use for it. Users of our portal know how to make this tool yourself, and whether it is possible to somehow improve factory-made devices.
Before you buy or make your own hand drill, you need to ask yourself the following questions:
- For what purposes and work do you need it;
- What type of soil will be drilled at the site.
Sand, rocky ground, abandoned garden soil, refractory clay, loam, soil with big amount roots. Drilling a hole for installing fence posts and posts of small diameter, drilling out “heavy” soil for powerful bored piles for the foundation of a house. All these factors have a significant impact on the design of a hand drill.

Sukhanov Mikhail User FORUMHOUSE
In my opinion, the best hand drill is the one that is “tailored” for work in a specific area, taking into account the characteristics of the soil and its layers. Those. earthen the drill must be made for specific tasks: installation of pillars, piles, etc.
A user of our portal offers the following mechanical design of the drill. How it was made can be clearly seen in this photo.

Two knives are used to preliminary loosen the soil, which simplifies the cutting of the main blades, set at an angle, into the ground. Moreover, the main blades can be made replaceable by attaching them to bolts and nuts. Thanks to this, it is possible to drill holes using one rod different diameters.

Although outwardly purchased and homemade drill are similar in many ways, it is homemade hand drills that show top scores. They are stronger and more convenient to work with, because... they are made to suit you.

Sukhanov Mikhail
My neighbor and I once conducted the following experiment: we decided to compare the performance of my homemade drill (blade diameter 25 cm) and its purchased one (blade diameter 14 cm).
The soil on the forum member’s site is like this:
- 0.7-0.8 m – “fertility”;
- 0.2-0.4 m – coarse limestone stone;
- then a layer of marl (yellow, with fine limestone chips).
During the competition, the drillers almost simultaneously went 0.8 m deep. Then the purchased tool stumbled on the marl, while, working as a homemade garden drill, Michael continued to drill as if nothing had happened. The neighbor had to loosen the marl with a crowbar and only then drill further.
The result of the experiment: in order to drill a hole under a pillar 1 meter deep, Mikhail it took a little over 5 minutes, and he wasn’t tired at all. The neighbor fell hopelessly behind in the last 0.2 m.
T.N. universal drill, seemingly suitable for working on different soils, may be ineffective.
That is why they are so popular among users of our portal homemade designs hand drills. To make one, it is enough waste materials and basic skills in welding.
The tool is made like this: take a round or square pipe, its length is selected depending on the expected depth of the hole. In the case of mechanical drilling of deep wells, the pipe can be extended by extending it with an additional rod. The diameter of the blades is selected depending on the expected diameter of the pit and the planned work.

Large-diameter saw blades from circular saws have worked well as blades. Such a disk is sawn into two parts with a grinder. The halves are welded to the pipe, and the blades must be spread to a certain angle (approximately 25-30°). This way they penetrate better into the ground. A lance or a large-diameter “killed” drill is welded to the end of the pipe. The tip is needed to center the drill at the beginning of drilling. Due to the saw teeth on the blades, such a tool cuts roots well when rotating.

The main thing when working with a hand drill is to stop in time and lift it out of the pit in order to dump the rock.

Boston User FORUMHOUSE, Moscow.
I've made it to the start summer season two earth drillers. The first is with a diameter of 210 mm, the second is 160 mm. Circular discs were used on the blades. The rest was made from what was literally lying under our feet. I also made a collapsible extension rod. I spent 200 rubles on everything, as they say, cheap and cheerful.

If you don't have it at hand welding machine, then such a tool can only be assembled using bolts and nuts. Also, as a drill for light soil and for drilling small-diameter holes, you can use a used ice auger (since buying a new one is an economically unjustified idea). For ease of operation of the ice device, you need to cut off the handle-turn and attach a standard T-shaped collar.

In addition to the tools described above, an interesting approach to making a homemade drill for drilling wells in the ground from a forum member with the nickname VyacheslavK.
A conventional earth drill was used to drill to a depth of 2.5 m. The forum member cut the blades with a grinder from a piece of sheet metal 3 mm thick, onto which a paper template was previously glued.

Then a hole with a diameter of 20 mm was drilled in the resulting workpiece.

A cut was made along the radius of the circle.


The pin has been sharpened.

The result is a drilling device like this.

During the work, the following shortcomings were identified and eliminated:
- The blades are brought together during drilling, which significantly reduces drilling efficiency. To prevent the blades from collapsing, bracing partitions were welded between them and to the pipe.

- When drilling holes for installing a fence, the tool, if it bumped into stones or roots, was pulled to the side. To eliminate this drawback, an arcuate side of 30x10 cm was welded one blade at a time, starting from the bend of the circle.

- Low efficiency when passing through oily clay. For working with clay, the so-called was made. frame drill designed by a user of our site with a nickname KND.
This device is best suited for working with lamellar clays. It has a minimum coefficient of friction against the rock. It is easy to remove from the hole (there is no “piston effect” like an auger drill). After lifting the drill, the clay is simply shaken out of the frame.

Although such a tool is most often used when drilling homemade wells“on the water”, its design turned out to be so successful that it is worth focusing on it.
VyacheslavK did this:
From a strip of metal 5 cm wide, he cut two identical strips and made angular bevels, moving 2 cm from the end of the strip. For the strips, you can use old car springs.

Cut and sharpened knives.

I welded the knives to the drill, pointing the sharpened sides in opposite directions.

I spread the knives apart using a corner so that the distance between the ends was 25 cm.

Using a gas key VyacheslavK turned the knives at an angle.

I assembled and welded the entire structure.

It is worth noting that the drill quickly broke off. That's why VyacheslavK sharpened the fragment, as shown in the next photo.

When making a frame drill, it should be taken into account that it is not suitable for working in loose, loose soil, because it doesn't stay in the frame.
Also interesting are the designs intended for making a widening - “heel” - during the construction of the TISE foundation.

Subarist User FORUMHOUSE
I modified the purchased drill and installed a second folding shovel on it. To make it easier to work, I made a T-handle 1 m long. Thus, I increased the force on the lever. The length of the rod is 3 meters. Now you can drill holes 2 meters deep while standing in full height, not all fours. I cut off the teeth from the land receiver because they are of little use.

The “improvement” didn’t end there. To increase efficiency earth drill when drilling expansion, Subarist I bent the blades - the straight blades did not cut the soil well. The forum member’s future plans include installing blades made of alloy steel, because... ordinary ones quickly become dull on stones.
Installing a pole is not like that simple task, especially dig a recess under it. A pit is needed in various construction work ah, such as arranging a foundation or a fence. You can’t do it with an ordinary shovel, so they use a special tool - a drill (pit drill, earth drill, etc.). A post drill, like any other tool, has its own characteristics.
A hand drill will help you make a hole of the required size
Types of drills
A drill is a type of construction equipment whose function is to make a hole the right size. It is used in different areas. For example, in the construction of bridges and fences, for gardening work (when planting trees and other vegetation).
Drills can be divided into several main types, which differ in size, purpose and power.
They can be divided into:
- Hand drills. They are often used in everyday life by both beginners and advanced summer residents.
- Designs with automatic drive. Modernized hand drills. A motor is installed on them.
- Mounted. These are the same mechanized drills, only with the possibility of installation on special agricultural equipment (tractors, walk-behind tractors, etc.).
The first ones have the weakest design and purpose. They drill holes of small diameter and depth. Without the effort of the worker, such a tool is useless. But its advantage lies in its compactness, since it is small and light. It is quite convenient to transport it. With this tool you can easily make a hole for a fence or seedlings.
In this video we will look at how to make a hand drill:
It consists of a rod and a T-shaped handle on top of the structure. There is a metal tip at the bottom that performs the function of centering the tool. A little higher is the drilling mechanism itself, designed in a spiral shape. Often consists of 2-3 rows of metal round cutters. As an alternative, use a saw blade as the cutting part.
As a rule, such a tool can make a hole up to 2 meters with a diameter of up to 30 cm. The drill is made collapsible for more convenient transportation. The metal pipe is made of two parts (collapsible). The blades are also often made removable with bolts.
Power drills are made with a drive system. The design is more complex, but most summer residents can make such a manual drill for poles on their own. The drill also has metal pipe with handle, tip and cutting part. But an additional motor with a gearbox and drive part is installed. The screw (cutting) part moves due to rotational movements transmitted through gears from a gearbox with a motor.
This design is more powerful, but its strength depends directly on the performance and strength of the motor. The hole can be made deeper, up to 3 meters.
Mounted drills are designed to perform more difficult work. The width and length of the holes are much larger. They are often used for the construction of bridges, train stations and other industrial purposes. With their help, you can make sheet piling fences for pits and trenches. Thanks to attachments, the cost of construction work is significantly reduced, as they have greater productivity and power.
Nuances of choosing a model
Today there are a huge number of purchased models, and often make right choice pretty hard.
When purchasing, first of all, you need to pay attention to specifications, namely:
- maximum pit depth;
- drilling width;
- work productivity (drilling speed and number of holes over a certain period);
- drill power.
When renting, it is also necessary to take into account the cost of delivering the drill to Right place. Before buying a rotator for the ground, you should pay attention Special attention knives. They need to be very sharp and preferably self-sharpening. They must be made of high-quality metal, as they will break stones, soil, cut grass, etc.
Caring for the bracelet
First you need to understand the main rule - to use the tool exclusively for its intended purpose. You can make a hole only when you are sure that the drill is intended for a certain type of soil. If he is not able to work on such land, then, most likely, he will break on the first try.
You need to carefully read the instructions and technical specifications and not demand more from the tool than it is capable of performing. It is also necessary to study technical features work. For example, with a hand-held hole drill you can make no more than 35 holes per day.
When working, the additionally installed tripod system greatly helps. It fixes the drill and makes it easier to pull it off the ground. And a special lever will help you get it out. It is clamped, and the drill is turned counterclockwise and removed. For long-lasting operation, it is recommended to lubricate the drill with anti-corrosion substances, and also paint it to secure the result.
Preparation for drilling
Fence holes will begin to be made only after the necessary preparatory work Location on. At the same time, you need to make the appropriate markings. Separately on the site you need to make wells for supports for gates and gates, if this is provided for by the layout of the building.
To install fence supports, they must be lowered to the appropriate depth. Not everyone knows what it should be. As a result, incorrectly installed supports cause the fence to fall over time, or their shape becomes deformed.
Make your own hand drill
You can do this job correctly with a few tips:
- To install the pole, you need to drill a well. Its diameter should be slightly larger than the diameter of the pillar. In this case, there is no need to make excessively wide holes, as they greatly loosen the soil. And when you make the width of the pit the same as the width of the support, then it will not be possible to mount it in this way.
- The number of holes required for the fence can be calculated without any problems. To do this, the perimeter of the fence should be divided into the number of sections. Add to the resulting number two more holes for the gate and two for the wicket.
- The depth of the holes must correspond to the weight, length and width of the pile. It is also necessary to pay attention to the type of soil, The groundwater. If the soil is unstable, then the depth of the holes should be at least 1.2-1.5 meters.
The depth of the hole should be greater than the possible depth of soil freezing in severe frosts. If the soil is dense, then the hole can be made up to 1 meter. In this case, the support itself must be at least 1/3 in the ground. This way the fence will be very strong and reliable.
Required Tools
Not everyone can make a well, and this work is not easy. Each hole must be the same diameter and depth, which usually takes a lot of time. Great importance has a choice the right tool. You can make such a well using various equipment: a specially converted shovel, a hand drill, an automated drill or a mounted installation.
Pros and cons of a shovel
A shovel is the cheapest tool, but its effectiveness is low. It will not be possible to dig a deep hole with such equipment, just as it will not be possible to dig a narrow or too wide one. In addition, the diameter of the holes will always be slightly different. But if the fence is planned to be made of brick, then a shovel will ideal option. If the tool is damaged, it can easily be replaced with another one, since the cost is low.
Advantages and disadvantages of a garden auger
Such equipment is quite popular, although every household does not have it. In most cases, it is used for digging holes for planting vegetation and for other needs in the country. It is relatively heavy when compared to a shovel, but the quality of the work is much higher.
Its design includes three parts: auger, drill handle and metal rod. A tip is also attached to the bottom of the metal rod, which performs the function of centering the drill. The diameter of the cutting part is about 15-20 cm, weight is 10-15 kg.
If you buy such a tool, you need to pay attention to whether it is sharpened accordingly. If not, then it needs to be sharpened before work. For this, it is better to use a grinder, but you can also do it with a hand file, although this is ineffective.
The tool can be used not only for making holes for fences. Often also used for planting trees, making holes for foundation piles and other work. You don't need any special skills to use it, so anyone can do it. In addition, the garden auger serves quite well long time at correct operation and prevention.
Autodrill with drive
Making holes with a motor drill is very fast, but the method is quite expensive. The design consists of a drive (motor, gearbox, gear system) and an auger drill attached to it. Purchased options run on gasoline diesel fuel or electricity. This depends on the device manufacturer.
With the help of such equipment, you can drill holes up to 3 meters deep and do it in a matter of minutes. But along with its advantages, an automatic drill also has its disadvantages:
- loud noise during operation;
- if the motor is electric, you need to constantly be close to the outlet;
- Buying gasoline to run the engine will not be cheap.
To build a fence, you need to make holes to a depth of at least 80 cm. And if you multiply it by the number of pillars, the figure turns out to be quite large. A hand drill will take a long time to complete the job. Another thing is a motor drill with an automatic drive.
For drilling more deep holes will be needed attachments, which is installed on cars. Often they make holes for artesian wells. They are not used for fence purposes.
Effective work
In order for drilling to be effective, you should remember some nuances. For example, it is necessary to do a large number of holes for the fence, but you need to save money. In this case, it is better to choose a garden auger, but with a well-sharpened cutting part. The tip and side edges also need sharpening. Only after this can you proceed to work. In a pre-marked place, the drill is placed in vertical position, after this, holes are drilled for the fence posts.
When there is a lot of clay and sand in the ground, then after a few turns it will be difficult to drill. To solve the problem, you need to pull out the drill and pour a bucket of water into it. After 15 minutes, you can continue drilling a hole under the pillars. Then the work will be much easier to do. If the drill is stuck in the hole, it must be loosened from side to side and then pulled out. It will be easier to do this. There may be a lot of soil on the auger. You need to remove it with a knife, then add more water and continue drilling.
The choice of purchased inventory is very important point for successful hole making. The quality of the work performed, its speed and practicality will depend on the characteristics of the tool.
To do this, you need to listen to some recommendations:
- When purchasing, first of all you need to pay attention to the spiral. It must be sharpened.
- The flat spiral is suitable for drilling holes big size.
- Hand drills for wells, poles, and fences should be selected carefully. You need to pay attention to the speed of work. It must be optimal.
- If you need to do more serious work, then it is better to buy an auger drill.
- Having a container for collecting soil makes the work much easier.
Drilling a hole is a rather complex process. For this it is better to use automated designs. But if the budget is limited, then purchasing a hand drill will be simply necessary. Besides small fence can be done with such equipment.

Is it possible to make a drill with your own hands? For some earthworks In the countryside, an indispensable tool is a hand drill. A hole dug using this tool will be compact, and the excavated earth will be less than when working with a shovel. Yamobur will also retain natural structure and soil density.
Types of garden drills
Garden augers vary in power, size and purpose. Highlight following types Yamoburov:
- non-motorized ( handheld device, which is actively used in everyday life);
- mechanized (a manual device that runs on gasoline and a motor);
- mounted (a mechanized device that works with a tractor or other equipment).
A non-motorized hole drill will be able to make holes of medium diameter and depth in the ground. The work is carried out thanks to the operator who holds the tool. This device is very convenient to use and easy to transport due to its compactness. Using such a tool, you can put up a wooden fence or dig holes for seedlings. The device consists of a main rod with a knife and a T-shaped handle. There are models of earth drills with removable knives or a screw, which makes it possible to drill holes various sizes(up to 2 m) and diameters (up to 30 cm).

The mechanized drill is equipped with a drive. Him simple design: screw auger or rod and electric or gasoline drive with geared motor. The screw is started thanks to the rotational and translational movements of gears. Such a tool can drill more deep holes(up to 3 m).
Mounted drills are intended for making wells of large size and diameter. They are used for installation of street lighting poles, fencing of enterprises, train stations, and airports. Thanks to them, fencing for trenches is made. They have great performance and power.
To choose the right device, you need to pay attention to the technical characteristics of the drill: hole diameter, depth, number of holes per day, power.
Return to contents
With my own hands.
Manufacturing Features.
DIY transforming bench: drawings, dimensions.Making a drill yourself
Making a pit drill is labor-intensive work, but it does not require any special skills. To make an earth drill you will need the following tools:
- cutter;
- rod (a metal structure that increases when the drill is immersed in the soil);
- handle for rotating the device;
- welding machine;
- lathe;
- motor with sandpaper;
- electric drill with various drill bits for metal;
- steel sheets;
- steel rods;
- pipe.
To make a drill with your own hands, you can use the drawings. First you need to cut a sheet of steel and cut out circles of different diameters, which will ensure the versatility of the device. Circles will be used to make the cutters. The diameter of the workpieces should be 5 mm larger than the required size of the recess. All workpieces are drilled in the center so that the holes are slightly larger than the diameter of the rod.
On a lathe, bushings are made from steel with perforations in the center, in which the threads are made. They will be needed to attach the cutting parts to the rod. It is recommended that they be performed by a master, because the reliability of the device itself will depend on its strength.
Next, you need to turn the round blanks into spiral ones. For this purpose, a small segment should be cut out of the workpiece, the ends should be secured in a vice and stretched. Due to stretching, the workpiece takes the form of a spiral. There is no need to stretch it too much, otherwise the metal will lose strength.
After that sharpen outer end spiral so that it cuts the soil easier. Small cuts (approximately 3 mm) should be made on the rod at intervals of approximately 8 cm from the edge. Sharpen the edge of the rod for easy penetration into the soil and cut into a shallow spiral. To make it easier to work with dense soil, weld a metal drill to the edge of the rod.
The rod is made from pipe sections. The possibility of fastening them to each other is provided. A handle is attached to the top to rotate the device. Upon completion of all construction work, you need to paint the device with a special paint that can protect the instrument from corrosion. The drill for poles with your own hands is ready.
