Garden chairs made of boards. DIY garden chair. Requirements for country wooden furniture
Read also
Making chairs for your garden with your own hands is both a way to demonstrate your skills and an opportunity to further decorate the area. Such furniture will come in handy when you want to sunbathe in the garden, or for relaxing in the shade of trees with your favorite book. Using these products, you can feel comfortable anywhere in your summer cottage. And when organizing family holidays and picnics, the problem of accommodating guests can be easily solved. Thus, homemade chairs are excellent helpers and organizers of relaxation.
Even the most inexperienced craftsman can make a chair for a summer house.
Their design should be chosen taking into account where they will be used. For example, a garden chair is suitable for relaxing in the garden, and a rocking chair is suitable for relaxing on the open veranda. If furniture installed indoors can be made of any materials, then for use outdoors you need chairs made of materials that are resistant to the vagaries of nature. Several typical designs for dachas are discussed below.
Homemade garden chair

Furniture of this type has been known for a long time and quite well. Most often it is assembled from planed boards without glue, using self-tapping screws or bolts. The material can be any boards, even old ones. In order to make a chair, you will need the following tools and materials:
- hand saw, circular saw or miter saw;
- hand or electric drill;
- screwdrivers or screwdriver;
- bolts with nuts and self-tapping screws.
The popularity of such designs is explained by their simple design, convenience and reliability during operation. For example, by placing pillows on the seat and back, you can easily turn the chair into a soft one. It can stand both in the house and on the street, and in the latter case both in the open and under a canopy.
As already mentioned, various boards can be used. Below are the approximate dimensions of the parts. In any case, it is recommended to make a sketch with the dimensions indicated on it. Approximate dimensions of parts and their quantity:

- front leg (section 15x2.5 cm, length 60-85 cm) – 2 pcs.;
- horizontal rail of the seat frame (section 15x2.5 cm, length 118 cm) – 2 pcs.;
- front cross rail of the seat frame (section 10x2.5 cm, length 55 cm) – 1 pc.;
- rear cross-bar of the seat frame (section 10x2.5 cm, length 60 cm) – 1 pc.;
- horizontal rail for collecting the back (section 10x2.5 cm, length 60 cm) – 1 pc.;
- horizontal rail for collecting the back (section 10x2.5 cm, length 74 cm) – 2 pcs.;
- vertical rail for the back (section 12x2.5 cm, length 120 cm) – 5 pcs.;
- armrest (section 15x2.5 cm, length 90 cm) – 2 pcs.;
- support under the armrest (section 12x2.5 cm, length 20 cm) – 2 pcs.;
- seat slats (section 10x2.5 cm, length 58 cm) – 5 pcs. (their number can be increased by decreasing the width accordingly);
- self-tapping screws 4.5-5 cm long.
Chair assembly sequence:

- The bars of the seat frame, 118 cm long, are given the desired shape - their front parts are rounded and bevels are made on the back ones.
- These bars are bolted to the front legs. The distance from the ground to the lower edges of the bars is 18 cm. Washers should be placed under the nuts.
- The two resulting parts are fastened using self-tapping screws with transverse slats of the seat frame. The front one is end-to-end, and the back one is overlapped.
- The back is assembled on three horizontal slats (short in the middle). Then its upper end is sawed off according to the template. The lower part of the backrest is screwed to the rear transverse rail of the seat frame. Its angle of inclination should not exceed 30°, and the depth of the seat should be about 50-55 cm.
- The frame of the structure is rigidly secured by two armrests.
- The seat of the chair is covered with slats using self-tapping screws. You need to pre-drill holes in the slats and countersink the entrance.
- All elements are carefully sanded and impregnated with antiseptic; it is better to putty the screw heads. For final finishing, stains, moisture-resistant impregnations or wood varnishes are used. The product can also be coated with opaque paints.
“From the presented material you will learn how you can make a “Garden Chair” with your own hands and install it on your site, for example, in the shade of a fruit tree (apple tree). On a chair, resting after working in the garden beds will be much more comfortable and enjoyable, because the inclined back relieves the load on the spine.
To make a chair, you do not need serious knowledge of carpentry and carpentry; everything is extremely simple and practical. The material is also the simplest - a 25-30 mm board and screws.
Let's look at the entire process of creating the "Garden Chair", and also look at what exactly the author needed?
Material
1. board 25-30 mm (soft wood)
2. screws (for wood)
3. stain
4. varnish
Tools
1. hacksaw
2. screwdriver or screwdriver
3. ruler and pencil
4. brush
5. sandpaper
The process of creating a "Garden Chair" with your own hands.
Getting your own country furniture is not so difficult, especially if you have the material (pallets or boards), the boards must first be planed and sanded with sandpaper, and then just follow the author’s photo instructions.
First of all, armrests are made from the board (in the shape of the letter P) and everything is twisted using wood screws.


The rear legs are screwed at an angle to the front ones.

A seat made from the same board is sewn onto the plane of the rear legs, and a cross member is also added to strengthen the structure and provide greater rigidity.

The backrest is made in the same way, the boards are screwed to the lower and upper crossbars.


To give garden furniture a more noble look, it can be covered with stain and varnish, or painted in any color of your choice)
As you can see, there is nothing complicated in creating a garden chair, everything is extremely simple and clear.
So, don’t throw away pallets and planks after construction or renovation, they can be used to make cool furniture.
This concludes the article. Thank you for your attention!
Come visit more often. Don't miss out on the latest in the world of DIY!
The article is presented for informational purposes only!
There is always a lot of work to do at the dacha or in the garden. But many people acquired these things not only to work there constantly. In my dreams of a dacha, it was imagined as a place for family vacations, meeting friends, reading books and just listening to the birds. The garden is a place for peace of mind. And a mandatory attribute of this picture is comfortable garden furniture, which with its whole appearance reminds you that it’s time to relax and drink a cup of tea. Today we will look at step-by-step instructions for making a wooden chair, such as the one in the photo below. It can also be used as an interesting lounge chair.

How to make a wooden chair-chair easily and with your own hands
It turns out that a comfortable chair for relaxing can be made easily and quickly with your own hands. The product is assembled from small parts and does not require a separate room for assembly, since its assembly occurs without noise and dust. Such a folding chair with a backrest can be made even without special skills in working with wood.
You can build this cunning structure from the boards and beams left over from construction, breaking them down into smaller pieces. If you have the appropriate equipment, you can prepare bars of the required size yourself. If not, no problem either. You can buy bars at hardware stores or warehouses and order them to be cut there.

All the bars for making this thing have the same cross-section. In the classic version, the cross-section has dimensions of 45x33 mm. This is an approximate size that came to us as a prototype from the English system of measures by converting inches to millimeters. It is absolutely not necessary to cut the bars exactly this thickness. It is enough to take bars that are close in size.
In order for the chair-chair to serve for a long time, it is better to make it from harder wood, such as oak or ash. But you can use other types of wood, it all depends on taste and the availability of assortment in local stores. And the first prototype can be made from any material that is available.
The step-by-step instructions describe in detail how to make a folding chair out of wood with your own hands. It turns out that this wooden product is not at all difficult to assemble and does not take much time, plus it can be used as a chaise lounge for the home, balcony and garden.
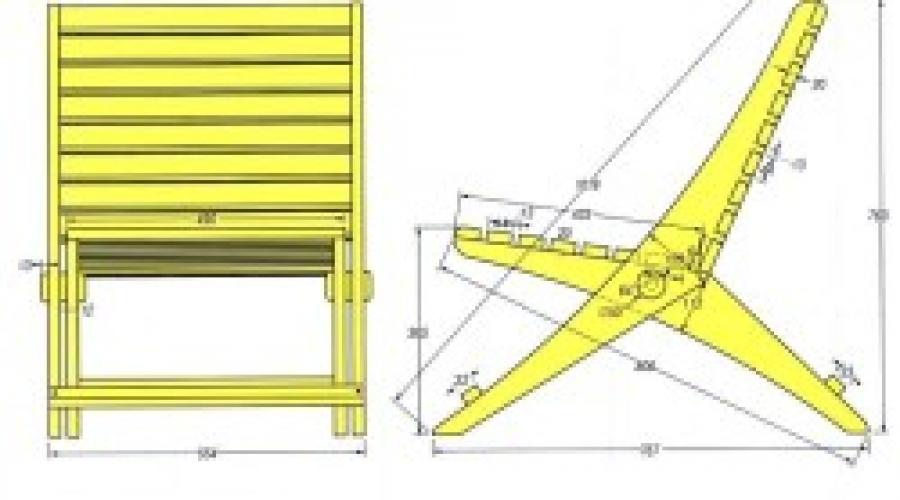
Drawing and diagram
The chair-chair consists of two parts: “Seat” and “Back”. These parts are connected using nine connecting bars.
The general assembly diagram is as follows:
- the seat is assembled;
- the back is assembled;
- the seat and backrest are connected by connecting bars.
For ease of assembly, the connecting bars are immediately attached to the seat and can be considered part of the Seat part.
The assembly diagram is shown in the figure.

The chair-chair consists of two parts: a seat and a back.
To work you will need:
- wooden bars;
- metal wire with a diameter of 4 mm;
- drill with a drill bit for woodworking;
- special scissors for cutting wire;
- washer and nut corresponding to the diameter of the wire (8 pcs each).
Step-by-step instruction
Step 1. Preparing the bars.
First of all, it is necessary to prepare bars of the required section and length. This is necessary for our folding “chaise lounge” to be comfortable. The length and required number of bars are shown in the table:
| Brand |
Detail |
Amount |
Length |
Section, mm |
|
| 1. | Seat | ||||
| 1.1. | Seat | 375 mm | |||
| 1.2. | Seat - rear legs | 875 | |||
| 2. | Back | ||||
| 2.1. | Back - long | 787 mm | |||
| 2.2. | Back - short | 745 | |||
| 2.3. | Back - front legs | 1050 mm | |||
| 3. | Compound | ||||
| 3.1. | Connecting | 9 | 228 mm |
Step 2: Drilling Holes.
After the bars are cut, they are sorted by length and placed into separate piles.

To connect the bars to each other, a wire is used, on which the bars are strung in a certain order. To do this you need to drill holes. The diameter of the hole should be 2 mm larger than the thickness of the wire, so for a wire with a diameter of 4 mm you need to drill a hole of 6 mm.
The holes are drilled on a wide plane of the block, the width of which is 45 mm. The holes must be placed exactly in the center of the bar and drilled strictly perpendicular to the surface. Otherwise, the connection will be uneven and not strong.
Hole pattern

We take the bars that belong to the “Seat” and “Back” parts. The first hole is drilled at a distance of 37 mm from the edge. The second hole is drilled:
- for bars of the “Seat” part at a distance of 300 mm from the center of the first hole;
- for bars of the “Back” part at a distance of 625 mm from the center of the first hole.
For transition bars:
- the first hole is drilled at a distance of 31 mm from the edge of the block;
- the second hole is at a distance of 166 mm from the center of the first hole.
Now you can begin assembling the chair-chair.
Step3. We unfold and assemble the “Seat” part.
We take bars (a) and (c), which belong to the “Seat” part and lay them out in a row in the following order:
- two bars (a) 375 mm long;
- then one block (c) 875 mm long;
- then again two bars (a);
- one block (c);
- two bars (a).
Thus, the bars should be laid out in the following order: (a), (a), (b), (a), (a), (b), (a), (a). There are eight bars in total.

We lay out the bars so that the first hole, which is located at a distance of 37 mm from the edge, is on one side for all bars. You need to align the bars along the edge and pull the wire through the hole. This will be the front of the "Seat".
Step 4. Attach transition bars to the “Seat”.
We take the transition bars (f), there are nine of them, and place them between the “Seat” bars. Transition bars should begin and end the row. The layout order will be as follows: (f), (a), (f), (a), (f), (b), (f), (a), (f), (a), (f) , (b), (f), (a), (f), (a), (f).

We align the bars so that the holes of adjacent bars coincide and connect them with wire.

If you understand the layout diagram correctly, you can try to lay out all the bars at once, align the holes and stretch the wire.

Step 5. Assembling the “Back”.
Now we take the bars (c), (d and (e) which belong to the “Back” part. We lay out the bars in the following order: (e), (c), (d), (c), (c), (d) , (c), (e). Again, make sure that all the bars have the first hole, which is located at a distance of 37 mm from the edge, on one side. We level the bars and connect them with wire, pulling it through the first hole of each bar. This part will then be the top of the “Back”.

Step 6. Putting the parts together.
We take the “Back” by its upper part and carefully place the “Back” on top of the “Seat”. It is necessary to apply it in such a way that the top of the “Back” is located above the front part of the “Seat”, and, accordingly, the bottom of the “Back” is located above the back part of the “Seat”, to which the transition bars are attached.

In fact, the eight bars of the “Back” should, as it were, lie on the 8 bars of the “Seat”.

Now we move apart the transition bars “Seats” one by one and place the bars “Backs” between them. The outermost ones should be the transition bars on one side and the other.

Now we lift the not yet secured edge of the transition bars and use wire to connect them to the lower part of the backrest.
The chair-chair is now fully assembled. We squeeze the bars of the upper part of the “Back” together so that they fit snugly against each other.

Carefully grasping the top of the “Back” we lift and open our product.

Step 7. Fasten the wire.
The folding wooden chair-chair is almost ready. All that remains is to cut off the excess pieces of wire. The wire is cut using special scissors for cutting metal.

In order to secure the wire, threads must be applied to its edges. To do this, the wire is cut so that it protrudes beyond the bars by 7-10 mm on each side to secure the washer and nut to them.
If threading seems problematic, you can secure the edge of the wire with a staple, which will need to be hammered in well and such a connection will hold well.

This connection is less aesthetically pleasing, but quite reliable.
Step 8. Final.
At this stage we will deal with the finishing touches. If desired, you can use a sanding machine to sand the edges of the seat to give them a rounded shape.
Depending on the intended design, you can simply varnish or paint it.

The item folds easily and does not take up much space when stored.
This chair-chair made of wood can also be made in other design options. Ordinary light - just varnish the wood. Or paint the tree in any color that suits you. The result is a stylish product that can also be used as a chaise lounge.

Accompanying video
We also recommend:
All photos from the article
The cost of massive furniture is quite high, which is why many owners of country houses and summer cottages make wooden chairs with their own hands. With a modern tool at hand and a charge of healthy enthusiasm, any man can cope with this task without any problems. We will tell you how to build a wooden chair for your garden with your own hands.

Wooden garden chair
Peculiarities

Wood is the best material for making furniture. Despite a number of disadvantages that this material has, we have nothing better.
We chose wood for a whole range of qualities that, in our opinion, are ideal for DIY work in a summer cottage:
- Wood raw materials are very pliable for processing with primitive tools: drilling, piercing with nails and screws, grinding, milling, etc. We have to do manual work using simple means, so this moment is extremely important;
- Lumber is available almost anywhere in our country. Boards and beams are widely represented on store shelves, and their price is relatively low;
- The material is completely natural and does not contain harmful impurities, does not emit toxins or volatile toxic chemicals;
- Boards and beams emit a pleasant smell, and coniferous parts do this especially actively;
- The texture and color of the surfaces are distinguished by their unique beauty, which is perfectly suited for a country atmosphere.

Important!
The listed set of qualities makes wood the most suitable material for making a country chair.
It should be remembered that the product will be used in conditions close to extreme. It will be exposed to rain, the sun will shine on it, and it will be surrounded by insects, bacteria and fungal spores. Therefore, special attention should be paid to the choice of breed, finishing and treatment of parts with an antiseptic.
The most suitable species in our case are oak, beech, ash, larch and pine. For parts that will not experience increased loads, you can use linden or alder.
Important!
All wooden parts must be impregnated with an antiseptic complex and then painted or varnished.
Model selection

There are so many possible options for choosing a chair model that we see no point in considering them in detail within the article.
It can be:
- folding and stationary models;
- rocking chairs;
- single and double;
- children and adults;
- high and low designs.

We'll just give you a few tips.
You must keep in mind two basic rules:
- Choose those models whose design you completely understand. You must imagine in advance what and how you will do, what tools to work with and whether you can master this or that part;
- Consider the features of the place where the item will be used. A rocking chair or a folding model is perfect for a summer house; by the way, you will find drawings of a wooden folding chair with your own hands on our website.

Important!
Choose simple and reliable models that you know you can make.
Consider the features of their operation.
Making a chair

So, we will make the model shown in the photo at the beginning of the section. It consists of two sidewalls, three drawers and 35 transverse slats that form the surface of the seat.
The hardest part is cutting out the sides. We will present cutting on a metric grid with a pitch of 100 mm, according to which you can make a template and transfer the design to a sheet, from which you can then cut.
Modern man is accustomed to surrounding himself with all sorts of amenities wherever he needs. And country estates are no exception: in private houses and summer cottages, we also want to spend time in comfort, without parting with the usual urban conditions. Therefore, you need to think about purchasing comfortable country furniture that will be comfortable and durable.
An excellent solution for garden plots would be a cozy country chair in which you can enjoy spending time in the fresh air. Choosing the right chair for your garden is a responsible matter; you need to take into account several features of garden furniture.
![]()
Differences between country chairs and ordinary furniture in apartments
The country chair is more practical; it is specially designed for outdoor use. It is made from special materials that dry quickly or do not get wet at all, do not fade in the sun and are not inferior in convenience and practicality. Also, such material is easy to clean and practically does not wear out.

A distinctive feature of armchairs and chairs for the garden is their mobility: they can be easily moved around the site, and some can even be folded and stored indoors. Therefore, by moving the chair to the right place, you can sunbathe in the sun or relax in the shade.

![]() And if you are looking for a good massage chair for your cottage, then we recommend the US MEDICA store; they have the largest selection and variety of models, which will allow you to find the ideal solution. Modern massage chairs are not only comfortable and practical, but also beautiful and will easily help you quickly relieve fatigue. Comfort and modern design will help make the time spent in the chair truly enjoyable.
And if you are looking for a good massage chair for your cottage, then we recommend the US MEDICA store; they have the largest selection and variety of models, which will allow you to find the ideal solution. Modern massage chairs are not only comfortable and practical, but also beautiful and will easily help you quickly relieve fatigue. Comfort and modern design will help make the time spent in the chair truly enjoyable.
In the photo you can see what a massage chair will look like in the interior of a private house

It is worth understanding what options are available on the market, and what rules should be followed when purchasing.
Types of chairs for the garden
Manufacturers of country furniture provide a wide selection of interesting solutions that will suit even the most picky client. There are several main types of garden chairs, each with its own purpose and characteristics.

When purchasing, consider how you will use it to ensure it is as functional as possible. Below are photos of garden chairs, which are worth talking about in a little more detail.
Plastic chair for the garden
The most budget and unpretentious option. The variety of shapes and colors makes it possible to choose the right solution for relatively little money. A chair made of plastic cannot be called practical: it can crack or bend.

For health-conscious people, the plastic option may not seem the best, but manufacturers of modern furniture are trying to minimize the harm from plastic. Before purchasing, be sure to check the quality of the product; it should not emit unpleasant odors.

But due to their simplicity and low cost, they have become quite popular among buyers. They can easily be replaced with new ones if the old ones suddenly become unusable or your mood changes. If you like change, a couple of new armchairs or stools in a bright color will add variety.
Folding chairs
Since country furniture is quite often made of wood, it does not like high humidity. Therefore, in order to preserve your purchase for many years, you need to put it away under a canopy in rainy weather.

Furniture that can be folded and moved at any time is very mobile and convenient. This can be either a folding chair or a chaise lounge chair. Such models do not take up much space; when folded, they can be stored in a country house.

Sun loungers have migrated from beaches to summer cottages, as they are very comfortable and easy to care for. The material is durable and comfortable, and the ability to transport it only adds to its advantages. A bright and comfortable sun lounger on the site will give you the opportunity to get a gorgeous tan without visiting the beach or solarium.

Wicker chair for the garden
The consumable material for weaving is willow vine: it is practical and flexible at the same time, and wicker patterns look appropriate and beautiful in nature. By attaching a soft seat made of quick-drying fabric to the wicker structure, you can get a cozy option, ideal for relaxing in the fresh air.
The wicker chair is almost not deformed and does not wear out. With a little practice, you can make such a chair yourself; it will delight you for a long time.

Rocking chair for a summer house
If you want to take a break from the hustle and bustle and enjoy the surrounding greenery, a rocking chair is the right solution for you. This piece of furniture is made of wood, metal or willow: the material is safe and environmentally friendly.


This model should not be treated as an attribute of the elderly generation; modern rocking chairs are represented not only by classic versions, but also by unusual ones, somewhat reminiscent of a large swing. Thanks to the large number of options, you can buy a stylish chair that brings comfort.
Hanging chair
An unusual and original solution that looks very impressive and modern, ideal for suburban areas. It can be installed either on a special stand or suspended on brackets from a tree branch.

When choosing such a model, be sure to calculate the load on the fasteners to eliminate the possibility of breakage.

Find out detailed information about all characteristics in the store at the time of purchase. Products can be made from artificial rattan or bamboo, or woven from wicker. You have the opportunity to purchase suspended structures of any complexity in our store at a reduced price.

Do-it-yourself garden chair
Some models of chairs, despite their comfort and excellent appearance, are quite expensive. Not every middle-income summer resident wants to shell out for expensive models, and the first thought that comes to mind is to build something cozy and practical on their own.


Only an experienced craftsman can make an original and interesting chair with a complex design, but even a beginner can make a simple armchair for a summer cottage. An ordinary wooden chair fits perfectly into natural landscapes, it can be quite durable and practical if made properly.
To get a good result, you will need high-quality materials: hard woods such as oak or walnut are ideal. You will need not only boards and tools, but also special coatings: paints and varnishes for wood that resist rotting and getting wet.

Thanks to the processing of the finished product, it will last much longer, but even with a coating, you should not test the strength of the chair by leaving it in the rain. Cut out all the blanks according to the diagrams and instructions, treat them with a protective coating and assemble the finished chair.

However, not everyone likes to assemble furniture themselves; it is much easier to purchase ready-made products. Because chairs produced by companies specializing in the production of furniture inspire more confidence and guarantee a certain level of build quality.

In the store you can find a chair that matches the style and color. You can purchase both a set of compact portable armchairs and chairs for the dining area, and a small cozy chair for relaxing outdoors. There are significantly more variations.

Where to buy a chair for a summer house?
For people who do not want to tinker with boards and waste their free time, there are ready-made designs for every taste. By finding the optimal solution at a competitive price, you will enjoy the purchase.


But it is worth remembering that truly high-quality products cannot be cheap. It is advisable to purchase quality products during the discount season. Our store is holding sales on chairs for the garden: we offer you to purchase beautiful products at a favorable price.

Photos of chairs for the garden


