DIY carved baby crib. DIY crib. Attaching the general frame
One cannot but rejoice at the fact how quickly our children are growing up. So my daredevil has grown to four years old and no longer fits into his crib, which is one meter and twenty centimeters long. What kind of “pull-ups” are there now?!
This is what should happen.
As everyone well knows, comfortable crib for the baby - his guarantee harmonious development. Children spend much more time sleeping than adults. And if also living space small, the crib can serve as an excellent help instead of a playpen. No wonder they top the list mandatory purchases for a child.
My wife and I looked around several furniture centers in search of a new crib. However, we came to the conclusion that we would make it ourselves, since not a single model met our requirements:
- Exceptional solid wood, without MDF and chipboard, in extreme cases, use plywood. Personally, I even have some kind of genetic distrust of super-ecological imported chipboards;
- Mandatory presence on the crib to prevent the child from falling (well, at least small ones);
- The dimensions of the baby bed must be no less than 160x70 cm and no more than 190x80 cm (the dimensions are determined by us taking into account the space allocated for the crib and common sense);
- The bottom of the crib should be equipped with spacious drawers (since one-room apartment we have to fight for the rational use of every square centimeter);
- If available, the price of a bed should not exceed twenty thousand rubles (a sum personally allocated for these purposes from family budget).
For a long time we looked closely at all kinds of folding sofas, cribs, and discussed options with a sofa. But they couldn’t decide on a purchase: either the presence of chipboard, or the lack of sides, non-removable mattresses, tiny drawers, or “exorbitant” prices.
I eventually went to hardware store and purchased the following tools and materials from the list:
- furniture panels;
- aluminum corners;
- different-sized screws;
- wheels for drawers;
- drills and other household items.
This purchase cost me 8,500 rubles. For another 7,500, I also purchased a lattice base from an online store for 1,600 rubles (although I could have gotten by with a sheet of plywood). Total expenses amounted to: 17,600 rubles.

Here they are, my initial materials. The size of the mattress and lattice base is 180x80 cm. There will be a royal bed for my tomboy!

I'm making markings.

I use a jigsaw to cut the designated areas, although maintaining a perfect straight cutting line is not as easy as it might seem at first glance. I sealed the cut areas with paper tape so that the fibers would not lift up as much (I read about this on specialized websites).

To my great surprise, the tape tends to run out quickly. Therefore, we had to work further without it, the main thing in this matter is not to saw the stool!

For drawing complex shapes I actively used improvised means. I came up with a recess in the front side so that my son could climb into the crib himself. And it wouldn’t hurt for me to take a break on it!

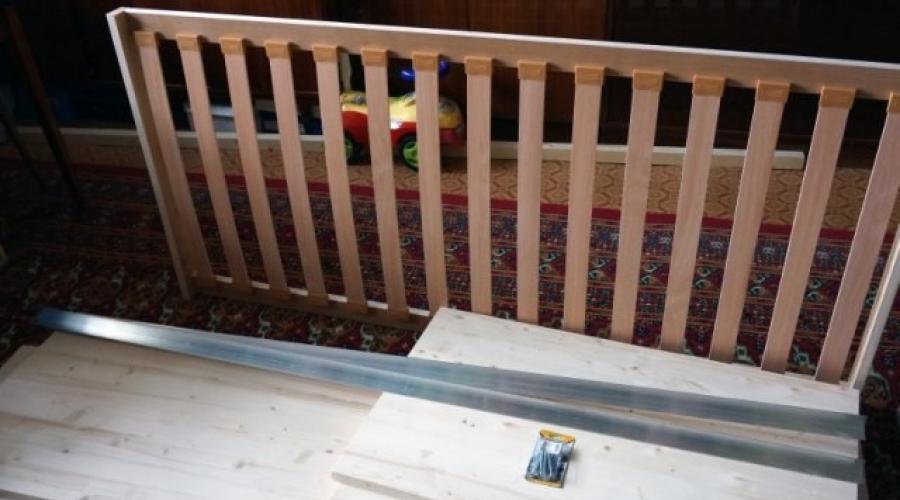
This is what happened, although before cutting it was a monolithic shield measuring 200x60x2.8 cm.


I made the holes and didn’t forget the rivet (it will be hidden under the head of the screw).

This inner side the front part of the sidewall, and the base of the mattress will be located on this corner. To begin with, I installed it on 4 self-tapping screws, but after thinking about it, I added four more for greater reliability. Fortunately, I bought self-tapping screws with a reserve!

He carefully laid the structure on its side, fearing that it might accidentally crumble at any moment. I carefully drill holes and fasten the panels together. Your own eye and a perfectly made mattress lattice are responsible for the straightness of the corners!

I fasten it with furniture ties, for which I prudently purchased a special drill, which saves a lot of time.

The first hole for the screed.

The first screed itself.

This is the result after all the twisting and fastening work is completed - an excellent, solid bed base!

I installed the bed in a specially designated place and laid out the mattress. I placed a panel at the bottom of the crib so it wouldn’t get in the way, and left everything as is for a while, since I can only afford to do construction and household chores on weekends. Our son had to sleep in an unfinished crib for a whole week, and during this time some flaws in the design became clear.
It turned out that sleeping without a headboard is not entirely comfortable, or rather very uncomfortable:
- in a dream, the child tosses and turns and, raising his head above the pillow, can accidentally catch the side, since its height is only 10 cm;
- a child can easily throw a pillow over the low side;
- the absence of a headboard means a lack of comfort; as soon as I lay down, I was immediately convinced of this.

It’s not pleasant when you contemplate bumps or bruises on your child’s head. I went to the store and bought two more small furniture panels to assemble the headboard. I sawed them as follows: for the back - one large sheet and two smaller ones - for the sides (the smallest one in the photo is just a trim).

This is me in a creative search to decide on the design and shape of the future headboard.

For symmetry, I cut out another part according to the shape of the back of the headboard.

According to Wikipedia information, emery (grinding) abrasive material is intended for surface treatment of various compositions(wood, glass, metal, plastic). Oh, I had a lot of trouble with this abrasive material!

I cut out a window in one of the sidewalls, which will serve more of a technical function than a decorative one. So I'm going to make an attachment to the side of the crib.

I make cuts in the bathroom. My wife (I give her a lot of credit for being patient) had to put up with a thick layer of fragrant spruce dust on all the toiletries.

To draw curves and bends, I again used all sorts of available tools.

It is very important to follow exactly the intended cutting line and not deviate even a millimeter from the course.

I twist, fasten, tighten, adjust

Since it is not possible to use a drill from inside the window, I had to drill a hole from the bottom up. Place for a hat furniture screed done by hand (lucky that spruce is a fairly pliable wood).

While creating graphic ovals, I felt a tremendous sense of satisfaction from my own artistic achievements, but after cutting, my masterpiece ceased to be an elegant, presentable design. But the ovals served their functional purpose very well, and the child enjoys looking at them before bed. He even uses them in his new fun: he covers himself with a blanket along with the headboard and, with the feeling of creating a personal reservation, waves to us through the side windows.

At this stage, construction work had to be postponed again until the following weekend.

The long-awaited weekend has arrived, and we are starting to make legs for the crib and assemble drawers. To do this, I needed a scrap about 20 cm wide from the end panel.

My imagination told me to make legs like this.

It is necessary to file the corners to the legs.

This is exactly how I originally envisioned attaching the legs to the crib base.

IN amazing world Our consciousness sometimes leads us into riddles and secrets (and it actually frolicked over me)! I still can’t find intelligible answers to the question: “Why did I decide to attach the legs of the bed in such a bizarre way?” This whole process could have ended with the elementary use of long self-tapping screws. But, apparently, at that moment I did not want to take a shortcut to achieving my goal.

Now it’s time to use the part of the front side that was simply temporarily attached to the bed. From 12mm plywood I cut the bottoms and sides for two drawers. For clarity, I somehow put this whole structure together.

Our bathroom has undergone a makeover again, this time in decorative coating aluminum dust (wood dust was heroically eliminated by my other half within a week).

I twist and fasten.

I install wheels with a diameter of 4.5 cm.

The fitting process without facades. We make sure that rotation occurs without any difficulty, even in the presence of a heavy load.

We complete the work by hanging the facades.

Sweet dreams, my baby!
P.S. The entire process of assembling and installing a crib will take you only a few days (in my case, three Saturdays). Advice for those who decide to follow my example:
- if possible, carry out construction and installation work outside the house (at the dacha, in the garage), since it is very difficult to get rid of traces of three-layer dust (wood, aluminum and emery);
- think and plan carefully first, then do (unlike my sequence);
- Order cutting of plywood and panels directly in the store, having previously indicated the exact sizes and shapes.
When a second child appears in a family, which happens often, the question of compact sleeping places for children inevitably arises. The most rational and aesthetic solution is to buy a bunk children's bed. But not everyone can afford it, but making it yourself is much cheaper and easier.
Pros and cons of a children's bunk bed
So double sleeping area for many families, it is sometimes the only acceptable option, because the advantages outweigh the disadvantages.
The main advantages of a bunk bed for children:
- it takes up little space in the room (in city apartments, where every square meter, this is a significant plus);
- a two-story bed looks beautiful if made by skillful hands with due diligence;
- it can simultaneously serve as a sports corner and a workplace for the child;
- Making a bunk bed with your own hands is possible with minimal carpentry skills.
But such furniture also has disadvantages:
- the whole structure sometimes looks too bulky due to its large height;
- a purchased bunk bed in cabinet furniture stores is expensive (from 7 thousand rubles or more);
- a child may fall from the second floor if the sides are not securely secured;
- the bed may turn out to be unstable; it will probably have to be additionally secured to the wall.
But all these disadvantages are not scary at all if you assemble the product yourself and follow all the recommendations of experts.
Photo gallery: bunk beds for children
A design with a ladder at the end will be convenient for both children to use. For a small room, a bed with a pull-out sleeping place is suitable. A bed with the function of a sports corner will appeal to boys. Symmetrical furniture will not leave anyone deprived. Sleeping places can be located perpendicular to each other. A staircase in the form of drawers will help save space. If desired you can make a whole functional complex. A bunk bed is also suitable for teenagers. A bunk bed can have different shelves and drawers in its design Classic version equipped with a regular staircase
How to make a bunk bed with your own hands (option 1)
And you need to start, as with any serious matter, by thinking through the design and drawing up a project.
Design description, drawing
Most often, the product is made of wooden blocks and plywood. This is the simplest and cheap option. Remember that the width of the bed should provide sufficient space and correspond to the standard size of the mattress. The optimal size is 80 cm.
As for the height of each tier, these parameters are taken individually. The first floor should be no lower than the tallest toy box, which will then slide under the bed. Usually it is 35 cm.
The second tier will rise to a height of 1.3 m from the floor or more. If you do below, certain inconveniences may arise. For example, an adult will not be able to sit up straight.
The total height of the structure should be approximately 2 m. More bad - the older (younger) brother (or sister), getting up in the morning, will poke his head into the ceiling. The length of the bed is assumed to be equal to the maximum average height of an adult. Ideally this size is between 1.75 m and 2 m.
The optimal width is 610 mm for stairs. It will be convenient to use for children and adults.
As for the distance between steps, it should be a minimum of 200 mm and a maximum of 260 mm. Otherwise, difficulties will arise for the child stepping from one step to another.
Material selection and quantity calculation
Bars are ideal for a bunk bed, since such material is inexpensive.
When selecting bars, you need to immediately look at their quality. You should buy only those that have as few knots as possible, a smooth surface and straightness that looks good to the eye. Pine or spruce are best suited. This material is inexpensive, durable and easy to process.
Let the height of the bed be 2 m, width 0.82 m, and length 1.88 m. Let's take the height of the first tier 35 cm from the floor, and the second - 1.5 m from the floor. We set the width of the steps to be 63 cm.
So, for the main frame you will need strong bars with a cross section of 40x60 mm. Remember that there will be 4 vertical posts of 2 m each and 4 horizontal crossbars of 1.88 m each, and you will also need 4 end horizontal beams of 0.82 m each. This lumber is sold in beams 2 m long. From each such beam you will get 2 end crossbars . As a result, you will need the total number of indicated bars N=4+4+2=10 pieces.
In addition, you will need sides made of bars with a smaller cross-section - 30x40 mm. The steps can be made from the same lumber.
 A homemade bed can always be styled to match the overall design of the room
 Now you can calculate bars with a cross section of 30x40 mm. The staircase will be located on the left side of the façade of the structure. In this case, the right ends of the steps will rest against a separate vertical post with their ends and be fixed to it. And the left ends will be overlapped and fixed on the front main vertical bed with a section of 40x60 mm. The steps themselves will remain with a rectangular profile. Their total number is 6 pieces (since we take the distance between them to be 250 mm, divide the height of the second tier by this value and get N=1.5/0.25=6).
So, for the stairs you will need:
- vertical right post with a section of 30x40 mm and a height of 2 m;
- steps of the same section with a total length L=6x0.63=3.78 m.
It is not difficult to calculate that from each block standard length 2 m will be 3 steps (0.63x3=1.89). This means that a total of 2 beams are needed for these elements. In total, we use 3 bars with a cross section of 30x40 mm and a standard length of 2 m for the stairs.
As for the sides, these elements are not needed below, on the first floor. On the second tier you can make two sides - on the facade and at the ends. On the back of the bed it is enough to make only one crossbar, because there will still be a wall of the room there.
The two front sides are each the length of the bed (minus the width of the stairs). The same applies to the rear. And the end ones are 0.82 m long. There are 4 of them in total. It is easy to calculate that from one piece of 2 m you will get 2 end beams. This means that in total you will need for the sides a number of two-meter bars with a cross section of 30x40 mm, equal to N=2+1+1+1=5 pieces.
 The surface of a homemade bed can be decorated as desired
 The flooring of the sleeping areas is made of plywood and reinforcing beams with a section of 20x20 mm. You will need an area of plywood equal to the area of the sleeping areas. Thus, using the dimensions of the bed, you get: S = 0.82x1.88 = 1.54 m 2. This is the area of one place. For the entire bed we take the value 3.1 m2.
It remains to count the bars with a cross section of 20x20 mm. You will need 4 pieces of two-meter blanks to secure them to the long horizontal bars of the bed. The sections reinforcing the plywood will later rest on these beams. There are enough such pieces for 8 pieces per single bed. Total length L=8x0.82x2=13.12 m. That is, 7 two-meter blanks. The total number of bars of this profile: 4+7=11 pieces.
In addition to wooden parts, it is necessary to use metal corners and screws. This design has 8 connection points for the most powerful beams with a section of 40x60 mm. For each such element you need to use 2 corners.
Self-tapping screws are enough for 100 grams of each of two sizes - 80 mm long for the main fasteners and 35 mm long for small things.
It is better to use black wood screws with a nominal diameter of 3 mm. They can be easily screwed into any wood without pre-drilling. And then the hats can be closed with special decorative “buttons”.
Now you can make a final list:
- block with a cross section of 40x60 mm - 10 pieces;
- blanks 30x40 mm - 3 beams for the stairs and 5 for the sides - 8 pieces;
- plywood with minimum thickness 3–5 mm and an area of 3.1 m2;
- block 20x20 mm - 11 pieces;
- metal corners - 16 pieces;
- self-tapping screws 80 mm long - about 0.1 kg;
- self-tapping screws 35 mm long - about 0.1 kg.
Before starting work, it is better to arrange all materials in separate piles, combining them by type and size.
Tools
To make a bunk bed you will need the following plumbing and power tools:
- screwdriver;
- jigsaw with a set of wood files;
- roulette;
- level;
- electric drill and wood drill with a diameter of 4 mm.
To assemble such a seemingly complex structure, you only need minimum set ordinary tools.
Step-by-step manufacturing instructions
All work on assembling a bunk bed consists of several stages:
- Cut long horizontal beams with a jigsaw, 4 pieces. The total length of the bed, equal to 1.88 m, includes the size of the profile of the verticals. That is, you need to cut horizontal beams each 1.8 m long. Since the vertical section has one of the dimensions of 0.04 m (40 mm), then during assembly the total length of the bed will be L = 1.8 + 0.04 + 0.04 = 1.88 m.
- At the next stage, just assemble the verticals with long horizontal beams. To do this, first place a two-meter piece of workpiece against the lower cut crossbar along the markings and fasten it with a corner. Then do the same with the top horizontal.
- Attach a second vertical to the other ends of the cut beams. Then, repeating all the operations, assemble another symmetrical unit consisting of bed posts and its horizontal beams.
- Having assembled the frame of the front and rear parts of the product in this way, connect these sidewalls into one structure. To do this, first cut 4 pieces of 70 cm long from a block with a cross-section of 40x60 mm. These will be the end rails of the bed.
- Combine them with other parts of the bed. First fasten with corners in the same places where the long horizontal beams are attached. Then strengthen the entire structure long screws, which screw into the “body” of the bars. If necessary, pre-drill holes for mounting with a drill. As a result, the width of the bed will be 0.82 m. This size includes a section of each end beam of 0.7 m and two vertical profiles of 0.06 m each (with a section of 40x60 mm).
- Now that the bed skeleton has been made, you can begin installing the stairs. To begin, cut six steps (from blanks with a cross-section of 30x40 mm) each 0.63 m long.
- Measure on the facade a distance of 0.63 m from the far left point of the bed and mark the location of the vertical rack for the stairs. Screw the right two-meter vertical ladder to the horizontal façade beams of the product.
- Attach steps in increments of 0.25 m, counting from the floor. Moreover, the left side should overlap the bedpost.
- The right end of each step should rest against vertical beam ladder Therefore, on the right, each time drive the screw into the vertical profile, and on the left, into the profile of the step through the bed post. To be sure, when installing steps, you can use a level, placing it on top of the mounted sections.
- All that remains is to secure the sides and cover the sleeping areas. Cut the beams for the fence from a bar with a section of 30x40 mm. For the end ones, the length is equal to the same length as the corresponding bed rails - 70 cm. For the front sides, mark the length in place, placing the blanks against the right bed post and the stairs. The guardrail should end where the right edge of the step is located. Finally, the backboard is equal to the full length of the bed minus two vertical profiles (1.88–2x0.04=1.88–0.08=1.8 m).
- Screw all the fences to the overall structure on the top tier. The pitch between the sides is 0.15 m.
- Arrange the flooring of the first and second berths. To do this, first screw a piece with a 20x20 mm profile to the bottom of each horizontal bed from the inside, having previously trimmed it. The pieces supporting the plywood will rest on this part. They should be 0.66 m long. And screw them to the support beams.
- Cut plywood the size of the bed and screw it to the main, strongest bed beams.
- It also doesn’t hurt to fix the flooring on the supporting sections. At this stage, use small self-tapping screws. The bunk bed is ready.
It is also advisable to attach the entire structure to the wall of the room using the same corners. Otherwise, when the child starts to climb the steps, the product may tilt.
Typically plywood is sold in standard sheets dimensions 1.2 m x 1.4 m. Cutting it is simple: first, a part is cut off to the width of the bed 0.8 m along the entire length of 1.4 m. Then it remains to cover approximately 0.5 m of the sleeping area. Two rectangles of 0.4 m x 0.5 m each are sawn off from the remaining piece of plywood measuring 0.4 m x 1.4 m and the open space is covered with them.
You can already use the bed, but it is better to further decorate it in order to avoid the feeling that something is missing.
Decorating the structure
First you need to coat the wood with varnish. It is better to use a matte finish for this purpose, since a glossy one gives off an old look. You can use inexpensive stain instead of varnish. It emphasizes the structure of the wood well. The coating is applied with a simple brush.
 Decor depends on the gender of the children
 But in addition to painting, it would be a good idea to attach some kind of façade to the sides to match the color of the furniture occupying the children’s room. Anyone will do universal option. The dimensions of the facade should be such that all the sides are hidden behind this part. It’s best if you can choose a decorative laminated chipboard with rounding.
Don't forget that a children's bunk bed requires beautiful mattresses. They are, of course, not cheap. If such mattresses are unaffordable, you can purchase a simple version with cotton filling.
How to make a bunk bed with your own hands (option 2)
The second type of product is assembled from chipboards.This design will ultimately look more beautiful, but the costs and effort will increase noticeably.
Design description, drawing
The backs of such a bunk bed are made from solid parts. The same applies to sides and decking. Chipboard data the right size order from a carpentry shop. There they will be made in the desired color and according to the required parameters, and all the ends of the slabs will be decorated.
Now you need to decide on the sizes. Let the backs of the structure be 1.8 m high and 0.8 m wide (2 pieces each). The standard plate thickness is 16 mm. At the bottom it is necessary to provide supporting plastic pads, which are nailed with small nails.
Make the length of the bed equal to 1.8 m. This means that for the flooring, order two slabs measuring 0.8 m x 1.8 m. To strengthen the structure, you will also need supports for the flooring - long slabs in the form of boards measuring 0.2 m x 1.8 m in the amount of 4 pieces.
The sides will have similar dimensions. They will only be needed for the top tier. Dimensions of long facade parts (2 pieces) - 0.4 m x 1.8 m.
Draw a rough sketch.
Of course, the slabs do not have to be ordered perfectly rectangular. For beauty, you can provide different cutouts and curves. And below, if possible, there may be drawers.
As for the stairs, make it from the end. To do this, additionally order 5 steps made of chipboards. The first measures 0.8 m x 0.48 m, the second is 10 cm narrower. And so on: each one decreases by 10 cm. Let the right side of the stairs be the headboard of the bed. Order the left slab with dimensions of 0.8 m x 1.36 m, and provide for a bevel of the upper part.
List of required materials
So, you will need:
- chipboard board (16 mm thick) 1.8 m x 0.8 m - 4 pieces;
- sheets 1.8 m x 0.2 m - 4 pieces;
- sheets 1.8 m x 0.4 m - 2 pieces;
- 5 slabs for steps (the first one is 0.8 m x 0.48 m, each subsequent one is 10 cm shorter);
- side slab with bevel 0.8 m x 1.36 m;
- hexagon furniture screws - about 50 pieces.
The latter are used to fasten the structure. They are also called Euroscrews.
List of required tools
You will need a few tools:
- roulette;
- electric drill with a drill with a diameter of 4.5 mm;
- hex key for Euroscrew;
- screwdriver
Children's bed with drawers
All parents know that the child’s mood and well-being throughout the day directly depends on how well he slept. Furniture stores offer a wide range of children's beds, but the best option for a sleeping place for a baby will be a bed made by the caring hands of a father or grandfather.
We make a crib for a child ourselves
 Children tend to sleep much more than adults, so it is very important that their bed is comfortable and comfortable. Parents can take care of arranging a place for him to sleep even before the birth of the child. Even a man who has never held carpentry tools in his hands can easily cope with making a bed for a baby. The entire process may take up to 12 days.
 A wide variety of cribs for children makes it possible to make for your child exactly the kind of bed that he will like and will fit perfectly into the design of the children's room. You can find many ideas for original cribs on the Internet. You can create your own bed drawing or use a ready-made one if the dimensions of the product suit you.
What parts does a child's bed consist of?

Children's bed assembly diagram
1. Mattress – preferably orthopedic. Don't try to do it yourself. This is exactly the crib part that is best to buy. From birth, the child’s skeleton is formed, so there is no need to save money and risk the health of your baby.
2. Frame – depends on the size of the mattress. The material for the frame will be dry planed board.
3. Lamels - are a lattice of slats, which is located in a sheet of thick plywood or frame. Have ventilation holes with a diameter of up to 50 mm. They are installed in the bed frame to support the bottom of the mattress.
4. Sidewalls – for the safety of the child, they act as a fence. Can be lattice or solid.
5. Byltsa - at the head they are higher than at the foot.
6. Legs – can be attached separately or located in a monolithic plane with the sidewalls. You can purchase it at a furniture store, in the accessories department, or make it yourself.
What do you need to make your own baby bed?
As you know, parents always choose the best for their child, so environmentally friendly materials should be used for the crib.The visible parts of the bed are made of MDF. You can choose the wood and texture based on your budget. The crib may need to be moved frequently, so it is best to choose lightweight wood. A suitable option There will be blanks measuring 16 mm. Internal parts can be made of plywood or wooden blanks having a thickness of no more than 20 mm. MDF is easy to process and cannot be laminated. Therefore, you can glue the parts even with PVA glue, which is absolutely safe for children. A laminated surface can only be glued with nitro adhesive, which contains dangerous substances. chemical compounds.
Advice! It is recommended to buy MDF not in a store, but to order it from furniture workshop. This is much cheaper and more convenient, since furniture makers will be able to immediately cut it into pieces of the required sizes and edge the edges.
To make a bed for a child you will need lumber. These will be 5×5 cm timber and 2×10 cm boards. It is best to take the timber with a total length of approximately 8 m. If it is impossible to purchase a whole timber, take individual pieces. You need up to 10 boards. Even ordinary plywood will work well. Choose your sizes carefully. They must correspond to the future dimensions of the bed. All lumber must be edged and planed. You will cut the boards yourself to the required size and select the quarters and grooves.
Advice! It is not recommended to use chipboard as lamellas. This material is not elastic, so it may not be comfortable for a child to sleep on this bed base.

Child bed with ladder and table
Crib making process
In order to know what size your child’s bed will be, the first thing you need to do is purchase a mattress. Standard sizes children's mattress are 1200x600 mm. It is best if it is made from coconut fiber and impregnated with latex. Now you can start determining the size of the bed.The bottom surface is determined according to the height, so that it is convenient for the child to climb onto the bed independently. For a child 4-6 years old, it can be up to 35 cm. There should be a distance of no more than 12 cm between the walls of the bed and the rods. This is necessary to ensure the safety of the child, since all children love to stick their heads between the rods of the side walls of the bed when playing.
After all the calculations have been made and materials have been purchased, you can begin making the bed itself. The first stage in carrying out any work is preparatory. You should devote most of your time to it.
1. The boards are processed on a machine. Their width should be 7 mm and thickness 35 mm. You can use timber as a frame. For it you will also need 6 bars, which are laid across as a base for the mattress. In each of them, nests measuring 25 mm are made.
2. For convenience, it is best to mark them simultaneously. This way you will save time and reduce errors. Nests are made using a milling machine or slotting machine.
3. It is necessary to calculate the backrest frame. To do this, 600 mm is folded with a wall thickness on the sides of the crib in double size and add 25 mm.
4. For the rods, use 20x20 mm slats.
5. We connect the poles and backs with the side walls with blind spikes.
6. Glue the back and connect the sides. We fasten all parts of the children's bed with bolts.
7. Cover the finished bed with three layers of varnish.
The bed for your baby is ready! If desired, handicraft mothers will be able to independently decorate their child’s crib with protection on the sides, a canopy and pillows. All this can also be purchased in the store.

Crib parts
Crib options for children
So, there are many options for cribs. Let's give examples popular models sleeping place for children:loft bed;
transformable bed;
bunk bed;
pull-out bed;
rocking bed;
bed in the shape of a car.
For children from 5 years old most suitable model there will be a loft bed. You can place a cabinet under the bed, which is very convenient for storing toys and various things. This bed is very convenient for small children's rooms.
Transformable bed allows you to save money usable space in a room shared by several children. Their convenience is that daytime day, the bed is removed, and a table is moved in its place, or part of the room is simply vacated. To do this, a frame is attached to the wall into which the bed is placed. The front of the bed, which will be visible when raised, is best decorated. Transformable beds can be vertical (bed-wardrobe, folded out lengthwise) and horizontal (bed-dresser and sofa-bed).
 Bunk bed
Great for two kids. Can be made on wood or metal frame. For an apartment with low ceilings, this bed option is not acceptable.
Bunk bed
Great for two kids. Can be made on wood or metal frame. For an apartment with low ceilings, this bed option is not acceptable.
Pull out bed grows with your child. It can be used long time. Has safety sides. Consists of two parts. There are wheels on the bottom that allow you to slide it under the top.
 Bed in the shape of a car
- the dream of every child. In stores, such beds are not cheap, so dad can easily make one himself. The main thing is to find a good drawing and choose a mattress.
Bed in the shape of a car
- the dream of every child. In stores, such beds are not cheap, so dad can easily make one himself. The main thing is to find a good drawing and choose a mattress.
Suitable for your baby from birth rocking bed . You can easily rock your baby with one movement of your hand, providing him with sweet Dreams. The inconvenience is that such a crib is suitable for a child up to about a year old. Having learned to walk, he may accidentally fall out of it.
The birth of a child is new stage in the life of a young family. They prepare for it in advance, at this moment the parents become closer, jointly showing care for their child. Things necessary from the first days appear in the house: oilcloths, diapers, diapers, a bath, special hygiene products, a personal sleeping place. The cost of all the required items can be very burdensome for young couples, sometimes unaffordable. Many people try to save money, for example, they make their own toys or make a crib with their own hands.
If you draw up a drawing correctly and plan the design of the bed, then the furniture can be used for a long time, from the moment the child is born until his fourth or fifth birthday. It is extremely important to teach your baby to sleep separately from the first day. It is unacceptable to put him to bed in his parents' bed. Although most mothers sleep very lightly, something irreparable can happen in their sleep. In addition, it is difficult to wean a child from the parental bed.
Advantages and features of making a bed with your own hands
Furniture stores sell many models of cribs made from various materials. Wood and its derivatives are mainly used, but there are also plastic options. It is not always possible to find furniture for a newborn that meets all requirements, and suitable products vary greatly at a high price. In this case homemade designs will be an excellent alternative, they have a number of advantages expressed in the following:
- Price. Furniture made by yourself will cost much less than purchased analogues, which will help save the family budget.
- Reliability. During the preparation and assembly process, the strength of all components is checked at each stage.
- Environmental friendliness. A bed for your son or daughter is made only from natural wood, which does not emit harmful substances.
- Exclusivity. A independently drawn up drawing will be the key to an individual, unique product.
- Gaining experience. While working, a person acquires new skills that can later be used in the production of similar items.
- Compatible with the interior and style of the room.
When making a bed, you should adhere to certain rules:
- for work it is necessary to use exclusively environmentally friendly materials, which include natural wood;
- the surface should not have sharp corners, roughness, chips, protrusions;
- The product must correspond to the height, weight, and physiological parameters of the baby.
- It is necessary to provide protection against falling and rolling of the child.
- For small apartments or houses, multifunctional structures are suitable; for this you can use free place underneath them, install additional drawers, make a play area.
Designs and sizes of children's beds
The easiest way to make standard furniture, which consists of four legs, a frame, a mattress and a headboard. The model is used exclusively for baby's sleep. If you fence the sleeping area around the perimeter with walls with bars, you will get a classic crib for a newborn. Although for this category you can use a cradle, playpen, rocking chair, and attached options.
IN small rooms It is more practical to install multifunctional items. To do this, they are equipped with drawers, a chest of drawers, and other useful elements. A bed with a loft, where the sleeping place is placed on the second tier, is very functional. From below you can organize playground, install lockers for storing items.
Furniture made in the shape of a typewriter looks unusual. This is an option for older children who have not reached adolescence. Non-standard design will allow you to make invisible cabinets inside, hidden under the hood or behind the door. You will have to tinker with many elements, which will require certain carpentry skills.
Among non-standard designs, you can choose a bed-house. This model is suitable for children over 3 years old. There are all the elements of a standard item, as well as doors and windows, gable roof. Decorative products will decorate any interior and will delight every child.
What material are beds made from?
At independent construction For children's furniture, you need to decide on the materials that will be used during the work process. The main requirement is that the raw materials used must be environmentally friendly and not harm the baby’s development. Let us dwell on this issue in more detail, consider best option for all components designs:
- Mattress. It is recommended to purchase it in a specialized store, since purchased models are produced taking into account the recommendations developed by orthopedic doctors. If you plan to use the bed for more than one year, then it is better to choose double-sided products with different degrees of hardness. For children under three years of age, a hard, rigid covering is required, which helps to support the back, proper development body. The filling should be wool; you should not take models that contain cotton wool and foam rubber. The upholstery should also be made of natural fabric and have an antiseptic coating.
- Frame, slats, legs, sides. For your beloved child, you should choose only a tree. Suitable for work conifers: pine, spruce. Natural wood It breathes, it is quite durable, and will suit any interior. Those who decide to use MDF or chipboard should remember that the boards contain phenol and formaldehyde resins, so it is necessary to take only models with emission class E-0.
- Protective means. To extend the service life, wooden surfaces process special compounds, they are painted and varnished. For these purposes, nitro enamel, acrylic, water-based paint for children's rooms. An excellent option would be to use wax. To preserve the wood texture, you can use acrylic varnish; other options are highly toxic.
Subject to availability Money You can purchase dense types of wood: solid oak, larch. This is the most durable material, the products look rich, but processing the raw materials is quite difficult.
Making a bed with your own hands
Having firmly decided to build a structure yourself, you should understand all the nuances associated with its creation. Initially, a drawing is developed that displays all the component elements. Then they acquire the materials necessary for the work, prepare the tools, and if any of them are missing, they buy them in addition.
Based on the diagram, raw materials are divided into component parts. They are cut out, combined into a single structure, treated with special compounds, painted, varnished, and decorated. For clarity, we will consider in detail the main stages that the process of making a classic crib includes.
Drawings and diagram
The creation of any object is impossible without a drawing. IN graphic representation, made to a certain scale, the dimensions of the nodes are indicated. To compile it you will need minimal drawing skills, you can also use special programs. When developing a project, you should consider:
- Dimensions of the room where the product will be installed. The spacious room can accommodate a larger bed.
- The dimensions of standard products for children under three years of age are 120x60 cm. If you plan to use the design in the future, preference should be given to larger models 150x60 cm, 180x70 cm.
- At the bottom of the crib you can equip cabinets in which children's things will be stored.
- For preschoolers, it is worth providing removable sides that will protect them from rolling and falling.
- Design and decorative design is selected depending on the preferences of the parents.
Required tools and materials
To make and assemble the bed you will need the following materials:
- board;
- MDF sheet;
- varnishes and paints;
- screws, fasteners, rubber heels for legs.
Tools:
- wood saw, jigsaw;
- hammer, screwdriver, screwdriver;
- drill, drill bit;
- measuring instruments, a simple pencil.
Main parts and their preparation
A standard bed consists of 4 legs, 2 backs, sides, removable sides, frame, slats, mattress. The last element from the list is purchased ready-made, the rest are made by hand. The process looks like this:
- In accordance with the drawing, markings of all components are applied to the tree. This can be done using a tape measure and a simple pencil.
- The elements are cut using a jigsaw or saw.
- The components are sanded with sandpaper.
- Depending on the length of the sidewalls, metal corners are cut out with a grinder and used to install the mattress. Holes are drilled in them for self-tapping screws to secure them to the tree.
- All components are painted and varnished.
Main assembly steps
Work on assembling the bed is carried out in the following sequence:
- The backrests located at the head and foot are assembled. They are connected to the legs.
- Prepare the base for the mattress. To do this, metal corners are attached to the wooden sides using self-tapping screws. The lamellas are fixed to them from above, perpendicular to the side walls.
- The backrests and the base under the mattress are connected using furniture fittings, for reliability it is better to use corners.
- A mattress is installed on the frame.
- Removable protective sides are added to the sides, secured to special metal or wooden fittings.
- If necessary ready product decorated.
Manufacturing and assembly of a bed-machine
Children will be delighted with this design. Anyone can make it. To do this, you will need to draw up a drawing or download it online. After which you can start cutting out the components and assembling. The work consists of the following stages:
- The side and front walls are made from furniture panels.
- Cutouts are made on the side surfaces, imitating car doors, through which it will be convenient for the child to get inside.
- On one of the end parts, using a jigsaw, carefully cut out holes for the headlights and radiator.
- Next, several more planks are cut out to imitate a car hood and windshield.
- The wheels are being prepared.
- Attached to the side walls wooden corners, on which the base for the mattress is laid.
- A rectangular frame is assembled from the prepared parts and mounted on wheels.
- The resulting workpiece is painted or varnished.
- The base is fixed inside the frame and the mattress is laid.
Features of assembling a bed for newborns
For newborns, the bed design should be slightly different. Its standard size is 120x60 cm; when the child reaches 3 years old, it will become a bit cramped for him. When planning, it is worth considering the possibility of adjusting the height of the bed. When the child is small, it is convenient to place him higher, but as soon as he learns to stand up, the bottom will have to be lowered for safety.
For comfortable sleep crumbs, parents, neighbors, it is worthwhile to provide one removable side or end wall in the crib, which will allow it to be placed near the parent’s wall. The distance between the rods around the entire perimeter is made within 2.5 - 6 cm. These are the optimal sizes at which the child will not be able to pinch his fingers or stick his head through. Do not forget about the strength of the product and good fixation of removable elements.
In addition to the listed features, the legs of the bed are often installed on wheels, making it mobile. Pendulum mechanisms or rocking chairs are also equipped. Their use is recommended by pediatricians. This makes it easy to lull your baby to sleep. It is advisable to use the bumper only in the first months; subsequently it should be removed to increase the overview of the child’s understanding of the world.
Bed decor with soft sides of your own making
Not only dad can contribute to the family budget by building a ready-made crib. Mom can also join this process by decorating the product with soft sides. Externally, the craft resembles covers stuffed with filler. In addition to a decorative function, they also have a practical function: they protect the baby from accidental impacts on the bars, and do not allow him to stick his hand between them. When sewing them, certain requirements must be observed:
- The fabric should only be natural; linen, calico, and cotton are suitable. Wool must be used as filler.
- It is better to choose the material in light, pastel shades, which have a good effect on the child’s psyche.
- If a drawing is provided, then it should be made in medium size; a small one will irritate him.
Master class on making a bunk bed
This perfect option for a family with two children of the same age, be it a boy and a girl or same-sex children. The design of a bunk crib is similar to a single-tier crib. The only minor differences are the presence of a ladder, the height of the product, and the mounting of two stocks on the same supports. For safety, there is a side on top located around the entire perimeter. To understand all the intricacies of the model, consider a master class on making such a bed:
- We prepare boards with a section of 3.5x10 cm. According to the chosen pattern, we cut out 4 blanks of 190 cm, 4 of 180 cm, 4 of 80 cm.
- On 190 cm boards, retreating 30 cm from each edge, we make grooves on both end sides, top and bottom, for the width of the crossbars 3.5x10 mm.
- Assembling the side backs. To do this, two support legs are connected using 80 cm segments.
- The finished backs are connected using 4 pieces of 180 cm each, installed in the outer end grooves.
- We make the base for the mattress from above and below. To do this, slats are nailed along the perimeter of both tiers on top of the sidewalls. Here they can not be recessed, thanks to the sides located in a circle.
- We install the stairs. Its length should be the distance from the lower edge of the side partition to the upper edge of the support.
- We install the sides and lay the mattress.
Making your own bed with storage drawers
You can take any drawing as a basis for the manufacture of such a design. standard bed. The only difference will be the presence of full side walls and drawers. First of all, it is necessary to determine their number. This could be one element that occupies the entire space under the crib, two, or even three. It is also worth considering the type retractable parts. There are two cardinal different options: independent from the main body, attached to the frame, retractable on guides.
The process of constructing the product will be similar to preparing and assembling a regular single children's bed. Here it is necessary to provide not legs, but side walls and intermediate partitions on which the guides will be attached. It is also worth considering the fact that the gap between the floor and the bottom of the tray should be at least 1 cm.
To make the box itself, you will need to prepare four pieces of wood; their dimensions depend on the size of the space under the crib. Next, they are connected into a rectangular or square box, a sheet of chipboard or plywood is nailed to the bottom. To strengthen the structure from the inside, 4 support strips are installed from below along the entire perimeter, and an inset bottom is made, which allows you to store heavier items.
Decoration methods
Equally important for a child's bed comfortable conditions and practicality of design. To improve the baby's conditions, auxiliary decorative elements, which also carry a number useful functions. Let's consider the most popular options for decorating this item:
- Canopy. An elegant canopy that is sewn from any natural fabric. This item is recommended to be used for up to 4-5 months.
In addition to decoration, the product serves as protection against insects. It collects a lot of dust, so it needs to be washed often.
- Canopy. Unlike the previous option, only light, transparent materials are used: tulle, organza, veil. Fastening is done using a rod.
- Valance. This is the frame of the lower edge of the bed. He closes bottom part furniture, which will perfectly disguise some mistakes made when making a crib yourself.
- Hanging toys. Often hung in pairs with a music mobile. This type of decor is made from cardboard or fabric. Contribute to the development of the child. May have the most varied look, be it snowflakes, animals, flowers or others.
- Stickers. You can buy them at any furniture store. When fixing them, you should make sure that the child cannot reach them.
Painting a bed - which paint is best to use?
At industrial production children's beds use oil paints. They improve appearance, protect the surface from damage, they are easy to clean from dirt. At independent choice coloring agents, you should study their composition, make sure that it does not contain toxic, poisonous elements. These requirements are met:
- Water-based acrylic paints. They are distinguished by high cost and good performance.
- Nitro paints. They have no distinct odor, are inexpensive, and dry quickly.
- Water-based. Characterized by a long service life. With their help you can hide shallow cracks.
- Wax. The most expensive option. This is an impeccable, high-quality coating with water-repellent properties.
A person cannot live without a pillow. This is device related human body. Element supports bending cervical region spine, promotes blood flow to the brain. This item begins to be placed on the child at the age of 1-2 years, depending on his physical development. The product must have rectangular shape from 30x40 to 40x60 cm. Its thickness should be: for children under three years old - 3-4 cm, after - 5-6 cm. Its elasticity plays an important role; a pillow that is too soft will lead to pain in the cervical vertebrae and rapid fatigue.
Bird down, natural wool, buckwheat husk, holofiber, and latex are used as filler. The last three options are the best in terms of elasticity. When selecting fabric material, preference should be given to natural fiber treated with antiseptics. It is better to choose models in which the cover is fastened with a zipper, then you can control the condition of the filler.
Unlike a pillow, a mattress is necessary from the first days of a child. It must be hypoallergenic, safe, and absorb and evaporate liquids without problems. For kids too great importance has elasticity, so it is necessary to take only orthopedic products. Otherwise, the requirements for filling and covering are almost the same, as for pillows.
Choice of bed linen
Any person gains strength during sleep, and babies still grow and develop. Every parent wants to make this moment calm. In this matter, they are helped by bed linen, which should be of high quality, made from natural materials. For these purposes it is used following types fabrics:
- cotton,
- chintz,
- satin,
- calico,
- bamboo.
The color of the selected canvas should be neutral; it is better to use pastel, light colors that are conducive to sleep. For newborns, a product without a pattern is suitable; for older children, but not teenagers, underwear with a print of their favorite characters from cartoon series is suitable. Also, when choosing bedding, you should pay attention to:
- the material should not lose its structure and color from frequent washing;
- Do not take underwear with buttons, ribbons, or lace;
Conclusion
Having studied ready-made diagrams, having considered all the positive and negative aspects associated with making a crib for your baby yourself, any parent will build similar design. In this case, all family members can participate in the process. Dad will prepare and assemble the frame, and mom will select a mattress, pillow, bed linen, and make decorative elements with her own hands. This will not only save the family budget, but will also show the child that he is cared for and loved.
A crib is the first piece of furniture that young parents acquire. As a rule, a sleeping place is purchased before the baby is born. But children grow quickly and after a few years the cozy crib needs to be replaced by a more spacious bed. Quality furniture It is not easy to find, and its prices are not affordable for every family budget. If you have certain skills, you can go the other way and make a bed with your own hands.
Crib diagram 
Cot  Children's bed
Ideal children's furniture should have the following qualities:
- made from natural, safe materials;
- have a “breathable” design;
- have enhanced strength;
- do not have sharp corners, protrusions or other dangerous elements;
- have a smooth, polished surface to eliminate the risk of splinters and scratches;
- match the height and weight of the child;
- protect the baby from falling;
- have high functionality (in addition to the sleeping place, there are also sections for storing things).
 Crib diagram
  Cot
Cot Benefits of making a baby bed yourself.
- You are confident in the quality of the materials from which the crib is made, since you choose them yourself and work with them yourself. For store-bought products, this parameter is not always obvious.
- You develop the design of the bed taking into account the individual needs and characteristics of the child (if any), the dimensions and stylistic orientation of the room.
- You can independently test the strength of the bed structure during the manufacturing process and ultimately be sure that jumping on the mattress will not end in breaking the furniture.
- You save significantly if you compare the cost of a home-made bed with store prices;
- You get real pleasure by creating furniture for your son or daughter with your own hands.
 Crib design
  Children's bed made of wood
 Deciding on the design of the bed
The easiest way to make a classic crib is a frame, four legs, a headboard and a mattress. However, this model carries a minimal functional load - it simply provides the child with a sleeping place. Suitable for a spacious bedroom of one child, where there is already a spacious closet, and there is no need for additional places for storing things.
If the children's room does not have impressive dimensions, it would be more practical to supplement the bed structure with drawers or even a chest of drawers. This will allow you to more effectively organize the space in the room.
 Baby crib with chest of drawers
  Wooden bunk bed
 Even more functional is the loft bed. It allows you to raise the child’s sleeping place to the second tier, and below organize a wardrobe, table, bookshelves or sports section– depending on the child’s needs. However, such a design will require serious skills in the process of creating a bed. If you are just starting your journey in furniture making, it is better to stick to the first two options.
Finally, bunk beds are especially popular. This is a great way to comfortably accommodate two children in a small children's room. However, as in the case of a loft bed, it is not easy to make a two-story bed yourself and before starting work it is better to carefully weigh your strengths and capabilities.
Let's look at further instructions using the example of creating a bed with drawers. This is a fairly simple option and is suitable even for a person with minimal skills in creating furniture. At the same time, such a crib is practical and functional.

 Children's bed made of wood
  Wooden children's bed
 Required materials and tools
It is better to make a bed from solid wood. This is the most environmentally friendly and safe material, allowing you to create truly durable furniture. Light wood MDF works well. Heavy solid wood is not suitable for children's beds, since this furniture has to be moved and rearranged often.
 Cot
Cot  Children's bed made of wood
 In addition to MDF blanks, you will also need wooden beam for lamellas. For this part of the bed, choose an elastic material (for example, plywood is suitable in this case, but chipboard is not).
In addition to wood and plywood, you will need:
- special metal corners;
- screws and other fasteners of various diameters;
- guide elements for drawers;
- drill;
- electric jigsaw;
- Grinder;
- sandpaper;
- paper tape.
 Solid wood children's bed
  Children's bed design
 In addition, at the final stage of making the bed, you will also need a mattress. When choosing, do not skimp, give preference to a high-quality orthopedic model. An important nuance - although the mattress is installed last, it is better to purchase it in advance and make a drawing of the bed based on its actual dimensions.
 Children's bed diagram
  Children's bed design
  Children's bed with chest of drawers
 Let's start production
Before starting work, decide on a drawing of the bed model that is suitable for you. Next, get to work.

 Children's bed made of wood
  Children's bed
 Decor variations
A simple bed with drawers usually does not require any special design solutions. As decoration you can choose original pens For drawers or make a carved headboard. You can also paint the bed in your chosen color, highlighting the design of the rest of the children's room. An option with painting of the headboard or legs is allowed, the use of special decorative stickers and other decorative elements.
You can emphasize the classic design of a children's bedroom with the help of carved legs or sides.
If you have certain skills, the sides of such a bed with drawers can be made in the form of the walls of a car, resulting in a car bed that is popular today. For girls, you can make a sleeping place in the form of a carriage. However, many young representatives of the fair sex also like the options with cars, except that the colors are better in more “feminine” colors.
 Solid wood children's bed
  Children's bed with wall mounts
 Carved handrails and slats can be used to decorate a bunk bed. A more difficult option is to issue bunk bed or a loft bed in the form of a castle or fortress, or a tree house. To do this, it is enough to cut out the facade of the appropriate type and paint it in accordance with the sketch.
Whatever bed you decide to create with your own hands, remember: you are creating furniture for a child. Approach the task responsibly. There are no small details in creating furniture - the safety of those who will use this furniture depends on the grinding of every corner and the strength of every joint. Put maximum effort, care and love into your product - and such a bed will give your child good dreams, and you - joy and satisfaction from the work done.
Video: Wooden crib
50 photos of crib ideas:
