Do-it-yourself repair of a Baikal perforator. Do-it-yourself repair of a perforator. Diagnostics of wires and buttons of a puncher with a multimeter
Read also
A rotary hammer is a tool that requires a serious attitude during its operation and disassembly. To do this, you need to know its device, all the nodes included in the design of the tool. Quick orientation in the device and knowledge of how to disassemble the hammer will help to avoid unnecessary expenses both financially and in terms of labor.
A hammer drill, unlike a conventional drill, can easily drill concrete and other durable materials.
Any, even the most insignificant, failure in the operation of the device can lead to breakdowns of a more serious nature. To quickly find a breakdown of the tool will allow its phased disassembly. It is important to know the cause of the breakdown and how to fix it. Disassembling the tool involves following a certain sequence.
Do-it-yourself step-by-step disassembly of a perforator
To begin with, the upper assembly of the perforator is inspected, which is disassembled primarily into its components. All parts are removed in the following order:
- Tip.
- Washer.
- Spring.
- Ball.
When the last part is removed, you will need to unscrew all the screws holding the case. Next, remove the overlay on the handle, if any, after which it is required to disconnect each wire from the starter. Then the brush holder is removed.

At the next stage, the gearbox and housing are disconnected until a gap appears through which the switch should be removed. Next, the device should be fixed in a vertical position using a vise. This will allow you to get all the details out of it.
You can use the services of the appropriate service to disassemble the punch. By doing it yourself, you can save a lot of time and money on equipment repairs. During the execution of work, you should follow the step-by-step instructions:
- Disassembly begins with the upper assembly, after removing the tip, washer, and at the end - a spring with a ball.
- When the ball is removed, you can begin to unscrew the screws that allow you to hold the case.
- After that, remove the overlay on the handle, if any, then disconnect each of the starter wires.
- Remove the brush holder.
- Disconnect the gearbox from the housing until a gap is formed so that the switch can be removed.

The final stage of disassembling the perforator involves vertical fixation of the tool using a vice, then all parts and spare parts are removed from it.
The disassembly of the tool should be done with the utmost care, since it is imperative to remember the locations of individual parts and the sequence of their extraction. You should choose a special place for them, otherwise they may get lost, rolling somewhere, and the hammer will not be repaired.
Back to index
What could be the reason for disassembling the perforator
Even if the puncher is in good condition, it still needs to be cleaned periodically for prevention. For this purpose, the device is disassembled, while replacing worn parts. The process of disassembling tools from different manufacturers is approximately the same, with the exception of some nuances.
Before disassembling the device, the causes of breakdowns are established, which may also depend on the surface of the device. For example, very often there is an unsatisfactory condition of the plastic anther on the cartridge due to its wear.

The reasons for disassembling the perforator can be instability of work, the smell of burning, strange sounds when working with a tool.
This is the reason for the loss of stoppers. In order to prevent the problem, it is necessary to use long drills in the process of working with the tool.
The main prerequisites for the repair of the device and its disassembly may be the following:
- Instrument instability.
- Occurrence of strange sounds when the device is turned on.
- The appearance of a burning smell.
- In the absence of visible reasons, the device does not hammer.
If these signs of malfunction are identified, the question arises of the need to repair the device.
Back to index
How to properly disassemble the rotary hammer gearbox
With great care, the gearbox with the body of the device should be separated in different directions so that a gap of 30 to 50 mm is formed between them. First you need to move the switch to the “hit with drilling” position, only then the switch is removed. After that, remove the housing from the gearbox.
The gearbox is an element that transmits rotation to the cartridge from the electric motor. This is due to bringing the percussion mechanism into working condition. The gearbox includes a set of gears that have a different shape. It can be cylindrical, worm or conical.

Disassembly of the perforator gearbox: 1 - special ring, 2 - releasing bushing, 3 - ring, 4 - ball, 5 - spring. Bearing shield from the casing: 22 - closing spring, 29 - ring, 30 - spring, 31 - retainer.
The unit of the device, including the gearbox, has an electronic device that is able to regulate the number of revolutions. It also regulates the beat frequency. This element requires periodic inspection, lubrication and replacement of worn parts. Before disassembling the perforator gearbox, the cartridge is disassembled, then the lever that switches modes should be disconnected. You may need a flat head screwdriver for this.
For example, in order to repair the armature of the gearbox or its stator, three bolts are unscrewed on the back cover of the tool and the cover is removed. The tool must be disconnected from the power supply before starting work. Be sure to pay attention to the condition of the brushes. However, you need to ring the power button and cable.
If a breakdown is detected after ringing, they proceed to inspect the cable, since it should be checked whether there are kinks in it. In the absence of visual damage, each core of the cable is checked by unwinding it. After penetrating inside the gearbox, an inspection of such parts and spare parts should be made, such as:
- Gears.
- Striker.
- Piston.

It is important to pay special attention to the gear teeth. When worn elements are found, they are replaced with new components. If they are absent, then a thorough cleaning is carried out using white spirit or gasoline.
It should be noted that repairing light-class rotary hammers is not as difficult as more serious equipment, which only professionals understand. When choosing a tool of any class, it is better to purchase a model that has a vacuum cleaner. This device allows you to save time, which is spent on cleaning the tool. Since the amount of dust will be the least, the use of the tool will be safer.
Another problem is the breakdown of the windings, which is also associated with the appearance of dust. In this case, the tool is disassembled if thorough cleaning and replacement of all elements that cannot be repaired are required.
Back to index
How to disassemble a rotary hammer to lubricate it
For prevention, the device must be cleaned every two weeks, impregnating it with varnish or lubricant. The choice of lubricant is made very carefully. Basic rules to remember when lubricating:

- You should buy a solution that is produced by the same manufacturer as the perforator itself.
- You can use the oil used for a diesel engine, if there is no varnish or special oil.
- It is necessary to replace the brushes, which are more likely to wear out.
It is necessary to disassemble the puncher to replace the brushes even if the tool is a fairly expensive model. To replace the brushes, the puncher is disassembled according to the principle described above. After that, they find brushes that are worn out, remove them from the structure, put others in their place.
It is best to use carbon-graphite brushes, which are the best and not too expensive option. Graphite brushes are used, which are distinguished by a long service life. Coal serve for a relatively short time, but they are in contact with other parts of the perforator at a qualitative level.
A household hammer drill is a versatile and useful tool that solves the most difficult tasks of removing and drilling concrete walls and ceilings, drilling stones, pavement, etc. It is used under constant loads, and over time, individual parts of the mechanism or electrics may fail . A high-quality product is expensive, so some breakdowns can be fixed with your own hands, the main thing is to know the device and the principle of operation of this tool, indispensable in construction.
Features and device of a construction puncher
Regardless of the type of tool, its power and scope, most modern models, including such popular brands as Makita, Bosh, Stihl, Stern, Metabo, Interskol, etc., have a similar design and consist of the main elements: cartridge, impact mechanism, gearbox , engine, power button, mode switch and connecting cord.
Selected versions are equipped with additional features such as anti-vibration system, impact frequency control and drilling depth limiter. Unlike a classic drill, the hammer drill has a reinforced impact option, which allows it to be used to work with complex and durable materials, including concrete, natural stone, brick, etc.
The engine of the device creates a rotational movement, which is converted into a powerful and translational oscillation of the percussion mechanism (drill, blade or chisel) due to the principle of compression between the active pistons of the tool.

Some models, in addition to the basic functions of drilling and the jackhammer mode, can also have a drilling role. Such tools are considered universal, but they are more likely to fail due to a more complex mechanical system.

For drilling work, it is better to use a reliable drill, and use a hammer drill only for its intended purpose. To avoid premature breakdowns of various parts, they also follow the rules for working with this tool and carry out preventive treatment (lubrication and cleaning of its individual elements).
Types and Troubleshooting
All emerging breakdowns of the perforator are usually divided into 2 categories depending on the nature of the damage:
- mechanical;
- electrical.
The former usually manifest themselves in additional noise, uncharacteristic rattles, increased vibration, etc. The most common mechanical failures include:
- failure of the mode switch;
- wear of rubber elements and seals on the striker;
- damage to the impact mechanism of the tool;
- wear of the main barrel during long-term operation;
- malfunction of gears and breakage of the cartridge-holder of the drill or blade.
Such problems most often occur when the operating mode of the tool is violated or when it is used for a long time under high loads. Repair of a puncher for each of the above breakdowns can be done with your own hands, but sometimes you still need the help of specialists.

The appearance of electrical faults is understood by the smell of burning from the body of the device, sparking during switching on and operation, rapid overheating of the engine, uncharacteristic "buzz" inside the mechanism, the formation of smoke, etc. In terms of electrics, such frequent breakdowns are distinguished as:
- problems with turning on / off the puncher;
- brush wear or clogging of the collector on the motor;
- weak circuit contact;
- problems with the rotor and stator of the engine;
- battery failure (on pneumatic models).
The solution to most electrical breakdowns is corrected independently only with electrical knowledge. In other cases, it is better to contact a specialist in this field so as not to permanently damage the working device.
Disassembly of the chuck and tool body for repair
To eliminate one or more of the malfunctions that have arisen, you should know how to properly disassemble and assemble the hammer drill. The main thing is to follow the algorithm of actions and safety precautions and have the necessary tools at hand. If there is a complex process of disassembly and repair, then it is better to photograph each stage, so that later it will be easier to assemble it back.

The dismantling of the cartridge begins with the removal of the rubber boot (1). Then, with a flat screwdriver, carefully pry off the retaining ring (2) and remove a similar plastic part (3). Next, they begin to remove the main washer (4), at this stage it is important not to lose a small metal ball (or several pieces, depending on the model), which is located under the washer. Now the remaining elements are sequentially removed - the spring (6) and the plate (5).

The wear of one of the above parts leads to the fact that the drill gets stuck in the chuck, which is why the normal operation of the tool is impossible. The damaged element should be replaced, and all other components should be thoroughly cleaned, lubricated and reinstalled in reverse order.

To remove and disassemble the main body above the mechanical part of the hammer, it is necessary to remove the operating mode switch. The roller with the sensor is set to the working position "jackhammer" with the corresponding icon in the form of the letter "T". Next, press the button on the right side of the indicator and gently pull it down until it clicks.

Now pry off the switch with a flat screwdriver and pull it towards you. On some types of instrument, it can be screwed to the body with screws that are simply unscrewed.
Disassembly of the housing in case of electrical damage
If everything is in order with the mechanical part of the device, and during operation there are signs that indicate the electrical nature of the breakdown, it is necessary to remove the plastic casing and, if necessary, disassemble the engine and its accompanying parts.

The back cover on almost all models is fastened with screws, after removing the switch, they are unscrewed around the perimeter and carefully, so as not to break the casing elements, remove the plastic case. Now the fastener of the network cable is unscrewed, the next wiring is removed from the fasteners and the start button is removed.

All wires going to the stator are also removed, after which the motor brushes are removed, which are fixed on several bolts. If there is a problem with the rotor in the gearbox, then it is dismantled, after which the bearings damaged in it are changed using a special tool. If necessary, remove the air intake and remove the stator from the casing, gently tapping it with a wooden object.
Do-it-yourself motor brush replacement
The need for new brushes appears in the presence of a characteristic smell of burning from the body of the perforator, strong heating of the engine during operation and sparking in the collector area. In the normal state of this part, a spark sometimes occurs directly under the brushes, but if sparking occurs throughout the commutator area, then the problem lies in the rotor bearings or burnt out plates.

In this situation, it is quite difficult to repair the instrument with your own hands. To detect malfunctions of the stator or rotor, alternately measure the resistance on them using an electrical tester, it must be the same and consistent on both windings. Otherwise, it is better to contact the service center, but they solve the problem with the brushes on their own.

To replace them, remove the back cover and motor mount inside the device. After that, the parts are removed from the holding boxes along with the springs. There are 2 types of brushes in perforators:
- Graphite. They are more durable and practical, but due to the hardness of the material they do not fit snugly against the stator, which leads to its wear during long-term operation.
- Coal. They wear out faster than the first, but have a better fit, which positively affects the performance of the stator.

On more expensive and powerful models of rotary hammers, combined versions of parts are installed, with graphite and coal in equal proportions. Experts recommend inspecting the motor brushes every year of tool operation in order not to wait for their complete wear and sparking of the motor. They are changed when worn 1/3 of the initial volume (8-10 mm).
Pay attention to the condition of the springs that are installed on these parts and on the fastening of the contacts. If the iron flies off during operation, this will lead to serious damage to the engine, and loose contacts reduce the performance of the tool. Before installing new brushes, the main parts of the engine are cleaned of coal or graphite dust and other contaminants with medical alcohol.
The device and repair of the impact mechanism on the "barrel" perforators
Percussion mechanisms are distinguished depending on the type and purpose of a particular hammer drill. Barrel or vertical versions of Bosch or Makita, on which the engine is mounted vertically, for the most part have impact blocks based on a connecting rod mechanism (KShM).

Most often, a special rolling bearing fails, which is installed either at the base of the main connecting rod, or on the cam wheel with an eccentric. On some models, this part is replaced by a sleeve bearing, which must be constantly and generously lubricated.
Another common problem is a broken firing pin. It is evidenced by the weak impact properties of the perforator or their absence at all. To replace this part, you need to disassemble the mechanical barrel of the tool according to the following scheme.
First, the barrel is disconnected from the body of the perforator. To do this, the cartridge is removed according to the technology described above, after which the barrel is tapped on the tabletop until the piston comes out of it, and then the body is knocked out with a hammer and the necessary part is removed.

Now remove the retaining ring that holds the piston in position. Next, the bearing itself is taken out, from which the metal balls are also removed.

This allows you to get to the raster sleeve, from which the balls are also removed. It is important not to confuse them with those that were in the bearing, they are smaller in diameter. At the final stage, a flat screwdriver is inserted into the sleeve and the broken striker is pushed out.

In addition to this detail, the seals and seals in the barrel body are additionally inspected. If they are worn out, they are replaced with new ones.
Repair of the impact mechanism on horizontal type tools
With a horizontal engine (on many Bosch, Hitachi, Energomash, etc. models), another shock block system is also performed. In it, instead of a connecting rod, an oscillating bearing is installed on the piston, which sets it in motion. It is also a common reason for the failure of the perforator, namely the loss of impact qualities, when the device simply does not hammer as it should.

Remove the worn part with a flat screwdriver, which pry the bracket on the gearbox housing and remove it. After that, the bearing is easily separated from the main body, and the gearbox itself is thoroughly washed, as fragments of the old part may remain inside. And after installing a new bearing, re-lubricate with a dense layer of a suitable material.

If the reason lies in the striker, then to remove it from the barrel, remove the retaining ring with a screwdriver, which is inserted into the hole and shifted towards the gears on both sides. With the same screwdriver, they push through the body and remove the broken striker from it. When reassembling the impact mechanism, be sure to apply a layer of lubricant to all metal parts.
Elimination of other mechanical failures
If a special mode switch fails, which occurs due to clogging with dirt and construction dust, it is removed according to the instructions described above, cleaned and installed back or replaced with a new one if it is broken.
With the loss of drilling properties and long-term operation of the perforator, the gear teeth on the rotor shaft may be worn out. The problem often occurs if the tool is used incorrectly (too heavy loads) or due to a malfunction and interruption in the operation of the clutch.

If the drill, drill or blade simply does not hold in the chuck, it is necessary to disassemble it and replace the ball, stop ring or retaining spring. If the drill gets stuck inside the chuck, the reason lies either in insufficient lubrication on the shank (it can be solved by additional injection of WD-40 under the sealing gum), or the holder has been riveted.

In this case, additional lubricant is applied and after some time the drill is pulled out manually, loosening it in different directions. If this does not help, then disassemble the cartridge and mechanically knock out the tooling with a hammer.
To avoid a large number of problems with the puncher, you must follow the rules for its operation:
- at the end of all work, be sure to remove all debris, dust and dirt accumulated in the cartridge;
- when drilling concrete structures, the frequency of work is observed (every 2-3 cm, the drill is removed from the wall and allowed to cool slightly);
- carry out preventive lubrication of external and internal parts of the tool, especially during its long-term operation;
- observe the rules for storing the puncher in a plastic packaging box, in a room with low humidity.

Normal operation of a high-quality rotary hammer will avoid technical breakdowns for a long period of time. Buy only models from trusted manufacturers and use the tool strictly for its intended purpose. If you are not sure where and what type of failure your device has, you should not experiment with it. It is better to contact specialists or a service center if it is covered by a factory warranty.
People who have used a hammer drill at least once are well aware of how difficult it is to properly use it and monitor its working condition. That is why the systematic repair and prevention of this device is an integral part of the operation process. Do-it-yourself puncher repair is the most financially profitable option, especially since some breakdowns are minor.
The perforator is an indispensable device in construction. However, if used incorrectly, it can quickly fail.
Such frequent malfunctions of the tool are connected with the fact that it is used in very difficult conditions when high performance is required. Often, the punch simply does not withstand the loads that are placed on it. Even branded models are not immune from breakdowns.
As a rule, almost any tool that ceases to function over time can be repaired at home. However, not everyone has an idea of how to repair this or that tool. The perforator is no exception.
Some general information

When a tool breaks down, it very often happens that some broken wire becomes the cause of the malfunction. Many pay a lot of money at service centers to insert this wire into place. Mechanical damage can most often be seen visually. When carefully examining a failed hammer drill, you can, for example, see a minor malfunction that led to a breakdown.
However, there are situations when the usual “old-fashioned” method - shake, knock - does not solve the problem. In this case, the question arises whether to contact a professional repair office or take on the repair yourself.
Back to index
Can I repair myself?

If no damage is visible during a visual inspection of the perforator, then the next step is to disassemble it.
It all depends on how serious the breakdown is and whether you have certain skills to fix a malfunctioning hammer drill. If we are talking about an old tool that has been serving for a long time and is not of particular value to the user, then you can try and find problems yourself. In addition, if the breakdown is visible visually and there is an idea of what needs to be done with the tool, then self-repair also takes place.
If the puncher model is more modern, bought relatively recently, and costs a lot of money, then it is not always recommended to take up the work yourself, as you can make it even worse. If during the initial inspection no visible problems were found, then it is not recommended to carry out further repairs. Only users with experience and technical skills can repair.
Back to index
Some signs of possible malfunctions

If in the course of work you find any malfunctions in the operation of the puncher, then you need to find out the cause of the malfunctions.
Of course, people who buy a hammer drill expect 100% return on it. Especially if the purchased device is a high-quality imported product. Therefore, in order to prevent serious damage, you need to have an idea of \u200b\u200bhow the device works. By the operation of the tool (some signs), you can sometimes determine the cause of the malfunction. Such things should not be neglected in order to prevent more damage.
- Unpleasant smell from the device, especially burning.
- The operation of the perforator in normal mode is unstable - there are short circuits or short pauses in operation.
- The device does not fulfill its intended purpose sometimes or for a certain time.
- When you turn on or operate the instrument, strange sounds appear that were not present before.
In the event that one of the above or other signs of unstable operation of the perforator was noticed, you should immediately find out what is wrong. Attention and care of the tool are indispensable conditions for a long service life. Therefore, the first step on the way to is the ability to completely disassemble it into its component parts.
Back to index
How to disassemble a hammer drill or drill?

In order to repair the puncher, you need to know how to properly and in what order it is necessary to disassemble the device.
Many may wonder what this is for. The answer is quite simple: if you disassemble the tool into its components and find a breakdown in one of the parts, you can purchase a new one and replace the spare part. Most may also think that it is much better and faster to take the tool to the appropriate service, and the repair will be done for you. However, first of all, it will take a lot of time to bring and take the tool, which is extremely wasteful with limited work times; besides, it is a waste of extra money for repairs. Thus, by carrying out repairs yourself, you can save money and time for repairs.
Disassembly Instructions:
- You need to start work from the top node. First, the rubber tip is removed, then the washer, at the end - the spring and the ball.
- After removing the ball, you can begin to unscrew the screws that hold the case. Next, the overlay on the handle is removed (if it is available). Only after the work has been done, the starter wires are disconnected.
- Remove the brush holder.
- At this stage, you need to disconnect the gearbox and housing before a gap forms. Through this gap, the switch will be removed.
- At the final stage, the body of the puncher is placed vertically and fixed in one position with a vice. All parts and spare parts are carefully taken out of it.
Regardless of what kind of breakdown is present, it is strongly recommended to clean both the case and all parts from dust and dirt.
Unremoved dirt in the future may interfere with the stable operation of the punch.
The hammer drill is in demand not only during professional construction work, but also in everyday life, when it is necessary to drill a hole in a concrete wall. If you think that a drill can cope with any task, then you are mistaken here, since this tool is designed for drilling wood and metal. Even the most expensive tools are not eternal, therefore, in the event of a breakdown, each owner will be able to repair the puncher with their own hands. To do this, you do not need to take the tool to a service center so that the master evaluates the cost of a simple repair. How to repair each perforator assembly is discussed in detail in the material.
What is a perforator and how does it work
Structurally, a hammer drill is similar to a drill, but its main difference is that it is endowed with an enhanced percussion function. The impact function is needed in order to not only drill, but also drill holes in durable materials such as concrete, reinforced concrete, brick, etc. The tool copes with its main purpose in the best way. It is achieved through a special mechanism, which is called shock. This percussion mechanism is under heavy loads, so the need to repair the hammer drill with your own hands arises depending on the frequency of its operation.
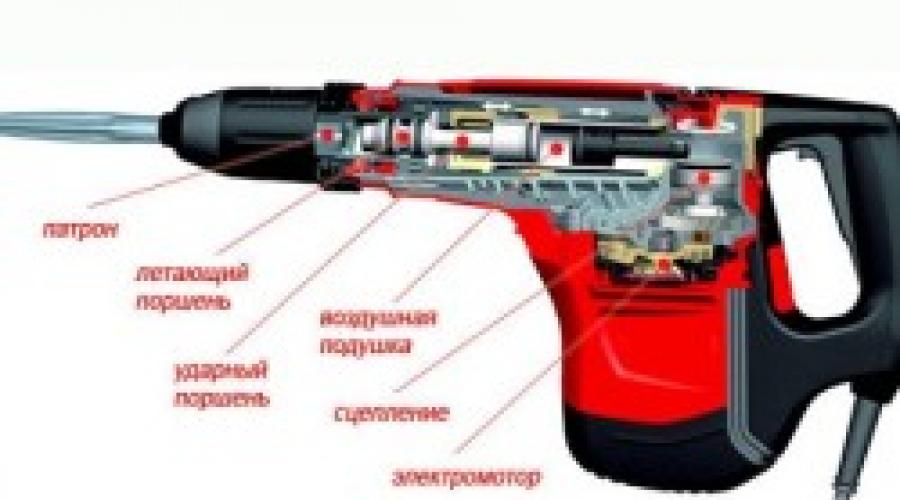
The percussion mechanism is implemented through the use of a so-called “drunken bearing” tool in the device, which creates shocks that are transmitted to the piston. This piston, in turn, acts as an impact hammer, which hits the rod or striker connected to the working nozzle fixed in the cartridge. A detailed diagram of the perforator device is shown in the photo below, on the basis of which it becomes clear how the percussion system of the tool is arranged.

In addition to the impact motions generated by the indirect rotation of the bearing, the drilling of holes by the tool also requires rotational motions. This option is implemented due to the gear unit, presented in the form of a pair of straight gears. Rotational and shock movements are created by rotating the shaft of a powerful electric motor.
It is due to the fact that a powerful impact mechanism is used in the design of the tool that it can be used not only for drilling holes in concrete, reinforced concrete and asphalt structures, but also to perform such manipulations as chiselling, destruction, removal of ceramic tiles, etc. This tool is also called destructive, but this does not make it eternal.
The time comes when the components and mechanisms of the power tool break down, which requires the need for repairs, the cost of which in service centers is decent. Repairing perforators is not a difficult procedure, as it might seem at first, and for its successful implementation, you will need not only to know the device and design of the tool, but also the principle of operation.
Types of perforators and their design differences
Before you repair a hammer drill with your own hands, you need to understand the varieties of these tools. Hammer drills come in two types:

If straight punchers are classified according to their purpose into household and professional ones, then barrel units are designed exclusively for complex work. They have a large power reserve, so they are used exclusively by professionals to perform work of any complexity.
Many do not understand how barrel units differ from direct ones, except for the location of the engines. The main difference, and it is also the main advantage, is that barrel models have a more advanced cooling and lubrication system, presented in the form of a container into which a liquid lubricant is poured. This means that barrel appliances have a longer service life, and therefore they break less often.

Barrel punchers, although more perfect, their main drawback lies in their dimensions. They not only have massive dimensions, but also weigh 2 times more than direct units. Both pistol and barrel perforators break down over time, which leads to the need for repair work. To repair the tool, there is no need to contact specialized service centers. After all, repairing a perforator can be done with your own hands quickly and easily.
The principle of operation of the perforator
Consider the principle of operation of the units under consideration, which will simplify the troubleshooting process. For barrel and direct units, the principle of operation is the same, despite their distinctive design parameters. All perforators work according to this principle:

The tool not only creates rotational movements, but also percussion, due to which heavy types of work with concrete and reinforced concrete structures are performed. Having an idea of how the punch is arranged, as well as how it works, it will not be difficult to take on its repair, which can be done at home.

What types of malfunctions occur on rotary hammers
If the punch does not work, then you should not immediately rush to disassemble it. There is also no need to rush to buy a new power tool. You need to act in order. To begin with, it does not hurt to find out what types of malfunctions are most common on rotary hammers, which will help simplify not only repairs, but also identify the cause of the breakdown.
The most common cause of breakdowns is the wear of parts. If the parts are of high quality, then they have a long service life, and in the case of low-quality components, as on household units, you have to resort to repairing the punch with your own hands quite often. That is why household hammers are not recommended to be used often and for a long time, otherwise the need for its repair in the near future is inevitable.
The perforator device shows that the unit is converting electrical energy into mechanical energy, which is used to perform useful actions. The tool can be conditionally divided into two parts:
- Electrical
- Mechanical

Actually, breakdowns are also divided into electrical and mechanical. Common signs of mechanical problems with rotary hammers include:
- When the start button is pressed, there are signs of motor operation, but the actuator is in place
- A working nozzle is wedged in the tool chuck - a drill, a chisel, a spatula, a crown, etc.
- Unable to install the nozzle in the chuck
- Extraneous noise occurs when the unit is turned on
- Operation modes do not switch
- Grease leaking
It is much easier to identify malfunctions of the mechanical part of the puncher than the electrical ones. This is due to the fact that the user sees signs of breakdown, which simplifies the repair procedure by 90%. Common malfunctions of the electrical part of the perforator include:
- When you press the "Start" button, there are no signs of the functioning of the motor
- The sparking of the brushes increases during operation, and there are also signs of a burning sensation.
- Smoke is emitted from the tool
- When the button is pressed, the motor turns on and off alternately
In almost all cases of malfunctions of the puncher, in order to repair it with your own hands, you will need to disassemble it. This is not difficult to do, but you should not rush. After all, often the inoperability of the tool can occur due to the lack of electricity in the outlet. Therefore, it is important to start repairing the perforator with your own hands according to the instructions.
Repair of the electrical part of the puncher, diagnosis of breakdowns and their elimination
Most often, as practice shows, breakdowns of the perforator occur in the electrical part, so it is with it that you need to start diagnosing. If the tool works, but at the same time it crackles, buzzes or makes other sounds, then the breakdown must be looked for in the electrical part, so it is immediately recommended to skip the item on repairing the electrical part and proceed to troubleshooting the mechanics.
Diagnostics of the electrical part depends on what kind of breakdown has occurred - the device does not show signs of life or it works, but at the same time it sparks, smokes, or periodically turns off. So, in order to repair the puncher without outside help, you must follow the instructions. Consider the main types of breakdowns and how to eliminate them.
The engine does not turn on and does not show signs of life
The most common failure is when the tool does not turn on. The reasons can be various factors - from the lack of electricity in the outlet to the breakdown of the electric motor. But you need to start looking for the cause from the smallest to the largest, and not vice versa. It is not advisable to immediately disassemble the hammer drill if it does not show signs of life, since such types of malfunctions as described below can contribute to this.
No mains voltage
Trite, but it is in 15% of cases that these types of breakdowns occur for this reason. You are working, and suddenly the tool stops showing signs of life. Check immediately for the presence of electrical voltage in the room. Even if the lights in the room turn on, this does not mean that everything is working properly. Perhaps while drilling or operating a hammer drill, you hooked a wire in the wall that powers the outlet. Even with prolonged operation, the cable could overheat, and knock out the “machine” on the meter. In most cases, sockets and lighting in the premises are powered by different machines, then the sign of the presence of light in the room does not mean that everything is in order.

To verify the presence of voltage in the network, you must use or a multimeter. It is better to pick up a multimeter, and setting it to measure AC voltage over 220 V, insert the probes into the outlet holes. If there is electricity in the outlet, and its indicators correspond to the norm (not lower than 190V and not higher than 250V), then proceed to the next stage of the test.
Mains cable damage
The current is supplied to the electric motor of the tool through a network wire, the length of which depends on the manufacturer that produces the puncher. When working with a tool, you can damage not only the cable in the wall, but also the power cord. And this may not necessarily be the working nozzle of the tool, but also the squeezing of the wire by a door or other objects, tools and materials.

You can identify a wire malfunction in the following way - visually inspect it for defects in the form of squeezing, damage and melting. If there are no signs of defects, then it is too early to beat the drums. The vein could become thinner, therefore, in order to determine the 100% serviceability of the network wire, you will need to ring it.
To dial the network wire, you will need to disassemble the puncher. More precisely, it is not necessary to disassemble the entire tool, but only its handle. After that, set the tester to the continuity mode, and touching the pin on the plug with one probe, and the second probe to the wire core (connected to the button), check. A beep means that she lived in order. Do the same for the second strand. If both cores are ringing, then you will need to make a more serious repair of the puncher with your own hands.
Punch button repair and diagnostics of its malfunction
What is a button on a puncher (it is also called a switch) is a part of the electrical circuit that is responsible for supplying current to the electric motor, that is, for turning the tool itself on and off. If the button on the punch is broken, then you can try to repair it. However, experience shows that repair attempts lead the masters to a dead end, and the result of such attempts is the same - buying a new button. Just do not rush to buy a button for a puncher, as it is not always a weak link.

If mechanically it does not show signs of failure, then the probability of its failure is 50%. If, when you press the button, there is a feeling of its malfunction, which manifests itself by such signs as jamming, jamming, failure or the need to make great efforts to press it, then only a dial tone will help confirm its breakdown. To do this, you will also need a multimeter, which needs to carry out contact dialing.
It should be borne in mind that, depending on the model of perforators, the start buttons may differ. And the difference is not only in design, but also in functionality. Professional models of rotary hammers are equipped with start buttons without a speed controller, but with a lever for switching the direction of rotation of the cartridge - reverse. Household rotary hammers, which also often replace drills, are additionally equipped with speed controllers, which allows you to work at the appropriate rotational speed of the cartridge, for example, when you need to drill woodworking material.
Depending on the model of the puncher, the button can be disassembled and its contacts cleaned. However, if it wedges, then it is better to replace it immediately. To make sure that the problem of the inoperability of the tool is in the button, a multimeter set to the dialing mode will help. We turn on the dialing mode, and touch both probes to the corresponding terminals of the punch button. In this case, the trigger on the button must be pressed. If an appropriate beep is emitted when the trigger is pressed, then the button is working, and if not, then it needs to be replaced.
Below is a diagram of connecting a button on a rotary hammer with a reverse without a regulator. This circuit will be useful not only for the dialing of the button, but also for those who did not remember the location of the wires when replacing the switch.

If you have disassembled the puncher and do not know where to connect the probes for continuity, then you need to find the wires that go to power and the capacitor. It doesn’t matter what brand of hammer drill you have broken Bosch, Makita or others, in any case, the principle of checking is the same. To remove the wires from the switch contacts, on some models of punchers you will need to use a thin wire or an awl. The awl is inserted into a thin hole near the contact, where the wire enters and remove it.
If you want the new button to last much longer, it is recommended to buy the original sample. The video below shows the repair of the punch button and its replacement with your own hands.
How to repair a hammer drill when brushes are worn
If the graphite brushes that are designed to transmit current to the collector connected to the armature winding are worn out on the puncher. The principle of operation of electric motors is to create a magnetic field by the stator, which contributes to the drive of the moving part - the armature or the rotor.
Over time, the graphite brushes on the perforator are erased, which is absolutely normal. When they are abraded, the contact quality decreases, therefore, if strong sparking occurs, which is visible through the ventilation holes in the punch body, as well as when a smell of burning and smoke is detected, it is necessary to replace the brushes. These items are not repairable as they are consumable items. If they are worn out, then the motor brushes will need to be replaced. Changing the brushes is quite simple, for which you need to remove them from the brush assembly, after unscrewing the screws, disconnect the power wires that come from the button, and then install new ones in the reverse order of removal.

It is possible to determine the malfunction and unsuitability of brushes for further use by measuring their length of the working part. If the length of the graphite base is less than 8 mm, then the elements need to be replaced. After replacement, the hammer will work like new. The process of replacing brushes on an Einhell barrel puncher is described in the video material.
Speed controller malfunctions
Not all models of rotary hammers have a speed control. This device is usually located in the design of a push-button mechanism. If the design of your tool has a chuck speed controller that is out of order, then it cannot be repaired, so it should be replaced.
Such a sign as the absence of a change in the speed of rotation of the cartridge will help to identify a malfunction of the regulator. Another malfunction of the regulator can be the cause of the complete inoperability of the tool.
Malfunctions of the electric motor of the perforator
The heart of any power tool is a collector electric motor, which converts electrical energy into mechanical energy. If all the diagnostics and repair steps described above are completed, and the rotary hammer does not work, then the rotary hammer motor needs to be repaired. This is one of the most complex elements of the tool, which requires a special approach. Breakdowns of this unit can be divided into two parts - malfunctions in the rotor and stator.
If the armature of the electric motor is broken, diagnostics and repair
You need to start diagnosing the rotor (armature) by checking the condition of the collector - these are plates or lamellas, due to which current flows through the brushes. First you need to inspect the condition of these lamellas, which should not have signs of soot and blackening. If there is carbon deposits, then perhaps the reason for the inoperability is in it. It is recommended to clean the soot with the finest paper sandpaper. For control cleaning, it is necessary to take cotton wool with alcohol, and thoroughly clean each plate.

After cleaning the collector and replacing the brushes, you need to check whether the hammer drill is working or not. If such a repair of the puncher does not give positive results, then you will need to arm yourself with a multimeter and check the suitability of the anchor.
The causes of damage to the armature of a power tool are:
- Violation of the winding insulation, which leads to an increase in resistance
- Violation of the integrity of the winding or breakage
- Lamination of the steel core
The process of checking the health of the armature of the electric motor is to perform the following steps:

It is almost impossible to replace the armature winding with your own hands at home, so you will need the help of specialists. Practice shows that replacing the winding is only advisable if you have an expensive puncher, the purchase of a new anchor for which will cost a round sum. If the puncher is inexpensive, then it’s easier to buy a new rotor and replace it yourself than to take it to a service for repair. The principle of checking the health of the rotor on all power tools is the same, so a detailed description is described using the example of grinders.
Stator malfunctions on a puncher, how to identify and fix
The stator is the fixed part of the electric motor, which also consists of a steel base on which a copper winding is wound. The stator is a magnet, due to which the rotor is actuated, thereby setting it in motion. To verify the serviceability or malfunction of the stator of the perforator, you will also need to take the multimeter in your hands and carry out some simple manipulations:
- The presence of resistance between the stator windings and the core is checked. We touch the probe to the output of the windings, and the second to the core. The absence of resistance indicates the health of the device
- Each probe must be touched in turn to the corresponding terminals of the winding. The resistance in each winding should be approximately the same, and with a large run-up, we can conclude that the insulation is broken
- A visual inspection of the stator will also make a conclusion about its suitability. If there are signs of delamination of steel plates, it will need to be replaced. If only the winding is damaged, the stator can be repaired. However, for this it will need to be handed over to a service center for rewinding.

It is also worth noting that rotary hammers are equipped with powerful electric motors with high torque, so problems with the failure of the "heart" of the tool are extremely rare. If this happens, then the reason for this is the improper use of the tool, for example, household hammers cannot be used for a long time. Another reason may be improper storage when the tool is in a humid room. In any case, there are enough factors that can cause the engine to fail, so only after a specific breakdown has been identified, it will be necessary to make a decision to eliminate it.
Repair of the mechanical part of the perforator, diagnosis of breakdowns and their elimination
In case of breakdowns in the mechanical part of the punch, you will also need to disassemble the tool in order to identify defects. Mechanical failures are much easier to detect, as they are audible or visible after disassembly.

In the mechanical part of the perforator, there are three main nodes that need to be repaired:
- Reducer - in order to identify a breakdown of this assembly, you will need to disassemble the tool, and then inspect the mechanism. If this is a barrel puncher, then you must first drain the oil. Visually, it is possible to identify such defects in the gearbox as licking of the gear teeth, a drunken bearing malfunction, and a violation of the integrity of the drummer. Repair of the perforator gearbox, unlike an electric motor, can be done by hand
- The cartridge is another node that, if not properly cared for, can fail. Often, cartridge failures are associated with clogging of its internal part. You can troubleshoot the cartridge on the puncher after disassembling this assembly. If the internal parts are damaged, then the cartridge must be replaced.
- The mode switch is a useful option that is designed to be able to operate the tool not only for drilling, but also for drilling
All these nodes break down sooner or later, and in order not to hand over the tool to a service center, it is recommended to repair the puncher yourself.
Gearbox repair or if the hammer drill does not work in impact hammer mode
If the perforator does not drill, but drills when the percussion mode is turned on, that is, the percussion function does not work, then factors such as a malfunction of the floating bearing (destruction of the inner race) and a violation of the integrity of the rod (striker) can serve as reasons for this. It is impossible to identify such a breakdown from afar without dismantling the plastic case, so the puncher (its mechanical part) is disassembled and the internal structure of the mechanism is examined.

How to replace a drunken bearing on a hammer drill
If the floating bearing (on straight lines) or the crankshaft (on barrel) units fails, they should be replaced. If the reason for the inoperability of the punch is a rod or striker, which wears out over time, then it should also be replaced. The process of dismantling a drunken bearing is quite simple. To do this, the fixing U-shaped bracket is removed with a screwdriver, after which the bearing can be removed by hand.

When replacing a floating bearing, you will need to perform a thorough cleaning of all internal parts.

How to repair a striker and put it back together
Breakage of the impact striker on perforators is a common malfunction that you can fix yourself if you know how to properly disassemble the design of the gearbox assembly. If it is necessary to repair or replace the drummer (aka the striker), then the process of extracting it from the raster tube is performed in the following way:

As a result, we get a striker, which consists of some parts, including sealing collars, which are recommended to be replaced with new ones.

Often the impact bolt fails in the striker and needs to be replaced.

After replacing it, it is necessary to assemble the parts and install the mechanism in place inside the raster tube, having previously lubricated each element. The impact striker is fixed with a retaining ring, which is installed by pressing in with a screwdriver.
How to remove and replace warped bearings and impact heads on rotary hammers is shown in detail in the video material.
In any case, if you change parts, then at the same time you need to completely replace the lubricant, having cleaned the entire mechanism and the body of the mechanical part from the old production. If this is not done, then the repair will most likely have to be repeated, since the lubricant contains a lot of metal dust and fragments.
If the cartridge stops rotating, how to repair
Before you repair the punch, you will first need to identify the cause of the breakdown. For example, if the working body or cartridge does not rotate, then the gear mechanism can serve as the reason for this. The moment from the motor shaft to the intermediate shaft of the tool is not transmitted due to abrasion of the teeth on the gears, so the chuck does not rotate.

Another cartridge may not rotate due to jamming of the gearbox assembly. If part of the gear tooth broke off, then it could be clamped inside the rotating elements, which leads to jamming. If the gearbox is jammed, then it will be heard. The motor will hum, but the tool will not work. To eliminate such a breakdown, disassembling the tool and removing stuck parts will help.
If the drill does not hold in the cartridge and constantly falls out
If, when a drill tool or other nozzles are installed in the chuck, they fall out, then the reason for this is non-compliance with the rules for operating the unit. Working with a tool that does not hold a drill and other nozzles is not only difficult, but also dangerous.

If the cartridge does not hold, then the reason for this is its wear or breakage. To eliminate this type of breakdown, you will need to disassemble the cartridge and identify the cause. The reasons may be the following factors:
- Deformation of locking balls for rotary hammers with SDS plus chuck type and rollers for SDS max
- Development of the restrictive ring
- Detent spring sagging
By replacing the worn part, the chuck starts working properly again. How to disassemble a perforator cartridge and repair it is shown on the example of a DIOLD sds max brand tool in the video below.
The cartridge does not hold in the puncher causes and repair
In addition to the fact that nozzles do not hold in the cartridge, there are situations when the drill flies along with the cartridge. This is also not a pleasant phenomenon, which has its own explanation. The reason for such a breakdown is the wear of the body mount, which fixes the element. The chuck body is secured by a retaining ring fitted on the end of the raster sleeve.

As soon as the integrity of the retaining ring is violated, the entire cartridge crumbles during operation with all its component parts - a protective cover, balls, rollers, springs, etc. It is not difficult to repair a perforator with your own hands with a flying cartridge. To do this, you need to arrange all the elements in their places, and then fix everything with a new retaining ring. To install the retaining ring, you will need to use special devices - round-nose pliers.
How to replace bearings on a rotary hammer and lubricate them
The puncher has not only a “drunk” bearing, but also ordinary ball bearings, on which the motor armature is centered. The bearings that drive the armature shaft need regular lubrication. The misaligned bearing must also be lubricated, otherwise it can accelerate its wear. When installing drills and other attachments, their shanks must be lubricated, which will extend the life of the components of the cartridge, among which there are fixing balls or rollers, depending on the type of cartridge.

To dismantle the bearings to replace them, you will need to use a special tool called a puller. Installing new bearings is done by using the correct size tube and hammer. When installing new devices, one factor must also be taken into account - they must not be skewed relative to the rotor shaft. How a drunken bearing changes is already known. On barrel perforators, instead of a drunken bearing, a crankshaft can be installed, which has a longer resource compared to its counterpart on direct units.
It is interesting! If we compare the cost of barrel models with impact mechanisms - a drunken bearing and crankshaft, then the latter are more expensive, due to their efficiency and reliability. However, this does not mean that models with floating bearings are not effective. They have a slightly shorter resource, but they also have a high efficiency of impact work.
How to properly disassemble the gearbox on the rotary hammer and repair it
To diagnose the gearbox, as well as its repair on the punch, you will first need to disassemble it. How to do it right, we will consider further. Initially, it is necessary to unscrew all the screws holding the plastic housing cover, and also dismantle the cartridge. After that, the gearbox with the housing is bred in different directions until a gap appears between them. To remove the mode switch, it must first be switched to the "impact with drilling" mode, and then dismantled. To do this, press the switch to the body and move it slightly below the drilling impact mode, and then pull it towards you.
Following the switch, you can remove the plastic housing cover, under which the gearbox is located, or remove the mechanism from the housing base. It all depends on the model of the perforator, which is being repaired. After repairing the gearbox on the puncher, you will need to assemble it in place, having previously treated it with lubricants. Lubricants must be in sufficient quantity to exclude the possibility of operation of the mechanism in conditions without lubricants.
How to repair a barrel puncher
Dismantling the hammer drill is not difficult, but the dismantling process differs depending on the type of tool. For example, the repair of a barrel perforator begins with draining the oil from a special container, while there are no such devices on pistol devices.

The process of disassembling the barrel perforator begins with the fact that the plastic cover, which is located on top, is dismantled. To access the electrical part, you will need to remove the plastic cover at the bottom. The principle of repairing the electrical and mechanical parts of a barrel-type perforator is similar to direct devices.
On barrel perforators, crank mechanisms are used instead of warped bearings. However, in the design of such units, sliding bearings are used, located on the wheel cam together with the eccentric. All these mechanisms work in a liquid lubricant, the amount of which must be in abundance. If there is not enough lubrication or it has not changed for a long time, the probability of failure of the crank mechanism of the perforator increases.

If it is serviceable, as in the photo, then it is necessary to replace the seals and lubricate it. If it is damaged, then it should be replaced completely.
It is interesting! Barrel units do not have a drilling function in the design of the mechanism, as is typical for pistol devices. This means that professional barrel machines are used exclusively for heavy work such as chiselling and drilling. In addition, in the design of such units, only cartridges for nozzles with a shank type are used.SDS-max.
How to use and care for a perforator so that you do not often repair
How long a power tool will last depends on how it is properly maintained and stored. Even if this is a professional tool of the popular brands DeWalt, Makita, Metabo, Bosch, Hitachi and others, this does not mean at all that they can be loaded to the fullest. Any even the most high-quality and expensive tool has its own specific resource, which largely depends on the nature of operation and storage.

If you want to extend the life of the newly purchased puncher, then from the very first days you need to follow a number of the following recommendations:
- Before using the tool, it is necessary to check its technical condition visually.
- Use the machine only for the work for which it is intended. If there is no drilling option in the assignment, then you should not try to drill a hole with an impact function in metal or wood, since you will not only fail, but the tool will also break
- Before installing the drill and other nozzles in the cartridge, it is imperative to apply lubricant to the tail section. This will extend the life of not only the tool, but also the nozzles used.
- After finishing work, clean the hammer drill from dust and debris, and even better, using a compressor and a blow gun, clean the tool with compressed air
- Do not store the tool in damp rooms, as moisture accumulates in the design of the working mechanisms, which not only destroys the metal, but can also cause a short circuit when the tool is plugged into an outlet
These are the simplest rules that will help extend the life of the tool up to 5-10 years, depending on the frequency of its use. In addition to electric, there are also battery models of rotary hammers, the repair of which is almost the same. Structurally, battery devices are similar to barrel units, only they are additionally equipped with autonomous batteries.
In general, it should be noted that if the design of the device and the principle of operation are known, then it will not be difficult to perform any repair of a puncher with your own hands of different brands. Difficulties only arise mainly in terms of electrics, however, using the above material, any breakdowns can be easily and quickly eliminated.On the puncher adapter for fixing the drill
Technology
It is difficult to imagine a modern set of repair and construction equipment without such an important tool as a puncher. The principle of its operation is based on the functions of a conventional electric drill, which are expanded with reciprocating impact capabilities. A special mechanism is responsible for them, which converts the rotational movements of the shaft into shock. If repair of the hammer drill is required, then this particular assembly most often fails, because it is subjected to increased loads.
Features of the design of the perforator
The percussion function in the electric puncher is provided by a special pneumomechanical unit. However, there are also models of perforators in which a mechanical or electrical system is responsible for the impact. It should be noted that these tools are inferior in accuracy and performance to electric perforators with pneumatic impact formation.
The design of perforators has its own characteristics, one of which is the use of extra strong drills instead of conventional drills. Due to its special shape, the drill is able to withstand greater longitudinal loads than a drill with a percussion mechanism. The drill does not have a sharp cutting edge on the working end - it is replaced by a carbide tip. Meanwhile, the design of the drill provides spiral longitudinal grooves, similar to the grooves of conventional drills. However, they are intended for the removal of crushed waste material in the process of drilling a hole. To do this, the perforator drill performs, in addition to reciprocating, also rotational movements around its own longitudinal axis, which also contribute to the straightness and centering of the drill in the material.
The chuck and shank of the drill are designed in such a way that it is not rigidly fixed, but has some freedom of longitudinal movement. This is done in order to prevent the loss of kinetic energy of impact to accelerate the cartridge, increase productivity and reduce the vibration level of the punch.
Strong pollination is one of the main causes of tool breakage, and the chuck, in addition to heavy load, also takes on the main part of the dust. So that the repair of the punch cartridge does not turn into a chronic problem, it must be periodically cleaned of dust and dirt. Washing with gasoline or cleaning with compressed air is recommended. After cleaning, all elements of the cartridge should be re-lubricated.
Perforator reducer

The gearbox transmits torque from the engine to the percussion mechanism of the perforator. It is a set of cylindrical, bevel and worm gears. The speed of rotation of the cartridge and the number of strokes are changed using electronic controllers. There are also models equipped with a two-speed gearbox.
The gearbox needs to be lubricated periodically and for this purpose the use of greases is recommended. They are refueled when assembly, maintenance or repair of the rotary hammer gearbox is carried out.
Related videos
The main causes of breakdowns

As already mentioned, one of the main causes of breakdowns of most of the perforator assemblies is heavy dusting. For example, a collector motor is cooled by a fan, which, together with air, delivers dust particles to the motor. As a result of the friction of these particles on the armature and stator, these mechanisms wear out quickly.
If the tool does not turn on, one of the reasons may be damage to the winding, then the repair of the puncher is inevitable - you will have to rewind the stator and armature.
Also, frequent breakdowns are associated with mechanical assemblies of perforators. Most models are equipped with mechanisms for switching operating modes (rotation, fight, rotation with fight). If at least one of these functions has stopped working, the switch is most likely to blame. To repair the damage, disassembly of the tool will be required.
Do-it-yourself puncher repair: is it worth the risk?
 Most users are convinced of the inappropriateness of repairing cheap models of rotary hammers. Such a skeptical attitude is explained by the imperfection of the design of inexpensive, as a rule, Chinese models. But if some insignificant detail has broken, this does not mean at all that you should immediately run to the store for a new tool. Currently, you can easily purchase all kinds of spare parts for any models of rotary hammers.
Another reason for the reluctance to repair the puncher with your own hands is the fear of not understanding the complex mechanism. Of course, such concerns are justified. After all, if the user does not know the perforator device perfectly, he will not be able to do repairs on his own. In this case, of course, it makes sense to contact a specialized workshop. Be that as it may, do not rush to put an end to your tool, because any repair will be cheaper than a new puncher.
Disassembly order
If you still decide to repair the hammer drill on your own, then the tool should be disassembled in the following order:
- Carefully remove the shift lever.
- Detach the rubber cap.
- Disassemble the cartridge: remove the brushes, unscrew the screws and disconnect the body.
- Inspect, clean parts, replace faulty elements (brushes, bearings, gears, armature, etc.), lubricate all friction units (CVL greases are not recommended).
The tool is assembled in the reverse order.
Fault symptoms
 But how do you know that a hammer drill needs to be repaired? Of course, the simplest sign is the inability to turn on the tool. However, any other, even minor changes in the operation of the device should not be ignored. This, for example, can be changes in sounds at idle or during operation, sparks from the engine, smoke, burning smell, jerks of working bodies, sudden periodic stops, and other symptoms. All this indicates problems that must be immediately eliminated in order to avoid global breakdowns and costly repairs.
Source: fb.ru
Similar content
Cars
The spark on the scooter disappeared: possible causes and their elimination. Do-it-yourself scooter repair
Scooters today are relevant, popular and practical vehicles. People of various age categories can successfully move on them. For most scooter owners - and at all ...
Cars
Chevrolet Niva hydraulic lifters: photo, device, repair, do-it-yourself replacement
The first hydraulic lifters appeared in Russia in 1989. At that time, they became widespread in the modernization of Zhiguli engines. Modern Niva Chevrolet hydraulic lifters, the photo of which is presented below, appeared ...
Cars
Do-it-yourself bumper repair at home (photo)
In the development of the earliest automobiles, the bumper part was designed to protect the body and doors from damage resulting from collisions on the road or hitting obstacles. Bumpers…
Cars
Steering rack, "Kalina": repair, do-it-yourself tightening
If suddenly while driving you began to hear a characteristic knock (especially when driving on rough roads) and strange sounds, most likely this indicates a malfunction of such an important element as the steering rack. VAZ "...
Cars
The best do-it-yourself car body repair
Everything that is made by human hands can be restored by yourself. This is the motto of most motorists. They can sort out the engine, and make car body repairs with their own hands. Unfortunately, even the most …
Cars
Do-it-yourself car repair: replacing the crankshaft oil seal
If an oil leak is detected in the machine, and it occurs through the seals in the crankshaft, the first thing to do is: examine the crankcase ventilation system for blockage; check ...
Cars
DIY Car Repair
Many will ask, why do you need to learn how to repair a car with your own hands, and indeed know how a car works? Surely you just want to go to your car, open the door, sit in it, s…
Cars
Do-it-yourself bumper repair. A few simple recommendations
It would seem, why do you need to repair the bumper, and even more so to give money for it, if this in no way affects the ride itself. This should be done for several reasons. First, bumpers are needed to protect ...
home comfort
Do-it-yourself laminate repair indiscriminately: features, methods and recommendations
Laminate is a material that is quite resistant to wear and tear, but even on it defects such as cracks, chips, swelling and scratches can appear over time. Such problems can be caused by a violation of technology ...
home comfort
Do-it-yourself bread machine repair. The bread machine does not work: possible causes. Spare parts for bread machine
A bread maker is a rather complex device. It is able to please the whole family with fresh pastries. But then a misfortune happened: the bread machine does not work, complex repairs are required. Is it possible to correct the situation at home ...
Perforator SDS Plus Black+Decker KD985KA
Perforator. Black &. decker. KD 985. KA - tool with a power of 800. W. The rotary hammer is equipped with a speed control system. With the help of the depth gauge, you can make holes of a given depth. Due to the corrugated surface of the cartridge, it is quickly replaced. Peculiarities
Read more >>>
Mixer whisk Armero A241/126
 Purpose: sand and gravel mix,. Type: for perforator,. Cartridge type: SDS+,.
Replacing the brushes of the perforator
Blade type: flat. Length (mm): 600,. Diameter: 120
Read more >>>
Perforator Pobeda P-28-1135, SDS+ 140301135
Dual-mode perforator economy class designed for use in everyday life. The vertical striker delivers a powerful impact force of 3.5 joules at a power of 1135.W. Sufficient power perforator allows you to easily work with concrete. The rotation of the collector engine reaches 1400 rpm.
Read more >>>
Perforator Black&Decker KD985KA
 Quality perforator. Black&. decker. KD985. The KA is finished in a versatile and non-marking red and black color scheme, which makes it especially pleasant to use. The device has a well-balanced design. It compensates during operation for the impressive weight of the hammer, which is 3.4 kg.
Read more >>>
Bosch rotary hammer handle 1612025032
 Handle for perforator. Bosch 1612025032 is a comfortable and practical handle made of high quality materials. It is suitable for brand construction tools. GAH 500. DSR and. GBM 13. HRE. professional.
Read more >>>
Hyundai drill SDS+ for perforator, 8 x 160 mm
Boer. Hyundai 8x160 mm for perforator. The SDS+ is designed for impact drilling in concrete and brick. Manufactured from hardened structural alloy steel. Cr40. The drill has a hard-alloy tungsten carbide tip. NMST. The special helix geometry ensures efficient sludge removal.
Read more >>>
Hyundai drill SDS+ for perforator, 5 x 160 mm
Boer. Hyundai 5x160 mm for perforator. The SDS+ is designed for impact drilling in concrete and brick. Manufactured from hardened structural alloy steel. Cr40. The drill has a hard-alloy tungsten carbide tip. NMST. The special helix geometry ensures efficient sludge removal.
Read more >>>
Chisel for perforator Archimedes 91656
Chisel for perforator.
Archimedes 91656 tool, indispensable for processing a small opening. This type of chisel is suitable for processing brick and concrete workpieces. The shape of the tip is flat; Shank type. SDS;. Overall length 250 mm;. Product width 20 mm.
Read more >>>
Hyundai drill SDS+ for perforator, 10 x 160 mm
 Boer. Hyundai 10x160 mm for perforator. The SDS+ is designed for impact drilling in concrete and brick. Manufactured from hardened structural alloy steel. Cr40. The drill has a hard-alloy tungsten carbide tip. NMST. The special helix geometry ensures efficient sludge removal.
Read more >>>
System chuck for Bosch quick-clamping hammers 2608572112
 Cartridge system for perforators quick-clamping. Bosch 2608572112 is designed to be mounted on tools with the correct size of the landing shaft shank. Useful as a replacement for the main cartridge of the perforator. Suitable for models. GBH 2-24. D.F.R. GBH 24. VFR. professional;. PBH 200. FRE;.
Read more >>>
Office Depot (officedepot) DP041 punch punch punches
office. Depot (officedepot). DP041 punch punch punches
Read more >>>
HUILANG (huilang) HL-3000-type financial document file saving perforator binding machines
HUILANG (huilang). HL-3000-type financial document file saving perforator binding machines
Read more >>>
The principle of operation of the Bosch 2-26 perforator is no different from perforators of well-known brands.
The rotating rotor transmits torque to the intermediate shaft of the mechanical unit of the perforator, while simultaneously transmitting translational motion through the rolling bearing to the impact mechanism of the perforator and the impact impulse. Torque is transmitted to the working tool with a translational shock impulse. This principle is implemented in all perforators.
But different firms producing punchers have their own design features.
Bosch rotary hammers are considered the best in their segment of power tools. But nothing is eternal.
If your Bosch 2-20, 2-24, 2-26 rotary hammer has stopped working, then you can restore it yourself. You need to have basic locksmith skills and a little understanding of electrical engineering.
And another important detail, the design of Bosch rotary hammers is so simple that it does not cause difficulties during repairs.
When repairing power tools, including the repair of Bosch rotary hammers, strictly follow the safety precautions when working with electrical appliances.
To facilitate the repair of the Bosch rotary hammer, its disassembly and assembly, study the tool assembly diagram:

Any disassembly of the bosch 2-26 rotary hammer begins after inspection, test switching on and identification of the causes of the device malfunction.
Bosch 2-26 rotary hammer disassembly video
The order of disassembly of the Bosch 2-26 rotary hammer
Since the disassembly order of Bosch 2-20 punchers; 2-24; 2-26 is almost the same, consider the order of disassembly using the Bosch 2-26 rotary hammer as an example.
Disassembly of the Bosch GBH 2-26 dre rotary hammer begins with the disassembly of the quick-release chuck.
Disassembly of the quick-release chuck
Two types of cartridges are most commonly used in Bosch rotary hammers: SDS-plus cartridges and SDS-max cartridges. The difference between them is in the principle of clamping the tail of the working organ.
The Bosch puncher chuck device differs in the design of the tool's seating rods, depending on the SDS-plus or SDS-max model. In addition to the listed types of cartridges, there are cartridges SDS-top, SDS-quick.

The procedure for disassembling the Bosch 2-26 perforator cartridge is simple:
- remove the rubber tip poz.34;
- remove the retaining ring poz.87;
- remove the steel washer poz.833;
- remove the conical spring poz.833;
- carefully, so as not to lose, using a magnet, remove the barrel balls poz.89.

Carefully inspect all parts of the cartridge.

SDS-plus chucks have been developed especially for drilling tools. The diameter of the tool shanks is 10 mm, the length of the working tool is in the range of 110…1000 mm. The diameter of the drills lies in the range of 4…26 mm.
How to remove the mode switch
Putting the punch on its side, remove the mode switch poz.832.
First, turn the switch to the “Drilling” position, press the end of the switch button (it is red) all the way with a screwdriver and turn the switch counterclockwise by 70º.
While shaking the switch handle, pull the switch handle out of the housing.
Disassembly of the percussion assembly
Putting the Bosch 2-26 rotary hammer vertically on the handle, unscrew the four screws pos. 90 holding the cover of the mechanical assembly housing.
Press the end of the shaft of the percussion mechanism and remove the cover. The lid is black plastic.
Now you need to remove the barrel poz.821 and the intermediate shaft poz.826. They are not attached to anything.

Dismantling the barrel assembly of the percussion mechanism
- disassembly of the Bosch perforator barrel assembly begins from the side of the cavity, removing the cylinder poz.26 from it with the drummer poz.27;
- from the cavity it is necessary to get the firing pin assembly;
- from the side of the chuck shaft, remove the retaining ring poz.85, the steel ring poz.38 and another locking ring poz.85;
- remove the spur gear poz.22.

Cylinder disassembly
Inside the cylinder, a drummer poz.27 is inserted, from which the rubber ring poz.73 must be removed. At any disassembly, rubber parts must be replaced without fail.
At the opposite end of the cylinder, a hinge poz.29 and two flat washers poz.41 are inserted.
Dismantling the intermediate shaft
The intermediate shaft is disassembled by removing the shaft poz.24 and pulling out of the housing poz.77 "drunken bearing".
Bearings are removed by pullers or manually, using a tool.
Uncharacteristic malfunction of the Bosch rotary hammer
Bosch rotary hammers are very reliable.
But there are malfunctions that are practically not encountered in practice. Below is one of them.
Bosch rotary hammer drills but does not chisel
If the hammer drill has stopped hammering, but still allows drilling, the most likely cause may be the destruction of the “drunk bearing”. This malfunction is not common and it is not easy to find it.
To fix it, you do not need to go to a repair shop. Such a malfunction will be eliminated by any person more or less versed in mechanics.

First you need to disassemble the Bosch puncher to the intermediate shaft. The order of disassembly is given above.
After removing the intermediate shaft, you will get to the "drunken bearing". The destruction of the rolling bearing is indicated by a broken cage, scattered balls, pieces of the cage.
You take out the bearing, remove the dirt, all parts of the destroyed mechanism.
You buy a new “drunk bearing”, and, having lubricated all the parts with new grease, replace and assemble in the reverse order of the disassembly steps.
Dismantling the electrical part of the Bosch 2-26 rotary hammer
Disassembly of the Bosch 2-26 rotary hammer, its electrical part, begins with the removal of the rear cover on the rotary hammer handle by unscrewing three screws.
The next step is to remove the reverse switch.
Turn it to neutral position and lift it towards you. The reverse switch is out.
To remove the stator cover, it is necessary, holding the mechanical assembly in the right hand, and in the left stator housing, drag them in different directions, shaking.
The stator cover will come off.

To separate the rotor from the mechanical unit, it is enough to drag these parts in different directions. The rotor is attached to the mechanical assembly by a small helical gear inserted into contact with the large helical gear of the mechanical assembly.
The rotor has been released and you can carefully inspect the condition of the collector, bearings.

To remove the stator, it is enough to remove the protective plastic protective cover, and knock with a wooden block or mallet on the end of the housing into which the stator is inserted. Before doing this, do not forget to unscrew the two screws securing the stator to the housing.
The stator is removed, the rotor is taken out, you can proceed to their inspection and defect detection of all parts that make up the electrical part of the Bosch rotary hammer.
When inspecting a disassembled Bosch 2-26 rotary hammer, pay special attention to the condition of the carbon brushes, plaque on the brush holders and the reliability of their fastening, the integrity of the reverse switch contacts, and the condition of the wire at the entrance to the rotary hammer.
The length of the brushes must not be shorter than 8 mm. On the brush holders there should be no traces of sparks and coal dust from the brushes, on the contacts of the reverse switch of the Bosch 2-26 puncher there should be no burnouts or damage to the contacts.

This completes the disassembly.
I wish you success!
Do-it-yourself repair of a puncher
If you need to repair a perforator, then this means, at a minimum, that you already have it. Although it is quite possible that you are just choosing this impact drilling tool, in parallel studying the weak points of its design, and which nodes can theoretically fail in it.
Well, let's try to help you. In this article we will study:
- Perforator device.
- The most loaded parts and components of the tool.
- Disassembly and assembly.
- Measures that extend the life of percussion drilling power tools.
Perforator device
Studying the principle of operation of a percussion drilling tool will not only expand your technical horizons, but first of all will allow you to competently carry out its maintenance and, if necessary, repair. To make it easier to understand the processes that occur during drilling in hard materials (and this tool is designed to perform just such jobs), do not be too lazy to watch these two short videos. The first one clearly shows the operation of a rotary hammer with a longitudinal engine.
The second video shows the device of the perforator with a transverse engine.
So, let's start with the most important thing: concrete, brick, stone, the tool destroys shock wave, which occurs at the moment of a very short contact of the striker with the end of the drill (through the striker). The energy of the shock wave is transmitted through the drill (impact drill) and destroys the bonds (forms microcracks) between the grains of the minerals that make up the stone (concrete, brick). The spiral grooves of the rotating drill serve to remove loose particles of material from the hole.
(Hence the conclusion follows: there is no need to press hard with a puncher on a concrete wall, it will not drill faster - you will only get tired yourself, and the tool will break faster.)
The striker is made of high-strength steel and moves freely enough inside the piston cylinder. The sealing rubber ring seals the gap, preventing air from passing freely into the gap between the cylinder and the drummer.

The outer race of the rolling bearing, mounted at an angle on a shaft rotated by an electric motor, reciprocates, causing the piston cylinder to move back and forth. When the cylinder is moved forward (towards the drill), the drummer remains in place by inertia, the air between the drummer and the rear wall of the cylinder is compressed and pushes the drummer to meet the end of the drill.
In fact, this air serves as a damping element that prevents deformation and destruction of the perforator cylinder. In a tool with a transverse engine, the cylinder is stationary, and the rarefaction and compression of air behind the striker is created by a piston driven by a crank mechanism.
The most loaded parts and assemblies of the perforator
Based on the foregoing, the impact mechanism and gearbox experience maximum loads during long-term operation. Part of the striker's kinetic energy is converted into thermal energy, and heats the entire assembly. The sealing ring continuously rubs against the inner surface of the cylinder and wears out with a lack of lubrication, over time passing more and more air from the working area.

The energy of compressed air becomes less and less - the impact drill no longer hammers as it should. When repairing a hammer drill on your own, it is sometimes enough to simply replace the lubricant in the gearbox, piston cylinder and rubber o-ring on the drummer.
During long continuous operation or during normal drilling under high load, the electric motor can easily overheat and burn out. Although the latest models of the tool have an electronic control unit that includes motor overload protection. If you wish, you can read about troubleshooting the electric motor, power cord, electronics and power button in the previous article.
Disassembly and assembly of the puncher
When trying to repair a puncher with your own hands, first of all, you need to disassemble it. To do this, the rubber tip, annular spring, and the casing of the drill fixation coupling are removed. The fixing steel ball is removed. By turning the operating mode switch to its extreme position, pressing the locking button on it, the switch handle is removed.

The rear pad on the handle is removed, the brushes of the electric motor are removed.
How to repair a perforator with your own hands
4 screws are unscrewed (from the side of the drill) and the entire front part of the tool (gear housing) containing the barrel, gearbox, impact mechanism and operation mode switch will be removed.
The motor rotor is removed. Two screws securing the stator are unscrewed. 4 terminals are removed from the stator contacts, then it is removed from the housing. The switch (button + reverse switch), brush holder, noise filter and power cord are removed.
If it is necessary to repair the puncher in terms of the impact mechanism and gearbox, 4 screws are unscrewed from the end of the gearbox housing, then the outer plastic casing is removed. It is best to do this in an upright position. Then in the inner case all the details will remain in place.

After replacing the defective part, the assembly is carried out in the reverse order. Parts that turned out to be "superfluous" should be wiped dry and taken to a repair shop along with a perforator.
Activities that extend the "life" of the perforator
All activities are as follows:
- Read the user manual and operating instructions for the instrument carefully.
- Strictly follow the instructions given in the instructions.
- Change gear and impact mechanism lubricant regularly. Exactly replace, since there is no point in adding a new lubricant to the used old one - metal dust serves as an excellent abrasive that “eats” everything in its path.
- Lubricate the drill shank before work.
- Inspect motor brushes regularly and replace as needed.
- Clean the outside of the tool every day after finishing work.
- Try not to work in clouds of dust - it is harmful not only for the perforator, but also for your lungs. Ventilate the workplace by opening all windows.
- Do not climb into what you absolutely do not understand anything - entrust the service to a professional, or, if you have already undertaken to repair the puncher with your own hands, then do it slowly, remembering well where you put it.
We wish you success!
How to disassemble a perforator cartridge? Learning to do simple things, avoiding mistakes
 Why do you need knowledge, how to disassemble a perforator cartridge? In the event that a rather expensive tool breaks down, isn't it easier to just take it to a repair shop? However, as practice shows, far from every user aspires to go there (either, sometimes, due to lack of time, or because of the lack of a sufficient amount of additional funds, because repairs can sometimes be quite expensive and result in a price for which you can buy half of the new toolkit).
Therefore, some people prefer to carry out disassembly on their own, with their own hands. After all, it is clear that if the device suddenly stops working for a number of reasons, then the most predictable solution would be to disassemble it and fix the problem.
How to disassemble a hammer drill so that then, in the newly assembled form, the tool continues its functioning after the elimination of the found breakdown? But it is not necessary to do this only in cases where the trouble has already occurred. It is also necessary to know how a thing, such as a puncher, is disassembled for prevention and lubrication. So, for anyone, knowledge can be useful to almost everyone who has a similar device on the farm.

We remove the cartridge
First you need to determine its design, and by the way, they are different. Cam - various drills are inserted and replaced using a special key. In a collet, you just need to turn the part, and you won’t need keys for these purposes. In quick-clamping (one- or two-sleeve) - a different design. In general, drills can be fixed differently on different devices, and this factor should also be taken into account.
Many beginners often ask: why do we need so many species?
The thing is that the tools themselves come with high or low power. And if the device is powerful enough, then you need to seriously think about the reliability of fasteners for drills and nozzles, otherwise tragedy cannot be avoided!
In some cases, the part is removed quite easily, and in some - you have to tinker. We study the fastening of the cartridge itself. The part is usually held in position using a spindle or screw rods (we rarely see a more tenacious fixation, depending on the manufacturer, and then new applied efforts will be required).
But in its most common version, the cartridge can be removed using three simple tools: a screwdriver, a wrench and a small hammer. It is necessary to tap on the head of the screw with a hammer, slightly loosening the fixation. Then - twist the screw, acting with a screwdriver. Clamp the chuck in a vise or wrench and turn the spindle.

We study the details
We will not consider more rare and older models. Today, many modern rotary hammers are quite versatile and indispensable in performing some work during repair and construction.
How to repair a perforator?
Accordingly, for such a tool there are many nozzles and adapters in accordance with the tasks. But the basis of the design is still a cartridge.
By the way, professionals advise keeping a spare cartridge on hand for a reserve: with sufficient heavy loads, the only one can break, and you will not have anything to change it with. Experts note that for different work it is necessary to use cartridges of different action: with a key (for overall drills), quick-clamping (for quick change of adapters and drills during the execution of work).
Very important: if earlier the drill was mounted on movable cams, today progress has long gone ahead - in the SDS chuck, for example, the drill is held by guide wedges and special locking balls (usually 2 or 3 each). This type of fastening looks both fast and, most importantly, very reliable.
The replacement of nozzles is also greatly simplified. It is enough just to insert the selected one into the socket, press until it clicks.
How to do your own disassembly
The most common devices at the present time are models of some well-known brands. We will tell you how to disassemble a punch chuck using Bosh as an example.
- We move the plastic part and remove the rubber seal.
- Using a screwdriver, pry off the locking ring. Next - a similar puck. You need to act as carefully as possible, without sudden movements, in which a breakdown and rebound of these small parts is possible.
- Behind the puck is another ring. It must be turned and also removed, prying, for example, with a screwdriver.
- Behind the plastic there will be an SDS clamp, which consists of a spring, a ball and a washer. We take out the ball, after - hook the washer and pull out the spring.
I must say that the cartridge usually deals with various tasks, including making repairs or replacing failed parts, cleaning, lubricating parts. And cartridges from modern rotary hammers of other models (for example, Makita) are sorted out in approximately the same sequence as Bosh. Sometimes there are, however, nuances of designs, but this is quite rare.

Cartridge assembly and replacement
After carrying out the planned repair, restoration or prevention work, the cartridge must be properly assembled. It will be quite simple to do this by following the previous instructions, performed in reverse order: starting with the last step and ending with the first.
As already mentioned, when choosing a spare cartridge, remember that not every cartridge fits every base. This circumstance should be taken into account when choosing a part of the same company as everything else, or at least observing the basic parameters of the cartridge.
When installing a new one, you need to perform several steps: screw the part onto the drill until it stops, insert the fixing screw into the socket, tighten it with a screwdriver until it stops. After - we check how the parts are fixed, and you can begin to carry out repair work using this necessary tool.
Results: In general, as you can see, nothing complicated if you know how to disassemble the punch cartridge or replace it. Any person who knows how to manage this tool well enough can cope with the tasks. It should not be forgotten that with frequent changes of drills or nozzles, it is better for you to buy a keyless chuck, and if you use a large drill size, a key one. And it would be desirable, ideally, to have various cartridges suitable for your rotary hammer (especially if the tool is used often). It is for this purpose that learning to remove and disassemble cartridges is an urgent task.