Cross-section of wooden beams. Ceilings on wooden beams. Applications and calculation of wooden floors
The advantage of a multi-storey building is obvious - a large living area with the same external dimensions. Figuratively speaking, putting the floor on the floor, you can double the usable space.
This is actually not difficult, the only thing that needs to be thought out in advance is the design of the floors. Concrete creates an excessive load on the walls, steel is difficult to process.
A wooden floor between floors is the best choice for a country house. It is only important to accurately calculate its parameters and choose high-quality materials.
Wooden flooring device
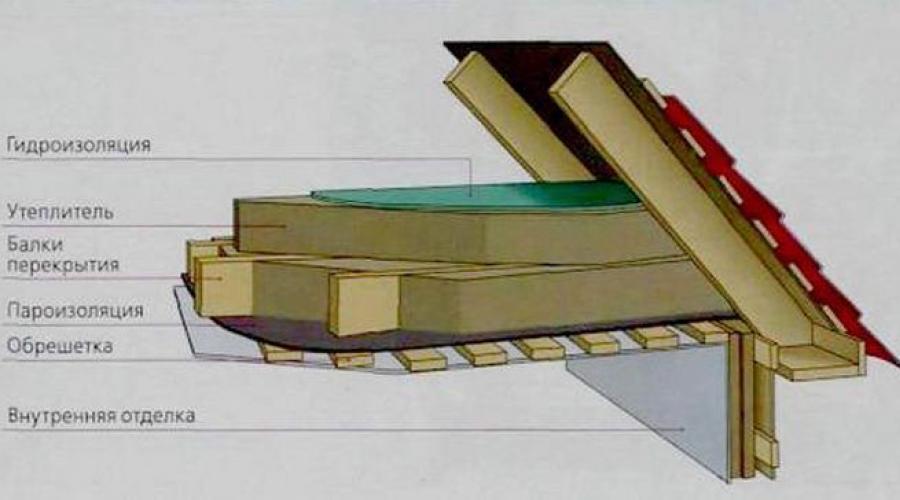
Perhaps this is the best type of flooring, it compares favorably with ease of manufacture and availability of materials. In addition, only wood is used to create it, which ensures environmental cleanliness with sufficient reliability. The device for overlapping on wooden beams is not particularly difficult, its main components are:
- bearing beams;
- guide bars;
- draft ceiling;
- the base of the floor of the upper floor;
- insulation;
- waterproofing;
- decorative coating.
The necessary strength and reliability of the entire structure will give the timber. It can be solid or glued from several layers. A good replacement for timber is solid logs of small diameter. Boards can also serve as the basis for the structure, but such floors have significant limitations in terms of span length and load.
In principle, the beam can be made of any wood, but it is better to choose larch or pine. Hardwood has a slightly different structure and less resistance to bending. Such an overlap may not withstand constant load.
On the supporting structure of parallel beams, the base of the future floor and ceiling is mounted, respectively. It can be a prepared board or wood-based sheet material. A floor covering is laid on the finished base (on the second floor), and a full-fledged ceiling is made from below.
A feature of this design is the free internal space that must be used. It is filled with any material with heat-insulating or sound-absorbing properties. This will help keep the heat in the rooms and provide a sufficient level of sound insulation.
Material selection
First of all, this design is functional, therefore, the interfloor overlap on wooden beams should be reliable. It is important to understand that it must not only support its weight, but also the weight of the furniture located on the top floor, and the weight of the people there. Consequently, high quality requirements are placed on the material used, especially on the beams.
As already mentioned, the best material for a beam is coniferous wood. The choice of wood should be taken with all possible responsibility. Basic material requirements:
- minimum humidity, its value should not exceed 14%;
- minimum knots per unit length;
- there should not be a pronounced oblique layer;
- absence of cracks, rot, darkening, traces of pest activity.
To ensure the durability of the floor, all wooden surfaces are pre-treated with an antiseptic and impregnated with special compounds that reduce the combustibility of the material. This guarantees the durability of the structure and protects against fires.
Varieties of floors according to the method of fastening
Bearing bars are securely fixed to the walls. There are two main ways to attach them: installing them in a socket or using additional fasteners.
Installing the bars in the grooves
This method is great for brick houses, cinder block buildings and similar materials. To fix the beam, you need to make a selection (groove) in the wall. The dimensions of the groove should exceed the thickness and width of the beam by 2-3 cm, the depth varies in the range from 100 to 150 mm. It is not difficult to provide waterproofing of the connection with the help of a conventional roofing material; they wrap the ends of the beams recessed inside the wall.
Using metal clips
If it is not possible to sink the beams into the wall, external steel fasteners can be used. Technically, this method is simpler, but it provides less strength, therefore, the wooden floor will withstand less load. Such a hinged mount can be used to create small ceilings or between the first floor and the attic (attic) of a garden house.
Clamps of various shapes come on sale, some are designed for fastening to the wall, others are mounted on internal or external corners. With the choice of the optimal configuration of the supporting elements, there will definitely not be any problems.
The main parameters of the beam for beams
The parameters of the beams directly depend on the geometric dimensions of the premises of the lower and upper floors, their intended purpose. The calculation of parameters is an important stage in the creation of an interfloor overlap, the reliability and durability of the entire structure largely depends on it.
Shape and section
A rectangular beam is seen as the optimal material for the manufacture of beams. Installed on the edge, it has a sufficient margin of safety, high reliability. Sometimes round timber or lumber of specific profiles, for example, an I-section, is used as load-bearing structures.
The exact parameters of the beam directly depend on the expected load, the span length and the distance between adjacent beams. By the way, it is not at all necessary to calculate all the parameters yourself; you can use ready-made tables and diagrams.
Length calculation
Calculating the length of the beam is simple - this is the width of the span plus the tolerances for embedding in the grooves. Regardless of the section, it is not recommended to make spans more than 6 m wide, this will inevitably cause sagging, which can result in an accident. If it is necessary to make a larger wooden floor, you can get out of the situation by installing supports and props in the form of columns from the same timber.
Material quantity
For ease of calculating the amount of material, it would be useful to sketch out a diagram of the future overlap. It should be borne in mind that the distance from the extreme beams to the wall will be approximately 50 mm, and the rest will be evenly laid between them at the same interval (0.5–1.0 m).
Stages of manufacturing an interfloor ceiling
After the calculations are completed, the material is purchased, you can proceed directly to the installation of the wooden floor. The process of its manufacture is not a very complicated matter, but in order to facilitate the work, it is advisable to do everything with an assistant, this is especially true when making large-width floors.
Beam installation
The best option for a residential building with a full-fledged second floor can be considered the installation of beams in grooves. You can make grooves both at the construction stage, which is much easier, and after the construction of the building. Work begins with the extreme beams, which will be located in close proximity to the side walls.
A blank of the required length is cut out of the timber, the ends are cut with a circular saw or hand saw at an angle of about 60 degrees. Special accuracy is not needed, it is important to create conditions for the wood to breathe.
Note! The part of the beam that will be hidden in the wall is impregnated with bituminous mastic (with the exception of the end) and wrapped with roofing material.
The beam is inserted into the groove, a board 20–30 mm thick is placed under it. With the help of the level, the correct installation is controlled, the beam must lie strictly horizontally. The first and every fifth beam is additionally fixed with anchor bolts or steel plates.
This procedure is repeated with the other extreme beam. To control the plane, a board is temporarily laid between the extreme beams, on top of it - the usual building level. Thanks to this simple design, it is easy to choose the thickness of the lining for each subsequent beam.
skull bar
Cranial bar - slats with a cross section of approximately 50 x 50 mm, which are attached to both sides of the beam. Its task is to hold the roll used as a draft ceiling. It is advisable to use a bar only when the ceiling is mounted from above.
The slats are cut along the length of the beam, fixed with self-tapping screws. A roll is attached to them. This method is simple and does not require excessive physical effort, there is no need to keep the details of the draft ceiling on weight, but it significantly reduces the space inside the ceiling, which can be used for laying insulation and sound insulation.
If the ceiling is mounted from below, the work technology can be significantly simplified, without a cranial bar, then the roll will be attached directly to the beams using self-tapping screws.
Creating a draft ceiling
In most cases, it is convenient to use wood-based sheet material to create the base of the ceiling. It's easy to attach and is durable. To work, it is enough to arm yourself with a screwdriver and self-tapping screws.
When using a cranial bar, the material is cut into strips equal to the span in width, laid, fixed with self-tapping screws. If the cranial bar is not installed, you can use a material of any size, the only condition is to ensure that adjacent plates converge on the beam.
Thermal insulation and vapor barrier
Even if an overlap is created between residential floors, it is worth laying heat-insulating material inside, mineral wool is best. It will completely fill the space, save heat and become a good protection against noise.
Under the insulation, especially if there is a kitchen, bathroom or other room with high humidity on the lower floor, you need to lay a layer of vapor barrier. It will protect the ceiling from steam, protect the tree from moisture that will condense inside. The sheets are overlapped, the joints are additionally fixed with construction tape.
Waterproofing
A waterproofing film is laid on top of the finished insulating cake. Its task is to block the path of moisture from above, to prevent it from seeping into the sealant. The edges of the film must overlap each other by at least 10 cm on each side. Additional protection against possible leaks, as in the case of vapor barrier, will be provided by construction tape.
Draft floor of the next floor
To create a base for flooring, a board, plywood, OSB sheets, chipboard of sufficient thickness can be used. Fasteners are selected for the selected material, for plates these are self-tapping screws, for boards nails are suitable. When working with sheet material, as well as when creating a draft ceiling, you need to ensure that the plates are joined only on the beams.
Finishing floor and ceiling
Actually, the work is almost finished, only the skin remains. Here the technique depends solely on the selected material. The floor of the upper floor can be covered with budget linoleum, elite parquet, or choose the golden mean - laminate. The material for the ceiling can be drywall with subsequent painting, plastic ceiling panels, lining.
Wood flooring is the best choice for a country house. It is easy to install, strong and durable. This is exactly the overlap that you can do with your own hands. It will last a long time, does not require special care, and thanks to exclusively natural materials, this is an excellent solution for a children's room, it can be made both on the top floor and on the bottom.
Insulation of the interfloor ceiling on wooden beams is a crucial part of the work: it is required to create a barrier to cold and reliable sound insulation of the premises, while preventing the possible formation of drafts and mold on the ceilings.
Thermal insulation is required for a bridging between a cold basement and ground floor living quarters or between living quarters and an unheated attic. Floors between living spaces need soundproofing, and therefore the approach to solving problems will be different.
How to insulate the interfloor overlap to eliminate drafts, dampness and mold? From the point of view of building thermal physics, the insulation of an interfloor ceiling along wooden beams will be competent when the thermal insulation is located on the side of cold air.
The correct arrangement of layers in the floor structure repeats the principle of facade insulation: a vapor barrier is placed on the side of cold air inlet, then a heater, another vapor barrier, then a slab or other supporting structure. The arrangement of the layers must ensure the release of water vapor to the outside.
But when it comes to specifically wooden structures in a private house, constructive difficulties arise.
When insulating the attic floor, there are two of them: thermal insulation, sound insulation and waterproofing of the structure are required at the same time. In addition, it will be necessary to walk on the floor for periodic inspection and repairs of the roof. The "pie" of the interfloor overlap in this case will look like this:
- A layer of material that can withstand occasional traffic.
- Vapor permeable waterproofing.
- Insulation.
- Vapor barrier.
- Basic structure.
- Room ceiling.
Insulation of wooden floors above a cold basement requires the layers to be arranged in the reverse order:
- Clean floor.
- Vapor barrier.
- Insulation.
- Vapor barrier.
- Basic structure.
ATTENTION: In the absence of a basement and the presence of a ventilated underground under the house, which often happens when laying pile foundations, the insulation from below must be protected with a moisture-windproof membrane.
In order to fulfill all these conditions, a competent choice of materials is necessary.
Material selection
Insulation of floors on wooden beams can be performed by any of the types of heat-insulating materials:
- Bulk (slag, expanded clay gravel).
- Monolithic laying (lightweight concrete - expanded clay concrete, aerated concrete, etc., foam).
- Slabs (slabs and mats from various materials of mineral and synthetic origin - from porous concrete "Velit", mineral wool, foam glass, expanded polystyrene).
- Film.
In order to choose a heater, it is necessary to analyze their heat-insulating properties, volumetric weight and the supporting structure of the building itself.
As a rule, bulk and monolithic heaters with high thermal conductivity have an impressive weight and, in order to ensure the required resistance to heat transfer of external enclosing structures, a thickness of, for example, 0.5 m expanded clay concrete backfill will be required with a minimum volumetric weight of the material of 200 kg / m3, which is wooden beams may not endure. These heaters are more often chosen for interfloor ceilings on concrete slabs in brick houses.
The materials that are most in demand for insulation are mineral wool boards (from stone, basalt or glass wool) and expanded polystyrene. These materials have excellent characteristics:
- thermal conductivity indicators from 0.33 to 0.42 W / (m × K);
- low volumetric weight – from 10 kg/m3;
- low water absorption;
- high vapor permeability;
- compression density from 70 kPa.
These indicators indicate the following:
- insulation of interfloor ceilings along wooden beams will not require a thick layer of heat-insulating material;
- load-bearing structures will not be overloaded;
- the insulation, in the presence of proper vapor and waterproofing, will not accumulate moisture, which means it will last a long time and will
- maintain comfortable conditions in the house;
- during the repair will not collapse from the severity of the person.
No less important for the durability of the structure is the choice of vapor barrier materials. A significant number of them are offered in the construction markets. Before buying, you need to find out how this material works, and in the case of multilayer membranes, which side it should be adjacent to the insulation.
IMPORTANT: Polyethylene films, due to their short service life, brittleness and inelasticity, are unsuitable for use as vapor and waterproofing when insulating floors in a wooden house.
We warm the attic floor on wooden beams
Insulation of the attic floor on wooden beams can be done in several ways. The choice depends on the distance between the beams and financial capabilities.
First way
The floor plan using mineral wool boards is as follows:

Work algorithm:
- Preparation of beams - impregnation with flame retardant and fungicide, if necessary, reinforcement.
- Attach a layer of vapor barrier to the lower edge of the beams with a crate.
- Lay a layer of soft insulation between the beams - mineral wool mats.
- Lay the second layer of insulation on the upper edge of the floor beams - rigid mineral wool boards with a laminated surface that can withstand limited walking.
- Fuse a layer of waterproofing welded roofing material (Technoelast, Krovlyaelast, Bikrost, etc.) onto the slabs using a building hair dryer.
- Attach a hemmed ceiling along the crate (drywall, OSB, chipboard, lining, etc.).
Second way

Work algorithm:
- Beam preparation.
- Using the crate, we attach the vapor barrier to the beams.
- We lay the first layer of thermal insulation.
- We mount wooden logs along the beams.
- Between the lags we lay the second layer of heat-insulating material.
- We mount the flooring from moisture-resistant chipboard, OSB or other material.
When laying the insulation plate, fix the foam on the mounting glue or glue. According to the second method, mineral wool boards can be replaced with polystyrene foam or foam plastic.
We insulate the ceiling of the first floor
Insulation of the floor in this case can also be done in several ways, the choice depends on the design features of the house. If there is a ventilated space under the ceiling, insulation can be performed according to the attic principle by changing the alternation of layers.
First way
Insulation of the floor of the first floor along the logs, with a cold underground, is as follows:

Work algorithm:
- Beam preparation.
- We fasten the cranial bar along the lower edge.
- We fasten the black floor (boards, plywood, OSB, DSP, etc.) to the cranial bars with nails.
- We lay a moisture-windproof membrane on top, attaching it to the beams through the counter rails.
- We put a heater in the interbeam space.
- Laying a clean floor.
Second way
The insulation of the floor above the cold basement differs from the previous method in small nuances, respectively, the algorithm for performing work does not change.

IMPORTANT: Before performing work, the tree must be protected from decay with antiseptic impregnations and fire retardants to make it fire resistant.
Conclusion
Properly executed floor insulation between floors on wooden beams is guaranteed to ensure the comfort of housing, eliminate drafts and the formation of fungus and mold. All work will not be difficult to perform by any homeowner who knows how to use a drill and a building level.
Private low-rise construction has become increasingly popular in recent years.
Do-it-yourself country houses and summer cottages occupy an increasing share in the total volume of housing being put into operation.
 The most demanded material in private construction is wood, due to its affordable cost and ease of processing. But not all individual developers have sufficient experience and knowledge to independently carry out the entire range of construction work. So, the question often arises of how to properly lay the floor of the second floor in compliance with all building codes and technologies.
Construction requirements for wooden floors
In order to mount a durable and safe wooden floor between the 1st and 2nd floors with your own hands, you must strictly comply with the technical requirements for them.
Thermal insulation layer
 Thermal insulation of the floor will improve the temperature in the room on the second floor
 If the wooden floor will separate the upper and lower rooms with a temperature difference between them of more than 10 ° C, it will be necessary to build a heat-insulating layer.
This is necessary, for example, when arranging ceilings between the first floor and the underground, basement or between the first / second floor and an uninsulated attic.
Beam strength
 Beams and ceilings must withstand up to 180 kg / sq.m of load
 When constructing the floor of the second floor on wooden beams, special attention should be paid to the strength of the supporting structures. The safety of the operation of the building depends on how durable the wooden beams of the floors are.
According to building codes for wooden low-rise buildings, the maximum load on the floors of the first floor should not exceed 210 kg per sq.m., the pressure on the wooden floor of the second floor should not exceed 180 kg / sq.m., and for attics and attics this figure should be less than 105 kg/sq.m.
Maximum deflection
In addition, building codes also impose requirements on the deflection of wooden floor beams. According to SNiP, this coefficient should not exceed 1 to 250. That is, the maximum deflection of wooden supporting structures during operation should be less than 4 mm per meter of beam length. 
According to this standard, the deflection of a beam structure 4 m long in the center should not be more than 1.6 cm (4 m: 250 = 0.016 m). If it is planned to place massive furniture and household appliances in the room, flooring as a floor covering of tiles, etc., then the requirements for structural rigidity increase to 1 to 400.
That is, the deflection should not exceed 2.5 mm per meter. For non-residential attics and attic spaces, a larger deflection coefficient is allowed - 1 to 200 (5 mm per 1 meter).
Soundproofing
 Fifty-millimeter mineral wool will not only insulate the floor, but will also become a good sound insulator
 According to building codes, the sound insulation threshold for interfloor floors of residential buildings should be 50 dB.
To ensure this requirement, it will be enough to cover the floor of the second floor under the finish coat with mineral wool 50 mm thick.
 The length of the beam should be no more than 5 m
 The maximum allowable length of the free sag of wooden beams should not exceed 5 m for interfloor and 6 m for attic floors. If the design length of the room is more than 5 m, it will be necessary to install an additional support under the bearing beam. The fact is that the optimal length of the supporting wooden structure is 4 m.
With a further increase in its length, the rigidity and strength of the supporting structure decreases sharply and the requirements for the thickness of the beam section increase disproportionately. So, in order for the deflection indicators for an 8 m beam to “fit” into the SNiP standards, its thickness should be about 40 cm. For example: the same deflection indicator shows a 4 m beam with a cross section of only 15 x 15 cm.
Wood is a material quite vulnerable to external influences, primarily dampness and fire, therefore, before proceeding with the construction of load-bearing structures, all wooden elements must be treated with antiseptic materials and flame retardants.
Construction material
Before proceeding with the installation of the floor on the second floor on wooden beams, you should make a list of all the necessary materials. This will allow during work to avoid unforeseen downtime and delays caused by the need to purchase some building materials.
beams
 A beam section of 15 x 15 will be enough
 The basis of the entire structure of interfloor wooden floors is beams. They play the role of load-bearing elements, and the strength of the structure depends on them. For them, a bar or gun carriage with a section of 15 x 15 cm, or 18 x 18 cm is usually taken.
This section is usually enough to provide sufficient rigidity for a specific load of 400 kg per sq.m. In this case, it is necessary to observe the parameters recommended by building codes: the span is 4 m, and the step between the beams is 60 cm. Based on these parameters, you can also calculate the required amount of timber.
| № | Span length (mm) | Beam cross section (mm) |
|---|---|---|
| 1 | 2000 | 75×150 |
| 2 | 2500 | 100×150 |
| 3 | 3000 | 100×175 |
| 4 | 3500 | 125×175 |
| 5 | 4000 | 125×200 |
| 6 | 4500 | 150×200 |
| 7 | 5000 | 150×225 |
However, in the absence of a beam and small values of the expected loads on the floor, it is quite possible to use boards nailed together in pairs and placed on the edge with a thickness of 50 or 40 mm. This option is suitable for flooring in the attic or in a small country house.
For the first floor of a residential building, this option is not suitable due to the low bearing capacity of the boards: to ensure the necessary rigidity, the step between the plank beams will have to be significantly reduced, which will lead to unjustified waste of material.
 The most commonly used material for beams is pine. This is the best option according to the "price-quality" criterion: its wood is quite affordable and at the same time has good technical characteristics.
Bars made of wood of stronger species (larch, oak) can rarely be found on free sale, and their price is incomparably higher, and pine wood after appropriate treatment with antiseptics will not be inferior in terms of durability to the same larch.
When buying a bar, you should choose a material with dry wood. Otherwise, after mounting the beams, their deformation during the drying process is possible - bending and twisting.
Flooring
 Wooden decking laid on beams will be a rough base for flooring
 Usually, the flooring of interfloor ceilings is made in two tiers: from below there are rough floors, on which insulation is laid, and from above - pre-finish flooring, mounted on top of the bearing beams. A decorative floor covering is laid directly on it.
To determine the nature and amount of material for flooring, you should clearly consider the design of the floors.
In the device of the subfloor, either 5 x 6 cm bars stuffed onto the supporting beams or grooves made in the beams can be used as a support for the floorboards. The latter option is quite laborious, so most often 5 x 6 cm bars are used to create a support.
 To calculate the required number of bars, it is enough to count the number of beams and multiply them by the length of each of them. The resulting footage (the total length of all beams) is multiplied by two more (since the bars will be stuffed on both sides of each beam).
A wide range of materials can be used for finishing flooring. It can be boardwalk, plywood, chipboard, MDF, OSB, etc. Each of these materials has its advantages and disadvantages, after reading which you can choose one of them. To calculate the required amount of material, it is enough to simply calculate the area of \u200b\u200bthe room.
When purchasing building material, you should always purchase it with a margin of 10 - 15%, since unforeseen material overruns are inevitable during construction.
This will save you from having to interrupt work and buy the missing part.
Impregnation
 Antiseptic will extend the life of the tree
 To maximize the service life of wooden structures, they must be treated with antiseptic materials.
It will also be useful to treat wood with fire retardants, which increase its fire safety.
To calculate the required amount of impregnation, you should read the instructions for its use - it always indicates the approximate consumption of the mixture per sq.m.
Waterproofing
 Since wood is afraid of moisture, waterproofing materials are always used in construction.
This can be rolled waterproofing used to create a water-repellent layer between wooden floor structures and the finish coat, or between wood and brick (stone, cinder block, etc.).
To protect the tree from moisture, you can also apply a coating waterproofing based on polymers or liquid bitumens.
Heat and sound insulation
If it is necessary to create a barrier to noise or cold, insulating materials are used in the construction of floors. Most often, for these purposes, use a minplate or foam. Their total number in area should be approximately equal to the area of \u200b\u200bthe room. For more information about floor insulation, see this video:
Expanded clay or ordinary slag mixed with sawdust can also be used as an insulating material.
Fastening materials
To fasten wooden floor elements, you should purchase self-tapping screws, nails, steel corners, anchor bolts and other consumables. When purchasing screws and nails, attention should be paid to their length.
According to the standards for a strong connection, the nail should be 2/3 longer than the thickness of the attached element (board, bar). For self-tapping screws and screws, this figure can be reduced to 50%.
Those. for reliable fastening to the beam of the “magpie” board, you will need 120 mm nails or 80 mm self-tapping screws.
After all the necessary materials have been purchased, and all preparations have been completed, you can proceed directly to the construction work. The construction of interfloor floors can be divided into several main stages. 
 The part of the beam inserted into the wall is wrapped with three layers of waterproofing material
 The installation of load-bearing beams is most often carried out at the stage of erecting the walls of the building. Before laying the bearing bars, their surface is treated with all the necessary impregnations.
Then their ends are cut at an angle of 60 ° and that part of them that will be walled up in the wall is wrapped in 2-3 layers of rolled waterproofing.
 The ends of the beams are usually also coated with waterproofing compounds, but some experts advise leaving them open to allow the moisture contained in the wood to freely escape.
The depth of the beams to the depth of the wall should be at least 15 cm. The step of laying the beams is usually taken at 0.6 m, but depending on the expected load on the floors, as well as on the thickness of the beam section, this indicator can be reduced or increased.
The choice of the interval between the beams is also influenced by the technical indicators of the material used for the finished floor.
If the top flooring is supposed to be made of inch boards, plywood or chipboard, then the distance between the beams should not exceed half a meter, otherwise the floors will sag when walking. For more information about the installation of beams, see this video:
 Floor joists must lie in the same plane
 Installation of load-bearing beams starts from the two extreme walls, while the beams should be located at a distance of 5 - 10 cm. After installing the two extreme beams, we mount the rest, observing the required interval.
When laying beams, special attention should be paid to the horizontal slope: all floor beams must lie in the same plane. To do this, a cutting board is placed on the edge between the two extreme bars, or the twine is pulled tightly.
If the base on which the beams are laid is uneven, then mortgages should be installed under the ends of the beams to level the horizontal level. For mortgages, material is used that is resistant to decay and physical stress - metal plates, pieces of tiles, etc.
It is not recommended to use wooden wedges to adjust the level of the beams, as they can quickly rot, which will cause the lowering of individual floor beams and the curvature of the floor line.
The bearing bars are attached to the wall with anchor bolts and steel corners.
Fastening of support bars
After all the floor beams are exposed, bars with a section of 5 x 6 cm are attached to them (the so-called "cranial" bars). They serve as a support for laying the subfloor and are attached along the entire length of the bearing beam, on both sides.
They should be nailed in such a way that their bottom is flush with the bottom of the beams.
 Most often, the draft floor is made from an inch board.
 For the device of the subfloor, edged boards are taken and laid across the beams on the support bars. Since the distance between the beams usually does not exceed 0.6 - 0.8 m, then an inch or thirty board is quite suitable for subfloors: the pressure on them will be limited only by the weight of the insulation.
Also for these purposes, you can use a cut slab. You can also combine the draft floors of the second floor with the finished ceilings of the first floor or basement. In this case, edged boards are hemmed from below, from the side of the first floor to the beams. For more information about the draft field, see this video:
Thermal insulation flooring
 After the installation of subfloors, compartments are formed between the beams, which, if necessary, can be filled with heat-insulating materials.
To do this, a hydro- or vapor barrier (roofing material, isospan, etc.) is laid on top of the subfloor boards, and then mineral wool, polystyrene, slag with sawdust, etc. are laid.
In this case, the entire space between the bars should be densely filled. We fill the gaps between the beams and foam sheets with sealant.
It is also desirable to lay waterproofing on top of the insulation, which will protect it from moisture leaks from above.
 The final stage will be the flooring of the finishing floors, which is mounted on top of the supporting beams with self-tapping screws or nails.
To do this, the material (boards, OSB, plywood) is cut in such a way that their joint falls in the middle of the timber. The finished floor is the basis for the finishing coating - laminate, linoleum, parquet.
Ceilings between floors, basements or attics are structurally arranged according to two schemes - a beamless ceiling (based on the use of a monolithic slab), and a beam ceiling (wooden floor beams are used). They make ceilings to separate the interfloor premises, as well as to separate the rooms from the basement and attic. Beams can be made from various materials, such as wood, cast-in-situ reinforced concrete, or metal girders.
The installation of wooden floor beams allows you to solve the following problems:
- achieve the required indicators of strength and rigidity of the overlap;
- ensure that sound insulation and heat transfer resistance comply with the level required for energy saving;
- maintain compliance with the established standards for vapor and air permeability.
The choice of beams for interfloor ceilings:
By type and type:
- Timber floor beams. Most often, for the manufacture of beams, a rectangular beam is chosen. The height of the beam should be in the range of 140-240 mm, and the thickness should be 50-160 mm. In this case, the rule is observed: the thickness of the beam is at least 1/24 of its length. Professionals note that greater strength is inherent in a wooden beam with an aspect ratio of 7:5.
- Log beams. More economical solution. The log has a high resistance to stress, but also low resistance to bending. The log is suitable for use only if it has been aged in dry conditions for at least one year.
- Floor beams from boards. The use of the board leads to a reduction in the amount of lumber consumed for the flooring device. But, it is worth noting that in this case, the resistance of the ceiling to fire, durability and sound insulation are reduced. Usually the board is used in the construction of attic floors. To strengthen the boards, you can use the technique - to splice two boards together along the length. Then the total cross section will correspond to the load level. This design can withstand a load 2 times greater than a beam or two boards laid close to each other. In this case, fastening is carried out with self-tapping screws or nails fixed in a checkerboard pattern with a step of 20 cm.
2. Acquisition of timber, logs or lumber and its treatment with an antiseptic, fire-fighting, anti-fungal solution and biological protection.
3. Choice of the type of fastening of the beam to the wall.
Fastening wooden floor beams to the load-bearing wall is carried out in two ways:
- wall mounting. The beam is embedded in the bearing wall to a depth of 150-200 mm.

With this method of installation, the end of the beam must be cut at an angle of 60 °. To protect the ends of the beam, they need to be wrapped in two or three layers of roofing material. In this case, the end of the beam remains open, and it should not rest against the wall. The presence of a gap of 20-25 mm. allow free air exchange. And the resulting niche (gap) is filled with mineral wool.
- hanging method. In this case, the beams are fixed on the wall by means of metal plates.

4. Laying wooden floor beams
At this stage, beams of the desired length are prepared. The length depends on the mounting method. If the beam is inserted into the wall, then it is calculated as follows: the length of the room plus 300-400 mm. for wall mounting. If attached to the wall, then the length of the beam is equal to the length of the room.
The installation of wooden floor beams begins with the extreme beams. Each beam is checked with a building level. After that, the beams are fixed in the sockets of the wall using dry crushed stone.
When the beams are set exactly in level and the horizontal is checked, they can be concreted in the landing slots.
Conclusion
Wooden beams made using this technology will reliably serve you for several decades. However, in order to prolong its service life, it is necessary to process the wood and carry out periodic inspection to control their condition. If there are defects, repair (partial or complete replacement of damaged elements).
There are two options for arranging wooden floors: on beams and on logs. The choice of one or another method of performing work depends on the individual characteristics of the premises and the preferences of its owners. Among the advantages of floors made on beams, it should be noted their high level of strength and low cost of work. How to build floors on wooden beams, we will consider further.
Floor construction on wooden beams: performing calculations
The use of wooden beams, in comparison with reinforced concrete, is distinguished primarily by a more affordable cost and ease of work. In addition, the floor has almost the same strength characteristics. The use of wooden structures helps to reduce the overall weight of the house and its load on the foundation base.
Among the advantages of floor beams in a wooden house, we note:
- high resistance and rigidity before loads;
- light weight compared to concrete beams;
- affordable cost;
- the possibility of self-assembly, without specialized technical equipment.

For arranging the floor on wooden beams, specialized equipment is not required, since several people are enough to lay the balls. The main load-bearing element of the structure is a wooden beam. It has the shape of a wooden beam, the height of which is from ten to thirty centimeters, and the thickness is from seven to twenty centimeters. The optimal beam laying step ranges from 65-100 cm. To determine the beam cross section, one should take into account the individual characteristics of the room, the load and weight of the building, the span length and other important factors. Interconnected wooden boards mounted on the edge will help to replace the timber. The use of hewn logs will be the most economical option for arranging flooring.
In order to determine the cross section of a beam installed in a particular house, it is necessary first of all to determine the level of load that affects it. To determine the total load, the weight of the floor, the load from people and the fittings that will be installed on it are taken into account. The total value of the total load is four hundred kilograms per square meter. In relation to this value, the cross section and size of the beam is determined by the table:

If the span is about 4 m, then with an installation step of 65 cm, a 10x20 cm beam will be required. Please note that the length of the beam must be 15 cm longer on each side to ensure its installation in the wall. That is, to determine the length of the beam, add 30 cm to 400 cm, you get 4.3 m.
The correct calculation of wooden beams allows you to choose the optimal size of materials with which you can correctly distribute the load in the building.
Laying wooden beams is carried out in a direction parallel to each other. At the same time, the interval between the beams should be maintained in almost all areas, with the exception of chimneys and other structural elements of the ceiling. The interval for laying beams in a house made of wood is about one meter. If the house is made using frame technology, then this distance is reduced to 50 cm. If this value increases, in relation to the structural features of the building, then an additional element is installed between the beams, which improves their bearing capacity.

If there is no place for fastening the beam in the area close to the stairwell, an additional structure in the form of a wooden crossbar should be equipped here. It will become a place for installing beams. At the same time, the beams can be installed directly on the crossbar or in it. In order for the beams to easily withstand the loads placed on them, the following requirements must be observed:
- the optimum height of the beams will be at least one twenty-fourth of its length;
- the width of the beam should be at least half of its height;
- if the beam is installed in the attic, then a width of one third of its height is sufficient.

With the help of this ratio, it is possible to choose the best option for beams for arranging floors. If the installation of beams is carried out in a section of the mounting grooves, then the size of the beams should increase slightly. In order to reduce the thickness of the beam, if the overlap is quite long, support posts are installed between them.
If the installation of beams is carried out in outbuildings, garages, change houses or other non-residential premises, the average load level decreases and ranges from 100 to 300 kg per square meter. At the same time, the cross section of the beams should also be reduced.
If you could not find the indicated size of the beams, then it is possible to construct them independently using ordinary boards. At the same time, they are stacked in a checkerboard pattern, connecting with each other with the help of nails.
With the further construction of the stove and chimney in the house, one should take into account the fact that the distance between it and the beam should not be less than thirty centimeters.

Overlapping the floor on wooden beams: features of the installation of beams
Fixing wooden beams is carried out directly on the wall. If the ceiling is arranged in the attic, then the beams are installed on the last crown of the wall, made of timber or logs.
A hole should be made in the wall, comparable in size to a beam. Before installation, the beam should be overlaid with tow. If there are too thin beams, they are installed into the wall by 10-15 cm. In this case, a special cutting method is used. It is possible to attach the beam using a connection called a dovetail.
This option is suitable for houses, which is also made of timber. To fix the beam in a house made of wood, a trapezoidal connection is used, and a clamp is installed for additional strength. In this case, the crossbar and the beam will be on the same level. The easiest way to install floor beams is to mount the cranial bars and fix the beams on them. In this case, the size of the bars will be about 5x5 cm.

If the house is made of a shield, then for laying the beam, you should equip a hole in the wall in the form of a nest. Each end of the beam is installed inside the holes. In this case, each nest for the beam must be at the same level. The optimal depth of the nest in this case is about 15-20 cm, and the width between the beam and the wall is about 1 cm. Each of the ends that is installed in the nest is lined with tow. This is followed by the process of processing the beam with an antiseptic solution. Thus, it will be possible to extend its life and protect the coating from mold and fungus.
It is possible to fix the tow with steel anchors. One end of the anchor is installed in the socket, and the other is fixed on the beam with screws, while the length of the beam is calculated so that it does not enter the wall and is different from the length of the ceiling.
If the house is made of brick, then the installation of wooden beams will also require the construction of nests. They are the supporting elements for holding the beams. Try to build nests as level as possible. In order to install the beams at the same level, you will need to level the bottom of the nests with a concrete mortar. After the concrete solution is completely dry, a roofing material or roofing felt is installed on its surface, which protects the tree from moisture.

In this case, the size of the nest is 6-10 cm more than the thickness of the beam. The gap between the wall and the wooden beam should be about three centimeters. The depth of the nest in this case is about 20-25 cm, while the beam is installed only 15 cm inside. The sections of wooden beams that are placed in the nest should be smeared with hot bitumen.
Then they are wrapped with roofing felt or glassine in two layers. After that, the rest of the beam is covered with a solution with antiseptic properties. After laying the beams in the nests, they should be poured with a concrete solution, for which crushed stone is used as a filler. Alignment of beams is carried out on the same level with the wall.

Overlapping the floor on wooden beams: features of the floor device
The rolling part of the ceiling is the ceiling on the rolling floor. There are several ways to lay out flooring. Most often, cranial bars are installed on the beam, the cross section of which is 4x4 or 5x5 cm. The cranial bars are installed in such a way that they are flush with the beam. Further, a wooden roll is laid on the surface of the bars in the form of wooden boards, the thickness of which is from 10 to 20 cm. At the same time, there should be no gaps between the boards. A ready-made shield made of wood or ordinary plywood will help replace the boards. In order to equip a flat ceiling on the lower floor, drywall sheets or plywood are installed on top of the run.
With the help of another method of mounting the roll, it is possible to significantly increase the area of \u200b\u200bthe ceiling, if it is not large enough. Bars are installed on a wooden beam, with a section of 4x4 cm. A roll is laid on them, while its installation is carried out perpendicular to the beams. This is followed by the installation of filing in the form of boards, the thickness of which is the same as that of the previously installed bars.

In addition, a bar with a thickness of 6 cm or more is also used to make a roll. Cranial bars are installed on the beam, the cross section of which is 4x4 or 5x5 cm. This is followed by the process of laying the bar, At the same time, they are connected by a quarter method using a cut groove in the bar . The thickness of the beam depends on the height of the beams, they must be located on the same level. In this case, the beam performs the function of both rolling and filing. In addition, the manufacture of a mounting groove inside the beam will help replace the cranial bars. In some cases, the lower part of the beams is left open and unfinished. This method is relevant when using country style indoors.
Floor installation on wooden beams: technology for performing work
This is followed by the process of arranging the floor on wooden beams. To begin with, bars are installed on each of the beams, in relation to which the flooring surface is formed. This stage involves the fitting of the floor and the construction of a rough coating. Therefore, it is allowed to use an unplaned board in the work, however, it must be covered with protective materials and impregnations.

The next step is waterproofing the flooring. The best option is to use a clay-sand mortar, which has the consistency of putty. Another option for performing waterproofing work is the use of roofing material. With it, it is possible to provide high-quality waterproofing, which does not take up much space. After that, the process of providing thermal insulation follows. The most popular materials for carrying out these works are the use of:
- slag, poured between the bars;
- mineral wool;
- polystyrene;
- non-polystyrene;
- sawdust or expanded clay.

The most popular floor insulation for wooden beams is mineral wool. It has high thermal insulation capabilities, has a long service life, is resistant to rodents and is quite antiseptic.
Mineral wool is installed in such a way that it fits snugly against the floor surface. After that, a vapor barrier is installed, since this material is not resistant to moisture, which can get on it through a wooden floor.
Further actions are related to the arrangement of the finishing flooring. It is possible to install it directly on the beams, but it is best to pre-install the system from the log. Thus, firstly, additional space and ventilation will be arranged under the flooring, and secondly, the noise level emitted by the wooden floor will be significantly reduced.
In addition, it is possible to build a wooden floor of a floating type. The warm floor on wooden beams is distinguished by the presence of rigid fixation to the surface of the walls. In addition, it has excellent soundproofing characteristics and a low level of creaking. As a finishing finishing material for arranging a concrete floor on wooden beams, a planed floorboard, chipboard, laminate, parquet board or linoleum is used.