We make various hanging chairs for the home or garden with our own hands. Hanging chairs for the garden: characteristics of types and a master class on how to make it yourself Hanging chair cocoon drawings

Hanging chair– comfortable and unusual garden furniture designed for a relaxing time on fresh air. This device appeared in the 50s of the last century and in a short period of time became an integral part of the house, claiming to be a truly cozy home.
A beautiful “cocoon” can be used as a swing, a place to sleep or meditate. It is noteworthy that it is easy to make a hanging chair for your home or garden yourself from available materials.
Users often search:
Types of hanging chairs
Currently, there are several types of products:
- With a rigid frame made of rattan and plastic. The structure is covered with strong fabric. Also, vine is used as a base.
- With a soft frame (reminiscent of a hammock). The main difference is the size: the chair is smaller than a hammock and therefore takes up little space. This product adapts to the human body, which means it is comfortable to sit and lie in.
- Cocoon chair. Distinctive feature this modification is 75% hidden inner space. This effect is achieved thanks to wicker walls - macrame. “Cocoon” will appeal to those who love a secluded holiday, hidden from prying eyes.
- “Drop” – as a rule, used in a children’s room. The chair looks like little house, sometimes equipped with doors. An excellent rocking chair for a child.

Making your own hanging chair
Making a comfortable hammock for a comfortable pastime is not as difficult as it might seem at first glance. First you need to prepare the necessary parts:
- Metal hoop with a diameter of 90 cm.
- A piece of strong fabric 3 m long, 1.5 m wide.
- Braid, interlining or dublerin.
- Eight meter sling.
- Steel ring for mounting the structure to the ceiling.
- 4 iron buckles.
- Sewing supplies, measuring tape and scissors.
Let's take a closer look at choosing a hoop. As load-bearing structure You can use the following materials:
- Gymnastics hoops. Aluminum and plastic are not suitable for this purpose, as they will not withstand the load of an adult’s body. Only steel models can be considered. Maximum cross section such a hoop is 16 mm, while to make a durable product you need 32 mm, which is twice as much (for a wicker chair this figure should be 40 mm). However, the gymnastic ring is perfect for children's version. The small cross-section is compensated for by multilayer filler.
- Softwood. Such hoops are lightweight, but require careful processing, since moisture and heat contribute to the destruction of the wood.
- Metal-plastic water pipe. Perhaps the best option for implementing the idea. PVC is a cheap and durable material. The hoop is made by rolling a cut piece of pipe into a ring. For fastening, parts made of wood or plastic are used.
The list of materials suitable for creating a hoop is not limited to the options listed. Everyone chooses the basis for the frame themselves - it all depends on their imagination.
Preparing the cover
Cutting the material for a hammock chair requires care and attention. If in doubt, it is better to leave a small supply of fabric; later it can be removed without any problems.
The principle is: measure seven times, cut once.
- To begin with, let's take a 3-meter piece of fabric and cut out 2 squares from it - each 1.5 meters long and wide. We fold both 4 times. In the corner in the center we mark a circle with a diameter of 65 centimeters. Draw a line along the marked points. Cut out identical circles from each square. We move 4 centimeters away from the edge of the circle and draw a dashed line segment.

Cutting out squares
- We put two holes on the first circle. They are designed for slings. Next, fold the fabric 4 times and iron it. We take the folds as guidelines. Two slings should have a slope of 45 degrees, the others - 30 degrees each. Having highlighted the corners, open the circle and iron it again. The result is axes indicating the slot points for the sling.
- Select on all axes required holes– rectangular shapes 10 cm wide and 15 cm high. Y is marked in the inner part. The cut will be made along its contour. We fold the circles together, but in such a way that the threads do not overlap each other. Because of this, the case will be able to better withstand the load. Place the circle on top. Cut the marks on two circles at once.
- We bend the ends of the cut holes onto reverse side. We attach braid around the perimeter of the figure or treat it with doublerin so that the material does not fall off. Next, cut through completely and sew along the edge, leaving 3 mm.

Bend and stitch the edges
- Leaving the marked 4 centimeters at the edges, we connect the circles to each other, marking a slot for inserting the hoop. We cut the gap left so that we get teeth along the entire edge. Turn the cover right side out and iron it.
- We cut out the filler into strips, then we cover the hoop (preferably in 2 layers). We insert the processed structure into the case. Moving the ring towards the edge, we sew all the circular parts at a distance of approximately 7 cm from the end.

Insert and sew up the hoop
- Turn the edges of the unstitched cut intended for inserting the hoop inside out. We carefully cut off the allowances on the front side so as not to damage the correctness of the circle. We connect the edges and sew on a machine, leaving a few millimeters. We move the frame to the stitched end, baste the fabric by 7 cm.

Sewing the edges
- Synthetic padding mode through the slots and move it inside the material, securing it with threads. Side holes seal with a hidden seam. Then we fix the cover on the hoop, sewing it along the verified 7-centimeter basting. After every 4 stitches we wrap a knot. Further rows are made at a distance of 7 cm from the previous one, so that the thick fabric can gather into soft folds.
- Sling mode for four 2-meter segments. It is better to burn the edges over a flame. We insert the end into the hoop through the prepared slot. It is necessary to fold it so that a loop is formed. Using a needle, we cut and stitch. The algorithm is the same for all slings.

Attaching the slings to the hoop
- We insert the end of each into the buckles, then into the ring and again into the buckle. It is necessary to weave everything well in order to be able to change the height and tilt of the chair. The ring serves to collect the slings.

Pattern example
Hanging chairs are a kind of swing, cozy place for relaxation and privacy.
Making a wicker chair
The macrame technique allows you to create original products yourself.

Photo: egg-shaped wicker hanging chair - a comfortable place for reading books in the fresh air
This unusual structure consists of several circles woven together in macrame. For such an “egg” you will need the following parts:
- 2 metal-plastic rings with a cross-section of 35 mm. One for the backrest measures 1.1 m, the other for the seat – 70 cm.
- Polyamide 4 mm thread 900 m long. In the store, ask about the option with a polypropylene base, which guarantees strong knots.
- Twelve meter slings.
- 2 thick ropes to connect the hoops.
It is worth mentioning that rings of a smaller diameter are suitable for the product, since the specified characteristics are the maximum for a chair. It is better to buy the thread of the required length immediately to avoid differences in color or quality. After preparing all the parts, you can safely begin work on creating the “egg”.

Any patterns are suitable for weaving the back. The cord is attached to the top. Work is carried out in a downward direction. On the lower hoop, the knots are tightened, and the remaining threads are collected into tassels. The design requires reinforcement with 2 wide cords connecting the seat to the back. Slings are attached to the finished product - and the “egg” hanging chair takes its rightful place on summer cottage.
By making such a device, you will receive cozy corner for a secluded holiday and forget about problems and stress for a long time!
In an effort to comfortably arrange their living space, many people prefer non-standard design solutions. They are able to bring originality to a familiar interior and provide additional comfort. These items include hanging chairs that you can make yourself.
What kind of hanging chairs you can make yourself
Among the variety of hanging chairs, there are models that you can make yourself. Such options will become the highlight of your interior. Besides, self-production allows you to bring to life an individual plan, which is based on proven and reliable designs.
Hanging swing
Unusual swing chairs are made from various materials. The peculiarity of such structures is their elegance, simplicity and the ability to use both hard and soft frames. These chairs can become stylish decoration country house, an unusual addition to the interior of a bedroom, living room, children's room or veranda.
Wicker cocoon
No less popular is the cocoon chair or egg chair. A special feature of the model is the presence of walls that hide the internal space by about 2/3. These chairs allow you to enjoy privacy; they are most popular among children due to their resemblance to a hanging house suitable for games. Typically, cocoons are made from natural materials intended for weaving.
Nest chair made of hoop
As the most popular homemade model protrudes a nest chair made on the basis of a hoop frame. This model can be equipped with many decorative elements, and its shape fits harmoniously into the living space modern apartments. A variety of weaving techniques are used to make a nesting chair.
Materials and techniques for making home chairs
When choosing the materials needed to make hanging chairs, first of all take into account the features of the model you are interested in.
- Thick textiles are suitable for swing chairs, synthetic ropes various types and wooden blocks.
- A cocoon chair is made from rattan, willow twigs, bast, willow or bird cherry, which have the necessary flexibility.
- To make a nest chair, you need plastic or steel hoops to ensure rigidity of the structure. And you can’t do without wear-resistant textiles, synthetic fillers, decorative cords for weaving and wooden blocks of different sizes.
To create the seats of hanging chairs, craftsmen use various techniques:
- macrame. The artistic interweaving of rope and rope knots gives the chairs airiness, ensuring impeccable appearance;
- patchwork. To ensure the strength of the seat, the patchwork fabric is sewn on top of a dense wear-resistant material;
- knitting. The combination of durable cords of various colors allows you to implement unusual design solutions;
- Tatting. Thanks to their openwork, these designs look weightless, instantly attracting attention.
Remember that the materials chosen must be able to withstand certain weight loads. Fabrics that are too thin or lace can tear under the weight of a large person. The fastening elements also deserve special attention and strength testing: chains, ropes, braid on which the structure is suspended.
DIY hanging chairs - gallery
A hanging swing chair made of fabric is a convenient addition to a country house  Cocoon chair from thick fabric kids will like it
  Hanging cocoon chair Rattan is strong and durable
  A hanging nest chair made of thick fabric is suitable for relaxing in a summer cottage
  A simple model of a swing chair is easy to make with your own hands
  An original handmade hanging chair will become a source of pride for its owners.
  A hanging swing chair woven using macrame technique adds coziness and comfort.
  An openwork seat for a hanging chair can be woven from thick cord
  Hanging chairs can be used as a cradle for a baby
Step-by-step instructions for making a hanging swing chair
The swing chair can rightfully be called one of the most simple models that you can do yourself. To create it you will need:
- 2 meters of dense fabric (canvas, satin, trouser fabric);
- a wooden stick about 1 m long and 5–6 cm in diameter;
- drill and twist drill (15–20 mm);
- carbines (11 cm) with a load capacity of 160 kg;
- rope for static belay with a thickness of 10–11.5 mm with a breaking load from 2600 to 3200 kgf;
- sewing machine, scissors, ruler.
- paint, brushes, iron and durable synthetic fiber threads.
Having prepared everything you need, you can start making an unusual interior detail.
- Fold the selected fabric in half, then count 18 cm from the top corner.
- Carefully cut off the resulting triangle (photo 1).
- Hem all sides of the fabric cut, bending the edges by 1.5 cm (photo 2).
- Create pockets for the ropes (Photo 3). On the long side of the workpiece, fold the edges 4 cm and sew them up using a sewing machine (photos 4 and 5).
- Make two holes on both sides of the wooden stick at a distance of 5 cm from each other, and the distance between pairs of these holes should be about 80 cm (photo 6).
- Thread a rope into the holes located closer to the center of the stick and secure it with knots. At the same time, in the center of the cable, also tie a knot necessary for attaching the carabiner.
- Pass the sections of cable hanging under the stick through the fabric blank, and insert its ends into the free holes located closer to the edges of the stick. Secure them with a secure knot (photo 8).
- Attach two carabiners connected to each other to a hook pre-fixed to the ceiling. This will ensure you can rock safely in the chair. Thread the cable into the lower carabiner.
The resulting hanging swing chair can be additionally equipped with soft cushions that provide comfort.
How to make a hanging hammock yourself from a hoop and fabric - video
Drawings and diagrams for a cocoon-shaped structure
For the manufacture of original model hanging chair you will need:
- rattan or willow rods with a diameter of 10 or 15 mm, approximately 450 pcs.;
- a ready-made metal hoop, metal pipes or several thick vine branches woven together in the form of a circle;
- strong rope and glue, which will be needed for tying the frame;
- knife, ruler, pruning shears and awl;
- nylon cord with a cross-section of 4 mm, used for weaving the back (it can also be made from wicker);
- ropes, chains or cords for hanging finished design to the ceiling.
It will be useful for beginners ready-made diagram cocoon, which allows you to correctly calculate the dimensions of the future chair.
When manufacturing, follow the instructions.
- Cut the vine, peel the bark and steam it, then beat it thoroughly. These manipulations will provide her with the flexibility necessary for weaving.
- Then proceed to forming the frame of the future chair. You can do it from metal pipes or a slightly flattened hoop if the final shape of the product should be oval. If using a pipe, connect its ends using inserts.
- To the pipe acting as frame base, attach all the remaining elements one by one. If the chair is mounted vertically, use rods 6–8 mm thick, the length of which should exceed the height of the chair by 250–400 mm.
- Attach each of the rods to the upper parts of the frame so that a gradual movement between them is maintained. In the middle of the back the distance should be 20 - 25 mm.
- By bending the rods, give the future chair depth and shape. Make sure that they are reassembled at the bottom of the structure.
- When using horizontal rods in the process of creating a frame, secure them to the sides of the workpiece. Install them at a distance of 20–25 mm from each other, then give them the desired shape.
- To secure the vine, carefully bend it through the pipe in the direction from inside outdoor chairs. Secure the ends with a rope.
- Weave the finished structure with thinner rods, moving from bottom to top.
- If you need to braid the frame from horizontally fixed rods, start work from the middle of the back in both directions. Bend the end of the rod that is on the pipe and twist it around the base.
- Press each new layer of thin twigs as hard as possible against the previous one.
- Braid the entire basket. Bend the end of the last rod, tuck it in and securely fasten it in the main weave.
To give additional comfort to the seat of such a chair, you can use a thick pillow.
You can braid the frame different ways. Suitable for beginners simple techniques, providing a firm seating base.
Simple twig weaving techniques - gallery
 Even beginners can cope with such weaving
  Various weaving patterns can be used to make hanging rocking chairs
  Using twig weaving you can create a dense base for a chair
How to make a nesting chair with a knitted bottom
To create a nesting chair that will become exquisite decoration apartment or garden, you need to prepare the following materials:
- metal hoop with a diameter of 90 to 110 cm, a cross-section of at least 35 mm;
- 700–800 m of polyester cord with a diameter of 4.5–5 mm;
- crochet hook No. 8–9;
- slings - 12 meters;
- roulette;
- scissors.
Wrap the hoop used as a base with strong twine, securing every tenth turn with a knot; this will prevent the cord from unraveling.
To create the bottom, you can use a variety of crochet techniques. To make such a seat you will need from 120 to 160 m of cord. The exact quantity depends on the knitting pattern chosen.
- Start working from the center. Knit the circle as tightly as possible using single crochets and chain stitches.
- Start forming the seat with 6-7 circles, after which move on to the back in the form of a knitted mesh.
- Stretch the finished napkin onto the hoop, spreading it evenly over the entire base. The resulting structure should not sag. Attach to the hoop from the side of tight knitting, without cutting the cord.
- Attach slings to the finished product.
Making a seat using the macrame technique
For this version of a hanging chair you will need:
- 7 threads of 6 m;
- 4 threads of 5 m;
- 4 threads 4.5 m each;
- 2 threads of 4 m;
- 2 metal hoops with a diameter of 90 and 110 cm.
Having prepared the cords of the required length, proceed to attach them to the hoop.
- Starting from the center, fasten 7 long threads in pairs at a distance of 6 cm from each other.
- Continue fastening the threads along the sides of the warp. As a result, on one side there should be 2 threads of 5 m each, 2 threads of 4.5 m each and 1 thread whose length is 4 m.
- Then start weaving the pattern from the center of the workpiece.
- As a result of your work, you should get an openwork circle.
- To prevent the cable from moving in a circle, secure each thread with a flat knot.
- When knitting, maintain tension at all times, placing knots at 6 cm intervals.
If it is necessary to create a fringe, the length of the threads should be increased by about a meter and, at the end of the work, do not cut the remaining cord.
Additionally, equip the resulting structure with reliable slings and a soft cushion.
Hanging hammock chair using macrame technique - video
Hanging mounting options
Attaching a hanging chair can be done in different ways. One of the options - ceiling mount on the hook. Ready product, suspended in this way, can swing in different sides, however, moving it to another part of the room is very problematic.
This method can only be used if there is high-quality concrete floor or with coffered ceilings, allowing fastening directly to the beams.
No less popular is mounting to a stand, which can be purchased in specialized stores. This design is equipped with circular platforms that provide stability. The chair on the stand can be easily moved around the apartment and even taken outside.
Another option is axial fastening, which allows you to fix the structure between the ceiling and the floor. This method is suitable for decorating children's rooms.
If the ceiling in your home is not reliable enough and is hollow, you can install a hanging chair using a chemical anchor. This method involves injecting a polymer paste into the ceiling cavity from a syringe, after which the product is installed.
Simple options for making a hanging chair at home are available even to novice craftsmen. Unusual designs decorate the interior, give the room originality and comfort. Good luck with your work and have fun creating!
A hanging macrame chair is the dream of many, young and old. Therefore, it is not surprising that there are now a great many offers on the market for the sale of such chairs. And you can always buy a ready-made hanging chair, handmade, of course. But the price of such a chair is sometimes shocking.
Don't have any extra money? Do you have a couple of hours of free time in the evenings? And I really want to have my own cozy armchair rocking chair? So why not weave a hanging chair using the macrame technique with your own hands. This way you will get a truly exclusive chair, in the color and size you want, and most importantly, cheaply.
Before proceeding directly to the master classes on making such chairs, let’s make a reservation: a finished hanging chair can be attached either to the ceiling in an apartment or to a special support in the yard at the dacha. We will discuss ways to hang such chairs in more detail in a separate article.
DIY round hammock chair detailed master class
So, let's start the first master class on weaving round chair hammock, with step-by-step photo instructions and additional diagrams.
When I say round, I mean the seat of the chair, but its top somewhat resembles a tent.
As a matter of fact, it is more convenient to start weaving a chair from the seat. In the future, connect the finished seat with the back, add fringe if desired, and you can admire the result. But first things first.
Necessary materials:
- polyester cord (D 4.5 -5 mm, 800-900 meters);
- gymnastic ring (D 17 cm, thickness 2-2.5 cm);
- steel gymnastic hoop (D 90 cm);
- hook No. 8-9, scissors, tape measure.
We weave the chair seat
As I mentioned, let's start with the seat. To begin with, I suggest you familiarize yourself with the simplest, in my opinion, version of weaving “net” or, as this technique is usually called in macrame: “Chess of flat knots”. We will discuss other options in the future.
The photo of the instructions shows a diagram of weaving a double flat/square knot and a mesh of them.
In addition, for those new to macrame, I am attaching a video tutorial with detailed explanation how to weave a network of square knots.
For such a seat you will need a large steel hoop (aluminum will bend) and about 96 meters of cord.
The cord should be cut as follows:
- 8 threads of 6 meters;
- 4 x 5.5 m;
- 4 x 4.5 m;
- 2 x 4 m.
In terms of the length of the cord it turns out: 48+22+18+8=96 meters.
In photo No. 3, I marked each cord with a certain color so that it would be clearer to you where each one ended up on the hoop (I think in the future it will become clear to you why we cut them to different lengths).
So, first we attach the longest ones (these are 8 pieces of 6 m each) in photo 5 point - they are marked in green. We tie them in pairs at a distance of 6 cm from each other.
Please note that the cord is folded in half and secured with a special knot - it is shown in photo No. 4. And in the addition diagram, which is presented just below with a separate photo: there are four fastening options. Which option to use is up to you. The main thing is that in the end, from one cut 6 meters: you get two working threads 3 m long.
The tied ropes must be fixed (so that they do not slip). To do this, in each pair (which is 4 threads of 3 m each) we knit a square knot - pattern No. 6.
From tied threads we weave a checkerboard net (video lesson above).

A few words about mounting: the photo below shows the promised four options. These are regular fastenings with a lock either on the face or inside out, and extended fastenings also on the face or inside out.
Why pay attention to them? If in the future you don’t want to spend a lot of extra rope on wrapping the hoop (so that it doesn’t peek out), and don’t dream of a chic fringe. It is better to use an extended mount - this way you will hide a little more of the hoop.

The second thing I want to draw your attention to in this version of weaving a seat for a hanging chair: the outer threads (2 x 4 m) are tied to a hoop - they are highlighted in yellow in the diagram. Well, in fact, she schematically gave examples of how you can tie them to a hoop.

We weave a hanging macrame chair
We cut 20 threads of 10 meters each (i.e. cord consumption - 200 m).
We fold each rope in half and tie a knot in the middle (in the work, 20 threads of 10 m each will again turn into 40 of 5 m each).
We focus on the two threads on the sides (remember that one thread is two working threads). Accordingly, it turns out that we have two threads on the left and 2 on the right (they need to be highlighted somehow - alternatively, wind their ends).
We divide all the cords in half in the middle (for convenience, throw them over the door). We are working with the first part: 20 ropes, 2 of them with windings (one on the left and one on the right, respectively). Using these threads we weave 12 square/double flat knots (the bulk of the ropes are braided with four selected ones). At the end, tie the threads with windings in a knot (pictured No. 3).
Then the knots tied in the center unravel, unroll the work No. 4 and weave 15 more knots.
Next, we connect the edges (we form a loop - No. 6) and continue to braid 38 with the same two cords. Now it is better to hang the loop on a carabiner or, if there is none, on a belt, etc. We weave 3-4 knots and tie these 2 threads with windings in a knot, dividing all the ropes in half.
Now pay attention to point 8: unfold the loop as shown in the photo, find two ropes with wound ends and make them the middle of a square knot. Those. this time they tie up. Next, we weave 4 square knots sequentially in a row.

And again we take two threads with wound edges (the remaining two) and tie them too. From the remaining threads we tie 4 more knots - the result should be a row of 10 square knots (40 threads / 4 per knot = 10 knots).
We knit a couple more rows in a checkerboard pattern and tie the ropes to a small ring.
Cords with wound edges are marked in red (No. 16).
No. 17 we start weaving slings.
They will hold the hanging chair in front. For them you need to add ropes: cut 8 by 6 meters (consumption 48 meters). We tie them with an extended knot No. 19.

We tie 4 in front, and 2 on the sides. We knit a series of square knots and divide them in half (we need two slings).
We work with the first one: we knit a couple more rows of double flat knots (in the end we get 3 rows of knots), retreat 10 cm and knit 3 rows again and repeat until you get the desired length. Weave the second line the same way, try to keep them symmetrical.
If you already know where your beautiful chair will hang, do it because it will be more convenient for you. Please note that when loaded, polyester cords will stretch a little - i.e. the seat will lower by 10-20 cm.
At this point, the slings are ready; all that remains is to tie them to the finished seat.
No. 24 we weave the back of the chair using the macrame technique.
We will again need additional threads, we cut 16 by 9 meters (this is another 144 m). We tie them to the ring, 4 in the back in the middle, and 2 in the remaining intervals (I drew a diagram below so as not to confuse you in these additions, so don’t be alarmed).
We move the threads with windings towards the slings; in photo No. 25 they are marked in blue. Just tie them with rep knots (shown schematically No. 27).

Promised diagram of added ropes. I drew them according to the number of “cuts”. We remember that after tying to the base they “turn into two”.
Those. 8 threads of 6 meters = 16 threads of 3 m; 16 threads of 9 meters = 32 of 4.5 m.

We tie the slings to the seat of the chair at a distance of 77-80 cm.
And we proceed to the actual weaving of the back. You can choose the pattern yourself, whatever suits your soul. Let me draw your attention to the first row of nodes. In the diagram below I have already drawn the specific number of threads that is obtained at this stage.
In the first row you get 13 knots, if you knit the second with a checkerboard, you get 14, etc.


The wide, beautiful openwork back is the main highlight of the macrame hanging chair. Accordingly, the wider the back you need, the more threads you add.
This version includes:
- 4 threads - 7.50 m each (30 m);
- 4 - 7 m each (28);
- 4 - 6.50 m each (26);
- 4 - 6 m each (24);
- 4 - 5 m each (20).
In total, an additional 128 meters were woven.
Adding threads to the back is demonstrated in photos No. 37-39.
Finally, along the edge of the design at the bottom, pass a couple of rows of flat knots or secure the design next to rep knots.
Tie the finished back to the hoop from the middle (evenly pulling, symmetrically to the center, tie the side threads).

At the finish line, we conjure over the fringe, additionally cut the threads for the front 160 cm, for the back 180 cm. Tie them tightly until the gaps on the hoop are completely filled (and of course, do not forget about symmetry).
We will weave the skirt together from additionally tied ones and from the ones hanging from the back, slings and seat. By the way, at this stage you can cut off the excess (if any) and use it to create a skirt.
Simply tie pieces of sufficient length to the hoop; short pieces (in case of shortage) can be “soldered”. Heat the edges with a lighter and quickly connect both ends. Use soldered threads only in fringes that are not under load!
If there is enough cord, then run 150 - 200 meters onto the fringe.
Another important point: before weaving a particular pattern on the skirt of your chair, you need to “fasten” the threads. Alternatively, first weave a brid or a couple of rows of flat knots. And then, with a calm soul, weave your pattern; you can also complete it with a brid. We trim the fringe threads evenly and admire the hanging chair made by ourselves.
Such a chair will withstand a hundred and something kilograms, the main thing is that the fasteners can withstand it.
Let's summarize the thread consumption: seat 96 m + base 200 m + slings 48 m + back 144 m + additionally 128 m woven into the back + fringe 200 m = 816 meters.

Tell me, did you change the threads there, adding extra ones? Even the same “knitter” cannot have two identical chairs. It is better to cut off the “extra” than to redo the entire chair due to a lack of them. In addition, excess trimmings, as I already mentioned, can be used in the fringe of the hammock chair. Experiment - come up with your own patterns, you will definitely end up with a beautiful macrame hanging chair.


A couple of ideas on how to make a chair seat differently.

Here the seat is crocheted, more details about it in the master class presented below.

The second option for weaving a hanging chair
This option of weaving a macrame chair can be called economical in comparison with the first. The first chair took 800-900m, but this is only 400. Accordingly, you will weave such a chair faster.

We begin again to make a hanging chair from the seat. In this version it is crocheted. Crochet a round napkin, then tie it to the hoop (using the same hook - do not cut the thread).
In this option, it is better to wrap the hoop with twine in advance.

We begin to make the loop in the same way as in the first version. I signed everything in detail in the photo instructions.

The threads used to weave the square knots are marked in blue and green. As a result, they securely hold the seat: two in front and two in back.


There's really no need to go through the trouble of coming up with a complex pattern for the seat of a hanging hammock chair. After all, it will still be covered with a pillow or feather bed. But a beautiful skirt with fringe will significantly improve the appearance of your chair.

Well, I prefer the “solid” back of macrame chairs; a mesh of double flat knots is prettier when there is a small distance between them and a lot of ropes are involved. But that's up to you to decide.

Please note that you can not only modify macrame patterns, but also the very basis of the design of your hanging chair. Add a circle on top of the same diameter as the seats and you have a great mini hanging tent.


You can completely abandon the round base.


Macrame hanging chair with short back
From two hoops different diameters you can weave a cozy hanging chair with a low back.

Load-bearing twisted chains can be woven into the back of the chair.


Or you can attach them purely to the hoops.

In addition, you don’t have to connect the hoops end to end at the front.


Or this kind of modernization.

It’s true that with just one hoop you can make an unusual round hammock chair with your own hands, see the video master class for inspiration.
And one more example for inspiration (this time without a hoop). This chair is made with a wooden seat. Why not?


The fastest and cheapest way to make a hanging hammock chair using the macrame technique
How to quickly and inexpensively weave a hanging chair using the macrame technique? I show the final, simplest option.
Here you will need to do wooden base, and then weave the familiar network of square knots. All steps are demonstrated in detail on step by step photos instructions.


The result is a beautiful macrame hammock hanging chair.

That's it, our selection of master classes on how to weave a round hanging macrame chair with your own hands has come to an end. For inspiration, don't be afraid to experiment!
By the way, before you start weaving such chairs, take a look at ours - there are very decent options, which will surely appeal to someone.
(20
ratings, average: 4,30
out of 5)
 Work days modern man keep him in suspense. Weekends allow you to relieve fatigue, during which you need to restore strength and completely escape from the hardships of everyday life. Many city residents go to their dachas outside the city for the weekend. This allows you to be in nature and completely relax from the bustle of the city.
Those who stay in the city for the weekend can be offered a lot of devices for relaxation and rest, one of which is a hanging chair that resembles swing. Ready model You can buy it in the store to save a little family budget, you can do it yourself. The device is used not only in the apartment, but also in nature, in country house or at the dacha.
Hanging chair
 Such a device became known from a designer from Denmark in the middle of the last century. As before, this item is classified as designer furniture. It is used in a country house or apartment. For its manufacture, modern materials are used, an unusual shape is made, and an ergonomic design is created.
A hanging chair is a comfortable and convenient bed made of modern materials or wicker or rattan. They fasten it to the ceiling using a hook. Thanks to this fastening, you can ride in the chair as if you were a child on a swing. An example would be Ikea hanging chairs.
This piece of furniture is essential for those who love to swing. Having settled down comfortably on the pillows, taking a book in your hands, you can sway a little and immerse yourself in a world of tranquility.
Types of chairs
Depending on the material used, products are divided into the following types:
- Armchair with rigid frame. It can be made from rattan, wicker or modern materials: plastic or acrylic. For comfort, you can put a pillow or soft mattress on the seat.
- . The design is similar to a hammock, but differs in size and fastening. This option is softer. If you swing on soft pillows such a hammock chair, you can perfectly relax and unwind. It is not difficult to make such a chair with your own hands.
- hanging. This model differs from the others in that it is ¾ closed. This makes it possible to completely disconnect from outside world and bustle and fully relax. The walls of this invention are made wicker in the macrame style.
- Drop chair. The model resembles a hanging house or a nest chair in which a child will be comfortable.
- Chair on the counter. This method of fastening differs from all others in that the structure does not need to be attached to the ceiling. It can be installed in any corner of the house, apartment or yard.


For the manufacture of hanging chairs, modern synthetic materials who do lightweight design, flexible and silent.
Advantages and disadvantages
TO merits include the following indicators:
- comfort;
- originality;
- exclusivity.
If you buy a chair, then first of all it should be comfortable. Its appearance must match the interior of the room in which it will be located. But an exclusive model can only be made with your own hands. Then you will be sure that no one else has such a product.
Such a wonderful swing has flaws:
- the fastening system must be reliable and thought out in advance;
- It is not possible to install a hanging wicker chair in a room with suspended or suspended ceilings.
Gallery: DIY hanging chair (25 photos)


Hanging or on a stand
 Considering in detail the types of hanging chairs, you need Special attention pay attention to the structure on a metal stand, which is installed on the floor. This model is considered more functional due to its mobility. The chair can be moved and installed in any place convenient for you.
In this model, you can easily detach the frame from the rack and hang it from the ceiling using a pre-prepared mount. Get a hanging hammock chair.
Placement in the interior
For any interior, you can choose a hanging chair. If we consider classic style, then you need to choose a good rattan model for it, Mediterranean style will complement the white cobweb chair, in rustic style a hanging hammock will look good, and for modern interior a cocoon will do, round form or a plastic egg. IN modern style A chair made of metal rods will fit perfectly into high-tech.
hang ball chair(another name for “bubble”, which means “bubble”) can be done in a room or in a recreation area. The model should be made in the same color and from the same material as the other furniture in this room.
If you want to focus on hanging swing, then you need to choose  extraordinary model(for example, with backlight). You need to place it in the middle of the room. It is desirable that the material from which the chair is made is unusual. If you live in an apartment with your significant other, then the second swing can be placed near the bed or in the recreation area.
A ball-shaped chair can be decorated with a pattern to suit your taste. In addition, you can choose the color of the backlight and change it depending on your mood. Perfectly relieves stress green or light green color, the color red can energize and lift your spirits.
Armchair for cottage and garden
Outdoor chairs can be combined into separate species. If for a residential premises it can be made from almost any material, then for placement on the street its material must have the following properties:
- resistance to temperature changes;
- density and reliability;
- resistance to natural disasters.
If we consider natural material to make a chair, you need to pay special attention to artificial rattan . Unlike natural material, it withstands influence better weather phenomena, therefore it will last much longer than natural. For the winter, furniture should be removed from the street. To store it, you can use any unheated room or utility room with normal humidity.
Making a chair yourself
Option 1
The chair consists of several rings woven together using macrame. To make such a device yourself, you need to purchase:

The diameter of the recommended rings may be smaller - indicated maximum dimensions for such a chair. As for the thread, it should not be purchased in parts, but at once the entire required length in order to avoid differences in color or quality. If all materials have been purchased, then you can start working.
Progress:

Option 2
If you are not familiar with the technique of weaving macrame, you can make a hammock chair from textiles.

To work, you will need a gymnastic hoop with a diameter of 90-93 cm. You will need dense fabric of a color that not only appeals to you, but will also add a certain zest to the interior of the room. In addition to the hoop, to make a textile product you will need:
- 3 meters of durable and dense fabric of any color, it can be thick cotton or thick denim;
- synthetic padding as a filler for a fabric cover;
- a zipper, the length of which will be equal to the diameter of the hoop;
- 4 buckles and ring fasteners for hanging;
- 3 meters of non-woven fabric or braid;
- 9 meters of belt tape.
Instead of a ready-made gymnastic hoop, you can use a bent metal-plastic pipe.
You need to make two circles with a diameter of 1.5 m from fabric. To do this you need:
- divide the fabric in half;
- Fold each resulting piece into quarters;
- mark a radius of 75 cm from the center and cut off the excess fabric.
On the resulting fabric circles you need to make markings and cut holes for the slings. You need to work with two circles at the same time to make it symmetrical.
In one circle in the middle you need to insert a zipper, the length of which will correspond to the diameter of the circle. Unfasten the zipper, and stitch the two circles together with right sides facing each other at a distance of 1 cm from the edge.
Turn out the resulting cover and iron it. Cover the hoop tightly with strips of padding polyester, and then with the same fabric as the product itself. This will be more reliable during subsequent use.
 Insert the hoop into the case with your hands. Using strong thread, make blind seam around the entire circumference.
You need to hang the finished swing using belt straps. To do this, the workpiece must be divided into 4 equal parts. Thread the ends into cells specially made for slings, tie them in a knot, and melt the edges with fire. This is so that during use the tape does not begin to unravel.
It’s not at all difficult to make or buy a hanging chair for yourself. The main thing is that it matches the interior and fits perfectly into the decor.
It is also important that the product is convenient. To determine this, you just need to sit down or climb into it. Do not hesitate to do this in the store, since the comfort of your rest will depend on the convenience and strength of the swing. By getting a wicker hanging chair, you will say goodbye to stress forever as you will have a cozy place to retreat to.
Rest plays an important role in the life of every person, as relaxation allows you to restore strength and take your mind off the difficult everyday life. For this purpose in modern world There are many devices, one of which is a hanging chair. Undoubtedly, you can buy it at a furniture store, but it is much better to do this work yourself, which will save the family budget. The finished product can be hung both in a city apartment and in a country house. It is very convenient to read books, have a conversation or drink tea in the garden. To make it you will not need to put in a lot of effort and time. How to make a hanging chair yourself from scrap materials will be discussed in this article.
Features and Disadvantages
A chair, like any interior item, has its positive and negative characteristics. Let's look at them. The advantages include:
- originality (adding to the interior);
- exclusivity (if you make it yourself, you can get a one-of-a-kind copy of a hanging chair);
- comfort (the main advantage that will allow you to enjoy comfort at any moment).
The list of disadvantages is smaller, but it is important to take them into account to avoid mistakes:
- necessary reliable system fastenings, thought out in advance;
- cannot be mounted on a suspended or suspended ceiling.
To solve the problem with fastening, it is important to decide on the model of the chair itself, since today there are a large number of them.
Note! If the design of a chair involves using it in several rooms, then it is worthwhile to immediately provide for several fastening systems. This will allow you to easily and effortlessly transfer it at the right time.
Main classification

There are the following types of hanging chairs:
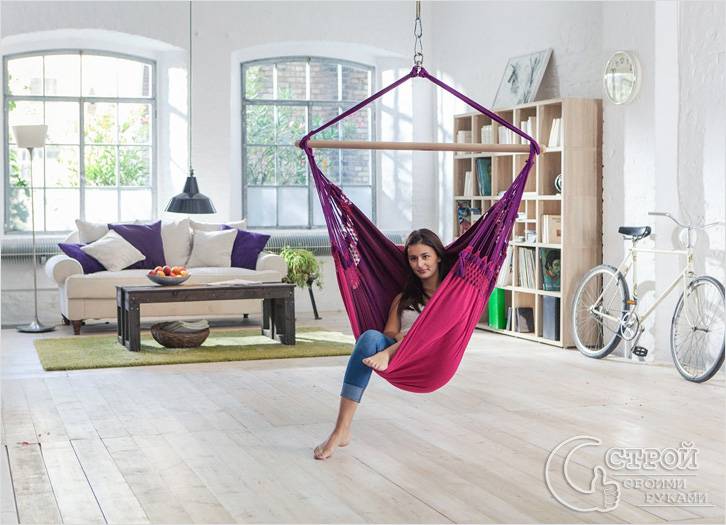
- Fabric frame. The design and appearance resemble a hammock, the ends of which are secured not at the sides, but at the top. Another difference is the size. The convenience of this form lies in the fact that the material accepts the shape of the human body.
- Cocoon chair. Comfortable and practical closed design allows you to hide from the outside world and be alone with your thoughts.
- Hanging chair. A practical model for children and teenagers, shaped like a drop. For safety, some designs have doors that will prevent the child from falling out.
- Chair with stand. This model there is no need to fix it on the ceiling, since the entire load is taken on by a special stable leg-stand.
- With a frame made of rattan, wicker, plastic or acrylic. The base material is used to make the frame of the chair, which is then covered with fabric.
- Glass chair. Popular model modern interior. If necessary, it can be moved throughout the house.
- Swing chair. A common design for placement in a garden or recreation area on the site of a country cottage.

In addition, there is another classification that divides all hanging chairs according to several criteria:
- material for manufacturing;
- method of fastening (axial and rod);
- maximum load (depending on the quality and strength of the materials used);
- shape (bubble, cone, bag and closed type structures).
Note! Most hanging chairs are designed for a load of up to 100 kg, these include plastic, fabric and rattan models. For loads up to 200 kg, it is necessary to choose acrylic options.

As already mentioned, most models of chairs can be made at home from existing materials and standard set tools. So, the easiest to manufacture is the model with a cover. To do this, you need to prepare the following materials:
- aluminum hoop with a diameter of 90 cm;
- durable fabric 1.5 m wide - 3 m;
- filler;
- non-woven fabric or trouser tape;
- metal buckles – 4 pcs;
- slings – 8 m;
- a metal ring of small diameter, but strong enough (for hanging a chair).

The only tools you will need are a sewing machine and all the tailor's supplies (measuring tape, chalk, scissors, pins, thread, etc.).
The first step is to make a cover. To do this, a 3-meter fabric is cut into two identical squares measuring 1.5 × 1.5 m. To cut a circle correct form, each piece of dense material is folded 4 times, a circle with a radius of 65 cm is outlined, plus the internal contour is outlined with a dotted line, retreating 4 cm. Cut it out. You also need to make markings for the slings: guidelines can be obtained by ironing the folded material with a hot iron. So, the first pair of lines will be located at 45° relative to the bend, and the second at 30°. After all the markings are ready, you can lay out the fabric, cut out circles and smooth it out well.
Next, we make 15x10 cm slits along the contour of the Y-shaped markings, which turned out inside the rectangles. To ensure that the cuts are the same, we fold both pieces of fabric one on top of the other and pin them together. Using non-woven fabric and an iron, we glue the edges, first bending the petals of the slots.

Sew the circles along the dotted line, leaving a small hole to turn the cover inside out and insert the hoop. The filler is cut into strips and the frame (hoop) is covered with them so that it does not press. We also fill the case with an even layer of padding polyester, not forgetting to secure the edges with a hidden seam. To strengthen the material on the frame, it is worth quilting in several places. The length of the sling depends on the height of the ceilings, but on average it is 2 m. It is necessary to cut 4 pieces, which are fixed through the prepared slots. The upper ends are secured to a ring, which will be suspended on a mounting system from the ceiling.
Note! You can use a metal hula hoop as a hoop or make it yourself from a metal-plastic pipe.
For video instructions on how to make such a hammock, see below:
Features of sewing a hammock chair

If you want to sew yourself suspended structure, but at the same time spending a minimum of time and effort, then the hammock chair will become the best option and a way out of the situation. To make it, you need to prepare the following materials and tools:
- a piece of dense fabric measuring 2x1.2 m (the load that the chair can withstand depends on the density of the fabric);
- nylon rope;
- block or plank of wood;
- steel carabiner;
- centimeter and chalk;
- scissors;
- sewing machine;
- iron.

The sewing technology is quite simple and does not require special knowledge and skills:
- The fabric is folded in half and 40 cm is removed from the top of the free edges. From this point, draw a line to the lower right corner and cut according to the markings. When expanded, a trapezoidal segment is obtained. Thanks to this action, the result is not an ordinary hammock, but a chair.
- The bottom and top edges are folded twice and ironed well with a hot iron to secure. For reliability, they are stitched on a sewing machine.
- The side edges also need to be folded 2 times at an angle of 90°. The rope should pass freely into the resulting cavity. The seams are sewn.
- IN wooden block 2 holes are drilled at both ends, the diameter of which should be slightly larger than the thickness of the nylon rope. The holes must be located at a distance of 2 cm from the edges, and the same number of centimeters should be between the holes. The prepared block is opened with any paint and varnish material.
- For reliability, the ends of the rope are burned to prevent unraveling. On one side they tie strong knot, then passed through the first hole in the bar, then pulled through the side edge of the material and fixed on the second hole. The same actions are repeated on the other side.
- A carabiner is attached to the block and the chair is hung from a hook in the ceiling or to a tree branch in the garden.
No less original in similar design A wicker chair will also look good.
Note! When choosing a material for sewing a hammock, you need to combine it with the interior of the room. Thanks to this, the design will easily fit into the interior and complement it.
Hanging chairs made of durable materials

In addition to fabric and ropes that can be used as the basis for chairs, there are other options:
- plastic;
- plexiglass;
- metal.
Most often they are used to create models such as an egg or ball hanging chair. It is very difficult to make them yourself, since they require special knowledge, skills and tools that not every owner has. Therefore, professionals advise purchasing them in specialized stores or ordering them from individual design workshops.
Some models can be suspended from the ceiling, but the best option there will be a special metal stand. Such models will have more advantages:
- it becomes possible to carry them, which indicates mobility;
- If desired, the chair can be detached from the stand and suspended from the ceiling or a tree.
Note! Keep in mind that not all options are suitable for placing a hanging chair outdoors, so it is better to give preference to those that are not afraid of moisture.
A few words about fastening systems

To make a hanging chair, it is important not only to choose durable materials, but also create reliable fastening. It must be designed not only for the weight of the structure, which can be made of heavy materials(for example, a ball chair is made of dense plastic with a durable frame), but also the weight of the person who will sit on it.
Another criterion that is taken into account when developing fasteners is maximum load to cover the ceiling. It is calculated in kg/m2. At heavy weight the entire load will have to be distributed over the ceiling, for which a load-bearing frame is built, which is connected with anchor bolts.

Note! During play, children will swing and jump on the chair, which increases the load, so this option should be considered.
In principle, this is only a small part of what can be said about the designs and features of hanging chairs. Manufacturing the most simple options we have considered. You can add something different to each of them, for example, decor or tulle to protect against annoying insects.