Propagation of thuja by cuttings in the fall at home. Propagation of thuja by cuttings. Growing thuja from cuttings: technique and care Green thuja cuttings
Read also
Thuja is a member of the cypress family. With this evergreen plant you can decorate any personal plot, local area, garden, do hedge or green corridor.
One way to have an unusual thuja on your property is to take cuttings from the plant. This is convenient and effective, since the varietal qualities of the plant are preserved and full-fledged trees are obtained in 2-3 years. It is quite possible to propagate thuja at home.
How to grow thuja from a twig?
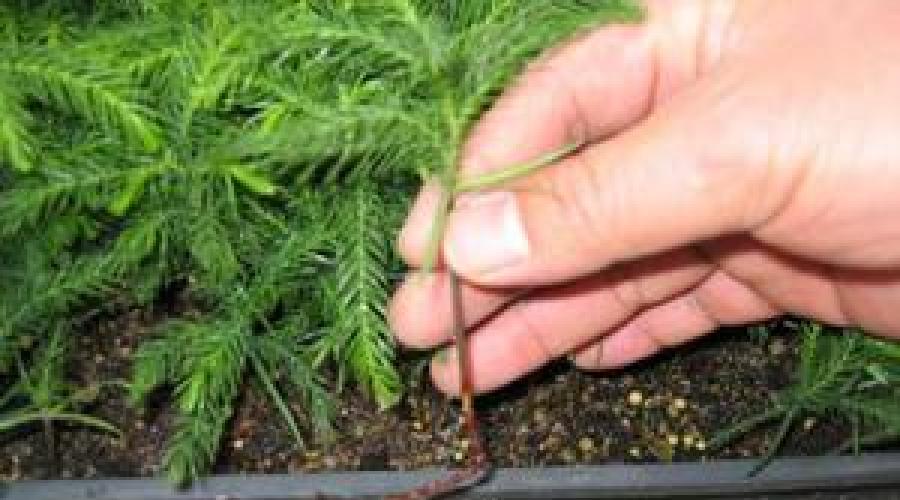
To carry out spring cuttings of thuja, you need to select the most beautiful branches of a plant that has not yet become woody, which is no more than 3 years old. When asking how to propagate thuja, you need to focus on the quality of the selected branches. It is better to cut half-meter green ones with a small piece of tree bark at the end. Such an event should be carried out in cloudy weather in the morning manually, tearing off the desired cutting with a sharp downward movement.
At the end of the plucked shoot, a “woody heel” should be left, which is a piece of bark as a basis for new roots. One more condition you need to know: if the cutting is taken from the tops of the axial shoots of the thuja, then a branched tree will grow, and if the cutting belongs to the lateral branches of the bush, a creeping form of the plant will be obtained.
It is best to carry out cuttings in the spring, based on the fact that it is during this period of the year that all processes in living nature are carried out faster, the movement of juices in the thuja shoots is activated and the cut cuttings will give the first roots faster.
In spring it is held at the end of March or beginning of April. If this period of the year is missed, then cuttings of thuja can also be done in June.
Cutting thuja cuttings in the spring, when the first wave of growth occurs, the germination of cutting branches takes over the entire development cycle of the plant. However, in this case there is a danger that the branches planted for germination will fall under spring frosts. This can be avoided by installing a box with cuttings in a home mini-greenhouse and covering it with film.
Summer cuttings affect the second wave of growth. In this case, sufficient watering of the substrate in which the twig produces roots is necessary. You need to carefully monitor soil moisture and frequency of watering. Future seedlings can seriously suffer from the summer heat. At this time, the plant is periodically sprayed with a spray bottle 2 times a day - morning and evening.
Thuja propagation occurs using a substrate or ordinary water. This means that a plucked cutting can take root equally well both in a glass of ordinary water and in soil prepared for it.
How to grow thuja in water?
 In this case, the long tail of the “woody heel” of the newly cut thuja cuttings is trimmed and the lower green growth of the shoot is cleared so that about 5 cm of clean stem remains. Then the root of the cutting must immerse 2 cm in water with Kornevin powder. More than 3 cuttings cannot be placed in one container, so that they do not suffocate.
Be sure to ensure that the branch does not begin to rot. To do this, do not immerse the green part of the sprout in water. Such home germination of cuttings in water should take place in a bright, cool, but not cold place.
Water needs to be changed promptly. It must not be allowed to become cloudy. When changing water, the cutting is removed from the container and its root part is wrapped with a damp cloth. IN clean water you need to add a couple of manganese crystals for disinfection.
Once the cutting takes root, it can be planted in the area. First you need to prepare a place in the ground for it.
Growing in substrate
A cut thuja cutting is also easy to grow in a substrate. This method of propagating thuja is considered more reliable, since in this case the sprout is saturated useful substances. Stages of planting in the substrate:

The cuttings should be sprayed with water daily. room temperature from a spray bottle. This way, water will not wash away the “woody heel” of the cutting. After two months, the thuja sprout should finally take root. If buds begin to appear on the cuttings, that is good sign. You should not immediately plant the sprout in open ground. First you need to harden the plant. The box should sometimes be taken outside so that the plant gets used to environmental conditions.
During spring propagation of thujas, already in September the rooted sprout is planted in a temporary place, where it should spend a couple of years. This is the so-called school for young plant. The soil should be filled with peat and leaf humus, and the place should be in light shade. If necessary, scatter 1 bucket of peat per 1 m 2 of land.
Planting a young plant and caring for it
 There is no need to rush to plant the germinated thuja from school in the place prepared for it. It is necessary to think through all the nuances of the future existence of the plant . It must grow in a place, well warmed by the sun, which the sun's rays will especially visit in the first half of the day, and in the second there will be partial shade from neighboring trees.
In the thuja hole you need to put a mixture of manure, compost and garden soil. The roots of the plant should not be broken, and the root collar should be above the ground. After replanting, you should water the plant generously and put sawdust or pine bark. This will protect the root system. It is necessary to ensure that the mulch does not cover the lower branches of the thuja and her fragile trunk - they can ban.
Young shoots should:

Propagation of thuja by cuttings is a very interesting and sensitive process. A beautifully growing tree will be a reward for all the efforts made during the entire period of growing the cutting. This plant will fit perfectly into any landscape design..
Propagation of thuja by cuttings in summer
Thuja reproduction
Coniferous trees are very popular because of their diversity in shape, variety, and color. They majestically decorate not only public places, but also suburban areas. It is possible to propagate thuja by cuttings or seeds. The first method produces a stronger and disease-resistant tree, while the latter is not particularly popular, since it takes from 2 to 6 years to grow.
Thuja propagation by cuttings: timing
It is best to propagate thuja by cuttings in the summer in the last ten days of June, during the second growth period. But these seedlings will not take root immediately, but will sleep until next year. Cuttings are also prepared in April, using green annual shoots, but they are more difficult to root, and they often get sick and die.
Cuttings of thuja in summer makes it possible for the seedling to grow quite powerful root system during the winter after the tree begins to wake up. If the soil was taken from the site of future planting, this will develop adaptability and enhance survival rate.
Thuja cuttings
A cutting 15-20 cm long is taken from the top of the crown from a 2-3 year old growth. If you take side branches, the seedlings may grow crooked.
Please note that the branch is not cut, but pulled out, since in this case part of last year’s wood with bark, called the “heel,” remains on it. It contains the components accumulated by the tree; they serve as a source for the rooting of a new seedling. The longer the heel, the better the rooting occurs.
Suitable branches are those whose upper part is green and the lower part is slightly woody. It is better to tear off a branch from top to bottom, as this will most likely leave a heel. If the bark on it is peeling, lightly scrape it with a knife to even it out. If this is not done, the cutting may rot or dry out.
Free the lower part of the cuttings from needles to prevent the formation of rot as a result of contact with sand. Soak them in the root-forming stimulator “Kornevin” for a day.
Planting cuttings in boxes
You can plant in wooden boxes, filled with large river sand. For drainage and to ensure air flow to the roots, make several holes at the bottom of the box and install brick supports at the edges.
Soil preparation
Pre-boil the sand to disinfect it. Pour it into an unenamelled bucket, fill it with water and boil for 5 minutes. Cool and drain. No need to wait for it to dry. Add half a glass of 3% potassium permanganate solution, move and pour into boxes.
Landing
- Using a peg, make holes at an angle of 45 degrees.
- Plant the cuttings, deepening them by 2 cm, at a distance of 5 cm from one another.
- Compact and water.
- Place the boxes in the shade.
In case of frost, cover with plastic. To root cuttings you need high humidity(up to 70%) at 18-23 °C. If the temperature is higher, remove the film and cover them with damp gauze.
Care
For two months after planting, spray daily, and in hot weather - twice a day. Ventilate the greenhouse regularly. If it is under film, then water the sand; under gauze, spray it generously.
In the fall, transplant the cuttings to the garden bed or flowerpots. To prepare the soil mixture in leaf soil add peat (to equal ratios). When transplanting, you will see that the rhizome of the cuttings is quite large - 8-10 cm. The seedlings take 2-3 years to grow, they need to be watered and weeded.
Besides in a box, there are other methods of rooting cuttings. One of the most popular methods among professional gardeners is growing in potatoes. Starch and juice nourish the plant and help quickly develop the root system.
Planting seedlings in the ground
Cuttings can be planted in a greenhouse or greenhouse. The soil should consist of peat, sand and turf land in equal shares. Disinfect the soil mixture with potassium permanganate (3%).
You can grow thuja from cuttings at home:
- To do this, they must be planted in flowerpots with a diameter of at least 12 cm.
- Make a hole in the soil at a 45 degree angle and place the cutting there.
- Cover with film, plastic or glass jars.
- Cover from straight lines sun rays, but leave partial shade and access to light;
- Water as needed and ventilate once a week.
- The roots will appear after 25-30 days, in some varieties - after 15.
The appearance of new shoots indicates that the plant has taken root. For the winter, it is better to remove the film and cover the former greenhouse with fallen leaves or pine needles. In the spring, the cuttings will wake up and the roots will begin to actively grow, so as soon as the frosts are over, replant them by digging them out of the ground.
Result:
Anyone who wants to decorate their garden will want to plant coniferous trees in it. To get maximum pleasure from the process and save money, it is better not to buy seedlings, but to propagate thuja from cuttings yourself, especially since following the recommendations of experts, this is not at all difficult to do.
Or, as people also call it, "life tree" – evergreen from the cypress family. Thujas are unpretentious to soil and climate, so they easily get along in major cities. They are widely used not only for landscaping cities, but also in gardening. It is good to use shrubs to mark the territory and plant living corridors from them. Plant cultivation is often done by cuttings. In this article we will tell you how to root a thuja from a branch.
How to prepare cuttings
Right choice cuttings and their preparation - the most important stage. Most evergreen plants are propagated by cuttings, and thuja is no exception. Best time for harvesting cuttings - autumn, it is during this period that the movement of sap through the plant slows down. The likelihood that the bush will take root increases. You need to choose branches closer to the crown or on it itself.

It is advisable to choose a bush that is 2-3 years old. The branches should be torn off with a sharp movement, so that a kind of “heel” remains at the end, the remnant of last year’s bark. And the longer this remainder is, the better. Another important point: you need to cut off the bark that has begun to peel off. The lower part of the branch must be cleared of needles by about 3 cm. The leaves of the needles should be healthy, 15-20 cm long (no more than 50 cm).
Methods for rooting cuttings
There are several ways to grow thuja from a twig. The most common methods: the method with ordinary water, preparing a special substrate or growing roots in film. Each method requires a specific approach, time and resources.
How to root autumn cuttings in water
The easiest way. To do this you will need a container for water and the branches themselves. You need to pour water into the prepared vessel and place the cuttings in it, immersing only the heel. Leaves should never touch the water. This can lead to rotting of the needles and the cutting will deteriorate. No more than three branches can be immersed in one container of water. Place the cuttings in a cool but sunny place.
 Changing the water during rooting is not recommended. It is best to add fresh water little by little. If the liquid is completely replaced, the nutrition of the roots may be disrupted, and the cutting will slow down or completely stop growing. There are not many nutrients in ordinary water, so the cuttings often weaken and subsequently do not take root well in the soil.
Rooting cuttings in film
Growing thuja using film will be a little more difficult than the method with water. To do this you will need a film, a small piece of fabric and peat moss or, as it is also called, sphagnum. First, we dilute any growth stimulator in water and lower the prepared branches there for about 10 hours. Fill with warm boiled water moss, leave it to soak in water for several hours.
After this, you can begin to root the thuja cuttings. We spread a wide piece of fabric and mentally divide it in half. We lay wet moss over the entire section of the upper length, and bottom part we leave it free, it will need to cover the cuttings themselves. We lay out thuja branches close to each other. Carefully cover the broken cuttings with sphagnum moss. We take the lower part, cover the cuttings and, leaving the needles free, roll everything into a neat roll. We wrap what we get in a plastic bag and hang it in a bright place, but away from direct exposure to the sun.
 The film that covers the branches will serve as a certain moisture meter. If the polyethylene is covered with strong condensation, you need to slightly lift it, thereby ensuring good air flow. And if the film is dry, you should moisten the fabric with a sprayer. This method is good because the moss will long time retain moisture, nourishing the cuttings and having bactericidal properties, thereby saving the roots from rotting.
How to prepare a substrate for rooting
And the most The best way root thuja from a branch using a substrate. The substrate is a nutrient medium for plants, and preparing it is not so difficult. Mix peat in equal proportions, leaf humus and sand. Place the mixture in the oven and heat it properly at maximum temperature.
Dilute a saturated solution of potassium permanganate and pour over the resulting mixture. As in the case of film, you need to place the cuttings in a solution that stimulates growth for 10 hours. Containers for rooting thuja cuttings in the fall should be selected with several holes at the bottom for better oxygen saturation. We lay drainage – fine gravel – on the bottom. We fill the containers with substrate and make small indentations for the branches. We place the cuttings themselves at about 2 cm and sprinkle them with sand, which it would not hurt to pre-calcinate.
 Having lightly compacted the sand, cover it with cellophane film and place it in a bright place, but keep it away from direct sunlight. If condensation appears on the film, slightly lift it on one side to fresh air. One of important points such cuttings - watering. It is best to do this using a spray bottle.
Did you know?If new needles begin to appear on the thuja, then the plant is well rooted.
Rules for caring for cuttings
After you have rooted thuja cuttings in the fall, they need care before planting in open ground.
There is only one important factor when growing twigs in water. This is water care. There are two ways to look after cuttings. In one case, you can completely replace the water. To do this, you need to remove the cuttings and wrap them in a pre-moistened rag. Rinse the container well, pour fresh water into the bottom and immerse the cuttings back.
You can add a little weak solution of potassium permanganate. The second method is considered more reliable for growth. It consists of adding water as the cuttings absorb moisture. Thus, without disturbing the impregnation of the roots, the cuttings have a greater chance of germinating on the site.
 The easiest way to care for cuttings that germinate in film. Sphagnum moss and fabric maintain the required moisture level very well. Pre-moistened moss can maintain moisture for a very long time. To understand what the cuttings need now, check the cellophane with which you covered the branches. If the film is dry, you need to moisten the fabric a little. This is best done using a spray bottle. And if excess condensation has collected on the film, lift it slightly and ventilate the sprouts.
Cuttings in substrate
Caring for cuttings in the substrate must be approached with all seriousness and responsibility. The most important task is to control the amount of moisture. Under no circumstances should you water cuttings from a watering can. Copious amounts of water may lower the soil slightly, exposing the heel. This will lead to rotting of the shoot or its roots. You need to use a spray bottle, as in the case of film.
 You should not allow the soil to dry out too much, but you should not overdo it with watering. In case of early cooling or late rooting, you need to fill the container with cuttings with leaves. And if the temperature drops below 5 degrees, it is recommended to cover them with film, opening them slightly from time to time, giving a stream of fresh air.
Important!If you decide to plant thuja as a green fence, then you need to take care of timely trimming of the plant. After two years slow growth Thuja actively strives upward. There is no need to allow the plant height to be higher than 1.5 meters, otherwise it will be inconvenient for you to cut it.
What to do after rooting
After you have prepared cuttings using one of the methods, the question arises: what, how and when to do next. When rooting thuja branches in autumn, they can only be planted in a special front garden the next year. For planting, beds are formed, which are called shkolka. For the garden bed, choose a location with medium shade. After the soil on the site has been dug up, you can fertilize it a little with regular peat.
Representatives of the cypress steel family welcome guests in the personal plots of a large number of people. Therefore, gardeners are interested in propagating thuja by cuttings in the fall at home. This procedure is simple and entertaining, accessible to any purposeful and inquisitive owner. True, you should understand that breeding a thuja is only half the battle; you also need to plant it correctly and provide it with proper care.
Advantages of propagation by cuttings
Although the method of propagating thuja by cuttings produces less hardy plants than the seed method, This technique has a number of significant advantages:
- When breeding varietal thuja using cuttings, there is a guarantee that the resulting young plants will retain all maternal characteristics, including appearance, and this is not always available during seed propagation.
- Cuttings allow you to obtain full-fledged healthy seedlings suitable for planting on permanent place in just three years.
When propagating thuja by seeds, taking into account natural stratification, it will take as long as 5-6 years to obtain full-fledged ready-made seedlings.
The vegetative method also has significant drawback. Even if all the cutting rules are followed, the survival rate of seedlings, as a rule, is no more than 75%, and in case of violation of the cultivation technology coniferous plants amount of healthy planting material is sharply reduced.
It is preferable to engage in cuttings of conifers in autumn time. In this case, there will be a greater chance of rooting maximum quantity twigs, because sap flow slows down in autumn, which means fewer cuttings will die from lack of moisture. True, it will take more time for rooting than when harvesting in the spring, when intensive plant growth occurs.
Where to get material for growing apple tree rootstock from seeds
Cutting process
Experienced gardeners successfully propagate thujas, like other conifers, on their own. To increase the number of these representatives of the cypress family, there are plant propagation methods such as seed and cuttings. In the second case, the harvesting of shoots can be carried out in spring or autumn. To decorate, for example, a hedge, you will need a lot of thuja seedlings. Propagation by cuttings in autumn is the most popular way to increase the number of conifers.
Preparation of shoots
You should not prepare planting material for breeding evergreen thuja immediately with the onset of autumn. It is better to choose a cloudy October day for this event when active leaf fall has already begun. First of all, you should take a responsible approach to the selection of shoots. Cuttings should be made from branches that are 3-4 years old. It is better to choose the apical shoots of an adult tree, then future seedlings will form a beautiful, lush crown of the correct shape.
You should select absolutely healthy shoots, making sure that there are no peelings of bark from the wood. It is important to ensure that the cuttings have lignified bark, otherwise the rooting process is unlikely to be effective. Optimal length The length of the prepared shoot should be 25−40 cm. It is better not to cut the branch, but to break it off so that wood and lignified bark remain at its end - the so-called heel. A piece 3 cm long from the heel should be freed from scaly foliage.
Rooting methods
After completing the procedure for preparing cuttings for plant propagation, you can begin to choose a method for rooting them. You can root thuja both in water and in a substrate or diaper.
Cuttings and propagation of roses at home
The easiest method for rooting woody branches is in water. Pour water into the prepared container. Place only the heel in it, avoiding the leaves touching the surface of the liquid. Up to three cuttings should be placed in each jar. All that remains is to place the containers in a cool place with natural light.
The disadvantage of the method is that plain water practically does not contain nutrients, necessary for the normal development of plants, the cuttings take root poorly and then take root poorly.
The method of propagating thuja in a substrate does not have this drawback, although it is more labor-intensive. The procedure in this case will be as follows:

You can root the cuttings with one more in a simple way. For this you will need: peat moss, a plastic bag, a baby diaper and a root growth stimulator. The sequence of actions will be as follows:

Ficus propagation at home
This method is good because the peat moss and the absorbent layer of the diaper do not allow the moisture to evaporate and the heels of the cuttings are constantly in a wet state. In addition, sphagnum has a bactericidal property, preventing rot from appearing on the branches. This method is highly effective and in a simple way rooting of thuja, which does not require special care.
Care during the rooting period
In the first case, when only water is used to root autumn thuja cuttings, care consists only of timely replacement of the liquid. To do this, you need to remove the cuttings by wrapping their heels with a damp cloth. Wash the container and fill it with water again to the previous level. You can add a little potassium permanganate to the liquid. Return the branches to their place.
The second method, using a substrate, requires timely and regular watering, and this should be done with a spray bottle so as not to wash off the soil from the plants and expose the heels. It is important to prevent the soil from drying out and forming lumps, but excess moisture can lead to rotting of the resulting roots.
The simplest, in terms of care, is the third method of propagating thuja - using sphagnum. Peat moss and the retaining layer of the diaper retain moisture very well, so additional moisture is rarely required. It is enough to periodically visually check the bag with cuttings and, based on the presence or absence of condensation inside the bag, decide on additional wetting of the sphagnum and diaper.
Thuja is an unpretentious coniferous plant that has found wide application V landscape design. It is used to form hedges and entire alleys, which require dozens or even hundreds of young trees at once. Therefore, to quickly green up an area, propagation of thujas by cuttings is practiced. Let's look at the benefits of cuttings and how to implement them.
Advantages of the vegetative method
Despite the fact that when propagating thujas by cuttings, less hardy plants are obtained compared to seedlings grown from seeds, this method enjoys some popularity. And there are a number of explanations for this:
- When growing varietal thuja, this is the only way to preserve its specific appearance. Seed propagation does not always allow one to maintain maternal qualities;
- For all seeds coniferous trees natural stratification is necessary. It allows you to get fairly hardy specimens. Since the process takes a long time, it will take a long time to wait for full-fledged seedlings ready for planting. This usually takes up to 6 years;
- Cuttings allow you to obtain young, mature thujas, ready for planting in a permanent place in 3 or even 2 years.

U vegetative method Thuja reproduction has one more small disadvantage. As a rule, in the process of obtaining seedlings for hedges, only 70-80% of plants survive from total number prepared twigs. And this is subject to all the rules for the propagation of coniferous plants. If you make obvious mistakes, the percentage of rooted cuttings is sharply reduced. Therefore, strictly follow the instructions below.
Features of autumn breeding
Propagating thuja by cuttings in the fall gives you a better chance of getting healthy seedlings. At this time, the movement of juice slows down. Therefore, the number of dead branches from lack of water will be reduced. But when harvesting them during the period of vegetative dormancy, you will have to spend more time for rooting than when harvesting during the period of intensive growth.
Preparation of twigs
If autumn has already arrived, this does not mean that it is time to harvest twigs. Then the question arises, when is the best time to propagate evergreen thujas from cuttings? This should be done on a cloudy October day, when they are actively showering. deciduous trees. You also need to be careful when choosing a tree and branches:
- In order for the seedlings to develop a beautiful crown correct form It is better to choose apical shoots;
- U tall trees select branches that have been growing for 3-4 years;
- The selected material must be lignified, otherwise rooting will be ineffective;
- The length of the shoot should not exceed 50 cm.
Now about how the preparation of thuja cuttings for autumn breeding. Tear off the branches from the shoots so that at the end of each there remains a piece of wood and lignified bark - the heel. The longer the heel, the better. But you need to cut off those places where the bark has begun to come off. Additionally, cut off all scaly foliage at a distance of up to 30 mm from the heel.
Rooting methods
After the autumn preparation of thuja cuttings for propagation has been completed, choose the method of rooting them:
- In water;
- In the substrate;
- In a diaper.
To propagate thuja from lignified cuttings, you can use the simplest method - in water. To do this, pour water into a container with a column height of 10-15 mm. No more than three cuttings can be placed in each container. Dip only the heel into the water - the leaves should not touch its surface. Place the jars in a cool place, but not deprived of natural light.

Plain water is devoid of nutrients, so the rooting branches with this method weaken and subsequently take root poorly. If you are interested in how to grow thuja from cuttings so that the seedlings are more hardy, then pay attention to the method of propagation in the substrate:
- Prepare containers for filling with substrate. They should have many holes for soil aeration;
- Place a little crushed expanded clay or gravel at the bottom to create a drainage layer;
- Mix equal parts peat, leaf soil and sand. Heat the mixture and pour in a dark solution of potassium permanganate;
- Then place the thuja cuttings prepared for propagation in water for 12 hours. To stimulate the appearance of roots, dissolve the growth stimulator Kornevin;
- Fill the containers with substrate and make indentations;
- Immerse the branches at an angle of 60 degrees to a depth of 15 mm;
- Sprinkle river sand on top of the substrate and compact it.

You can root thuja branches harvested in the fall in a diaper. For this you will need:
- Plastic bag;
- Sphagnum;
- Disposable baby diaper;
- Kornevin or Kornerost;
Place thuja cuttings prepared in the fall for 10-12 hours in a solution with a growth stimulator. Then:

- Spread the diaper with the absorbent layer facing up;
- Soak the sphagnum moss in boiled, cooled water and place it in the center of the diaper;
- Place thuja branches on the moss at some distance from each other;
- Bend the diaper so that the heels are between its layers;
- Roll the diaper so that only the heels are in it, and the tops of the branches peek out from one side;
- Place the folded diaper in a plastic bag and hang it on a window or place it between frames.

This method of propagation of thuja is different high efficiency And simple care for cuttings during the rooting period. Sphagnum moss and the absorbent layer of the diaper prevent water from evaporating. Therefore, the heels of the branches are constantly in a moist state. Additionally, moss has bactericidal properties, and the risk of rotting is sharply reduced.
Features of care during the autumn rooting period
If you propagate decorative thuja by cuttings taken in the fall, putting the sprigs in water, then care only consists of changing it. This will prevent heels from rotting. To change the water, first remove the cuttings by wrapping the bases with a damp cloth. Rinse the container and pour it into the bottom new water. You can add a little potassium permanganate. Then place the cuttings.
If you decide to root cuttings of your favorite thuja variety in the substrate, then main task the soil will become moist. This should be done with a spray bottle so that the earth does not settle, exposing the heels. Do not allow the earthen clod to dry out too much, but do not overdo it with watering. Excess moisture can lead to rotting of the heel or root system.
The most trouble-free care for rooted thuja cuttings taken for propagation in the fall will be when rooted in a swaddling blanket of sphagnum moss. The absorbent diaper layer and moss hold water so well that you rarely need to moisturize. Look at the bag of twigs. The presence or absence of condensation on inside package serves as an indicator of sufficient moisture or its deficiency. In the second case, it’s time to moisten the diaper a little.
Propagation of thuja by cuttings in spring
have their own characteristics spring ways propagation of decorative thujas by cuttings. At this time, sap flow and the growth of new shoots are activated. Therefore, rooting should occur faster. But this cutting method has a drawback. Since the plant is actively growing, it needs a lot of moisture. And if you forget to moisten it at least once, then the twig is unlikely to produce a root.
How to harvest cuttings in spring
How to properly prepare cuttings for propagating varietal thujas has already been discussed above. Here the rules for choosing shoots differ little. Healthy branches from the top of the tree that are no more than 3 years old are suitable. To prepare the material, you need to tear off the branches with a sharp movement so that a small heel remains.
If you did not have time to prepare thuja cuttings in April, then postpone the matter until July, when the second phase of growth begins. But you will only be able to get rooted seedlings by next spring.
Rooting methods
It is best to root thuja cuttings in the substrate during spring propagation. Twigs need a lot of moisture and at least a minimum of nutrition. But in plain water or a diaper with moss during active growth they are not enough.
Instructions for rooting spring cuttings:
- Place the branches in Kornevin solution for a day;
- Prepare containers with big amount holes;
- Place a drainage layer in the form of crushed gravel or expanded clay at the bottom;
- Fill the containers with river sand, possibly with an admixture of silt (natural fertilizer);
- Pour boiling water over the sand and then treat it with a pink solution of potassium permanganate;
- Insert the prepared cuttings into the cooled substrate to a depth of 10-15 mm and compact sand around them.
Since propagation of thuja by cuttings occurs in early spring, it’s still too cold outside for the branches torn off from the parent tree. Therefore, containers with them should be placed in a greenhouse in a shaded place or in a suitable spunbond greenhouse. pay attention to temperature regime. The temperature should not be lower than 17 o C. But heat from 23 o C will not bring health to the plant.
Many gardeners do not like propagating thuja by cuttings in the spring only because of the difficult care of seedlings. They need to be sprayed daily. What if it's on the street hot weather, then you need to moisten the substrate twice. But you cannot wet the thuja leaves, otherwise they will rot. After two months, the first roots will begin to appear, and the risk of drying out will decrease.
Growing up in schools
When the thuja cuttings prepared in the spring or autumn have given roots, they need to be transplanted for growing into a shkolka - a special bed, where they will spend 2-3 years before being transplanted to a permanent place. Autumn branches are replanted the next year, spring ones - the same year, in September:
- Select a site for the formation of a school. It should be in partial shade;
- Dig up the ground and add some peat (a bucket per square meter is enough);
- Water containers with rooted cuttings so that they can be easily removed without damaging the roots;