Dimensions of a homemade sawmill. Homemade sawmill, video. General description of the sawmill
For those who live outside the city limits, especially if there is an opportunity to “acquire” round timber, purchasing a sawmill is very important. Its presence will provide the owner with boards and timber at a very reasonable cost. And besides, it will allow you to earn money; wood has been and remains the main building material.
If we decide to purchase a frame sawmill, then we have two options: buy ready product, fortunately, the choice is varied, or you can build it yourself. The appropriateness of a particular decision will depend on our plans. That is, depending on the volume of cubic meters of wood that we plan to process. In order to make an informed decision, let's get acquainted with the types of frame saws, their main characteristics and consider their cost. And in the final part of the article we will learn how to build a sawmill with your own hands.
Type of frame saws
Frame sawmill video
Let us immediately note that in our understanding, a frame sawmill is somewhat different from the standard understanding of this equipment. In the article we will look at options for sawmills that have a base - a frame. A standard factory frame sawmill is professional and expensive equipment with high performance and functionality. There is no need for such a sawmill in the yard of an ordinary farmer, and if there is a need for it, then they buy it. There is simply no point in reinventing the wheel when the finished unit pays for itself in 2 - 3 months. The cost of such sawmills is from 500,000 rubles and above. Of course, if there is the required volume of forest. Therefore, we will look at the types of sawmills that you can buy or assemble yourself, the so-called mini-sawmills.
Exists big choice sawing equipment round timber. For a homestead, most of them are a very expensive pleasure. In addition, their wood processing volume is on an industrial scale, from several thousand cubic meters per day. In our case, we will be interested in three types of sawmills: band, disk (circular) and tire (chain). Let's look at the features and positive sides each of the sawing technologies.
Tape is the most profitable technology. It produces the least amount of waste (sawdust) and is the least demanding of climatic conditions. But at the same time, it is also the most difficult to create with your own hands. Its use is suitable for working with wood with a diameter of up to 70 mm.

Circular saws are one of the most common “home” saws. Simplicity of design, reliability, versatility - these are the main advantages of this cutting technology. The disadvantages include the cost of high-quality discs and a slightly larger volume of waste compared to band sawmills. But in “home” conditions, the amount of waste is not significant, since the volumes of sawing are still modest.

Tire mini sawmill, the most common type of sawmill among “hobbyists”. But, despite the unpretentiousness of this technology, it gives very good wood processing performance with sufficient high quality. The sawmill is the easiest to create with your own hands.

Main characteristics, models and their costs
Let's look at several factory models of sawmills, we will know what to focus on and the price of a frame sawmill will help you decide whether to buy a finished product or make it yourself.
Tire mini-sawmill PCM-3B (Stihl MS 660) - this device capable of processing logs up to 60 cm, length up to 9 meters. Model chain saw Stihl professional, motor power 5.2 kW. The saw is capable of processing up to 6 cubic meters of wood per shift, i.e. in 8 hours. Its cost is from 60,000 thousand rubles.
Mini sawmill PCM-1E (380V) - also processes wood up to 60 cm thick, maximum length logs 9.5 meters. The main difference is the presence of a three-phase electric motor with a power of 5.5 to 7.5 kW. Cost 30 - 40 thousand rubles.
The Wood-Mizer LT-15 band sawmill is capable of processing logs up to 70 cm thick and unlimited in length, with a maximum weight of up to 2 tons. Available in two versions, with an 11 kW electric motor and an 18 hp petrol engine. The cost of such equipment is 220,000 rubles.
Disc sawmill Taiga DP-1 - logs up to 90 cm and 7 meters long. Produces all types of lumber. The engine power is 11 kW, and is capable of processing from 10 m3 of lumber per shift. Cost 190 thousand rubles.
Making our own
After we have become acquainted with some models of sawmills, we know what we are aiming for when designing and assembling - we can begin to draw up a plan for creating a homemade frame sawmill. Note that if this equipment is needed for business, it is better to buy ready-made equipment, it will be faster and more profitable. It’s worth making it yourself only if we don’t need such a device all the time, or we have at least part of the necessary materials (engine, metallic profile etc.).

Indicators homemade equipment will have more low performance, and that's quite normal. If we need to produce a board for the floor or beams for the roof, a self-made frame sawmill is also quite suitable.
First, we need to decide on our needs:
- productivity, how many cubic meters of wood we are going to process;
- estimated thickness and length of logs;
- installation location (stationary or will need to be moved);
- type of energy (electricity or gasoline).
Depending on these characteristics, you will have to choose the materials and type of construction of the sawmill. The construction of a frame sawmill will be as follows:
- base, bed or frame. Regardless of the type of sawmill, it must be reliable and stable. The quality of the cut and, more importantly, our own safety will depend on this. Its length will depend on the length of the logs that we are going to cut. To create guides, the material can be a corner, a pipe, a U-shaped profile or other types. The thickness of the metal will also depend on the expected weight of the round timber. For a carriage with a saw, metal with a thickness of 3 - 4 mm will be enough for us; the weight of the engine and saw fittings will withstand it completely;
- engine. It depends more on what is more accessible to us. Are available three phase electric motor with a power of 3 kW or more - we install it. If you have a semi-professional chainsaw, you can adapt the carriage to it. Electric chain saw will not work, its engine is not designed for such types of work. Household chainsaws are also not suitable, they are rather weak, which means they will quickly fail under heavy loads;
- device for fastening logs. As a rule, it is easier to make it stationary and low. The thickness of the metal will depend on the weight of the log for cutting, depending on the needs. You can also use hardwood, it is easier to work with;
- tire or disk. The length of the rim and tire are approximately the same 40 - 50 cm. There is special type tires and chains with a smaller cut thickness, this will result in significantly less waste. You also need a special chain with a sharpening angle of 10 degrees.
Let's look at an example of how to make a frame sawmill. This is only an approximate diagram; depending on the required parameters and the chosen design, it may differ. The main thing to understand is general outline, and then everything will come as we design and assemble. Moreover, over time, no one bothers to modernize it. Let's take the factory model shown in the photo as a basis.
Let's take a sawmill with a disc as an example. The carriage will be on top. First, we decide on the guides, which will be a 50 mm corner, the length of the “rail” is 5 meters. According to the plan, the sawmill will be stationary and will be located in a barn. Therefore, at intervals of 15 cm, we drill holes in the corner and in the concrete, and fasten them to the floor using dowels.
We will make a device for fastening the log from a U-shaped profile or channel, the edges of which are welded to the corner. To fix the logs in the profile, we make holes for bolts. Because the maximum thickness the logs will be around 40 cm, from the center of the profile we measure 10, 15 and 20 cm. There we make holes for the stops. For more reliable fixation, we will install a special movable clamp with teeth on the first and last profile. It can be made from a piece metal sheet 4 mm thick. Using a grinder, we cut out the teeth; a few pieces will be enough so that the log moves. We drill holes in the profile and in the clamp; using two cotter pins, you can easily remove and install the clamp.
After the frame is ready, we make the carriage. Since the motor is three-phase, with a power of 3 kW, we will need a reliable design. The height of the carriage is 1 - 1.2 meters. We mark a corner of 40 mm, with a thickness of 4 mm. You can use this profile.

We cut into elements. The carriage structure will be welded, we will connect everything into a single structure. Drill holes for the wheels at the ends of the corners of the carriage. The carriage frame is ready.
It is necessary to install a motor with a disk. As planned, the engine height will be adjustable. In addition, the saw motor will operate in two positions: horizontal and vertical. To adjust the height we use two pipes. We weld them to the carriage frame.

We will need a steel sheet 6 mm thick and two channels welded to each other (two square profiles or similar). Using U-shaped clamps with a diameter of at least 10 mm, we attach the channel to the pipes; to do this, you will need to weld pieces of metal with holes for the clamps to the ends of the channel. The U-clamp should fit snugly on the pipe, but at the same time it should slide along the pipe. To adjust the height, we use two threaded rods (preferably M24). In the upper part of the carriage, in the profile, we drill two holes for the rods. We weld a nut on both sides to the ends of the profile on which the motor will be located. We screw our threaded rod into the nut, and weld a regular bicycle sprocket to its upper part. Thus, on both sides you should get two threaded rods and two sprockets. Between them we install two large sprockets from a bicycle and firmly connect them to each other. We tighten the chains, and when the handle rotates, two sprockets along the edges should move simultaneously. As the sprockets rotate, our motor will either rise or fall.
In order to have two disk positions, it is necessary to create the ability to rotate the engine in two positions - horizontal and vertical. We assemble the frame according to the dimensions of the engine and disk. We weld it to our movable profile. We attach two bearings. IN steel sheet We drill 4 holes for mounting the electric motor and weld two metal rods to it according to the diameter of the bearings. We attach the structure to the frame. On the back side we install a handle with stops. We make it from stainless steel protective cover and fasten it with self-tapping screws to the frame with the engine. We attach the motor with the disk, connect the control panel (consists of a start and stop button).
It can be made simpler, as shown below, a sawmill frame diagram, but the disk with the motor is located on the side.

The principle is something like this; you can provide and come up with other devices that regulate the cutting process. The main thing is to remember safety and do everything conscientiously. If in doubt, it’s better not to do it, buy a ready-made factory sawmill. Health and life are worth much more than the amount saved.
When it becomes necessary to process a large volume of boards and wood, then the best option is the use of a sawmill created by yourself. Many are sure that it is worth buying finished device, however, making it yourself is not at all difficult. in this article we will talk about how to make a homemade sawmill. Photos of drawings are available in large quantities on the Internet.
How to make a homemade sawmill
Before you begin this process, you need to decide on the amount of work to be done, as well as the wood. After this, you need to look for drawings of a homemade sawmill on the Internet and decide on the type of device to successfully achieve your goal. When assembling a device with your own hands, the main attention should be paid to safety issues, since such a device is subject to increased risk.
Homemade sawmill resembles the rotation of two reels with a thread stretched between them. This thread is the saw, and the distance from one coil to another is optimal size logs A homemade sawmill, the creation video of which is presented below, makes it possible to:
- adjust logs to one shape and size
- cut the workpiece according to a specific pattern after fine-tuning the equipment.
However, cutting often results in minor flaws that cannot be eliminated. For this reason, the wood must be additionally processed manually.
A homemade sawmill works like this:
- the workpiece is firmly fixed to the platform and does not move
- the movement of the mobile cart ensures cutting of wood
- the saw is positioned horizontally
- To obtain a specific size of boards, you must initially set the appropriate parameters
- The saw blade is a saw, so it must be properly tensioned.
Homemade sawmill, video
Place for a homemade sawmill
Since a homemade sawmill is a large-sized and quite dangerous device, before making homemade sawmills with your own hands (you can watch a video of their creation on our website), you need to think carefully and decide in which place you will use such a device.
A barn or garage, as well as any utility room with a concrete base, are best suited for this purpose. The sawmill room must have good system ventilation. It should not be cramped and well lit.
It is fashionable to place the sawmill on the street, but it is necessary to build a canopy for it. If you are planning to create a sawmill with an electric motor, then you need to pay special attention to the installation of wiring and all switches and machines.
When assembling the unit with your own hands, pay attention Special attention cutting it and moving parts. They are the most dangerous parts.
When working with four roller sawmill frames, it is necessary to cut logs no shorter than 3 meters. If there is a need to process shorter workpieces, the sawmill must be equipped with additional mechanisms. To work with workpieces less than 1.5 m, you need to use special eight-roller frames. Additional safety is guaranteed by the brake of the sawmill, which allows it to be braked without recoil.
Upon completion of assembly and before use, you must carefully check all fasteners and components, as well as the stability of the entire structure. Only after this can you start the device.
How to make the right choice
During the selection process ideal option woodworking machine, you need to pay attention to the most basic advantage of band saws in comparison with multi-rip saws disk machines, this advantage lies in the low cutting height.
 The cut size of a circular sawmill often ranges from 5-6.2 mm. Tire sawmill makes an even larger cut. For example, you can look at the cutting map of a thin log with a cross-section of 180 mm and a material with a cross-section of 124x35, it turns out that the total cutting area will be 4377 mm2. But if the log is 90x90, then 17.2% of the wood will become sawdust. If you process 900 m3 or more every month, then such wood loss will not be noticeable, because the volumes processed compensate for the loss. But if production volumes are not large, then it is necessary to use technologies that are characterized by low productivity, but make it possible to saw workpieces with minimal losses. Therefore, for small production volumes it is better to use band sawmills, but not tire sawmills.
Using band press, the cut size will be from 2.2 to 2.5 mm. When harvesting with a cross-section of 180 mm for the production of lumber with a cross-section of 124x35, the cutting area is 1765 mm2. In this case, only 6.9% of the wood will turn into sawdust.
Tire devices that produce a wide cut are used most often by private owners or small farms for processing minimal volumes of raw materials, for which the yield of lumber is not important.
To work on your site, sooner or later you may need a sawmill. The mechanism is used for primary processing of wooden building materials. It's no secret that the simplest models of a circular sawmill can be made with your own hands. Instructions from specialists, tricks of folk craftsmen, photos and examples of drawings will help you figure out how to do this.
Operating principle of a circular sawmill
This type of sawmill is most convenient for use for domestic purposes. It is easier to construct than mechanisms of a different operating principle (belt or bus). On a circular sawmill, as a rule, large and medium-sized logs are cut into beams, boards, slats, and veneer. Basic functional elements tool:
- Power point. Most often it is an electric motor. He must set the rotating mechanism at the required speed to process the wood.
- Cutting unit. Consists of one or two circular saws mounted on a shaft. On factory machines, they can be inclined towards each other to ensure cutting at a given angle.
- Sawmill control unit. Responsible for starting and stopping, changing the speed of rotation of the motor shaft.
- Feeder. Helps move the workpiece to the cutting point. In factory models, the sawmill can be driving. In those designed by yourself - static, needed for convenient fixation of the log on the surface.

Cutting process
To make a sawmill at home, you do not need to resort to complex drawings and diagrams. To provide one-time construction and installation needs for your home and land plot It is better to simplify the design as much as possible. The lightweight version works safer. Experts advise using the following scheme:
- durable working plane (also a convenient stationary feed line);
- circular saw on a spindle or electric motor shaft;
- reliable fixation of both elements in the same plane.
Preparing to assemble the disk mechanism. Installation of the work surface
When making a sawmill you will need to draw up a drawing. Since the device itself is not complicated, you can take one of the standard ones. Assembly begins with the installation of the desktop. It must be stable, durable, and able to withstand the weight of the log, so the wooden parts should be reinforced with metal.
To work on the base of the sawmill you will need:
- metal plates;
- wooden boards;
- nuts;
- screws;
- screws;
- tool for fixing fastening materials;
- devices for processing metal and wood.

Pay special attention to the saw. It can have an electric or gasoline engine. The motor will perform the function of a rotating device using a pulley that increases the speed of the shaft.
Attention! Diameter cutting disc sawmill must be at least 500 mm. The bigger, the better. Optimal thickness- 3 mm. Material - steel or duralumin. The disc should have 2 or 3 teeth.
Having decided on the dimensions of the table, start assembling it:
- Weld the frame, placing the supports crosswise for greater stability and reliability of the sawmill.
- Firmly fix a metal plate on it (less often they take a wooden one). Often the supports are attached to wooden lid, and is already placed on top of it heavy metal in one piece or plates (fixed with bolts).
- Make a slot in the center into which the circular saw will subsequently be recessed. The dimensions of the hole should ensure a minimum gap between the plate itself and the cutting surface. The slot should be countersunk and then fastened with screws.
Advice. Calculate in advance and make holes in the plate to secure the engine.
Engine installation and the final stage of sawmill assembly
Installing the engine is the most difficult part in the process of making a home circular sawmill. It requires meticulous precision and reliability of connections. Loose elements will not be able to perform their tasks efficiently. In addition, they are quite dangerous to the health and life of the worker at the machine.

The final stage of construction of a sawmill:
- Bearings and a pulley are attached to the underside of the plate, which is connected to the saw with a safety belt. This trick will protect the engine when the saw jams.
- The belts are properly tensioned, not forgetting the weight and power of the engine itself.
- The saw is attached strictly in the middle of the working surface.
- The main part of the work is completed by installing a thrust pad for a gasoline or electric motor. It must be movable relative to the shaft.
A good motorized saw is a balanced mechanism with the correct cutting blade angle that produces straight cuts and edges. The entire process of assembling even a basic sawmill mechanism requires a serious approach. You can see the subtleties and example of installation in the video.
Before work, stock up not only necessary materials, but also patience. In this case, you will assemble an affordable analogue to expensive machines and make your own alternative to low-quality factory-made lumber.
Homemade sawmill: video
Modern sawmill production and private buildings require a disk or band sawmill with a performance reserve and high technical characteristics. The many advantages of these machines allow us to confidently say that circular sawmills are the most a good decision for all woodworking industries, regardless of the scale of production and range of products.
The purpose of the circular sawmill
Wood is one of the most popular building materials. High strength and unique structure allow the use of wood in the construction of buildings, exterior and interior decoration premises. Scope of application and quality of this natural material depends largely on the woodworking equipment used.
A popular method of wood processing is sawing the material using frame, band and circular saws. The disk design, for example, makes it possible to produce edged and unedged lumber, such as beams, boards and slats, from round wood with high quality and quickly.

Disc units can be used for sequential processing of wood after cutting band saw and creating material from logs. Similar equipment is different high level productivity, because the design possibilities include longitudinal edging, cross-cutting and dividing.
During construction wooden houses and in carpentry shops, a circular sawmill is simply irreplaceable. It can significantly speed up and simplify the entire work process, while saving a lot of effort and time. Without such equipment, longitudinal cutting large timber It will take the owner more than one hour, but thanks to the disk sawmill it will happen in a matter of minutes.
Disc sawmill design
A circular sawmill is a hardware machine that produces longitudinal sawing trees and powered by an electric motor. Looking at the drawings of the circular sawmill, it becomes clear that the main design elements are two engines, circular saws, mobile operator's cabin, rail track and carriages.
The elementary design consists of a table on which a shaft with a disk is mounted, and its cutting part rotates above the plane. This simple design is suitable mainly for household use, A industrial production needs more complex equipment equipped with disks that can change the cutting angle.
The main working element is a circular saw, which is usually installed on the machine spindle shaft or on the motor shaft. Each of the circular saws is driven by a separate engine, and their power does not always match. According to their design, disc sawmills can be single- or multi-saw.

The metal frame of the circular sawmill is made of strong metal pipes and fastened by welding. For the carriage as guides, it is best to choose the highest quality rails without external defects, otherwise the carriage wheels will jump off or get stuck.
The carriage itself is assembled from metal parts. The rollers or wheels must fit perfectly under the rails. It should also be remembered that the frame itself, where the rollers are attached, must match the distance between the rails very accurately. Only then will the carriage move freely and smoothly.
To drive a circular saw, it is customary to use any gasoline engine. It is desirable that the motor be more powerful, because it will have to work on two saws. In order to prevent overheating of the drive, it is recommended to exclude the chain drive from the design and replace it with a reliable analogue, this will extend the service life of the machine and protect it.
Operating principle of a circular sawmill
The machine can operate in production premises or logging conditions, that is, inside and outside the building. The cutting itself is done along a horizontal line manually. Processing using a circular sawmill allows you to achieve flat surface edged tree. In addition, after watching a video about a circular sawmill, you will understand that the machine does not act up even in severe frost.
The main feature of the circular sawmill is its ability to cut in two directions simultaneously: across and along the log. This is possible due to the peculiar arrangement of the saws - mutually perpendicular. This machine is suitable for working with any type of wood. A disc sawmill is capable of sawing logs with a diameter of more than 70 millimeters. The thickness of the cut can be only 1 millimeter.

Transverse and longitudinal cutting of logs on such sawmills is carried out simultaneously while moving along the rail guides of the portal with saws. The sawmill portal and carriages are moved using an electric wire. The speed of the portal is adjusted in steps, by chain transmission.
The circular sawmill does not require installation on a special platform or foundation. The main thing is that the circular sawmill is reliably protected from the effects of precipitation. It is also very convenient when working with a circular sawmill to use an electronic ruler, which allows you to adjust cutting parameters automatically.
Classification of disc sawmills
The circular sawmill is designed for sawing into all types of roundwood lumber - edged and unedged boards, timber and beams. The cut is made with a circular saw, which has a diameter of 500-600 millimeters and is securely fastened to the shaft of the spindle unit, with the possibility of cutting in two directions and turning 90 degrees. Thus, circular rotary sawmills are divided according to the type of work.
Horizontal circular sawmill
One of the types of machines is a horizontal circular sawmill, which is quite common in the field of woodworking. Has such a device collapsible design, thanks to this it can be easily transported to logging sites. When working on such a sawmill, there is a minimum of waste.

Sawing is carried out by a saw carriage running along the logs in both directions. The main advantage is that there is no idling. The sawmill uses circular saws with a diameter of more than 550 millimeters, made of steel with Pobedit teeth. Cutting due to such discs occurs very accurately, without the formation of wave-like depressions.
The operation of a horizontal circular sawmill does not require high qualifications; the device is controlled using a remote control installed on the sawmill itself. Using similar sawmills, materials such as edged and unedged boards, beams and slats are produced. The productivity of these machines is very high.
Corner disc sawmill
The second type of sawmill is the corner disc sawmill. The log is cut using the angular sawing principle. There are two types of corner saws - with one and two discs. Look at the photo of disc sawmills: a single-disc sawmill feeds the unit in two positions - vertical and horizontal, sawing has no idle move and occurs in both directions.

The double-disc corner sawmill works by feeding saw blades orthogonally. The disks are placed horizontally and vertically to each other. The double-disc corner-type sawmill shows high productivity of products even from one log. At large facilities, entire industrial sawmill complexes are installed, which perform the functions of sawing, cutting out wood for lining or other material.
Manufacturing of circular sawmill
When choosing woodworking equipment, you should remember that the price of a circular sawmill is quite high. Therefore, purchasing such a machine is often unaffordable. This is especially true for young enterprises engaged in wood processing and private craftsmen. But there is a way out of this situation; you can make a circular sawmill with your own hands. This approach allows you to save a lot of money and gain experience in working with woodworking equipment.
Today you can make a homemade sawmill if you have the desire and minor skills in working with such equipment. You will need construction sawhorses, boards and metal plates, fasteners (screws, nuts, screws), tools for working with metal and wood, and an electric motor.
Before starting work, familiarize yourself with the design of the sawmill and get to know it distinctive features. The working element of a circular sawmill is a toothed circular saw mounted on the spindle of the machine. There is an option for mounting the saw on the motor shaft. At the sawmill, sawlog processing includes division and edging unedged boards, as well as sawing workpieces to the required sizes.

You can preview ready-made diagrams homemade circular sawmill and create your own drawing of the mechanism based on your needs. The most simple design sawmills - a table under which a shaft with a saw is placed. Its cutting part rises above the surface of the table. The shaft with the saw rotates using a motor through a belt-type transmission.
To make the base of the sawmill (table or frame), you can use ordinary wooden or metal sawhorses, tying them together with pieces of board. Attach a table from above to a similar base that is made of steel plates that are approximately 200 millimeters wide and about 4 millimeters thick. The plates are connected with screws and jumpers.
Disks for sawmills are best made from steel or duralumin sheets, the thickness of which reaches 3 millimeters. The diameter of the disk should be within 500 millimeters. When creating a sawmill for cutting wood, the saw should have only 2-3 teeth. And such a disc will easily work with most breeds.
The main guarantee of high-quality work of a circular sawmill is the production of cutting teeth. The main requirements for them are careful balancing and the correct cutting angle. The workpieces from which it is easiest to cut teeth are a broken drill or carbide insert. The cutting angle of the teeth should be 30 degrees. The rear angles must be at least 15 degrees. It should be remembered that if the cutters are poorly balanced, there will be friction against the walls of the cut.

The cutting tool is attached to the table from below in such a way that the saw blade is located exactly in the middle of the gap that is formed between the plates. Fasten the saw to the table plane through holes made previously in the plates and base plate. The holes made in the slab from the front side are countersunk and assembled with screws that have a countersunk head.
In addition, when creating a circular sawmill with your own hands, the design of the guide is important. The most simple option is a U-shaped saddle, which is formed from boards in the shape of a log, which is freed from branches and roughly processed with a plane. The engine with the saw is attached to the saddle. The motor power should be clarified: it should reach 2 kW.
The assembled table must be screwed to the frame using screws, and an insert with a slot for positioning the saw blade must be inserted into the gap between the plates. When the saw is in operation, the stop bar is secured to the table with clamps. If you follow the recommendations described above, a self-made circular sawmill will delight you with the quality of its work.
Disc sawmill maintenance
Working with circular sawmills requires a certain skill. However, maintenance of this machine big problems does not deliver. To accommodate the operator who cuts logs at the sawmill, a special cabin is provided. During cutting, the cabin moves simultaneously with the sawmill, so workers must constantly monitor the progress of the machine.
It should be kept in mind that when working with a circular sawmill, safety precautions require that the device be firmly attached to the base, which should not be neglected in any case. Remember that due to the design features of such sawmills, there is no idle reverse motion - in other words, when the portal moves in the opposite direction, the log is also cut.
Now you have concluded for yourself what is better: buy ready-made woodworking equipment or ask how to make disk sawmill with your own hands. Undoubtedly, a homemade sawmill is much cheaper than one purchased in a specialized store.
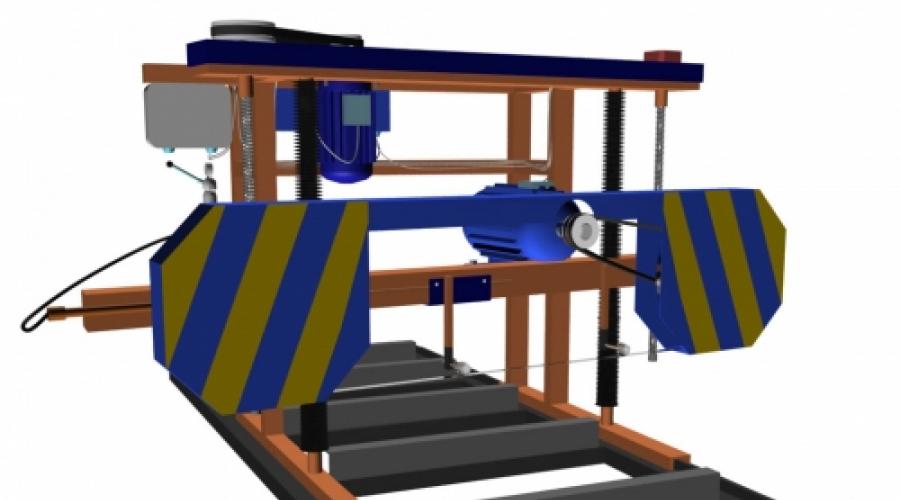
Dear site visitors " « From the presented material you will learn how to make your own band sawmill. Every craftsman dreams of having his own sawmill on his farm, because its presence will reduce the cost of lumber tenfold. Using this machine, you can cut logs into boards and bars yourself, as well as great option and, that is, the boards can be produced directly at the construction site of the future house. It is also possible to open your own private sawmill and cut boards for money and replenish the family treasury with additional income. In general, the machine is very good from all sides, and its independent assembly will again cost much less than a factory analogue, because many spare parts can be used used and those available to the car enthusiast, for example: wheels from passenger car, hubs, bearings, bolts and other things that you can get in the garage)
The design of a band sawmill consists of 1. a rail track 2. a frame with a power unit 3. a blade 4 adjustment and tension mechanisms 5. a carriage 6. a flat surface (preferably a foundation slab)
And so, let's take a look at the list of necessary components for assembling the machine. We will also analyze the whole process step by step.
Materials
- corner 100x100, channel, narrow-gauge rail (for the manufacture of rail beds)
- car wheels
- hubs
- bearings
- square corrugated pipe
- threaded stud
- jack
- drip
- power unit (gasoline or electric motor)
- fittings
- bolts, nuts, washers, engravers
- sheet metal 1 mm
- belt
Tools
- welding machine
- drill
- emery
- Bulgarian
- hammer
- roulette
- set of wrenches
- Laser level)
- ruler
- corner
The assembly process of a band sawmill.
And so, the first thing you should do is get acquainted with the drawings, because any business begins with markings, as they say, “Measure twice, cut once. 


 So we got acquainted with the drawings, and now I would also like to note that homemade sawmills come in several types
1 Band sawmill with an electric motor.  2. Band sawmill with gasoline engine.
  3 Tire sawmill.
  The operating principle of a band saw for sawing wood. The canvas is stretched on 2 horizontally located pulleys, in in this case These are ordinary car wheels with a tire and a tube. The undeniable advantage of this design is that the saw can be tensioned by inflating the tires.
  The limiter and support rollers are located directly at the bottom.
  Well, I hope the principle of operation is clear, then you should take care of placement rail track along which a carriage with a saw blade will walk and cut the logs into boards. The area must be at least 3 x 6 m in size, and most importantly, level! Therefore, it is necessary to pour a foundation slab under the sawmill and level it to a perfectly flat surface. A recess is dug, a sand cushion is laid and a reinforced concrete slab is poured.
  Next comes the installation of the rail road itself; at best, it can be made from narrow-gauge rails railway, but it’s difficult to get one, so you’ll have to make it from a channel or corner. Note!!! In the photo the corner is positioned edge up.
  You can connect the corners to each other by welding, but when the metal heats up it can lead, and we need a perfectly flat road, you can also attach the rail directly to concrete base using anchor bolts.
  Support rollers can be made from ordinary bearings, or ordered from a familiar turner.
  After which the saw frame itself is made directly, where the pipes are used different diameters which can be inserted into one another. due to which the slider can rise up and down.
  The frame is welded from a square-section corrugated pipe.
  Support rollers are installed at the bottom. they must match the width of the rail track.
  Next, the lifting mechanism is manufactured.


 Then the pulleys and hubs are installed.
 Connection to the power unit.
  Alignment and support saw blade carried out by bearings.
 A protective metal casing must be installed on top. Safety precautions are paramount here, because the canvas can fly out.
  The tension mechanism can be made from a small jack.
  After complete assembly of the sawmill, trial run, if everything is in order, then the engine is turned off and the log is laid and secured.
 The log unfolds into planks. You can also watch the work of the sawmill visually on video.
In general, this is such a wonderful sawmill, now lay out the boards and bars for construction and repair as much as you like, just have time to throw the logs)
Thank you very much for your attention!