Dimensions of a children's wall bars with your own hands. DIY wall bars (photo, step by step). Tools and materials

Read also
All photos from the article
A simple wooden wall bars with a horizontal bar is an indispensable purchase for a summer house, country house or apartments. Such a simple structure will serve as an excellent attraction for growing children. However, in addition to entertainment, wooden wall bars for children allow you to properly form the muscles of children's and adolescents' bodies.
The benefits of wall bars are obvious, and therefore in this article we will look at the instructions for assembling this structure with your own hands using simple accessible tools.

The benefits of wall bars
Currently on the market a wide range of sports equipment for home use. But it is the children's wooden wall bars that are good for their small dimensions and convenient location, which allows you to save money. free space in room.
In addition to its convenient location, this sports equipment is distinguished by its versatility. On the wall you can strengthen your arms by pulling yourself up on the horizontal bar, you can strengthen your abs by raising your legs at right angles relative to your body, etc.
Selection of materials

A wooden Swedish wall for children in an apartment can be assembled not according to special drawings, but according to your own sketches. The stability and strength of the structure is determined by the selection of materials.
To manufacture the planned structure we will need the following materials:
- 1 sheet of five-layer plywood with a thickness of 2.2 cm;
- 2 pine boards for the sides (230x12x3.5 cm);
- 12 cuttings from shovels with a diameter of 4 cm;
- fastening materials;
- stain and wood varnish;
- epoxy adhesive;
- screwdriver;
- wood saw or jigsaw;
- electric drill + wood bit with a diameter of 4 cm.
Important: It is better to dry the purchased plywood and boards for several days so that they do not warp after assembly.
The idea with cuttings for shovels is justified, despite the fact that the price of such an acquisition is high. If you order the manufacture of handrails at a special lathe from scratch, the cost of the project will increase significantly.
So, the plywood and boards have dried, it’s time to start installation.
Cutting materials and assembly
If you wish, you can use the drawings of a wooden wall bars proposed in the article with your own hands, but we simplified the proposed scheme a little, and this is what came out of it.
- From plywood sheet cut out two square pieces measuring 72 by 72 cm.
Important: Try to cut the plywood more carefully so that the factory glue does not crumble along the cut line.
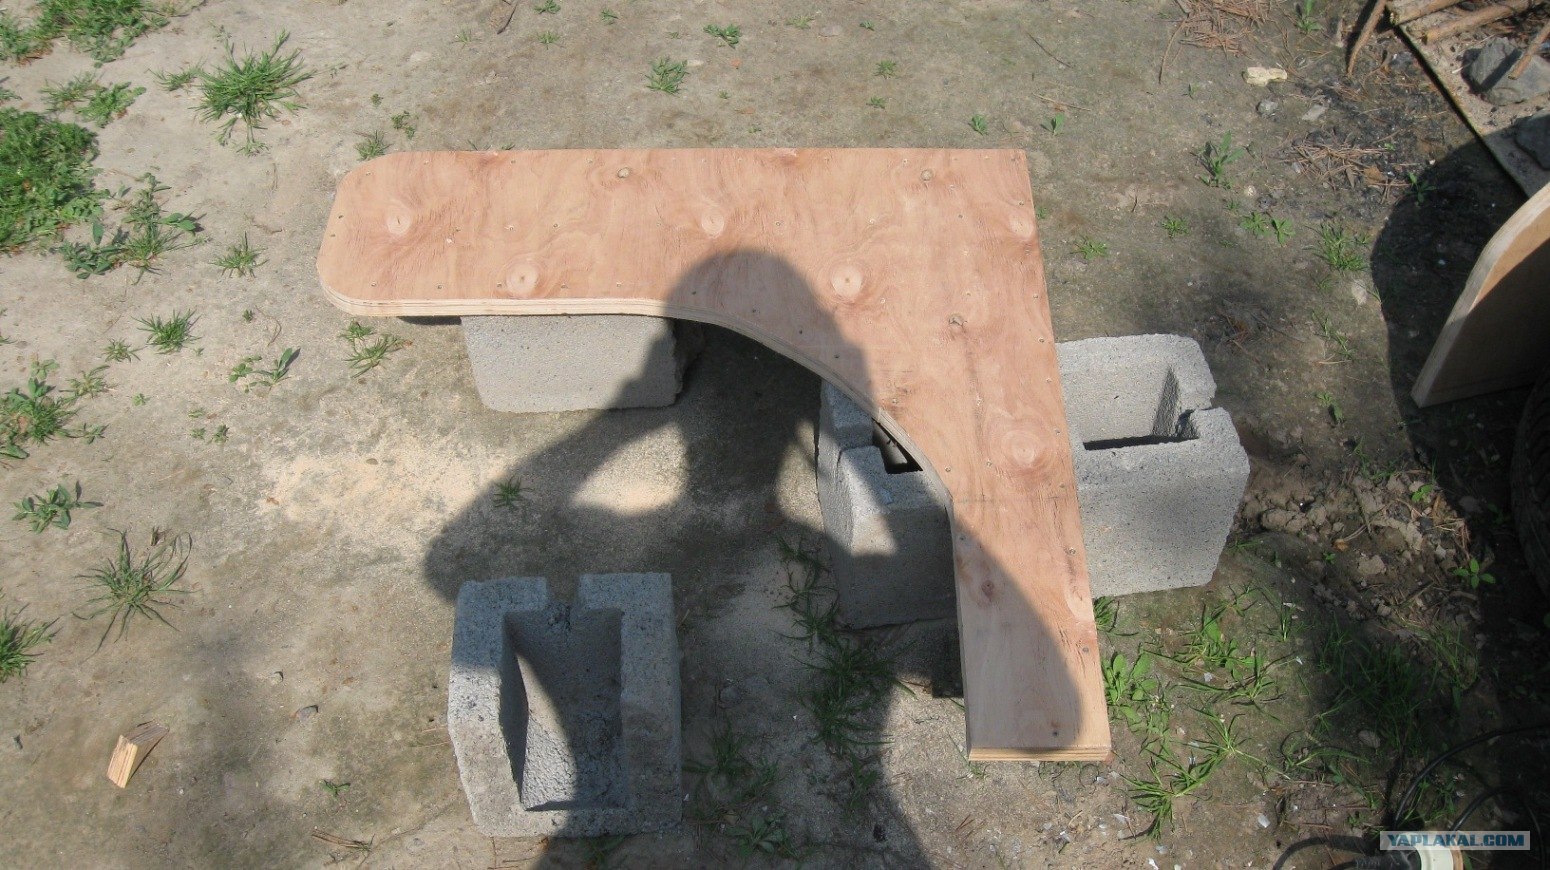
- We cut out holders from the resulting pieces as shown in the photo.. The size of the holders was chosen so that the overhang of the horizontal bar relative to the sidewalls of the wall was 60 cm.
- We grind the prepared holders and make a small end chamfer.

The prototype of this gymnastic device was the most common household ladder, familiar to everyone from childhood. These were the ones they used to climb into the attic of a house or go down into the cellar. But even the most simple exercises It turned out to be so effective that even those who lead a sedentary lifestyle managed to improve their health. Today the topic of our article is a do-it-yourself wall bars: how exactly it can be made for children and adults, what features will have to be taken into account, what materials can be used, and how to simplify your work as much as possible.
Basic requirements for the manufacture of a wall bars
It is believed that this sports equipment was invented by Finnish peasants who often needed to go down into glaciers - large pits in which fish were stored. At the top of such devices, a thickening was made or a special bar wider than standard steps was filled, on which a basket or other container with food could be hung. It was from there that this type of staircase was later distributed throughout the world. However, due to the fact that at that time the area belonged to Sweden, the name for the stairs was assigned to the name that has remained to this day.
Today, city dwellers suffer en masse from a sedentary lifestyle, physical inactivity and are successfully decimating our ranks. Moreover, if complex fashionable ones have quite high cost, then making a wall bars with your own hands for children and adults will not be difficult. You will need basic skills in working with wood or metal, a standard minimum set of tools, as well as materials.
Correct parameters
For execution minimum set exercises, it will be enough to simply firmly fasten an ordinary household ladder to ceiling beam or, as many do, to the door frame (removable option). However, the construction of a new wall bars implies different technical features, allowing you to do a much broader set of exercises than what the old Finnish peasants practiced during the long winter.


First of all, this concerns the standardization of sizes that are optimal for gymnastic exercises.
- The length of each crossbar (span) must be at least 80-90 centimeters. It is permissible to reduce such proportions in children's version. Then you can make a span 60-70 centimeters wide.
- The standard distance between the axes of the crossbars should be at least 15 centimeters. However, it must be taken into account that this child size. For comfortable activities by adults, the range from 14 to 23 centimeters is considered “deaf”. The optimal distance between the slats for an adult is 22-26 centimeters.
- All crossbars are completed cylindrical. Bars or rectangular section It won’t work here at all, as it will rub your palms a lot and interfere with the exercises.
- The diameter of each crossbar must be standard. For children, it can range from 22-30 millimeters. For adult athletes, it is better that they reach 40-42 mm.
- Number of crossbars in the set: approximately 9-16, suitable for children and teenagers, for adults it is better to make 11-20. The dimensions of a do-it-yourself wall bars for adults will largely depend on the height of the ceiling of the room where you are going to install it.
- The bottom bar of the stairs should be placed 15-25 centimeters from the floor.
When planning to make such sports equipment, you need to remember that any piece of equipment, even with the smoothest, slowest exercises, is subject to dynamic loads that are several times greater than standard weight those who work on them.
Strength test
At the same time, static loads come more from adults, and dynamic loads from active, nimble children and teenagers. To ensure that no one gets injured due to a broken device, you need to check its strength very carefully. This is done using a special weight suspended from the middle of any crossbar.
- Any crossbar of a children's wall at home should withstand 120 kilograms.
- 150 kilograms are usually withstood at home, as well as special ones for sports.
- 180 kilograms – maximum load for a set of standard daily exercises in 2-3 approaches.
Technologically, the projectile can be made from the most different materials. Behind wooden version It’s nice to hold with your hands, and even in the interior of an ordinary city apartment it looks quite organic. For higher loads, for example, for performing exercises with additional weights or supports, metal sleds can be made. Plastic option sports equipment is only suitable for a children's sports ground at home, no more.
Drawings and device: do-it-yourself wall bars made of wood
Since most men and even some women who attended general labor lessons in childhood or were taught by their parents know how to work with wood, it is worth starting lessons on making a wall bars with your own hands with diagrams and drawings from wood.


Materials
For crossbars, standard cuttings are suitable for gardening tools(shovels, rakes, hoes, brooms). Most often they are made of oak, hornbeam or beech, but they can also be glued, thin-layered, similar to plywood. The latter material is no less durable than others.
Such cuttings do not always have a perfectly round cross-section, so they will have to be processed. If it’s difficult to do it yourself or you don’t have the tools, you can go to the nearest carpentry or furniture workshop, where for little money they will not only grind you, but also cut the crossbars to the required length.
- Shovel cuttings (120 centimeters) – 4 pieces. Grind to a cylindrical shape 35 mm in diameter, cut in half.
- Board 10 centimeters wide, 2 centimeters thick (length 4 meters or more) - 1 piece. It will need to be cut in half.
- Metal corners.
- Anchor.
- Impregnation for wood (stain).
- Varnish for coating.
- Self-tapping screws for wood.
Tools
- Jigsaw or jigsaw.
- Screwdriver.
- Sandpaper or sanding machine.
- Roulette.
- Corner.
- Pencil for marks.
- Brushes for stain and varnish.
Brief instructions and video tutorial
The side posts of the projectile are also called bowstrings. A regular construction board will do for them. It is necessary to ensure that it is completely free of knots and other defects that significantly reduce the strength of the finished structure.
Using a tape measure and a pencil, you need to mark the holes on the bowstrings, and then select them. It is optimal to use the most common drill for furniture joints; it produces a hole diameter of 35 millimeters. Wherein side mount The crossbars are made using self-tapping screws, but the most experienced can also use confirmats (furniture screws).
It won’t hurt when assembling the stairs, but before you screw everything together, glue all the parts. This increases the reliability of the design significantly. You can use special wood glue, but regular PVA will do; it glues well not only paper, but wood too. That is, the algorithm is as follows: we prepare everything, assemble it, drill the necessary holes, disassemble it, coat the joints with glue, assemble it, fasten it with self-tapping screws and anchors. The entire structure must be reinforced with metal corners so that it does not move apart over time.
It is not difficult to secure such a simple ladder. The easiest way is to install a special traverse between the walls, screw metal hooks to the structure, and hang everything on the prepared support. You can use special flat metal staples attached to anchors or self-tapping screws with dowels. For the rest, follow the video instructions, everything is thoroughly and clearly described there.
The end of the supporting bracket, on which the entire structure will be supported in the future, is under no circumstances allowed. They will definitely get loose. Eventually they will fall out and you will have to redo everything.
Details and options
Many fear that difficulties will arise with the most basic operations - drilling holes for crossbars, as well as installing stops and a horizontal bar for performing exercises on the apparatus.
Bowstrings
Finding quality boards for these elements is not as easy as it seems. Usually suitable material the manufacturer selects it at the stage of cutting the logs. Such material goes on sale at a much higher price than regular construction boards.
If you find good boards If it doesn’t work, you can glue plywood layers or even lumber waste to strengthen them as much as possible. You will have to spend much more time on gluing and sawing, but the strength of the racks will be very enviable.
Typesetting option


Many people prefer to make a Swedish wall built into the doorway. No, you will no longer have to climb between the crossbars to get to another room, since the design is meant to be collapsible.
Bowstrings for this option can be made from any board 15 millimeters thick, or even from ordinary plywood. The main load here will go to doorjamb, That's why special requirements no to them.
It is better to choose a more durable material for the crossbars for the stairs in the doors - metal. However, many say that even durable beech, oak and hornbeam planks last quite a long time under moderate loads.
Horizontal bar and stop
A crossbar fixed in the upper part, while allowing you to perform pull-ups and hold your legs at an angle while hanging, significantly expands the functionality of the equipment. But even here it is possible various options, and almost anyone can, if they really want to, make a horizontal bar for a wall bars with their own hands.


This is the simplest option for attaching a horizontal bar with a wooden holder. Anyone who has reached this stage will definitely be able to cope with its production. However, it is worth taking into account that this type of bar is intended only for children or calm pull-ups by adults, without unnecessary movements, additional weights or sudden movements, or exercises with stops.


In the photo above, there are other options for making or simply attaching a horizontal bar or hanging hand rest to perform more complex exercises. For self-made wooden structures you need to choose only the highest quality, dense and durable wood, otherwise it simply will not withstand the load. Please note that the standard “movement” of the horizontal bar forward, relative to the ladder, will be 60-65 centimeters. Otherwise, the exercises will be inconvenient, especially for an adult.
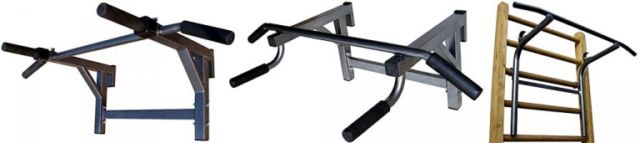

For those who do not want to bother with such a responsible and important work, available for purchase in the store standard design made of wood or metal. All that remains is to secure it to a pre-assembled wall, then you can practice without worrying that something will break and you will get injured.


Above in the photo there are correct options for attaching a horizontal bar or stop to the wall. It is best to secure the structure with specially cut plywood scarves, 22-35 millimeters thick.
They are screwed to the bowstrings (stands) with through screws, of which there should be at least four pieces, or even better, take five, placing them as indicated in the figure. With this fastening, the horizontal bar or stop will definitely not fall off suddenly - at first they will loosen for a long time, which will definitely not go unnoticed by you.
DIY metal wall bars

For advanced athletes who need to perform more difficult exercises, ordinary wooden walls may not be suitable. They are much less durable than metal ones. The same goes for people with large mass body, regardless of whether it is muscle mass or excess fat. The figures above show drawings of the so-called female (left) and male (right) options.
All consoles and bowstrings there are made of a special professional pipe with dimensions 80x40x3, and the crossbars themselves are made of ordinary pipe round section 40x2. It is necessary to take into account your own capabilities, because not everyone knows how to work with metal. Although, in principle, welding work can be eliminated by securing all joints with bolts. More detailed information available in the video below.
Wall mount
Most often, home craftsmen attach their sports equipment to corners and screws directly to the wall. This is not entirely correct, since as soon as just one of them breaks for any reason, the entire ladder will simply fall off - all the other fastenings simply will not withstand the load.
- The wall can be secured at four points if the structure has bearings. In this case, the upper pair is located between the second and third upper crossbars, and the lower one between the first and second from the bottom. This mount is intended for people whose weight does not exceed seventy kilograms.
- At six points the distribution is slightly different. The first fastening from the bottom must be at a height of at least 10 centimeters, the second is located in the middle, and the top one is between the first and second crossbars.
- Children's wall bars can be attached to two points located between the first and second upper crossbars.
You also need to remember about the correct deepening of the anchors into the wall. We must not forget about the dowels.
- Wooden wall - from 1.3 centimeters.
- Brick – 1.2 centimeters.
- Concrete - 1 centimeter
Wall bars for children


As already mentioned, the weight of the children is small, and therefore they cannot create very large static loads on the projectile. But the dynamic ones here will literally go off scale, because the children are very energetic and perform not only the necessary movements, doing memorized exercises, but also simply fool around. At the same time, if the child is not alone, then most likely they will hang on the ladder as a whole “camp”, and on top of that they will arrange tags when their feet cannot touch the floor.
Wall mount
All this requires additional fastening force, although usually such equipment is not high, so the lever arm when lifted from the wall is also small. But you need to remember that it is not advisable to tightly embed a children's wall into the wall. Before you know it, the child will grow up. Then the “toy” version will have to be changed to a real adult one or simply removed. There are two options for attaching shells.
In stride
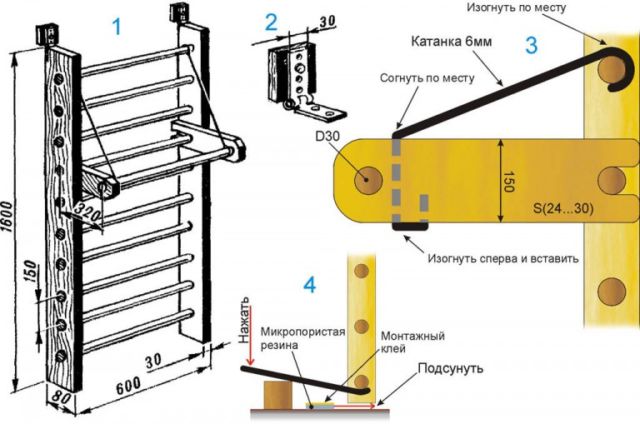

This design option takes into account the elasticity of the materials of the staircase itself. Therefore, it is very important that the racks (strings) are quite strong in diameter. For this it is better to take solid wood, thickness from 3.0 centimeters, or glued options from 2.4 centimeters. On-site installation is quite simple; we will provide an abbreviated algorithm for it.
- Special pads are temporarily attached to the heels of the racks. Their thickness should be 3-4 mm.
- The structure is installed on the floor in the place where it will always be.
- The installation locations of dowels for self-tapping screws and anchors are marked on the wall.
- The gaskets attached at the beginning are removed, and the wall itself is screwed to the wall. At this stage, the lower parts of the strings will simply hang in the air.
- A special permanent gasket made of microporous, but at the same time quite dense rubber is placed under the heels of the racks. They should be 2-3 mm thicker than temporary ones. You can place them by slightly lifting the structure with a pry bar. Before installation, do not forget to lubricate the rubber bearings with special installation glue so that they do not slip out over time.
The glue hardens very quickly. Therefore, after just an hour and a half, not every adult, not to mention children, will be able to move or even slightly loosen the structure.
Point-blank between the floor and the load-bearing wall
However, who previous version seems not reliable enough, there is another option for securing a children's wall bars, namely, point-blank at the same two points. You can do it yourself; you don’t need an assistant to lift the structure. However, it should be noted that the upper part (attachment points) must have high maximum rigidity in three planes. All this is important because the option works on the principle of a lever that is stuck at a dead point.
![]()
![]()
Despite the fact that it would seem that two dots are enough, pay attention to the picture. It matters whether you use a solid construction of the bowstrings or whether they have “ears” that are additionally screwed to the machine or the ladder itself. All additional articulation points are potential places for loosening. Therefore, it is better to attach the projectile to the wall in a similar way at four points.
Mixed wall bars
Another reliable option, when the inventory can no longer be shifted even by minimum distance, this is a mixed mount. This means that first it is screwed to the wall using anchors or self-tapping screws as standard, and then it is further expanded between the floor and the ceiling. This is truly the most reliable and also safe for further activities.
Amazing wall made of water pipes
Many craftsmen say that the easiest way, and at the same time cheaper and faster, is to make such sports equipment from ordinary plastic water pipes. However, making a wall bars from polypropylene pipes with your own hands, you need to remember that all types of plastics that are used in everyday life tend to “get tired” very quickly. That is, long time They are not able to withstand even static loads, so this option is definitely not suitable for adults.
Of course, there are different options for very durable newfangled materials, for example, carbon fiber, but their cost will hardly seem affordable to you. In addition, then for cutting, drilling, and soldering the material, you will also need to purchase additional special equipment, which is unlikely to be useful ever again.
How to diversify the wall
The functionality of a homemade wall bars can be easily changed at your own discretion. After all, a child, and even more so a teenager, will be bored just doing pull-ups on the horizontal bar. To do this, you will need to independently manufacture or buy additional equipment that is hung or attached to the main structure.
- Rings.
- Rope.
- Bars.
- Stops.
- Rope-ladder.
- Basketball hoop.
Many people make it easier for themselves to replace a child’s wall with an adult one in the future. To do this, it is enough to install a large version, and then buy or make special children’s modifications for it. In the future, they are simply removed, without harm to the main projectile, walls, or floor.
Rules for the safe operation of the wall bars
No one wants to see themselves or their child injured while using a projectile. Therefore, you need to adhere to certain operating rules.
- Always check the integrity of the structure before starting exercise.
- For safety, you need to monitor the weight regime. This means that an adult should not exercise on a children's wall if he weighs more than the maximum allowable.
- Can't leave small child at the time of training on the apparatus. If it is installed in a nursery, it is worth installing a height limiter or simply removing a few top bars, provided that this does not harm the overall stability.
- The child must be instructed on how to properly practice on the wall.
- It is advisable that the equipment is used by no more than one person at a time.
In addition, please note that for the long service life of the wall bars, it should always be kept clean. The structure must be maintained in accordance with the materials used. For example, wood may require an updated layer of stain and varnish over time, and metal may require rust removal and painting.
Comprehensive development of a child at every stage of his life - the main task for each of the parents. AND physical education in this case it is not in last place. Sports clubs and dance lessons become an integral part of the life of almost every child. But what should those parents do who do not have enough free time and the necessary “arsenal” of grandparents, aunts and nannies. There is an exit. You can equip a small sports section directly in the apartment!
Home gym: pros and cons
Simple design on minimum area will help a lot in the development of the child
Offering the child his own sports section in the apartment, you provide him with the opportunity to actively move, regardless of weather conditions outside the window. Rest assured: it’s worth giving the fidget room for movement, something, and his imagination will be enough for fun and useful games. Think for yourself, you only take up 2-3 sq.m. the baby’s room, and the benefits from this will last for the rest of his life.
Significant factors in favor of creating a sports corner in the house are:
- Possibility of active movement of the child at any time convenient for him (during breaks between preparing lessons, in the morning instead of exercises).
- Great option for have fun and work on physical fitness with friends or relatives.
- Excellent preparation of the body for future stress at school during physical education (for a preschooler) or additional classes for a schoolchild.
- Confident coordination of movements and well-developed vestibular apparatus and cardiovascular system.
Perhaps the only argument against installing such a house structure is possible injury due to a fall. But this problem can be solved by equipping the site with a high-quality mat. Plus dad's support during classes with a very young athlete.
Please note that today you can buy children's sports ground for the home, ready-made and in any configuration. But if you have the materials at hand and the desire to tinker with the tool, then it’s time to save your family money and please your child with a homemade wall bars.
Design requirements
In almost all models, the basic elements are unchanged
Equipping a gym with your own hands at home is not at all difficult. The main thing is to choose the right place in the child’s room for its location. Please note that you will need at least 2 sq. m for the structure itself and at least 1 sq. m around the sports ground. This is necessary for the child’s free movement.
The main elements included in the sports corner set are:
- Swedish wall;
- Small horizontal bar/bars;
- Gymnastic rings;
- Rope ladder or swing (optional);
- Soft sports flooring.
It is this set of sports equipment that will allow your baby to fully realize the potential of his physical activity at any time convenient for him.
Swedish wall
One of the main elements of the home gym
To make a wall bars (or simply a sports ladder) you will need:
- Side bars made of wood. The height of the material can be arbitrary (depending on the height of the ceilings in the children's room), but, as a rule, the height finished stairs is 2.5 m. In our case, the finished structure will be installed on spacers, and therefore accurately measure the distance between the floor and ceiling minus 10 cm. This indicator will be optimal for your stairs. The width of the beams should be from 10 to 15 cm, and their thickness should be 2 cm or more.
When choosing wooden blocks, you should not save money - buy the highest quality wood
- Wooden round slats (diameter - 2.5 cm; length - 40 cm; the quantity is calculated based on the height of the sidewalls divided by 30. In this case, the number 30 is the step length of the stairs).
- Sandpaper.
- Wood glue.
- Drill/driver for drilling holes in the sides.
- Construction or simple pencil.
- Self-tapping screws (optional for securing the steps of the stairs in the sidewalls).
- Roulette.
- Varnish for treating wooden surfaces.
Stages of staircase manufacturing
- After the wooden blanks have been carefully processed, using a tape measure and a pencil, we mark on the sides the places for drilling holes for the crossbars.
- Using a drill-driver using a special attachment, we form the joints of the crossbars with the sidewalls.
Drilling holes for steps using a special nozzle
- We coat the finished round slats-steps well with wood glue and drive them into the resulting grooves.
Fastening steps with glue
- Thus, we assemble the entire structure and leave it until completely dry.
- If desired, you can additionally secure the steps in the stairs with self-tapping screws outside sidewalls
- After two or three days we cover the entire staircase thin layer varnish This will add color and additional smoothness to the structure.
We varnish the finished structure
Horizontal bar
While the finished staircase is drying, it’s time to start preparing the horizontal bar. It will be part of our wall bars.
We will need:
- Wooden boards measuring 60x25x5 cm (if desired, the parameters can be changed in a direction convenient for you) - 2 pcs. They will play the role of side bars for attaching the horizontal bar.
- The crossbar itself, the length of which should be 60 cm, and the diameter 3-4 cm (for children's hands - the most convenient option). We calculate the length of the crossbar in this way: the width of the finished staircase = 50 cm + 10 cm (which falls on the two side crossbars of the horizontal bar).
- Wood glue.
- Bolts, nuts and washers - 12 pcs.
- Drill-driver.
- Wrench for fixing bolts and nuts.
Stages of work on the manufacture of a horizontal bar
- We carefully sand the wooden sides of the horizontal bar. If desired, you can add details to the sawmill rounded shape on one of the sides.
- We apply markings to the inside of the sidewalls and use a drill to form holes for the horizontal bar.
- We coat the crossbar on both sides with wood glue and firmly drive it into the formed grooves.
- Now you need to apply markings to the sides of the stairs and the sides of the horizontal bar in such a way as to form symmetrical holes for fasteners. Try to place six bolts on each side and at the same time evenly distribute the load of the horizontal bar sides on the staircase structure by rationally arranging the hardware. Let's say there are three of them along each edge of the side of the stairs. Total - six bolts on each side of the ladder for reliable fixation of the walls of the horizontal bar.
- Using a drill, we make holes for the bolts and securely connect the ladder to the horizontal bar at the top of the wall bars.
- After the finished structure has dried, coat the horizontal bar with varnish and leave it aside for now.
Ideally, we should end up with something like this:
After finishing the work, the horizontal bar should look like this
Rings
In order for the child's wall bars to be as complete and functional as possible, all that remains is to equip it with rings and a rope ladder. Step by step creating a sports complex for the baby, for now let's move on to making rings.
For this we need:
- Plywood sheet 75x75 cm - 2 pcs.
- Construction compass.
- Wood glue.
- Press or bolts.
- Jigsaw.
- Milling machine.
- Rafters.
- Drill-driver.
Step-by-step production
- We draw each sheet of plywood into six equal squares and cut it with a jigsaw.
Production of plywood blanks
- We glue each of the six squares together with wood glue, laying them one on top like a sandwich. You should get two such plywood “sandwiches”.
Gluing plywood blanks
- We send both structures under the press or securely tighten them in the corners and center with bolts, leaving them for a couple of days until completely dry.
For maximum tightening of the workpieces when gluing, it is best to use bolts or self-tapping screws
- As soon as the wood dries, we draw rings on the plywood, the inner diameter of which will be 18 cm, and along the outer edge - 20.5 cm.
- Cut out the rings with a jigsaw.
Cutting rings with a jigsaw
- By the way, there (if you don’t have a milling machine) you can ask your friends to give the rings a circular cross-section along the entire perimeter of the workpiece.
- All that remains is to sand the rings and coat them with varnish.
- Now in one of the sides of the horizontal bar we make holes with a drill at a distance of 40 cm from each other.
- We pass the rafters through them and hang the rings at the desired height. By the way, it is better to purchase good rafters from sports store. After all, they play an important role in ring training, taking on the entire load. If you can’t afford it, then limit yourself to any rope that is convenient for you. It's inexpensive for you, and it's fun for your baby to be a monkey.
Video: how to make wooden gymnastic rings
Rope-ladder
The last step is a rope ladder and wooden beams. This exercise perfectly develops coordination and strengthens the spine and shoulder girdle. So you can’t do without it.
You will need:
- Round wooden slats. Mop handles are great.
- Rope - at least 6 m (or depending on the height of your ladder).
- Drill-driver.
- Brass or duralumin rings (optional) for fixing at the ends of the slats.
In fact, to create a rope ladder you only need wooden sticks and strong rope
Stages of work
- We cut the sticks into pieces, the length of which will correspond to the future steps.
Cutting steps from wooden sticks
- So, every wooden blank carefully grind and use a drill to form holes along the edges of the steps. The diameter of the holes should correspond to the diameter of the rope, but not exceed it.
Two bars stuffed onto the plank will help make all the steps the same
- In this way we put all the slats on the rope, securing them from below with strong rope knots.
- We also fix the last step with a knot. At the end of the stairs there should be at least 30 cm of rope for reliable installation rope projectile to general design Swedish wall.
- If desired, the edges of the steps can be trimmed with duralumin or brass rings.
- Using a drill in the second side of the horizontal bar, we form two holes at a distance identical to the width of your stairs. And with the help of a rope we securely attach the projectile to the general sports facility.
This is what the finished staircase should look like
Installation and installation of a finished wall bars
So, the whole structure is ready. All that remains is to install it on the spacers. To do this, we screw spacers into the upper and lower parts of the sidewalls of the wall bars, install the structure in the desired location and then unscrew the spacers to the limit, ensuring the absolute immobility of the structure.
It is important to remember that it is advisable to periodically check the spacers and, if necessary, tighten the nuts.
And for those who still want to install finished corner by attaching to the wall, we inform:
- It is better to install the structure to a brick wall using dowels;
- TO concrete wall- on anchors;
- Plasterboard walls are just spacers.
And be sure to equip the children's sports corner with soft mats. You don't have to worry about possible injuries to your baby and his friends.
Born in 1977 in Donetsk, Ukraine. Graduated from Donetsk Polytechnical Institute(now Donetsk State Technical University) in specialty Automated systems management. Worked at the Donetsk Metallurgical Plant. In 1997 he moved to Moscow, where for 8 years he worked in several construction teams.
Caring for the younger generation includes the physical side of education. Regular sports exercise strengthens children's bodies, develops strength and endurance, and helps them burn off excess energy. The area of the children's room is not suitable for installing large sports complexes, and their price is too high. An elegant solution to the problem would be a hand-made wall bars. It takes up little space, is easy to make yourself, and requires little investment in materials and time.
Sports equipment can be made from two types: wood or metal. Each has its own advantages. The wooden wall bars are made from natural materials, easily and organically fits into the design of the premises, production takes little time. A metal product is much stronger and will withstand the weight of even several children or adults. But it requires skills to work with welding machine, which is not available to everyone.
Sports walls come in wood and metal
Regardless of the material chosen, at the initial stage of construction it is necessary to prepare drawings of the future projectile. This will help you calculate correct parameters, because the height of a standard apartment does not exceed 2.7 m. In addition, in the drawing it is necessary to take into account the distance between the two racks in order to correctly measure the crossbars. Take into account the dimensions of the future sports equipment in order to fit it into the existing interior. The drawings will help determine correct connection walls and crossbars, adjust the dimensions, and outline the fastenings.
The dimensions of the wall should be such that it does not touch the floor in case of laying a carpet or carpeting. It should also not touch the ceiling from above, so that the hanging bar can be easily removed. The height should be safe for children.

Drawings of a wooden sports wall for home training
Sports equipment made of wood
To make a do-it-yourself wall bars, you will need the following materials:
- board more than 4 m in length; about 2 cm thick and 10 cm wide;
- cuttings for a shovel or broom 4 pcs. 120 cm each;
- set of tools;
- glue or liquid nails for wood;
- screws.

The wall bars are simply ideal for home workouts.
Preparing the racks and crossbars
The board is sawn in half, measuring the required length of the stand. The ends of the beams are rounded using a jigsaw, sawing off the excess. Initially sanded with a plane, then treated with sandpaper or grinder. Measure the distance for future crossbars (about 30 cm), mark the locations of the holes using a thin drill.
Preparation of the crossbars begins with determining their length. Usually it is 60 cm, so the cuttings are cut in half. If they were not sanded at the factory, you will have to carry out this process yourself. Any roughness or chipping of wood products can turn into a thorn in your hands in the future. The bars and crossbars are treated with stain, then varnished or painted, depending on the desired appearance.

Drawing of a sports staircase with a suspended beam made of wood
Assembly of the structure
After drying, holes are made in the bars. To do this, use a pen as an attachment for a drill required diameter, or a crown. The hole should be made non-through so that it remains possible to further strengthen the steps with screws and glue. Also Smooth surface racks, without traces of recesses, have a more aesthetic appearance. Then the structure is put together: the ends of the crossbars are treated with glue, inserted into one rack, then the second is secured on top. Additional fastenings are provided with self-tapping screws, connecting the rack and the step with them.

Fastening to the wall is carried out using metal corners. To do this, mark holes at the required height, focusing on construction level. Select dowels of the required sizes and parameters, and fix the ladder to the wall.
Making a removable crossbar
Removable horizontal bars are made in several versions: solid sidewalls are cut out; assembled from two planks, connecting them at an angle; welded from metal pipes, bending the ends into hooks. . If it is possible to make blanks for milling machine, or the manufacturer has the skills figure cutting jigsaw, then cutting out the necessary spare parts from thick plywood (more than 18 mm) will not be difficult. You will need to make two identical sidewalls of a triangular or smooth “L” shape with cut out hooks with which the horizontal bar is hooked to the crossbar.
The distance between the hooks should be taken into account; it should correspond to the gap between the crossbars. The sides are fastened at the back using a strip of plywood, the size of which is slightly smaller than the length of the crossbars. This is necessary for firmly inserting the crossbars into the grooves, without interference from the side posts.
At the end of the protruding part of the sidewalls, holes are prepared and a crossbar is inserted, strengthening it with self-tapping screws. It should be noted that similar design designed primarily for the weight of a child: for an adult, it makes more sense to make a removable horizontal bar from metal.

Wide-grip attachments
Metal wall bars
Do-it-yourself metal wall bars are not so easy to make. Preparatory work it will require less if the materials are purchased in a store. Purchased pipes do not need to be cleaned old paint and rust. For production take:
- two square profile pipes 25x25mm, total length 6 m;
- sections of half-inch pipes 50-60 cm long, in quantity according to the expected number of steps;
- segments profile pipes to strengthen the horizontal bar, the dimensions are determined based on the length of the extension part;
- corners for wall mounting.
The racks are cut to a given height of the projectile, approximately 2.5 m, the remains of the pipes are used for remote parts, welding them to the top of the racks at an angle of 90˚. The crossbars are connected to the uprights by welding, making sure that the metal is set thoroughly and not as a top layer.

Metal sports wall can be complemented with overhead bars, barbell supports and abdominal benches
Then it is necessary to make reinforcements so that when hanging on the horizontal bar, the outrigger part does not bend down. To do this, measure the length between the end point of the upper extension and the stand so that the reinforcement forms the third side of the triangle. Pipes are cut off the right size, not forgetting about processing allowances. Weld reinforcements onto both posts of the wall bars. Along the entire length of the racks on the back side, pipe pieces with nuts are welded, with the help of which the equipment will be mounted on the wall. The surface is primed and covered with paint and varnish.
A do-it-yourself wall bars are quite easy to make. Her an undeniable advantage is availability and low price. It helps save space in the apartment, providing children and adults with equipment to maintain physical fitness.
The Swedish wall can be made more diverse by additionally equipping it with a rope or rings. It is a good alternative to bulky sports equipment and is suitable for working the muscles of the whole body.
The wall bars for a child are both entertainment, a hobby, and The best way development. It can be made of wood, plastic or other materials. But instead of going around stores looking for what you need, you can make a wall bars yourself. This is not so difficult, even for a novice craftsman, and anyone can find the materials and tools at hand.
Wall bars: for sports and more
By making a wall bars with your own hands, you will get an indispensable item for your home. By the way, it will be useful not only as a sports equipment, but will also become a truly multifunctional equipment. The wall bars can be used not only by children, but also by adults, because it can withstand weights of up to 100 kilograms. You can also dry clothes on its slats in bad weather or if you don’t have a balcony.
And finally, main function- sports. The wall bars for children will be best help in healthy growth and development. With daily use, the baby will grow strong and strong. It is especially recommended to equip a boy’s room with such a device, but active girls will also enjoy using the wall.

Before starting work
Think about how you see the wall bars in the room, calculate its dimensions, taking into account the size of the room itself. Please note that you will also need space during its operation. You may have to rearrange the furniture, and remove some things from the room altogether. It is best to plan the wall bars in the corner.
Not only the width, but also the height of the wall is important. Take this into account if you are going to make fastenings not on the main wall, but on the ceiling and floor. The calculations here will require very accurate ones. If you are a novice master, it is better to get by with mounting it to the wall - here, in principle, the height can be any.

What materials will be needed?
A do-it-yourself wall bars for children can be made from various materials. But the most durable, reliable and safest will be natural wood.
The Swedish wall will be based on wooden beams, the length of which is equal to the expected height of the structure. Focus on the height of the ceilings. And their thickness should be at least 4 cm. You will also need cuttings of a smaller diameter (2.8-3 cm), in the amount of 10-15 pieces - depending on the length of the wall that you imagine. Processing wood yourself is a labor-intensive process, and not everyone can handle it. Therefore, it is more convenient to take ready-made cuttings from shovels or other tools and work with them.
In addition, you will need special wood screws, a saw and drill, a hammer and screwdrivers, a set of wood drills, Grinder, tape measure and pencil for marking.
Please note that the base of the wall bars must be perfectly processed, safe and durable. Check both each detail separately and the entire structure for strength - the health and life of your child depends on it!

How to make a wall bars with your own hands
The Swedish wall for children, the drawing of which you see above, will be optimal and easy to make at home. Here detailed instructions to work.
- If you bought ready-made beams, they may be higher than necessary. Therefore, you will have to trim off the excess length. Carefully process and smooth out any uneven surfaces so that your child cannot scratch or stick a splinter.
- The edges of cuttings also need to be carefully cleaned. Their structure is usually uneven, so sand the entire length as well. It is better to work with gloves - it is safer. Ideal if you have a grinder at home. With its help, you can quickly process wood to perfect smoothness. If not, it doesn’t matter either - an ordinary plane or sandpaper will cope with the task no worse. True, it will take longer.
- After adjusting the dimensions and sanding the parts, the wood must be coated with an antiseptic. Especially if the air in the room is humid, otherwise the wall bars may become damp, and moisture is detrimental to wood. Choose a medium antiseptic; it is important not to overdo it, but also not to skimp on protection from moisture and insects.
- Having processed the parts, you can begin marking them. Do it as accurately as possible to avoid bevels of the crossbars.
- The crossbars should be about a meter long and spaced about 40 cm apart. Drill holes for them to a depth of at least a centimeter. The crossbars are secured using strong self-tapping screws or wood screws.
- When the structure is ready, the child's wall bars are attached to the wall or ceiling - depending on which mounting method you have chosen in advance. Here you will need standard installation tools: drill, screwdriver and mounting brackets.
How is the wall bars useful?
This sports equipment can work real miracles. After regular training with him, your child will become stronger and more resilient, his agility will increase and his correct posture. Activity on the wall bars helps strengthen blood vessels and even improve immunity.

Other advantages include the opportunity physical activities even in cases where it is simply not available. For example, you don’t have a playground in your yard, or it’s cold outside and you can’t go out for a walk. A wall bar for a child will not take up much space, but it will become great view activity and distract the baby from the TV or computer. And it will be much easier for schoolchildren to do their homework with breaks in the form of exciting sports exercises.
Swedish wall - convenient and beautiful
The whole design can help not only in the development of the baby, but also in the design of the nursery. Let the child use his imagination: together you can paint the wall bars, cover it with stickers, and apply any decor that will turn the structure into a unique element of the interior.
The Swedish wall for children, photos and drawings of which you see in the article, is only the basis for your creativity. You can attach not only a ladder to it, but also a swing, a horizontal bar for practicing, or a rope for climbing. Think for yourself what type of creativity your child is more inclined towards, and build on this when working on the apparatus.
Helpful advice for parents: the wall bars should not be a daily “must” for a child. If you don’t force your baby to study, but give him freedom, he will be much more willing to climb the wall. In addition, you can always connect a game element to this activity.