Extension of aur. File extension AVR. Programs that support the AVR file
Read also
If our system cannot cope with the .AVR extension and all the automatic and semi-automatic methods of teaching it this art have failed, we are left with manual editing of the Windows registry. This registry stores all information related to the operation of our operating system, including the connection of file extensions with programs for servicing them. Team REGEDIT inscribed in the window “search for programs and files” or "launch in the case of older versions of the operating system, it gives us access to the registry of our operating system. All operations performed in the registry (even not very complex ones regarding the .AVR file extension) have a significant impact on the operation of our system, so before making any modifications, you should make sure that a copy of the current registry is made. The section we are interested in is the key HKEY_CLASSES_ROOT. The following instructions show, step by step, how to modify the registry, specifically the registry entry containing information about the .AVR file.
Step by step
- Click “start” button
- In the “find programs and files” window (in older versions of Windows this is the “Run” window), enter the command “regedit” and then confirm the operation with the “ENTER” key. This operation will launch the system registry editor. This tool will allow you not only to view existing records, but also to modify, add or delete them manually. Due to the fact that the Windows registry is key to its operation, all operations carried out on it should be performed judiciously and consciously. Carelessly removing or modifying an inappropriate key may permanently damage the operating system.
- Using the ctr+F key combination or the Edit menu and the “Find” option, find the extension you are interested in.AVR by entering it in the search engine window. Confirm by pressing OK or using the ENTER key.
- Backup copy. It is extremely important to create a backup copy of the registry before making any changes to it. Every change has an impact on the operation of our computer. In extreme cases, erroneous modification of the registry may result in the system being unable to restart.
- The value you are interested in regarding the extension can be manually edited by changing the keys assigned to the found extension.AVR. In this place, you can also independently create the desired entry with the extension a.AVR if it is not in the registry. All available options are located in the handy menu (right mouse button) or in the "Edit" menu after placing the cursor in the appropriate place on the screen.
- After you finish editing the entry for the .AVR extension, close the system registry. The introduced changes will take effect after restarting the operating system.
The AVR file extension is a data format known as Audio and Video Research files. AVR files were designed for use on Apple Macintosh computers. They were specifically used for older 680x0 based Atari ST computer systems. This legacy Mac audio format contains 8-bit or 16-bit mono or stereo sampling rates on one or two channels of audio files. They have fixed size information, 128 bytes of fixed format header, MIDI sample loop and MIDI attachments. They are characterized by the use of the MPEG-2 video codec transport stream for its video, associated with the AVF format. They allow you to store images, audio and video, power for non-linear editing, providing their own codecs optimized specifically for their software. They provide faster editing times to crops without sacrificing quality. Files in AVR format can be opened using SoundApp on Mac operating systems. These files can also be converted to MP3 or WAV format using free conversion tools.
Today we will continue what we started and try to see the results of our code in a live debugger - in proteus. Here the simulation is happening clearly. Here is its desktop shortcut
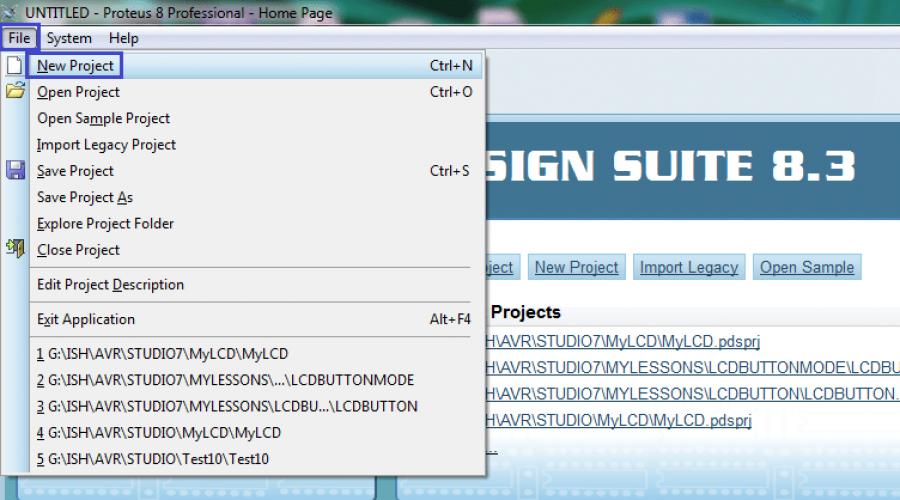
I won’t tell you where to find this program, you can find it yourself without difficulty. I'll tell you how to use it. Let's run it and create a new project

Our project name will be the same as the project name in Atmel Studio - Test01 and we will create it in our project folder


At the end, click "Finish"

The project has been created.
Let's add some element to it. To do this, click on the “P” button in the left panel and select an element from the list. In the search bar at the top, you can enter the name or part of the name of the element. Let's try to add our Atmega8 microcontroller. There are controllers without letters here. Let's select Atmega8 and click "OK" or double-click on the line with the element (click on the image to enlarge)

The element will appear in the left panel

If we have just added an element, then to install it in the workspace, we do not need to select it, just click on the place in the workspace where we would like to install this element. On the first click, the element will be installed, but will not yet “stick” to the space, that is, we can still position it. After the second click, our controller will be firmly installed.

We can see that this is not exactly the type of controller that we will use. We need a DIP version with 28 legs. To change the case type, double-click on the controller and change its type in the next drop-down list. Also, at the same time, we will add a file with the firmware to the “Program File” field using the folder button to the right of the field. For the firmware we will have a file created in the last lesson using Atmel Studio. You see the path to it in the field in the figure; accordingly, it may differ for you
and click "OK"

Now we see that this is exactly the controller

In approximately the same way, we will add a resistor and an LED to the pad. The resistor is needed to limit the current flowing through the LED so that neither the LED nor the controller burns out.


Only for current limiting an LED, 10 kilo-ohms will be too much. To change the value, double-click on the “10k” inscription or on the resistor itself and replace the value with 220 ohms. At 5 volts it will be optimal

We will also need to add a contact for the common wire (ground). To do this, click on a specific icon in the left panel and select “GROUND” from the list. Then, in the same way as any elements, add it to the right place


Well, our elements are in place. All that remains is to connect them. This is done using the mouse. First we single click on one connection pin and then on the other. This way we will connect all the elements

Our elements are connected, you can try the circuit in action. It is not necessary to supply power to the controller. This goes without saying. To start, press the button in the form of a green triangle in the bottom panel. The button will turn bright green
![]()
If everything is done correctly, the LED will glow

This way we saw the result of what we achieved as a result of the code. Our program works. To stop the process, click on the button with a blue square.
The next task of the lesson is to see the result of the program in hardware - on a live controller. To do this, we will use the debug board that I have.


We will connect this debugging board to the computer using this programmer

For this programmer I have review. There is information on how to connect this programmer, how to install a driver on it, and how to flash controllers using it. In this review we are flashing three different controllers. We also use several programs for firmware. In this tutorial we will use the avrdude33 program.
Let's connect the debug board to the programmer, and connect the programmer to the computer's USB bus. The driver must be installed.
Now let's launch the firmware program and select our controller there


Next, open the Fuses tab. Fuses are controller tuning bits, experimenting with them is a dangerous task. Therefore, carefully study the technical documentation for the controller you are programming before installing and flashing them. In our specific case, for now, just remember the settings in the figure and be sure to set exactly the same ones, unless of course you are using the same controller and it is also configured, that is, you do not have a quartz resonator and you are using the built-in clock generator. The fuses must be “inverse”, so the button must be installed next to this option

These fuse settings will force the Atmega8A controller to operate from an internal clock generator with a frequency of 8 megahertz. To save the settings to the controller, click “Programmed”, after thinking carefully a few more times before doing so, otherwise you may get a brick.
The Atmega8a microcontroller can operate with equal success at a frequency of 1, 2, 4, 8 megahertz from an internal oscillator, it can also operate from an external oscillator, and also using a quartz resonator. In the latter case, more stable operation of the internal clock generator is ensured and the controller will also be able to operate at a frequency of 16 megahertz.
Now let's go back to the "Program" tab. Also, before uploading our firmware, I would advise you to erase the information in the controller by pressing the “Erase everything” button. So let's press this button

Now we select our firmware - exactly the one we tested in Proteus

Now click "Programming"

Our firmware is uploaded to the controller. The reboot occurs automatically.
As we can see, our program is running and the LED is glowing

This board is powered by a voltage of 5 volts coming from the programmer; the programmer takes this voltage from the USB port. That is, there is no need to supply power separately to this board, provided there is a small load on the ports, which is very convenient for educational purposes.
Well, let’s also try to program our controller not through a third-party program, but directly from Atmel Studio. In general, I prefer to program from Avrdude, but in general it’s more convenient if we don’t change fuses or select some other controller. This is exactly the case when our programmer does not have driver support in Atmel Studio. Let's go into the studio, open our project and go to the menu Tools -> External Tools

Let's call our new menu "Atmega8a". In the “Command” line, through the overview button, select the file with the Avrdude program, but not the file with which we launch this program, or rather its graphical shell, but the file that is used directly for command line commands. In the next line "Arguments" enter a line with the parameters "-c usbasp -p m8 -B12 -U flash:w:$(ProjectDir)Debug\$(ItemFileName).hex:a" only without quotes. Click "Apply" and "OK".
Just in case, let's assemble our project again and try to flash the controller using our command, using the new Atmega8a menu item that has appeared in the Tools menu.

As a result, the LED should light up. This option is much more convenient, but it does not allow you to edit fuses (this is not often required) and also does not clear the flash memory of the controller (but without this, everything is also flashed and works fine).
Watch VIDEO TUTORIAL

Post Views: 12,241
You"re here because you have a file that has a file extension ending in .avr. Files with the file extension .avr can only be launched by certain applications. It"s possible that .avr files are data files rather than documents or media , which means they"re not meant to be viewed at all.
what is a .avr file?
The AVR file extension is a data format known as Audio Visual Research File. AVR files were developed for use on Apple Macintosh computers. They were specifically, used for the older 680x0-based Atari ST computer systems. This outdated Mac sound format contains sampling rate in mono or stereo at 8 or 16-bits at one or two channels of audio files. They have a fixed-size, 128-byte fixed-format header, MIDI sample loop and MIDI application information. They are characterized by the utilization of the MPEG-2 video codec transport stream for its video, associated with the AVF format. They allow the storage of image, audio and video, catering to non-linear editing by providing its own codecs, optimized specifically for their software. They provide faster editing time yields without sacrificing quality. Files in AVR format can be opened with SoundApp in Mac Operating systems. These files can also be converted to an MP3 or WAV format using free conversion tools.
how to open a .avr file?
Launch a .avr file, or any other file on your PC, by double-clicking it. If your file associations are set up correctly, the application that"s meant to open your .avr file will open it. It"s possible you may need to download or purchase the correct application. It"s also possible that you have the correct application on your PC, but .avr files aren"t yet associated with it. In this case, when you try to open a .avr file, you can tell Windows which application is the correct one for that file. From then on, opening a .avr file will open the correct application.
applications that open a .avr file
Atari ST
Bitmap files are files with the .anm file extension which contains graphics and animation. The Atari ST home and personal computer supports the ANM file extension, files saved in this file extension are in 32-bit internals and 16-bit external bus to match the image capability of the computer. Integrated in the animatic Animation File, the ANM file extension is in the format of the Atari ST graphic. Animatics was used to create videotapes for storyboards and film, both for advertising and animation films. Mock-ups are followed in the stage of story boarding, with this, users will be aware of the final representation of the image for timing and motion, and the dialogue and soundtrack can be sequenced and added to the still images These are stored using the ANM file extension (.anm). Alterations in the storyboard may be done in files with the ANM file extension in the Atari ST graphic file formats effectively. The main function of the animatic animation files is avoiding direct editing on the film, due to the fact that editing can be done with the animatic stage editing.a word of warning
Be careful not to rename the extension on .avr files, or any other files. This will not change the file type. Only special conversion software can change a file from one file type to another.
what is a file extension?
A file extension is the set of three or four characters at the end of a filename; in this case, .avr. File extensions tell you what type of file it is, and tell Windows what programs can open it. Windows often associates a default program to each file extension, so that when you double-click the file, the program launches automatically. When that program is no longer on your PC, you can sometimes get an error when you try to open the associated file.
- Extension (format) is the characters at the end of the file after the last dot.- The computer determines the file type by its extension.
- By default, Windows does not show file name extensions.
- Some characters cannot be used in the file name and extension.
- Not all formats are related to the same program.
- Below are all the programs that can be used to open the AVR file.
MediaInfo is a program with which you can find out all the technical information from media files. Easily recognizes the title, author, director, date, etc. For video files, you can find out codecs, aspect ratios, FPS, bit rate, etc. Supports many popular formats and codecs for both audio and video files. MediaInfo also recognizes the details of the subtitles, and indicates what language they are in. In addition to analysis, it is also possible to export the obtained data into different formats, both plain text and HTML. Ability to work in a graphical interface or command line. For simplicity, there is a Drag&Drop function. Program...
Sonic Visualiser is used to analyze audio files based on various parameters. First of all, using the program you can make a spectral analysis of any audio recording, which is especially important for sound engineers or audiophiles when it is necessary to find out some parameters about a given audio recording, for example, whether this recording is uncompressed. Next, using Sonic Visualiser you can comment on the received data. There is support for standard effects, which is very useful for a sound engineer. Further, the program can determine the key of a piece of music if you install the appropriate plugin, which will allow you to clarify this...