Working from plywood with a jigsaw. What can be made from plywood with a jigsaw. Scope and installation features. Simple and mechanical plywood crafts. What kind of plywood is needed for cutting with a jigsaw
Read also
Fretwork, a hand saw, has been in existence for over 450 years. The first mention of this instrument appeared in 1870 in a book about ornaments. Over the past few centuries, all sorts of things have been done with the help of this miraculous jigsaw. decorative items: picture frames, various furniture inserts, stylish boxes and boxes.
Much has changed since then. The jigsaw has also undergone changes - now it has become electromechanical. And this is not surprising. The need for this tool has not gone away, just like in previous times, people are engaged in creativity, some for pleasure and others for profit.
Tool for making decorative and openwork crafts
 Sawing with a jigsaw - view creative activity, with which most people are familiar from childhood, from school. At least it wasn't that long ago. When labor lessons began at school and girls learned sewing and needlework, boys were introduced to such a tool as jigsaw.
It is not difficult to use, and crafts made with a jigsaw from plywood carry not only artistic value, but also practical use. Manufactured products can act as souvenirs: various boxes and toys, and also have practical applications in everyday life. Decorated elements of the porch of the house, windows, stylish benches with carved legs, beautiful kitchen furniture and many others useful products can be made from wood using this wonderful tool.
Ideal hobby tool
A hand jigsaw is a tool for cutting shapes out of plywood or some other material, for example, plastic. Its manual version is budget-friendly - its cost does not exceed several hundred rubles, and its scope is very wide. Figure cutting with a hand jigsaw is a very interesting activity. This is not only a pleasant pastime, but also practical benefits, not only financial, but also moral.
The design of this tool is very simple:

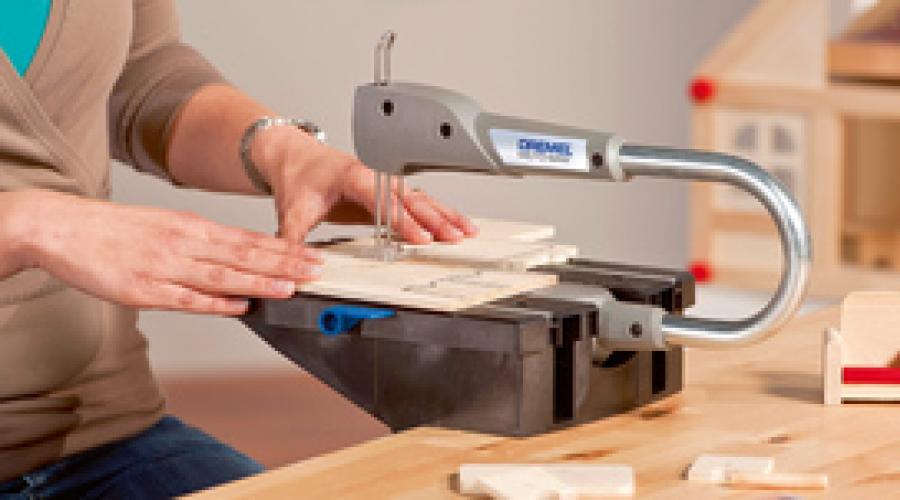
Electromechanical jigsaws
The electric hand jigsaw has become an indispensable tool in the household. It can be used to cut various materials: plywood, wood, plastic, metal, ceramics, etc.
 This tool works from electrical network 220 W and is a plastic case with working elements, equipped with a control knob. Its main component is the saw blade, which is mounted on a rod located in the front of the device.
The rod is driven by an electric motor. The movement of the cutting blade is reciprocating. To speed up the sawing process, some samples of this tool use the pendulum principle, that is, the file moves not only up and down, but also back and forth.
Cutting blades - consumables and they need to be changed from time to time. They are functionally different from each other - there are attachments for wood, metal, and ceramics. There are thicker blades, with more or less rigidity, with larger or finer teeth. Important characteristic files is their shank. The most common ones nowadays are files with U-shaped and T-shaped shanks. It is with such files that you need to purchase a jigsaw - then there will be no shortage of consumables.
 Electric tools differ in many respects, but in this article we will pay attention to only one important factor - this saw blade play. This characteristic affects the movement towards the cutting blade when figured sawing. Many brands of jigsaws cannot cope with the task of perpendicular cutting, this is especially sensitive when cutting thick wood - the error can be up to 5 mm.
Conducted experiments on figured cutting of wood showed that the best jigsaw turned out to be a tool from the company Festool. Popular company Makita in this competition she showed herself not with the best side- the error of the perpendicular-shaped cut turned out to be quite large (up to 5 mm), and the jigsaw of this brand also enters the tree with large chips.
 - this is already professional equipment for sawing. Its design is more complex than the equipment discussed above. The principle of its operation can be compared with sewing machine, which instead of a needle jigsaw blade. The quality of the products obtained using this unit is incomparably better. The error of a perpendicular cut with a large workpiece thickness is zero.
The only disadvantage of this electromechanical device is its high price. But this is compensated by the comfort of working on it and high productivity at highest quality the resulting products.
Manufacturing technology of decorative and openwork products

To work you will need the following:
- Plywood or wooden blank.
- A template, drawing or drawing of a future product.
- Manual or electric jigsaw.
- Files and needle files of various configurations.
- Wooden square and ruler.
- Skin of various grain sizes.
Cutting drawings
To begin work, you need to determine what should happen at the end of the work. To do this, you will need a drawing or template of the future product. You can invent and draw it yourself, or use it ready-made solutions. There are many collections containing drawings and diagrams of crafts. The Internet is also replete with a variety of interesting ideas. And for almost everyone there will be an interesting diagram or drawing.
Typically, diagrams of small crafts are printed on A4 paper. To create drawings of decorative and stylish furniture or other large household items, whatman paper in sizes A0 and A1 is used, however, other paper and cardboard media, for example, pieces of unnecessary wallpaper glued together, can also be used for this purpose.
After the drawing is selected, it must be transferred to the material from which the craft will be made. There are several ways to do this:

Technology
After applying the drawing to the workpiece from which the future craft will be made, they begin to cut it out. Sawing begins with the internal elements of the workpiece and only then the outer contour is cut out. This procedure is more convenient - holding the workpiece is much easier.

Holes for the jigsaw blade are drilled in sharp places on the internal contour, which also makes work easier. You need to drill holes carefully, as chips may form on the back side.
To avoid this, you need to follow simple rule- Do not drill holes completely. For example, if the thickness of the plywood is 3 mm, then the depth of the hole to be drilled should also be set to 3 mm. This is easy to do if you limit the depth of penetration of the drill into the plywood using electrical tape - wrap it around the drill, leaving only the 3 mm long tip without electrical tape. After drilling, turn the workpiece over and use an awl to make holes.
After the workpiece is cut, it needs to be process and polish. If the outer contour is not difficult to process, then grinding the internal elements is sometimes difficult, especially in sharp corners. It is difficult to sand such places with a file or needle file. Therefore, ingenuity can come to the rescue. You need to cut a thin strip of sandpaper and insert it instead of a jigsaw file and then hard to reach places It will be much easier to process.
The principles of sawing with a manual or electromechanical jigsaw are similar, but there are also differences.
Working with a hand jigsaw
 When working with this tool, an additional device is required - sawing machine. It must be equipped with a clamp for attaching to a workbench or table. This device serves as the base on which the workpiece is sawed. This addition can either be purchased at the store, or you can make it yourself from a piece of thick plywood.
When working, the workpiece should be secured at chest level - this will make work more comfortable and maintain posture.
When working with a hand jigsaw requires accuracy and patience. The files of this tool are quite fragile, so you need to avoid sudden movements and distortions of the blade, and also not allow the file to overheat during operation; to do this, you need to pause work every 10 seconds and let the cutting blade cool.
When sawing, the jigsaw file should remain in one place, that is, it should not be moved forward or backward, the movement of a hand jigsaw is vertical, reciprocating. Only move the workpiece, turning it smoothly without stopping translational movements hand jigsaw.
Sawing with an electromechanical tool
The operating principle is very similar to hand tools. The difference is that for manual jigsaw no need optional equipment(machine with clamp). And also when sawing, the shaped movement is produced not by the workpiece, but directly by the tool itself. Wood blank it is firmly pressed or attached to the workbench, and all curly movements are made directly with a jigsaw.
 A jigsaw has an advantage over a hand saw- this is the thickness that he can cut out figuratively. A wooden blank 50 mm thick is inaccessible for processing with conventional, non-electric tools. So, if you need to decorate elements of a porch or furniture, then you can’t do without a jigsaw.
You need to be very careful when choosing a power tool, since not all tools allow you to perform high-quality figure sawing of great depth.
Safety precautions
Basic safety precautions are required for all types of physical work.

To make your dream come true - to make your personal garden unusual and unique, you can use plywood figurines for your garden with your own hands. To implement this idea, large financial expenditures are not required.
Plywood figures can be in the form of funny characters, which will add a touch of fun to the design of the site.
In the last few years, plywood jewelry has become quite popular due to the fact that it is very simple to make and takes very little time. And if there are children in the family, they will be happy to help paint the blanks. These crafts will fit perfectly into the design of any garden or cottage. To create a unique relaxation corner, you don’t need to have any special talent, it’s enough to have a wild imagination.


Plywood figures can decorate any area, even the simplest one.
These homemade decorations are used to highlight special places in the country house or garden. They make this corner of the site unique and attractive. Due to the fact that the figures are made from quality material, they look great and harmonize with the surrounding landscape.
Crafts for the garden can be represented by the following types:
- unusual mailboxes;
- all kinds of figures, for example, heroes from your favorite fairy tales;
- painted feeders for birds living in the garden;
- decorated fences around the garden or cottage.
Each decoration made from plywood has its own uniqueness, expressiveness and beauty.

Some characteristics
The best, convenient and easy-to-process material for creating masterpieces is plywood. Using it to create figures, you will spend very little time, and the process will be interesting and exciting.
Plywood is produced in the form of veneer sheets, bonded together with a special synthetic glue in several layers. The more layers, the stronger and thicker the material will be. There is plywood with a thickness of 3 to 30 mm.

The structure and color of the craft for the cottage or garden will depend on the texture of the plywood. For example, if the base is made from coniferous species wood, then it is more convenient to paint it, and if it is made of birch, then the figures will look beautiful and aesthetically pleasing even without the use of paint.
Why is it better to use plywood:
- it is environmentally friendly;
- durable and will serve for many years;
- has good flexibility;
- does not allow water to pass through;
- very easy to process.
Due to the fact that plywood is made from wood, it has some of its properties, namely the ability to change its structure under the influence natural conditions. Therefore, when choosing the source material for a figurine, you should adhere to the following rules:
- Plywood marked FSF or FKM has greater moisture resistance. Phenolic and melamine resins are used for connection in these materials. This connecting material does not absorb water at all.
- On sale you can find plywood sanded on both sides, on one side, or unsanded. This needs to be taken into account when choosing a material for the base, especially if you do not have time to additional processing the resulting figure.

In order for the crafts at the dachas to look bright and colorful, when painting them it is necessary to use acrylic or oil paints. The use of this type of art supplies is convenient, as they fit well and softly on wood and are also resistant to sun rays, that is, you won’t have to repaint the figures over several summer seasons.
What you need to create a masterpiece

To make figures from plywood you need a stencil.
The dacha is decorated in most cases with figurines flat shape, for the manufacture of which sheets of plywood are used. In addition to the main material you will need:
- stencil of the future product;
- pen or pencil;
- screws and jigsaw;
- screwdriver or screwdriver;
- fine grain sandpaper;
- brushes, special acrylic paints;
- furniture varnish.
If you do not plan to place the figure on a support, then you need to make special pegs. They should be dug into the ground to a depth of 50 cm.
You can buy a stencil for a craft in a store or make it yourself by drawing an outline on cardboard and cutting it out.

DIY crafts have always been exquisite decoration at home or garden plot. They can be made without outside help. The success of any creative endeavor depends on how serious the preliminary preparation. A preliminary work plan is simple and accessible diagrams that can be downloaded in finished form with an attached photo of the product or created with your own hands.
Well-designed drawings of lightweight plywood crafts can turn the labor-intensive processes of creating items for home decoration into easy ones that can be accomplished in a matter of hours.
Sawing out of plywood with a jigsaw: specifics of the process


A useful leisure option that is available at any time with a minimum of tools and materials. In order to make a craft you need:
- pre-drawn drawing;
- jigsaw - a tool for cutting out material;
- sheet of plywood of any size (depending on required sizes finished product);
- mounting bolts, self-tapping screws, screws, glue (if needed).
Crafts can be for children, in the form of decorations for the home and garden, kitchen, or landscaping. It is better to carry out the work collectively, involving a child as an assistant. For him it will be educational and interesting; crafts in this case become a source of pride and are placed in a prominent place.
The manual jigsaw is metal frame, curved in the shape of the letter “P”. The files used in this tool are made of steel and are very thin and fragile. Therefore, if you plan to make several crafts from plywood in an evening, you need to take the number of removable elements with a reserve. Professionals prefer to use a jigsaw - this increases the speed of processing the material.
How to make a simple craft drawing


To do this, you need to stock up on a wide-format sheet of paper. It doesn't matter whether it's thin or cardboard. The drawing is needed in order to attach it to the plywood and cut the material along the lines. Schemes can be of two types:
- simple,
- complex.
The first type is a regular drawing drawn with a pencil or marker on paper. Complex drawing - scaled image with symbols and marking the dotted lines (the future bend of the craft) and specified length ribs
Easy crafts made from plywood take a minimum of time and effort, they are accessible even to children. A good helper In the implementation of the project, carbon paper will be used (special paper with a layer of paint applied to one side). It lies directly on the plywood, and a drawing is placed on top. It is enough to press along the main lines once and a clear pattern will appear on the material, according to which you can cut with a jigsaw. In the photo you can see a diagram of an improvised sun for a summer residence.
Toy car - an exclusive craft for children


If you want to make a plywood craft project in the shape of a car using a jigsaw, you can take an example of a finished drawing as a basis. Artistic talents are encouraged, with light projects being DIY. The main thing is to follow the rules and proportions. To make a car craft from plywood, you need to cut out separately:
- 2 wings,
- 4 wheels,
- bottom,
- hood,
- trunk,
- top.
When creating projects and diagrams of plywood crafts that others will use, you need to number each part on paper, attaching a description of the order in which they will be connected sequentially. If drawings and future products are true to size, ensure that the dimensions match, carefully double-checking all calculations. The photo shows an example of a car made of plywood - such a craft will definitely work out if proper organization creative process.
Easy crafts for the garden: a thoughtful approach


A dacha is a place of relaxation that the owners strive to decorate with exclusive crafts. If the plans include a makeshift garden, you can create drawings of a well and a stork attached to it. Similar country crafts from plywood on the site can be made anywhere, and thanks to minimum weight The material design is easy to transport outside the city.
These are simple product options. It is enough to cut 4 sheets of equal size from plywood, providing space for fasteners. The artificial stork must correspond as closely as possible appearance birds. It needs to be drawn on paper and transferred using carbon paper to plywood sheet. The finished bird is painted on both sides. These are options for easy crafts for the garden, where you do not need to make the product voluminous and use glue or bent elements. You can place such an exquisite decoration in the garden among an abundance of flowers and vegetation.
The presented plywood garden crafts in the photo will become an incentive for creativity for a novice gardener; you can borrow ideas or modify them to suit your aesthetic preferences.
Making drawings of products for a summer cottage or urban life is not only the lot of professionals, but also an unknown world for novice craftsmen. The process itself does not require significant financial costs and brings a lot of pleasure.
The purpose of this article is to demonstrate how you can do made of plywood their hands.
The article lists the basic principles by which similar ones should be built.
Step 1: Materials and Tools

Materials:
For a plywood cache, you need:
- 1 sheet of birch plywood 30*60 cm, 1.3 cm thick;
- 2 sheets of birch plywood 30*60 cm, 0.3 cm thick.
- 10 neodymium magnetic disks with a diameter of 0.95 cm;
- The spring is about 3.8 cm long and 0.95 cm in diameter;
- Dowels with a diameter of 0.95 cm;
- Copper sheet measuring 12.7*10.2 cm;
- Incandescent lamp;
- A piece of walnut with a cross section of 2.5*2.5 cm and a length of 12.7 cm;
- 5 cm threaded nipple with cap, 0.6 cm in diameter.
This list looks massive, but the good news is that you can find many of these items around the house and buy the rest for not too much money. a large amount money.

Tools :
- Various clamps;
- Wood glue;
- Putty;
- and drills;
- Sandpaper;
- Squares;
- Band-saw;
- A circular saw;
- Facilities personal protection(glasses, gloves, hearing and respiratory protection).

Step 2: Construction


I wanted each side to have a kind of hiding place. Once installed, they should not interfere with each other when opening.


Sketches must be scaled for paper measuring 21*28 cm.


Step 3: Style A (Top Compartment)


This compartment will be located at the top of the lamp. It will open using a magnetic key.


Glue 3 of the 1.3cm strips onto one board, leaving a 10cm edge open. Make sure that all corners of the square are securely clamped.

Take the remaining 1.3 cm strip and drill two 0.95 cm diameter holes on the inner edge, spaced about 2.5 cm apart. The holes should be as deep as possible, but not through. Place a magnet in each hole, then apply wood glue and cover everything with a dowel. After the glue has dried, apply putty to the surface.

Once the glue has dried, use the frame as a template for the drawer. If done correctly, the sides of the box should be 7.5*10 cm with a 1.3 cm piece as the front. Let's connect the 4 walls and the bottom of the box together, making sure that it still fits into the frame before fixing them further.

Glue another 0.3cm piece of plywood to the frame, making sure the box won't stick to it.

We use sandpaper for cleaning the edges of the box.

Step 4: Style B (Right Compartment)


Let's lay out the pieces of wood and make adjustments. I advise you to leave enough space for moving parts.


Glue together the three parts that will make up the edges of the box and press them together for 20 minutes.


Let's add small 0.6 cm pieces in which the button and spring mechanism. Let's glue and fix them in the right places.

Let's install the box, and as soon as everything fits well, we'll glue it too.

We install magnets and moving parts. Let's install the drawer into the box and add a button and a spring. If everything is moving smoothly, then everything is fine! If not, it's time to start sanding... Let's mark the mounting locations for each magnet. Remember that when the button is at rest, the magnets must be positioned (+) (-) so that they attract each other. When the button is fully pressed, they should be positioned (+) (+) so as to push the drawer upward.

Let's drill a hole for each magnet. Let's check that they are in right place, then cover the magnet with a dowel and the two magnetic buttons with a piece of wood veneer.

Glue the last 0.3 cm of plywood to the top, and clamp the lid. Press the button every few minutes until the glue dries to make sure the button is not stuck.

Step 5: Style C (Left Compartment)


Style C differs from other drawers in that it uses a 45 degree bevel on the inside walls


You need to use a reliable one measuring tool for installation band saw at the right angle.


Once all the pieces are cut to size, we will check the fit and do any necessary sanding. Glue the first set of beveled perimeter strips onto the plywood.


Using the finished halves as a template, sand the remaining 1.3cm strips until they are flush with the beveled strips. Then glue them to another piece of plywood.


Let's cut out several 0.6 cm strips that will serve as shelves.

Let's place sets of magnets around the perimeter of the strip so that they hold the compartment closed. We will install them below the inclined surface and cover everything with a dowel.

We will check the fit and make any necessary adjustments if necessary.

Step 6: Style D (Bottom Compartment)

In one of the short 1.3 cm strips, drill a hole with a diameter of 0.95 cm in the center and cut off the edges.

Glue the 1.3 cm strips that make up the frame to one of the plywood. Clamp and leave them to dry.

Using 0.3 cm strips, we will form the inside of the box. Let's start by gluing four 0.3 cm strips together.

Using a drill, make a through hole from 1.3 cm of board through 0.3 cm of plywood and using a saw, open the unglued edges.
Step 7: Key


This key fob is the key that opens compartment A.


Let's start by cutting a piece of wood. The end result should be a 12.5 cm piece with a cross section of 1.9 * 1.6 cm. Cut it in half to get two 6.25 cm pieces.


Let's take one of the parts and drill two 0.95 cm holes, 2.5 cm apart.


Mark with a pencil where the magnets will be installed, and then glue the second 6.25 cm half on top of them.


Now, let's cut the block to a size of 1.9*1.9 cm, so that the magnets are just below the surface. This means that you will cut off all but 0.3 cm of the second block that was glued.


Let's shorten the 1.9 * 1.9 cm bar to 5 cm, trimming the last part by 1.3 cm to put on the cap.

In the main body of the key fob, drill a 0.95 cm hole to accommodate a 0.6 cm threaded nipple. Screw the nipple into the hole using pliers.

Let's make two holes in the cap. One with a diameter of 1.3 cm to accommodate the threaded metal cap, and the second for the fastening ring. Let's drill it so that the cap sits flush with the wood. Glue the lid in place.

Using sandpaper, round off all the edges.

Step 8: The Secret of the Lamp Box
Just for fun, it was decided to make a hiding place in a light bulb. If you are going to use such a hiding place, do not connect the lamp to the power supply.

All you need for this is a white light bulb and some bright paint.

Wear protective gloves when working. Let's sand the edges of the base.

Let's put a little red paint on the end of the lamp to indicate that this is not a working lamp.

Step 9: Putting it all together


Cut out a rectangle measuring 10*12 cm from a copper sheet (to fit the dimensions of the lower compartment). Use a file to smooth the edges.

Using wood glue, fix the copper sheet.

We use a ruler to mark the center of the sheet and then drill a small hole through the copper and plywood in the compartment lid. Using a 0.95 cm drill, we will make a hole to install the lamp socket.

Install the socket through the back of the compartment where the hole is drilled.

Let's connect the four finished sides.

Fill the gaps with putty and clean the edges with sandpaper.

Step 10: You're done


It's time to hide the treasures! As stated at the beginning, the concept can be applied to any project. This lamp hides small treasures. Let's install it on a shelf, screw in the Edison lamp and enjoy.


Thank you for your attention!
Plywood is a wonderful material for those who like to do everything with their own hands. And we’re not talking about repairing floors or walls at all. And about various household items for the home, accessories and crafts. Which some masters turn out to be so original and beautiful that sometimes they even surprise you. Therefore, there is no shame in presenting such things even as a gift. We will tell you what can be made from plywood and show you with examples.
Plywood stands
This is one of the few things that you can cut out yourself using a jigsaw from a small piece of plywood. Stands are designed to make a person's life more convenient. For example, a laptop stand made of plywood, like the one below in the first photo. It can not only bring comfort, but also maintain health, because with its help you can work in different positions and not only sitting, but lying down and even standing.
And the option in the second photo will not only make working on a laptop comfortable, but will also protect the device from overheating.
These things won't cost much if you do them with my own hands. After all, plywood doesn’t cost a lot of money.

But a stand for bowls will make comfortable life pets. Simple design and the availability of material allows everything to be implemented very quickly.


For children, you can make such a creative stand for pens and pencils from plywood. The product is so original that the child is unlikely to notice what it is made of.

And so that your phone, keys, charger and other small things are not scattered throughout the house, this thing made of plywood will help maintain order. When everything has a specific place, it's always easier and faster to find the right thing.

As you can see, there is a lot that can be made from plywood scraps for your home. And here is the next confirmation - adults will already appreciate this wooden gift. The bottle holder is made from very narrow pieces of plywood, but it still looks stylish. 
Therefore, if even narrow pieces remain, do not throw them away, it’s worth imagining with them, maybe you will be able to come up with something original. Even if you have everything, you can always make things out of plywood for sale, because today Hand-Made products are in demand and highly valued.

Tea storage idea
Tired of keeping tea bags in a shipping box?! Then this storage house will replace it. With it, a zest will appear in the kitchen and the space will be transformed with such beauty. Every housewife will surely like this tea house.

Support for flowers
Human imagination has no boundaries, so some plywood crafts for the home are more like a work of art. For example, this elegant flower stand in the shape of a carriage. The only thing missing is horses and a coachman. 
Clock cut from plywood
Simple round form, the absence of numbers, but the presence of wood - all this is very useful for an interior in the style of modern minimalism or eco. It’s easy to make them yourself from plywood; all you need is an electric or manual jigsaw. And the clock mechanism can be removed from old outdated watches, and the hands can be cut out of cardboard or thin plywood. You can decorate them to your liking ordinary paints.

By the way, such watches can be easily transformed using burning or decoupage techniques. You just need to decide on the picture.


Volumetric paintings made of plywood
The author of the paintings, pictured below, is Maria Ostashova. Her favorite theme is plywood paintings in the pop art style. Her work is truly original and very colorful. She works in 3D technology. Surely such products require painstaking work. But, as they say, the result is worth it. It is in such things that the author’s professionalism and love for his craft are truly felt.

And here's another one beautiful work from another workshop. You can’t help but like such aesthetically pleasing plywood paintings, so you can not only decorate your interior with them, but also feel free to give them as gifts. The main thing is to choose a suitable topic.

Plywood panel
The walls can be decorated with paintings, posters, or you can make 3D panels. Of course, it will be very difficult to do something like the one in the photo, especially with a hand jigsaw, and it will take quite a lot of time. But this idea can be implemented on a smaller scale. You just need to prepare a drawing from which the templates will be cut.

There are different piggy banks, but we present to your attention an unusual one - a piggy bank for banknotes. If you are saving for own house, then such a symbolic and beautiful specimen will not only accommodate required quantity money, but it will also remind you of the goal and will certainly motivate its achievement.
Thus, you can make a smaller one with your own hands or to order exact copy the house project you dream about and literally start investing money in it. Is not it interesting idea!?

What else can you cut out of plywood for your home?
If you are very inspired and fascinated by this material, then why not own home not to make and door handles. This is the case when even the smallest pieces of plywood will go into action. Handles can be made both double-sided and single-sided.

A mirror for a bathroom or hallway using plywood is also easy to make. The main thing is what to make from plywood in in this case What is needed is a base on which the mirror itself will be attached. Well, then a decorative overlay is cut out of it. Here, as they say, whatever comes to mind.

Furniture made from plywood for home is popular today due to the great interest in the hand-made industry. All more people tries not to buy standard cabinet furniture, but makes it themselves. This kind of creative expression also benefits the budget.
For example, in none furniture store You won't find a creative horse shelving unit quite like this one.

Some plywood furniture ideas are incredibly complex, while others are distinguished by their laconic simplicity. As a rule, in the first case, these are developments professional designers.
Round shelf from plywood, a good place for storing cosmetics.

Swing chair for garden

What else can you make from plywood? Of course, lamps, both for home and for street lighting under the roof: tabletop, floor-mounted, hanging. Products made from plywood fully compete with other materials, but at the same time they have a unique advantage - they are made of wood.


Not practical, but aesthetically pleasing
When there is free time, why not give in to the creative impulse and cut something for your soul out of plywood, for example, figurines of birds and animals. Yes, they cannot be used practically, but with their help you can fill the house with warmth and fairy tale.


Or you can make figurines for your dacha out of plywood. This is an excellent alternative to gypsum options. By filling your garden with characters from cartoons and fairy tales, you will not only transform the area, but also greatly amuse your children.

