A simple do-it-yourself overpass. How to make an overpass for car repairs with your own hands, drawings and standard dimensions Wooden overpass
Read also
For many car owners, their own garage overpass is not just a dream, but one of the most popular devices. Experienced auto mechanics know that it is almost impossible to get to the bottom of the car or the engine compartment without an overpass. And these parts of the car need constant repairs.
Of course, there is the option of renting an overpass for a certain period of time or taking the car to a repair shop for repairs. However, such options are quite expensive and quite impractical, since there are times when the vehicle cannot be transported due to serious damage. That is why we recommend that you seriously consider making your own overpass, the production of which is quite easy. In addition, it is better to spend one time on materials for an overpass than to spend a lifetime on expensive auto mechanic service or overpass repair.
What to do if it is not possible to make an inspection hole
To repair the chassis, underbody of a car or engine compartment, inspection holes are often used, which are convenient in small garages where it is not possible to make an overpass to lift the vehicle.

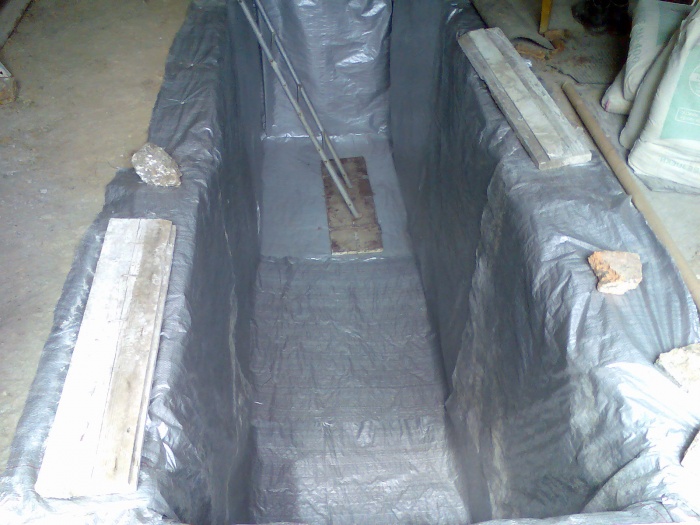
However, there are times when it is not possible to make a hole in the garage. For example, a fairly common problem for making an inspection pit is the groundwater level, which can be very close to the surface. Because of this phenomenon, additional waterproofing may be necessary to prevent water from penetrating into the pit. Otherwise, car repairs can easily turn into taking a not-so-pleasant, dirty, cold bath.
If your garage has such a problem or you simply don’t want to waste your time and effort on digging and finishing a hole, then the option of making a trestle is perfect for you. Nowadays, there is quite a wide variety of this design, among them two main types of overpasses can be distinguished:

Both the first and second overpass options have many varieties of design types. The type of construction is influenced by the size of the garage, the weight and type of car, financial capabilities and much more. That is why we will tell you about some of the most popular options for making a garage overpass.
DIY overpass in the garage
Many of us have seen stationary overpasses; as a rule, they are located on the side of the road so that a driver whose vehicle needs urgent repairs can troubleshoot problems. Making such a structure is not at all difficult; the main requirement is the availability of sufficient space. The materials you can use are wooden beams, metal pipes, bricks and corners. If you want to make a more durable structure, then make it metal. If you do the work correctly, you can lift the car to a height of up to one meter.

To make a flyover in your garage you will need the following materials:

Important reminder! When making a structure for an overpass, take care of limiters that will not allow the car to drive further than necessary or roll back. Limiters can be either removable or retractable.
Options for homemade overpasses
The “rocking chair” is quite simple to manufacture; it is quite simple and can be made by almost any car owner. We all know the principle of operation of an ordinary children's swing; its mechanism is that, due to the overweight, one side is always higher than the other. To make a swing for your vehicle, you need to do similar work; you need to make a platform, one of the sides of which will rise when a car drives onto it. To prevent the car from overturning, support pillars are installed on the back of the platform, and special portable supports must be made on the front part, thanks to which the car will not roll down. The dimensions of the platform must be matched to the wheelbase and ground clearance of the vehicle.
You can see what the finished structure looks like in the video:
There are other options for manufacturing this structure; one of the most common and economical options is the manufacture of a metal structure for partial immersion of the car. The great advantage of this device is that it does not take up much space in your garage, in addition, you can move it from the garage to the street or to another room with a hard floor surface. To make it, you will need iron corners and metal for the platform; this can be either reinforcement or solid sheets of metal. As an exception, you can use wooden materials, however, before using them, make sure they are safe and durable.
Almost every motorist needs an inspection hole. With its help, you can perform a routine inspection of the car and its partial repair. Such a structure is especially important if there are no service stations nearby.
Why is the structure needed?
As already mentioned, if you have a car, then there may be certain problems with the mechanisms. Not all breakdowns can be fixed right in the garage. Sometimes you have to climb under the car. Naturally, doing repairs lying down is not very convenient. This is precisely why the overpass was invented.
It is not difficult to make such a structure with your own hands. You just need to decide on the design and collect all the necessary materials. It should be noted that to build the structure you can use everything that is on your farm. For example, an overpass for car repair can be made of metal stairs (above-ground version), bricks, or simply dug in the form of a hole (underground version).
What tools might you need?
It is quite simple to construct such a structure. You must first draw a diagram on paper, calculate its dimensions, and also select the necessary tool:
- Welding (if a metal version is built).
- Grinder (for cutting materials).
- Shovel (if you want to make a hole or fix overhead posts).
- Brick and sleepers.
- Cement (to prevent the product from “driving”, it should be fixed with concrete mortar).
From this list you choose what you will need depending on the materials.

How to make the simplest design option?
It is a structure on which a car can drive only with its rear wheels or only with its front wheels. This type of overpass for a car consists of identical structures that can be made of metal or wood. Please note that the width of such products should not be less than 40 cm. Otherwise, they may be unstable or too narrow.
This structure can be welded from corners. In this case, the cross-section of the elements is about 2.5 cm. To prevent the car from sliding off the overpass, limiters must be fixed on the racks. Their height is at least 7 cm. After all welding work is completed, sharp corners must be removed using a grinder. In order for the product to last as long as possible, it must be coated with a special anti-corrosion compound or painted. Please note that one element of such a structure will have quite a lot of weight.

How to make a structure from stairs?
A similar overpass can also be done quite quickly with your own hands. It is a more advanced option than the previous one. To work, you will need two metal ladders at least 3 meters long, a welding machine and corners.
First you need to treat all components with an anti-corrosion compound. Next, you need to weld 4 vertical supports to the edges of the stairs, on which they will stand (like benches). Their length should be sufficient so that it can be partially dug into the ground. Naturally, in this case it is better to choose corners or pipes. In any case, these elements must be strong enough to support the weight of the car.
After the main structure is assembled, it is necessary to fix it in the garage. Place the future overpass so that it is convenient for you to drive onto it. The posts in the ground must be fixed with concrete mortar. In order for the car to drive onto the structure, 4 more corners (on both sides) need to be welded to the stairs at an angle. It is better to unite them together with crossbars.

Features of the inspection pit arrangement
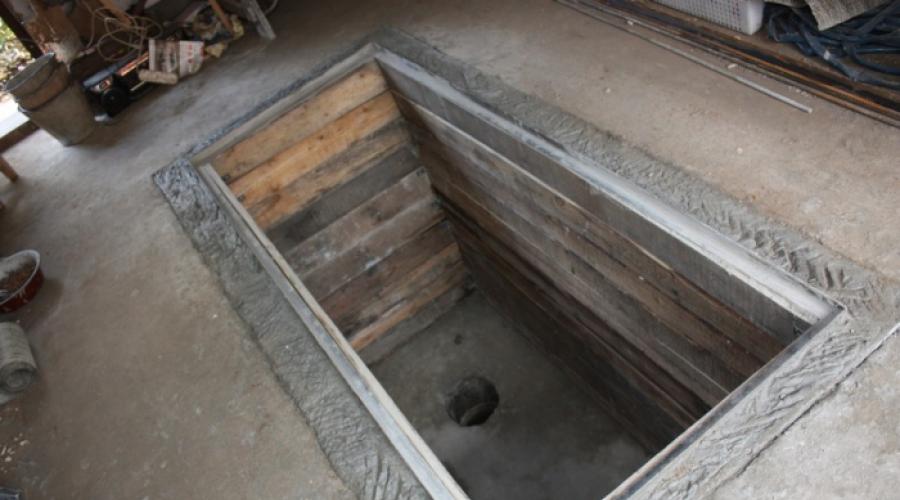
The construction of an overpass of this type is the most common. However, it is possible under one condition: you have a lot of free space. Such an inspection hole must have a depth of at least 1 meter. This parameter depends on the height of the person who will be repairing or inspecting the car. To prevent the earth from crumbling inside, it is better to cover the walls of the structure with boards. In order to get down into the hole comfortably, you need to either dig steps or install a ladder. Please note that the steps should be equipped with anti-slip pads.
Please note that the edges of such an overpass should be slightly above ground level. The length of the pit must correspond to the size of the machine. In this case, after driving in, the car should not block the descent stairs. As for the width of the ditch, it is about 1 meter. Safety flanges must be added to this distance.
As you can see, a do-it-yourself overpass can be built quite quickly. You just need to draw a diagram in advance and select materials.

Arrangement of the overpass
Naturally, the workplace must be arranged accordingly. For example, there should be a workbench with all the necessary tools nearby. Everything you need for repairs should be within arm's reach.
You will also need to arrange good lighting. It is better to use LED or fluorescent lamps. Inside the inspection pit, you can make additional shelves on which tools will be placed. Please note that they must be secured as well as possible, and at a level so that if any products fall, they cannot harm you.
The inside of the pit can be lined with bricks. It's better to build a foundation. The surface on which the car will stand must also be secured as much as possible. It is better to install it on pipes dug deep into the ground.
If you need a trestle, you can make it yourself in just one day.
The overpass is an indispensable tool for inspecting and repairing a passenger car. A small mini-structure is made at home with your own hands. It is important to observe all dimensions and focus on the dimensions of your car.
The need to install a mini-overpass. Device
A modern car is a technically complex device that requires periodic maintenance, replacement of components and consumables, and minor repairs. Many inexperienced motorists prefer to carry out a routine inspection of the car exclusively at a service station and pay out of pocket even for an oil change.
More experienced drivers do most of the work themselves. To do this, a homemade overpass is often installed in the garage - a structure with which you can examine the bottom of the car.
There are two types of overpasses:

To a first approximation, the functions of the overpass are similar to the inspection pit. It provides access to the underside of the car. However, if the level of groundwater is high at the site where the garage is being built, it is not advisable to equip an inspection hole: it will constantly be filled with water, which will require the installation of an additional drainage system, and corrosion will appear on the metal parts of the car due to increased moisture.
A full-size overpass is a monolithic structure that can be found in auto repair shops and along busy highways. Its installation requires a lot of space - the length of the product is about six meters above the ground plus the driveway. The construction of this option in your own private garage is justified if the building is designed for two parking spaces, one of which is empty.
A mini-overpass is a small portable structure designed for partial collision with a car. It is based on two independent parts that are not connected to each other. The car drives onto the prepared platform with its rear or front wheels, rises slightly above the floor or ground and allows the car owner to carry out an initial inspection or cosmetic repairs.
The advantage of a mini-overpass is the possibility of its use in limited space. After work it can be put aside. The main disadvantages of the design are as follows:
- To enter the platform, pinpoint precision is required. Otherwise, the structure may overturn or the vehicle may be damaged.
- Structural elements are installed in places where there is no possibility that they will diverge in different directions from the slightest push of the wheels.
General requirements
When manufacturing a standard overpass, a number of requirements must be met. This will help ensure convenient and safe operation of the vehicle.
- The height of the full-size repair structure is about a meter. This allows you to easily climb under the car, provide a sufficient influx of natural light to inspect the chassis, and carry out the necessary manipulations with spare parts and tools. The height of the mini-overpass with partial access is about half a meter: it does not involve detailed disassembly of the car.
- The width of the structure directly depends on the type and dimensions of the vehicle. You should not display the size down to the millimeter; when calculating the design, you need to make small allowances. The car must drive onto the platform without hindrance.
- Mini-overpasses are used for inspection and repair of passenger cars. For a stationary structure, an additional margin of safety is provided. Thanks to this, the product does not deform over time. You can also roll fairly heavy vehicles onto it.
Material selection
There are many ways to make a do-it-yourself overpass or mini overpass for car repairs.
Brick construction
A brick overpass is a stationary structure, which is more often used in rural areas or outside the city. Construction is carried out using the bricklaying method using cement mortar. The width of the structure corresponds to the distance between the wheels of the car.
This method has a number of disadvantages:
- It is necessary to allocate a plot of land for development. If the overpass subsequently needs to be removed, its dismantling will require considerable effort and time.
- After some time, under the influence of overloads, the brickwork may collapse, which may require its dismantling.
Overpass made of sleepers
The structure is based on several railway sleepers. The sleepers laid one on top of the other in a “slide” style form two bases. Tracks are laid across to ensure access. To prevent the sleeper trestle from moving apart during operation, it is carefully secured with brackets.
This design also has certain disadvantages.
- Sleepers are not so common in everyday life, and not every car owner has a few extra ones.
- It is impossible to install and disassemble such an installation alone. The sleepers are too heavy.
- Storage of railroad ties requires space.
The use of an overpass made of railway sleepers is justified in a summer cottage or garden plot, when the structure is left outdoors all year round. To protect against rotting, the product is impregnated with creosote.
Made of metal
Most often, the overpass is made of metal and wooden boards. Advantages of a metal overpass:
- Mobility. If desired, the structure can be made collapsible and assembled only before starting repairs. This saves space.
- Simplicity of design. You can assemble a metal overpass with your own hands using a minimum of tools.
- Durability. With proper care and timely inspection, a metal trestle can last about ten years or more.
There are also some disadvantages. The metal is initially susceptible to corrosion, so before work the material must be treated with special impregnations.
Among the main advantages of a wooden trestle are the ease of assembly and low cost of materials. It is easy to install and, if necessary, can be quickly dismantled and removed. You do not need complex specialized equipment; ordinary carpentry tools that are found in every home are sufficient. Among the disadvantages of wooden structures are low durability and poor resistance to rot and insects. These problems can be partially solved by treating with antiseptics, fire retardants and insecticides.
Tools and materials
Independent production of a wooden or metal overpass requires the availability of certain materials and tools. There is no need to purchase complex specialized equipment; it is enough to purchase household power tools, which are sold in every store.
What is needed to build a metal overpass
To make a regular metal overpass, you will need the following materials and tools:
- Rolled metal.
- Welding machine with a set of electrodes.
- Grinder equipped with several cutting wheels.
- Pieces of reinforcement.
- Fasteners: bolts, nuts.
- Metal paint for finishing the structure.
Materials and tools for a wooden overpass
To make the simplest portable wooden trestle you will need a minimum of materials and tools:
- Boards 45–50 millimeters thick. If thinner boards are used, additional vertical supports are installed in the center of the overpass.
- Two wooden blocks.
- Two pieces of carriage plank.
- Screws (150), nails (300), screwdrivers, hammer, wood saw.
Preparing for work and drawing up a drawing
Before making the overpass, it is necessary to carry out a number of measuring works. The mini-overpass consists of two independent installations. The width of each of them corresponds to a car wheel with a small margin. The gap between installations is equal to the distance between the wheels of the car. At the same stage, tools, materials and work site are prepared.
All dimensions are approximate and calculated for each car model
DIY metal structure
If a metal overpass is planned to be used in several places, or is needed only occasionally, the structure can be made in a collapsible version. This will allow you to quickly assemble it as needed within half an hour.
The assembly of a metal overpass occurs as follows:
- The bases of the cabinets are assembled. The blanks are cut based on the size of the car wheels. The blanks can be laid out on a sheet of chipboard or other flat surface and fixed at an angle of 90 degrees (you can use a regular construction angle to determine the angle). After all measurements, the workpieces are welded together.
All parts are connected at right angles
- The racks are being assembled. The height is about half a meter, the angle is about 120 degrees. Fixed, scalded.
Corners and side walls should be equal
- The upper supports of the pedestals are welded. To do this, the upper corners are connected to the racks, set at an angle of 90 degrees, and scalded.
- The finished supports are connected to the base, set at right angles and welded.
After assembly, you can additionally weld the main components
- The dead end of the cabinet is welded. This is necessary to prevent the car from driving further and overturning. The part is made from a corner 63*63*5 mm.
- Reinforcing bars are welded to the finished cabinet. To adjust the distance between them, you can use the same corner 63*63*5 mm. The reinforcement sections are laid so that their “herringbones” intersect.
A regular construction corner with a side of 63 millimeters is used as a template.
- Assembly of gangways (bridges). The blanks are cut and fixed with clamps at the corners. Sections of reinforcement are welded to the corners, the distance can be determined using a template corner, the “herringbones” intersect. The corners are welded to the workpieces.
The car will drive onto the overpass using these bridges
- The final stage is fitting. On level ground, both parts of the overpass are placed close to each other. The centers of the bollards are marked, the structure is adjusted to the width of the car. Holes are drilled in the ladders and cabinets, after which the elements are connected to each other using bolts. Thanks to the bolted connection, the overpass can be easily disassembled and reassembled later.
The finished structure is cleaned with a metal brush, degreased and painted.
The finished design will look something like this
Making a wooden mini-overpass
The simplest wooden overpass is assembled from two pairs of wooden beams with a cross-section of 20–20 cm. The beams are knocked together in pairs and cut at an oblique angle. The improvised overpass is ready.
An improved wooden overpass is assembled from scraps of boards, which are assembled into a wide “pyramid shield”. On one side there is a stepped slope for cars to drive in.
Another version of the mini-overpass is assembled from four 50-mm boards, two blocks, lining and fasteners.

A similar design is used for repairing passenger cars. For heavy transport it is worth installing a stationary overpass.
Video: Assembling a metal structure
Every car owner can make a mini-overpass on his own. It is very important to check the strength of the structure before driving a car onto it and starting repair work.
The car periodically requires inspection of the chassis. An overpass is used for this. The design is used at maintenance points. If the car owner does not want to spend money on the work of auto repairmen, he can inspect the car himself by raising it above the ground on an overpass. This is an alternative way to the inspection hole to gain access to the bottom. Assembling the overpass yourself will save money.
Based on the type of construction, there are two types of overpasses for cars:
- Full-size ones allow you to repair a machine that is completely raised above ground level by 1 meter. They are bulky and require a lot of space. Suitable for both passenger cars and trucks.
- Mini overpass. It consists of two small, independent from each other, beveled on one side of the podium. The auto overpass allows you to lift the car from the front or rear wheels. Used for partial inspection of the bottom. The disadvantage of this design was the need for the driver to have pinpoint precision when driving on it.
Stationary
Full-size overpasses are of the stationary type. They are installed along highways, on roadsides, and at service stations. The platform is raised high above the ground and allows for a detailed inspection of the car from the bottom and for carrying out repair work. Designed to support the weight of cars and trucks.
The strongest and most durable structure is made of metal. To create an observation deck, brick, wood, pipes and channel are used.
Advice! If the garage is built for 2 cars, but there is only one there, then the free space can be allocated for your own overpass.
Collapsible
The collapsible overpass has smaller dimensions. It fits easily in the garage and, if necessary, is quickly assembled. Designed for inspection of a passenger car.
The design includes:
- 4 stands for supports;
- 2 pairs of platforms with a stopper to prevent the car from rolling away;
- 2 pairs of horizontal ramps for inclined access;
- several stiffening ribs for fixing parts relative to each other.
They are built from metal. The thicker and more durable the material chosen, the longer the structure will last.

General requirements
Making an overpass is not a complicated process, but you need to remember a few nuances:
- The height of the full-size version is up to 1 meter, and the mini version allows you to raise the car by 0.3-0.7 meters.
- The width of the structures is determined by the width of the car. To make it easy to access, the ramps and platforms are made 0.4 meters wide. These dimensions are sufficient for most wheels.
- The safety margin determines the service life. In the mini model it is not so critical, and when building a stationary overpass they do not skimp on materials.
The overpass, assembled independently, should fit in ordinary garages. When creating a drawing, take into account how much free space there is to store it.

Stages of preparatory work
Carrying out the work yourself, from the design stage to final assembly, is not difficult. To do this, you need to decide on the type of construction, the preferred and available material, make a drawing, calculate the dimensions and number of parts, make an estimate for the purchase of material, and rental of equipment.
Calculation of dimensions and drawing up drawings
Start creating a drawing by selecting the type (stationary or portable) and material. Each person will have their own preferred shape of the product. General dimensions:
- height – up to 1 meter;
- width – about 0.4 meters;
- lifting length – about 1 meter;
- the length of the flat platform is from 0.3 meters.
An overpass is a pair of identical structures. On the side of the diagram, its shape resembles a rectangular trapezoid. A pair of slides can be additionally fixed to each other to avoid displacement while the machine is being lifted onto it.

Preparation of materials and tools
Depending on the material, tools are selected for the overpass. A structure made of sleepers or metal is assembled using:
- welding machine;
- Bulgarians;
- bolts, nuts.
The main material is reinforcement and a 40 mm corner. The finished structure is coated with anti-corrosion paint on top.
A wooden overpass is created from:
- wooden blocks with a square cross-section with a side of 0.2 meters;
- wooden blocks or boards;
- nails, screws;
- saws;
- screwdrivers.

DIY metal structure
The most popular is a mini overpass made of metal. This product has a number of advantages:
- easy to move;
- ease of assembly - does not require special skills;
- reliability and durability.
Although a do-it-yourself overpass can last for decades, over time any structure wears out. If you properly care for it and treat it against rust, its service life will increase significantly.

Welding of the structure proceeds as follows:
- a corner is cut and two rectangular trapezoids are assembled;
- connect them together with a corner;
- using scraps and remnants of the corner on the sides, additional stiffening ribs are formed;
- the reinforcement is cut and welded onto the upper base and inclined plane;
- cleaned with a wire brush and painted with metal paint.
The procedure is repeated for the second part of the trestle pair. You can make a limiting side on the upper platform to prevent the car from passing further. It is convenient to store it vertically.

Instructions for making a wooden mini trestle
Wooden construction is characterized by low cost of materials. The advantages also include:
- simplicity of design. It does not require special tools and equipment; it can be made using available materials;
- the mobile overpass has a relatively light weight;
- mobility - easy to set up and remove.
The disadvantages include a small margin of safety. Over time, the timber overpass will rot and be undermined by insects. Special treatment will help increase service life.

There are two types of portable wooden overpass:
- One piece. Take a beam with a cross-sectional side of at least 0.2 meters. Connect it with nails to another cut. A bevel is cut off from one edge. The height of such an overpass is small, but it is lightweight and can be stored in the trunk of a car.
- Stepped. It is created from blocks and 50 mm boards. The pads are cut into pieces. Depending on the height, some are cut off from one edge. The structure is assembled in layers: a board, on it, with a certain step, several blocks are nailed, and again the board. Each tier is shorter than the previous one. Stops at the required height. A motion limiter block must be placed on top. The smaller the angle of inclination, the easier it is for the car to drive. But this lengthens the overpass and makes it heavier.

Technology for creating a brick structure
A type of stationary structure is a brick product. For construction it is necessary to allocate a plot of land. A homemade overpass is no different in shape from metal or wood. All parts are built from brick.
The construction method involves creating classic brickwork with cement mortar. The advantage of this automotive alternative to the inspection pit is its strength. It can withstand the weight of even a truck.
The disadvantages include:
- the need to allocate a sufficiently large plot of land for it;
- installation, as well as dismantling, requires a lot of time;
- Over time, the masonry collapses and requires its hollow demolition.
Such a structure is more suitable for garages in villages and outside the city, where there is a lot of free space. The brick is chosen to be as durable as possible. Construction work is best carried out in the warm season.
When carrying out current and major repairs in a garage, the motorist has to pay a lot of attention to the engine compartment and. Some operations with the engine can be performed from above, but when diagnosing or restoring the suspension, you will have to work on the car from below. There are two ways to ensure comfortable mechanic conditions in such situations: lower the repairman into the pit or lift the car onto an overpass. Most people prefer lifting the car because it is a less expensive option. However, before making an overpass, it is necessary to prepare a project and select materials and tools for it.
Methods for making a car overpass with your own hands.Popular types of automobile overpasses
Craftsmen have implemented a large number of various designs that help to conveniently position the machine before repair. Thanks to such successful results, popular groups of auxiliary equipment can be distinguished:
- For one bridge. In such a situation, the car will have only one axle, front or rear. The advantage of the form is its compactness, since it does not require a large area. The disadvantages are that the method is not suitable for complex repairs.
- Full size type. The format allows you to pile up the car by completely raising the entire body to a sufficient height. The option is relevant for working under the entire bottom, but requires significant space and a larger volume of materials for implementation.
- Stationary type. Mounted in one place, for example, in a country house, which minimizes mobility. At the same time, it may have good equipment, a close distance to electrical and pneumatic connections, and an indoor type is allowed.
- Mobile variety. Presented in the form of cabinets made of metal or wood. For installation you need a flat area. After completion of the work, the construction is easy or in another utility room. Easily adapts to any type of vehicle, subject to load limits.
Important! A mobile overpass for cars, made by yourself, can be intended for either one bridge or two.

How to make a collapsible car overpass yourself
Most motorists prefer collapsible overpasses. This is due to the fact that they can be made independently at minimal cost, which will allow them to quickly pay for themselves. At the stages of development of this auxiliary device for repairing a passenger car, you will need to take into account some, which include:
- the width and height of the base pedestals on which the structure rests;
- length of the driveway and horizontal platform;
- width for inter-wheel space (track).
Basic knowledge in the field of strength of materials is welcome, which will help form strong components and joints of the product that can withstand the weight of the vehicle without rupture or deformation. You should not skimp on materials.
After various repairs, trimmings of boards may remain. It is rational to use them to make a trestle with your own hands, since a wooden product will have minimal weight with optimal strength. A popular design is a pair of meter-long bars with an approximate cross-section of 200x200 mm. On one side, wooden blanks are cut at an angle of 40-450 to form the drive-in part. Next, we nail the parts onto a two-meter board with a cross-section of approximately 200x40 mm. We place the finished products under the wheels and can drive onto the mobile mini overpass made of boards using one of the bridges. For optimization, we recommend placing a front block on top as a sliding stop. Although the lifting height is small, it will allow a number of operations to be carried out under the machine.

Another wooden variety is a structure made from scraps of boards with blanks of equal thickness. Typically, the base for each support is a pair of strong, wide slats, about 40 mm thick. and 1.5-2.0 m long. They are filled with steps across the planks to the desired height (about half a meter). The front part is also equipped with anti-rollback. For ease of carrying, the structure is equipped with straps made of durable material. The total cost of the product is minimal.
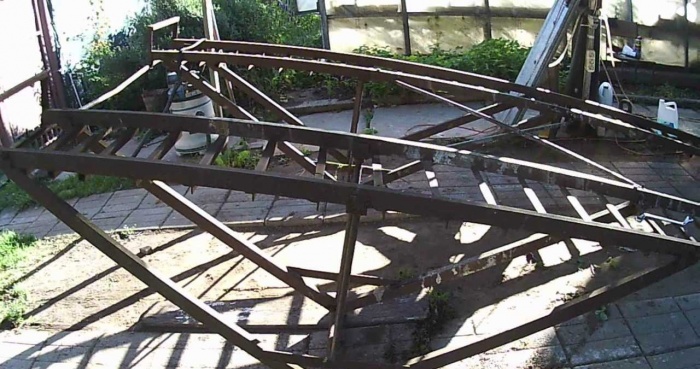
A do-it-yourself metal overpass on a level surface is more reliable. The product will be much heavier than its wooden counterpart, and also more expensive to manufacture. However, the homemade product will last much longer and will be able to withstand heavy vehicles. To make a metal slide you will need any material:
- profile rolled products (hollow square or rectangle);
- pipes or fittings;
- corner.
Everything is joined together using a welding machine. We recommend painting the finished product. We recommend making vertical posts from profile pipes. It is preferable to make the horizontal platform from reinforcement, and the entrance - in the form of steps from the corner. It is advisable not to increase the approach angle, so 30-350 will be the optimal value. The horizontal part at the top is completed with a vertical stop that prevents rollback. The height of the racks is selected at the request of the car owner. The design can be used both for full vehicle entry and as a mini-overpass for entry via one bridge.

Convenience for users is provided by the collapsible type of overpasses. The option belongs to an intermediate type between stationary and mobile structures. Due to its large dimensions, when assembled, the slide provides a lot of space for repairmen, and when disassembled it takes up little space. The constructor consists of elements:
- four base cabinets;
- two horizontal slabs for moving;
- two inclined slabs for entry.
The pedestals are arranged in a special way so that each of them is under the wheel of a car. A maneuver in which the horizontal beams are removed, while the car remains standing on the pedestals, helps improve accessibility to the wheel arches. For a stationary version of the overpass, you will need to find a flat, free area. Cabinets are usually made of brick, cinder block or poured concrete. We weld entry and horizontal beams from metal corners, reinforcement and rolled steel. With proper planning, a reinforced site can accommodate not only cars, but also trucks.

Step-by-step production
At home, after preparing a plan, you can begin production by assembling the cabinets. They can be made with right angles and dimensions of 60x60 cm and a height of up to 80 cm, or the top can be reduced to a cone with a platform of 50x60 cm. Assembly can be carried out from wooden OSB boards or cooked from a corner. For an inclined ladder we use two three-meter corners 60x60 mm, located parallel at a distance of 40 cm. We lay a ladder between them at intervals of 60-65 mm. fittings with a diameter of 14 mm. and weld it. The horizontal ladder is made in the same way.
Conclusion
Each motorist chooses which type of overpass to assemble based on current needs and prospects. The optimal option is a mini version or a prefabricated structure. Craftsmen choose between cheap, practical wooden products and expensive but durable metal structures.