A simple bathhouse in a summer cottage. Do-it-yourself bathhouse in the country (42 photos): choosing a location. Construction of foundation, walls and roof. Installation of doors and windows. Furnace and ventilation device. Interior and exterior decoration
Read also
Of course, it's good to have a spacious and large bathhouse, which can easily accommodate a group of friends or the whole family. But not everyone can boast of a large plot of land, especially if we're talking about about the bathhouse. Even if the area is very small, this is not a reason to deny yourself the pleasure of visiting - pay attention to the small baths.
Small bathhouse projects: advantages and disadvantages
Such projects have the following advantages:
- compactness. Small baths can easily fit even in a small area;
- quick kindling. Thanks to small sizes the steam room heats up quickly, so less firewood or other fuel will be needed;
- ease of construction. It’s easier to build a small bathhouse with your own hands; in addition, construction will take less time;
- the possibility of building a bathhouse on a lightweight foundation;
- saving. For construction and finishing you will need less material.
The disadvantage is the small capacity of the bath. Large groups may not fit in, so you will have to take turns visiting the steam room.
But you shouldn’t think that small bathhouse projects for summer cottages are exclusively budget options. You can make it luxurious, even if it is small in size.

Small bathhouse project: photo, layout features
You can draw up a project and carry out all the necessary calculations yourself or turn to professionals. In the first case, you can prepare drawings for free, but you can do the project yourself only if you are confident in your capabilities. Projects of small baths, photos of how they look after implementation, can be found on the Internet. In this case, you can evaluate different variants and choose the best one for yourself.
The bathhouse design should include the following premises:
- hallway It usually also serves as a locker room;
- steam room - the main room, without which the existence of a bathhouse is impossible;
- washing. A shower is installed here, a container of water is placed;
- restroom. Sometimes it is done directly on the terrace or veranda.
To save space, you can combine the hallway and the rest room, but in this case the room must be spacious, otherwise it will be uncomfortable to be in.
Project small bathhouse for a summer residence it is usually designed for several people. But you cannot make a structure that is too small. The steam room should at least accommodate two people who can move freely: each person needs about 1.5-2 square meters. It is better to install a sauna stove with a firebox in the dressing room, in which case it will be more convenient to heat it, and there will be free space in the steam room.

When calculating the size of the rest room, you need to take into account that one person will need about 3 square meters.
The size of the washing room can be different: from several square meters to an area exceeding the size of the steam room.
Do-it-yourself small bathhouse in the country: projects
Of course, there are many projects and drawings available on the Internet. Let's look at the most popular layouts of small bathhouses for summer cottages.
Small sauna 3x4
A compact and budget option that is perfect for a small garden plot. Despite its size, such a bathhouse can accommodate all the necessary premises for relaxation. The construction of such a building will take little time - only 3-4 days.


Small sauna 3x6
It consists of three rooms that are approximately the same in size and follow each other: a relaxation room, a washroom, and a steam room. It's also comfortable and has plenty of capacity. Construction of a bathhouse takes on average about 10 days.


Small sauna 4x4
A more spacious option, which features three main rooms. Usually the most spacious room is the rest room, which also serves as a dressing room and dressing room.
This design of a small bathhouse for a summer house is the most practical. Its implementation will only take about a week.


Small sauna 4x5
This sauna option is similar to a 4x4, but can also have an additional small terrace. It is convenient because in the warm season you can relax on it, enjoying the clean air and bright landscapes.


Despite their compactness, projects for small baths may differ from each other in the size and location of the premises, the presence of a veranda, etc.
When drawing up a project, do not forget to indicate not only the dimensions of the premises themselves, but also note the location of doors and windows, and the arrangement of furniture. Before construction, you should also decide on the materials and calculate their quantity.
For the construction of baths, you can use different materials: wood, brick, foam block. Each of the materials has its own advantages and disadvantages.

Despite its compactness, small sauna- this is a functional structure in which you can have a good steam bath with a bath broom. It will fit harmoniously into a small area and will not take up extra space. In addition, making a small bathhouse with your own hands is easy and inexpensive.
Almost every owner land plot, sooner or later, thinks about building a bathhouse. After all, the bathhouse is not just a room for washing, but also important element country holiday. The construction of a turnkey bathhouse can be ordered from professionals for a tidy sum, or you can try to build a bathhouse with your own hands.
After reading this article, you will be able to select a project, find out the sequence of the construction process, get acquainted with boiler models and find best option baths for your dacha.
Before starting construction, it is necessary to develop a bathhouse design. To do this, you don’t have to contact an architect; you can develop a simple project yourself, especially since there are now many computer programs for design.
Think about what size bathhouse will be optimal for your family. What rooms will be located inside the bathhouse? What materials to make the foundation, walls and roof from, do not forget also about finishing the bathhouse. An important point in design is the placement of the boiler and the method of firing it.
Below you can see popular bathhouse projects:

- The design of the bathhouse is 4x4 meters in size.
- Bathhouse design - 4x6 meters.

- Bathhouse design - 5x6 meters.

- Bathhouse design – 6x3 meters.

- Bathhouse design - 3x3 meters.
Once you have decided on the size and materials for the bath, you need to create a cost estimate.
Foundation
To build a bathhouse, several types of foundations are used. Depending on the weight of the walls and soil characteristics, the following types of foundations are made:

- Slab foundation.
- Columnar foundation for light walls.
- Pile foundation.
- Concrete strip foundation.
As practice has shown, the most reliable foundation for almost all types of soil is a concrete strip foundation reinforced with reinforcement.
To make a reinforced strip foundation for a bathhouse you will need:
- Cement.
- Sand.
- Gravel.
- Fittings.
- Formwork.
- Ruberoid.
- Wire.
- Shovels.
- Concrete mixer.
- Tourniquet.
- Stakes.
- Tools (pliers, hammer, tape measure and others).

In the location chosen for building the bathhouse, mark a trench for the future foundation. To mark, use a tourniquet stretched between the pegs. The width of the trenches is based on the weight of the wall material. For a one-story bathhouse made of wood or brick, it is enough to make a trench 30-40 centimeters wide. After installing the markup, do the following:
- Using the markings as a guide, dig a trench 50-80 centimeters deep.
- Compact the bottom of the trench and fill it with water to shrink the soil.
- Cover the bottom of the trenches with roofing felt for waterproofing.
- Fill the trench with gravel to a third of its depth.
- Install formwork along the edges of the trench.
- Make a frame reinforcing the foundation from reinforcement bars tied together with wire.
- Install the reinforcement cage into the formwork.
- Using a concrete mixer, make a cement mortar in the proportion: one part cement to one part sand and two parts gravel.
- Pour cement into the formwork, being careful not to allow any air voids.
- After the concrete has dried, remove the formwork.

The foundation for the bathhouse is ready!
Walls
The following materials are used for the construction of walls:
- Wooden beam.
- Logs.
- Boards.
- Brick.
- Blocks from various building mixtures(cinder block, aerated concrete, wood concrete, and so on).
Since the construction of a bathhouse from logs or bricks is already quite widely described on the Internet, let's consider the construction option frame bath from timber 15x15 and 5x10 centimeters and boards with a section of 2x15 centimeters:

- Make the bottom trim; to do this, take bars with a cross-section of 15x15 cm and install them on the foundation, connecting them together with special metal plates and corners. There is another way to connect bars, by cutting out tenons and grooves at their ends and then fastening them with screws or nails. When making the strapping, do not forget to place waterproofing under the bars.
- Install vertical racks from timber 5x10 cm. The distance between the posts is usually 50-60 centimeters. First of all, determine the position of the window and doorways and install the racks that frame them.
- While working, secure the already installed racks with temporary strips so that they do not warp.
- Make the top trim, securing it to the ends of the vertical posts.
- When making the final fastening of the top trim, carefully monitor the position of the vertical posts, checking their evenness with a level.
- Be sure to strengthen everything corner connections diagonal posts, this will help avoid warping of the frame.
- Make the ceiling sheathing.
- After making the frame, make the external cladding of the walls of the bathhouse with a board with a section of 2x15 centimeters. If you do not want gaps to appear between the boards, then make the sheathing - “overlap”, laying the bottom edge of the board on a nailed board. In appearance, this method resembles finishing walls with siding.

- Having covered the outside of the bathhouse, proceed to installing the insulation. Sheets of foam or mineral wool are installed along the vertical posts of the frame.
- On top of the insulation, it is necessary to install a layer of vapor barrier, which is attached to the vertical posts using thin slats.
- After installing the vapor barrier, carry out interior lining baths with clapboard or slats.
- Insulate the ceiling by laying vapor barrier sheets on the inner lining, then insulation. Sheathe the ceiling from the outside with sheets of plywood.
Please note that the manufacture and insulation of the ceiling can also be done after the roof has been installed.
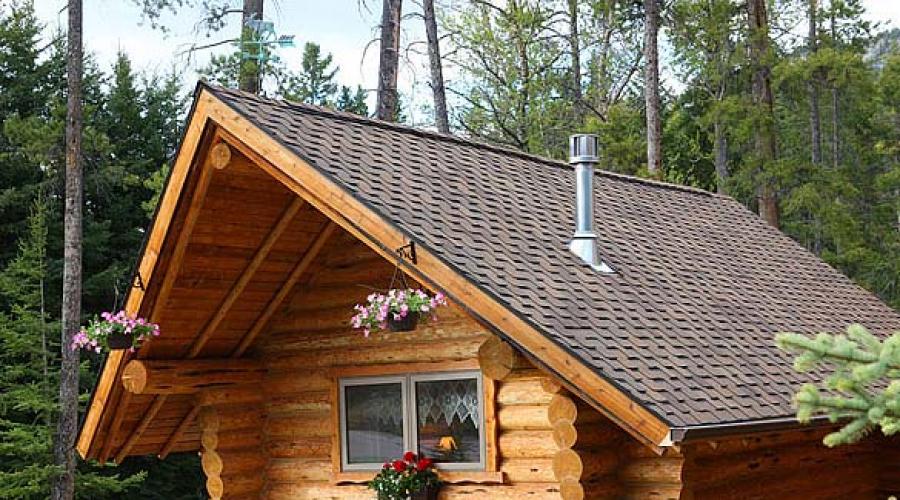
Roof
There are three types of roof for a bathhouse:
- Single-pitch.
- Gable.
- Complex - consisting of four or more slopes.
Usually the first two options are used for a bath. Let's look at the option gable roof covered with metal tiles: 
The manufacture of the roof begins with the installation of the Mauerlat. In case of frame walls, the role of the Mauerlat is performed by the upper outline.
- Place the uprights on the bench.
- Connect the posts using purlins and ties.
- Install rafter legs, attaching them to the Mauerlat, purlin and connecting the upper ends to each other. The distance between the rafters should be 50-60 centimeters.
- Install sheets of metal tiles.
- Cover the gables with wooden slats or sheet metal.
For a more visual understanding of the roof fastening, here is a drawing: 
All dimensions of roof elements are given in the list: 
Please note that the less you slope the roof, the more snow load it will bear in winter. Also, a small roof slope can lead to poor water drainage and leaks.
Floors
The design of the floor depends on the type of room. In the recreation room, ordinary wooden floors are made. In the washroom and steam rooms, the floors are made of two levels:
- The first level is made of concrete and has a slope towards the drain hole.
- The second level is a finished floor made of boards with gaps for draining water.
If you want to make a floor of porcelain stoneware or tiles, then they are simply laid on the first level at a slope towards the drain hole. 
In order to make a concrete floor and drain in a bathhouse you need:
- In the center of the steam room and washing room, install plastic pipes with a diameter of 5-10 centimeters with a socket at the end. The pipes must go out through the foundation to the street and connect to the sewer system.
- Lay down a layer of waterproofing material.
- Spread a layer of gravel 10-15 centimeters thick over the entire area of the rooms.
- Make a cement mortar and pour the floor with a slope towards the hole installed on the drain pipe.
- Install a grate over the drain hole to prevent debris from entering the drain.

At the second stage, wooden floors are made:
- Install baths in all rooms wooden joists. Make the distance between the logs 30-40 centimeters. As logs, you can use bars with a section of 3x5 cm or 4x6 cm.
- Nail boards with a section of 2x15 cm or 5x20 cm onto the logs.
- In rooms where water is expected to drain, leave gaps of 0.5-1 cm between the boards.
Don't forget before you start installation wooden floors, treat all parts with wood impregnation. When making floors, keep in mind that they should be higher, or at the level of the upper edge of the foundation.
Boiler
The boiler model for a sauna will largely depend on your financial capabilities and the fuel you will use for heating. If you know how to use welding, then you can make a simple boiler yourself, from thick sheet iron. If you prefer more advanced colas with gas or electricity, you can purchase them from specialized companies.
The boiler in the steam room is installed in such a way that the combustion chamber is loaded with fuel either from the street or from the rest room (dressing room). The boiler itself, for purposes fire safety, located 10-15 centimeters from the nearest walls. The walls are as high as the boiler and covered with iron sheets. A good decision, will cover the boiler with bricks, thereby reducing its cooling time and protecting the walls from fire.
When installing a chimney for a boiler, pay special attention to the place where the pipe comes into contact with the ceiling. The opening for the chimney should be insulated with refractory material. Also, pay attention to the place where the chimney pipe exits through the roof. This area is usually prone to leakage, so it should be sealed thoroughly. Below are the options for boilers for baths:

- Homemade boiler made from metal sheets.

- A gas boiler.

- Electric boiler.

- Solid fuel boiler.
Arrangement of the bathhouse
After the bathhouse is built, it is necessary to equip it:

- Connect all available communications to the bathhouse - electricity, sewerage, water supply.

- Place a sink, shower stall, light sources, and furniture for relaxation inside.

- Decorate the walls of the steam room with shaped slats and make stepped shelves.

- Buy wooden tubs, buckets, ladles and brooms.
After arrangement, you can safely invite guests to take a steam bath in your personal bathhouse!
You can also watch the instructions for assembling a mini-sauna for a summer house without a foundation in the video:
Options for beautiful and unusual baths
In addition to traditional materials and design for a bath, there are many alternative solutions. Below we present photographs of the most unusual baths:

- Mobile sauna made of clapboard, built on a car trailer.

- Bath in a huge wine barrel.

- Bathhouse made of plastic bottles.

- The dugout bathhouse was built directly into the ground.

- A sauna housed in an iron container.
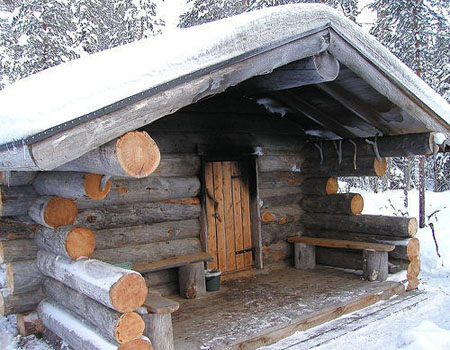
- Forest sauna made of untreated logs.
![]()
- A beautiful bathhouse made from a gun carriage.

- Bathhouse made of unedged boards.
At the end of the article, I would like to remind you that heating a bath is associated with fire and high temperatures. Therefore, when building a bathhouse from bricks, logs, cinder blocks or boards, pay great attention to fire safety. This warning also applies to electrical wiring, since the rooms inside the bathhouse have high air humidity and the risk of a short circuit due to condensation is very high. 
We hope that reading our article will encourage you to build a bathhouse yourself!
If you want to have a pleasant time at your dacha, then you definitely need a bathhouse. A small do-it-yourself bathhouse, built on the site, will save both money and square meters if you don’t have a lot of free space to build a bathhouse. In this article we will talk about how to design and how to build a small-sized bathhouse with your own hands.
Determining the size of a small bath

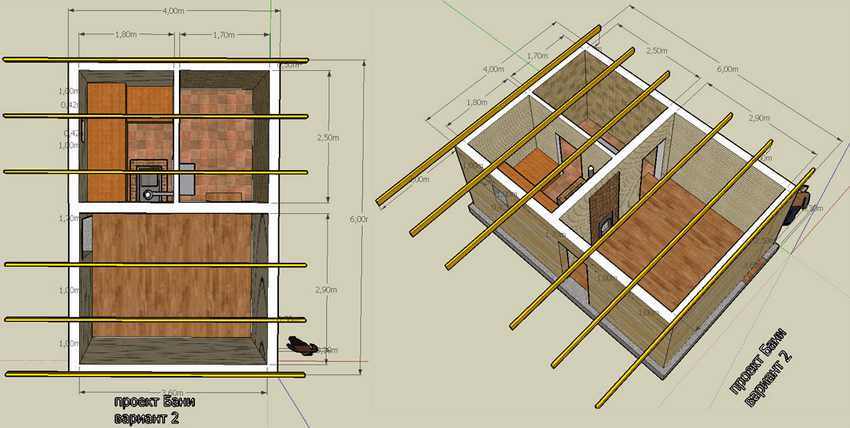
The size of the bathhouse should be determined depending on the number of people who will regularly visit it at one time. If your family consists of 2–4 people, then you can get by with the budget version of this building. In this case, the length of the bath will be 6 m, the height will be 2 m, and the width will be 2.2 m. There should be four separate rooms inside. Each of them will perform its own function and have a certain size. For example, each room will have a certain size. The width of the bathhouse is 2.2 m, and the length is:
- dressing room 1300 mm;
- rest room –2100 mm;
- shower –1000 mm;
- steam room – 1600 mm.
For the steam room and shower room, it will be necessary to perform separate calculations for the area, because shelves must be placed in the steam room, and a tray must be placed in the shower room.
A small bathhouse should be built in the usual sequence. The construction rules for its construction are no different from those by which other buildings are erected.
Construction of the foundation

The construction of each building begins with the construction of a foundation. To determine which foundation to lay as the base of a bathhouse, first determine the quality of the soil on which it will be laid. If the soil is hard enough and dry, then you can build a simplified foundation. To do this, lay out along the intended perimeter flat stones. Next, fill the inside of the foundation with similar stones. The cracks should be filled with clay and compacted. Lay a layer of wooden beams on top, pre-treated with hot bitumen. You can, in fact, not use clay. To do this, you can make a waterproofing layer that will cover the laid stones.
As a rule, a columnar foundation is preferably chosen for a bathhouse. For these purposes, you can use stone, ready-made concrete pipes, bricks, or asbestos concrete pipes, the interior of which is filled with concrete.
Another option is to install the bathhouse on wooden, metal or concrete piles. However, in this situation, you will need to take care of the thermal insulation of the floor.

Strip foundation is the most common and reliable. To build it, you will need to dig a trench and make a cushion of crushed stone and wet compacted sand. Afterwards you should tie the reinforcement and pour concrete mortar. For the waterproofing layer, you can use roofing felt.
If the soil is dominated by sand, groundwater very high, then to arrange the base of the bathhouse you should use reinforced concrete structures block type. For a mini-sized bathhouse, it will be enough to use ten such blocks, the dimensions of which are 20x20x40 cm.

After the foundation is ready, install the frame of the bath house and build its walls, then the partitions dividing the dressing room. The rest room and shower room should be insulated with a mixture of sawdust and expanded clay. The insulation should be covered with polystyrene sheets, after which the walls should be covered with clapboard. To prevent rodents from entering the bathhouse, you can add broken glass. Before laying the lining, it is necessary to carry out heat and vapor barrier, as well as insulate the walls with mineral wool. After that, cover them with clapboard.
Make the walls in the shower room from polystyrene or galvanized steel. These materials are more durable than wooden lining; they are better able to withstand changes in temperature and moisture.
Water supply and drainage. How to do it right?

If you are setting up a bathhouse for your summer cottage, but you do not have a pressure water supply system, you can organize a gravity supply of water. To do this, it is necessary to build a structure that will consist of:
- two galvanized tanks (50 l);
- hose
The hot water tank should be installed half a meter lower in relation to the cold one. Attach one end of the hose to the bottom of the cold water tank, and connect the other to the top of the hot water tank. Water circulation will be possible due to the temperature difference in the pipes. To organize the water supply to the shower, the tanks must be connected with a separate pipe. A mixer must be installed at the end of the pipe.
To organize the drainage of water, sewer pipes are installed, which will drain the wastewater into a drainage hole, previously dug and equipped. For rapid gravity drainage, pipes must be laid with a sufficient slope.
Heating system installation

The water in the bathhouse is heated by the stove, which is located in the steam room. In addition, a heating element can be used for this, which can be purchased at a specialized store.
If you decide to heat water with a stove, then install a U-shaped pipe at the hottest point of the stove and run it around the base of the chimney. The water supply should be on the body, and the outlet should be 5 cm above it.
If you decide to use a heating element to heat water, then install it under the cold water tank, connecting it to the system with stainless steel pipes and hoses.
Lighting and ventilation device

In a small bathhouse, ventilation is easy to arrange. To do this, make a hole on the wall opposite the front door that will be easy to open and close with a damper.
To organize lighting in a small bathhouse, it will be enough to install several halogen lamps with a heat-resistant housing. To reduce the voltage from 220 to 12 V, use a small transformer. Now your small sauna is ready!
Features of a single outdoor mini-bath

To assemble a bathhouse for one person, you will need to purchase lightweight insulated panels, which are a frame made of beams covered with thin boards. The standard frame size is 185x60 cm. To do this, you will need a beam whose cross-section is 1–1.5 cm and 3x6 cm. To insulate the bathhouse and provide a vapor barrier, fill the panels with mineral wool or polystyrene foam. WITH inside the material is sheathed with special aluminum foil and polyethylene film. As for the outside, it is covered with glassine or roofing felt. The panel can be covered with clapboard.
In one of the panels you should make a door measuring 160x60 cm. Install a small window in it, preferably with double glass. The bathhouse must be airtight; door locks at the bottom and top ensure this. At the bottom of one of the panels, on the side where the heating device will be installed, make vent with a plug.
To build a single bathhouse, you need to assemble the structure and, most importantly, ensure its heat and waterproofing.
To build a steam room with an area of 1.8x1.3 m, you will need 10 panels for the walls and 2 for the roof. Fill the seams with batting and close them wooden planks on both sides. To protect the ceiling from precipitation, cover it from the street with a triple layer of roofing felt. If you will use the bathhouse only during the warm season, then you should not insulate the floor. If planned year-round use baths, fill the strip foundation and insulate it. To heat the steam room up to 90°C you can use an electric stove closed type, having a power of 3 kW. Place a metal bucket with stones on the stove and turn it on for several hours. Then proceed to bath procedures.
Small indoor sauna

You can also set up a small steam room in your home, for example, in the bathroom. This can be achieved in two ways. In the first case, you will need to install a removable shelf on two bars. The height from the floor should be no more than one meter. The bars are secured to the wall with reliable anchors. Above the bathtub, the height of the shelf should be between 400–600 mm.
To climb onto the shelf, you will need to make several steps or a ladder using rubber bearings. Tie the ladder to the shelf with twine. The shelf width should be 600 mm. This steam room is heated by an electric stove. It can be installed on a special stand, for example, above a washbasin. As a heater, use a basin or metal bucket, which should be filled with stones and placed on the stove.
Another option is to create a sitz steam bath on your bathtub. It will be closed with removable wooden shields. The shelves will be used as a seat, and you can rest your feet on the durable panels. To make the room remind you of a bathhouse, cover the walls and ceiling above the bathtub with clapboard or install removable panels. They can be installed and removed without much effort. Heating is performed by an electric stove with a container of hot stones placed on it.
Choose your version of a small bathhouse, plan your actions and get started!
Video
Minimum size bathhouse built in full size Part 2 \ Small bathhouse
Photo


The rules for the construction of a bathhouse are subject to the current sanitary and fire safety standards. Such a structure is presented as general construction requirements, so requirements arising from specific operating conditions. Bathhouse construction standards for summer cottage or building codes for section of individual housing construction take into account the possible impact on the environment, ecology and human health. When it is planned to build a bathhouse on a garden plot, the standards must be fully observed, otherwise the competent authorities have the right to take appropriate punitive measures.
Regulatory basis for bathhouse construction
At first glance, it seems that when building a bathhouse (and other useful structures) it is enough to have a suitable area on a summer cottage or near the house and own wish. However, often personal interests after construction are completed come into conflict with the interests of the state and neighbors, which leads to litigation and penalties. In order to ensure that the interests of all parties are not violated, and to prevent risks to the environment and the health of the owner himself, regulatory documents have been developed regulating the choice of location for the bathhouse.
First of all, the norms of any construction on an individual housing construction site, a dacha or garden plot must comply with the Town Planning Code, which regulates the rules for the use of land plots and generally gives the right to appropriate construction. A complete list of standards, taking into account sanitary and fire safety for any buildings on garden and personal plots, is established by SNiP 30-02-97. The procedure for implementing all rules is determined by the Code of Rules SP 11-106-97. If the owner of the site does not want to have problems after the construction of the building, then he should carefully read these documents.
In addition to mandatory standards approved at the federal level, there are so-called unwritten rules - recommendations of experts. Any construction (including the construction of a bathhouse) must be preceded by a detailed design plan for the structure.

 When choosing a site for construction and the location of the building itself, it is necessary to take into account many factors: the structure and characteristics of the soil, climatic conditions, the topography of the site and its size, ease of approach, the presence of reservoirs and vegetation, the presence of other buildings and areas, frequency of operation, general design and local traditions. During construction private bath you should take into account the recommendations of the Instructions for the organization of public baths, which will help you deal with the problems of ventilation and the procedure for mass operation of the building.
What is taken into account when choosing a construction site
The construction of a structure for any purpose begins with choosing a place to lay the foundation.
Construction norms and rules SNiP 30-02-97 regulate the following conditions that are mandatory when constructing structures on a suburban site or site within a populated area (individual housing construction):
- The norms for the construction of a bathhouse to the neighboring site take into account the following circumstances: to the beginning of the neighboring site (fence, boundary) - more than 1 m; to a wooden building on a neighboring plot - at least 15 m.
- The standards for building a bathhouse on its site determine the permissible distances to objects on the same territory: to a residential building - more than 8 m; to the “red line” (street, roadway) – more than 5 m; to any buildings made of non-combustible materials– 6-11 m; before wooden buildings with non-combustible cladding - 8-12 m; to wooden outbuildings – 11-15 m.
- Construction of a bathhouse on the site: rules and regulations regarding natural, protected and vegetation zones provides for minimum distances to the following objects: forest - 15 m; natural reservoir – 5 m; vegetation: tall trees – 4 m, medium height trees – 3 m, bushes – 1 m; well with drinking water– 12 m.
In addition to the regulatory parameters, when choosing the location of the bathhouse, you should also take into account the rules that contribute to the comfortable operation of the establishment:
- you should not choose a place in the lowlands and areas of spring floods;
- when choosing a location, you should find the area with the deepest groundwater;

- the place should be closed from the prevailing wind direction, and the entrance should be oriented to the south, where there is the least accumulation of snow in winter;
- the bathhouse is located within walking distance from the house, within direct visibility, but hidden from unnecessary prying eyes from the street;
- there should be no foundation pit in the digging area engineering communications, especially gas lines and electrical cables;
- when choosing a location, the proximity of the sewer system, water supply, electrical network and having a free approach.
Fire safety rules
The most important rule of construction is strict adherence to fire safety standards, since the bathhouse is an object of increased danger in this part. First of all, this is due to the presence of a sauna stove with a different combustion system (solid fuel, electric, gas). In addition to the already given minimum permissible distances to other objects, it is necessary to take into account a number of fire safety measures when designing and constructing the bathhouse itself.

 Especially dangerous object is considered a stove, so measures are mainly related to its installation and arrangement of the chimney. In particular, the following parameter is standardized: the outside walls of the furnace should not have a temperature above 1300C. Reliable thermal protection must be installed in the base of the stove, as well as in the area where the bathhouse wall comes into contact with the stove. In this case, metal sheets, refractory bricks, ceramics, and asbestos fiber of the required thickness are used.
A metal sheet measuring at least 55x75 cm must be placed on the floor in front of the firebox door. The supply of firewood for the firebox must be stored at a safe distance. Special requirements are presented for the installation of a chimney from a stove. It must go out onto the roof, and its roofing cap is equipped with a probe that prevents the spread of sparks. At the passage through the ceiling and roof, a special passage unit must be installed to prevent the ceiling and roof from igniting from smoke. When laying the chimney pipe, safe distances from the bathhouse wall are maintained and protective screens are applied.
The safest chimney pipes include sandwich pipes, which have a multilayer design with thermal insulation inside.
Sanitary standards
When building a bathhouse on a suburban site, it is necessary to comply with sanitary standards and rules so as not to harm your own health and the health of others. These standards primarily concern the safe distance to drinking well and public open water bodies. Besides, important It has proper organization wastewater collection and disposal systems. If there is a centralized sewer system, the bath drain must be connected to it.

 If the dacha plot does not have central sewer, then it is equipped with its own sewage system. It may involve the collection of wastewater in a sealed well with subsequent pumping by sewer trucks or the discharge of wastewater into the soil after reliable filtration. Special conditions are observed when the site is located in a conservation area.
Sanitary rules also apply to the arrangement of the bathhouse itself. In a bathhouse, two dangerous areas can be distinguished: the accumulation of harmful emissions from the action of high temperature on the wall cladding material and the effect of carbon monoxide. In the latter case, it is important reliable operation chimney, its tightness and proper operation of the valves.
The release of harmful substances can be eliminated only by making the right choice. facing materials. That is why chipboard, plastic, and coniferous wood should not be used in the steam room. Ventilation is designed to help eliminate harmful effects. Its presence is mandatory in the bathhouse, and its proper operation becomes the key to the health and durability of the bathhouse, as it helps get rid of dampness and condensation.
 When constructing a bathhouse in a suburban or own plot In rural areas, compliance with building codes is a must. Only their strict implementation will help get rid of problems with neighbors, various authorities, and also ensure the safe operation of the bathhouse.
Requirements and standards for the construction of a bathhouse on a summer cottage
The construction of a bathhouse on a summer cottage must comply with current legislation and established regulations.
The approved federal standards for the construction of a bathhouse on a summer cottage clearly define the permissible distances to various objects, which makes it possible to resolve all disputes between interested parties. After all, the construction of a bathhouse on a summer cottage can affect the interests of neighbors or have a harmful impact on nature and the environment, which must be taken into account when constructing any structure.
What are the restrictions based on?
The bathhouse refers to auxiliary buildings with all the ensuing legal approaches. In accordance with clause 3 of the Town Planning Code of Russia, the construction of a bathhouse on a summer cottage does not require a separate permit. At the same time, the fact of the appearance of a new structure on the site must be registered with local authorities in in the prescribed manner, because it changes overall plan possessions.
In general, a bathhouse can be classified as a high-risk facility: the presence of a sauna stove and waste water drainage increase the risk fire danger and environmental pollution. In addition, improper placement of the chimney can cause unpleasant effects.
In order to avoid problems with neighbors and government agencies, the construction of a bathhouse on a summer cottage must comply with standards approved at the federal level.
An exhaustive list of mandatory standards in terms of sanitary and fire safety is established by SNiP 30-02-97, and the procedure for implementing and challenging fundamental rules is regulated by the Code of Rules SP 11-106-97. Before you start building a bathhouse on your summer cottage, you should carefully read the specified documents to avoid problems.
Naturally, in addition to established standards There are generally accepted rules, without which construction can become downright dangerous. Any construction must begin with the development of a structure plan based on strength calculations and taking into account numerous influencing factors. When choosing a place to install a bathhouse and the type of structure (including the materials used), the following factors should be taken into account:
- soil parameters (freezing, groundwater level, density);
- climatic features of the area (temperature, wind, precipitation, seismicity, flood conditions);
- terrain and size of the site, the presence of natural reservoirs and forests;
- intensity of planned operation;
- proximity to other structures and communication systems;
- existing landscape design and local traditions.


Regulating the location of the bathhouse
When determining a location for bathhouse construction it is necessary to take into account possible claims from neighbors. In order to regulate disputes, the following standards are established: the distance from the bathhouse to the border of the neighboring plot (fence, boundary) must be at least 1 m, and the distance from the wooden capital construction neighbors - more than 15 m. In addition, it is better to agree in advance on the necessary distance from the neighbors' storage facilities for flammable substances, garages, playgrounds, wells and other objects.
On your own site it is necessary to comply with established standards to ensure sanitary and fire safety. Violation of regulations on one’s own territory may be punishable by fines. The following mandatory standards have been established:
- the bathhouse should be located no closer than 8 m from a residential building;
- the minimum permitted distance from the roadway or street (the so-called red line) is 5 m;
- the distance to buildings of any purpose, built using only non-combustible materials, must be at least 6-10 m, depending on the type of building;
- the bathhouse is removed 8-10 m from wooden buildings with non-combustible finishing;
- The bathhouse must be removed 12-15 m from wooden buildings for household purposes.
Environmental regulations establish the following standards:
- distance to forest area – 15 m;
- distance from natural bodies of water – 5 m;
- It is recommended to remove the bathhouse from tall trees– at least 4 m, from trees of medium height – 3 m, from shrubs – 1 m;
- If there is a well with drinking water, a bathhouse can be built no closer than 12 m to it.
Choosing a place to build a bathhouse is a responsible undertaking. It should be carried out taking into account practical recommendations that ensure ease of use. When choosing a construction site, you need to take into account the following recommendations: a bathhouse should not be built in a low-lying area, especially if there is an unfavorable flood forecast, in a windy area; It is better to choose a place within the direct line of sight from a residential building, but ensuring secrecy from prying eyes, and the entrance of the bathhouse should be built on the south side so that there are no large snowdrifts near it in winter. 
How fire and sanitary safety is ensured
Fire safety of a bathhouse at a summer cottage is the most important condition for its construction and operation. In addition to the established standards that regulate safe distances to various objects, it is necessary to take into account a number of fire safety measures inside the bathhouse.
Special precautions must be taken when installing a stove (brick or metal) and installing a chimney. The heating of the outer furnace wall should not exceed 135 degrees.
The base of the furnace is built from fireproof and heat-resistant materials.
In particular, materials such as steel sheet, asbestos fiber, fireclay, ceramics, and of sufficient thickness. Reliable protection is provided for the area where the sauna wall comes into contact with the stove.
In front of the combustion chamber, a metal sheet of at least 60x80 cm in size must be installed on the floor of the dressing room.
To ensure that the construction of a dacha does not affect human health and environment, it is necessary to comply with the above standards, install a reliable wastewater drainage system and use it during construction safe materials. If there is a central sewerage system, the issue is resolved simply: the bathhouse drain is connected to the central communication system.
If there is no sewerage system, you will have to install your own system. For this purpose, a sealed wastewater collector can be installed with its subsequent removal or discharge into the soil after good filtration.
Sanitary safety during the operation of the bathhouse is ensured correct selection building materials. In particular, polystyrene foam, glass wool or asbestos cannot be used for thermal insulation of the steam room, since when exposed to superheated steam they can release substances harmful to human health. For the same purpose, it is not recommended to use plastic for lining the steam room, chipboards, coniferous wood, materials with fillers. A prerequisite is to ensure reliable ventilation and a chimney damper system. It should be remembered that carbon monoxide can cause poisoning within 20-25 minutes.
How to place a bathhouse in a residential area
When building on a site, the question of where to put the house, how to locate the bathhouse and other additional buildings is always decided. Everything should be not only convenient, but also safe to use.
How to choose a place for a bath
To decide where to place the bathhouse on the site, you need to carefully study the garden area. The natural elevation will significantly save money on sewerage installations. In this case, the used water from the bath will flow away by gravity.
In a steep slope, you can dig a dugout for the main premises of a bathhouse or sauna. Nearby you can arrange a platform for relaxation and/or games in the form of a terrace located on pillars.

 Natural elevation will significantly save money on sewerage installations
 Initially, the site for the bathhouse is selected according to the nature of the soil. The soil must be dense, without instability, sliding or swelling of the soil masses.
It is necessary to take into account the topography of the site proposed for the construction of a bathhouse. It is desirable that it has a slight slope in any direction other than north. In this case, the constructed bathhouse will be protected from melt and rain water during the cold season. Reliable protection The sauna house will be protected from dampness by its construction on a slightly raised area of soil.
It is necessary to take into account the topography of the site proposed for the construction of a bathhouseThe sauna house is best located in a place remote from the highway or nearby industrial enterprise. This will create protection from dust, noise, polluted air, unpleasant odor and other irritants during rest.
On a note! Additional protection of the area where the bathhouse will be located will be provided by a blind fence, green spaces or walls of outbuildings located in accordance with the instructions of SNiP.
How to create a project
The bathhouse must be built according to a pre-designed project. It is necessary to take into account the type and dimensions of the future building. This will help determine how to place the bathhouse on the site. The following points must be taken into account:
- relief of the site;
- nature of the soil;
- location of the residential building;
- distance from various outbuildings;
- the location of the walls of the bathhouse relative to the cardinal points.
Particular attention should be paid to the question of how to locate the bathhouse to the water supply and sewerage system. Water should flow freely into the bathhouse as needed and be removed without problems after use.

 The bathhouse must be built according to a pre-drawn project
 Sanitary standards
The requirements of SNiP 30-02-97, which must be strictly observed when constructing a bathhouse, determine the following distances between objects on personal plot:
- between the bathhouse and garden house– at least 3 m;
- between the bathhouse and outbuildings - from 1 to 4 m.
After determining the exact location for the construction of the bathhouse, the construction should be coordinated with the relevant authorities. A copy of the document must be kept permanently.
Attention! Sanitary safety standards should be taken into account especially carefully, because the bathhouse is being built as an object for hygienic and/or therapeutic and preventive procedures.
Distance from the border local area for different buildings, according to SNiP standards, there must be at least:
- 3 m - for a country house or garden house;
- 4 m - for outbuildings;
- 1 m - for a bathhouse and other similar objects;
- 4 m - for tall trees;
- 1 m - for dense bushes.

 After determining the exact location for the construction of the bathhouse, the construction should be coordinated with the relevant authorities
 When calculating the distance of a bath house from the boundaries of a personal plot, the location of a residential building and other objects on neighboring plots should be taken into account. This will allow you to take bath procedures and relax peacefully without disturbing your neighbors.
Types of baths
You can finally decide how to position the bathhouse relative to the house only after determining its type. For a black bath, that is, a smoky one, you need to choose a place that is at least 12-15 m away from the residential building, outbuildings and borders of the local area. You should also take into account the wind rose in this region. This will help prevent smoke from blowing from the bathhouse towards the house.
A smoky bathhouse is considered an object of increased fire hazard, therefore such facilities are prohibited from being built in densely populated villages and near planted areas. A white sauna, that is, smoke-free, is often located near a residential building. If desired, it can be attached to one of the walls, if such a project is agreed upon with a specialist.
Combining a smoke-free bathhouse with a country or garden house will make the process of connecting water and water supply to it much easier. sewer systems. This will save not only time and labor costs, but also significant money.

 Combining a smoke-free bathhouse with a country or garden house will make the process of connecting water supply and sewerage systems to it much easier
 When choosing where to place a bathhouse combined with a residential building, you should remember about the ventilation and waterproofing system, because a bathhouse is a room with high humidity.
Fire safety
How to place a bathhouse, house and other buildings on the site is determined in compliance with fire safety standards. All rules are detailed in the relevant regulations SNiP, which should be carefully studied. This will greatly facilitate the planning process and help avoid many problems in the future. Open fires are often used in bathhouses, creating increased danger.
The finishing floor in a bathhouse is usually made of wood. To protect the wood from accidental fire, sheets of asbestos or steel no more than 1.5 m wide are laid along the perimeter of the stove foundation on the floor surface.
Near a natural pond
If there is a pond on your personal plot, it must be used. The main thing is to figure out how to properly position the bathhouse nearby natural source water.
A pond or river provides the following benefits:
- usage natural water in case of problems with the water supply;
- opportunity to conduct water treatments for general hardening;
- water availability in large quantities in case of fire safety.
Basic rules that must be followed:
- the place for the bathhouse must be chosen in such a way that it does not flood during the spring flood;
- for used water, you need to make a special pipeline in the opposite direction from the river or pond;
- It is best to plant trees and/or dense bushes around the bathhouse and the path from it to the pond to create natural protection from prying eyes.

 Bathhouse near the pond
 If there is no natural reservoir on the site, you can build a pool near the bathhouse. You can buy it unassembled and install it yourself using the included instructions.
If the funds for the purchase finished design not enough, you can make a pool with your own hands. To do this, you can use a previously purchased rubber boat or other available means. If a swimming pool is planned to be installed next to the bathhouse, then the minimum depth of the pool should be at least one and a half meters.
Stove in the bathhouse
The stove in the bathhouse requires special attention: how to position it correctly, which option is better to choose, and many other issues should be resolved in advance. Subsequently, this will provide comfort when taking bath procedures and good vacation in a properly equipped bathhouse.
The most important condition for the construction of a stove in a bathhouse is compliance with fire safety rules, therefore it is necessary to equip a separate foundation for the stove from non-combustible building materials. Typically concrete or brick is used for this.
 The most important condition for constructing a stove in a bathhouse is compliance with fire safety rules
 During operation of the bathhouse, the stove can heat up to 120°C, so the walls adjacent to it must be protected from fire.
The stove, made of protected material, is placed at a distance of 26 cm from walls and any other objects. An unprotected stove is installed at a distance of at least 32 cm from the specified objects. The stove must be removed from wooden walls by at least 50 cm.
Individual elements of the oven become very hot during its operation. For fire safety, it is necessary to install a special channel made of asbestos or other non-combustible material.
Important! The door of the combustion compartment through which firewood is placed into the stove should be located opposite the entrance door to the sauna house at a distance of at least 1.5 m from the nearest element of the sauna.
How to place the stove in a sauna safely? It is mainly located in the washing compartment. If the bath area is small, a steam room is also equipped here.
In a spacious room, the steam room and sink are arranged separately. In this case, the stove is laid out so that both compartments can be heated. In this case, the heater for steam generation is placed in the steam room, and the hot water tap is led to the washing compartment.
The most optimal option is to place the stove in a special room of the sauna house or in a small niche between the internal compartments. This will ensure safety and ease of use of the oven.
If you wish, you can arrange the stove at your own discretion, not forgetting about fire safety standards. Electric heaters are often used in modern baths. After installing such a device, grounding is mandatory, otherwise there is a danger of electric shock when high humidity, and this is life-threatening.
In the steam room, the sauna stove heats up to high temperatures. To eliminate the possibility of accidental burns, you need to build a brick screen or an envelope-like structure.

 Particular attention should be paid to the tightness of the chimney
 Chimney features
An important element of a sauna stove is the chimney. It can be made from materials such as:
- brick;
- ceramics;
- steel.
Particular attention should be paid to the tightness of the chimney. All its seams must reliably protect the bathhouse from carbon monoxide. Additional safety is provided by ventilation. The fuel combustion process is controlled using a gate valve. The ceiling around the chimney should be sheathed with basalt sheets to protect against accidental fire.
Premises in the bathhouse
Options internal space baths are calculated taking into account the number of people washing at the same time. According to GOST standards, 5 m2 is required for 1 person free space. In a small bath house, there is usually no division of space.
If dimensions allow, it is best to arrange 3 compartments in the bathhouse:
- dressing room;
- washing room;
- steam room
 In the washing room you can put a bathtub or a small inflatable pool, or equip a shower stall
 Comfort, coziness and quality of relaxation depend on how to properly arrange the premises in the bathhouse. The dressing room stores the necessary bath equipment, fuel, and brooms. A locker room is also set up here.
In the washing room you can put a bathtub or a small inflatable pool, or equip a shower stall. The mixer for supplying cold and hot water is located in close proximity to the bathtub or sink.
Some owners of baths place them in the washing room washing machine. You can also install a bidet and/or toilet, but you need to ensure protection against unpleasant odors.
The main room of the bathhouse has always been considered a steam room. A special stove-heater is installed here. In addition, you need to think about how to arrange the shelves; the bathhouse requires a special area for them.
Windows and doors in the bathhouse
The entrance door of the bathhouse is installed in the wall facing the south side of the building. Temperatures here are usually higher all year round, there will be less snow in the winter, and it will melt quickly in the spring.

 To allow more sunlight into the bathhouse or sauna, it is better to install a window in the western and/or southwestern wall of the bathhouse
 One should also take into account such a point as fire safety: the door to the bathhouse should be clearly visible from the residential building. This will allow you to control the sauna during heating in order to immediately correct any problems that may arise.
Another important point layout - a window in a bathhouse, where to place it will be dictated by folk experience. To allow more sunlight into the bathhouse or sauna, it is better to install a window in the western and/or southwestern wall of the bathhouse.
When choosing a place for a future bathhouse, you should also take into account the interests of the owners of adjacent plots - this will help avoid conflict situations and maintain good relations with neighbors.
Correct location of the bathhouse on the site - distances from borders and other objects
The correct location of the bathhouse at a distance from the boundaries of the site is one of the main requirements for its construction, since it ensures fire and sanitary safety. If the development plan is carried out by a design bureau, you don’t have to worry about meeting all the requirements. But if you decide to plan the location of the house and bathhouse on the site yourself, we recommend that you familiarize yourself with the information that we will present later in the article.


Regulatory framework for placing a bathhouse on personal plots
All standards and rules for the construction of baths are developed to ensure the comfort of being indoors, as well as its safe operation. If you neglect these settings, you can endanger not only your health while staying in the steam room, but also put everyone else at risk.
To understand how to properly locate a bathhouse on a site, you will need to study the following regulatory documents:
- SNiP 30-02-97 is a document establishing the rules for the construction and placement of buildings on a personal plot. It must be studied without fail before any actions to begin construction.
- SP 11-106-97– contains standards for the correct design of a bathhouse on the site. According to this document, you can draw up detailed plan, in which to write everything technological stages building a bathhouse and avoiding mistakes. In addition, this regulatory act contains instructions regarding the preparation of conciliation documents and the procedure for submitting them to the relevant authorities.


We will present some excerpts from these documents in detail below.
What are the fire safety standards when building a bathhouse?
It is especially important to adhere to fire safety rules in order to protect the bathhouse itself from fire, as well as to prevent the death of people. When building a bathhouse, the main attention should be paid to the stove, since it is a source of high temperatures and open fire. Note that the walls of the furnace should not heat up more than 120 ºС.


Walls directly adjacent to or located near the stove must be insulated in one of the following ways:
- Plastering over metal mesh sand-cement mortar.
- By attaching a sheet of galvanized iron to the fireproof wall of the furnace, or by covering the wall over an insulating material.
- When working with wood, the walls can be lined with asbestos cardboard.
A metal sheet measuring 50x70 cm should be screwed onto the floor directly in front of the firebox.
In those places where the chimney pipe comes into contact with the ceiling, insulation must be installed. In addition, it is best to install a sand trap at the junction of the pipe and the ceiling, which will extinguish any sparks coming from cracks in the chimney.


It is worth remembering that the chimney cannot be made of iron or asbestos cement pipes, since these materials get very hot. But coaxial pipes with a double-circuit insulator placed inside are quite appropriate.
We should not forget about fire extinguishing means - in the bath they should be located as conveniently as possible for quick use.
Distances between objects on the site according to standards
Clear standards have been developed that determine how many meters from the fence a bathhouse can be built, as well as how objects should be placed on the site. Failure to comply with these standards may result in unpleasant proceedings with regulatory authorities.
So, the bathhouse must be located at least 3 m from the fence, since an outflow from the bathhouse must be organized dirty water. If the design provides for a separate septic tank or waste pit, the distance can be reduced to 2.5 m.
According to other standards, the indents should be as follows:
- the distance from the bathhouse to the neighboring house must be at least 8 meters;
- if there is a well on the site, then you need to retreat at least 12 m from it to the bathhouse in order to avoid contamination of groundwater and, accordingly, the water in the well;
- As for the distance from the bathhouse to the border of the neighboring plot, in this case it should be at least 8 meters.

These standards can also be used as a guide when designing a bathhouse, taking into account buildings in adjacent areas. In particular, the distance from the bathhouse to the neighbor’s bathhouse must be calculated based on a distance from the fence of 3 m, therefore, you can build no closer than 5 m from the fence.
Another important point is the presence of sunlight. Following the standards, the distance from the bathhouse to the neighbors’ fence should not be less than the height of the building, so that the shadow from the building does not fall on the territory of the adjacent plot, so as not to cause discomfort to the neighbors.
If some violations were made during construction, and the distance between the bathhouse and the house on the neighbor’s property does not meet the standards, all disagreements should be formalized in a written agreement with the neighbors in order to avoid misunderstandings when reselling the property.
Sanitary and hygienic standards for the design and operation of a bathhouse
Sanitary hygiene standards are adhered to very strictly and strictly in public places, but in home baths they are not followed so carefully.
However, there are also rules for the operation of private baths, in particular the following:
- After each use of the steam room, it must be thoroughly ventilated.
- Each person must sit strictly in one chosen place in the steam room. If there are a lot of people, you can use towels or mats that need to be washed after the procedures.
- After leaving the steam room, you need to wash off the sweat from your body, preferably with warm water.
- If you visit someone else's bathhouse, it is better to wear slippers to avoid fungal infection.
- Upon completion of the bath procedures, all shelves and floors in the steam room should be rinsed with plenty of water.
To facilitate compliance with all hygiene standards, a number of bathhouse features can be provided at the design stage.


In order for the steam room to heat up quickly, the stove must be heat-intensive and comparable in power to the size of the room.
Ventilation outlets should be provided so that the room can be quickly ventilated.
It is forbidden to use artificial and semi-artificial materials such as plywood, polystyrene foam, polyurethane foam, antiseptic substances, varnishes and paints to decorate the steam room.
To facilitate the removal of debris, for example from brooms, the loungers should be arranged so that there is access to the floor underneath them.
A prerequisite for a steam room is the presence of a drain for water, so that after cleaning it is quickly removed from the room to the outside.
The source of water supply can be a warm shower.
It is advisable to study all these subtleties provided for by the project before starting to build a bathhouse on the site.
Taking into account the information contained in the regulations and brief excerpts in our material, you will be able to independently build a bathhouse on your territory, ensure compliance with all fire and sanitary safety standards, and get everything permits and also save a good relationship with neighbors in the area.
The distance to the bathhouse is a matter of convenience, safety and peace with neighbors
What should be the distance from the bathhouse to other buildings? Are there any specific recommendations regarding this? Let's try to answer some more of these questions today.


Solving a problem with a lot of restrictions


The following circumstances force us to keep distances:
- firstly, the insufficient area of the site itself;
- secondly, the size of the buildings that you want to get at any cost;
- thirdly, our appetites, when we want to have everything and cannot refuse anything;
- fourthly, the desire to maintain good relations with neighbors;
- fifthly, already hot, the need to link to existing life support networks;
- Well, and, most importantly, sixthly, comply with all the requirements of the Construction Norms and Rules, this code under the short name SNiP.
Ways to get out of the situation
The solution to the first three circumstances is entirely up to us:
- you just need to know what you want;
- be able to prioritize;
- be able to refuse unnecessary things and face the truth;
- be disciplined and model the layout of objects on your site, fortunately, we have quite a “ flexible material", which allows:
- if necessary, reduce the size of the house, and if you want to have a larger area, think about the second and even third floor;
- reduce the area of the bathhouse, because very often the most popular size of 3 by 5 is suitable, it will allow this structure to fully fulfill all its spiritual tasks;
- re-plan communications;
- make the playground smaller and abandon the pool, which can be replaced with a temporary one that can be inflated and filled - after all, think about it, there is a river literally 100 meters from the house;
- discard raspberry bushes.
In general, you need to think and estimate.
But there are no rights without responsibilities
All of the above decisions relate, rather, to our right to think, but there are also obligations for the distribution of distances, which are established by the following SNiPs:
- SP 30-02-97 - determines the procedure for planning and effective development of gardening associations and other private properties, and,
- SP 11-106-97 – description of the procedure for creating design documentation for the development of private property and regulation of the approval and approval of this documentation. It is according to this documentation that the nature of the arrangement of houses is determined, from which the minimum distance “A” is calculated for a single-row arrangement. Distance “B” in this situation is of a secondary nature.

Let's consider three options for placement schemes with minimal distances (see also the article " Allowable distance from the bathhouse to the fence: prerequisites and norms").
First scheme (“A”)
Take this diagram as a standard when modeling your site:
- from a residential building:
- to the fence - 3 m minimum;
- to the bathhouse – 8 m;
- from the bathhouse:
- to the fence - 1 m, in this way it is possible to solve the question of what should be the minimum distance from the bathhouse to the neighbor's bathhouse - 2 meters, but this is the minimum, which everyone strives to do much more;
- to the edge of the roadway - 5 m;


- from the well:
- to the toilet, if, of course, it is on the street - 8 m;
- to the compost pit – also 8 m;
- from trees and shrubs:
- to the fence of the neighboring plot, if the tree is large - 4 m;
- to the neighbor’s fence, if the tree is small – 2 m;
- to the fence from the bushes - 1 m.
Second scheme (“B”)
Scheme “A” introduces minimum distances according to SNiP, but in practice they are guided by much large values For convenience and greater safety:
- from a residential building:
- to the bathhouse – 5-8 m;
- to the greenhouse – 15 m;
- to outbuildings – 15m;


- from the well:
- to the bathhouse – 20 m;
- to the greenhouse – 20 m;
- to the outbuilding – still the same 20 m.
Third scheme (“C”)
Scheme "C" will allow you to have a good relationship with your neighbor.
- from a residential building – 3 m;
- from the bathhouse – 1 m;
- from the outbuilding – 4 m;


Here it is convenient to consider not only the permissible minimum distance between bathhouses in neighboring areas, but also all other distances to neighboring objects
- from bushes – 1 m;
- from small trees – 2 m;
- from large bushes - 4 m.


Some nuances
When determining distances, the following nuances must be taken into account:
- For drainage from the bathhouse, it is recommended to use either a separate sewer channel or a drainage ditch; regardless of what is used, the distance to the fence can be reduced to 2.5 m;
- the distance from the trees is calculated from the center of the trunk; SNiP does not regulate the distance from the crown of a tree, so a heavily overgrown crown that covers the floor of a neighbor’s garden does not fall under legal requirements, only moral ones;
- the given distances for outbuildings and greenhouses depend on their nature - if the building contains pets, then the distance must be at least 4 meters;
- SNiP requirements also take into account the construction process of structures - space is also needed for placing building materials, and they should not cause inconvenience to neighbors on the site or on the street.
Helpful advice! It is impossible to provide for everything in the rules on paper. Therefore, going beyond the given distances is allowed, but this can only be done after drawing up a protocol of consent of all interested parties. We especially recommend difficult situations formalize it legally in order to protect yourself in the future, both from claims from neighbors and regulatory authorities.
conclusions
Compliance with all recommended distances between buildings on a suburban site, taking measurements with your own hands is the price of successful and comfortable stay in future. When we talk about a bathhouse in which there is a stove, then this is already a question of the safety of all residents and the safety of all property on the site.
Be sure to observe the given distances. Pay special attention to the organization of sewerage from the main residential building, bathhouse, greenhouse and outbuilding. In case of violations here, the SES - the sanitary-epidemiological station - is a serious organization that is better off “not to put a finger in your mouth, it can bite off your hand.”


The additional video in this article will remind you everything key parameters placement of objects on a suburban area. Just don’t forget to stock up on a pen and a notepad for notes – you won’t be able to keep everything in your head.
Who hasn’t dreamed of building a real bathhouse on their summer cottage? But sometimes it is so small that a full-fledged bath structure simply cannot be squeezed in there. In this case, a mini-sauna can be an excellent way out of the situation. In terms of comfort and functionality, it practically does not differ from a standard-sized bathhouse, and the time, effort and money to build such a structure will take much less. In addition, it is quite possible to make a small bathhouse with your own hands. This will be discussed further.
Features of designing the interior space of a bathhouse
When creating any project, the first step is to select suitable material for the construction of a structure. And the bathhouse is no exception in this matter. So, when building a bath structure, builders mainly use materials such as foam blocks, bricks, timber or solid logs. Professionals recommend giving preference natural materials– wood. But this is no longer a matter of taste, but of financial capabilities.
When designing a small bathhouse, you must adhere to the same technologies as when planning a bathhouse of standard sizes. But in our case, it is still important to take into account some points:
- To build a small bathhouse, a powerful, complex foundation is absolutely not required, since we are talking about small loads. Therefore, in order to facilitate the excavation process and reduce the cost of funds, it is quite possible to get by with a strip/support-pile one.
- To location functional zones should be approached very seriously, since in a small structure, all the flaws and imperfect layout will be immediately noticeable and will certainly cause inconvenience.
- It is best to place the stove in the dressing room so that it does not interfere with going from the washing room to the steam room and vice versa. The firebox must be protected as much as possible from spontaneous combustion.
- The principle of building rooms in a mini-bath should be absolutely the same as that of a standard one. So, the shelves must be installed along a blank wall, the door threshold should be raised as high as possible, and the frame should be made low. All this is done with the aim of trapping steam inside even when the door is opened.
- Under no circumstances should there be locks in bath rooms, and all doors should only open outwards.
Attention! To make it convenient to wash and comfortably steam in a bathhouse, the area of the structure must be calculated in such a way that its useful part is at least 10 square meters. m.
Basic drawing of a mini bath: a compact and functional solution for a summer residence
So let's consider simplest project bath design. Any bathhouse should have four main rooms: a dressing room, a washing room, a steam room and a relaxation room. It is necessary to clearly understand what the minimum dimensions each of them can have. So, for the waiting room and steam room you can choose optimal sizes– 1.5x2 m; the washing area can be 1x1 m; and the rest room is 2 times larger than the washing room.
Construction of the foundation
After determining all the basic parameters of the bath premises, you can proceed directly to construction work. When choosing the appropriate type of foundation, pay special attention to the type of soil of the area on which the bathhouse will be built. If the soil is hard enough and the groundwater is deep, then a lightweight foundation will be sufficient. We lay flat stones around the markings of the future building, cover them with a small layer of clay and lightly press them. We lay wooden beams on top. We complete the process by covering the beams with waterproofing bitumen.
If there is soft or wet soil on the site, use a strip foundation. Prepare a trench, fill it with a layer of sand, then crushed stone and compact it tightly. Then place the reinforcing mesh on top. All that remains is to prepare a cement solution with which the pit will need to be filled. Don’t forget about waterproofing: roofing felt sheets can be used for this purpose.
Frame construction
There are many options for constructing bath walls. We will use the simplest and fastest - frame. For its construction we will need the following materials:
- wooden blocks (5x5 cm);
- boards ( minimum thickness– 2.5 cm);
- foil/film for waterproofing;
- thermal insulation.

Frame mini bath: the simplest and most quick option the buildings
According to a previously prepared project, a frame of beams is assembled. The inside is lined with boards. You can use ordinary screws or anchors as fasteners. Don't forget about heat and waterproofing. The first thing we install is a material that does not allow heat from the bathhouse to pass out. In this capacity, you can use expanded clay, sawdust or mineral wool(rarely used). Bitumen mastic is suitable for creating a waterproofing layer. Final stage construction of walls - internal board covering (not mandatory, but a desirable element).
Advice. For finishing the washing area, it is best to use materials that can withstand frequent contact with water: galvanized steel, polystyrene, etc.
All that's left to do is build the roof. First, we prepare the rafter system and mount it on the frame. Then we begin laying the roof: metal tiles, slate, etc. will do. Don't forget about the chimney - you need to leave a free opening on the roof for it.
To complete the appearance of the bathhouse, lining or a block house is used as a protective and at the same time decorative element. Lining is the most common option for finishing the external frame of a bathhouse. This material is cheap, practical and durable. In addition, it is a fairly successful imitation wooden beam. The block house is similar in appearance to the lining, but differs in a more presentable appearance and quality of wood.

A mini bathhouse sheathed externally in wood will delight with its aesthetic appearance
We have finished decorating the bathhouse, all that remains is to carry out communications. Let's start with the water and sewerage system. The water supply system (we use the gravity principle) is installed as follows:
- We prepare two 50-liter water tanks, as well as a hose and mixers.
- We install the containers so that the cold water tank is half a meter higher than the hot water tank.
- We connect the tanks with a hose: connect one end to the bottom of the “cold” tank, and the other to the top of the “hot” tank.
- As an additional connecting element we use a pipe with a mixer.
To ensure complete drainage of water after a bath “session”, it is necessary to design an effective drainage system. This is quite easy to do. You just need to dig a drainage well not far from the bathhouse, and do it in the washing room drain holes, to which pipes should be brought at a slight angle and directed to the well.

Diagram of one of the options for connecting communications to a mini bath
A mini-oven or heating element is quite suitable for heating water in the washing room. To ensure sufficient air ventilation in the bathhouse, it is enough to make several wall holes near the entrance and close them with special barriers.
At this point, the process of constructing a mini-bath for a summer residence can be considered complete. Follow the instructions in this article and you will be able to build a convenient and quality sauna for your family.
Video: Do-it-yourself mini sauna for your dacha