Do-it-yourself garage gadgets. Homemade workbenches and racks - we make accessories for the garage. DIY garage equipment: making a lift
Read also
Absolutely anyone can make accessories for their garage with their own hands. With the help of such products, the owner of the premises will free up a lot of space, and tools and equipment will always be at hand.
A workbench is a necessary product in every garage
A homemade workbench should be in every garage. It does not take up much space and makes it possible to comfortably carry out repairs and make useful crafts. Typically, a workbench is made from durable wooden planks that are attached to a thick wooden beam or profiled pipe. Often the workplace is made of steel blanks. They are quite easy to cut and fasten into one durable structure using metal corners and universal screws.
To make a workbench, as well as other machines for the garage, you need to draw an accurate design plan. At the same time, take into account the space that will be allocated for the product. It is best to place the structure next to shelves or racks. In the drawing, note the presence of drawers and shelves. You will store small fasteners and tools in them. You can also attach a compact vise to the tabletop. Having drawn up a plan, start making the workbench. First, we assemble the tabletop.
If you have a small room, then there is no point in making a large homemade product for it. You can connect the boards together using good glue and metal ties. As a rule, the tabletop of a standard workbench consists of 5–10 identical boards. Next, we make special grooves measuring 2.5x2.5 cm on the tabletop. They are needed for stops. As soon as the glue on the product has dried, the surface must be planed. The result should be a perfectly smooth coating. The legs for the structure can be made from several bars measuring 80x10x10 cm.

We make grooves in the front legs into which the brackets will be inserted. In the future, the latter will be connected to the longitudinal beam of the tabletop. Then we assemble the base of the underframe. It consists of two frames, which are made from 5x10 cm boards. The base is attached to the support, after which the frames are cut into the legs of the workbench by 2.5 cm. At the end, we secure the components with bolts. Then you need to attach the back and side support walls to the workbench. For their manufacture, sheets of chipboard or centimeter plywood are taken.
The last step will be connecting the tabletop and the upper frame. To do this, you should use powerful bolts. Afterwards we apply drying oil to the surface of the workbench. As soon as it dries, we treat the surface with varnish. As a result of the work, you received a stable structure on which you can not only repair spare parts or make various crafts, but also store tools.
Making a rack - about a complex design in simple words
Every driver probably has a lot of large garage equipment that there is no place to store. Where can you find a place for them so that you can quickly find the right tool? The correct answer is on the rack. This design will allow you to organize free space and save a lot of time. Similar devices for the garage can be made of wood or metal. The second option is more reliable, but it is quite difficult to implement it yourself.

The first one is much easier to complete, however, in order for the structure to last for a long time, it is worth choosing strong wood species for the work. Beech or oak are perfect for this. Boxes and shelves made from them can withstand significant loads. In principle, the norm for a rack is the ability to withstand a weight of 150–180 kg. In practice, only a few adhere to these recommendations. However, it is definitely worth remembering that the maximum weight of all tools on the rack should not exceed 300 kg. Otherwise, this design will become dangerous for the garage owner himself.
Making a rack with a complex design is very difficult. It requires significant effort, a lot of time and equipment. It is not much inferior to a simplified product, the manufacturing algorithm of which we will consider in more detail. So, the operating procedure is as follows:
- 1. First you need to take a board 9 cm wide and cut it into pieces of different sizes. In the future, these parts will play the role of supports for the structure.
- 2. For shelves you will need to take a thicker board. It must be cut into several identical parts.
- 3. Next, take a board for the base of the rack and mark on it the points at which we will make spacers. They should be located at a distance of 3 cm from the edges of the base.
- 4. Attach the upper spacer using superglue. We nail the top shelf to it. The same manipulations must be repeated with other spacers and shelves. The bottom expansion part should be attached last.
- 5. Then you need to turn the assembled product over, tighten the base of the rack with spacers, using screws for this.

After the work done, your rack is almost ready. At the end, all you have to do is clean the surface of the rack with sandpaper and treat it with oil varnish. It is best to apply the latter in 2 layers. Attach the structure to the wall with powerful anchor bolts, screwing in fasteners under the upper and lower shelves of the structure.
Cyclonic vacuum cleaner and press - useful homemade products for those who like to tinker
The list of homemade machines and devices must include a press. This clamping device will become an indispensable assistant for every DIY enthusiast. To make the press you will need a hydraulic jack, a metal platform frame and 4 profile pipes. Two of them should have a cross-section of 4x4 cm, and the rest - 6x6 cm. To make a press, we take two pipes with a smaller cross-section and attach them to the base of the product. At the very top, between these pipes, we weld another pipe with a larger cross-section.
Install the remaining pipe so that it can easily move along the previously installed guides. The device made in this way works on a very simple principle. To connect two products, they need to be placed on the base of the press and covered with a thick plywood sheet. The pipe with the jack installed must be lowered, and then the two short pipes must be turned. By making this simple movement, you will securely connect the two previously supplied products.
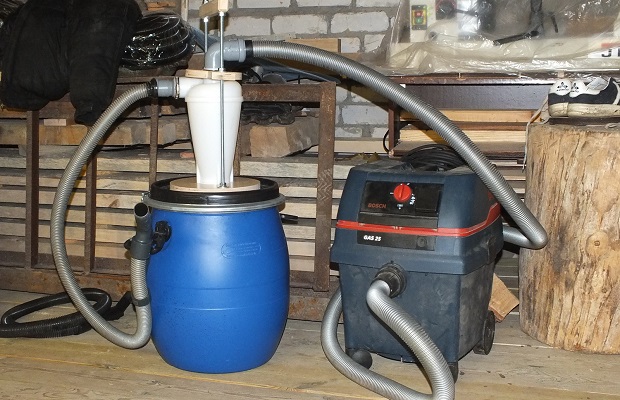
The second device is a cyclone vacuum cleaner, it will help you always keep your garage perfectly clean. To make it, prepare a plastic or metal container. An important nuance is that the lid of the vessel must be tightly closed. Next, we make 2 small holes in the lid. The first should be located in the center, and the second should be located near the edge. The hole diameters and cross-sections of the hoses you use must be the same. We connect the pipes to the holes. The first will serve to collect garbage, and with the help of the second you will connect a regular vacuum cleaner
Install a plastic elbow into the inlet pipe. With its help, air will be sucked into the device, like a cyclone. Thanks to the presence of this elbow, the vacuum cleaner will be able to suck in not only dust, but also small stones, sawdust, lumps of dirt and other small debris. All this will remain in the container to which you connected the hoses. If you wish, you can not equip the vacuum cleaner with a knee. But in this case, you will not be able to remove garbage, only dust. In such a device, it is best to use a plastic container and narrow hoses. If you need a more powerful device, then you should make a vacuum cleaner from large hoses, an elbow and a steel container.
Device for making ropes - ropes from plastic bottles
When heated, plastic bottles shrink quickly. Thanks to this, we are able to make fairly strong ropes from them. With their help, the garage owner will be able to connect several different products that are used on the farm. To create the device, you need to find two bolts with nuts and washers, a piece of thin board, an electric drill and a utility knife. After that, take two washers and place them in the middle of the board. The centers of the washers should be marked on the board with a marker. We drill holes at the resulting points.

Next, drill holes on the back of the board. This must be done to prevent rotation during operation of the device. The next step is to screw in the bolts. We are testing the device. We put several washers on the protruding ends of the bolts. The final thickness of the rope will depend on the number of bolts. Next, place a stationery knife or a small piece of it on top of the washers. We secure the device with additional washers screwed in until it stops. Next, the device must be fixed on the desktop using clamps.
Then we take a two-liter plastic bottle, cut off its bottom and cut a strip in the remaining part. We place the latter on the device so that it is located under the knife. Next, we take the strip with one hand and pull it, while holding the plastic container with the other hand. As a result, from one unnecessary 2-liter bottle you will get approximately 20 linear meters of rope.
How to make a viewing hole - detailed instructions for beginners
Whatever one may say, sooner or later the car has to be repaired. And so that the car owner does not have to crawl under the car and “squirm”, bending double, it is necessary to dig a hole in the garage floor for inspection and repair. First of all, those who want to do this must mark the area of the room where the car is parked. To do this, the area of the garage is marked with chalk. When creating markup, there are several important factors to consider. The length of the pit must correspond to the length of the car, and another 1 meter must be added to this value. The width should be such that it is comfortable for you to work. However, be careful - this value should not be greater than the distance between the wheels of the car.

The depth of the hole is calculated taking into account the height of the garage owner. Another 20 cm is added to this indicator.
“Having taken measurements”, start digging a hole. Once you've done this, think about the arrangement inside. First of all, this concerns the walls of the pit. For this purpose, brick, building blocks or concrete can be laid on the sides. The thickness of the walls directly depends on the material. So, if you use ceramic bricks, then this figure should be equal to 20 cm. If you purchased cement, then the wall thickness should be 12 cm. If you want to make walls from blocks, then their thickness should not exceed 22 cm.
Do not forget that the walls of the pit will require hydrophobic impregnation. It will protect materials from moisture. Impregnation must be applied from the inside of the brick or blocks. To make entry and exit more comfortable, we make steps in the front part of the pit. It is best to use cement for this. You need to start from the lowest step, gradually rising higher. Each of the staircase elements must be the same. To achieve this, first measure the height of the rise and calculate the number of steps.
Shelves in the room - for storing loose fasteners and more
Sometimes the garage space does not allow you to make and install a large, spacious shelving unit. In this case, you can make shelves of different sizes. They will be attached directly to the walls at any height convenient for you. This will make it possible to save space on the floor of the room. First of all, you will need to determine where the shelves will be fixed. On the selected section of the wall we make approximate markings, dividing the area into equal squares. Dowels will be screwed into the corners of these squares to hold the shelves.
To screw in the fasteners, drill holes for them using a hammer drill. If possible, it is worth purchasing special dowels with hooks at the ends - they will provide better fixation of the products. Next, we take a thin board and attach hangers with eyes to it. When calculating the distance, be guided by the markings you made on the wall surface. To secure metal hangers, use reliable self-tapping screws. After that, all that remains is to make the shelves. We take several boards and cut them into equal parts - they will serve as bottoms for the products. Then we cut out the walls of the shelves from thicker boards. We nail or glue them to the bottoms. If desired, the products can be painted or varnished.
The final stage will be the installation of finished shelves in the designated places. When installing each of them, carefully ensure that the products stand level and move freely along the guides. If you want, you can glue turned wooden handles to the front walls of the drawers. It will be more convenient to use the shelves with them. A very interesting idea would be to make shelves from plastic canisters.
If you have a sufficient number of these containers, and in the future you do not plan to use them for their intended purpose, then you can use them according to this principle. First, we cut holes in the outer walls of the canisters. At the same time, make sure that only the right or only the left wall of each container is cut off. Otherwise, the shelves will look inorganic. After cutting out the outer walls, clean the plastic from burrs. To do this, use a file. After this, all that remains is to install the shelves in place in the wall or use them as drawers in the shelving unit.
As they say, there is never too much space in the garage. Men who spend a lot of time in the garage will agree that in some cases every minute and every square centimeter of free space counts. That is why a garage master needs competent organization of his workspace. Various people help out and help here in every possible way. devices for storing building materials and work equipment, machine parts and other things necessary for work. To ensure that your electronic, garden and garage gadgets are always in their place, use the following devices:
- stands;
- shelves;
- retractable panels;
- racks;
- organizers for tools.
Also, for clarity, we offer do-it-yourself homemade products for the garage and home craftsman - the YouTube video will reveal all the nuances of organizing the workspace and suggest fresh ideas.
DIY crafts at home with your own hands
Man has been making homemade crafts since prehistoric times. In fact, all industrial processes are improved, once handicraft or home-made developments of folk craftsmen. Sometimes we don’t even think about the fact that we pay for things that we can do with our own hands. DIY homemade schemes are easy to find online, and the materials can be purchased at a hardware store or found at home.
For example, from a cardboard box and a piece of fabric You can make a convenient portable organizer for towels and other textiles.
The topic of storing all sorts of little things is inexhaustible, fortunately, as is the number of ideas. Good ideas for decor You can also draw from ordinary things - let them be buttons or empty tin cans.  Cool shelves are made from ordinary drawers. How do you like this idea?
As you have already understood, if you have detailed instructions, it is not so difficult to make homemade products with your own hands at home. The video will help you understand all the nuances of this enjoyable activity. Useful tips, interesting ideas - everyone should watch it.
DIY crafts for the garden and garden with your own hands
At the dacha there is usually some free time for creativity and arrangement of the surrounding space. That's why It's worth having a few fresh ideas on hand to implement them on your own summer cottage. Do-it-yourself country crafts at home can be brilliantly simple. From scrap materials you can make unexpected and extremely useful things for home use. 
Ordinary pebbles turn into fairy-tale animals.From an old teapot It makes a wonderful flower pot.
Used tires- this has already become a classic in the world of garden figures.  Stylish lamps for country interiors – do it yourself from an ordinary jar and candles (don’t forget about safety precautions).
- a great idea for a small cottage.  Do-it-yourself homemade products for the garden and garden are often made by yourself, without unnecessary time and financial costs. Perhaps you had no idea how useful they would be for the household plastic bottles. Plastic bottles that have gone out of use can serve as the basis for an incredible decorative flower bed.
  Cool “blooming” pillars will significantly decorate your garden space.
Do-it-yourself garden furniture, successful homemade products: photos and drawings
In the previous sections, we told you about homemade products that will become indispensable for the household and home life. However, we should not forget about rest, before which, nevertheless, you will have to work a little. Cozy armchairs, various tables and benches, swings and hammocks- all this country and garden bliss can settle on your site. We invite you to familiarize yourself with photo instructions and drawings for making garden furniture. We have selected the best options for you.
An ideal garage should organically combine the functions of a reliable shelter for a car and a well-equipped place for performing various repairs and other work. There are a number of useful recommendations for the interior arrangement of a garage, and you can make most of the necessary equipment yourself without spending money on their purchase.
Work on the interior arrangement of a garage involves the use of many different useful devices. Read the suggested instructions and your garage will become the most convenient and comfortable.

Usually in the garage you have to store not only the car, but also many tools and other accessories. To conveniently place all this, you need to equip the garage with racks, shelves, hooks and other similar devices.
The best option is a spacious rack. You can do it yourself. Fill the remaining free space with convenient shelves. There is nothing complicated in making them either. You will receive more detailed instructions below.

Get to grips with your tools. Arrange them according to frequency of use. The items you use most often should be stored in the drawers closest to the workbench. Store heavy equipment on the lower shelves of the rack; allocate space near the ceiling for spare tires - you will need them least often.
Secure the brackets
These devices will help you conveniently store replacement tires. Place the brackets closer to the ceiling, so the wheels will not take up useful space. For tires, buy large bags, or better yet, special covers to protect them from dust.

He's a workbench. The structure can be easily assembled with your own hands from boards and bars. You can attach a vice and other tools needed in the garage to the table. It is more convenient when the workbench is installed next to shelves and racks.
Organize your lighting system wisely
You will need several lamps: above the place where the car hood is usually located, above the work table, and in other important places in the garage. Ideally, the lighting system should be organized so that you can turn on all the lamps at the same time and each of them separately. An ordinary double switch will help you do this.
Install an outlet near your garage door and above your workbench.

Designate a place to store your work uniform. One shelf or at least a basic hook will be enough. Also provide a place to store work shoes and personal protective equipment.
Security questions
Substances such as gasoline, oil, etc. are stored in the garage. To store them, you need to allocate a separate cabinet or at least a shelf not far from the gate. Place a box of sand nearby and hang a fire extinguisher on the wall.

Each tool in the garage must have its own place, otherwise there will simply be no order in the room. To organize convenient storage of things, assemble a homemade rack. Ready-made models are quite expensive, and do not always meet the needs of a particular person. Therefore, it is much more profitable and rational to make a rack “for yourself” right away.
Assemble the rack in such a way that it can withstand a load of at least 150 kg. In this case, the load on each individual section should not exceed 500 kg. The rack can be assembled from wood or metal. The design can be straight or angular.
As for wood, preference should be given to the most durable species such as oak, hornbeam, beech, etc. Before assembly, all wooden structural elements are treated with antiseptic impregnation. Thanks to this treatment, the wood will be more resistant to moisture and various bacteria and will last much longer.
If possible, plan and sand all frame elements with high quality.
Make shelves from plywood or chipboard. DVL and OSB boards are also suitable. The main thing is that the plate has a thickness of at least 4 mm. The higher the expected load on the shelves, the thicker they should be.

To give the shelves a more presentable look, it is recommended to cover them with decorative film or paint them. Also, such processing will allow you to better get rid of contaminants in the future.
The simplest rack is made in several steps. Complete each of them in sequence. Various sizes will be given below. You can stick to them or change the dimensions at your discretion.
First step. Take a 9 cm wide board and cut it into several pieces of different lengths: 30 cm, 27.5 cm and 18 cm. From these pieces you will make spacers.
Second step. Take a board 19 cm wide and cut it into the required number of 36 cm long sections. From these sections you will make shelves for your rack.
Third step. Mark on the board that serves as the base the places for attaching the spacers. It is recommended to install spacers at a distance of 2.5 cm from each edge of the base. Glue the top brace in place, then nail the top shelf to it with the pre-attached brace. Do similar manipulations with the remaining spacers and shelves. The bottom brace is attached last.
Fourth step. Turn the rack over and tighten the spacers to the base of the structure using screws.
Fifth step. Carefully sand all wooden surfaces and apply a double coat of oil varnish. If you wish, you can cover the shelves with decorative film or decorate them with other material at your discretion.
Sixth step. Attach the shelving unit to the wall using anchor screws. Place fasteners under the lower and upper shelves.

Using this scheme, you can assemble a rack from the required number of sections. To strengthen the structure, place wooden blocks between the sections. This will help distribute loads evenly throughout the system.
If there is no space to install a full-fledged rack or, on the contrary, you have installed racks and there is little unoccupied space left, be sure to make several convenient and simple shelves for storing various accessories.
First step. Determine where to place the shelves. In accordance with this, set the required quantity and optimal sizes of products.
Second step. Prepare the required number of boards and fasteners in accordance with the plan drawn up at the previous stage.

Third step. Mark on the walls where the future shelves will be attached.
Fourth step. Armed with a hammer drill, prepare holes in the walls in accordance with the markings and screw dowels into them. It is best to use dowels with hooks - they will provide a more reliable fixation of the shelves.
Fifth step. Attach eye hangers to the board. When choosing a distance, refer to the markings on the wall. Use self-tapping screws to attach metal hangers. If you don't have them, you can get by with ordinary nails.


Metal shelves

Metal shelves for garage

Metal shelves
Sixth step. Fix the finished shelves in their intended places.
Remember: it is better to make several short shelves than one long one, which will break under the weight of the objects placed on it.
If you wish, you can decorate the shelves, for example, cover them with film or paint them. Make sure the shelves hang level. A tool called a level will help you control this moment.

To make working in the garage as comfortable and productive as possible, assemble and install a workbench in a convenient place. You can use it to repair both car parts and other household items. A homemade workbench has a big advantage over a ready-made factory-made model - you can make a table of the size that you need.
Workbench assembly kit
- Boards.
- Bars.
- Fasteners.
- Plane.
- Ties.
- Tool for wood processing.
- Wood glue.
- Sandpaper.
- Drying oil.
First step. Consider the optimal design of your workbench. The main elements of such a product are the underframe and the tabletop. The design also includes one or more clamping devices.


Second step. Assemble the tabletop. The best option is a tabletop made of 20 boards measuring 200x10x5 cm. Prepare grooves for stops measuring 2.5x2.5 cm in the 5th and 16th boards. Place the grooves in 25 cm increments.
Use glue and metal ties to connect the boards. Before gluing, the surfaces of the boards must be planed.

Third step. Plan the dry tabletop thoroughly. You should get a smooth, flat surface. Over time, the wood will shrink. You need not to miss this moment and tighten the nuts on the ties in a timely manner.
Fourth step. Make the legs. To do this, use high-quality bars measuring 80x10x10 cm. Make grooves for the brackets in the front supports. The brackets will later be connected to the longitudinal beam. This type of beam is commonly used in the construction of window frames.

Fifth step. Assemble the base of the table from two frames and fasten it to the supports. Assemble the frames from 10x5 cm boards. Use a tenon joint. The frames are directly cut into the table legs to a depth of 2.5 cm and bolted to them. Attach a sheet of plywood to the bottom frame. A sheet 1 cm thick will be enough.

Sixth step. Attach the side and back support walls to the table. To make the walls, use chipboard or plywood 1 cm thick. Build a convenient cabinet with a hinged door on the left of the table.

Seventh step. Connect the workbench top to the top frame using bolts. It is recommended to prepare the holes for the bolts in advance - this will make connections faster and easier. Tighten the bolts so that their heads are recessed into the wood.
Eighth step. Make a miter box. This device will help you in the future to cut workpieces at the required angles. The miter box is assembled from wooden strips 2 cm thick. Attach the finished miter box to the table using stoppers.
Ninth step. Treat your homemade workbench with drying oil and varnish. Let the paint dry and you can start using the table. If necessary, install a vice or, for example, a circular saw on it. At this point, focus on your needs.

Video - DIY garage accessories
In today's story, we will introduce you to several tips and rational recommendations for arranging a garage parking space that will help cottage owners save square meters and things.


Let's look at 10 easy DIY ideas for...
You can easily and quickly install some wire containers on the wall to store various things. The rational arrangement of balls and hoses is another simple way to organize all the items and products that easily create chaos and dust if they are not sorted into compartments and containers.

2. Signs and inscriptions
This could be stickers or completely painting doors and cabinets. unusual furniture coating for special markings. They will help family members navigate the garage space, and also store items and products in a certain place. The main advantage of this method of decoration is the speed of implementation, which will only take a few hours!

3. The magic of magnets
For small tools and drill bits, you can use magnetic strips on the available wall space. You can hang small parts and devices on them that will always be at hand. This is a simple way to practically organize a room and storage systems, and is also extremely easy to implement.

4. Original hooks
Take long unused keys and turn them into hooks for wall decor and as an original authentic accessory. On them you can hang work clothes, ropes and everything that should be within easy reach.

5. Cans and other containers
You can organize and separate your nuts and bolts by adding some plastic toolbar containers. This will make it much easier for you to find the part or element you need. All products will be sorted and placed in certain containers, and for additional convenience they can be attached to a wooden shelf.

6. Patch panel or board
Of course, you can always put in a perforated board where you can easily add some new hooks and organize your home decor in a new way. Plus, this organizational idea can act as a “makeover” for a garage wall! Tips and recommendations for using this multifunctional device can be found on the Internet portal Small Interiors.

7. Practical buckets
Some shelves and a large set of segments (stickers) can really come in handy. This is another quick way to create a functional and efficient storage area that will add character to your space. Interior Design and help keep your work tools in order.

8. Bungee balls
Using bungee cords to store equipment for a variety of sports is a great concept for transforming a space. You can place both soccer and basketball balls in these stylized nets! They are commercially available and extremely easy to install.

With this creative, sustainable layout idea, you have absolutely no excuses for kids not wearing helmets during school and after school on bike rides and rides. After all, now you need to manage not to find them in a specially equipped place! Add wall decoration small hooks on which these safety devices will be located.

Instead of throwing water bottles and cardboard boxes in the corner of the garage, build a quick and easy recycling station for the whole family. It can be built using plastic boxes and boxes with inscriptions, which allow you to sort waste into plastic and iron.

We have presented to your attention an interesting and extraordinary selection of conceptual ideas and creative solutions for organizing a garage space in an unusual house.
Did you like these rational and practical ideas? Share with us your opinion on this issue in the comments below...
Categories:Places:
A garage is more than just a place to park a car. It is also a workshop, a place of relaxation, and a club of interests. Therefore, the arrangement of the garage should be convenient and thoughtful. You need to place a lot of things in a small area, and they should be convenient to use. Homemade products for the garage will help with this. What people don’t do with their own hands. From a simple shelf to a complex device. You can make all this yourself. But you need to know how. Several ideas for modernizing a garage and a plan for their implementation are in the article.
Homemade garage: ideas for arrangement
Setting up a garage is a long process. You won’t be able to do everything right away. You have to constantly modernize, change, and create something new. In this case, they mainly use homemade products for the garage. It requires less money and is also a pleasure - making the right thing out of garbage is worth a lot.
Even in a small area you can fit everything
Tire and wheel storage
Every car owner is faced with the problem of storing out-of-season “shoes” for the car. Where to put the tires is a sore point. In general, the way tires are stored depends on whether they are mounted on rims or not.

Tire storage methods
So tires with rims can be hung or stored lying down - in the form of a stack, stacking them one on top of the other. To hang tires, you can use luggage straps, chains, or a metal cable with a diameter of 4 mm or more in a polyethylene sheath. Fasten the belts to the ceiling, wall, or beam located above.

Cable in a polyethylene sheath, anchors with a ring and clamps for tightening

It is better to attach luggage straps to rings in the ceiling or hooks on the walls

Drive pins of sufficient length into the wall, but such that the pin does not stick out beyond the tire

Not only a pin will do, but also a hook with a small bend radius
Another available method is to drive pins or hooks with a small bending radius into the wall. The distance between the hooks is slightly larger than the diameter of the tires. The length of the pins should be such that they do not protrude beyond the tire. You can fill them almost to the ceiling so that the wheels fit.
Tires without rims can only be stored standing up. Special shelves are made for them. They are usually welded from profiled pipes. 20*20 mm, maximum 30*30 mm. You can also use a corner. It is inconvenient to weld a round pipe, but cross members can be made from it - the tires fit and hold better in this case.
The width of the shelf is 4 times the width of the tire, plus a margin of 10-15 cm for some freedom. The height of the rear wall is slightly higher than the outer diameter of the wheel. The design is simple = from the side it resembles a right triangle. Having an inverter welding machine, welding such a shelf will not be difficult.

Tire storage shelf - a great homemade product for the garage

This is a factory option with a completely inhumane price tag. But you can borrow an idea - the crossbars can be rearranged depending on the size of the tires... you never know

Just welded and painted
Such shelves are usually hung on the wall. But the place must be chosen so that light does not fall on the rubber - this will deteriorate it. Not the most complicated DIY projects for the garage, but very useful.
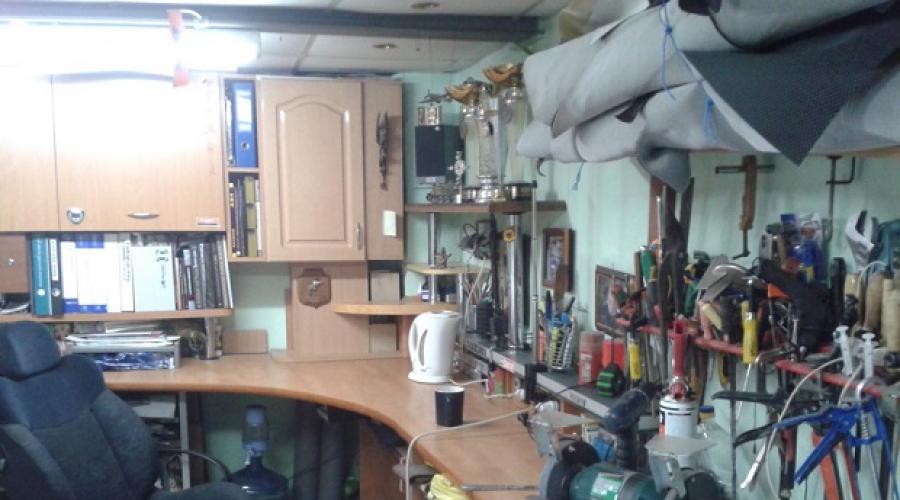
Workplace
Probably the largest number of DIY projects for the garage is related to the equipment of the workplace and tool storage systems. Moreover, shelves and racks in the garage are not the only way to solve this problem. First of all, you need to decide where the workplace will be located. There are three options:

A table or workbench for a garage is made of boards and covered with plywood. Inexpensive, quite reliable. If you have a welding machine and verification skills, you can weld a frame from a corner or profiled pipe. Again, it is better to sheathe it with moisture-resistant plywood. The result is a smooth, abrasion-resistant surface. You can, of course, use laminated chipboard, but the laminating layer is quickly damaged.

U-shaped workbench for garage
To prevent the space from wandering around, you can install shelves or make drawers under the countertop. Boxes are more convenient, but making them is still a hassle. It is quite possible to make shelves and put boxes made of plywood on them. Plastic boxes and baskets are also suitable. But the walls must be thick.

You can put boxes on the shelves
By the way, there is a useful idea - to make a rack for storing tools from used canisters. Find ones that have the handle on top. Then everything is simple - one of the sides is cut out and in the future this canister is used as a box.

Useful and simple DIY projects for the garage
It’s not necessary to make a whole rack - it’s still difficult to remember where and what is located. But you can use the same principle to make drawers for shelves. By the way, you can stick inscriptions or pictures on the ends (with pictures identification is faster). Such DIY projects for the garage bring satisfaction - creating a useful thing from garbage is a pleasant feeling.
Tool storage
The most difficult task is organizing tool storage in the garage. We must make sure that everything is in order, but at the same time, is at hand and in sight. Moreover, closed boxes are suitable only for very organized people who always put the taken item back in its place. Otherwise, you will constantly rummage through drawers, forgetting where everything is. There are several ideas for convenient storage of small items and tools. These are very simple DIY projects for the garage.
An ordinary metal mesh will help to quickly solve the problem. A reinforcing mesh made of 2 mm wire, a 10 cm cage, is suitable. Attach it to the wall, bite off some rods, bend them, make hooks, crossbars, etc. out of them. You can buy special hooks that are attached to the mesh (available in stores that sell commercial equipment); ordinary double-sided hooks, which can be bought or made from wire, are also suitable.

A grid on the wall is a way to quickly organize tool storage
It is convenient to store screwdrivers on a special shelf. Take a board, plywood, 10-15 mm thick. The board must be sanded well so that there are no splinters. Then drill holes of different diameters in one or two rows in the plane. If the board is wide enough, you can make larger holes for chisels or even hammer handles. Clean all the chips again. Now we need to come up with a wall mount. You can use a regular bracket. Screwdrivers, chisels, and other similar materials are inserted into the holes. Convenient, fast, everything is in sight.

Idea for storing screwdrivers in the garage
There are also useful homemade products for the garage that allow you to organize the storage of hand tools. Pliers, pliers, wire cutters, etc. placing it conveniently is problematic. You can hang it on a net. It’s convenient to take off, but not to hang it up. But there is a simple solution - attach a narrow board and put the tool on it. To make it sit comfortably, grind down the board on one side. When cut, it should look like an isosceles triangle.

Storing hand tools in the garage
Another simple idea for storing cordless tools, chargers and spare batteries for them. Make a shelf as in the photo above. In the lower part, cuts of different formats are made, and the upper parts are used as regular shelves. The idea is that everything is in one place, quickly taken out/installed in place. These garage DIY projects will make your workspace comfortable. It will be easy to maintain order.
Homemade carriers for the garage
Even with very good lighting in the garage itself or on the street during the day, visibility under the bottom of the car is very low. To illuminate the front of the work, portable lamps are used. These are the simplest DIY projects for the garage. With them you can begin the epic of arranging and equipping your garage space.

The most common type of garage carrier. Homemade ones are usually made very similar
In its simplest form, it is a cartridge attached to a wire; a small screen with a hook can be attached to it. This is such a simple thing. The light bulbs used are ordinary ones - incandescent or housekeeper with a standard socket. Everything is not bad, except that these light bulbs break very often, you need to figure out how to hang them so that they shine in a specific place. In general, the design needs improvement. There are several modification options.
Unbreakable lamp socket
This plastic bottle lampshade perfectly protects the fragile bulb of an energy-saving lamp. You can also use an LED lamp, but an incandescent lamp will not work - it gets too hot. The design is simple - a cord with a plug and a cartridge at the end.
The main task is to find a plastic vessel with walls made of translucent milky plastic of medium thickness. Transparent will not work - it will not scatter light, too thin walls will not save the lamp from impacts. After you have found a suitable vessel, some small change remains:

Everything is simple, but such a lamp allows you to brightly illuminate exactly the desired area, the rest of the space is filled with even light that does not hurt the eyes.
Carrying LED Recessed Light
The simplest and most common homemade products for the garage are portable lamps. Without them, it is inconvenient to work not only in a garage pit, but even just on a workbench. You need a flat recessed LED lamp that can be turned on at 220 V. These models are called “tablets” because of their shape. You also need a cord with a plug and a piece of plastic window sill to install the lamp. The window sill piece should be larger in size than the lamp. You choose the specific sizes yourself. The next steps are:

That's it, the homemade carrier is ready. This option is for floor installation. The movable leg allows you to change the angle of inclination. To make it turn over less, you can attach a couple of weights inside the body (in its lower part).
Attach the carrying cord to the ceiling
Convenience comes from little things, and very simple homemade products for the garage help with this. For example, you can remove the cable from a portable lamp that always gets tangled under your feet. Carrying is usually done with a cheap cable. It is not the most flexible, does not fold well, and its coils on the floor get under your feet. In general, it is inconvenient to use. You can protect yourself and carry it by hanging the cable from the ceiling. The solution is simple but very effective.

You can make this “suspension” to the ceiling for carrying with your own hands in an hour
- Two anchors with a ring at the end.
- Cable tie.
- Clamp clamp.
- Metal cable. The length depends on the size of the garage - it needs to be from one wall to the other.
- Steel/plastic rings or steel wire and a piece of pipe to make these rings.
- Carrying with a long cable - its length is approximately double the length of the garage.
The cable is stretched along the long side of the garage. It’s more convenient - not far from the “working” wall, where the workbench or other equipment is located. A little work:

Well, that's all. You can use it. With such a device, the carrier can be carried to any end of the garage without the cable getting tangled or caught. Convenient, takes little time.
DIY garage compressor
A compressor is needed in any garage. And, by the way, this is not the most difficult homemade product for the garage. A low-power compressor for the garage for inflating tires and other small jobs can be made with your own hands from auxiliary materials. For example, from a compressor from a refrigerator. For this you will need:
- refrigerator compressor;
- a sealed cylinder with thick walls (you can use a fire extinguisher flask or a small gas cylinder);
- safety valve 8 atm;
- pressure gauge;
- fitting;
- oxygen hoses with couplings (select the length based on the size of your spare parts);
- base for the compressor - a thick board or piece of plywood will do.
In order not to pump any nasty stuff into the tires, it is advisable to also install a filter to separate oils, dust and other contaminants. The diagram of a homemade compressor is shown in the photo.

Homemade compressor diagram
The compressor must have a starting device. We plug it into the network, see which tube the air is sucked into, and mark it. You can put a car filter on it - clean air will be pumped in.
We assemble an oil separator receiver from a cylinder and a safety valve. To do this, we cut two fittings into the cylinder - for air inlet and outlet. We place a safety valve on the inlet hole and connect the compressor outlet to it using an oxygen hose.

Homemade compressor for the garage based on a compressor from a refrigerator
We install another automobile oil filter at the outlet of the oil separator receiver to completely remove the oil. We connect the filter to the pressure gauge, and from it comes a hose, which is connected to the tire through the appropriate adapter.
Assembly is complete. But in order to carry this device conveniently, everything needs to be secured in some way. You can weld the frame to size, attach wheels and a handle for easy transportation. One of the compressor options for inflating wheels is described in the video. There is no receiver, but its functions are performed by an oil filter. You can do it this way, but with a receiver the design is more reliable.
Since the compressor in the refrigerator is low-power, it may take a long time to inflate the tires. You can make it more powerful by installing two compressors that will start simultaneously. Accordingly, the pressure will build up twice as fast. But such an installation requires a more robust security group. Such homemade products require a little more equipment, since the circuit is still more complicated.