We turn a child's dream of a car bed into reality with our own hands. Making a car bed with your own hands Children's beds in the form of cars with your own hands
If you suddenly decide to distinguish yourself by the originality of your taste and make your little child really unique bed with your own hands, then you have come to the right place.
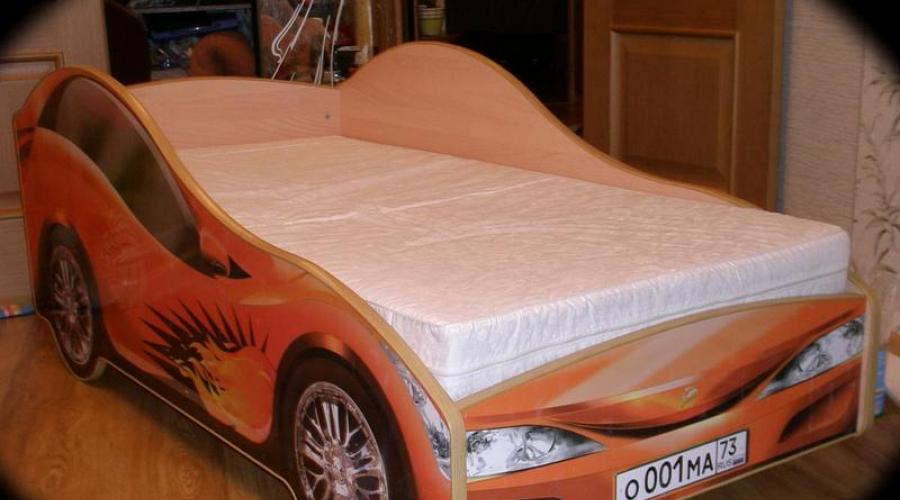
By using of this material You can easily make a car for a child and please your loved one, they say, I’m such a great guy, I made such a bed myself (see photo).
The design of this “car bed” project was carried out by E.N. Chernyshov, the construct was entrusted to the shoulders of V.V. Shevkolovich.
The children's bed machine is made for a mattress 120*700*1400 and has overall dimensions of 1480*720*610 mm. Before the purchase children's mattress be sure to check out .
The headboards and sides of the children's “car bed” are made of chipboard. These parts were cut out on a CNC machine. Of course, you can cut them yourself, but to get a perfect cut, you need to sweat quite a lot.
The archive, which you can download at the end of the article, contains the layout of the bed parts for the CNC machine in dwg format. This file can be opened using Compass or AutoCAD. But to you, according to by and large, you don't need to do anything with it. Just pass it on to the company where you will order the parts, and they themselves will make it for you according to this drawing. necessary details for bed - sides, front and rear bumper car beds.

The design on the sidewalls was obtained using glued oracal film, which was previously printed on a large-format plotter.
The ends of the chipboard are covered with a U-shaped mortise profile. The installation process is described in the article.

The slats that will hold the mattress were attached to the sides of the bed using wooden beam and lath holders (see photo).

Also, in order to hide the fastening points on the visible parts of the bed, not , but were used as fasteners.
Authors' Comments
For a clearer understanding, please read the authors' comments.
Since two people were involved in the development and manufacture of a children's bed different education, from different areas activities and different experiences, then deviations from the project began at the very beginning of the assembly.
1. The metallized edging included in the project was not available for sale; it had to be replaced with laminated chipboard (beech) close to the texture; The same fate befell the reinforced eccentrics (more precisely, they were on sale, but in wholesale quantities) - they had to be replaced with regular ones (this change is reflected in the design documentation).
2. It was proposed to fasten the beam for fastening the lath holders not from the inside with 14 screws each, but from the outside with only 5; At the same time, cover the countersunk holes (in which the screw heads are buried) with epoxylin.
The proposal is justified - the total twisting length in the second case is slightly less than the total length of the first option, but in this case the beam is attracted to the sidewall with great force and there is no need to glue the beam and the sidewall and, therefore, to prepare the surface of the sidewall for gluing.
BUT further operations (sticking the pattern and beyond) showed that the use of epoxylin must be carried out with the obligatory fulfillment of the requirements of the drying process: complete hardening after 12 hours and ONLY THEN treatment of the pouring area - sanding and sanding the epoxylin stain, and carefully - the film with the pattern is quite thin and reveals all surface irregularities (including trash cans).
3. Points not reflected in the documentation:
- install dowels with glue,
- Lat holders fix furniture bracket 11-12 mm (quite enough - a bracket of a longer length and, accordingly, a larger diameter can split the lat holder),
- The design documentation states, however, I repeat - the batten should not stand up in the batten holders by surprise, it should be able to move within 5 mm.
4. For a person familiar with the oracle sticker, this operation will not cause difficulties.
Briefly:
- the surface must be smooth and clean,
- the sticker must be guided through the water - this makes it easier to smooth the film and expel air bubbles,
- the film with the applied pattern is very unstable to mechanical influences (I do not rule out that printing on other, more resistant media is also possible), so a transparent oracal was glued on top of it (the so-called “cold lamination”); Notes specifically on this point - the sticker should also be placed on water; It is advisable to use boiled water without impurities (we had some streaks under the oracle, the nature of which we could not determine),
- As a squeegee, use a fairly hard (and clean, free of foreign inclusions) felt; using a rubber squeegee can cause streaks and scratches in the drawing.
5. The profile was glued with Titan glue along the untreated (in the sense of unedged) end; I'm almost sure that this glue is far from best material, but... “I made him out of what was...” (there was nothing else at hand and accessible...). The very presence of this profile is explained by the need to protect the edges of the films (patterned and transparent) from scuffing, which could ultimately lead to their (the films) peeling. During the work on this item, the following considerations arose:
- It would probably be more correct to first apply 0.4 mm, then apply the design, and only then sculpt the profile - this way the adhesion of homogeneous materials would certainly be higher.
- It would probably be more technologically advanced to apply the design using ultraviolet printing (however, the resistance of such a design to mechanical influences is unknown, and the cost of the issue is unknown...).
- the feasibility of using a T-shaped mortise profile is, in my opinion, questionable; I'm not sure if this is a better solution.
That's how all the comments are.
PS: The designer does not want to give away full-color and full-size drawings suitable for printing (tiff, 300dpi) for “just like that.” So either use jpg, or draw it yourself, or something else (for example, buy it).
Drawings and detailing of a children's bed machine
- Layout of parts for a CNC machine (dwg)
- Bed assembly drawings and diagrams (pdf)
- Bed detailing in (pdf) format
- Car bed images (jpg)
The machine bed is made by hand using custom design. A sketch of future furniture is preliminarily prepared.
The car bed is made to order.
Main works
Professionals know how to make a car bed with your own hands efficiently and quickly. An important point in this matter is the choice of material. For this, it is recommended to use MDF or chipboard. The sheet parameters should vary between 2700x1830 mm. You can make such furniture using 1-2 sheets. In order for the machine bed to be an environmentally friendly product, you will need to use furniture panels made of natural wood(plywood).
The production process is carried out using the following materials and tools such as:

It is necessary to cut out the elements of the future bed on a sheet of chipboard.
- timber 50x70 mm;
- confirmations 6.3x50 mm and 7x70 mm;
- screwdrivers;
- drill;
- screwdriver;
- level;
- rollers;
- nails 120 mm;
- mattress;
- material.
A car bed needs a strong frame. Timber is used for its manufacture. It is cut taking into account the dimensions of the future furniture. The frame parts are fastened together using screws or self-tapping screws. Pre-drill holes.
The next stage involves cutting chipboard(MDF). To do this you will need to make templates for each part of the crib. Parents who know how to draw well can make them with their own hands. Otherwise, print suitable option from several angles. The drawings are enlarged to appropriate sizes using a photocopier. The templates are placed on furniture panels and outlined with a marker. The parts are cut using a jigsaw.
If parents own graphic programs, then a vector drawing of each part is prepared. For this purpose they use special programs(Corel Draw, Adobe Illustrator, AutoCad). File:
- printed on a printer, the resulting elements are glued together;
- The sheets are printed and cut in special companies.
Return to contents
Making a box

The next stage involves processing the ends of each part using sandpaper. Future bed the car should not have sharp corners and edges. Then holes are made for confirmations. To do this, use 5 and 8 mm drills.
To install a sliding drawer, you will need linear rollers. They must be placed on the side posts of the box. The niche parameters depend on the size of the rollers. The width of the structure should be 552 mm, depth - 639 mm, height - 214 mm. The dimensions of the drawer parts are as follows (mm):
- bottom – 639x552;
- side rib – 639x169;
- inset rib – 520x169.
Holes are made on the sides for confirmations. A facade with parameters 606x208 mm is screwed to the niche. The bottom edge of the last element should coincide with the corresponding edge of the furniture side.
Along the entire perimeter it is necessary to maintain a gap of 2 mm (between the cutout and the facade).
A box is inserted into the bed of the car. A limiter of the required length is screwed to the other side of the side.

The bed machine is ready for decoration. This will require MDF sheets of slight thickness (12 mm). The material is used to cut out linings for sides, wheels and tires, a spoiler and other parts of the product. The next stage involves painting the bed. The sides are painted in 2 colors: main and secondary (for arches). IN in this case the main color is red, and the shading color is gray. The last color is used to cover the front of the drawer.
To screw the decorative trims onto the side, you will need self-tapping screws. When performing this procedure Special attention placed on the back of the bed (the edges of the side should coincide with the pad). Length from floor to bottom edge decorative element equals 41 mm. The cover is prepared and installed on the front of the crib. Do the same with the box.
A children's bed in the shape of a car is probably the dream of every child from 0 to 90 years old :). After all, men are the same as children, which is why some of them one fine day decide to make a car bed for their son with their own hands.
These dads are so skilled that their products are of a factory-quality quality, and words cannot express how much joy there is from such creativity!
While mommies are doing easier crafts (for example, making), dads are rolling up their sleeves with all their might.
How to make a children's bed?
Today we will show, using the example of Alexey Neplyuev from Krasnodar, how to make your child’s dream come true by arranging for him a sleeping place in the form of a vehicle.

You will have to sweat and spend some time and money, but all this will pay off handsomely when you see the smile of your son or daughter.

What materials are needed to make children's furniture? Usually home craftsmen buy sheets of chipboard or MDF. Their thickness varies, you will need 1-2 sheets, depending on the size of the machine. If you find a thick piece of plywood or furniture board made of natural wood, the bed will turn out to be environmentally friendly!

DIY children's bed
Buy orthopedic mattress and sew a cover on it so that it lasts as long as possible. Prepare tools, nails, screws, etc. You will also need spray paint to paint the product. The one that won't suit you. Alexey, judging by the photo, used real headlights for the car, but you can get by with a symbolic image-drawing.

From the photographs you will understand the entire process of transforming ordinary parts into a super-vehicle for baby sleep and games.


This children's car bed furniture will look especially amazing if you attach diode lighting to it and place it on the bottom of the product. Just don’t forget to come up with a product switch!


Probably now your child will happily run to bed as soon as he hears your request: “It’s time to go to bed!”
So, the disposition is as follows. Time - 22 hours. The baby is already sleeping in his room on a new bed. My wife and I have already washed our purchase and are each going about our own business. She goes to bed, because tomorrow the little despot will wake her up at six in the morning. And I decided to take advantage of the silence and the fact that the impressions had not yet faded from my head and write this review. About how best to choose a bed typewriter, how to buy it, what to look for, how to assemble it and how to survive the storm of delight from the heir :).
How we chose a car bed for a child
It all started with the fact that about a year ago our baby began to show genuine interest in all kinds of things. We have a great many of them. There are rubber ones, and plastic ones, and wooden ones... In a word, not a house, but a whole garage (well, without the smell of gasoline:).
At some point, it was time to change the crib. Our good old one has served its time. Despite the fact that the baby was 2.5 years old, he no longer fit into it. I had to think about buying a new crib.
First, we would opt for a bed from IKEA. What seemed convenient about it was that it was extendable and seemed to grow with the child. Maximum length it is 180 cm, that is, even a short adult can fit in there.
But choosing between crib from Ikea And bed car, we chose the latter without hesitation. It may be a little more expensive, it may be only 165 cm long, but it’s a CAR! It doesn't matter to you, but for the child it is a considerable pleasant surprise.
Additional fat was added to the fire by reviews from those who had already purchased machine beds, accompanied by photographs of happy children who literally the words lived on these beds for the first days - they were so happy.
So we started choosing car beds for boys. Why specifically for a boy? Because there are options for girls. Sort of pink in ladybugs and butterflies. But we needed a red racing car with a wing. These are the toys our baby loves.
To begin with, we started looking at offers from the Internet. There were a lot of them and prices fluctuated so significantly that we had to work hard before we settled on something specific.
At all car bed prices start from four thousand and a penny. But we didn’t even look at them, because we had previously read reviews about cheap models. The main problems with them: clumsy execution, unreliable film with a pattern that begins to lag almost immediately, and, what is most disgusting, is the disgusting smell of some kind of chemical that does not disappear for weeks.
On the other side of the scale were, of course, Ferraris and Audis with glowing headlights and sound effects (very necessary :), an exact copy the bodies of real cars and even a control panel that allows the child to turn on the headlights and “start the engine.” It is noteworthy that the length sleeping place in such beds - 190 cm. Even I could fit :)

In a word, these cribs contain all the most best ideas domestic (or foreign?) bed history, which, according to the designers, should lead the child to complete delight.
But no matter how much we love our son, we couldn’t buy him a Ferrari. After all, for such a price you can, in principle, buy a real car. Of course, it will not be a foreign car, but some kind of used Lada, but the fact remains a fact.
Therefore, we decided to settle on an option that, on the one hand, would be affordable for us, and on the other, would not cause strong rejection.
Meet, car bed Gold Magazine Team R1 Goldmagazin.ru company (St. Petersburg).

Why this particular car?
- worthy appearance,
- high-quality performance,
- good reviews on the Internet,
- reasonable price (12,000 rubles, but with a discount we bought for half the price),
- ease of assembly.
Generally in the company Goldmagazin.ru are offered not only machine beds, but also a lot more. For example, when buying a bed for a child, you can order other interior elements made in the same style: cabinets, bedside tables, tables, etc.

This is a picture from their website. You can find it on the Internet and watch it yourself. There's a lot more there. And I guess I’m done here praising the company itself, otherwise you’ll think that this is a custom article :)
Bed machine Gold Magazine Team R1. Opening the box
As I already wrote, this evening our purchase was delivered to the entrance. All my entreaties to help drag the box at least to the elevator were answered with a polite refusal. I had to resort to the good old method - give 100 rubles.
Yes! Now this site must work properly for a whole day and a half to make up for the resulting gap in family budget... I already wrote that this site makes money, right? You didn't know? Want to know how? Then read This(but not now, sometime at your leisure).
After handing over the bill, everything immediately settled down, and now in our hallway we already have a box with a machine bed and a mattress for it. By the way, the box weighs just over 60 kg and has dimensions of 170x80 cm. In principle, 60 kilograms is not so heavy, but there is absolutely nothing to grab onto. Therefore, in order not to accidentally drop the box, it is better to carry it together.

I would like to immediately apologize to you for the fact that starting from this place there will be a lot of pictures. Therefore, if you are viewing this text on a tablet, save your traffic. You can then watch the article on your home computer.
After opening the box, it was discovered that the packaging did its job brilliantly. No parts were damaged during transportation:


After all the parts of the bed were carefully removed from the packaging and laid out at the assembly site, the following picture appeared before our eyes:

Our child immediately liked the wheels the most. Please note: in the R1 model, although the wheels are painted on the side walls, they are additionally duplicated with real round ones wooden parts. They are screwed on top of the drawn ones and can rotate. The R2 model does not have such overhead wheels. In principle, the loss for us, adults, is small. And for the baby it is much more interesting to have the wheels spinning.


The kit includes a bag with mounting materials. Looking ahead, I will say that not everything went smoothly with them. But more on that later. The package also contains a hex key. It is not very convenient for them to work, but it is quite possible. Better and faster assembly will go with a screwdriver. We also need a screwdriver and a drill with a thin drill bit.
So, everything is prepared - let's start assembling.
How to assemble a bed car. Instructions in pictures
Step 1
Freeing up space for assembly. Keep in mind that once the machine is assembled, it is advisable not to move it unless absolutely necessary. Even the instructions say that movements are only allowed when raised above the floor.
So clear the area where the bed will be and assemble it right there.
Step 2
Attached to the big red slab back wall. Nothing particularly complicated - just screw two tie bolts into pre-prepared holes using a hexagon. You have to act very carefully. If you carelessly tilt the back wall relative to the bottom, you can simply break it.

Step 3
Screw the front wall. It is on this that the slab with mattress will subsequently lie. Nothing complicated either. But for convenience, it is better to put the structure on its side, as shown in the photo:

We fasten three boards on which the radiator grille and headlights are depicted. I must admit I made a mistake here. First I screwed on the headlights, and then, when I installed the radiator grille, it turned out that I screwed them on upside down. I had to redo it. Conclusion: first install the radiator grille. I hope it doesn’t occur to you to put it inscription upside down :)

Step 5
This plank has to be secured with as many as 8 tie bolts. It performs two functions - it fixes the headlights, the radiator grille and the front vertical wall and serves as a support for the berth:

Step 6
We install one of the side walls. It doesn’t matter which one, right or left, you start with. The main thing before installation is to put future car on its side and try to act carefully. Side wall- quite heavy construction. It wasn’t difficult for me to just put it on top of the car body, hitting all the grooves at the same time. But how will the mother of a child whose father is on constant business trips or is very busy at work do this? It probably won't be easy.

Step 7
Install the second side panel. The main thing here is not to damage the previously installed one. On at this stage The structure is not yet rigid enough. Any careless maneuver and something could snap.
I decided to use a mattress so as not to damage the film covering the already installed side wall. You know, you wouldn't want to scratch the side of your car, even if it's just a crib.
At this step, do not forget to fasten the supports - four bolts with plastic caps, on which, in fact, the machine bed will stand.

Step 8
Next, while the car is on its side and its bottom is accessible to us, we need to attach side panels to the bottom base. There are special ones for this metal corners and small screws. However, the holes for them are not drilled in the panels. Therefore, you can either screw the screws into the panels with all your might, or drill the holes yourself:

Step 9
Place the car in a horizontal position and attach the spoiler:

Step 10
Fastening metal structures lifting the bed was not without complications. The problem is that the holes in the side panels were only drilled half the length of the supplied screws. That is, the screws were screwed into the side panels quite quickly until about halfway, and then considerable effort had to be made to continue screwing.

You could, of course, take a drill and drill more deep holes, but I really didn’t want to “climb out” with a drill on outer surface glossy side panel, ruining both the design and the overall appearance. I had to replace the standard screws with shorter ones.

Step 11
Most exciting process- installation of a sleeping place. It must be installed, trying to simultaneously hold a fairly massive white plate - a sleeping place - and get four bolts into the holes of the metal parts of the lifting mechanism. It is very difficult to do this kind of work alone, so I had to call my wife for help. She held the stove, and I climbed inside the car, trying to perform the most difficult maneuver.
However, sooner or later reason prevailed, and now the car is almost ready for a test drive:
Next, all that remains is to screw on the wheels and put the mattress in place. By the way, pay attention to the fact that the front part of the mattress also has a semicircular shape, like the sleeping place. You could save a little and buy a regular children's mattress. However, it would definitely be rectangular and the appearance would be a little lost.

General conclusion
Bed machine Goldmagazin.ru R1 Gives the impression of a solid, reliable product. Of course, this is not a plastic Ferrari or Audi, but the quality of the parts does not cause any problems negative emotions. Everything falls into place normally. During the entire assembly there were only a couple of minor mismatches in the mounting holes. But this did not stop us from tightening all parts of the bed tightly.
I would especially like to note that only on the first evening the bed machine smelled of wood (not chemicals, but wood). But the very next day the smell disappeared.
The child, of course, was delighted. Now he has his own bed, on which he not only sleeps at night, but also plays during the day.
I don't feel sorry for the money anymore. We believe that buying a car bed instead of a regular children's bed is great idea. Of course, you could try to make such a bed yourself, but you have neither the time, nor the tools, nor the materials, nor the experience.
Everyone must do their job. Company LLC "Goldmagazin.ru" did a great job. And for Good work and it’s not a sin to pay.
My son grew up and no longer fit into his first crib, and secretly from my wife and family, I decided to make it myself.
Having rummaged around on the Internet I found very interesting project car beds, sleeping space dimensions 70x160, just what I wanted.

I downloaded the furniture planning program and opened the project.
Everything can be twisted and turned and, most importantly, there are all sizes!
My eyes lit up, my hands itched =)

My goal was a bed made from environmentally friendly materials
I chose the 18mm furniture board from coniferous species(pine, spruce)
I estimated the volumes of parts on a squared sheet of paper and decided to buy two panels 1x2m and three 0.6x2m, it seemed like it should be enough =) even with a small margin, if I suddenly mess up.
Honestly, I went around a lot of building materials in search of the right size. Of course, I could safely order it on the Internet, but I wanted to feel with my hands what I was buying and how durable it was.
Having successfully unloaded this stuff in the garage best friend, I went home to puzzle over the question of how to transfer these forms to pieces of wood.
After several hours of dancing, a tambourine and a printer, I managed to print out many, many A4 sheets with details. The scale on the monitor screen, bastard, did not coincide with what was printed on paper. Thank you very much ruler attached to the screen and the math teacher, I remembered the proportions of multiplication and division)
Armed with a stapler, a glue stick and a flashlight, I put together the printouts of the parts.


cut it out and transfer it to our furniture panel

Using the means at hand, we invent a compass 😉 use a tape measure to estimate the required radius and... wow, the circle is ready.

put a paper star on it to make a wheel

we drill holes so that the jigsaw blade can pass through and saw


The star on the disk is asymmetrical, that’s how it was in the design, I didn’t change it
I’ll add that it’s better to cut with a special saw for figured carvings, others start to get very hot, the wood smokes and burns in places with strong curves


We assemble the frame of our bed from 50x50mm bars, according to the project.
Everything we cut will be attached to it
I didn’t take pictures of the rest of the sawing - it’s not very interesting
There were a lot of details, I signed it so as not to get confused 😉

Finally the day of assembly has come, we assemble the front drawer, screw on the piano hinge

I fastened all the parts with 5*50mm furniture companies, we drilled them with a special drill for these companies, bought where they were.


Apply the trim approximately, align it logically and screw it onto the yellow screws, for clarity we screw the wheels

screw on the spoiler and backrest


The sander was good only on long and more or less even parts, the rest was done by hand.

After spending 4 weekends on sanding, the next step was painting
I chose acrylic eco-enamel for furniture and added color “ green apple“, I started stirring first with a screwdriver, then with a larger stick, in the process, to put it mildly, I was all hesitant and, showing ingenuity, I stuck the bent electrode from welding into the drill 😉 It was stirred with Hurray!


The drying rack previously assembled from an iron cabinet was also useful for painting. various kinds pieces, the heating elements below are red from the microwave oven)
The paint dried instantly - the temperature was about 60 degrees

when two layers of paint have dried, try on the overlay, trace the outline with a pencil, draw the glass by hand using masking tape

paint in 1 layer, let it dry...


I spray-painted the wheels first completely in silver, after which I applied a circle of cardboard in the same spray-painted black color, ala tires

I forgot to write that I sanded the wheels longer than anything else, “filling up” one edge of each beam with a file, who the hell knows why 😉 it’s more fun this way

The frame made of bars was also covered with dark paint, the color is interesting, lighter than black, slightly blue, reminiscent of graphite


I’m happy with the work done, smiling as I finish my beer, I can already see what’s coming out 😉

On top there is 12mm plywood, kindly provided by my grandfather and cut to size by him.


so as not to spoil the surprise, my friend and I ram this heavy thing into his apartment, first they barely pushed it into the car, and then to the 3rd floor 😉

we modify the roll-out drawer locally, 4 below furniture roller, on the sides, 2 on each side. Here a small jamb appeared, having screwed the rollers on the sides there were decent gaps relative to the base, rubber bands for taps from the times of the USSR were used. It turned out very well, the box slides in smoothly, the rubber bands also serve as a damper
The mattress was ordered during the assembly process to size, natural latex, natural jacquard on top and medium firmness.

I ordered Ferrari logos printed on adhesive paper from a printing house and covered them with acrylic varnish from a spray can.

It's already home =) My son was very pleased, it was only for the sake of the first moment of joy that he started all this! It's indescribable.
Thank you all for your attention!
P.S. if anyone is interested, about 17 thousand rubles were spent on materials + mattress, and 2 months of my free time on weekends)