Correct placement of blocks. Step-by-step instructions for laying expanded clay concrete blocks with your own hands How to lay building blocks correctly
Proper laying of blocks: how to lay blocks yourself
Building blocks - this material burst onto the domestic market relatively recently - in the second half of the last century. However, despite their relatively “young” age, building blocks have already managed to displace both the usual brick and time-tested wood from the building materials market.
After all, this material is characterized by a rather rare combination of qualities, which include sufficient strength, high heat resistance, enviable cost-effectiveness and the amazing simplicity that distinguishes the laying of blocks.
The laying process itself can be accompanied by only two relatively difficult moments - laying the first row of blocks and arranging the floors. In addition, in some cases it may be necessary to install a reinforcing frame. Let's look at these points in more detail.
So, before laying blocks on the foundation, that is, forming the “first row,” a novice mason needs to perform the following set of actions:
1. Using a cord and a plumb line, it is necessary to determine the location of the corners of the house and outline the boundaries of the walls of the building. After which, using a horizontal level, the highest point of the foundation is calculated - laying the blocks will begin from the corner located at the minimum distance from this point.
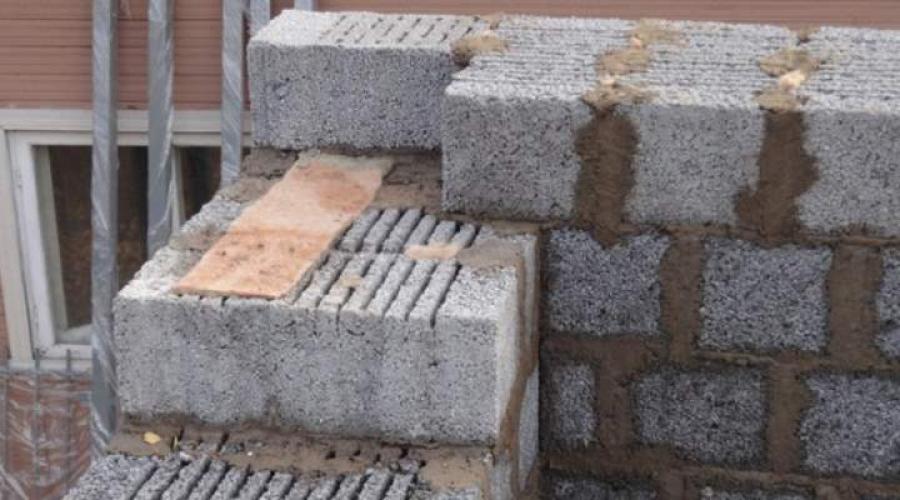
2. Next, along the outlined contour (the edges of which can be marked with special cords), a layer of moisture-resistant, cement-sand mortar is applied. This layer is necessary to level the surface of the foundation. It is best to buy the dry mixture for such a solution ready-made. After distributing the moisture-resistant solution over the surface of the foundation, a layer of insulator is laid on it, protecting the first rows of blocks from dampness. Roofing felt, roofing felt and other similar materials can be used as an insulator.
3. Next, at the location chosen for laying the first block, a relatively thin layer of mortar is applied directly to the insulator layer - after all, for the first block it was necessary to choose the highest point of the foundation - and the first block is “laid” on this mortar. After laying the first wall element, it is necessary to check the position of the block vertically and horizontally. The position of the block is adjusted using a wooden or rubber mallet.
4. After installing the first block, you can begin building the first row of the wall. Moreover, the masonry itself can be continued from the first block, however, it is best to immediately install blocks in each corner of the building. And only after that fill the space between the corner elements of the masonry. In this case, horizontal control must be done using a hydraulic level, and the outer boundaries of the blocks will be determined by the intersection of the marking cords.
After completing the first layer, laying the blocks will proceed with less difficulty. However, before starting the second layer of blocks, you should remember that the vertical seams of the bottom row must be bandaged with a whole block from the top layer.
However, most novice builders may have difficulty laying the second row. Therefore, before laying the blocks of the top row, novice masons need to remember the sequence of laying the first row and repeat all these steps, starting with the first corner element. Moreover, in the process of subsequent installation it is necessary to try to minimize the thickness of the fastening seams, because the heat resistance of the structure will depend on their size.
But before laying the fourth row of blocks, you need to take a short pause. The fact is that it is between the third and fourth rows, in some cases, that it is necessary to arrange a horizontal, reinforcing frame. To do this, one or two grooves are cut in the upper part of the third row blocks, into which metal rods with a cross-section of 6-8 millimeters are laid.
And in the future, this operation is repeated with similar frequency - the reinforcing frame will be installed between the seventh and eighth rows, the eleventh and twelfth rows, and so on. However, such a frame is only necessary for relatively fragile blocks made from certain types of foam concrete.
The next challenge for a new mason trying to figure out how to lay blocks on his own can be openings and slabs. Moreover, the entire complexity of arranging these elements will lie in the need to construct an additional reinforcing frame at the installation site of doors and windows. After all, a relatively fragile block may simply not withstand the weight of a reinforced concrete floor over a window or doorway.
However, there is simply no particular difficulty in the technology of arranging such a frame. Its elements can be laid out from ordinary bricks. And the only difficulty awaits the performer when leveling the horizontal of the upper edges of the reinforced concrete floor and the last row of blocks.
The problem of arranging interfloor coverings is solved in a similar way. On the upper plane of the outermost row of blocks, a layer of denser material is mounted - the same brick on which reinforced concrete floor slabs are laid.
How to lay blocks with your own hands + step-by-step instructions
So, after the foundation has been poured, a rather important stage begins, namely the laying of blocks, which is not as difficult to do with your own hands as it might seem. Today we propose to consider this very topic, and we will talk about low-cement blocks.
Before you start, you should prepare all the necessary tools. First of all, you may need tools such as buckets, shovels and a hammer. Next, arm yourself with special devices, namely a mason’s pick, a trowel or trowel, a plumb line and a building level. To break the walls, you may need a strong thread called a “chalka”, as well as a tape measure.
It is best to buy thread on a handle, from the company Stauer, because it fits perfectly in the hand and is bright yellow, which is clearly visible even at dusk.
Tools
As for electrical tools, you may need a hammer drill, a grinder (to cut off reinforcement or corners to create jumpers). To mix the solution, it would be nice to have a concrete mixer on hand, as well as a barrel of water (can be made of metal or plastic). To create jumpers from corners you will need a welding machine. If you plan to lay two or more floors, then it is better to carry pallets with blocks along the floor not by hand, but to use a cargo trolley, which you don’t have to buy, but rent at a tool rental shop.
Materials
Directly for installation you will need low-cement blocks, cement mortar, water and sand. The lintels that will be located above the door and windows require metal - reinforcement, angle or channel. As a rule, a lintel made of reinforcement is used over the doors, the diameter of which is from 1 to 1.4 cm in several rods, and for windows it is better to use corners. For garage doors, the best option would be to make a lintel from channels - much will depend on the weight of the door and the width of the opening. Beacons may require a wooden batten, as well as dowels; For scaffolding, use boards and pallets, and you can fasten it all with nails. If you have a construction goat, then that's even better. If you live in seismic regions, then you will need a masonry mesh, or A240 0.6 cm reinforcement. But it will be much easier to find the mesh and use it, and it is better not to use fiberglass reinforcement as wall reinforcement. if you plan to cover the entire house with facing bricks, you will need a notch for the outlets that will be embedded in the seam. This is where you can use fiberglass reinforcement.
Work process
Wall markings
Any work begins with the need to clean the base from debris and dust. If we are talking about the first floor, then you should remove it on the foundation, and if you are laying the second and higher floors, then we will start with the ceiling. All you need to do is sweep the walls with a broom. As was previously done when laying out the foundation, now it is necessary to correctly break the corners of the building so that they turn out straight everywhere, because this will be the last moment when it will be possible to correct everything, since otherwise errors in geometry will crawl out onto the floor and roof. The best option to solve the problem would be to call a surveyor who will cut right angles with an accuracy of 0.3 cm, but this will cost several thousand rubles, and usually such a master is called only to break down a building or to overly long houses.
Small houses can be demolished without outside help. To do this, you will need a roll of rope and a construction tape, preferably made of metal. The technology is quite simple - place the blocks dry and take measurements of the diagonals of the resulting rectangle. The accuracy will be within 0.3-0.5 cm. You should take into account the fact that a metal tape measure does not stretch, but a thread or cloth tape measure will stretch, and quite a lot. If you do not plan to do cladding, then you can extend the block or brick beyond the vertical border of the plinth to approximately 1/3 of the brick/block. BUT try not to abuse this, especially if the buildings are higher than 1 floor. When the main corners of the building are exposed, it will be possible to simultaneously expose additional ones, if any. At the same time, it will be possible to put up partitions, especially if there are no columns, so that they can be laid at the same time as the outer walls.
Laying blocks with your own hands in the first row
 Before starting the laying of the first row, it is imperative to check all the vertical type marks on the foundation, because the first row is the most important stage. If you do not level the base with mortar or there are large differences, then there is a high probability that the walls will crack. The check is carried out with a regular spirit level or a laser level, which was set during marking. If deviations from the horizontal are up to a maximum of 2 cm, then you can level out the unevenness with a solution. If it is more, then it is better to fill the belt with reinforcement and make sure that the horizontal level of the concrete is normal. The first row should be laid on roofing felt, cut the roll in half and laid directly on the foundation. This is done in order to cut off capillary moisture from the blind area and the ground.
In seismic areas where the standard value is higher than 6, such waterproofing is prohibited! During a seismic wave of a lateral type, a building can be moved from its foundation and completely collapse. For this reason, waterproofing is made from mortar if roofing felt cannot be installed. So, before starting masonry, check the base again for debris and wet the base. The mortar is placed on the first corner stone and the second on the opposite corner with the holes downwards, and you also need to carefully monitor the height of the masonry. Be sure to check the side edges and ends of the blocks by level so that everything is only vertical.
When all the blocks stand exactly horizontally and vertically, you should stretch a cord between them and align them along it. Now, in the same way, make a perpendicular wall - this technology is called “bringing corners.” While you are making the second and third corners, on the first floor the solution will have time to lose its mobility, and the block will lie tightly. Once this has happened, you can begin laying the first row further. If we are talking about a seismic region, laying in a wasteland is prohibited. We are talking about work when only horizontal rows are placed on the mortar, and the vertical rows are not filled with mortar. Thus, masons often try to save time, and then plasterers will have to tinker a lot and seal the cracks.
For this reason, apply two portions of mortar to the end side of the next block where the block on the foundation/slab will be laid out and carefully place the block, almost touching the thread. With a light tap of a pick or trowel, the block should be tapped to the first block and then aligned with the thread so that the block touches it slightly. When everything is finished, check the side edge for verticality. We do the same for the rest of the wall.
Wall laying and mesh reinforcement
 The second and all other rows will hardly differ from the masonry of the first row, but the main difference will be that the corners, in addition to the level, will need to be checked with a plumb line. The more rows, the greater the accuracy of the plumb lines, because the level has quite large errors. Typically, plumb lines are bought in stores in the form of metal weights, to which you must attach a rope yourself.
To mark the load, you should make a conical hat in order to know exactly the point where it will look. For masonry and plastering, it is best to use Armenian plumb lines rather than store-bought ones. It was invented by builders to do work accurately and quickly, and not be distracted by anyone.
Yes, to lay aerated concrete and other blocks with your own hands, you will need an Armenian plumb line, which is shaped like a spinning top, and not a thin nylon thread is inserted into it, but a thick rope. At the second end of the rope there should be a pipe where the rope is threaded in the middle. Inside the hole, the rope will pass with force, and behind the pipe it will be tied with a knot. It will be the same size as the plumb line.
To measure, you can easily measure the required length of rope, and attach the end of the tube to the block, and release the plumb line down. A light touch will indicate verticality, and other deviations can be easily noticed and corrected in time. It is unlikely that you will be able to buy such a plumb line, but you can make it yourself. In addition, it would not be superfluous to lay a mesh for “resistance from vandals,” because in most crime reports you can often see cases of theft from shops in a tree without signals, where the store was broken into by breaking the wall.
Banding masonry in a block wall
As a rule, external walls are placed in a block, and internal ones in half. Bandaging of the partitions should be at least 30% of the block in the run. It is unlikely that we will be able to come up with something new here. External walls can be bandaged in different ways.
Lintels in a block wall
In a block wall above the opening of windows and doors, it is necessary to install lintels, and in load-bearing external walls, a depth of embedment into the wall of 0.2 meters is allowed, and with an opening width of more than 1.5 meters, at least 0.25 meters is allowed, for other cases the optimal figure is 0.35 meters. You can pour all the concrete, but it is inconvenient and time consuming. To implement it, you will need to install formwork, reinforce it with a spatial frame and fill it. In this case, the laying will be suspended. If you do everything yourself, then you can use this method - although it is the most labor-intensive, it is also the cheapest, and nothing will stick out from the wall.
Ready-made lintels are heavy and are placed several times per row to match the thickness of the wall. This method is much faster, but it will be difficult for 1-2 people to do it while standing on scaffolding. During private construction, reinforcement and a corner are most often used as a lintel. In partitions, you can use 1-1.2 cm reinforcement, 4 pieces each, which will be embedded in the masonry, and pull up the board from below, and then spread it with a stand, and apply mortar through the rods. When the cement becomes less mobile, the blocks can be laid. But for external walls, which are much thicker than partitions, corners are used. To do this, cut it to size and weld the reinforcement together through the strip in several places. Next, prime the metal to prevent rust and install it on the block. Apply the solution to the shelves and install the blocks with the holes facing up. This will be the most expensive method, but very reliable and fast.
Masonry mortar
A typical concrete mixer, which is capable of producing in a home/factory environment, contains about 10 buckets of materials. One mixer will require half a bag of M500 cement, 8 buckets of sand and approximately 1.5-2 buckets of mortar. As a result, we get an excellent 1 to 5 solution with excellent strength. You can use any sand, but it’s better to wash it, because it has practically no shrinkage. To prevent the solution from settling, you need to add liquid soap to it. If it is good, then 0.8 liters will be enough for all the given proportions, but there are soaps of such quality that you have to pour up to 2.5 liters - it is better not to use it.
The mixing technology is as follows:
- Lay 2 bricks and place reinforcement between them. A bag of cement should be placed on top of it in front and leveled in the middle. Using a trowel, cut the bag on one side, and then lift the bag using the reinforcement. The cement should be carefully divided in half, cut and use one half.
- Pour 1.5 buckets of water into the mixer.
- Then carefully pour in the cement and start the device.
- After 1 minute of work, sand begins to be poured in little by little.
- When everything is finished, add water or sand to adjust the mobility of the solution.
Please note that it should not be liquid or dry - not roll on the trowel, but not clump.
Posted By: 03/03/2017
In the previous article we told how we found it. It is with this that the construction of the first row of walls made of aerated concrete blocks will begin. This is done due to the fact that by changing the thickness of the sand-cement mixture, we can later easily level the first row of blocks, which will become the basis of the entire masonry.
By the way, we also checked our measurements using a water level. To do this, they poured water into it, installed it on corner blocks, and then checked the values. We will definitely devote one of our future articles to this measuring tool and its use. Now let’s just summarize that our measurements with water level are completely identical.
Now we will tell you step by step about the procedure for installing and laying aerated concrete blocks, and to be precise, about how we did it and what nuances we encountered.
How to lay the first row of aerated concrete blocks.
- Installation of corner blocks on the foundation. First of all, we placed 4 corner blocks. I would like to note that at first we carried out all the manipulations by eye, then we took measurements. Our blocks are located outside the foundation. Thus, when installing the blocks, we checked the dimensions of the extensions in different parts of the block several times. To ease one's conscience, we checked the laser level's readings using a water level. Then we needed to check the distances between the blocks, they must match the design of the house. And it would be good to check the diagonals; just like when marking a house, they should be equal. Unfortunately, we did not have the opportunity to check the diagonals, since the foundation was filled with flying blocks, but in terms of the size of the future walls, everything agreed.
- Guide for laying blocks. We stretch the mooring. Now we need to tighten the guide, which will later serve as a guide when installing the first row of aerated concrete blocks on the foundation of the house. For this we used the most ordinary rope (construction cord) of bright yellow color. It is better to choose a brighter color so that it is clearly visible. We tried 2 options. The first involved stretching the rope between the remnants of reinforcement driven into the ground. The second involves attaching metal corners to the blocks, and then tightening the lace in a similar manner. In both cases, the rope must pass through the corners of the blocks. With its help, you not only set the masonry guide, but also double-check whether the corner blocks are aligned correctly. If the lace clearly passes along the border of the blocks, then you have done everything correctly, and you can begin full-fledged masonry. By the way, we liked the second option with the placement of the mooring more.

- Laying corner blocks on the mortar. We laid the first row of blocks on a ready-made sand-cement mixture, to which you just had to add water according to the instructions. We started with corner blocks. To ensure that the blocks do not move from their proven location during the installation process, we pre-circled the boundaries of the block with a white construction marker, not only on the foundation itself, but also on our roofing felt sides, which we talked about in the article about waterproofing the foundation. Thus, having accidentally moved an aerated concrete block, we clearly understood to what place on the foundation it needed to be returned. Then they applied sand-cement mortar to the foundation and then laid the block on it, clearly understanding the boundaries beyond which it should not go. Using building and water levels, as well as a rubber mallet (special hammer), we achieved even masonry. Then the first 4 corner blocks were allowed to dry on sand-cement mortar to secure the position.

- Laying the first row of blocks. The corners were ready. Now you need to continue laying the first row. By the way, before laying the blocks, we recommend that you quickly clean them, going over them literally a couple of times with a spatula and a brush to remove possible unevenness and then construction dust. Let's return to the masonry. After calculating the required number of blocks per row, it became clear to us that we need additional blocks, i.e. blocks that need to be adjusted to length. It is not recommended to make an additional block less than 10 cm. If such a small gap remains, it is better to first reduce 2 blocks in order to eliminate the need to install one. It is better to place smaller blocks not in a row, but on different sides. This will simplify the laying of aerated concrete in the future. The entire first row is placed on a sand-cement mortar, and the bases are lubricated with it. We lubricate the sides of the blocks with a special glue designed for aerated concrete. In the future, glue will be used when installing all other rows except the first one instead of sand-cement mortar. We use a mallet to level the blocks and remove excess mortar. At the same time, we knock down the blocks not only from above, but also from the sides, constantly checking their location and joints with a level. I would like to remind you that we started laying blocks from the upper corner of the foundation, so now is the time to pay special attention to leveling all the flaws in the foundation using sand-cement mortar. That is, in the place where the highest corner of the foundation was located, the layer of mortar will be smaller than in the lowest corner of the foundation. Thanks to this manipulation, we lay the first row in such a way that it removes all the unevenness of the foundation and prepares a good foundation for the remaining rows, providing us with smooth walls of the house in the future.

This step-by-step instruction for laying aerated concrete blocks is theoretically correct, but we encountered some nuances that caused our masonry to go downhill. We will now tell you about these mistakes and tricks.
Attempt No. 1 of laying the first row of aerated concrete blocks.

Everything was done according to the instructions. At the stage of laying corner blocks, it was discovered that the building level, when changing its position, slightly changes its indicator. At a distance of 11 meters, this error in calculations can give quite unpleasant results.
Conclusion: for laying aerated concrete or any other blocks, it is necessary to use the most accurate building level. In this case, the proverb “the miser pays twice” is directly related to the situation...
Attempt No. 2 of laying the first row of aerated concrete blocks.
We acquired a new, more accurate construction level. We installed corner blocks, then installed the entire first row around the perimeter. All measurements showed excellent results. But we encountered another problem, which you can find out about in the second part of the article HERE.
In the meantime, we offer you a video from our YouTube channel with a detailed step-by-step story about installing corner blocks on the foundation and complete installation of the first row of aerated concrete blocks. Enjoy your viewing and look forward to your feedback and comments.
Best wishes,
Yana and Zhenya Shigorev.
Laying the first row of blocks is perhaps the most critical stage when laying blocks. For this reason, you should approach this stage in the most responsible manner. Many novice builders involve specialists in laying the first row of blocks, which is a completely justified step. If you don’t have a specialist in mind, then use the recommendations from this article.
So the laying of the walls begins. But not yet with a thin layer of mortar, since with the help of the first row you need to simultaneously level out all the unevenness of the foundation slab. And for this, a regular solution is mixed.
Before the first block is laid, you need to mark the corners of the house. To do this, it is necessary to break out the axes with tensioned cords. At the point where the cords intersect, you hang a plumb line, the tip of which accurately points to each corner of the house. At this point a nail is driven into the foundation slab. Tip: Drill a small hole first. After all the corners are marked, stretch the cords from nail to nail. These are the outer edges of the basement walls, which are then marked with chalk or pencil on the slab. The rule is suitable as a ruler. It is best to mark all the walls at once. A pallet with blocks is placed next to the future wall.
Since a concrete slab is never completely level, the lowest row of blocks must be placed on a leveling layer of mortar. Thus, an absolutely horizontal lining is obtained, necessary for laying walls with a thin layer of mortar. The first block of porous concrete is placed in the corner closest to the highest point of the foundation slab. All other corner blocks are later aligned to this block. Where the foundation slab has the lowest point, the blocks are placed accordingly on the thickest layer of mortar. The highest point of the foundation slab is determined using a hose level or level. A specialist should help you with this work. However, most suppliers of prefabricated blocks for houses perform the leveling work and laying of the first blocks as a free service.
Once the basement walls are marked, you know exactly where you will be placing the mortar. Use moisture-resistant cement mortar (Group III mortar), which can be purchased in bags as a ready-to-use mixture. You should only add water to it. The advantage of the ready-made mixture: a homogeneous composition of the material is ensured. Consumption: on average, 15 kg of dry mixture is needed per meter of solution layer.
An insulating layer of roofing felt is placed on the mortar layer
As an insulating layer against dampness rising from below, roofing felt is placed on the first layer of the solution. Important: in corners and wherever joints cannot be avoided, the insulation strips must overlap by at least 10 cm. And the roofing felt must be wider than the wall.
Now the solution for the first block is applied to the roofing felt in the highest corner. In this case, the surface of the solution is not smoothed, but becomes, as it were, ribbed. In this place, try to use the solution sparingly. All other blocks must be placed in a layer of mortar of the appropriate thickness. Too much mortar at the very beginning may mean that you will have to lay all the other blocks on an excessively thick layer of mortar. Now you place the first corner block, which is leveled using a rubber mallet and a hose level. The outer corner should be exactly above the previously driven nail.
Help: At the height of summer, wet the foundation slab and blocks (bottom). Then the connection will be even better.
As soon as the height of the corner blocks is leveled, cords are stretched from one corner of the house to the other corner and the first row of the wall is laid. If you are laying blocks with steep projections and grooves, then the joints can be made dry. Important: When laying the first row of blocks, think about all the holes for drainage pipes and water pipes.
Before laying the walls, the corners of the house are transferred using a plumb line from the alignment axes with stretched cords...
...on the foundation slab and are marked with nails. Tip: Pre-drill the nail holes.
Finally, the walls of the house are drawn on the foundation slab.
Pallets with blocks should be placed in close proximity to future walls.
The prefab supplier will help you measure the foundation slab.
Now things have started. The solution for the first row of blocks is mixed in the concrete mixer.
At the height of summer, you need to wet the foundation slab. This way the connection turns out better.
Now the first layer of solution is applied. A mentor from a prefabricated house supply company also helps.
Roofing felt is placed on the first layer of the solution as an insulating layer against dampness.
A second layer of solution is applied to the insulating layer, making it slightly ribbed.
The first corner block is laid and leveled using a rubber hammer and a hose level.
When laying the first row of blocks, take into account all the holes for drain pipes.
Appeared on the market only in the second half of the last century, they gained enormous popularity among developers. Heat resistance, strength, cost-effectiveness, and ease of installation were the main reasons for using this material. However, despite the apparent ease of use, not everyone knows how to lay blocks correctly.
Difficulties with installation most often arise during the construction of the first row and arrangement of floors. You may also need to install a reinforcing frame, which can also cause difficulties.
Of course, before laying the blocks, preparatory work is necessary:
- Using a cord and a plumb line, it is necessary to determine exactly where the corners of the house and the very boundaries of the walls of the building are located. Then determine the highest point of the foundation using a level. Laying begins from the corner closest to this point.
- Then a layer is applied along the marked border of the walls cement-sand solution. This layer aligns the entire foundation to the selected point. Next, moisture protection is installed. Roofing material is usually perfect for such a role.
- After the operations have been completed, a thin layer of mortar is applied on top and the first block is installed on it. Don't forget to check how level it is relative to the horizontal and vertical levels. Depending on how you start the wall, further rows will go. However, to avoid deviations, it is best to immediately install blocks in all corners and align them. Control is carried out using a hydraulic level and wall markings.
Having laid out the first row, you then need to monitor the level and marking of the walls, however, since the blocks have a very even shape, installation is done quite quickly and without any problems. However, following the technology, it is necessary to bandage the lower vertical seams as a whole block for greater strength, and also to reduce the thickness of the fastening solution. When completing the laying of the second row, you should repeat the steps of laying the first, but in relation to the top ones. This will allow you to perfectly align the wall and avoid problems in future stages of construction.
In order to correct the position, a rubber mallet is often used, or, if necessary, the bottom of the block is slightly filed. Which, although not desirable, is used when distortion occurs. You yourself will be surprised how correctly laid aerated concrete blocks overlap each other’s seams, increasing the strength of the wall itself.
In the case of using a reinforcing frame, the laying technology is still the same. However, it should be remembered that it is sometimes placed between the third and fourth rows. For it, grooves are specially cut in the upper part of the third block, into which rods from six to eight millimeters fit. This method is the most effective, although somewhat labor-intensive. Then it is repeated with similar frequency. Although it is mainly used to give greater strength to certain types of fragile blocks, it is also possible to use it to increase the strength characteristics of the wall. When wondering how to properly lay hollow blocks, you will encounter similar problems, since the methods for laying them are almost the same.
Next, novice builders may have questions regarding laying out doorways and windows. After all, a relatively fragile block may not withstand the weight of a steel beam. But in this case, these elements can be laid out using the same frame or using brick. The only difficulty will be the alignment of the blocks, which with proper skill can be quickly dealt with. Interfloor ceilings are also made using denser material. In this case, it is also suitable, on which the floor slabs are laid.