Rules for installing a chimney for a sauna stove. What types of pipes are there for sauna stoves? Determining the cross-section of a chimney for a bathhouse
Our bathhouse is associated with light steam and the pleasant crackling of wood in the stove, hot stones in the heater and the smell of a freshly brewed broom. But a live fire is associated with smoke, and if the chimney is not made correctly, you can get carbon monoxide poisoning in 20–30 minutes. The pipe in the bathhouse is planned before the construction of the bathhouse; it must be assembled efficiently and correctly. This is the only way the bathhouse will be safe and will not cause harm to its owners. We will tell our readers how to remove a pipe in a bathhouse with your own hands, what features and subtleties you need to know.
The pipe in the bathhouse is removed in two ways: inside and outside the structure.
Planning a chimney in a bathhouse is always associated with the choice of design. It is necessary to understand all types, know how to correctly calculate the size, display and install. Before drawing up the project, it is necessary to briefly study these aspects.
What pipes are used for baths?
The chimney in a bathhouse can have two devices: external and internal. Each has its positive and negative sides:
- External arrangement is less fire hazardous, do-it-yourself installation and fastening is also easier. The disadvantages are that the pipe goes outside and heat loss increases.
- The interior arrangement is complex, but all the heat gets into the bathhouse. The main disadvantage is a high degree of fire hazard.
 The sandwich pipe is easy to install with your own hands.
 Design flaws can be prevented by using high-quality insulation. We advise you not to save on time and effort and install an internal chimney; although it is more difficult to install, it will reduce the cost of heating the steam room structure. For a small bathhouse in a summer cottage, it is easier to remove the external chimney. In any case, the choice is up to the user.
Various materials are used for the chimney: red brick, ceramics or metal. They tolerate temperatures above +100 °C well and are durable.
It’s easier to buy a ready-made sandwich chimney. It is easy to assemble and install, and the internal asbestos lining makes the device safe.
Design of external and internal chimneys
The design of the chimney is selected depending on the characteristics of the selected stove. The pipe package includes several components, each with its own functional features. For a bathhouse with a brick stove, you can use brick, metal, ceramics, and for a metal stove - a ceramic or metal chimney. You can use brick, but laying the pipe yourself will be difficult. You will have to hire a bricklayer - a stove maker.
The main components of the chimney (design lists start from top to bottom):
- Head (probe) - prevents sparks from hitting the roof and neighboring buildings, as well as from flooding during rain.
- Master flush.
- PPU (Ceiling assembly where it goes through).
- Chimney made of double sandwich or brick.
- Single iron pipe.
When choosing a brick structure, you need to be prepared for complex cleaning and maintenance. A massive foundation is needed for the stove, since a brick chimney weighs a lot, and the entire load will fall on the stove.
A simpler assembly that does not require special knowledge is a ready-made structure made from sandwich pipes. It consists of a double structure between which asbestos is laid. More heat-saving and lighter. They are made up of individual elements: elbow, deflectors, tees, rain protection, adapters and gate. Fastened using brackets that are mounted with clamps.
What to pay attention to during installation
It is necessary to remove a pipe in a bath taking into account a number of its features (material, design). The installation is influenced by sanitary and environmental standards, the material from which the bathhouse was built. Do not forget that traditionally this is a tree.
Compliance with certain rules and regulations will make the structure reliable and safe:
- Any one must be insulated with environmentally friendly and non-flammable material: expanded clay, asbestos, stone wool.
- Thermal insulation of the place where the chimney passes is necessary only with foil material. It is often confused with materials covered with Dacron foil, but it is highly flammable and melts at temperatures above 300 °C.
- The chimney is installed so that the structure does not touch any wooden elements: floor beams, roofs, walls. To insulate the joints, they are sheathed with metal sheets. The outlet area can only be insulated with non-flammable mineral wool or expanded clay mound.
- Inside the ceilings you need to install a special iron box, into which the structure is placed and covered with expanded clay. There is no need to make a box for the sandwich.
- On top, to avoid contact with the roof, a casing of metal sheets is made around it.
- All joints and seams can be sealed with special iron foil tape or foil.
How to choose the size and shape of a chimney
Diagram of the pipe outlet in the bathhouse.When designing a chimney in a bathhouse, you need to adhere to the standard shape and size. The best option is a cylindrical shape. The simple shape is due to the fact that any bend in the elbow will additionally create areas for the accumulation of ash and soot; the structure will have to be cleaned frequently. And cleaning a structure with numerous bends is more difficult.
The main dimensions that need to be determined are the diameter and height of the structure. They must be taken from SNiP.
Bath pipe diameter
The power and choice of stove are directly related to the choice of diameter and height of the chimney. Here are some values for a rectangular and square chimney in the form of a table:
| Furnace power, kW | Chimney diameter, mm |
| Up to 3.5 | 140x140 |
| 3,5–5,2 | 140x200 |
| 5,2–7,2 | 140x270 |
For a round stove, the diameter of the chimney is taken equal to or greater than the outlet of the stove. In order to calculate the diameter, you need to know the formula, which stipulates that for 1 kW of stove power, take at least 8 m2 of pipe. So, for a 20 kW stove, the chimney area will be at least 160 m2. It is at least 14 cm in diameter.
Bathhouse chimney height
The height is calculated depending on the type and height of the roof ridge. Neighboring buildings must also be taken into account, especially if the bathhouse is attached to the main house. According to SNiP, the height of the bath chimney must correspond to the indicators indicated in the table:
For a flat roof, the height of the bathhouse chimney must be at least 1 m. For a high pipe (more than 1.5 m), it is necessary to install special guys, they will strengthen the structure.
It is important to take into account the moment of the sloping and horizontal elements of the chimney. A length of more than 1 m is unacceptable. The permissible size will prevent soot from accumulating on the walls of the bathhouse pipe and will not interfere with traction.
DIY chimney installation
Before work, you must purchase all the necessary materials and components. All work takes place in stages: preparing holes for the pipe outlet, installing a protective box, assembling the pipe.
Preparing holes for pipe outlets
 Do not install a pipe with too many bends.
 It is better to make holes in a new bathhouse under construction at the stage of assembling the floors and roof. In an already assembled structure, you will have to do it from scratch. If installation is chosen inside the bathhouse, then holes are cut out in the ceiling and roof; the external one is provided in the wall near the bathhouse stove.
The holes must be sheathed on both sides with sheets of metal 0.5 mm thick. They will protect the surface from fire. The holes are made with a square section of 450x450 mm. Dimensions depend on the sandwich pipe adapter. For a brick chimney, the size of the hole must be equal to the specified width of the chimney masonry. More information about how to properly make a hole in the ceiling of a bathhouse is described in the video:
Manufacturing and installation of a protective box
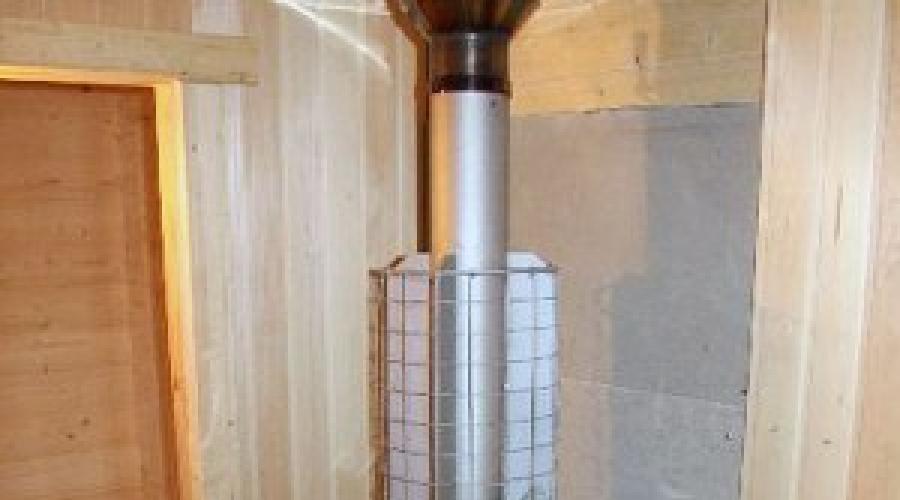
 Factory-made protective box for a sandwich pipe.
 You can make an adapter for a metal and sandwich pipe with your own hands: Take 2 metal sheets measuring 50x50 cm and cut out an outlet for the pipe in the middle. A box is made from 4 sheets, which is connected by welding. The box is insulated with stone or basalt mineral wool and covered with metal foil. A pipe will be inserted into it, it will protect the ceilings from heating.
Next, attach a metal protective apron to the roof. You can buy it ready-made “Flash Master”. The box is installed in place between the ceiling transitions and screwed in place. There is no need to make a metal protective box for a brick pipe. Next, a chimney is installed.
Installation of a chimney
 The assembly of the pipe in the bathhouse must be completed by installing an anti-rain fungus.
 To attach the pipe, you need to drill places for fastenings opposite the chimney outlet hole. The sandwich pipe is made in such a way that all parts are simply installed into each other.
First, the first link from the stove, 50 cm long, is mounted. It is fixed into the prepared holes using metal fasteners to the wall and the stove. Next, the second link is brought out into a metal box. If the diameter of the second link is smaller than the outlet of the first, then use a special adapter.
Having installed the second link, the box is filled with expanded clay into the adapter. If the stove is not located strictly under the hole in the ceiling, then use an elbow. You should not use more than three elbows in one pipe design; soot and soot will accumulate in the bathhouse pipe.
A fungus is mounted on top of the pipe; you can make it yourself from a sheet of metal or an old tin can. It's easier to buy ready-made.
The outer pipe is assembled with one difference: first the elbow is mounted to the wall and only then the main structure. A transition box, insulated and filled with expanded clay, is placed in the wall in the same way. The main pipe goes out from the box to the street. On the outside of the bathhouse, a tee is attached to the pipe, where an inspection with a window is located. They will help clean the building from soot. All parts of the pipe from the outside are attached to the wall in stages. On the façade of the bathhouse you can only use a double sandwich structure, and only a single one on top of the roof. The wall under the pipe is insulated with metal or asbestos material.
There is no need to rush to assemble the pipe; it is better to carefully secure each link. How fireproof the bathhouse will be depends on how well the bathhouse pipe is installed. The safety of not only the wooden walls and passages of the bathhouse, but also the safety of the people who will use the building is important. You should not skimp on insulation; it is better to make it high quality from expensive material. This is the only way the steam will be light and the sauna safe.
According to the overwhelming majority of lovers of bath traditions, a Russian steam room, like a Finnish sauna, should be heated with wood. For this purpose, a stove is installed in the steam room, and combustion products are discharged outside. The question is how to properly install such a chimney in a bathhouse, which will provide good draft and last a long time, and most importantly, safely. This article will allow you to become familiar with the existing types of chimney pipes and methods of their installation.
Types of chimneys
Currently, homeowners install 3 types of chimneys for baths:
- a pipe made of stainless steel or ordinary ferrous metal with thick walls;
- double-walled pipe with a layer of fireproof insulation - sandwich chimney;
- traditional brick chimney.
An ordinary pipe is the simplest option, but it is used less and less. People prefer safety to cheapness, and therefore are increasingly inclined to sandwiches. And few people like black streaks of condensation, spoiling the entire appearance of the shiny surface of stainless steel. Although, if you make some effort and install the pipe as expected, such troubles can be avoided. Below we will look at how to do this correctly.
For reference. Ordinary metal pipes are usually installed on steel sauna stoves by owners who like to do everything with their own hands and save as much as possible on materials.
The double-walled sandwich design of the channel greatly simplifies installation work and makes the operation of the bathhouse much safer in terms of possible ignition and fire. Since the stove is in any case located inside the building, on its way the chimney encounters various building structures - a wall, a ceiling, a roof covering. And they are not always made of fireproof materials, which means that an ordinary red-hot flue pipe poses a high fire hazard.

The good thing about a chimney made from sandwich pipes is that the temperature on its surface is much lower than the flash threshold of most building and finishing materials. However, in accordance with fire safety rules, an indentation is also made from the double-walled and brick flue to combustible structures. By the way, the first 2 types of channels are installed together with steel sauna stoves, and the third, respectively, with brick ones.
Note. If the stove itself is made of brick, then the pipe for combustion products is made the same; in other cases, metal flue ducts are installed.

Depending on the installation method, the installation of a chimney in a bathhouse with your own hands is carried out outside or inside the building. When located externally, a horizontal or inclined section coming from the stove penetrates the outer wall, and only then joins the vertical section. The internal layout involves the passage of a vertical chimney through the floor and roof structures. These components pose the greatest fire hazard; the consequences of incorrect installation are reflected in the photo:

In the photo, when passing through the ceiling, the distance from the pipe to the flammable materials was clearly not maintained, which is why the latter began to smolder. The error in the bottom photo is obvious - the unacceptably short vertical section that should rise above the ridge of the roof in this case.

Chimney installation rules
Places where pipes pass through the ceiling and other building structures should be considered taking into account the fact that the inside is lined with wood, that is, combustible material. In this case, it does not matter what material the wall or ceiling itself is built from, it is enough that there is a flammable cladding. In general, the postulates for laying chimney ducts sound like this:
- Before installing a metal or brick stove, you need to choose a place well so that the future chimney of the bathhouse does not fall on the load-bearing structures of the roof. There is no point in making unnecessary turns of the pipe later, but it is impossible to turn a brick channel. The total number of pipe turns should not exceed 3;
- the horizontal section from the stove to the insert into the vertical channel should not exceed 1 m in length. The exception is a gas duct inclined at an angle of 45°, sometimes used instead of a horizontal one. But you shouldn’t get carried away here either, make this segment as short as possible;
- a single-walled metal chimney should be separated from unprotected combustible floor materials at a distance of 0.5 m. If the combustible surfaces are covered with a non-combustible screen, the gap can be reduced to 38 cm. All requirements of fire safety standards are shown in detail in the figure below;
- the same figure shows how to correctly install the chimney in height so that its cut does not fall into the leeward zone. Then the force of natural traction will decrease significantly;
- the vertical gas duct must be equipped with a system for cleaning and draining condensate.

A modern, regular brick chimney has an insert made of stainless steel or ceramic elements inside. This is necessary to avoid destruction of the walls from the effects of condensation, which, due to the uneven operation of the heat source, freezes in the pores of the brick, breaking it into pieces.

Starting from the attic floor, it is strongly recommended to protect the single-wall pipe with a heat-insulating layer of fireproof insulation; the best option is basalt fiber. On the outside, the insulation is wrapped in a galvanized steel casing. Then condensation will not appear outside the pipe, and the attic space will be protected from fire. When installing a chimney through a wall, the same distances are observed as for passing through the ceiling.

First, about brick structures, which are a continuation of the furnace masonry. The passage unit, called cutting, is performed by expanding the masonry to standard dimensions, as shown in the diagram above. It turns out that when crossing the ceiling, it is necessary to maintain a wall thickness of one and a half bricks (380 mm), and a roofing thickness of 1 brick (250 mm).

Steel pipes for exhaust gases are usually assembled from sections inserted one into the other. Moreover, the chimney must be installed in such a way that the condensate inside the flue can flow down without hindrance. That is, the upper section is inserted into the lower one, this is called a “condensate” assembly. As for modular sandwiches, the inner pipe of the inserted upper section should fit into the lower one, and the outer one should wrap around the casing of the lower one from the outside. In this way, sediments are removed and quietly flow to the ground.
Important. No “smoke” assembly, that is, inserting sections into one another in reverse, is allowed.

If you decide to make a chimney for a bath through the ceiling, then you should prepare an opening of the required size in the ceiling. Then make a box from roofing steel with a bottom and a hole for the pipe, secure it in the opening and then install a smoke duct. The space between it and the sides of the box is filled with expanded clay, vermiculite, or tightly packed with basalt wool. Detailed details of the unit can be taken from the diagram:

Advice. Instead of a complex passage unit, you can use a samovar-type water tank, built into the ceiling and performing 2 functions at once. Many stove manufacturers offer similar successful solutions; details are shown in the drawing:

The vertical external chimney is attached to the wall on brackets in such a way that there is at least 1 fastener for each section. If the sections are long, then the brackets are placed at intervals of 2 m. When making turns, you should avoid installing elbows at an angle of 90°; try to use bends at 45 or 30°. The upper section of the chimney can be covered from precipitation with an ordinary umbrella or some kind of deflector can be installed. Better is the one that turns with the wind, preventing it from blowing inside the pipe.
How to clean a chimney in a bathhouse?
Brick or stainless steel chimneys serving sauna stoves should be cleaned as needed. Practice shows that with year-round use of a bathhouse, such a need occurs at least 2 times a year. For this purpose, there are special pipe cleaners that are tied to a rope with a load so that they can be lowered from top to bottom.

You should drain the condensate through the tap at the bottom of the pipe, climb onto the roof and lower the brush inside. Before doing this, you will need to remove the umbrella or deflector. It is very convenient when a chimney with a hole (revision) is installed in the bathhouse, through which access is provided from below. Then cleaning can be done on both sides, and then the spilled soot can be removed through the hatch.

In addition to the mechanical method, there is also chemical cleaning of the chimney. There is a product on sale called “Chimney Sweeper log” that is placed in the firebox of the stove and burned there in accordance with the instructions. The product is quite universal, suitable for any solid fuel heaters and has been tested in practice more than once.
Conclusion
Installing a sauna stove is only half the battle. Installation of such an important part as a chimney will take no less time, if not more. It is important to ensure compliance with 2 main requirements: compliance with fire safety standards and the presence of good stable traction.
For quite a long time, stoves were deprived of chimneys, which is why our ancestors had to take bathing procedures “the black way.” Today, such problems do not exist, so being in a steam room brings more positive emotions. Now anyone who has managed to build a bathhouse can install a chimney for a bathhouse, because it is not difficult if all the rules are followed - below, in fact, we will describe how to make a chimney in a bathhouse with your own hands - a step-by-step guide is attached.
Installing a chimney in a bathhouse requires special responsibility, because if even one mistake is made, the correct functionality of the bathhouse will be called into question. It is very important to create all the conditions under which carbon monoxide would under no circumstances be able to penetrate into the steam room. To do this, before starting work, you should outline a plan, including all stages of construction.
What types of chimneys are there?
A do-it-yourself installed chimney for a bathhouse can be external or internal. In Russia, you can most often find the second option - it fits perfectly into the architectural style of the steam room, and does an excellent job of saving the heat generated by the stove. External chimneys are typically installed on American farms.
The internal type of chimney is good because it has more efficient draft and is easier to maintain. In addition, there is no need to insulate such a chimney.

The external chimney is notable for the fact that there is no need to violate the integrity of the roof; moreover, it is clear that such a design is safer for the bathhouse itself and the visitors inside. The internal brick chimney in the bathhouse must have a wall thickness of at least 12 cm, while the external chimney will require a thickness of more than 38 cm.
Variations and designs of chimneys
It is worth considering the installation of a chimney in a bathhouse for a wood-burning stove. Typically, this design includes pipe, flanges and connecting components. The main thing is that the finished chimney can withstand high temperatures without emitting harmful compounds at this moment.
In order for the chimney located in the wall of the bathhouse to retain as much heat as possible, it should be placed with a shift into the room - then the draft will be as efficient as possible. If for some reason it is not possible to achieve this goal, provide sufficiently thick walls, the width of which is determined based on the ambient temperatures.

For example, if the temperature outside does not drop below -20 o C, then a wall thickness of 38 cm is sufficient, however, if frosts sometimes drop below the above figure, then the thickness will have to be increased to 58-65 cm.
If there is more than one stove in the bathhouse, there must be several chimneys to maintain normal draft. Otherwise, a cutting structure is installed at a height of 75 cm. In any case, the inside of the chimney should be as flat as possible so that a minimum of soot accumulates on it.
The simplest chimney design
Installing a chimney in a stainless steel bathhouse is the simplest type of chimney.
For the design you will need:
- galvanized elbow 20×120 cm – 1 piece;
- galvanized elbow 16×120 cm – 2 pcs;
- stainless steel elbow 16×10 cm – 3 pcs;
- 16 cm tee with plug – 1 piece;
- fungus 20 cm – 1 pc.
To understand how to properly make a pipe in a bathhouse, you will need to do the following work. The pipes are fastened using self-tapping screws; a 16 cm hole is made in the slab. At the location where the chimney is installed, within 15 cm, soft roofing material with thermal insulation is temporarily removed from the roof.

The part of the pipe that will protrude onto the street is wrapped with basalt wool and asbestos cord to fill the width of the hole made. Next, put on a pipe lubricated with bitumen mastic, which will be fastened with a 20 cm overlap. At the junction of the pipes, to prevent precipitation from getting inside, an asbestos cord is wound.
Methods for installing chimneys for various stoves
Brick is now increasingly used in the manufacture of chimneys for baths. Although both brick and stainless steel have their own positive and negative qualities, their installation is somewhat different.
Installation of a chimney to a steel stove
Installation of the chimney begins after installing the stove. The process begins with connecting several supports with the gaps necessary to install wider asbestos or sandwich pipes - they have increased fire resistance. Although, it is still undesirable for open fire to fall on them. In this regard, before the first elbow, a steel pipe is installed in the bathhouse, and after that a sandwich pipe is installed.

Lastly, a protective cone from precipitation is installed at the upper end of the chimney. The lower part of the pipe is usually closed with a plug, through which in the future it will be possible to drain the collected condensate and clean the inner surface of the chimney.
Attaching a chimney to a brick stove
The installation diagram for a chimney for a bathhouse on a brick stove is also simple, and all the work can be done with your own hands.
The construction of the chimney begins after laying the last brick row of the stove - often this corresponds to rows 12-19, when the upper level of its side doors is reached.
Somewhere on the 21st row, two channels are created, the size of which is equal to one brick. Then they will be connected into one channel. At this stage, three quarters are added to the right in order to cover the free space above the core. You will get a gap between the main masonry and the core of 2-3 cm.

The voids are filled with mineral wool. The 22nd row will completely cover the core, and you can proceed to shifting the channels to the central part. To prevent cracks from forming on the ceiling over time, an additional row of brick can be laid above the core.
The chimney is narrowed on the 23rd row. The laying is carried out in fives. At this stage, valves are installed - first one, and the second - through the row. Next, the type of masonry gradually changes to fluff.
When carrying out all the work on installing a bathhouse pipe with your own hands, make sure that no cracks form, as condensation may appear in such places in the future. In addition, do not take pipes with a larger diameter than required, as the gas will not be able to rise at the proper speed and it will cool faster.
Installation of a finished chimney for a bath
Naturally, there are also ready-made chimneys. They are easier to install and require significantly less time. In this case, it is also important to do everything as correctly and efficiently as possible; you should be especially careful if you do all the work without anyone’s help.
Whatever the chimney is, it is installed so that it protrudes beyond the building by exactly half a meter. At the junction of the roof and the pipe, you will need to make an “otter”, thanks to which precipitation will not get inside.

It is worth noting that the appearance of soot on the walls after some time indicates poor installation of the chimney. In this case, it will be necessary to identify any gaps that have appeared and eliminate them as soon as possible.
Cleaning the chimney from dirt
Among other things, you need to provide a list of measures for timely cleaning of the chimney. It is best if this is a mechanical method. For cleaning you will need brushes, a special weight, and even a sledgehammer with a crowbar. This process is very dirty, so it is advisable to take everything you can out of the bathhouse and cover the rest of the things with something, for example, with plastic wrap.
The easiest way to operate is with a brush - it is inserted into the chimney and slowly pushed down and up until the movements begin to become easier.

If you notice that small accumulations of soot have begun to appear on the pipe, they can be removed by burning the stove with aspen wood. During the combustion process, a huge draft arises, carrying the ash outside the chimney. In addition, when aspen burns, intense heat appears, due to which the resins in the pipe instantly burn out. Potato peelings are considered no less effective; the main thing is to prepare them in sufficient quantities.
However, newer cleaning methods using chemicals are becoming increasingly popular. They are also effective at removing all the soot and removing build-up. It is worth noting that it is better to clean the chimney after rain.
So we learned how to make a chimney in a bathhouse through the ceiling, with a minimum of effort and time. With proper timely care of the pipes, the firewood will always give out maximum energy, keeping the temperature at the proper level, and delighting you and your loved ones!
Do-it-yourself chimney for a bathhouse: a step-by-step guide, a device for a wood-burning stove, how to properly install it through the ceiling, installation diagram from brick and chimney
Do-it-yourself chimney for a bathhouse: a step-by-step guide, a device for a wood-burning stove, how to properly install it through the ceiling, installation diagram of brick and chimney
Construction and installation of a chimney in a bathhouse for a wood-burning stove with a video lesson

Internal structures
One of the advantages of such a system

External chimneys

- The chimney will not heat the steam room, which will significantly increase the consumption of wood fuel.
- A pipe located outside must be carefully insulated, otherwise the quickly cooling exhaust gas will not have time to escape. In this case, the chimney system will need to be cleaned frequently.
There are combined chimneys, which are a metal pipe installed on a wood-burning stove. The structure is built into the brickwork built into the surface and raised to the required height.
Materials for production
The most popular materials For the chimney of a wood-burning stove in a bathhouse there are bricks and metal.
Brick structures
This is the most common and at the same time labor-intensive version chimney for the stove in the bathhouse. The structure is strong, durable and has high thermal insulation properties. A bathhouse with a brick chimney is most protected from fires. The only disadvantage of the brick system is its rough inner surface, which makes it necessary to clean it frequently.
Bath chimney made of metal
 Metal construction is easier install on wood stove and take her out of the room. The disadvantage of metal pipes is the need to create high-quality thermal insulation and the formation of condensation on the internal walls.
When installing a metal chimney, the following nuances of choosing a material should be taken into account:

The simplest option for installing a chimney
Using a stainless steel pipe, you can make and install the simplest and cheapest chimney structure for a bathhouse. In addition to pipes, you will need to prepare the following elements:

chimney system
Sandwich chimney installation
Provide

Installation of an external chimney
for chimney structure

Installation of an external chimney
- The entire chimney structure rises up and is attached to the wall. It is recommended to install it already assembled. This will make working at height easier.
Having secured the structure to the wall, you need to take care of sealing the joints. The vertical pipe must be insulated and insulated to avoid condensation.
Since the safety of the building and the health of people directly depends on it, there should be no errors or omissions during its installation. Before installing the chimney, it is necessary to study its structure in detail.
Features of external and internal chimneys. Materials for the manufacture of chimney structures. The simplest option for installing a chimney. Installation of a sandwich pipe and a metal external chimney.
Installation of a chimney in a bathhouse: types of chimney structures for a wood-burning stove and features of their installation

To remove fuel combustion products, ensure long-term heat retention and fire safety in the bathhouse, a properly constructed chimney is required. Therefore, before installing it, it is necessary to find out the main parameters of the chimney and study all the intricacies of installation.
Types of chimneys for wood stoves
Stove bath chimneys differ according to several criteria. According to the installation method, they are divided into internal and external.
Internal structures
One of the advantages of such a system is its maximum vertical location, which contributes to good traction. The internal chimney provides heating in the steam room and significantly reduces its warming up time. When installing this design, wood fuel consumption is significantly reduced.
The disadvantages of the internal system for the furnace include:

Labor-intensive installation. To install the structure, you will need to break through the ceiling and roof, which reduces the quality of the pipe sealing.
- Fire hazard. When installing a pipe for a bath, you will have to insulate the passage in the ceiling with special heat-resistant materials.
- Difficult to maintain and repair.
- High risk of smoke in the bathhouse. If there is a negative impact on the structure and cracks appear on it, smoke will begin to flow into the room.
But, despite the listed disadvantages, the heat given off by a chimney installed inside is much more important for a bathhouse.
External chimneys

Such designs are an American idea. They are very popular due to the fact that the chimney system located on the street significantly reduces the risk of fire. When installing an external system, the pipe is connected to the wood stove and goes outside through the wall. It is attached to the external surfaces of the bathhouse using special brackets.
The disadvantages of such designs are:

A hole with a diameter of 16 cm is drilled in the slab, pipes fastened with self-tapping screws. The 16 cm part of the pipe extending through the roof is wrapped with basalt wool and asbestos cord. An upper pipe is placed on it at a depth of 20 cm, which must be well secured and treated with bitumen mastic. To prevent precipitation from entering the chimney, an asbestos cord is wound around the upper gap between the pipes.
This is the simplest chimney device in a bathhouse. You can easily do it with your own hands.
Construction and installation of a sandwich chimney for a wood-burning stove
Manufactured using new technologies chimney system has a multilayer design. Its body consists of two pipes of different diameters, which are inserted into each other. Between them there is a heat-insulating gasket in the form of basalt fiber or mineral wool. These materials are resistant to open flames, high temperatures and are immune to chemicals. They retain heat well and dampen sound waves.
The components of a sandwich chimney include elbows, tees, roof passage elements, a condensate collector, a wall clamp, a support console, a mouth, and an inspection tee with a door. When choosing these materials, it is necessary to take into account the characteristics of the chimney in the bathhouse.
Sandwich chimney installation
Provide safety of passage of the structure through surfaces is possible only if all the rules and features of its installation are observed.
Stages of work on installing a sandwich pipe:

If the distance between the attic floor and the roof is more than one and a half meters, then a unloading unit must be installed on the attic floor. It consists of installation elements and metal corners that are attached to the legs of the rafter system. The unloading unit takes on the loads of the pipe coming out of the ceiling and will prevent lateral vibrations.
- A starter sandwich is installed on the outlet pipe of the wood-burning stove. It is necessary to ensure that the inner pipe at the outlet of the furnace fits into the nozzle and is not located on top of it.
- Pipe sections inserted into each other, bends and transitions are additionally secured with clamps.
- To give the structure stability and close the outlet hole in the ceiling, a ceiling groove is installed where the pipe passes through the surface. A passage in the form of a pipe with a slightly larger diameter than the diameter of the sandwich pipe is welded to it. Mineral wool is placed under the ceiling groove, and the structure is tightly pulled to the ceiling with nails or self-tapping screws.
- Holes are made in the roofing and sheathing for the chimney to exit, which are sealed using a roof penetration. The joints are coated with a special sealant.
- The pipe outlet should be half a meter above the level of the roof covering. A fungus is installed at the top of the sandwich chimney.
After assembly is completed, the protective film is removed from the pipes, and all gaps and seams are sealed. For this, a special heat-resistant sealant is used.
Installation of an external chimney
The most optimal option for chimney structure is a stainless steel pipe. When installing an external system, the main condition should be the absence of horizontal transitions. Otherwise, condensation and a large amount of soot will accumulate in the chimney. As a result, there will be no normal traction.
Basic requirements for installing an external chimney for a bathhouse:

It is necessary to exclude contact of gas lines and electrical wiring with sections of the structure.
- The pipes are attached to the walls of the house using special brackets, the distance between which should not exceed one to one and a half meters. Other structural elements are attached additionally.
- Each joint between pipes is clamped with a clamp and treated with a special sealant. This will provide the system with a better seal.
- For convenient cleaning of the structure, it is necessary to provide removable parts or an inspection window.
Installation of an external chimney starts from the bottom of the structure. Each subsequent section of pipe is inserted inside the previous one.
Stages of work on installing a metal chimney outside the bathhouse:
- The lower part of the pipe is connected to the furnace pipe in the bathhouse and treated with sealant. A clamp is put on top. The chimney must be connected to the pipe using a tee, pipe or elbow. It all depends on the design.
- At a height of half a meter from the stove, a hole is made in the wall through which the chimney passes through with the help of a passage pipe.
- At the end of the horizontal pipe brought out, a tee is installed, equipped with fasteners for the vertical part of the chimney. The lower outlet is blocked by a plug, which will be removed if necessary to clean the chimney.
- The pipes are attached to the walls using special brackets. If the main pipe is heavy, then an elbow is installed on the support.
- The entire chimney structure rises up and is attached to the wall. It is recommended to install it already assembled. This will make it easier to work at height. Having secured the structure to the wall, you need to take care of sealing the joints. The vertical pipe must be insulated and insulated to avoid condensation. Since the chimney is a structure, on which the safety of the building and the health of people directly depends, there should be no errors or omissions during its installation. Before installing the chimney, it is necessary to study its structure in detail.
Installation of a chimney in a bathhouse: types of chimney structures for a wood-burning stove and features of their installation with video
To remove fuel combustion products, ensure long-term heat retention and fire safety in the bathhouse, a properly constructed chimney is required.
Installation of a chimney in a bathhouse for a wood-burning stove
It is difficult to overestimate the importance of the smoke exhaust system for the comfortable, convenient and safe operation of the bathhouse. Requirements for performing work on chimney installation:
- Compliance with fire safety rules. One of the most important requirements, as it is directly related to the safety of human lives. Performed by
- thorough insulation of the chimney from ceiling materials, usually flammable. In addition, during design and construction, a significant thickness of the chimney is laid;
- maintaining the minimum required distance between the chimney and the wall;
- Good traction. This can also be achieved in two ways:
- the length of the chimney (optimally 5-6 meters) - the longer it is, the stronger the draft;
- reducing resistance by maximizing the alignment of the chimney walls;
- High-quality materials that meet operating conditions;
- Optimal temperature conditions. The operating conditions of the chimney must correspond to those planned. For example, if the smoke temperature is insufficient, condensation will form at the inlet, which will subsequently lead to the destruction of the chimney structure from the inside.
Features of chimneys for wood stoves
The main feature of using wood-burning stoves in a bathhouse is the greater heat they produce compared to other stove options. As a result, the requirements for chimneys must be increased.
Thick wall pipe
The simplest chimney design is an installed thick-walled ferrous metal pipe with a wall thickness of 3 mm. and more. Installation occurs using welding. But such a semi-handicraft design is not reliable and fireproof.

Chimney supplied with the stove
In most cases, when purchasing a wood-burning stove, a smoke exhaust system is included that is ideal for this type of stove. You can install it either independently or with the assistance of third-party specialists. Moreover, the cost of such work is relatively small - it starts from 4-5 thousand rubles.
Structures can be made from a wide variety of materials, ranging from steel with a diameter usually from 9 to 20 mm. and ending with ceramic pipes. Moreover, it is the latter that are considered the safest and most durable. Next come chimneys made of stainless steel. The next highest quality level is sandwich pipes. If we return to steel pipes, the most preferred steel grade is AISI 310S, which has increased heat resistance.

The complete diagram of the “stove-chimney” design and related systems is as follows.
Particular attention is paid to the passage through the roof or through the wall, depending on the type of chimney structure.
Types of chimney designs for wood stoves
The principle of the device is that exhaust gas is removed due to the natural draft created. The chimney pipe is led out through the wall and then rises vertically upward. The minimum height required for normal operation is 5 meters.


Interior
The chimney pipe rises directly from the boiler, passing through the ceiling, upward with a final exit to the roof. Typically, a chimney of this type is made in two layers to increase the fire safety of the system. In addition, the presence of thermal insulation between the layers helps to avoid the occurrence of condensation inside the pipe.

Brick chimney
When constructing a chimney, stove fire-resistant bricks should be used, laid on a mortar made from special heat-resistant mixtures, or using a conventional clay-sand mortar, which is a more economical option that practically does not lose out on the quality of the structure.

Brick chimney installation
- The riser pipe installed on the furnace. It is equipped with a valve to regulate the flow of smoke. Masonry is carried out with the obligatory special binding of bricks.
- Fluff. It starts 5-6 rows of bricks before the ceiling. The cross-section of the chimney remains unchanged, but on the outside it becomes wider by 25-40 cm.
- Riser. Part of a brick chimney extending through the attic.
- Otter. Expansion of the chimney after exiting the roof, preventing precipitation from entering the junction of the chimney and the roof.
- Neck. The dimensions are similar to the main chimney. An umbrella is installed on it.
Installation of a chimney in a bathhouse for a wood-burning stove - types of designs
In this article we will look at the design of a chimney in a bathhouse for a wood-burning stove, the requirements for performing the work, and the types of chimney designs for wood-burning stoves.
The bathhouse in Russian culture has long become a unique national element.
And if earlier our ancestors had to wait until the last firebrands burned out and only then begin to take water treatments, then with the advent of the chimney the situation changed radically.
Its device is responsible for removing carbon monoxide to the outside, minimizing possible risks"get burned" and allows you to keep the room clean, preventing soot from settling on its walls.
Chimney structure for sauna stoves: which design is better?

In the entire design of the bathhouse, the chimney plays an important role - removal of combustion products.
In addition, by skillfully manipulating air flows through a chimney pipe, you can regulate fuel consumption and the ability of the stove to give off heat.
Thanks to the chimney, you can maintain the fire even during the steaming process in the bathhouse.
Device chimney pipe is often varies regarding type and materials manufacturing. Depending depending on the installation method, chimneys are divided into:
- internal, which allows for additional heating of the room, but creates an increased threat to fire safety;
- external, which do not pose a fire threat, but will require additional fuel for heating.
From a technology point of view, the internal arrangement of the chimney is more complicated, but it allows you to save a valuable resource - heat. Given the high cost of energy resources, this factor has a significant influence when choosing the type of chimney structure.
Important! When selecting installation external chimney, chimney additionally insulate using mineral wool, and the pipes are laid outside, along the facade of the building.
The design of chimney pipes also varies depending on the materials used. There are a considerable number of them, but two designs stand out: brick and chimney from a metal pipe.
Brick structure diagram

The main advantage of a brick chimney is heat resistance and thermal conductivity.
However, it is worth noting that the construction of this type of chimney pipe is a very labor-intensive and painstaking. Such chimneys are usually used for metal and stone stoves.
Main material During construction, fire-resistant bricks are used, and a solution based on clay or special “kiln” mixtures is used.
During the construction of a chimney, a necessary point is maintaining ideal evenness of masonry both the structure as a whole and its individual functional elements.
In order to smooth the planes and reduce the amount of soot and condensation accumulated in the chimney, The inside of the pipe is plastered, smoothing out seams and irregularities. It will also have a positive effect on your cravings.
Metal chimney diagram
Metal chimneys easy to install and will cost an order of magnitude cheaper. However, unlike a brick structure, metal has very high heat transfer. There are frequent cases of fire as a result of burning of a metal chimney pipe.
Chimneys made of steel pipes are installed directly on top of the stove. Most often required cross section 115 mm, but this figure may vary depending on the power of the heat source or specific manufacturer recommendations.

Photo 1. Schemes of two options for installing a metal chimney: inside the house and outside.
As experience shows, the best material for the manufacture of this type of chimney are pipes made of of stainless steel. Its structure can be single, subject to good insulation. However, there is a more practical solution - sandwich pipe. Such a channel essentially consists of two pipes of different diameters, and the space between them is filled with thermal insulation materials, in particular mineral wool.
Exists a number of features and requirements, which extend to steel chimneys:
- internal Wall thickness must be from 0.8 mm;
- steel must be resistant to temperatures up to 850°С inclusive;
- index thickness of basalt filling must begin from 50 mm, And his density — from 120 mg/m3;
- model outdoor It’s better to choose pipes the same way stainless steel.
Installing a chimney for a sauna from a sandwich pipe
A chimney made of steel pipes is the best option in the price-quality ratio, and requires the least labor costs.
You might also be interested in:
Preliminary preparation: diameter measurements, selection of tools
Before you undertake the installation of a chimney yourself, you need to take the time to carefully design of this enterprise:

- Measure distance between roof ridge and pipe oven, then add another 50 cm and get the total height of the chimney.
- Divide the pipe into top and bottom, which will later be secured with a clamp at the middle height of the attic. Upper part insulate.
- Calculate size of the protective casing according to the formula d * 3.14 + 30 mm, Where d- pipe diameter including insulation.
- Do two galvanized blanks for both parts. Their size should be slightly larger than the holes in the ceilings.
- Prepare a metal strip for the clamp 20 cm wide, and its length is calculated by formula P + 30 mm, Where P- circumference of the outer pipe.
- Cut out 4 galvanized rings, which will later secure the insulation.
- Weld a strip to the bottom edge of the upper pipe 4 cm wide, into which the upper end of the lower part of the pipe will be inserted.
In addition, at work you The following tools will be useful:
- Bulgarian;
- a set of locksmith tools;
- galvanized sheet with thickness 0.8 mm;
- steel sheet with thickness 2 mm;
- metal scissors;
- stainless steel metal pipe;
- mineral wool.
The procedure and rules for doing the work yourself. Where to put the gate?

Having carefully prepared, you can begin to assemble and install the chimney. To do this, cut out in the ceiling and roof holes measuring 450*450mm.
Need to be cut to the same dimensions two metal blanks. A round hole is made in one of them, and an oval hole in the other (it is attached to the roof slope).
Insulation is put on the pipe and secured with a galvanized casing, and the ends are covered with metal rings with edges concave inward. Then she fits onto the pipe stove, and its upper part is placed in the passage on the ceiling. After which the hole is closed with a galvanized blank.
A pipe with a welded strip of metal is placed in the passage located on the roof. Bottom and top fit on top of each other and tightly fastened with a clamp. On the inside of the roof, the hole is closed with a metal plate. Very important fill the free space between the chimney and the ceilings with some non-flammable substance: asbestos, expanded clay, clay.
It is worth mentioning such a device in the chimney as a damper. It allows regulate air flow and most often takes the form of a metal valve.
In the old days in Rus', the construction of a bathhouse lasted for more than a year, but now you won’t surprise anyone with ready-made bathhouses, which are brought directly to the site and assembled in a few hours. However, after the builders leave, you are left with a log box that is not equipped with a heating device.
Therefore, the installation of a chimney in a bathhouse and installation of a stove falls on the shoulders of the householder. To do this correctly with your own hands requires knowledge and experience, because a frivolous attitude to this problem promises increased costs for maintaining the required temperature, the risk of fires and the danger of carbon monoxide poisoning.

Chimney classification
A chimney for a bathhouse can be equipped in several ways, depending on where the stove is installed. Methods for organizing smoke removal from a bathhouse are classified according to the following parameters:
- Material used. To make chimney pipes, metal or heat-resistant bricks are used. Brickwork is considered a more traditional option, but modern stove makers prefer a metal chimney for a sauna stove. Its advantage is quick installation with your own hands.
- Installation method. The chimney in the bathhouse is installed inside or outside the building. Installation of an external chimney system is a North American technology, according to which pipes are led through the wall to the street. It was developed in response to the disadvantages of the internal method, which involves running a pipe through the ceiling to the roof.

The choice of material and method of installation depends on the financial capabilities, placement of the stove and the construction skills of the master. Experienced stove makers do not recommend that those who do not have experience combine it with a ventilation system, as this may be unsafe.
Advantages of a brick chimney
A chimney for a bathhouse was built from heat-resistant bricks before the advent of metal ones. This can easily be explained by the fact that there was no metal that could withstand high temperatures in mass production.
Only a true professional can do the brickwork of a chimney pipe with his own hands; installation is carried out according to a scheme, the violation of which will ruin all the work done. Compared to a metal chimney, a brick chimney has the following advantages:

- Heat-resistant brick, designed specifically for creating stoves, demonstrates high thermal insulation and thermal conductivity qualities, thanks to which a brick chimney effectively retains and accumulates heat inside the steam room.
- Long service life. A chimney made of high-quality brick, laid with your own hands in compliance with technology, lasts much longer than its metal counterparts, and therefore does not require periodic replacement.
- High fire protection. Fire-resistant bricks do not burn and prevent fires from spreading. Since the bathhouse is a room with a high risk of open fire, the fire-fighting properties of bricks can save the property and life of the owner.
It is important to clean brick chimney pipes in a timely manner, since its rough structure accumulates ash, dust and other contaminants, reducing stove draft or leading to smoke in the bathhouse.

Metal chimney device
For those who make a chimney for stoves with their own hands, metal pipes are an ideal option, reducing material costs and installation time. Construction stores sell ready-made systems consisting of straight pipes, bends and clamps. In favor of metal pipes says:
- Affordable price. The cost of a metal chimney is several times lower than that of a brick chimney. In addition, I do the installation of a metal chimney with my own hands, and this saves the customer a considerable amount that he would have paid to a professional stove technician.
- The surface of a metal pipe is smooth, even slippery, so soot and other small particles do not linger on it. This allows the air, under the influence of the temperature difference inside and outside, to rise upward in a single, directed flow.
The only drawback of this method of organizing a stove chimney is that metal pipes do not have the same heat-insulating qualities as their brick counterparts, because of this, in winter, when the difference between the internal and external temperatures is maximum, condensation settles on the internal surface, this problem is solved by modern sandwich pipes protected by a layer of insulation.
Selection of chimney system elements
If you decide to make metal with your own hands, it is important to choose the right pipe section. Oven manufacturers indicate the recommended diameter for each model in the instructions.
In the absence of this information, this parameter is calculated based on the power of the oven and the number of turns. However, it is better to entrust the calculations to an experienced consultant, since the draft and safety of the chimney depends on him.

Scheme of a chimney system made of metal pipes
Please note that the length of horizontal pipe segments should not exceed 100 cm; neglecting this simple rule can result in weak draft of the stove and soot deposits inside.
- If you lead the chimney through a wall, it would be correct to place it at a distance of 50-60 cm from the edge of the overhang.
- When installing a pipe through the roof, try to place it 50-150 cm from the ridge.
- If the location of the stove does not allow this, the chimney umbrella is raised above the highest point of the roof by 1.5 or more.
- Typically, the internal chimney system is laid strictly vertically; if it is necessary to change the direction, elbows with an angle of 45 or 90 degrees are used.
- In order for the seller to correctly select the chimney for the stoves, it is better to make a diagram with its dimensions.
Installation technology
It is better for an inexperienced master to opt for an internal chimney made of metal pipes, exiting through the roof and ceiling of the bathhouse. DIY installation looks like this:


It is important to ensure that the joints between pipe segments do not fall on the ceilings in order to seal and tighten them with wide metal clamps.
A well-installed chimney for a bathhouse is a sign of a real Russian bathhouse, which is warm even 6-7 hours after the fire is completed.
Video instruction