Build your own arched plexiglass veranda. Polycarbonate terrace attached to the house (53 photos): placement options and main stages of construction. How to sheathe a structure with polycarbonate
Over time, the owner of a private house or dacha thinks about how to increase the useful living space inexpensive and time-consuming. One of the most available options You can use a polycarbonate veranda attached to the house. Many people want to create an area for summer holiday, but unfortunately they have no idea where to start. You can hire professionals and then you will definitely be guaranteed delight and praise from your guests at the sight of a beautiful and comfortable extension. On the other hand, it is not at all necessary to entrust all the work to specialists; this article will step by step discuss all the nuances of building a cozy, small veranda from cellular polycarbonate with your own hands. Everything is much simpler than it might seem, as the proverb says - the eyes are afraid - the hands do.

What is cellular polycarbonate?
A distinctive feature and advantage of polycarbonate is its material and design. Polycarbonate consists of several layers with stiffening ribs. Inside, between the ribs, air is contained; due to the air, the thermal insulating properties of the veranda material are manifested. Polycarbonate has established itself as the most cheap material, due to this, it is quite possible to afford more expensive types, by the way, the choice of models is large and varied. Small hallway in Khrushchev design and photos. They differ in a variety of colors and quantities additional layers, which provide greater strength and reliability. From an environmental point of view, carbonate is not like wood and does not allow air to pass through it.

What types of verandas are there?
The most popular building options are following types:
With a sloping roof. The roof is made at a degree of 30-40 degrees so that snow and rainwater couldn't stay. Gable roof will permanently save the building from leakage.
With an arched roof. Arches are placed on the frame and polycarbonate sheets are attached; thanks to its flexibility, the material allows you to implement the most daring solutions.
Semicircular veranda;
Open veranda;
This article discusses the stages of building the most common veranda with a sloping roof; this option does not require special knowledge and takes less time and effort.

So where to start?
The first stage is to choose the location for future construction. Even if an attached veranda was not planned during the construction of the house, it can be located anywhere. It is visible from the main entrance and there was an accessible passage to the house. You can attach it to the side of the house; as a rule, there are no restrictions when choosing a place, it all depends on your imagination and possibilities.
Construction begins with cleaning excess garbage and clearing the area for the extension; if there is a porch, it should be dismantled. We are deciding on a place for construction. On which side of the main building will the extension be located, where will the entrance be, and so on.

Making the foundation for the veranda
The veranda will not be very heavy, unlike thick-walled, insulated winter verandas. For a polycarbonate veranda, the simplest columnar foundation is suitable. Such a foundation is a series of columns arranged in a row, in places where the main load of the structure will be expected. To begin with, you should draw up a construction plan and mark the location of the pillars on the site. In these places you need to dig holes measuring 1 m deep and 0.5 m wide; it is better to place them at a distance of 1-1.5 m from each other.
After this, pour sand into the holes in a layer of 20 cm and on top of 10 cm of crushed stone. After this you can pour it into the holes cement mortar. You can also pour concrete. We insert a reinforcement grid for the stability of the building. If there is a problem with the fittings, you can leave unnecessary metal parts in the monolith. At this stage, you need to calculate the proportions when preparing the solution. You can order the solution from construction companies, or you can do it yourself using following proportions:
60% crushed stone;
30% sand;
10% cement;
It is better to stir the mixture on a flat area. Ideally done on a concreted area. We pour in some sand and cement, mix everything thoroughly, add crushed stone, make a hole in the mixture, which we fill with water. It is better if two workers with shovels are involved in the process. They stand opposite each other and knead. Concrete mix make it thinner under the foundation. After this, the finished substance is loaded into buckets and distributed throughout the trench.
After filling and 12 hours, the top of the monolith is scraped to level it. Now work must be suspended for at least 5 days for the monolith to set. If you do not follow the proportions or if there is insufficient water, you can get a low-quality solution, and as a result, over time, the foundation will crumble and collapse.

After the solution has hardened, you can start laying out brickwork- columns, while the height of the masonry should be 30 cm lower than the future finished floor; if you want to save a little, you can make cavities in the masonry by filling them with crushed stone or brick waste. For greater reliability, you can make board formwork around the perimeter of the pillars and fill it with cement mortar. After the concrete has hardened, wooden formwork should be disassembled. The next day after concreting, trim the monolith with a trowel to give it a smooth shape.
Be sure to put waterproofing on top of the masonry and coat the brick with bitumen, this will protect the brick from external natural factors. The material used is roofing felt sheets. Pay attention to equal spacing and the masonry must be at the same even level. Tensioned threads and weighted threads are used, which are hung on the corners of the building.

Making a frame for the future veranda
The frame is made from any available material, most often bars with dimensions of at least 10x20 cm are used, although if you can afford it, then buy a ready-made metal profile, here you have the right to decide for yourself.
The frame begins with the installation of the lower tier; for this, timber is used, which is laid along the perimeter of the building and fastened to each other with nails or staples. On the second tier, a horizontal beam with grooves for vertical supports is laid; as a rule, they are made every half a meter, but for some reason many people neglect this rule. After installing all vertical supports it is necessary to make the upper ligament. To do this, use a long beam, the far end must be placed under the roof of the house, the near end is screwed to the supports with anchor bolts. This procedure is necessary for strong, reliable roof, the roof of the veranda must be connected to the roof of the house.

Making a roof for our veranda
If the roof of the veranda should be placed under the roof of the house, then it is important to make it a continuation of the main roof. If the veranda is located perpendicular to the house, be sure to make the roof tight to the house. Rafters are installed on the upper beam of the vertical supports at a slope; the slope is needed so that water cannot stay on the roof and flows off it. The rafters are installed on each vertical support, leading them under the roof of the house; the second edge of the rafters should be longer and hang over the frame. Lathing is made on the rafters, a board is used for this, the distance between the boards is taken into account based on what roofing material You will for the roof:
Ruberoid. Such material requires continuous sheathing, without long distance between the boards. It is secured to the roof using slats and nails. Soft roof not reliable and not durable, even a small hole leads to leakage.
*Crushed stone. An old proven method of covering a roof, but this last century. Snow on such material gets stuck and melts, possibly dampening the rafters and causing the roof to leak.
Profiled sheeting. Reliable and durable material roofs. It is attached to the sheathing using self-tapping screws with a rubber washer every 50 cm. The sheets are stacked on top of each other in 2 waves, the excess is cut off with a grinder. We maintain the slope and lay the sheets in one direction to completely prevent the roof from leaking. If the roof is adjacent to the house, use a metal strip, which is bent in half lengthwise and screwed one side to the wall of the house, the other is attached directly to the roof. Don't forget to use a level so that the slope is equal and correct.
Polycarbonate. You can make a veranda from this material. Nuances when using polycarbonate as a roof. They are screwed onto self-tapping screws, having previously drilled holes for them in the polycarbonate. The internal stiffeners must be parallel to the direction of the rafters.

Wall and floor stage
When building such a veranda, a warm floor is not required; it is enough to lay thick boards tightly together. Previously, transverse beams from timber are installed under the future floor to the lower tier. The main thing is not to bend when walking. You will need a level. All that remains is to cover the walls with polycarbonate sheets. Holes for screws are drilled in the frame. There are 2 ways to attach sheets to the frame:
Using bolts with washers, under which rubber gaskets are placed, to avoid damage to the polycarbonate.
Using a special sealant, the sheets are attached end-to-end to each other and aluminum tape is glued at the joints to ensure the tightness of the joints.
You should be aware of the thermal expansion of polycarbonate under the influence of sun rays, during installation it is necessary to maintain clearances. The construction is intended for the summer season.

Polycarbonate verandas are thermally insulated and allow sufficient light to pass through; windows can be made if desired. Install between vertical supports cross beams. This will be the window opening; order a window or make an opening for an existing window frame.
Construction of a veranda takes no more than two months and, according to people’s reviews, is profitable and a good decision to increase the area of the house. At minimum costs you can build a room loved by guests and household members. A convenience worth spending time and effort on.


Do you want to make an attractive extension of your home? Then you definitely need to start arranging the veranda. One of the inexpensive, but very durable materials The material used for this is polycarbonate. With a little time and diligence, your family will have a unique place to relax and receive guests!
Polycarbonate sheets are used today in various areas of construction, including in the construction of verandas. Simple polycarbonate panels usually consist of two layers, between which there are stiffening ribs. They are located along the sheet. The voids contain air, which serves as additional thermal insulation. More expensive polycarbonate is distinguished by the presence of two or even three layers, which are also separated by stiffening ribs and voids. Such panels are lightweight and flexible, and transmit light rays perfectly.
A polycarbonate veranda can be used for growing plants even in the cool season. Under no circumstances can this structure be continuous. There should be windows for timely ventilation.
How to decide on the shape and type of veranda
If we talk about the types of verandas, there are only two of them: built-in and attached. At the same time, built-in structures are almost always done at the stage of building a house, which implies the presence of a common foundation and roof. An exception may be a veranda, which is made on one porch. If this structure is added to an already erected and furnished house, then it is already considered attached.
As for the forms, they can be very different. Sometimes the veranda can resemble a kind of belt due to its location around the building. But most often this structure is a passage between the entrance to the house and the street. However, if the veranda is planned and arranged as winter Garden, then it serves, as a rule, as an exit from only one room.
Terrace or open veranda. The word "terra" is translated from Latin as "earth". This may be due to the fact that this structure is only slightly raised above the ground and resembles a small platform. There should be a roof over it.
Usually an open veranda or, as it is commonly called, a terrace is located next to the house or is completely attached to it. I wonder what it is design feature verandas visually increase the size of the house.
This type of construction is ideal for southern climates where the warm season is predominant. The roof can be made of polycarbonate. Green shrubs and ornamental plants. If climatic conditions If your area is very harsh, it is preferable to sheathe the building on all sides with polycarbonate sheets. These light walls will certainly serve as protection from gusty winds.

Veranda with sloping roof usually adjacent to the house and serves as a kind of buffer between the building and the street. Due to the close connection of the veranda to the mansion, stable and rigid support for the roof is ensured. As many believe, it is very convenient to have two entrances, one from the street and the other from the house.
Veranda in the shape of a semicircle- This is most likely the best option. The prettiness of the green spaces and the beauty of the garden’s flowers seem to frame the semicircular veranda, smoothly transitioning into it, creating a special panorama of the landscape. In this case, the foundation must be constructed from concrete blocks, turning the structure into a monolithic strip.
To build the frame, you can use solid timber with rectangular section. To increase the rigidity, stability and reliability of the veranda, both the upper and lower frames must be made of the same timber.
Self-construction of a recreation area made of polycarbonate

Polycarbonate is lightweight material, accordingly, the veranda from it will not be heavy. As a result, when constructing a structure, you can get by with columnar or strip foundation. When you start making the base, you should first make sure that the veranda structure is secured to the foundation. As for the frame, it can be made from metal pipes, corners or channels, is also appropriate here plastic material And wooden blocks.

Most often, the roof is made pitched, having an angle of inclination of about 40°. And, nevertheless, its configuration may be different. For example, if you decide to build a small veranda, then the roof can be made arched, especially since polycarbonate is very flexible and can be bent freely. The frame of such an extension should be made taking into account what the roof will be like in the future.

The panels should be secured to the frame using screws and washers.
You definitely need to place a rubber gasket under each washer. In addition, holes for screws should be drilled that exceed the diameter of the screw by no more than 3 mm. Such values were not chosen by chance: under the influence of heat emanating from the sun, polycarbonate expands, and when low temperatures it tapers. These factors can swing and, accordingly, weaken the fastening.

Usually for construction summer veranda use polycarbonate sheets with a thickness of 0.8 to 1.0 cm. If you plan to build a more durable structure, then use a polycarbonate sheet with a thickness of 1.4 to 1.6 cm. Work on the construction and arrangement of a recreation area from a polycarbonate sheet will take you have relatively little time. However, the service life of this material is quite long and often reaches 10 years. In order to relax comfortably on the veranda, an area of 16 m2 is sufficient. But, if you often invite many guests and like noisy parties, then it is better to make the veranda larger.
So, do you already have experience in building a polycarbonate veranda? What difficulties did you encounter while carrying out the work? What helped you cope with them? Maybe you made a veranda using some kind of individual technology? Share your experience, knowledge and skills with us! Write your comments!
Video
How to make a visor from cellular polycarbonate can be seen in the following video:
Photo


Do you want to expand your home while spending a minimum of money on it, and make your kitchen cooler in hot weather? summer days? Or do you dream of a transparent extension from which you can admire lush flowering roses and romantic autumn leaves? For these purposes, a polycarbonate veranda attached to the house is perfect - the photos of such solutions exude comfort and coziness. Open or closed - this building can have different designs depending on its purpose and the desires of the owners of the site.
How to choose the right material for construction
In order to choose the right polycarbonate for the veranda, you must first think about what you want your extension to look like. Will it be a heated room or open summer building? Are you planning to admire beautiful view or want to protect yourself from the prying glances of your neighbors?
Open veranda with transparent roof

Colored material provides shade on hot days
In what cases is monolithic polycarbonate needed?
Molded polycarbonate is more preferable in the following situations:
- You want to make an unheated extension by covering the walls with opaque material. Colored monolithic sheets they look much more luxurious and rich than cellular polycarbonate (CPC). But they have absolutely no heat-saving properties!
- You need to build completely transparent walls or a roof. Colorless injection molded polycarbonate is completely transparent, like glass. Whereas multilayer honeycomb sheets distort the view.
- You are planning to make the veranda a relaxation area and do not want to hear unnecessary sounds. SPK, unlike its monolithic counterpart, tends to crack quite loudly when the temperature changes (especially in the evenings). This occurs due to the expansion and contraction of the material, as well as due to its friction against the supporting structures.

Veranda made of injection molded polycarbonate
Advice! To reduce cracking, it is necessary to use a sealant between polycarbonate sheets and metal, and also lay them so that they can “breathe”. That is, do not pinch the material with profiles and washers, leaving a gap for expansion.
In addition, with injection molded polycarbonate there is no need to use profile tapes and special tips. Water will not accumulate in it, dirt will not collect, and small insects, spoiling the appearance of the structure.
But this material also has obvious disadvantages:
- high price(price square meter 5 times higher than the price of SPK);
- if the overhang length or wall height is more than 3 meters, you will have to make a joint or overlap, which is undesirable when using this material;
- warm room You can’t make it from an MPC.
Cellular polycarbonate – are the cost savings justified?
Cellular polycarbonate is much cheaper than monolithic. But is the game worth the candle? Is such savings justified when building a polycarbonate veranda with your own hands?
- For a closed heated building, you need to use only cellular polycarbonate. Moreover, if you make double sheathing with a distance of 20–50 mm between the SPK sheets, then the extension to the house will turn out to be really warm!
- At high snow load It's too expensive to buy thick monolithic polycarbonate. Similar in its technical specifications a honeycomb sheet will cost several times less! For example, with a load typical for the Moscow region (180 kg/sq.m.), monolithic polycarbonate should be no thinner than 6 mm, and cellular polycarbonate should be no thinner than 10 mm. The cost of these materials is 1,966 and 397 rubles per square, respectively.
- The sheet deflection of SPK is less than that of monolithic polycarbonate. Therefore, when there is a high wind load, it is better to use honeycomb sheets for construction. Otherwise, the roof of the veranda will rise and fall in waves.

Verandas made of polycarbonate with a multilayer structure
Transparent veranda - to be or not to be
The photo shows how a transparent polycarbonate veranda gives a feeling of unity with nature and allows you to solve many issues. So, you can calmly watch the children while preparing a family dinner, or admire the beauty of the garden while drinking tea.
But transparent sheets can only be used if the extension is located on the north or north-east side. When the veranda is oriented to the south or west on hot summer days, it will turn into a steam room!

Transparent monolithic polycarbonate roof
What is the way out of this situation:
- use polycarbonate milky(it is almost transparent, but gives shading);
- paint the veranda for the summer with special paint (it can last 2, 4 or 6 months, as there is information on the label);
- use transparent inserts in monolithic roof;
- make a ventilation system (provide opening windows).

Gable veranda with transparent roof
Project of an open veranda made of wood
Wood and polycarbonate go well together, especially if the bronze shade of the latter is selected. Wooden structures visually soften the coldness polymer coating and allow this material to “breathe”.
Construction of the foundation - how to make the building reliable
The question of how to build a polycarbonate veranda with your own hands begins with laying the foundation. For an open building, a columnar base will be sufficient:
- After clearing the area, it is necessary to drill 80x15 cm holes with a garden drill.
- The pitch of the pillars must be calculated based on the thickness of the polycarbonate chosen for the roof. So for a sheet with a thickness of 8 mm, one notch will be required every 52.5 cm, with a thickness of 10 mm - every 70 cm, and with a thickness of 16 mm - 1.05 m.
- Cover the walls of the holes with roofing felt, install formwork and lay out pillars of brick and concrete.
- After the cement has set, install the embedded plates for further installation of the timber.

Embedded support for timber in the foundation
Load-bearing structures – durable wooden frame
After the foundation has settled, it’s time for the load-bearing structures:
- Install load-bearing structures on a closed galvanized beam support, pre-mounted in brick pillars. Glued laminated timber 100x100 mm is suitable for this purpose.
- Execute bottom trim and install logs from 50x150 mm boards.
- Make corner steps.
- Lay the floor from a tongue-and-groove board 38x100 mm, leaving gaps for drainage of water falling on the veranda during slanting rains.
- Install rafters on the roof from 40x100 mm boards.
- Cover the roof polycarbonate sheet.
- If cellular polycarbonate is selected, treat the ends with a special tape and secure with clamping profiles and thermal washers. If monolithic polycarbonate is installed, use thermal washers, pre-drilling holes wider than the screw leg by about 2–4 mm. This will protect the structure from distortions when temperatures change.

Advice! You can attach the timber to the wall using concrete screws installed every half meter, and the floorboards using anodized screws.
Final finishing and the importance of details
It would seem that the veranda for the polycarbonate house is almost ready. But in fact, there is still quite a lot of work ahead:
- Cover everything with special impregnation or paint wooden structures. At first support pillars, and after – the floor.
- Install railings and pergola for climbing plants(to do this, select grooves in 10x20 mm slats with a router and insert them into each other to form a cell of 150x150 mm). Cover these elements with paint or impregnation.
- Cover the railings and one of the corners with polycarbonate.

Railings and pergola to decorate the veranda
Advice! Light curtains will give the veranda a more lived-in look, and festive mood will add backlighting.

LED lighting with curtains
Let's calculate the budget for a veranda for a house made with our own hands from polycarbonate:
- logs and pillars - 14 thousand rubles;
- batten– 13 thousand rubles;
- supports for fastening poles, logs 7.5 thousand rubles;
- polycarbonate and components – 12 thousand.
Additionally you will have to spend money on protective equipment and paint for wood, as well as pay for delivery of the material. In total, the cost of such a building will cost 50–55 thousand rubles.
Even a veranda built according to all the rules can quickly become unusable and require expensive repairs. The main problem with such extensions is their inability to withstand harsh winters.
What techniques will make the veranda durable?
How to make a polycarbonate veranda reliable:
- Provide protection against icicles and avalanches of snow if the roof of the veranda is under the roof of the house. To do this, it is necessary to install snow guards, drainpipes And metal mesh, stretched on brackets with an overhang equal to the overhang of the extension roof. The purpose of such a mesh is to absorb the impact of snow and crush icicles so that they do not penetrate the polycarbonate.
- Try to avoid using cross profiles. They make it difficult for snow to melt and can cause the structure to collapse. This happens due to the fact that snow accumulates in the places where the crossbars are attached, causing excess load on the load-bearing supports and pushing through the polycarbonate.
- Abandon arched structures, since it is very difficult to carry out the installation of a domed veranda yourself. And the slightest error will lead to the structure simply “driving.”
- Do not attach polycarbonate with an overlap - only with the help of connecting profiles. When connected with an overlap, the structure quickly becomes leaky, which guarantees leaks.
- Correctly fasten connection profiles. The depth of entry into the profile must be at least 15 mm, the profile must be aluminum only. Under no circumstances should PVC structures be used! They are not resistant to UV radiation and are incompatible with polycarbonate in their chemical composition. This means that the sheet will simply crack at the contact points.
- Cellular polycarbonate should be covered with special tapes and ends. In addition, the ends must be mechanically secured to the sheet to prevent them from being pulled together by snow and falling ice. And also - make drainage holes and leave a gap between the sheet and the protective element for water drainage.
- It is better to provide a closed veranda at the stage of building a house and install it on the same foundation as the permanent structure. Otherwise, the extension will eventually move away from the wall and form cracks.
Photos of the original attached verandas
Taking as a basis a photo of a polycarbonate veranda attached to the house, you can create your own project.
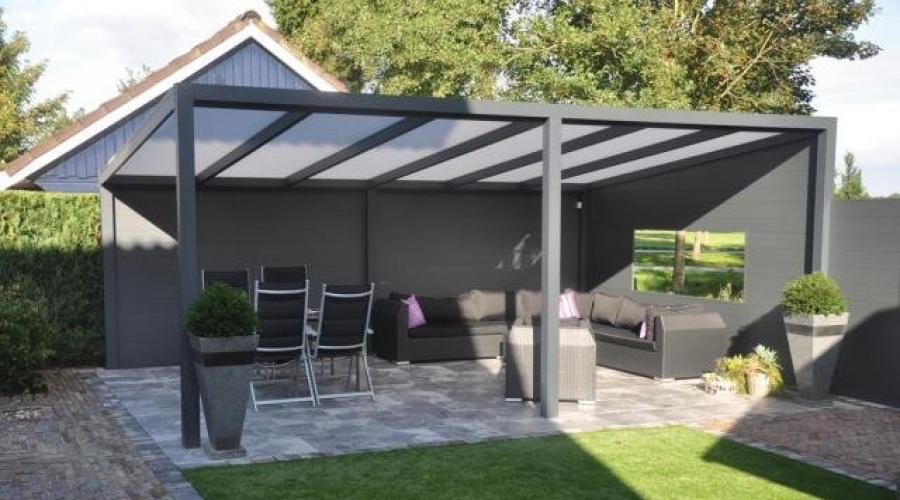
Few people enjoy being forced to stay indoors in hot or stormy weather. Therefore, verandas are added to almost every private building using various materials. A revolutionary phenomenon in the creation of such structures was the appearance on the market of such building material like polycarbonate.

Fig.1. Polycarbonate veranda attached to the house
Properties of the material and features of the design of structures made from it
As can be seen in Figure 1, this material is available in the most different versions. Please note that tinted roofing is used. sheet material in a cellular design, the walls are also built. And the window openings are made of monolithic polycarbonate, completely transparent. Polycarbonate is produced with various fillers that change light transmission up to complete opacity. The structure of the material in a honeycomb design, with maximum transparency, transmits up to 95% luminous flux, and the image becomes blurry.
Polycarbonate sheets can be easily bent during installation, which allows you to create original designs, which are a real decoration of the exterior of the site.

Fig.2. Veranda made of bent monolithic polycarbonate
Please note that the veranda from Figure 2 allows you to move the walls apart so as not to turn it into a greenhouse, in which staying in will not bring pleasure. Options with sliding walls can be fundamentally different, as shown in Figure 3.

Fig.3. Veranda with sliding elements made of bent polycarbonate
When using bending of this material, it must be taken into account that the minimum possible bend radius is 150 thicknesses of the sheet material. So, with a material thickness of 4 mm ( minimum size) the product can be bent with a radius of at least 600 mm.
However, the use of this technique is not always applied due to increased complexity installation What are used traditional forms execution of veranda premises with the installation of doors and windows in the usual design.

Fig.4. Polycarbonate veranda with fireplace
Device heating device in the form of a stove will allow you to comfortably spend time in such a room even in the cold season.
It should be noted that polycarbonate is absolutely non-flammable and can withstand temperatures up to 600 degrees, after which it simply decomposes to a gaseous state without releasing harmful substances. Also, the wide applicability of this material is due to its strength properties. It withstands the impact of large branches when strong wind and is resistant to impacts even from stones. And if it still manages to be destroyed, then no traumatic fragments are formed.
Veranda construction
Such a room differs from a terrace in that the floor level in it is arranged at the level of the foundation of the house, while the floor of the structure in the second version is placed directly on the ground.
Support base
Considering the ease of the veranda extension, it is clear that it does not require a powerful foundation. Maybe, the best solution V in this case there will be a pile foundation with a grillage as the least labor-intensive and costly option.

Fig.5. Pile foundation with a grillage for a wooden floor for a veranda
Application screw piles excludes concrete works, allows you to save time and money.
Bearing structures
Can be used as a veranda frame various materials, including:
- wood blocks;
- profiles made of non-ferrous metals in the form of various products made of aluminum-based alloys;
- square or rectangular steel pipes;
- plastic profiles.
The choice depends on the availability of a particular material on the local market. Wood is most often used; in our country, wood is the most common. You can almost always purchase steel hollow profiles.
If the roof of the veranda will be made of profiled sheets or metal tiles, they are almost always used wooden beams, with lathing. Treated and tinted wood is durable and visually excellent.
When using metal profiles, it is usually carried out arched design from bent elements. In this case, bending can be done with your own hands according to a single template or ordered at the nearest enterprise that produces building metal structures. To do this, you need to complete at least a preliminary design of the veranda and submit drawings (sketches) of the arches to the contractor.
Installation of polycarbonate sheets
The standard sizes of forms of this material are 2050 x 3050 – 12000 mm with thicknesses from 4 to 25 mm. Therefore, before designing a veranda, you need to check the availability of material sizes on the market and calculate the length of bent profiles with the condition minimum quantity joints.
For the construction of a veranda adjacent to the house, cellular and (or) monolithic polycarbonate with a thickness of 4 - 6 mm is used.
Attention! Before the beginning installation work Do not remove the protective film from the sheets. This is done upon completion of work.
To seal the structure, you can use special seals, applied to the surface load-bearing structure before laying sheets. Porous rubber seals are also used.
A wall profile is installed at the upper end of the cellular polycarbonate sheet F, preventing moisture from entering the honeycomb structure.
The edges of the forms are attached to the frame with self-tapping screws using shock-absorbing washers.
Important! Taking into account the high coefficient of linear thermal expansion of the material, the holes for the screws should be 2 - 3 mm larger than the diameter of the screws.

If there are joints, they must be made using connecting profiles in detachable or one-piece design.
Something to remember! Polycarbonate is produced with a protective film against ultraviolet radiation, which should be oriented outward.
When installing polycarbonate sheets, you need to avoid impacting them with your own weight, so you need to use temporary ladders or scaffolding.
Screwing fasteners on cellular polycarbonate must be done all the way, but without allowing overtightening or distortion.

Fig.6. How to properly attach cellular polycarbonate
Further development of the veranda room
Summer is rightfully considered the most comfortable season for a person and therefore his desire to “preserve” this heavenly time in a separate room is understandable. A great place for this is a spacious, well-built veranda.
Looking from the outside, many people think such a structure is expensive. beautiful toy. This is actually serious engineering structure, which requires constant care, but in return provides constant physical activity and the result in the form of the opportunity to enjoy the smell of flowers and clean, healthy air all year round.
Providing for the further development of the veranda into the winter garden, already at the design stage it is necessary to lay out a number of technical solutions for this:
- more reliable option insulation of the room in the form of thicker polycarbonate with a thickness of 8 - 10 mm. If the creation of a winter garden was not initially planned, a solution may be to install additional glazing with thin polycarbonate from the inside;
- installation of a heated floor on the veranda, which will not only serve as a means of heating the air in the room, but will warm the ground, creating comfortable conditions for growth tropical plants;
- the possibility of heating the air in the winter garden due to the heating system of the main residential building in combination with a heated floor system is optimal temperature regime for tropical plants, as well as for residential premises, it is 20 – 22 degrees;
- installing a fireplace not only as an additional source of heat, but also for purely aesthetic purposes;
- Ventilation of a winter garden requires ventilation openings of about 25% of total area walls, double-glazed windows are most effective for this.
The additional costs incurred to give an ordinary veranda a higher status of a winter garden will be more than repaid by improving the living conditions in the house.

Fig.7. Polycarbonate winter garden equipped on the veranda
Analysis of cost estimates for a veranda
The costs of constructing a veranda are determined based on the completed preliminary design and includes the main articles:
- Construction of the support base. For this you will need the following materials:
- Screw piles - at the rate of 1 piece per 2 linear meters support beams.
- Support beams made of softwood timber: for tying the outer belt measuring 150 x 150 mm, for floor joists - 150 x 50 mm, the distance between the joists is 750 mm.
- Support plates are made of sheet steel 4 mm thick at the rate of 1 piece per pile.
- Fasteners in the form of self-tapping screws with a diameter of 5 mm and a length of 50 mm - at the rate of 8 pcs per pile.
- Angles made of sheet steel for attaching the ends of the logs to the timber frame - at the rate of 4 pieces per log.
- For the frame of the veranda, in accordance with the project, a timber made of coniferous wood, a board for sheathing.
- Material finishing coating roofs.
- Roofing fasteners.
- Fasteners for mounting the frame.
- Polycarbonate in accordance with the project and additional elements for it.
- Materials for antiseptic and fire-prevention treatment of wood based on a single treatment of all parts.
The cost estimate must include the cost of delivery of materials. It is advisable to increase the total amount by 15 percent as a reserve for Unexpected expenses, which you can rarely do without.
Conclusion
The veranda is necessary element building that improves living conditions in the house, and it is advisable to build it together with it, including it in the initial project. If for some reason this was not done, then completion is always possible. As can be seen from the text above, the process is quite simple to do it yourself. Feel free to take on this work and good luck to you!
Video compilation
The video below shows 53 options for polycarbonate verandas.
Polycarbonate verandas are a good option for comfortable stay in the country. This is an unheated room adjacent directly to the house, which can be glazed or without glass, which is chosen by the owner.
However, many people prefer to build closed buildings to make it more comfortable in the event of strong gusts of wind or cold rain. The article suggests learning how to make a polycarbonate veranda with your own hands.
The main purpose of polycarbonate for a veranda is its glazing. This is a sheet material for the manufacture of which polymers are used with the addition of various additives. This translucent material has a number of advantages.
These include:
- Increased strength, high impact strength and resistance to wind loads. Polycarbonate is quite difficult to break, but it does not shatter into small pieces with sharp edges.
- Light material weight allows you to reduce costs during its installation and foundation construction.
- Fire safety.
- Ecological cleanliness, does not cause allergies, is safe for human health, does not emit toxic substances.
- Withstands low and high temperatures.
- A single sheet of polycarbonate has thermal insulating characteristics comparable to a double-glazed window.
- Good sound insulation.
- High transparency, to reduce light transmission it can be tinted or painted in various colors, which will allow you to implement a variety of design solutions.
- Good ductility, easily bends without heating, this makes it possible to create curved glazing.
- Chemical resistance.
- Optimally transmits useful rays of the spectrum, has high degree protects it from ultraviolet radiation and partially blocks infrared radiation.
Tip: By choosing polycarbonate glazing of the veranda, the owner gets a veranda at little cost impressive looking, With reliable protection from UV radiation, which retains heat well indoors.
Types of polycarbonate for verandas
Many polycarbonate manufacturers produce material with different thicknesses, numerous colors, high translucency. There are two types of polycarbonate.
It happens:
- Monolithic type.
- Cell phone.
Features of monolithic polycarbonate:
- The presence of a continuous homogeneous structure, without cells.

- Practically no different from glass.
- The material is anti-vandal, superior in strength to cellular.
- It is harmless, after an impact a dent appears on it, but there are no fragments.
- During transportation and installation, it requires careful handling due to the possible formation of scratches.
- Its price is more than a cell phone.
Features of cellular polycarbonate:
- The panel consists of two or more sheets that are interconnected internal partitions, installed as stiffeners, with a cellular structure.

- The presence of air channels increases heat and sound insulation properties.
- Better bendable.
- Weight is less than monolithic.
- Has a wider color spectrum.
- Lower cost, less raw materials required for production.
Tip: When glazing a veranda, you should purchase lighter and cheaper cellular polycarbonate, which provides excellent thermal insulation. Monolithic type justified only if increased impact resistance is required, better protection when glazing a room.
Do-it-yourself verandas made of cellular and monolithic polycarbonate look different. In this case, it is imperative to give preference to a material with UV protection, approximately 10 millimeters thick; with cellular polycarbonate, it is better to give preference to a two-layer one.
How to build a foundation for a polycarbonate veranda
Regular or warm veranda made of polycarbonate differs from a canopy in the presence of a foundation.
The type of base of the extension determines its appearance, it can be:
- Built-in. In this case, the structure is designed with the main building, and its foundation is integral with the base of the building.
- Attached(cm. ). The extension will be erected upon completion of construction. In this case, the foundation is constructed separately and then joined to the structure of the house.
Advice: When choosing the type of foundation for an extension, you should focus on the weight of the structure and its dimensions.
The foundation for the veranda can be:
- Slab is a solid concrete base. Used for the construction of heavy terraces and verandas made of bricks, maybe together with a porch.
- Tape is a more popular type. In this case concrete base serves as a support under the walls of the structure being built.
- Supporting or columnar. In this case, the structure has the form of separately located support pillars. This method is used for the construction of lightweight open structures.
- Pile. It is made similarly to the support base, but the piles are screwed in rather than driven in. Its construction requires the use of special equipment.
For device supporting foundation The following materials can be used under a polycarbonate veranda:
- Brick.
- Wooden bars.
- Metal pipes.
- Concrete.
The advantages of such a foundation are its independence from the foundation of the main structure.
Instructions for constructing the structure:
- Before installation, the support pillars must be pre-treated:
- coat metal pipes with a special anti-corrosion compound;
- wooden blocks - antiseptic. In addition, the tree must be additionally waterproofed with coating or bitumen.
- Pits are dug along the perimeter of the site, the number of which depends on its area. The depth of the pits should be equal to the depth of the foundation of the existing building.
- Sand is poured onto the bottom in a layer of 20 centimeters and thoroughly compacted.
- The supports are lowered into the pits, covered with earth and gravel, or filled with concrete.
When installing screw piles, you can adjust their height without difficulty. This is especially convenient for a site that is located on a site with a large slope. In this case, no leveling of the territory is required.
Principle of installation of piles:
- Their placement locations are marked in increments of one to three meters.
- Using special device shaped like a lever, the piles are screwed in a spiral into the ground to the required depth. In this case, the quality of the soil does not matter.
How to sheathe a structure with polycarbonate
When covering a veranda with polycarbonate, the material can be mounted vertically or horizontally, it depends on the type of structure: open or closed.
For the construction of the frame the following are used:
- Wooden beams.
- Metallic profile.
Only the roof sheathing is mounted; when constructing an open extension, it is installed on support pillars. For closed veranda the lathing is done for the walls and ceiling. The distance between the sheathing beams is selected from 60 to 80 centimeters, support pillars are installed after one to three meters.
Mounting monolithic polycarbonate onto beams is carried out using one of the following methods:
- "Wet."
- "Dry."
For installation of honeycomb panels:
- Holes for fastening are drilled - using self-tapping screws, in increments of approximately 40 centimeters, with a diameter greater than the diameter of the bolt axis.
- Due to the thermal expansion of polycarbonate, it must be fixed loosely.
The polycarbonate terrace panels are laid in the following sequence:
- Starting from the left edge, elements for constructing a wall or roof are placed. When joining sheets together, there should be a gap of up to five millimeters. Panels made of cellular polycarbonate are laid in such a way that the cavities are located vertically, then the accumulated condensate can be easily removed.
- Before installation, each sheet is pre-insulated. In this case, the upper end is sealed with a strip or continuous tape, which will prevent debris and moisture from getting inside the sheet, and the lower end is sealed with perforated tape, to ensure condensate drainage.
- If present on the material used protective film, the sheet should be placed so that the coating is on the outside of the roof or wall.
- The honeycomb panels are fixed to wooden blocks using self-tapping screws made of stainless steel, with the installation of regular washers. The photo shows how to fasten the sheet yourself.
At metal frame Thermal washers are used, which can be transparent or suitable color. Monolithic slabs can be glued to the frame or secured using a profile.
- The joints formed between the sheets should be sealed and then covered with decorative strips.
The video in this article shows the process of installing a polycarbonate veranda in more detail.


