Build a house from 200x200 timber with your own hands. How to build a house from timber yourself? Nuances of construction. Construction of a house - we strictly adhere to technology
Read also
After a hard week at work, you always want to have a good rest. And for this you need to go to nature outside the city, to your home. You can build a house from timber with your own hands if you have a small plot of land. You can landscape it yourself, install water and heating there, and make a sewer system. You will want to spend every free day in this house, and eventually move into it.
Dacha design
A house made of timber is erected without experience in construction in several stages:
- design;
- laying the foundation;
- laying crowns;
- roof;
- finishing and laying of communication systems.
The beam has a rectangular shape, which allows you to initially obtain uniform walls and reduce construction time. An important point is also that it can only be used for the construction of houses up to a maximum of the 3rd floor. It has several more positive features:
- good performance properties;
- ecologically pure;
- design and others.
A house made of wood is quite warm due to the tight fit of the wooden elements during construction. Wooden houses are also advantageous because interior and exterior decoration is quite easy; you can use various decorative elements.
Before you move on to building a dacha, you need to make a design and calculate how much this construction costs.
It is better to order a building project from construction companies. Their technical specialists will calculate everything down to the smallest detail in terms of soil characteristics, construction technology, amount of material, and will even find you a developer.
But in order to save money, it is better to independently develop drawings and calculate the number and cost of elements. In the case of the construction of several floors, the project must have floor plan drawings. With a finished project, you need to contact a special institution to obtain permission to build a house.
If you have made or ordered a drawing, then after receiving the appropriate signatures and the approved project, we proceed to the foundation.
Laying the foundation
The main structural element of any building is the foundation. Before creating a project, it is very important to decide on the type of foundation of the house. If a mistake is made at the beginning of construction, an incorrectly designed foundation will lead to negative consequences during the operation of the house and such serious problems will arise as:
- warp of the base;
- cracks in the supporting structure;
- deformation and others.
The reliability of the building's foundation is the durability and quality of construction.
There are several types of foundations used in the construction of country houses:
- from screw piles;
- tape and others.
In areas outside the city where soil moisture is high, foundations made of screw piles are often used.

Its advantages are as follows:
- cost savings of 2-3 times (compared to strip foundations);
- easy to do yourself;
- construction time - 1-2 days;
- high reliability;
- you can work with it at any time of the year;
- application for complex landscapes.
As practice shows, this structure should be erected and poured independently, since it will be much cheaper and more reliable than the work of so-called “specialists.”
The most popular base today in the construction of houses. Its advantage is that any house can be built on it, it is durable and less expensive. The base is quite strong, it uses much less building materials, and the time allotted for work is reduced significantly.

How to make a strip foundation yourself:
- First, let's mark the area around the perimeter of the house.
- Then we designate the location of the internal walls (load-bearing). The width of the dug trenches should exceed the width of the walls by at least 10 cm, and the depth should be above the freezing level of the soil, but not less than 0.6 m.
- Pillows made of crushed stone and sand (10 cm each), poured into the trench, need to be filled with a half-smaller layer of concrete (5 cm).
- Formwork made from 2.5 cm boards must be installed so that its top is visible above ground level (about 0.4 m).
- For reinforcement, use 1 cm rods in two layers. The structure of them is laid longitudinally, then transversely, and the intersection points are secured with strong wire with a gap of about 5 cm.
- For concreting, the popular type of cement M400 is used. To mix the solution, take it together with sand in a ratio of 1:3.
- Concrete is poured into the trenches with a special pump or shovel.
The main thing is to prevent bubbles from appearing before it hardens. This is done using special technology. The concrete surface (not hardened) is periodically sprayed with water.
After pouring, construction of the house is suspended for a month. This is necessary for the concrete to harden and prepare to take on a heavy load.
Construction of a building
How to build a house from timber with your own hands? To build a warm and cozy cottage, you should take the choice of materials seriously. As practice shows, it is better to use timber made from coniferous trees, as it is strong and durable. There are two types:
- profiled;
- whole.
Let's consider each of them separately.
Profiled timber
It differs from the solid one in that it has crown grooves or tenons over the entire surface. Building a house from it is quite easy and quick.

The advantages of such a building:
- excellent thermal characteristics;
- modern design;
- smooth walls that do not require additional cladding;
- the design does not allow moisture to enter the inter-crown seam.
- is highly flammable (to eliminate this drawback, it should be impregnated with special means);
- requires insulation on both sides when living in the cold season;
- redevelopment in a house built from profiled timber is impossible.
This material should be chosen with a humidity of no more than 20% (this is achieved in special dryers for wood).
Solid timber
It has many advantages, but outwardly it looks bad. The process of preparing it for installation is quite fast. You can purchase the material from any construction company and on the construction market at a minimal cost.

How to build a house from solid elements after choosing the material:
- it is worth preparing for the fact that there will be additional costs for its finishing (siding, lining) to give it a more aesthetic appearance;
- use only the highest quality wood; Before use, it should be treated with antiseptic agents (to prevent the appearance of fungus).
In solid slats, the inter-crown seams are weaker than in profile ones. When wood shrinks and subsides, cracks and cracks appear. They are eliminated with the help of sheathing, which leads to additional costs.
We build a house from solid elements:
- The first crown is made on a double layer of waterproofing, which covers the foundation. The quality factor of the building depends on its assembly. As a rule, elements measuring 150x150 mm are used.
- The insulation is laid 0.3 meters more than the width of the foundation itself.
- Then we assemble the walls from timber, which we pre-treat with an antiseptic. Each rail needs to be processed.
The tree is laid out in rows. If the timber is solid, its grooves are additionally insulated with special material. For strength, the elements can be connected with special spikes.
Roof of a wooden house
The roof, as the final stage of building construction, should also look efficient and original. To begin with, lay the Mauerlat (it is better to use 150x150 elements) and attach it with hardware to the crown.
The rafter frame defines the shape of the roof. All parameters of the rafter system are specified in advance in the project. Slats up to 180 mm wide and 50 mm thick are secured with steel plates.
We install the rafter frame and cover it with a layer of high-quality vapor barrier. Then we install the sheathing (across the rafters) using nails. The distance between the slats will depend on the type of roofing material:
- tiles - solid (slats end to end);
- slate, corrugated board - with a distance of 0.3 m.
It is worth remembering that a wooden house “shrinks” over several years. During this period, you can live there, but it is strictly forbidden to decorate and tile it.
Construction of a house from timber is today one of the most popular types of construction contracts in the private sector. The revival of interest in wooden construction in all countries of temperate and in large parts of cold climate zones is quite natural. Wooden houses are good not only and not so much for their “spirit”, “breathing”, “environmental friendliness”, but modern methods of wood processing make them completely safe and durable. At the same time, information circulating on the wooden house market is clearly mythical and clearly commercially oriented. In this article, we will try to give the reader an objective idea of the features of timber houses, their advantages, disadvantages, and we will try to draw a conclusion where and in what cases it is advisable to build a timber house.
Main advantages
The first main advantage of a timber house is the same as that of all wooden ones: the foundation for it can be of a lightweight type - not buried, insulated. It’s clear why: wooden buildings are lighter than stone ones and more resilient.
Next factor– timber construction technology actually does not require technological interruptions. More precisely, it does not require “deaf” breaks, when the building must simply stand still and nothing can be done there. That you can move into a log house right away is, of course, nonsense. But, firstly, it will take a year for complete shrinkage, while a brick one needs 2-3. Secondly, while the log house is settling, a lot of things can be done in it that you won’t have to do later, see below.
Other main advantages of houses made of solid wood (cut and prefabricated beams, see below) are due to the ratio of the heat capacity of wood to its thermal conductivity. In modern climatic conditions - global warming and the increasing frequency of abnormal, warm and cold winters - it turns out to be optimal from the point of view of heating engineering. For brick and stone, this ratio is too high, and for aerated concrete, insulated frame and composite structures (SIP panels, etc.) it is small.
What does this look like in practice? An adult at rest emits approx. 60 W heat. A family of 5 people, not all the time lounging in a chair - ok. 350 W. Lighting, household appliances, and heat generation during cooking in the kitchen also provide, on average, 700-1200 watts per day. Roughly speaking, the house consistently produces approximately 1.3 kW of waste heat. In a brick building, not to mention a concrete one, this heat will go uselessly into the walls, and from there outside. In aerated concrete or composite, it will have to be released into the ventilation or through a window, otherwise it will become hot. And in a wooden one it will be evenly distributed in time and space.
With intensive combustion, such an addition is unnoticeable, but when the boiler operates almost “on guard,” the fuel savings are quite noticeable. True, in pyrolysis and solid fuel combustion boilers the efficiency drops sharply in this mode, but in gas and surface combustion boilers this effect is weakly expressed. As for stove heating, it becomes possible to reduce the number of firings per day without reducing the fuel load to a value at which the efficiency of the stove decreases. The advantages of a log house for stove heating are especially clear if the stove has 2 modes, “spring/autumn - winter”.
The next advantage of timber/log houses is related to the previous one: the mechanical properties and geometry of wood properly prepared for construction do not deteriorate from periodic freezing/heating, unless the wood is drenched with moisture to a drip. The reason is the very thin pores in it. Water in ultra-narrow capillaries freezes at a temperature much below 0, but only becomes viscous. That is why winter animals survive under snow, and small animals overwinter in frozen soil or under the bark of trees. The walls of a brick and aerated concrete house, if it has to be heated at minimum for 2-3 years in a row, can become damp and after another 3-5 seasons begin to crumble. The thermal insulation of the frame wall from the “underflow” also becomes damp; composite panels delaminate. But a wooden house can be left unheated as many times as you like, and after the fire starts, it will warm up in 2-4 hours, and not in 2-3 days, like a stone one. In the Russian outback you can find wooden log houses abandoned to the mercy of fate 50-100 years ago. Many of them can be moved into after renovation.
Note: a log is a round beam, and the construction techniques for timber and log houses are very similar. Therefore, further the log is considered on an equal basis with the timber, specifically stipulating what is being discussed only if there is a difference in relation to a given moment.
Is it possible to do it yourself?
Is it possible to build a house from timber with your own hands is also a very relevant topic. As can be seen from the previous one, the main advantages of individual log houses appear outside the coverage area of centralized heating networks. Having a construction crew visit the site will make construction much more expensive, and you will have to pay the full amount for it at once, which not everyone can afford. And if you negotiate with the contractors about work in parts, the “cool” budget will also burst due to construction costs.
Timber construction, except for the zero cycle(pit - foundation - plinth) does not require the use of special equipment or complex tools. A physically strong man can handle a 6-meter beam alone; Sometimes an unqualified assistant may be needed for a while. How to build a house from timber with your own hands, see a selection of videos:
Video: do-it-yourself timber house in stages
Stage 1: the whole box before shrinkage
Stage 2: initial finishing
Stage 3: final finishing
Stage 4: staircase construction
As you can see, it is quite possible to build a house from timber without being a professional carpenter or builder in general. It’s clear that you need the right kind of head and hands for this. But what can be achieved (in the sense of what kind of house to build), and what initial skills you need to have for this are more serious questions.
What can timber do?
From timber you can build houses with up to 3 storeys with an attic and a total area of up to 600-700 sq. m. m. Architectural forms – angular; A selection of photos gives an idea of the possibilities of timber construction. Suppliers of construction logs offer material with ready-made bowls not only at 90 degrees to the axis of the log, but also at 45, 60, 30, which allows you to assemble faceted structures. In principle, smoothly curved timber walls can be assembled from bent timber, but the price is exorbitant.

About insulation

Many sources claim that log houses are suitable mainly for seasonal living. The reason is that for the average family budget, construction from timber up to 200x200 is feasible; the most popular standard size is 150x150. According to heating engineering, such a wall is equivalent to 1.5 bricks, which is not enough for Central Russia. However, firstly, timber houses can be insulated from the outside under without restrictions; it turns out to be easier and cheaper than similar insulation using stone. Secondly, the thermal properties of wood make it possible to insulate a permanently inhabited (and heated in cold weather) house from the inside; For a typical diagram of the internal insulation of a timber house, see Fig. on right. Thirdly, there are timber construction techniques (see below) that allow you to place insulation in the wall. In general, the timber foot, i.e. a wall whose thermal engineering is equal to or better than 2.5 bricks is real.
Note: wooden building beams are produced up to a section size of 300x300, which is equivalent in terms of heat to a wall of 2 bricks, but the price of such material skyrockets.
How to be a “teapot”?

Is it really possible to install such beauty without the experience of a carpenter and builder? At all without experience, on bare theory, nothing can be done at all. A theory can generalize existing experience, clarify something incomprehensible in it, and discern in experimental data something that previously eluded general attention. On this basis, theory can extend existing experience and look far ahead of it. But the theory is based only and only on experimental data. Speculative speculation has never brought any benefit to anyone anywhere.
Specifically, in relation to this case: to assemble a foot from a solid 6-m timber, you need to make 36-50 longitudinal cuts and the same number of transverse ones. Cutting width – 2.5-3 mm. The error in maintaining dimensions during manual unskilled work is twice as large. It does not converge to half according to the law of large numbers, like an experienced worker: due to the accumulation of fatigue, the inexperienced hand leads in one direction. With a wall height of 3 m, the flaw will run up to 9-15 cm, randomly in the corners. Will a house like this stand? The question is rhetorical. What about the corners, ceilings, roof, partitions? What about openings and communications?
In addition to the accumulation of errors, there are other factors leading to defects. To level them in the process of work deliberately beyond the limits of human capabilities requires working skills. It is possible to work them out automatically by first installing a non-residential or seasonal timber structure with a plan size of approx. up to 4x5 m - barn, bathhouse, utility block, country house. He will be able to “keep everything in his mind” and “a full teapot”, as long as he is not a “teapot” in essence and not by conviction. And in the process of work, purely mechanical skills will be developed that will allow you to take on a residential building.
If you have already built something similar, after reading what follows, watch another video as carefully as possible and begin preparatory work. If not, read anyway. This will allow you, firstly, to significantly reduce the cost of design. Secondly, choose a suitable contractor: there are a lot of hacks in this sector. Thirdly, also wisely select and, possibly, purchase the material yourself.
Note: It is best to start building a log house in winter. A tree harvested in autumn-winter has the least shrinkage, and a tree cut down earlier will have time to rest comfortably.
Design and technology

The general diagram of the construction of a timber house with an attic is shown in Fig. below. It can be collected not only chopped. If you are not planning anything more complicated than building a seasonal one-story house up to approx. 6x6 m in plan from timber 150x150, then it is possible to use beam-and-beam construction techniques. At the same time, in the corners and under the piers in the mortgage (lowest) the crown of the box, which in this case is not a log house, is placed on tenons, i.e. vertical bars, pos. And in the drawing in Fig. on right.
The simplest way to assemble beams into walls is with a tongue-and-groove insert, as shown in Fig. As tenons, you can use ready-made slats of a suitable size, only rectangular ones, not furniture elliptical ones! The grooves for them are selected using a manual wood router. A more durable structure, suitable for housing in places that are not particularly windy or snowy, can be erected in this way on root spikes; better - in a frying pan, see below, but you need a special factory-made beam, because a manual wood milling machine will not turn the cutter of the required size.

An additional condition is the roof transom, i.e. its entire power structure, including the rafter system, and the building frame must be mechanically self-sufficient. Simply put, so that the entire roof can be removed, placed side by side, allowed to sit for 2-3 months, and then put back without disturbing the design of either one. The reason is that prefabricated beam boxes are not capable of bearing the loads that push them.
Note: the feet of prefabricated beam walls need to be fastened with dowels, as in the next. case.
Real lumber
So, we are building a log residential building. The base is a log house, a very strong and fairly elastic box of lying beams, fastened together with notches at the corners and in places where the walls are drained. This means that you will need to master several types of timber cutting, see fig. For log houses in the oblo, a simple cut into a bowl is most often used; for a 1-story house with an attic it is quite enough. It is better to assemble the frame of a high-rise house in a fat tail; this is the most difficult, but the most reliable method. For a log house made of laminated veneer lumber (see below), cutting into okhryap would be no worse.

When cutting without leaving a residue, cutting into the paw is commonly used. Methods b, c, d are recommended for non-residential or seasonal buildings up to 1.5 floors. Methods a and d provide a durable frame, but are not recommended for places with annual precipitation exceeding 300 mm or wet areas. Method g is used to assemble lungs, and method h – load-bearing partitions.
Note: The frying pan looks like a dovetail joint, but is not one. Dovetail is a corner furniture connection of flat parts on a set of trapezoidal tenons and resp. grooves
Logs in a log house are also cut in several ways; on both halves of the fig. they are arranged, from left to right, in order of increasing complexity and reliability. Currently, there are rounded logs for sale for log houses with ready-made bowls at 90, 45; sometimes - at 30 and 60 degrees. The spacing of the bowls along the length is 1.2, 1.5 and 3 m. Before designing or laying out the beams of the house (see below), you need to decide on the supplier of the material and tie the log house project to the pitch of the bowls.

We’ll have to get ahead of ourselves a little about logs. Most calibrated logs go on sale with a ready-made lunar groove, pos. 1 on next rice. If there are doubts about the quality of harvesting and seasoning of wood, it is better to take a log from the so-called. Finnish groove - longitudinal slot at the top, pos. 2. Cracking of any type of non-laminated timber is inevitable. The Finnish groove provokes the appearance of a primary crack where it is most difficult for moisture and pest germs to get into it, and when the cracks go along the sides, the log will turn into almost pure lignin, which is more resistant to harmful influences.

Construction logs should not necessarily be stored under a canopy, but certainly on some elevation and on logs with a thickness of 150 mm, laid at least every 2 m (to avoid sagging of the logs), and the rows in the stack should be arranged with slats with a thickness of 50 mm or more, pos. . 3. The highest quality timber is stored on concrete sites with a slope to drain rain and melt water, pos. 4, in stacks oriented longitudinally in the north-south direction.
But let's return to the stacks of beams in the walls. In addition to corner and intermediate notches, to prevent longitudinal and transverse displacement during shrinkage, their assembly is reinforced staggered with dowels - round wooden pins, see next. rice. Dowels with a diameter of 30 mm are used to connect along the length and corners of the notches in the paw and half the tree, and the notches in the root tenon are reinforced with 20 mm dowels. Dowels are not necessarily made of hard wood; The main thing is that the wood of the dowels dries out faster than the timber, otherwise the beams will hang on the dowels, the walls will split and weaken. Aspen pins are suitable for 1-story houses made of pine timber; they do not rot. Birch is stronger, but is only suitable for partitions in dry rooms, because Birch is very susceptible to rot and mold. The best, but most expensive pins are oak.

Recently, another way to fasten the beams in the foot has appeared: with steel bolts with threads for wood. They are driven into the lower beam by half or 2/3 of its thickness, and in the upper beam a wide hole with a depth of 1/3 of its thickness is selected under the head of the bolt. Place 2 washers with a spring between them under the bolt head. At first, the bolt is tightened tightly, and as it shrinks, the springs compress the foot. This allows you to counteract not only the correct shrinkage of the timber, but also its rather strong warping, see below. In theory, everything here looks perfect, but this technology has been used relatively widely for less than 10 years. The minimum permissible service life of residential buildings is 40 years, so it is too early to definitely recommend tying the timber pile with bolts.
Caulking and shrinkage
As the timber stack is assembled, it is caulked with strips of flax or jute with an overlap of 5 cm to the sides. After assembling the foot, the caulking laps are pushed into the grooves, this is the so-called. the first padding or tuck. Then, if the log house is still without a roof, the tops of the walls are covered with roofing felt and the log house is left to shrink for up to a year. At this time, communications can be laid inside it and some other work can be done, see the video above. Shrinkage is controlled by slats with marks installed in the corners. If the openings for windows and doors are not cut out in the settled log house, but are formed by trimming the beams immediately, they must be made higher than the calculated ones minimum possible the amount of shrinkage of this timber. They are cut to size later. The final caulking with a rope is carried out under the roof after shrinkage of the frame.
About the ends
There is no need to paint or resin the ends of the timber. Although wood draws moisture primarily along the ends, it also dries evenly along them. In a finished unpainted log house, 2-3 years after construction, in dry summers, it is useful to generously soak the exposed ends with water-polymer emulsion 2-3 times. It will not affect the appearance of the house in any way, but the likelihood of developing cracks, rot and mold will drop sharply.
Mortgage crown
The Achilles heel of wooden houses is the lowest, mortgage, crown of the log house. Capillary damming is inevitable between it and the foundation, i.e. accumulation of moisture that has settled directly from the air, and a rotten mortgage crown requires reconstruction of the entire log house. To avoid this, SNiPs recommend raising the mortgage crown above the foundation by 5 cm, but how? Wooden slats rot, steel mesh in several layers or pressed small metal waste rusts, cement screed leads to the same soaking, only higher. The most effective way to neutralize capillary moisture is provided by the same SNiP: a mortgage crown and, preferably, 1-2 more above it - made of larch. Even if it is not soaked, it is constantly in musty water and lasts for 100 years or more. In this case, the lower crown is simply laid without a gap on 2 layers of roofing material laid along the foundation.
Design

To build a timber residential building, an approved project is required. Minimizing design costs will also result in significant savings in overall costs. Standard projects are the cheapest, and more or less reputable contractors do not charge a separate fee for their own. But it is not always possible to fit into the “type”, either due to one’s own needs or local conditions. In this case, computer construction design programs will help. There are several of these, aimed at private log houses:
- VisiCon – interior design and planning, designed for amateurs. We need to start with it. If everything you want in the house fits into a “standard box”, then is it worth straining your wallet, yourself and people’s heads?
- FloorPlan 3D + House-3D, for facades and stairs - will allow a non-professional, right down to the user, to get a sketch from which the designer will understand exactly what the customer wants. This will reduce the cost of consulting with specialists and finalizing the project.
- CyberMotion 3D-Designer is a semi-pro software, designed for a user who can read technical documentation and is superficially familiar with computer-aided design systems (CAD, CAD). After using this software correctly, the specialist will only have to check the project and submit it for approval.
- Total 3DHome Design Deluxe, HomePlan Pro, Xilinx Planahead are professional products. If you have already designed houses yourself, here you have at your disposal extensive sets of templates, a database of technical and architectural solutions.
The SEMA software deserves special attention - a complete software package for designing timber and frame houses. Even a beginner can master it, but the result is:
- General layout and premises.
- Determination of the dimensions of surfaces and openings along the axes.
- Weight distribution is the determination of the centers of gravity of all structural elements, which will greatly simplify the work of the designer, and will give the customer serious reasons to demand a discount on the project.
- Layout of the rafter system for the selected roof, calculation of the sheathing and roofing pie. The effect is the same as before. case.
Particularly valuable to the developer directly at SEMA is planking - a full calculation of timber for building a house:
- Layout in rows along the axes.
- House kit cards.
- Summary material sheet with specifications of all elements.
- Schemes for laying out timber along the crowns.
Having an accurate layout, you can, firstly, while the papers are wandering through the authorities, reduce the estimate for construction and calculate your capabilities according to it. Secondly, find a supplier, select and order the material in real life. Thirdly, for screeding, you can purchase materials in parts as needed, rather than shelling out the entire amount at once.
Material selection
Now we're down to the material. Here we will have to learn the difference between the concepts of shrinkage and warping, which we have already encountered earlier. Shrinkage is a proportional decrease in the linear dimensions of the timber due to uniform loss of moisture and under the influence of mechanical loads, primarily weight. Warping is shrinkage that distorts the geometry of the part. Occurs from uneven drying, regardless of mechanical loads, see fig.

If shrinkage is standardized for different types of wood and types of lumber, then the warping effect is certainly harmful and is unacceptable for high-quality industrial wood. Depending on the drying conditions, raw wood may not warp, but seasoned wood, if stored incorrectly, will warp. Given these circumstances It is possible to build a good house from timber:
- Wild or wild wood - from the forest, which had lain at the lumber yard for an indefinite period of time before sawing. The cheapest. Shrinkage up to 10%, humidity is not standardized, the development of cracking and warping is not guaranteed with proper further storage;
- Seasoned edged - goes into sawing brought to an air dryness of 20%. In regions with developed logging and timber industries, it is not much more expensive than wild wood, but the shrinkage is approx. 7%, cracking is normalized (see below), does not warp if properly stored;
- Seasoned profiled - the properties are the same as in point 2, but more convenient to use. The price is slightly higher than the edged one. The most popular type;
- Glued – beams are glued together from individual boards/slats (lamellas), seasoned and impregnated. Only profiled, more expensive than seasoned. Surpasses everything before. types in all parameters, except one: in most profiles, see below, the glue seams are visible and it is noticeable that the wood is not natural;
- Rusk - from rusk, high-quality dead wood. Zero shrinkage, development of cracking, warping and rot are excluded. Very expensive, because... Tapping bark from the butt of a living tree to obtain crackers in all civilized countries, including the Russian Federation, is considered a predatory method of logging, is prohibited by law and is subject to criminal prosecution.
Savage and sawn-off shotgun
Types of edged timber, from left to right in ascending order of price per 1 cubic meter. m, shown in Fig. In the construction of a house, not only a 4-edged clean-edged can be used, as is commonly believed. For example, a 2-edge one gives a double-sided imitation of a log without making a moon groove and rounded bowls, which is difficult or even impossible with a hand tool. The 3-edge allows you to imitate a log on the outside, leaving a flat surface inside. 4-edge with wane provides an external wall that is more resistant to atmospheric moisture. To do this, you need to collect the foot with the wane facing outward and oriented upward. Rows of small teardrop cornices are formed on the wall, greatly reducing the penetration of water into the grooves even with very slanting rain.

Note: sleepers look similar to beams, but are more expensive because they are additionally rated for knots, curls, cross-layers, etc., which is not essential in construction.
Profiled timber
A house made of profiled timber is not only easier to build, it is also more economical in terms of heat, because... through cracks in the walls occur when the deformations of the timber are greater than that of the edged timber, approx. the same as in a log house. Also, the profile beam ensures the evenness of the wall surface, because the protrusions and grooves of the profile keep it from lateral displacement. But, contrary to popular belief, it is still necessary to reinforce a foot made of corrugated timber with dowels: suddenly it will warp and the thin protrusions will simply tear.

Comparative characteristics of solid seasoned and glued profile timber are given in table. in the figure, and how it looks naturally is shown in the photo below. Add to the table data. and there are few pictures left.
Firstly, about national standards for shrinkage. In Europe, which is poor in timber and free space for storage areas for timber, its permissible value is 2%, or 2 cm per meter, respectively. array size. With a foot height of 3 m, this gives 6 cm, which is not very good, but Europeans maintain their standards.
There is no need to compare Russian laminated veneer lumber from the best manufacturers with quality standards; it itself can serve as such a standard. But, unfortunately, in this very profitable sector there is a host of medium-small producers, many of whom, even if they have heard about the standards, then, pardon the expression, want to choke on them deeply and from a high place. Canadian timber is not inferior to Russian timber, but about such prices in Odessa they say: oh, mother, give birth to me back! That's why It is better to order high-quality timber construction on a turnkey basis with a guarantee(a year is enough for a log house for all the defects to appear), and for a budget one, take seasoned solid corrugated timber.
Secondly, Glued laminated timber is available in thicknesses starting from 50 mm, and its high performance qualities make it possible to assemble hollow walls from it, pos. 3 in the photo. The gap is filled with expanded clay, foam concrete and other non-flammable insulation; in addition, the resulting honeycomb structure is more rigid and wind resistant. This makes it possible to build a house from laminated veneer lumber in difficult, even extreme, climatic conditions. A hollow-core insulated timber wall is, as it were, dual-mode: in the off-season, with minimal heating, it behaves in terms of heat like a wooden one, see above, and if it “heats up”, the insulation comes into play.
Thirdly, the performance qualities of a wall made of laminated veneer lumber are determined not so much by its profile as by the gluing pattern, see figure:

- Horizontal gluing is the most reliable, because the adhesive seam is compressed by the weight of the overlying structures. Disadvantage: the seam is visible.
- Vertical gluing beams are suitable for buildings up to 2 floors.
- From salon beams you can build houses of any number of floors and structures allowed for timber beams. Also, salon beams must be high-quality beams with a thickness of 200 mm or more.
- Glued laminated logs work completely similar to solid ones, but its technical parameters correspond to the conditions for laminated veneer lumber, which is much more rigid, see above. True, the glue seams give away its artificial origin.
Summing up + prices

Price for houses made of timber per 1 sq. m of total area varies significantly depending on the availability of raw materials, the degree of development of the forestry and woodworking industries in a given region, logistics infrastructure, and finally, the season, current demand and competition among contractors. When navigating for yourself, you need to consider the following.
Firstly, for houses with a total area of more than 100 square meters. m, but up to 200 sq. m, you need to multiply the average price in a given location by 1.15, and for houses larger than 200 sq. m. m - by 1.25. The reason is the technological difficulties of assembling walls longer than the standard timber length of 6 m. The same coefficients apply for a number of floors of 1.5-2 and over 2.
Secondly, the turnkey price does not mean that you can bring furniture into the house and celebrate a housewarming party. In the “connected” house you will receive:
- In a house made of wild timber there will be no finished floor, but there will be empty openings, because... it must sit for a year before final finishing.
- The house is made of seasoned and laminated timber - there is a laid floor, windows, doors.
- The remaining surfaces are prepared for finishing (decorative) finishing.
- Divided communications, but without installed plumbing, heating, cooking and lighting fixtures. The maximum is temporary light bulbs dangling from wires.
- There will be no external cladding unless otherwise specified in the contract.
In general, averaging across the Russian Federation, the price of 1 sq. m. m of turnkey timber house is:
- from wild edged timber – 350-400 USD;
- from seasoned solid profiled timber – 600-750 USD;
- made of Russian-made laminated veneer lumber with a one-year warranty – 1100-1300 USD.
A brick house under the same conditions will cost 850-1000 USD per 1 sq. m. m. Taking into account the fact that the finishing of a timber house is cheaper (except for plasterboard sheathing), it turns out that way. However, the construction of a timber house may turn out to be more profitable, firstly, in places with a developed timber industry, but a shortage of mineral raw materials. Secondly, oddly enough, in the southern regions, due to savings on heating in the off-season and warm winters.
Having decided on the location and size of the tape, we carry out the markings.
To do this, in the inner corners we drive pieces of steel reinforcement 1 meter long into the ground to a depth of 70 cm.
Instead, you can use wooden pegs of similar length. We install the same racks in places where the jumpers for the partitions branch off from the main strip.
We tie the driven supports around the perimeter with a strong, brightly colored nylon cord so that they are clearly visible. After this, we retreat outward onto the designed tape and perform the second marking contour. Thus, we obtain the boundaries of the future foundation.
The markings should be treated with due care. Mistakes at this stage will lead to problems at all subsequent ones.
Ground work and installation of formwork
The soil between the marking lines must be removed to the required depth. For a permanent structure, it can be 1.5 - 2 meters, depending on the level of soil freezing.
The correct foundation trench contributes to the quality of the strip foundation.
Tape reinforcement
A prerequisite for obtaining a high-quality monolithic foundation is the presence of a recessed steel frame - an armored belt. It is made from special corrugated steel rods with a diameter of 10-12 mm, called reinforcement. To connect parts, two main ones are used:
- Gas or electric welding.
- Twisting with soft steel tying wire.
The second option is more widespread, as it can be performed by unskilled workers quite quickly. To carry it out, use a specialized tool or simple pliers (pliers).
To make an armored belt, long rods are cut to fit the sides of the tape and many shorter pieces are installed vertically and across the foundation. The length of the short parts should ensure that the reinforcing frame is indented from the formwork and the top of the foundation by at least 10 cm.
A simple technique will help ensure high foundation strength in corners and at the junction of walls and partitions - lay reinforcement there, previously bent at 90 degrees.
Before installing the armored belt, the bottom of the trenches is covered with clean, seeded sand in a layer of 10-15 cm and carefully compacted, after slightly moistening it. The second layer is filled with crushed stone of the middle fraction and compacted as well. After this, you can install the reinforcement and begin concreting the tape.
The correct armored belt is the key to the quality of the base of the house, its foundation.
Concreting the foundation
A mixture of sand, cement and crushed stone with water can be poured into a prepared trench, limited by formwork. It is not difficult to prepare it directly on the site on your own or buy it ready-made at the nearest concrete plant. Both options have advantages and disadvantages.
Self-production of concrete significantly increases the time needed to manufacture the foundation, since it can be obtained in small batches after each loading of components.
It will not be possible to completely fill the tape with concrete in a day, so the work will need to be repeated. The layered structure of concrete is less durable.
Purchasing a ready-made mixture will allow you to fill the foundation with one layer in a few hours. It will be enough to ensure that the mixer can drive directly to the construction site. A significant disadvantage of this is the cost of ready-made concrete, which slightly exceeds the total cost of purchasing its components.
Once poured, the concrete must reach maximum strength before construction can continue. This may take from several weeks to several months, depending on the thickness of the layer.
During the first days, the tape must be kept covered with burlap, which prevents the top layers of concrete from drying out. It is recommended to periodically moisten the fabric by sprinkling from a watering can.
Compliance with concrete technology is the key to the quality of the foundation.
We erect walls and partitions - we cut a log house

A log frame can be installed on a pre-conditioned foundation.
It can be purchased ready-made or made on site.
The second option is longer, since it is very difficult to build a house from 150x150 timber with your own hands without the use of construction equipment.
The weight of such lumber in a wet state can exceed 130 kg.
A layer must be laid on the foundation.
Roofing felt or glassine tapes are often used for this purpose. The first wall parallel beams with the quarters removed at the ends are laid on them.
Perpendicular to them, a couple more parts are placed with grooves pre-selected at the ends, made according to the markings using a chain or circular saw. This is how the first crown of the log house is obtained.
At the required distance from the soil, floor beams are cut into the crown, placing them parallel in increments of about a meter. They must be held securely, since in the future they will be covered with boards. Additionally, they can be fixed with construction staples bent from steel rods with a diameter of 8-10 mm.
To ensure the strength of the wall structure, individual crowns are connected to each other using dowels - wooden cylinders made of hardwood.
To install them in several crowns, as a rule, holes are drilled in three, the diameter of which is equal to the diameter of the rods. Next, the dowels are driven into them using a sledgehammer and partially deepened.
Thermal insulation of a house under construction can be ensured by laying a special tape between each crown. In the case of using profiled timber, which has a cross-sectional shape other than rectangular, the width of the tapes is taken slightly less; for non-profiled timber it is equal to its width.
As a rule, the insulation is fixed to the lower rims using a construction stapler with staples 10-12 mm long.
The log house is the most important element of the entire structure. The peace and health of residents depends on its quality.
Don't forget to make openings
During the construction of walls, it is necessary to leave window and door openings in external walls and partitions free. Their location is determined according to the project, the height from the floor is 80-100 cm.
To preserve the strength characteristics of the log house before it shrinks in the openings, they try to preserve one middle beam entirely, thus dividing the hole in the wall approximately in half. Subsequently, before installing windows and doors, the data is cut out.
The technology for making openings is simple, but this stage must be approached with full responsibility.
Installation of interfloor slabs and ceiling beams
If, according to the project, your house has more than one floor, you cannot avoid installing an interfloor ceiling, which will simultaneously serve as the basis of the ceiling and floor. In this regard, high quality requirements are placed on its parts. They must be well dried and have the correct geometric shape.
To install the floors proceed as follows. In the lower crown, at a height of 2.2-2.5 meters from the floor level of the first floor, grooves are made, the width of which is equal to the width of the beams, and the depth is not more than half the thickness of the crown beams.
In the parts of the next layer, similar sockets are made with the same pitch. Place the upper crown with the grooves down and secure it with dowels. You can drive rods through the ends of the cross beams.
Proceed in the same way when installing the upper attic floor. When the under-roof is not in use, the installation step of the beams may be larger, and when it is in use, it can be smaller.
The safety of residents depends on the quality of the floors.
Roof and roof installation

A complex and responsible structure is the roof of a house.
Errors made during its manufacture can damage the entire structure of the building.
Schematically, the roof can be represented by a set of inclined rafter beams, one end resting on the ridge beam, the other on the upper crown of the frame.
Based on the number of slopes (sloping flat sides), the upper structures of the house are:
- Single-pitch
- Gable
- Four-slope (hip)
- Multi-slope
- Hip roofs (multi-slope with a large rafter angle)
Traditional for our country is a gable roof with hemmed gables, as well as an attic roof with large usable spaces under the roof. It is made from roof trusses made from rafters connected to each other in the upper third by cross members.
They are installed vertically and sheathed on the outside with 25 mm thick unedged coniferous boards - lathing.
To cover the gables, an additional frame of bars is attached to the outer trusses. Sometimes they are installed at one or both ends of the house. In this case, you can reduce the under-roof spaces, leaving a few square meters open.
To protect the house from moisture, the roof must be covered with some kind of roofing material. The most common ones today include:
- Profiled sheet – profiled sheets made of galvanized steel
- Ondulin - corrugated sheets of high strength and low weight
- Bituminous shingles
- Ceramic tiles
The specific choice of one type or another depends on a number of factors, not the least of which is the overall construction budget. Some roofing materials are more expensive, while others are quite affordable for every buyer.
Preparing the roof for installation of each specific type of coating is also different. For ondulin and profiled sheets, a standard board sheathing is sufficient. For asphalt shingles, it is necessary to lay sheets of plywood or OSB.
For a wooden frame, it is better to use natural finishing. Making a roof with your own hands is not difficult if you follow a number of mandatory rules and process technology. Quality construction can only be achieved by using quality materials.
The final stage of work is exterior and interior finishing.
After installing the roof, laying the roof and sheathing the gables, you need to let the house sit for several months. During this time, a slight shrinkage of the log house will occur due to the drying of the timber.
Only after this can you finish the house - install windows and doors, install interfloor stairs, sheathe the walls outside and inside, lay the floor and hem the ceiling.
The walls can be sheathed with high-quality eurolining, the floor can be laid with tongue-and-groove boards made of larch or cedar. Wooden stairs with turned or flat ones leading to the porch or upper floors will also look beautiful.
Thus, we looked at how to build a house from timber yourself, photos of which can be found on every site on the network. The technology of work is complex and will require a lot of time, effort and financial costs, but it is worth it. As a result, you will get a unique structure in which every corner will be familiar to you.
Exterior decoration of a house made of timber - on video:
At all times, wooden houses were considered the warmest and most environmentally friendly. They have high heat and sound insulation properties. If earlier wooden houses were built from logs, then modern ones can be built from ordinary, glued or profiled timber.
A house built from timber has a beautiful and rich appearance, and inside it creates an atmosphere of warmth and comfort. It is very easy to breathe in it, as wood has good air permeability.
The timber differs in manufacturing technology (glued and solid wood), humidity (dry and natural humidity), and profile. The most popular are profile and laminated timber. They have a rectangular or square cross-section.
The profile beam has a certain profile and resembles a log. Its bottom and top sides are machined so that they fit snugly where they meet. Glued laminated timber has all straight sides.
It must be remembered that during use the wood cracks and shrinks.

Glued laminated timber does not have this drawback, since it consists of pre-processed boards glued together with a special glue. Due to the fact that the timber has a rectangular or square cross-section, it is convenient to lay. The tongue-and-groove fastening system in profiled timber simplifies installation.

Therefore, even a person who has only a little construction experience can build a house from timber with his own hands. In addition, it is easy to do internal and external finishing, since the geometrically correct shape allows you to obtain smooth surfaces.
Any material can be used for cladding. Thanks to the tight fit of the timber, the formation of cold bridges is eliminated.
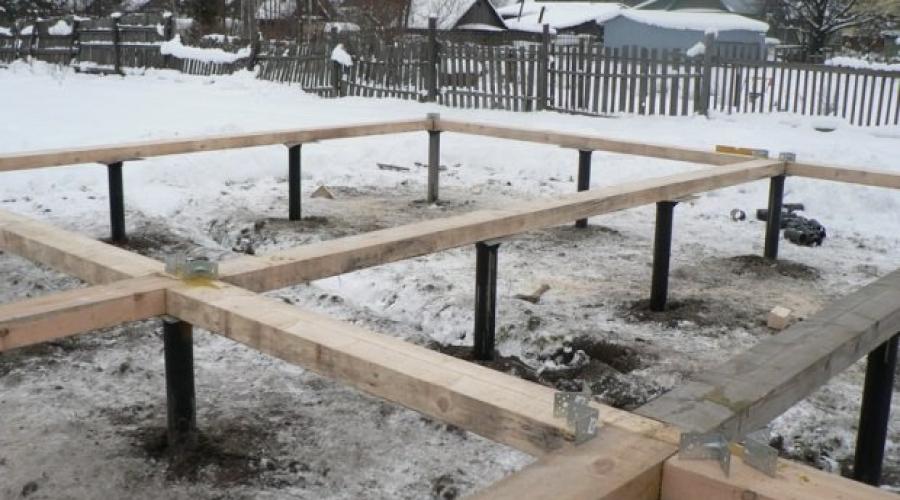
Foundation structure
Like any permanent structure, a house made of timber needs a foundation. The foundation is the foundation of the house and the service life of the entire structure depends on its quality.
The most suitable for a wooden house is a strip foundation, especially if it is planned to build a basement or cellar under the house.

It is able to withstand significant loads and does not require special equipment during construction. For silty, wet and loose soils, it is better to build a pile-grillage foundation.
It differs from a strip foundation by installing concrete piles in trenches; asbestos pipes can be used as piles. A solid foundation made of a concrete slab is possible, in which case it acts as a subfloor.

Let's consider the step-by-step construction of the most popular strip foundation with your own hands. First of all, the marking of the future house is carried out: the location of the external walls and load-bearing internal walls.
To do this, pegs are driven in at the corners and load-bearing walls and the fishing line is pulled. After tensioning the line, you need to measure the diagonals, they should be the same. According to the markings, trenches are dug, the width of which should exceed the thickness of the walls by 10 centimeters.
The depth of the trenches should be below the soil freezing level, but not less than 60 centimeters. At this stage, a pit is dug according to the dimensions of the future basement or cellar pit. The bottom of the trench is covered with a layer of sand and gravel or crushed stone, 10 centimeters each. In order for the sand to be better compacted, it must be moistened. Concrete 5 centimeters thick is poured on top of these layers.
At the next stage, do-it-yourself installation of wooden formwork from 20 mm thick boards is carried out. When constructing the formwork, spacers are placed inside for strength, and it is supported on the outer sides by support boards.

The rods are laid along and across the trench, tying the intersections with wire. After reinforcement, concrete solution is poured. When pouring concrete, to avoid the formation of air bubbles in it, you should use a cement vibrator or compact it manually.
When concrete hardens, it must be constantly moistened so that it does not crack during hardening. According to standards, concrete must harden for at least 28 days. After the foundation has completely hardened, you can begin building the walls.
If you understand that you cannot handle the construction on your own, then you can contact the company and order a house according to your or your project. For example, look at these options for houses made of pine, they are quite well designed, and the company’s experience and quality of materials are not in doubt among the professional community.
Watch our video collection on the topic:
Construction of walls and laying floors
Before you start laying the first crown along the entire perimeter of the base, you need to lay a waterproofing layer over two layers of roofing material. This layer will protect the walls from moisture penetration.
The layers should be laid in the following sequence: a layer of bitumen, a layer of roofing felt, then again a layer of bitumen and a layer of roofing felt. The width of the insulation should exceed the foundation by 30 cm.

Then the construction of the walls begins. Timber is taken for the walls depending on climatic conditions. If frosts do not drop more than 30 degrees, then timber about 150 mm thick is taken. Otherwise, the timber is taken thicker. The main load bears on the bottom trim, so it is advisable to place a backing board made of larch 5 cm thick under the first crown.
It is needed so that in the future, if repairs are required, not the entire lower crown is replaced, but only the wedding board.
Boards and all timber should be thoroughly treated with an antiseptic to protect against rotting and harmful insects, as well as with fire-retardant compounds that protect against burning.

The first crown is laid halfway across the tree, regardless of how subsequent crowns are laid. There are three corner connection methods:
- end to end;
- half a tree;
- using a root spike.

After the first or second crown, floor logs are laid. If the base allows, then the logs are laid on it; if not, then they crash into the first crown. The rigidity of the structure is ensured by the joists and the finished floor.
Therefore, the thickness of the finished floor depends on the distance between the joists. The smaller the distance between the joists, the thinner the finished floor can be.
For example, with a distance between the joists of 40-70 cm, a floor with a thickness of 25-40 mm is laid. The logs must be laid strictly horizontally. A rough floor made of unedged boards is laid on the joists.
A layer of waterproofing, a layer of insulation, a layer of vapor barrier are laid successively on top of the subfloor, and finally the finishing floor is laid.

In the future, each new crown is laid after the previous one is installed. Insulation is laid between the beams: jute, tow or flax. It is better to use tape insulation of a suitable length, which is secured with a stapler.
The gasket eliminates the formation of cold bridges, prevents condensation from collecting and mold from forming. This allows you to extend the life of the house. The crowns are fastened together using vertical pins - dowels. They prevent the beam from twisting and moving.
Pins can be wooden or metal. Metal ones are more reliable, but they are more expensive. Install the dowels in increments of one and a half meters. They usually pass through 2-3 crowns, holes 3-4 cm in diameter are drilled in a checkerboard pattern.
When laying timber, it is necessary to install window and door frames, cutting the timber to the appropriate length. The boxes are attached to the timber with nails.
If there are no boxes, then temporary risers are installed from unedged boards the size of the future window frames. Internal partitions are made only after the construction of the log house and are cut into the main walls.
If a two-story house is being built, the dimensions of which are more than 6x6 meters, then at least one partition must be installed on the first floor, which will act as an additional support for the floor on the second floor.

After the first floor of the house is laid out with your own hands, the second floor is covered and the construction of the log house continues.
The ceiling acts as a subfloor on the second floor. Waterproofing on the second floor is not needed. A layer of insulation is made for better heat and sound insulation of the floor. The construction market offers a wide selection of floor coverings:
- parquet board;
- linoleum;
- laminate;
- tile;
- carpeting, etc.
Any covering is suitable for a house made of timber; it is important that it is in harmony with the interior of the room and matches the overall design of the rooms.
Roof installation
After the walls are erected, the construction of the roof begins. Roofs can be single-pitched, gable, broken, cross, hipped and others. The most popular are gable and broken.
Due to their simplicity, they can be easily installed with your own hands. In addition, the design of these roofs allows the construction of an attic.

Roof installation consists of the following steps:
- installation of the rafter system;
- installation of a waterproofing layer;
- installation of a thermal insulation layer;
- laying roofing material.
The basis of the roof is the ceiling. It must be durable and reliable. Ceiling beams are used for its construction. They are laid in increments of at least one meter. When laying beams, you must use a level to achieve a general plane and perfect horizontality.

Then, using rafters, the structure of the future roof is mounted. It is rigidly fixed using crossbars, spacers and racks. First, a frame of rafters is installed, which are laid at a distance of one meter from each other. Then the fronts are laid out with timber or boards.
At the last stage, lathing is placed on the rafters in increments of at least 40 cm. Next, a waterproofing and thermal insulation layer is installed.

When the roof frame is ready and all layers have been laid, you can begin laying the roof. The main purpose of the roof is to protect the house from precipitation and external mechanical influences, but it must also be in harmony with the appearance of the entire house.
The most popular types of roofing materials are metal tiles, slate, ondulin and corrugated sheets. The cheapest roofing option is to lay roofing material on the sheathing and cover it with slate sheets on top.
Care and finishing work
If you build a house with your own hands from laminated veneer lumber, you can begin finishing work immediately after its construction. According to the rules, it takes about two years for a wooden house to shrink. During this time, the tree adapts to the climatic conditions where the house is located.
During this period, it is important to ventilate the room all the time to allow it to dry thoroughly and prevent rotting. After shrinkage, all cracks and cracks that appear on the walls must be sealed using a special mastic and constantly covered up as they appear in the future.

After the log house has shrunk, windows and doors are installed and you can begin to decorate it internally and externally. Houses made of profiled timber do not need finishing; they are beautiful in themselves.
In other cases, external finishing involves painting or covering the entire facade with facing materials. Interior decoration consists of finishing the ceiling and walls.

If finances allow or it is not possible to build a house with your own hands, you can buy a ready-made one. Prices for such houses depend on the architectural design and construction.
Their cost ranges from 7 thousand rubles to 20 thousand rubles per square meter. The more complex the project, the more expensive it is, especially if the house is built according to an individual project.
Below is a table of approximate prices for houses made of profiled timber:
| House size, meters | Beam 100×150 mm, thousand rubles | Beam 150×150 mm, thousand rubles | Beam 150×200 mm, thousand rubles |
|---|---|---|---|
| 5x5 | 350 | 390 | 450 |
| 6x4 | 450 | 530 | 590 |
| 6x7 | 530 | 610 | 650 |
| 6x8 | 550 | 630 | 690 |
| 6x9 | 739 | 790 | 850 |
| 7x9 | 865 | 895 | 987 |
Houses made of laminated veneer lumber are about one and a half to two times more expensive. This is due to more complex production technology.

In order for a house to last for many years, it must be constantly looked after. Renew the protective coating regularly every 3-4 years. Monitor the condition of the foundation; it should not be flooded to avoid rotting. With proper care, a house built from timber with your own hands can become a family nest and will last for decades.
Since ancient times, residential buildings made of wood have been considered the warmest. They create a special microclimate favorable for humans. An additional advantage of such buildings is their naturalness and environmental friendliness. Of course, building a house from a log is a task that only a master can do. But today there are many other wood materials on sale that are quickly and easily installed. For example, you can easily build houses from timber with your own hands. In our article we will describe step by step how to build such a house, and also talk about the intricacies of building a house from timber - a video of the installation process is attached.
general information
A timber house is a beautiful structure with an optimal microclimate and humidity inside, which is achieved due to the fact that the wood has a special structure that ensures microcirculation of air in the walls. Wooden houses are good because they are practically not hot in summer, and in winter they retain heat well.
You can build a wooden house from several types of timber:
- Glued laminated timber is an element that consists of individual lamellas made of coniferous wood glued together.
- Profiled timber is made from solid wood.
- Ordinary timber.
The first two products have grooves for tight, hermetically sealed fixation of adjacent elements. Also, elements may differ in humidity:
- Dry material after chamber drying is much better and shrinks less.
- Wood with natural moisture is susceptible to shrinkage, deformation and cracking.
Important: glued and profiled timber is the most popular. Products can have a square or rectangular cross-section. And the tongue-and-groove system makes installation easier.
That is why the construction of houses made of timber is most often carried out using one of these two materials, because you can build such a house with your own hands. In addition, a house built from this material does not need exterior or interior decoration. Assembling a house from timber is quick and easy thanks to the presence of a factory diagram, and standard designs for such buildings are easy to find on the Internet. So that you have an idea of how to properly build a house from timber, we offer detailed video material.
Foundation

Building a house from timber with your own hands should begin with the construction of a foundation. Since a building made of wood is light in weight, a lightweight foundation can be laid. So, you can choose the following types of base:
- If the house will be built with a basement or cellar, then it is better to use a monolithic strip foundation. For construction without a basement, it is better to use a shallow-depth tape.
- You can also build a house from timber on a pile-screw foundation with a grillage. This type of construction is more suitable for wet, loose and silty soils.
- Sometimes a columnar structure is used as a base. The pillars are made of concrete blocks and installed in 1.5 m increments.
- In some cases, the best option would be a monolithic slab foundation. In this case, you do not need to spend money on arranging the floor.
Since strip foundations are most often used, let us consider the sequence of its implementation in detail:
- First of all, the site is prepared and the future structure is marked.
- Next, under all external and internal load-bearing walls, a trench is dug 10 cm wider than the thickness of the walls.
- A sand and gravel cushion 15 cm high is made at the bottom of the trench. The sand is moistened with water and compacted.
- Wooden formwork is being installed.
- After this, concrete is poured in a layer 5 cm high.
- A reinforcement cage is installed in the formwork so that it does not approach the formwork structure itself by more than 5 cm.
- The concrete solution is poured and compacted.
- During the hardening process, the concrete is moistened with water and covered with a film.
- After 28 days you can begin installing the walls.
Installation of walls and floors

You can easily understand how to build a house from timber with your own hands, with our step-by-step guide. Before laying the first row of beams, it is necessary to perform horizontal waterproofing of the foundation. To do this, its surface is covered with two layers of roofing felt on bitumen mastic.
You can make your own house from 150 mm thick timber if construction is carried out in warm regions of our country. Otherwise, it is better to take timber 200 mm thick. Under the first crown it is necessary to lay a lining board 50 mm thick. It is better to use a board made of larch wood.
Important: the backing board and the first crown are treated with fire retardants and antiseptics before installation.
- Regardless of the method of laying the remaining crowns, the first crown is mounted in a “half-tree”. In this case, the corner connection can be made in a “half-tree”, using a root tenon, end-to-end.
- After installing the first and second crowns, they begin to install the logs for arranging the floor. If the basement of the house allows it, then the logs can be laid on it. Otherwise they will crash into the first crown. The lag pitch is 40-70 cm. The larger the pitch, the greater the thickness of the subfloor boards (25-40 mm).
- Then, cranial bars are attached to the sides of the joists, on which the knurling boards are laid.
- Next comes a layer of waterproofing. It should go around the logs themselves.
- After this, thermal insulation material is placed in the gaps between the joists on the bevel boards and waterproofing.
- After this, the entire structure is covered with a layer of vapor barrier.
- The subfloor is being installed.
Nuances of wall installation:
- The next crown is laid after tape insulation, tow, or linen has been laid on the surface of the previous element. The insulation is fixed with a stapler.
- The beams are fastened together with wooden dowels. To do this, holes are drilled in the beams in increments of 1.5 m: the top beam is drilled through, and the bottom – halfway. A dowel is driven into the holes and recessed 1 cm deep.
- During the laying of timber, temporary supports are installed in the areas of window and door openings. They are made from unedged boards according to the size of the openings.
- Installation of internal partitions is carried out only after the construction of the box. They crash into solid walls.
If the house has a second floor, we build a house from timber with our own hands in the following sequence:
- After completing the walls of the first floor, we make slots in the last crown for laying the floor beams. Additionally, we fix the beams using steel corners. The beam spacing is 70 cm.
- Laying the subfloor.
- We line the bottom of the beam with clapboard. This will give us the ceiling of the first floor.
- Next, we install the walls in the same way as the first floor.
Construction of the roof of the house

Even if houses made of timber are built for seasonal living, the process of installing the roof should be given maximum attention. Most often, wooden houses have gable or sloping roofs. If you choose the gable option, you can create a comfortable attic that can serve as a living space.
The last crown will be used as a mauerlat. The roof is installed in the following sequence:
- The easiest way is to assemble pairs of rafter legs on the ground. By connecting them with puffs, we get a rigid structure, like a truss, which can be easily installed on the roof.
- First, we install the two outer pairs of rafter legs. That is, we will get two pediments.
- Next, we connect them with a ridge beam.
- Now you can install all subsequent rafter pairs. We take their step to be 90 cm.
- We spread a vapor barrier over the surface of the rafters. We fasten it with a stapler and additionally fix it with counter slats, which we stuff onto the rafters.
- We fill the sheathing across the direction of laying the counter slats. The sheathing pitch is 40 cm. If the covering is made of soft rolled material, then we make a continuous sheathing from OSB.
- Now you can proceed to laying the selected roofing covering.
The roof needs to be thoroughly insulated from the inside. To do this, we place heat-insulating material (mineral wool) in the gaps between the joists. We cover the entire structure from below with a vapor barrier membrane. Now you can line the attic ceiling with clapboard.
Further work

If the house was built from laminated veneer lumber, then the installation of windows and doors, as well as finishing, can begin immediately. When installing from other materials, you need to wait 3-6 months, during which the house will shrink, and only then begin further work.
After shrinkage, all cracks and cracks formed on the walls must be sealed with mastic or caulked. Now you can begin installing window frames and door blocks. In a house made of profiled and laminated timber there is no need to finish it, since the walls already look beautiful. If the walls are made of ordinary timber, then they should be sanded, painted or varnished. The outer surface of the walls of a house made of ordinary timber also needs finishing. It can be made from different building materials - lining, vinyl siding, brick, etc.
Care
In order for a house made of timber to last as long as possible, it must be properly cared for:
- Once every 3-4 years, the protective coating of wood must be renewed.
- To avoid rotting of the walls, it is necessary to monitor the condition of the foundation. It should not be flooded by surface or groundwater.
DIY timber house - video: