Construction of a gazebo at the dacha. How to build an inexpensive gazebo in the country? DIY wicker gazebos

Read also
Beautiful gazebo made of wood with your own hands - a stylish and practical small architectural form that will help decorate your garden plot in any design direction. This is a comfortable holiday destination for outdoor recreation at any time of the year - right choice The type of design will help you enjoy the functionality of the gazebo not only in the summer.
tree most practical material to create a frame:
- wood is easy to process using accessible tools;
- the material allows you to embody almost any style and shape;
- wood is an environmentally friendly material;
- given that correct processing, perfectly tolerates external influences - moisture, temperature changes;
- The advantages of wood include high strength and durability.
Types of gazebos
According to the criterion of operating features and functional load, the following are distinguished:

According to the criterion of design features:

According to the criterion of location on the site:

How to choose a gazebo style?
Depending on the style landscape design and a residential building on the site, you can choose suitable option gazebos:

Do-it-yourself summerhouses are represented by two of their distant relatives:

DIY gazebos: where to start?
If you have chosen a style and design option, you should choose a location for the structure. Depending on the size and shape of the site, the dimensions of the small architectural structure depend. Consider the purpose for which you are installing the structure:
- large family feasts in summer and winter or all year round;
- decoration personal plot;
- Convenient place for tea summer time;
- holidays in large groups on holidays or weekends.
In the first case, you should choose a secluded place, not very close to residential building so that non-friendly gatherings do not interfere with the rest of those who are in the house. Especially if several generations live in the house. As a decoration, the gazebo is installed so that it fits as harmoniously as possible into and emphasizes its features.
 A gazebo for feasts can be made in a closed form by equipping a fireplace inside, a lighting system, installing heating devices. If you install it close to your home, you can quickly transport food and dishes prepared in the kitchen.
How to make or garden plot? It is worth paying attention to the recommendations.
Select the location for construction according to the following criteria:
- the area should not be subject to flooding;
- preferably a flat, open place;
- you should not install a gazebo next to outbuildings And .
Photos and drawings of wooden gazebos with your own hands will help you choose the best option: 
Foundation and walls for the gazebo
 Depending on the type of soil, the purpose of constructing the building, and its parameters, we choose the type of foundation: slab, columnar, strip. A massive structure needs a strong and reliable foundation.
Wall options:
- wooden beam;
- boards;
- whole logs;
- slats.
If you are a professional, it will not be difficult to build a structure of complex shape, round or 6-gonal. For a beginner, we recommend starting with a simple, square or rectangular gazebo with lattice walls - it looks elegant and stylish.
Building a gazebo from timber with your own hands - video
DIY gazebo: drawings and dimensions
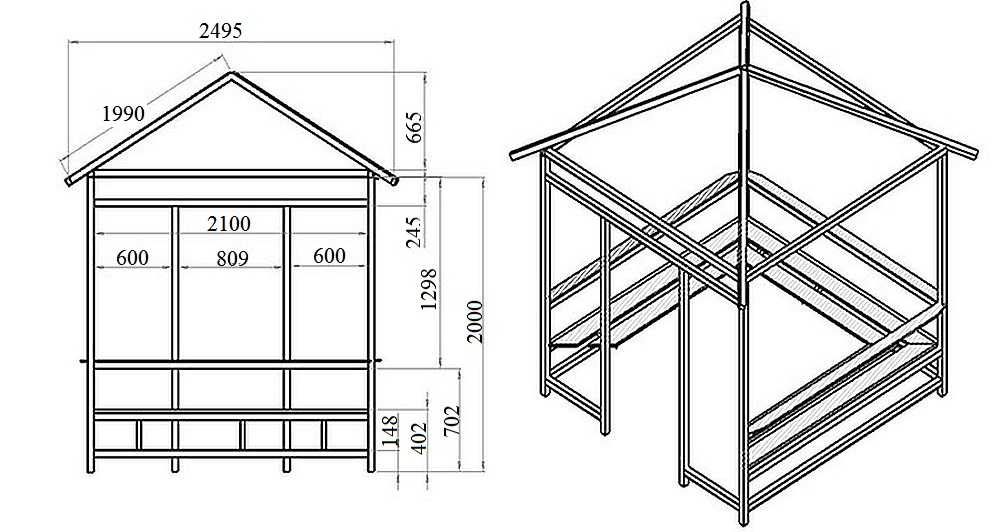
 Let's look at the features of building a small, open wooden gazebo. Characteristics future design:
- size: 3x3 meters;
- height of the structure to the top – 3.5 meters;
- 4-pitched roof;
- columnar foundation.
The initial stage for the construction of a gazebo
Preparing the site for construction. It needs to be cleared, excess vegetation removed, and the surface leveled. The size of the plot should be one and a half meters larger on each side than the building itself. Gazebo from natural wood with your own hands should be protected from flooding.
We buy materials for the gazebo
For a square building of 3x3 meters, you need to purchase timber in several cross-section options:
- 10x10 cm: 3-meter beams in the amount of 5 pieces for the base; 4 pieces 2.3 meters long for supports, 5 pieces meter long for the construction of the entrance, 3 pieces for strengthening and rigidity of the structure, for the center of other sides of the structure.
- 10x4 cm: for the roof - 8 pieces of 2 meters each, 7 beams of 3 meters each for piping and railings, beams of 2 pieces in sizes 1 and 4.3 meters (roof cross and railings).
To create a gazebo other than timber:
- solid floorboard: 4 cm thick, 9 sq. m;
- lining in the amount of 20 sq. m;
- wooden slats;
- inch for roof sheathing;
- roofing;
- bricks and cement;
- 5 kg of nails and screws;
- special processing agents for wood (about 15-20 liters).
Installation of a columnar foundation
 How to build a gazebo with your own hands? It is very important to build the foundation correctly.
The optimal type for a small, open building is columnar. In this case, brick was chosen for it.
What is needed to install a columnar foundation:
- item for digging holes for posts: a drill or an ordinary shovel;
- level for leveling;
- roulette;
- material for posts;
- cement;
- steel reinforcement to strengthen the structure;
- roofing felt for bottom waterproofing wooden gazebo.
Want to save money? If you have already used bricks, you can use them for the foundation.
 A drawing is presented according to which the area for installing the gazebo should be marked.
It is necessary to dig holes at the points where the foundation pillars will be installed. The last row of bricks should be at ground level. Before laying the brick, you need to create a cushion that is placed at the bottom of the hole. The pillow is made of crushed stone or sand.
Using a hydraulic level, it is necessary to level the plane of the brick pillars. To ensure the rigidity of the structure, reinforcement bars must be inserted into the corner posts.
Considering the size of the building, the result should be 9 columns: 4 corner, 4 intermediate between the corners, 1 central.
The supports should be located under the side walls every 2 meters. Considering that brick is chosen as the material for the supports, holes need to be dug with a shovel, they must have square shape. Recommended depth – 50 cm (not less). Hand drill used if the posts are made, for example, from metal pipes.
For the base, beams with a cross section of 10x10 cm were purchased in the amount of 5 pieces. The reinforcement that remains on the surface of the posts is placed in a hole drilled in the corner beams.
In order to connect the beams at their intersections, you can use the “half-tree” fastening technique. If everything is done according to technology, the result will be a reliable, durable structure.
Installation of the floor in the gazebo
The design can be made with or without a floor. Floor installation requires a foundation.
If there is no floor, you need to prepare a platform for the gazebo, finished with paving slabs and paving stones. The option without creating a special area is also allowed for summer open buildings.
Now consider the option with a foundation and floors. Installation is carried out after the foundation is completely completed and strengthened. What you need for the floor:
- beam;
- edged board;
- tools: hammer, drill, level, jigsaw;
- nails.
The easiest way to create floors is in a square or rectangular gazebo. The first step is to install timber around the perimeter of the base. Fastening is carried out using reinforcement that protrudes from the foundation.
 The next step is to install logs every 30-40 cm. The floor should not be inclined, so you need to use a level.
 And the last thing is covering the floor with boards.
When processing wood, it is necessary to use special substances to protect it from rotting, negative influence insects
Frame installation
 For the frame, logs 2.3 meters long with a section of 10x10 cm are intended:
- The surface of the beams should be smooth; an electric plane can be used to process the surface.
- It is necessary to make cuts to attach the roof rafters. The thickness of the cut depends on the thickness of the planks.
- In the corners of the gazebo there is reinforcement that must be mounted on support posts. To do this, you need to make a small hole at the end of the post - about 1 cm in diameter.
- The posts must be absolutely straight and vertical - you need to use a level to check the post's position.
- The position of the pillar is secured using first rough and then finishing struts made of timber.
In addition to wood, PVC or steel pipes. Polymer materials do not require special protection against rotting.
Installation of a roof for a gazebo and lining with clapboard
 Construction process:
- For the roof, a cross is formed from wooden beams. To connect, you can use the “half-tree” technique.
- Cuts are made at the edges of the boards to connect with similar cuts on the supports.
- It is recommended to use a special block to enhance the strength and durability of the connection.
- The structure is installed on supports.
After the frame is assembled, it is necessary to install the pillars and railings.
It is planned to create a 4-slope roof and cover it with bitumen shingles.
To create the roof, we use 10x10 cm timber - an 8-sided section about 80 cm long is made from it. Makes a cut in the timber for the first 2 planks. This is a post that will be fixed in the central part of the cross; it will ensure the strength of the future roof.
2 rafters are connected using the half-tree method and fixed in the grooves. We then attach the second pair of rafters to the central post. The entire structure is assembled on the ground. 
When 2 pairs of rafters are secured, we attach 4 more planks so that their lower ends lie on a bunch of outer posts.
If winter in your area is characterized by heavy snowfall, you should consider additional roof reinforcement. You need to add support posts between the corner supports, above the center foundation posts.
Now you can move on to covering the gazebo with clapboard and roofing work.
To cover the gazebo, we chose clapboard and special fasteners for its simple and aesthetic fastening. The roof is made of wood - planks up to 3 cm thick. We gradually cover all the roof slopes with these planks.
It is imperative to take care of creating a drain - the lower strips must protrude beyond the rafters by at least 10 cm.
In the future, the roofing covering will be laid on top of the sheathing. The choice of roofing depends on stylistic nuances and financial capabilities.
The open parts of the gazebo, which are not covered with clapboard, can be decorated with thin wooden planks, fixed crosswise.
Since the work is carried out with wood, care must be taken to protect the structure from negative influences external factors. Wood is treated with special substances to protect it from rotting.
Alternative: log walls
 Projects for building a gazebo at the dacha involve the use of logs to create side walls.
If you choose logs for the walls of the gazebo, keep in mind that you do not need a frame. Starts right away direct installation logs in rows. The first row is attached to a base protected by waterproofing. Fastening the corners is done by creating grooves at the ends. Docking is done at the corners. The number of rows depends on the project - for the design open type 3-4 rows are enough.
What material to choose for the roof?
The material that will cover the roof of the gazebo must meet a number of requirements:
- resistance to moisture and temperature changes;
- high level of strength with low weight;
- durability;
- providing protection from precipitation (especially if the gazebo is closed and will be used in the autumn-winter period);
- stylistic match, if the house is covered with soft bitumen shingles, it is naturally better to use it for the gazebo.
The calculation of the roof truss system depends on the choice of roofing material, so you need to think through all the points in advance. The weight of the future structure, which also takes into account the roof, influences the choice of foundation type.
When choosing, consider the type of gazebo, its style and purpose.
What roofing options can be used for a wooden gazebo:

Foundation options for gazebos
Above is an example of the technology for installing a columnar foundation. This type combines practicality and ease of installation. There may be two more types of bases for a wooden gazebo in your arsenal:

High-quality execution of the gazebo is the key to its durability and aesthetics.
Video about building a wooden gazebo with your own hands
A gazebo built at a dacha creates a special atmosphere of sincerity, comfort and warmth. This is where you can sit and have tea with your family or spend time with friends, having leisurely conversations about life. This structure takes on special significance in summer time when it's time kebabs and barbecues. At the same time, the gazebo is also a decoration of the site, emphasizing the advantageous aspects of the landscape. Of course you can buy finished building, but we’re not looking for easy ways, are we? Considering that making such a house is quite within the capabilities of a skilled owner, we will tell you how to build a gazebo with your own hands.
Types of summerhouses
Gazebos in the country can be of a wide variety of shapes and sizes, with single and multi-slope roofs, open or closed. It is unlikely that anyone will undertake to classify these buildings by appearance, given all the diversity that was created by the hands of craftsmen. And the choice of materials from which gazebos can be built is very wide. By combining traditional wood and newfangled plastic, concrete and glass, metal and stone, you can sometimes get a real masterpiece of landscape design. So, what can a gazebo for a summer house look like?
Wooden gazebo
A wooden structure can be easily built in a fairly short time. However, it can be installed on any foundation, both capital and created from scrap materials. This is why wooden gazebos have become so widespread. And also because they can be like capital, so portable, With collapsible design. Such structures can be installed every season in a new place, besides, the wooden structure does not need to stand in the rain or snow - it can be easily removed under a canopy. You can build a wooden gazebo with your own hands not only from wooden slats and bars. Excellent durable structures are made from laminated veneer lumber or rounded logs, which are easy and interesting to work with.

The disadvantages of such buildings Firstly, there is a high fire hazard. It is because of this factor that it is not recommended to install barbecues, barbecues and other braziers with an open fire in wooden gazebos. Secondly, often a do-it-yourself wooden gazebo, a video of which can be found on the Internet, is a pitiful sight due to rotting wood and damage by insects. In principle, both disadvantages can be eliminated by impregnating the structure with special compounds.
Brick gazebo
If you are thinking about how to build a gazebo with your own hands from brick, do not lose sight of the need to arrange good foundation. For such a capital construction you need a strip or monolithic foundation, therefore, before starting construction, you need to study the properties of the soil on your site and only after that decide which type of foundation to choose.
Often brick gazebo for a summer residence it is used not only as a canopy from rain and sun, but also as a temporary shelter or summer kitchen. In this case, you can equip a barbecue, barbecue or fireplace in it, and if you also install windows and doors, then such a gazebo can be turned into a guest house if necessary. A brick building has virtually no drawbacks, except that it requires the highest manufacturing complexity among similar structures.
Polycarbonate gazebo
Such an innovative material as polycarbonate can combine any materials - metal, wood, brick or stone - in one design. The advantage of polycarbonate is that it is absolutely undemanding in terms of the type of frame, so such a gazebo can be made practically from scrap materials, without losing any of its effectiveness. This structure looks very modern, and there will always be enough light inside. It would be dishonest not to talk about the disadvantages of plastic panels.
Firstly, if you decide to make a gazebo with your own hands from polycarbonate, keep in mind that the cost of an inexpensive frame is compensated by the fairly high price of polycarbonate sheets(their thickness must be at least 8mm). Secondly, during the rain it will be difficult to hear the interlocutor, because plastic canopy It enhances the sound of falling drops quite well.

Third, polycarbonate is an excellent material for building greenhouses. You don’t want to end up in a sauna instead of a cozy shade, do you? And fourth. Heavy hail often damages the panels by punching holes in them, so if you live in a place exposed to this type of precipitation, then building a polycarbonate gazebo is out of the question.
Drawings and diagrams of do-it-yourself gazebos
The most popular materials for building gazebos are wood and metal. At the same time, making the simplest gazebo is quite simple if instead of a wooden floor, install a concrete screed. Before starting construction, you need to draw up detailed diagram or a drawing on which the required amount of material should be calculated.
Let's look at several simple structures that can be built from a variety of materials.

If you are interested simple wooden gazebo, it’s quite easy to install it yourself. This structure will be based on four pillars supporting the roof. In order to prevent contact of concrete with wood, even at the beginning of concrete work, it is necessary to dig into the ground at the corners of the building meter pieces of metal or asbestos cement pipe suitable section. In this case, there must be at least 20 cm of pipe above the ground surface. These supports will later be installed wooden poles, serving as the basis of the gazebo.
Next, longitudinal bars are attached to the pillars for installation of eurolining or polycarbonate. Since we are going to build a lightweight summer construction, then 90 cm of fencing will be enough for effective protection from wind and rain.
A square beam of 50x50 mm is suitable for roof construction. , from which you want to assemble the frame. To do this, install a harness around the perimeter of the roof, and attach to it rafter legs. Then the sheathing is filled, and the roof is covered with any roofing material.
Even at the design stage, a do-it-yourself wooden gazebo should have such dimensions as to minimize the amount of waste, including roofing material. That is why it is necessary to take the dimensions of the roof taking into account the dimensions of whole sheets, making necessary approvals on the roof overhangs.
For example, if you plan to use slate, then the length of the gazebo is taken as a multiple of 1 m, and the roof slope is 1.75 m. In this case, it is necessary to take into account the overlap of adjacent sheets of 100-150 mm.
Make a gazebo with your own hands in as soon as possible It can also be made of polycarbonate. To do this, you will need a steel corner with a shelf of 50 mm and 25 mm, a metal strip and a polycarbonate sheet 2100x6000 mm.
The structure consists of four corner posts, scalded with a 25mm corner. The roof is made in the form of an arch, installing a U-shaped support from corners and a metal strip.
A do-it-yourself wooden gazebo can also be covered with bitumen shingles; it is enough to install a base under it from OSB boards. This type of flooring has high rigidity, so there is no need for a supporting frame. A few bars are enough to fix the ends of wood-oriented boards.
As you can see, the designs of such gazebos are really very simple, taking into account the concrete screed as the floor. If you plan to operate the building in winter, then you need to build a columnar foundation, on which logs made of 50x100mm timber are installed, and then the floor is laid.
A do-it-yourself gazebo, the drawings and diagrams of which you can use in your work, must be treated with a protective agent and coated with paint or varnish to protect the wood from weathering.
We are building a wooden gazebo. detailed instructions
Although it is not difficult to build a gazebo made of wood, in order for the structure to be strong and durable, certain construction requirements must be met. We will tell you how to build a wooden gazebo and give step-by-step instructions, following which you can not only quickly build it, but also get a beautiful, reliable structure.
The very first thing that needs to be done is to clear the site for future construction from debris and rubbish, cut down unnecessary trees and remove bushes. Next, we carry out all the work step by step:
- We are drawing up a project . To do this, we determine the capacity of the structure. Next, we draw up construction drawings. You can take ready-made diagrams or adapt the drawings to suit your needs.
- Marking a site for future construction do-it-yourself gazebos at the dacha. For this purpose, we drive pegs in the corners at the required distance, pull the cord and check the diagonals. To maintain the rectangularity of the structure, they must be equal.
- We dig a shallow pit before pouring the foundation and using a building level we install the formwork. Best suited for these purposes edged board thickness of at least 20mm. Let us remind you that to build a gazebo at the dacha with your own hands from wood, you do not need a serious foundation, just enough monolithic slab up to 20cm thick.
- Filling the foundation with concrete . To ensure that the base is level, we use a broad rule, and for large foundation sizes, we additionally install beacons.
- We lay it on a concrete base ceramic tiles . Remember that it will be used year-round, so you need to purchase frost-resistant floor tiles.
- We deliberately did not dig the corner posts into the ground. A do-it-yourself wooden gazebo at the dacha will last much longer if you install the support beam directly on the foundation. To do this, we stock up on a U-shaped bracket with an internal size of 100mm. We attach it using dowels or anchors at the corners of the structure and in the middle of the long sides.
- We install vertical supports and secure them with self-tapping screws to the U-shaped fastener. It is best to use 4-5mm screws with a length of at least 30mm. If the gazebo at the dacha with your own hands will have pitched roof, then the pillars placed on the rear side must be at least 40-50 cm lower than the front supports to create the required roof slope.
- At a height of 100 mm and 900-1000 mm from the floor install longitudinal bars size 50x50 mm. They are intended for fastening side elements, so they must be additionally reinforced with vertical or cross spacers. We attach the same timber with appropriate jointing in the front part of the gazebo at the height of the rear supports. You may want your dacha gazebo, created with your own hands from wood, to have a ceiling. It can be attached specifically to these structural elements.
- At the top of the vertical posts (with inside) make gashes 120mm long by 30mm deep. Using M8x120 bolts we install the rafters. A 30x120mm board of the required length is quite suitable for this.
- We strengthen the frame under the roof with transverse elements , which we attach to support posts and rafters, and then strengthen them with corner bars.
- We put batten boards on the rafters with a frequency corresponding to the type of roofing material. For slate and ondulin, three sheathing boards under the sheet will be enough. If ceramic tiles are used, the sheathing is filled so that each tile rests on the frame in two places. If a do-it-yourself wooden gazebo is covered with bitumen shingles, then the sheathing boards should be installed solidly, and it is better to use plywood or OSB boards for these purposes.
- Don't forget to install a wind board . Without it, the roof will not look complete.
Don't forget to treat the wood with a protective agent and coat it with paint or varnish. This will protect the wood from weathering and keep it beautiful for a long time. appearance .

Wooden gazebo. Option two
The do-it-yourself gazebo, drawings and diagrams of which are presented below, has a more complex design, with a curved perimeter and a tent roof. However, we note that such a structure looks much more impressive. To build it you will need:
- Wooden block 100x100 mm;
- Slats 25x30 mm;
- Edged board 25 mm thick for roof sheathing and 40 mm for flooring;
- Fasteners;
- Roofing sheets.
And, of course, how to build a gazebo with your own hands without tools?! Therefore, we stock up on a circular and bow saw, an electric plane, a screwdriver, as well as fastening materials and measuring instruments.
In order not to run far to the grill or barbecue, we decided to make a gazebo with a nook where they can be installed.
We choose a place for construction at some distance from the house. Firstly, one of the guests or owners may want to take a break from the noisy company, and secondly, in this case, the smoke from the barbecue will not get into the open windows. And purely aesthetically, it’s not worth starting construction under the windows themselves.

So, do-it-yourself gazebo, drawings and dimensions plus detailed instructions according to its construction:
- Using a construction drill, we select the soil under the pillars of the columnar foundation . We lay reinforcement strapping in the holes, install sheathing boxes and pour concrete posts. 11 of these posts were needed, according to the number of corners and in the center of the building.
- Assembling the frame . To do this, we lay 100mm timber, fastening it with corners, and for additional strength we use fastening “into the floor of the tree”. We install logs (a board placed on the end) under the future floor of the gazebo.
- We treat the frame with an antiseptic and lay the floorboards . At the same time, do not forget to leave free space in the place where the barbecue oven will be installed. A lot has been written about how to build a gazebo from wood, but not a word has been written about the fact that for this you need to use only planed lumber, without leaving this process “for later.” Keep in mind that “later” is unlikely to come, because doing so will be disproportionately more difficult.
- Let's start building the roof . Believe me, by laying out its elements along the contour of the floor, making a gazebo will be much easier than if the roof is installed at a height. Therefore, we lay the base of the roof along the perimeter of the floor, install a support for the rafters in the center and attach U-shaped fasteners to it for these elements.
- Installing rafters , making cuts on them at the point of contact with the frame, and securing them with self-tapping screws. After this, we mark all the roofing elements and put them aside.
- The do-it-yourself gazebo, the drawings and dimensions of which we present, as you can see, has 11 vertical posts. They can be secured using construction corners. In this case, it is very important to maintain verticality, so constant monitoring with a level or plumb line will be required.
- We install horizontal ties along the upper contour of the building . You can fasten them to the supports with nails or self-tapping screws, and metal strips bent at the desired angle will help to fasten them together.
- We install and fasten all roof elements in place . After that central support under the rafters you can cut it flush with them.
- Laying the sheathing .
- Since we decided to build a gazebo under the same roof with a barbecue oven, we select soil in a nook (where there is no floor) and begin to prepare the framework for the foundation. To do this, we install a sheathing (you can use slats from under containers for it) and cover the walls with roofing felt for waterproofing purposes. Next, we create a harness from the reinforcing mesh attached to the reinforcing pins.
- We prepare concrete in a ratio of 1:1:3 (sand, cement, granite screening) and pour the foundation .

The walls of the gazebo can be sheathed with blockhouse or clapboard, and the roof can be made of soft bitumen shingles. A do-it-yourself gazebo in the countryside made of wood can have any interior decoration. It is only important to treat the wood well, remove sharp corners and sand the surfaces to remove splinters.
After completing all the work, do not forget to treat the wood with protective compounds.
Video of gazebos built by hand
Sometimes a do-it-yourself gazebo, a video of which you saw on the Internet, has such a fabulous appearance that you can’t believe it’s like this air structure can be created from ordinary wood. The videos we present tell you about all the stages of construction of various gazebos in such detail that they sometimes represent real video instructions. For those who have not yet decided what their future gazebo will be like, a video containing a slide show of the most original designs, will help you make your choice faster.
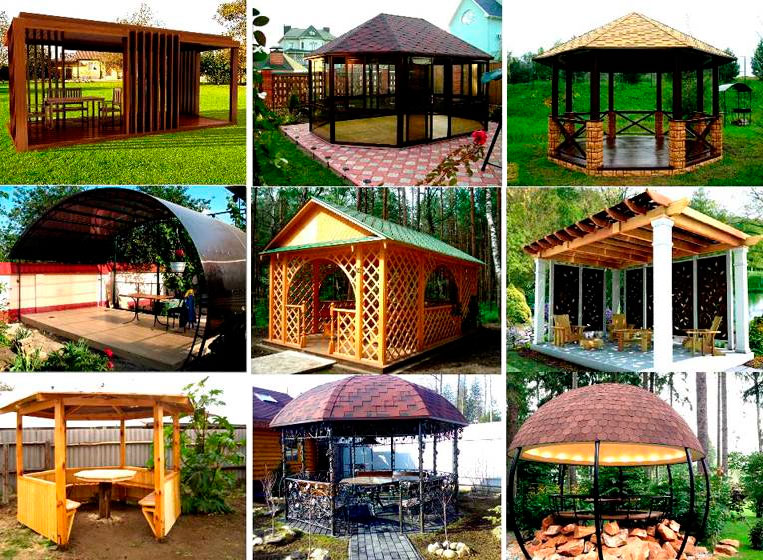
Photos of gazebos
An original garden gazebo can transform the whole country cottage area. Photos of modern buildings can serve as proof of this. Some of them are real masterpieces worthy of a place in the best gardens and parks of the world. We suggest looking at some original gazebos that can make your garden unusual and attractive, and make your holiday with friends comfortable and memorable. Maybe after watching you will want to pick up a saw and a hammer?

Almost all owners of dachas or private houses set up a wooden gazebo in their yard, where they can sit and relax in the summer. If you make a permanent gazebo of medium size, then you can actually install a barbecue inside it. Then here you can not just relax, but organize any celebration with your family or friends. If it is also closed on all sides, then you can spend time here in winter, especially since the grill will serve as an additional source of heat.
The decision on which gazebo is best to build is made by the owner of a summer house or private house based on his financial capabilities. In this regard, most often you can see enough simple designs made with your own hands.
The article is aimed at helping owners of summer cottages and private farms build some kind of gazebo, depending on the available capabilities.
There are summer, open-type gazebos and closed, all-season gazebos. In addition, there are combined options, when the gazebo is opened in the summer, and with the arrival of cold weather it is insulated. But these are intermediate options that deserve attention. As a rule, such options are somewhat cheaper than completely closed ones, but they take away some of the precious time for manipulation.
Gazebos with and without floors
There are gazebos with a floor, as well as gazebos mounted on an open area or area where a concrete screed is made or paving slabs are laid. If you just build a gazebo on the ground, especially a wooden one, then you need to take measures to protect wooden structures, especially in places that are in contact with the ground. If the gazebo is made of metal, you will have to protect it from rust.
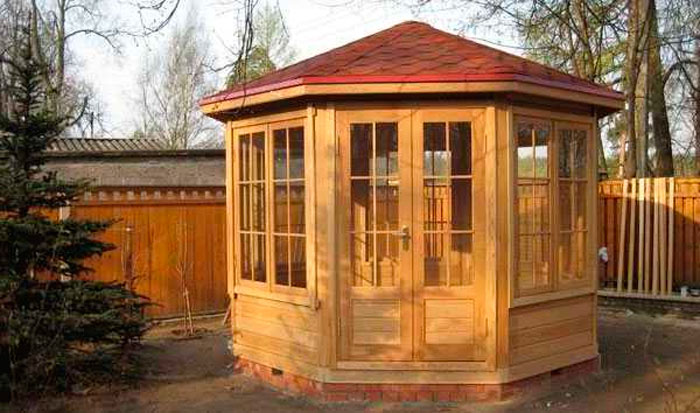
 A wooden gazebo without a floor, made of wood. It has one feature: the roof is quadrangular, and the gazebo itself has beveled corners.
 Building a gazebo with a floor involves installing a foundation. Basically limited columnar foundation, which is made from brick or rubble, poured with concrete or mounted on foundation blocks. Alternatively, you can use large stones (boulders) and support the entire structure on them, if available. This foundation is suitable for the lungs, frame buildings made of wood or metal. If the building is capital, made of brick, then it is unlikely to be limited to a columnar foundation: you will have to pour a concrete strip foundation, albeit in a simplified version. It is enough to deepen the foundation by 20-30 cm.
 A gazebo made of wood, but with a wooden floor, mounted on supports.
 To lay tiles in the gazebo, you will have to pour the floor with concrete, but first insulate the floor with foam plastic, for example, and also lay a layer of waterproofing. After this, you can lay tiles, and frost-resistant floor tiles. At the same time, you should make sure that the floor extends 50 centimeters beyond the gazebo and these 50 cm should be laid out at a slope so that moisture does not remain on the tiles. If the gazebo is not closed, then all the tiles should have a slope. If moisture does not linger on the tiles, the tiles will last quite a long time.
Materials used
The following materials are suitable for frame buildings of this type:
- A wooden beam or round timber of small diameter.
- Steel profile pipes.
- PVC pipes.
Of these three materials, only the last does not require additional protection. Polymer materials do not rot and are not afraid of both high and low temperatures. Therefore, such structures can withstand winter quite easily. The only thing that is accompanied by a certain complexity is the selection of PVC pipes for making the frame, since they do not have such high strength as wooden beams or metal pipes. In this case, you will have to decide on the design of the gazebo in order to installed furniture didn't load PVC construction, and the grill will have to be installed away from PVC pipes.
 PVC pipes can serve not only as a frame, but also act as a decorative finish.
 In order for a wooden gazebo to delight others with its appearance for a long time, you will have to treat the wood with a protective compound more than once.
As an option, you can use impregnations such as SENEZH or ESTATE. Reviews about these protective compounds are not bad. In addition, this manufacturer supplies the market with coloring compounds.
If the frame of the gazebo is made of metal, it should also be protected from atmospheric influences. To begin with, the pipes are primed, and then the welding areas are treated with a primer. Although this option is not optimal: it is not at all difficult to coat an already welded structure with a primer. If on metal elements if rust is found, it is better to clean it off sandpaper. This approach will allow you to maintain the acceptable appearance of the gazebo frame for a long time, which means that it will last a long time.
 Gazebo made of plastic. Nothing to do with the environment, but there is no need for additional treatment against fungi or rust.
 You can cover the gazebo with any material, but wood is considered the most popular: after all, it is a natural material. Processed boards, blockhouses, clapboards (wooden), thin round timber, as well as pallets are used as cladding materials, which are disassembled, the boards are processed (sanded) and sewn up. bottom part gazebos. It takes a lot of time, but it's very economical. In addition, such wood is quite dry and after additional protection can last a long time.
Gazebos of any design can be sheathed with the following materials:
- Polycarbonate, but this will be quite expensive.
- Corrugated sheeting, somewhat cheaper, but not very comfortable.
- Tempered glass is, well, very expensive.
- Ordinary fabric, which is very economical, but not very modern.
- Transparent PVC film.
- Bamboo, expensive, but stylish.
 A gazebo made of metal combined with translucent polycarbonate cladding.
Frameless gazebo options
Frameless gazebos are capital buildings on strip foundation, lined with brick or foam block, lined on the outside with decorative tiles or artificial stone. Moreover, building options can have all the walls up to the ceiling, or several main walls (for example, two), while the rest of the gap(s) remains open. Similar designs differ in large capital investments. To build them, it is better to hire craftsmen or seek help from construction company. If you do it yourself, the construction of the gazebo may take an indefinite period of time.
 A capital gazebo, trimmed with wild stone, in combination with glazing. Both brick and other modern materials can be used as the main building material.
 If you plan to build a gazebo made of brick, then it is better to hire good masons to lay out the frame of the gazebo with high quality. Then, you may not have to spend additional money on finishing the outside of the building. Building a gazebo from foam block will require exterior finishing. There are many finishing options. In this case, you will first have to level the walls and only then start finishing. Since capital buildings are intended for their operation in winter time, then they should be warm. Alternatively, you can build it outside wooden frame, insulate with ursa and cover with siding.
Roof structure
The design of the roof depends entirely on how complex the shape of the gazebo is. If the gazebo is rectangular, then the roof design will be quite simple: a single-slope, gable or hipped version. Such forms of gazebos are also considered one of the simplest, requiring a minimum of time and money. The process of constructing a single-pitch, gable or hip-pitch roof is almost the same in technical terms.
 Rectangular gazebo from round tree, equipped with a gable roof.
 With more complex forms of gazebos, the process of building a roof becomes more complicated. If the gazebo is pentagonal, hexagonal or octagonal, then the most suitable roof option is a tent-shaped roof (tent roof). In technical terms, this is the most complex designs, because you have to think about how to connect all the rafters at one central point.
 A dome-shaped roof is technically difficult to implement. If you have no experience working with wood, it is better to refuse this option.
 Availability of modern building materials, including roofing ones, allows you to make the roof generally round, without any edges. In this case, you need to be able to work with metal pipes and welding. The pipes are bent according to a certain pattern and the sheathing is attached to them. It is desirable that the sheathing be continuous. A flexible roofing material.
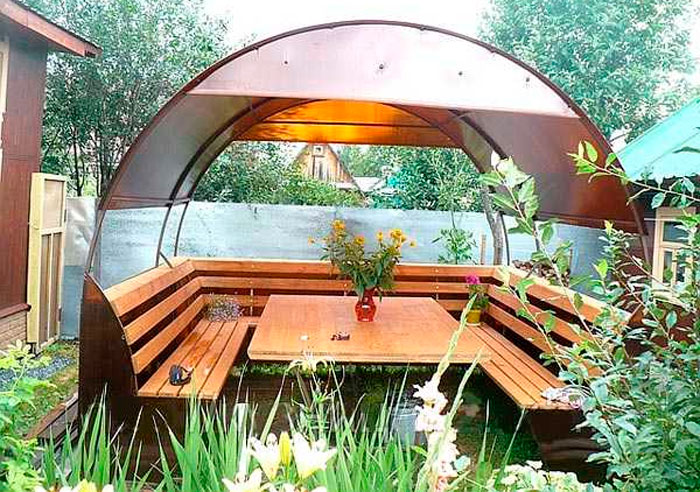 The simplest option garden gazebo: two curved pipes to which the polycarbonate is attached.
 Simple designs of gazebos, especially recently, are very popular. Some summer residents set up gazebos under the same roof as their house. They are usually called verandas. In fact, it is as simple and affordable option, with a minimum of costs.
There are a huge variety of gazebo designs, so it’s simply unrealistic to talk about them all. Moreover, each of them is the result of hard work and broad imagination.
How to make a gazebo with your own hands
It just so happens that most often they build gazebos with their own hands from wood. This is due to the fact that working with wood does not require special tools. The second place is occupied by metal gazebos, but their construction requires skills in working with metal. It is very rare to see gazebos made from other materials. This is associated with some difficulties, as well as increased costs, which the family budget cannot support.
If a gazebo is built from wood, first of all it will have to be treated with preparations that protect the wood from bacteria and fire. Work can begin after the impregnation has completely dried. Firstly, this is necessary for quality, and secondly, it is problematic (inconvenient) to work with wood that has not yet dried.
Availability of drawing
The presence of a drawing with dimensions significantly simplifies the process of building any structure, and a garden gazebo is no exception, despite its small size. Without a drawing, it is very easy to get confused in the parts being manufactured, although there are not many of them at all.
The figure below shows two options for gazebos: one with a gable roof, and the other with a 4-pitched roof, although both gazebos are 4-corner.
Step-by-step instructions with the presented photo
All work begins with preparing the site for the gazebo. As a rule, a certain ball of soil is removed along with the fertile layer. This is necessary so that in the future this organic matter does not rot under the floor of the gazebo. If the soil is sandy or sandy loam, then construction waste, crushed stone, broken brick etc., after which everything is carefully compacted. After this, a layer of sand is poured on top. If the soil is clayey and there are problems with water drainage, then it is better to pour a layer of clay into the pit and compact it. If the hole is filled with something else, then moisture will accumulate in it. Under the influence of heat, the water will begin to emit bad smell, which is completely unnecessary.
Arrangement of the foundation and lower trim
The easiest way is to install concrete blocks on the prepared cushion so as not to delay the construction of the gazebo. If you lay out brick columns, it will take a lot of time (not only work is taken into account here, but also the time to strengthen them). The distance between blocks is selected from 1.5 to 2 meters. If the gazebo is built from wooden beams 100x100 mm, then the distance is chosen to be 1.5 meters, and if from a profile pipe 60x60 mm, then 2 meters is enough.
The supports must be aligned in the same plane. To check this, you will have to use a level and a long, straight rod. After this, waterproofing is laid on top of the columns (2 layers of roofing material or bitumen mastic). And only after this the lower trim bars are mounted. The beams are connected to each other using nails 150 mm long. To strengthen the frame, each connection is duplicated with powerful metal corners. Despite the fact that this is a summer gazebo, extra strength will never hurt, since the structure will quickly become loose under the influence of wind.
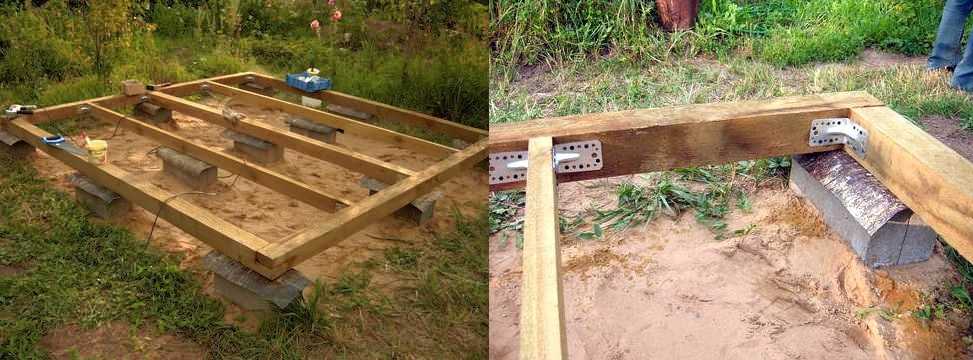 The lower harness is assembled.
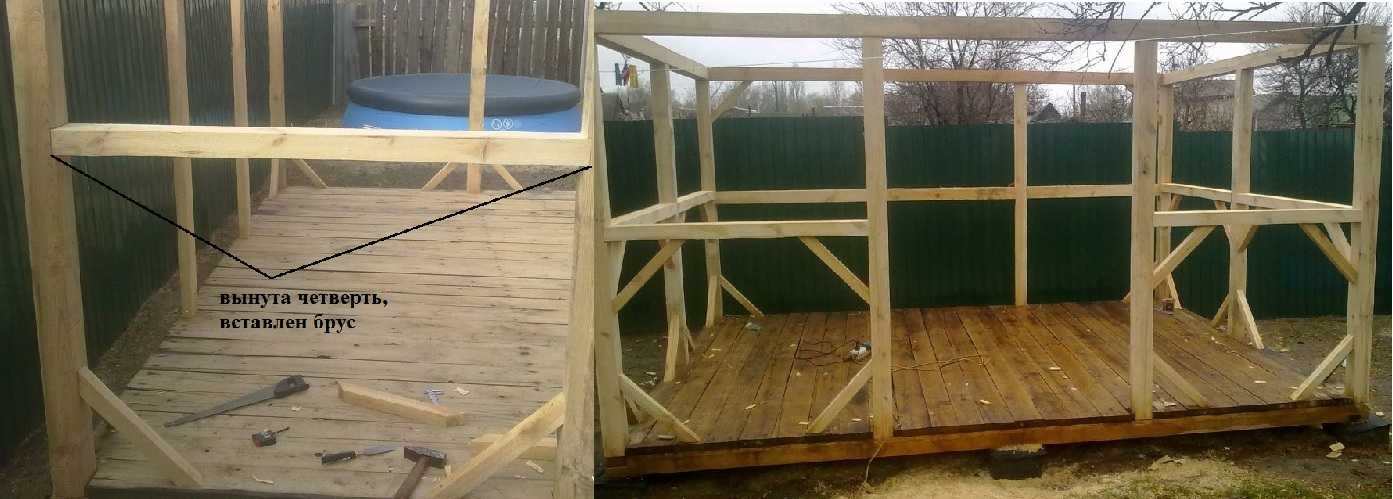
 Installation of racks
The next stage is attaching the racks. Racks are provided at the corners of the gazebo, in the center, on both sides of the entrance, and also where the supports (foundation) are installed. The racks on top have the same strapping as on the bottom.
Installation of racks is carried out strictly vertically, with control of this process building level. Many argue that building levels have a large error. This may be true, but for the construction of a garden gazebo the error does not matter much. In addition, when purchasing a level, it is advisable to check it. Alternatively, you can use a regular plumb line, but it is very difficult to use alone. One person should use the plumb bob and the other person should attach the posts. Using a building level, you can do without outside help.
Fix the position of the racks with jibs. In the future, having fixed and secured everything thoroughly, the jibs can be removed if they interfere. If the lower part of the gazebo is not transparent, then the jibs can be left. They can simply be permanently and reliably secured using metal corners. At the same time, it is advisable to check the racks for verticality each time.
 Two options for attaching racks with bevels. On the left are temporary jibs that are planned to be removed, and on the right are permanent ones that will be used in the future.
 Installation of the top trim and floor boards
After the racks are finally secured, they are also secured from above, installing the upper trim. Technically, it looks the same as when installing the lower trim. For reliability, metal corners should be used. This is especially important if the structure does not have permanent jibs.
After the frame is almost assembled, begin laying the floor boards. They, like all wooden structures, are treated with antibacterial impregnation. For such purposes, Senezh or Senezh-Ultra impregnation is suitable. They differ from each other in that “Ultra” does not color the wood, but gives it a greenish tint. If the entire structure is covered with a dark stain, the greenish tint will disappear and remain unnoticeable.
 Means for impregnating wood that may come into contact with the ground.
 After the boards are secured with nails, it is better to paint the wooden floor, otherwise the wood will become dirty before construction is completed. It is better to paint outdoor wood with varnish or tinting paints. oil based. Moreover, these are not classic oil paints, but special compositions to protect wood from atmospheric precipitation. The basis of these compositions is oil, to which protective elements and color pigments are added. As a result, the wood takes on a completely different shade, while maintaining its texture.
Strapping the structure in the middle of the frame
The middle frame binding, in most cases, is simply necessary, since the frame is divided into an upper and lower part, which is always (almost always) sewn up. It is better to secure the beams that need to be installed using metal corners or make recesses for them in the racks, up to 25 mm in size, if the thickness of the timber is 100x100 mm.
 Option for attaching the middle harness.
 After this, you can begin the final painting of the frame of the garden gazebo.
Roof arrangement
The next stage is the assembly of the rafter system, as shown in the photo below. The rafters are similar in appearance to triangles.
 Rafters (triangles) for arranging the roof.
 These elements are attached to the frame of the gazebo. Since there is no roof overhang, they are attached directly to the beam of the top trim. The triangles are installed vertically and secured with nails. To fix them in this position, you can use bevels.
If an overhang is provided in the gazebo design, then the rafters must be cut out seats. The attachment points look like triangles.
 Options correct fastening rafters
 Of these two options, the first one is more suitable, since the roof does not have large sizes. In order not to adjust each rafter leg individually, it is better to use a template. To do this, you need to take a piece of regular board and cut out an opening. required size. This will not only simplify the task, but also provide the necessary accuracy. To make the work less of a burden, you can use a power tool, for example, a jigsaw.
Before final fastening of the rafters, be sure to check the correctness of their installation, both vertically and horizontally.
After the final and reliable fastening of the triangles, the sheathing is filled. The nature of the lathing depends on the nature of the roofing material. Soft types of roofing materials require continuous sheathing. If it is slate or corrugated sheeting, then regular sheathing will do.
Decorative finishing
After arranging the roof, when the entire structure is closed from rain, they begin finishing the lower part.
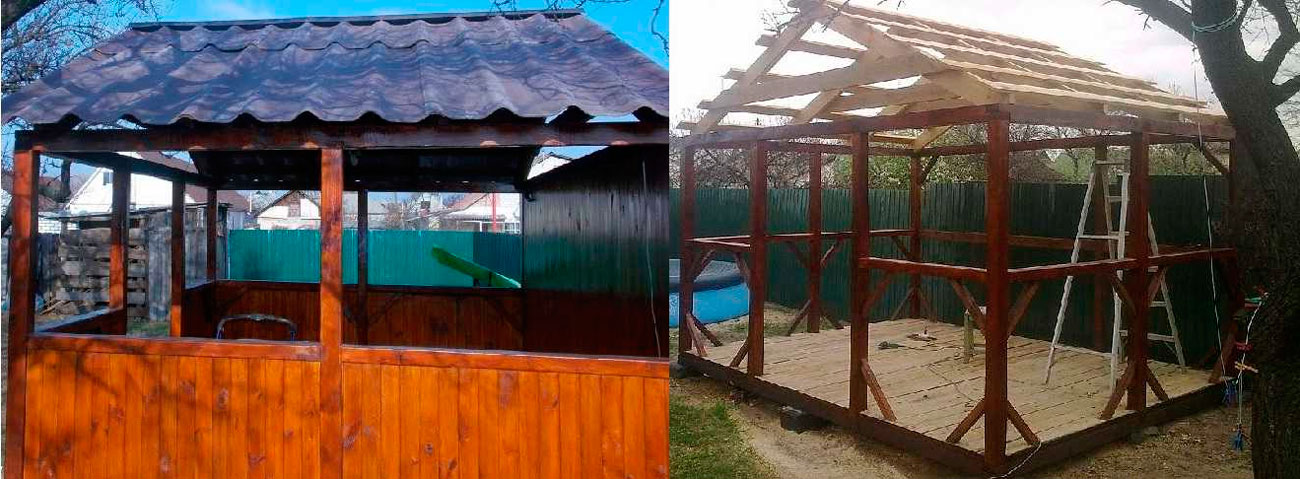 The gazebo with your own hands is ready.
 This design falls into the “simple, fast and cheap” category. Taking it as an example, you can experiment by doing something of your own with your own finishing elements. On following example you can see how the gazebo, made according to the same design, has changed: the lower part is covered with a blockhouse painted in a light tone. And the rest of the frame has a dark tone.
 This is another version of the same project.
  In the next photo, there is another option. Using this project as a basis, you can get many options.
 Below in the article are drawings with all dimensions. Below are interesting photos, but without drawings. There is hope that someone will use them.
Sketches of gazebos with drawings and dimensions
All dimensions indicated on the drawings can be increased or decreased to obtain the design required sizes. With a significant increase in size, the size of the wooden elements (section) should also be increased for the required strength. If everything is done correctly and in the right sequence, then you can count on a positive result.
Classic wooden gazebo
The project is almost the same, but some dimensions have been changed: the top point of the roof has been raised, making it seem lighter. The gazebo is quadrangular with a hip roof.
 An ordinary square gazebo for a garden or cottage made of wood.
 Roof installation has problem areas fastenings indicated in the figure by circles. The picture below shows how to do this correctly.
 Options for fastening problem units when arranging a hip roof.
  Option for distributing space in height and option for attaching the sheathing to the roof.
 Chinese style gazebo
All dimensions are indicated on the drawing, and the project includes marking for the foundation, installation of the rafter system, etc. The project is arranged in the form of a photo gallery.
A gazebo in a country house or in the courtyard of a house is a place for drinking tea and gatherings in the summer. In buildings slightly larger, it can be installed. Then you can think about glazing it: barbecuing in winter is a rare pleasure, and the barbecue will at the same time warm the air inside. They usually start with simpler and cheaper models: they build a gazebo with their own hands, most often there is not enough time. Hence this choice. We’ll talk further about how to do this correctly, about materials, methods, and methods of construction.
A little theory: what types of gazebos are there?
Nothing complicated: let's talk about the types of gazebos and the materials from which they are built. First of all, buildings of this type are divided into open (summer) and closed (glazed). This does not mean at all that there are only these two types: there are also combinations with removable glazing, and there are also awnings made of transparent film, which, if necessary, are stretched over the frame of the gazebo. Another option is that some of the walls are closed, some are open. Choose the one that is closer to you.
With or without floor
Gazebos can also be divided into those with and without floors. Gazebos without a floor are placed on a prepared platform made of paving slabs, poured with concrete, laid with paving stones, etc. Although no one is stopping you from building right on the grass. Only the frame must be treated accordingly: direct contact with the soil requires enhanced protection measures. If we're talking about about a wooden gazebo, it is impregnated from rot and fungal infections; if it is made of metal, it is treated with an anti-rust compound.
Gazebos with a floor require a foundation. Most often they make columns. They can be made of brick or rubble, filled with concrete, placed foundation blocks. If you have large, flat-topped boulders that can support the structure, use them. But all this - if easy construction- on a frame made of wood or metal. required, albeit shallow (20-30 cm below the level of the fertile layer).

This is also a wooden gazebo, but with a wooden floor. That's why it is raised on supports. The upper part is decorated in an original way - the binding made of processed thin boards looks great
If you want to tile the floor in the summerhouse gazebo, you will have to fill the insulated slab with concrete, and then lay frost-resistant types of tiles on it. Moreover, the insulated slab must be at least 50 cm wider in all directions than the building on it. And these 50 cm are made at a slight slope so that moisture drains. This is actually what will prevent the soil under the gazebo from freezing. This way the tile will not be twisted and cracked.
Materials
The frame of garden or country gazebos is made of three materials:
- wooden bursa or round timber of small diameter;
- steel pipe (profiled is more convenient);
- polymer pipes (PVC).
The only material that does not require protection is polymers. They do not rot or are affected by fungi. Some species tolerate freezing and thawing without much harm. So they can stay over the winter. The only thing is that for a gazebo for a summer house made of PVC pipes to be durable, they need a solid diameter and a thick wall. And even in this case, there is no need to rely on the frame: you will have to install furniture that will not put pressure on the plastic. Well, the grill will need to be placed to the side (if provided).

In order for a wooden garden gazebo to remain attractive for a long time, all wood that will be used in construction must first be coated with a protective impregnation in one or two layers. The cheapest impregnations today are SENEZH and Usadba, and the reviews about them and their protective properties are very good. These manufacturers also have coloring compounds.
This is the whole theory in a nutshell. There may be some other special cases: there are many materials, as well as possibilities for their combination. The most interesting original gazebos from non-standard materials We will publish it at the end of the article. And now - practice.
How to make a gazebo with your own hands
Most often, we build garden gazebos from wood on our own. The second place in popularity is among metal ones. Everything else is done infrequently. Brick and other building materials due to the fact that they are expensive, from PVC pipes- because there is no trust in the material.
We will look at an example of building a frame gazebo made of wood. But even if you are going to make it from metal or PVC, the procedure will be the same. Another principle for connecting frame materials, but otherwise everything is the same.
When working with wood, it must first be treated with antibacterial and fire-retardant (reducing the flammability of the material) impregnations. Only after the compositions have dried can you work. If this is not done, the wood will very quickly darken and lose its attractiveness.
Drawing
Two similar projects were implemented, each of the same type: a quadrangular gazebo under gable roof, only with different sizes and they were designed differently. See the photo below for a drawing of one of them.

Rectangular gazebo with hipped roof(in one project the roof was replaced with a gable roof)
Step-by-step instructions with photos
It all starts with preparing the site. If there is turf, it is removed, removed and fertile layer. If this is not done, the roots, greens and all the leftovers will rot. On sandy or sandy loam soils, screenings, crushed stone or broken construction waste are poured into the pit, everything is compacted, and sand is covered on top. On clay soils where water drains poorly, it is better to fill the pit and compact it with your own soil (clay, but without a fertile layer). Otherwise, water will accumulate and stagnate in the pit, which will lead to an unpleasant odor. Not at all what is needed.
Choosing the type of foundation and bottom trim
If you don’t have much time, the fastest way is to install ready-made concrete blocks on the compacted pad. You will have to spend more time if you build columns from brick, and even more time if you pour them from concrete. The distance between supports should be no more than 1.5-2 meters. More specifically, it depends on the thickness of the timber from which you will make the strapping. Under timber 100*100 mm the distance is 1.5 meters, under a metal profile pipe 60*60 mm it can be placed at 2 meters.
When all the supports are installed and level (use pegs, a stretched string and a building level), waterproofing is laid on them. This is roofing felt or roofing felt, rolled up in two layers, or bitumen mastic, which is also used to impregnate the surface twice. Then it is laid bottom harness gazebos made of timber. Everything is nailed together with nails of at least 150 mm in length or connected with wood screws. For greater strength, corners are used (if you find reinforced ones - like in the photo - it will be great). Although the gazebo was initially built as a summer gazebo, after some time most people decide to glaze it. That's when the margin of safety will be required.

Installation of racks
At this stage of building a garden gazebo, it is important to place the posts strictly vertically. It is not advisable to use a building level: it has a large error, especially household models, which are usually used by developers. Therefore, we take the good old plumb line and set it along it. Check the vertical position on both adjacent sides to ensure that the racks do not fall over.
The racks are fixed with jibs (seen in the photo). If they bother you in the future, you can do temporary option, as in the photo on the left. If the sheathing below is opaque, do it thoroughly: saw the timber at 45° (it’s more convenient to use a miter box) and nail it diagonally with two or three nails. Check to see if it has gone astray after installing each cut. These small triangles give rigidity to the entire structure and it stops wobbling.

Two projects and two ways to correctly position corner bars. On the left are temporary jibs; they will be removed after installing the harness; on the right are permanent ones.
Top railing and floor boards
Next, after all the racks are installed and secured, the top trim is mounted. There shouldn't be any problems here. To increase the reliability of the connection, use corners. By the way, the racks can also be fixed on the sides with corners. Especially if there are no constant cuts. Otherwise, your structure may collapse due to lateral loads.
After this, the floor boards are laid. It is highly advisable to treat them on all sides with an antibacterial impregnation for wood in direct contact with the ground. Senezh has two such squads. One of them is called “Senezh”, the other “Senezh-Ultra”. They differ in that “Ultra” does not stain the wood, while “Senezh” gives it a greenish color. If you cover everything with a dark stain, the greenery will be invisible; such a composition will not be suitable for a light stain.

After laying the floor, it is better to paint the boards, otherwise they will get dirty by the time you finish construction. Therefore, take the time to apply varnish or oil-based tinting paints - the best option for a tree outside. Not to be confused with oil paints! These compositions are often called wood oil because the base is oil to which protective substances and coloring pigments are added. As a result, the wood takes on a different shade (even pink or green, if you so choose), but the texture becomes clearer rather than painted over.
Middle harness
The next step is to install the middle trim, if there is one according to the project. A quarter is taken out under the beam in the racks - a small recess, in this case, with a beam of 100 * 100 mm, a quarter is 25 mm.

Making a roof
While the frame of the wooden gazebo is drying, assemble rafter system. It consists of triangles (look at the photo below).

They are installed on the frame. This project does not provide for a roof overhang. Therefore, they are simply placed strictly vertically and nailed directly to the beam of the upper trim. Such a roof is easy to install, but rain will pour heavily inside even with a slight wind.
If you do it with overhangs (the roof protrudes beyond the perimeter of the gazebo), then you will have to cut out “seats” in the timber for the rafters. They look like triangles (see photo).

Two options are shown. In fact, there are more of them, but since the roof is small, the first, simplest one, will be enough. To avoid fiddling with each triangle, sawing the wood at the top makes a template. Take a piece of board and cut a hole the desired shape, try on, check, adjust. Then you simply apply it to all the rafters one by one, trace them with a finely sharpened pencil and cut them out. What is the most convenient way to cut? A jigsaw, but you can also use a hand saw. Having prepared all the triangles, throw them up and install them (with long nails diagonally from the sides, you can also secure them with corners). Before fixing, do not forget to check the vertical and horizontal.
After installing the triangles, crossbars are filled: two on either side of the ridge, and then in increments that depend on the type and type of roofing material. Under, for example, in general continuous lathing needed. Then the entire rafter system is painted. And then the roofing material (in this case metal profile) is installed.
Finishing
The bottom trim is nailed down last. This project uses clapboard, which is then painted with wood oil.

This country gazebo is from the “simple, fast, cheap” category. Having her as an example, you can make something of your own that, in your opinion, is more attractive. Here, for example, is what came out of the same project, but in a different design: covering a veranda from a blockhouse, which was painted in light color, and the frame is dark.


And also this option: summerhouses this project turns out completely different
We will post several more complex projects with drawings and dimensions below, and even more interesting photos, but without drawings, at the very bottom. Maybe it will be useful to someone...
Sketches of gazebos with drawings and dimensions
Available sizes can be proportionally increased or decreased. It is important that you understand that with a significant increase in size, the frame requires a more powerful one. Don’t forget about this, and everything will work out for you: a gazebo made by yourself will be beautiful and reliable.
Simple wooden gazebo
Almost the same project, but with different dimensions: the top point of the roof is raised higher, which makes it seem visually lighter. The gazebo is also quadrangular, the roof is hipped.

When installing such a roof, the most problematic ones are the two places (nodes) indicated by circles. How to make them, see the photo below.


Chinese style gazebo (with drawings and dimensions)
Project with all dimensions, foundation markings, roof truss system, etc. Arranged in a photo gallery.
" data-link="file" data-itemtag="dl" data-icontag="dt" data-captiontag="dd" data-columns="0" data-size="large" data-width="600" data-auto="false" data-max-width="100%" data-ratio="1.1029411764706">
Main facade - height from floor to top trim 2,160 m Main facade without roof: vertical racks 150*150 mm  Cross section of a wooden gazebo. In the photo on the right - how to make raised ends of the roof Installation of floor beams (numbers are the designation of the material from the specification) Detailing of node 2 - how to install racks How to make steps to the veranda - node 2 Fastening the rafter system to the top frame - with wooden pins
Large gazebo on the foundation
Before you build this gazebo you need. Its parameters depend on the soil, the material you are going to use for the frame: metal or wood, and what you are going to use to glaze it. In general, the width of the tape is about 20 cm, the depth is 20-30 cm deeper than the level of the fertile layer. On heaving soils it is better to do so.

Drawing of a gazebo-swing
Gazebo swing requires special attention: they fasten it very firmly so that the alternating loads that arise do not loosen or overturn the structure. To do this, you can extend the legs downwards, dig a hole under them, fill them with crushed stone, compact them, and then fill everything with liquid concrete mortar. If you make the frame from a pipe, no questions arise; for wood you can use “U”-shaped fasteners with a pin mounted in the lower part. Here you can bend it and fill it with concrete.
For even greater reliability, crossbars are attached to the legs, which are slightly recessed into the ground. They are nailed in with U-shaped staples.

Photos of original wooden gazebos without drawings
This is an option - both stone and wood. Supports made of timber are installed on columns made of rubble stone. The style is the same - withered trees are used as supports
Country houses in most cases do not require any frills or aesthetics. Comfort and practicality are quite enough. That's why today we'll look at budget options gazebos that you can implement on your site with maximum savings money and time.

The main thing is to avoid THESE consequences in pursuit of the budget.
First of all, we will look at photos of inexpensive country houses.
Construction instructions will be provided at the end. budget gazebo, having a brick foundation and a frame made of edged boards.
When the cost of purchase comes to the fore, it is usually difficult to choose anything. Either the quality is not satisfactory, or the materials are “collective farm”, or you can’t look at the structure without tears.

Made from dark wood
In view of this, there are many options, but few of them are sensible. We tried to select the best in terms of price, quality and appearance, but this is our subjective opinion, which may differ from yours.

We give preference to inexpensive buildings made of wood (100 by 100 timber or edged boards), with the most simple foundation and inexpensive roofing. Depending on the size, the price varies up or down. Small buildings will always cost much less than large ones.
 In the garden
  With mowing posts
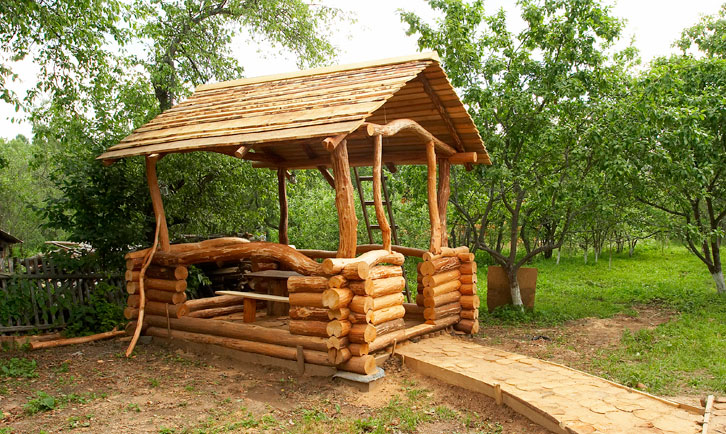
  From logs
  Country version made of corrugated sheets
  From boards
  Garden option with sheathing
  Made of wood
  In the trees
  In the form of a canopy
Cost of gazebos in the store
I would like to give a few examples from the online store “ Green Gazebo" We often recommend their buildings not because they ordered advertising from us. They are simply one of the most serious players and, in addition, have an online store with easy navigation.
Let's see!
Garden gazebo 3 by 3 “Cozy house” (43,000 rubles)

Cozy house 3x3 meters
- Foundation: foundation blocks.
- Floor: 38 mm pine board.
- Frame: timber 100 by 100 mm.
- Sheathing: eurolining.
- Roof: gable.
- Rafters: timber 100 by 50 mm.
- Roof: ondulin.
- Decor: wooden sheathing.
- Cost with installation: 43,000 rubles.
Open hexagonal gazebo 3×3 (55,000 rubles)

Open hex 3x3
- Foundation: foundation blocks.
- Floor: 38 mm pine board.
- Frame: timber 50 by 100 mm.
- Sheathing: imitation of timber or logs.
- Roof: six-slope.
- Rafters: timber 100 by 50 mm.
- Roof: soft tiles.
- Cost with installation: 55,000 rubles.
Wooden gazebo in Japanese style 3x3 (60,000 rubles)

Gazebo in Japanese style 3x3
- Foundation: foundation blocks.
- Floor: 38 mm pine board.
- Frame: timber 100 by 100 mm.
- Sheathing: eurolining.
- Roof: gable.
- Rafters: timber 150 by 50 mm.
- Roof: soft tiles.
- Decor: wooden sheathing.
- Cost with installation: 60,000 rubles.
Choosing cheap material
What material makes the cheapest gazebo? Possible different solutions, but in most cases it all comes down to one thing:
- which you have in stock.
- Boards or timber 100 by 100 mm for the frame.
- OSB or for cladding.
- or metal tiles for the roof.
The rafter system should be the simplest - or. We will use brick as the base, although you can pay a little extra and purchase foundation blocks. They are much more reliable.
Construction of a budget gazebo
Below is presented to you step-by-step instruction for the construction of a wooden gazebo. First of all, let's look at the final result that you should get after following all the recommendations.

Interesting, small and budget construction with sheathing. What else do you need for a real country holiday? 🙂
Foundation
The wildest and most purely country option is to install bricks as the base. In general, it’s a risky business, but it’s worth a penny and works well.
As an alternative, we can offer 20 by 20 by 40 cm, which will create more solid foundation for your future gazebo.


 Coating joints with bitumen and installing joists
Construction of the frame
The rectangular shape of the building requires the installation of pillars along the entire perimeter. To do this, use fairly thick boards (it is best to use “fifty”) in the amount of seven pieces.
It is assumed that the entrance to the gazebo will only be on one side, so the second will be covered with cladding.
Roof and roof installation
The gable rafter system can be assembled on the ground, then lifted up and secured. Either all work should be done at a high level, but it is still advisable to prepare the material in advance.

Start of laying the floorboard
The floor was painted green color, which will wear off over time. It is recommended to treat all wooden material with an antiseptic to delay the decay process for several years, and only then paint it.
Video instruction
Several thousand views of this video on the Youtube channel " Сhildren of Siberia 55“prove that the idea of this building has the right to life. In general, reviews about construction are positive, so we also recommend this approach.
The only thing that bothers me is brick base. Still load bearing capacity There are a lot of bricks, but there are only a few bricks for a whole gazebo with people... To be honest, this matter bothers me. Apparently the guys really know what they are doing.