Do-it-yourself pond at the dacha from the bathtub. An old bathtub in the countryside turns into a pond
Read also
Today we will take a closer look at the question of how to make a pond from old bath. We all have it sooner or later old bathtub in the country house. We will take her to the dacha. You can, of course, simply use it as a water storage tank. But it seems to us that with some skill, you can make it quite decorative pond with your own hands. This will greatly transform your garden design. A mini-pond from the bathtub will look very picturesque!
To create a pond you will need to purchase the following materials:
- packaging of adhesive intended for tiles or tiles;
- several packages cement-sand mixture;
- several buckets of gravel or crushed stone;
- a couple of buckets of clay;
- a small fragment of aluminum or steel mesh;
- a coil of metal wire;
- a certain amount of natural stones for decoration.
You will also need the bath itself, but we will assume that you already have one. Now let's decide on a place for the pond. It is best to choose a dry area with sufficiently strong soil. Don't look for damp places. In terms of lighting, choose a place where there is both sun and shadow. Very a good place- next to the fruit tree.
We begin to dig a hole under the pond. Its depth should be greater than the depth of the bath. About thirty centimeters. Dig a hole according to the shape of your bathtub. Next, along the perimeter of the pit, remove a layer of turf to the same thirty centimeters. Take the width of soil removal to about half a meter. Then install the bath in the hole. Check with a level that the bathtub is installed horizontally in the pit and sprinkle the gaps between the walls of the bathtub and the pit with sand. After these procedures you should have a foundation for the pond. It should look like this: a bathtub is dug into the ground, and thirty centimeters of earth around it around the perimeter.

Required tools for further work:
- a bucket for water;
- container for cement mortar;
- a scoop or trowel for working with cement;
- pliers for working with wire4;
- metal scissors.
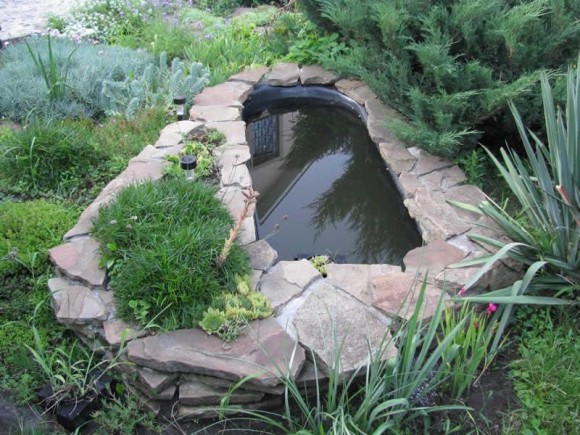
We dilute glue for ceramic tiles according to instructions. We put on gloves and treat with the composition inner surface baths. The bottom of the bath may not be treated. There is no need to level the glue. The more bumpy it is applied, the more natural it will look. Once the glue is applied, the bath can be left to dry until the next day. This event is designed to make the walls of your pond more natural. Over time, a natural vegetation cover of algae and plants forms on the walls.
We cover the upper perimeter of the bathtub and the walls one third from the top with a metal mesh. It is best to cut the mesh into pieces and install each side separately. At the corners of the mesh you need to tie wire rings. They should protrude perpendicular to the walls of the bath. In the future we will attach wire to the rings. The wire will make horizontal guides.
Next, we dilute the cement solution. We treat the mesh with this composition. We also do not level the surface. It will be more decorative. Small stones or crushed stones can be placed on top of the solution in places. And larger stones can be placed along the wire. Whether or not to make a wire edging is up to you. Please note that cement cannot be applied to the entire perimeter of the bathtub. And in some places. Over time, the mesh will also become overgrown with grass.

It is best to plug the drain hole at the bottom and side of the bathtub with cement and seal the top with sealant. The cement has been laid. Now we leave the bath to dry for a couple of days.
The bottom of the bath must be treated with clay. Place a five-centimeter layer of dry clay on the bottom of the bath. Add water and make sure that you get a mass like sour cream in consistency. We coat the bathroom walls with this mixture so that cement and adhesive materials are not visible.
Dry the clay after processing for several hours, and then start adding water. It is advisable to supply water in a small stream. The water pressure from the hose should be minimal. Ideally, the water should flow in a small trickle. The bath takes about an hour to fill. This maneuver is necessary to prevent the clay from being washed away from the walls and bottom of the container.
Bring a bucket of water with silt from a natural reservoir, scooped up from the shore. This will be a very good addition of living organisms. They will spread out and live in your pond. You can also add small fish from the pond into the pond. If you can catch them.
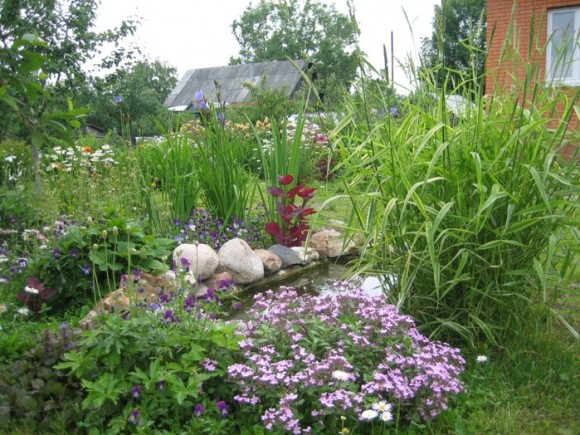
Plant moisture-loving plants in the perimeter with the removed soil around the bathtub. They can be transplanted from any pond nearby. You can also put several large stones. Every time you add water to your pond, part of the overflowing water will also irrigate the plants planted in this natural floodplain.
You can also plant some aquatic plants inside the pond. See for yourself. There is plenty of information on this topic.
The water in the pond should not be changed. Just top up what has evaporated. This way you will certainly preserve the natural biosphere of your pond. The pond should also not be cleaned frequently. Only if some plant tries to completely suppress all other plants. By the way, there is no need to drain the water from the pond in the winter. It is enough to throw a few large ones into it before frost. plastic bottles so that the ice, expanding, squeezes them out, and not the walls of the bath. Fill the bottles halfway with water and let them float on the surface of the pond. When snow falls, we recommend covering the pond with a thicker layer to prevent freezing.
The garden design takes on a special charm if there is a small pond. The easiest way to create a miniature pond yourself is to use a used cast-iron bathtub. Let's talk about the rules of installation and design.
Features of creating a mini pond
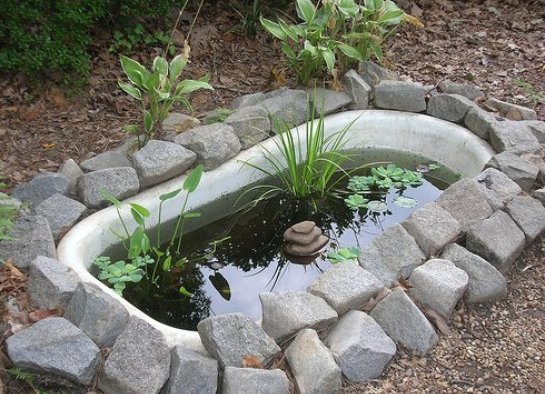
Original look small mirror receives water through registration natural materials, stones, plants. Night illumination will create a mysterious, attractive atmosphere. Using a container in the form of a cast iron bath to hold water, you can simplify the amount of work on arrangement artificial reservoir, overcome the difficulties of sealing the coating. Installation is fairly quick using available materials. IN further care it is also not labor intensive and simple. If desired, you can grow not only aquatic plants, but also add fish there.
A slight deepening of the edges improves perception and allows you to conveniently place decorative material in the form of stones and plants around the perimeter. If the edge protrudes above the surface, it is better to paint it in Brown color or hide under plants.
It is advisable to choose a place for a pond in a dry area. It would be good if there were trees here, creating shade for several hours. Usually selected cozy corner in the garden next to an apple tree or large bush. Lowland, with stagnant melt water and an area with the presence groundwater not suitable for placing a pond.

Required materials for a bathtub pond:
clay (2 buckets);tile/tile adhesive (1 packet);
piece reinforced mesh;
container for solution;
metal scissors;
metal wire;
tool for cement works;
pliers, level;
medium and large stones;
crushed stone/small stone (1-2 buckets);
cement mixture(2 packages);
cast iron bath with plugged/cemented drain hole.
Progress
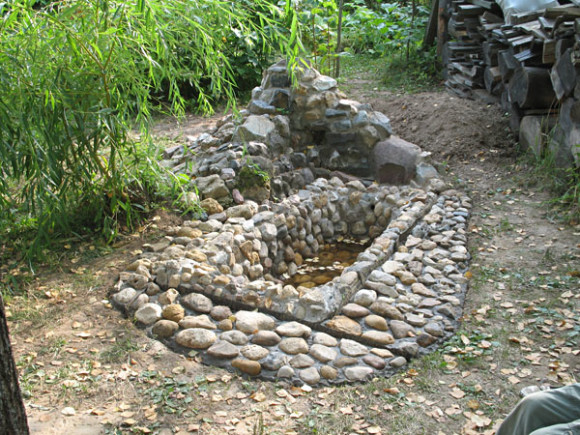
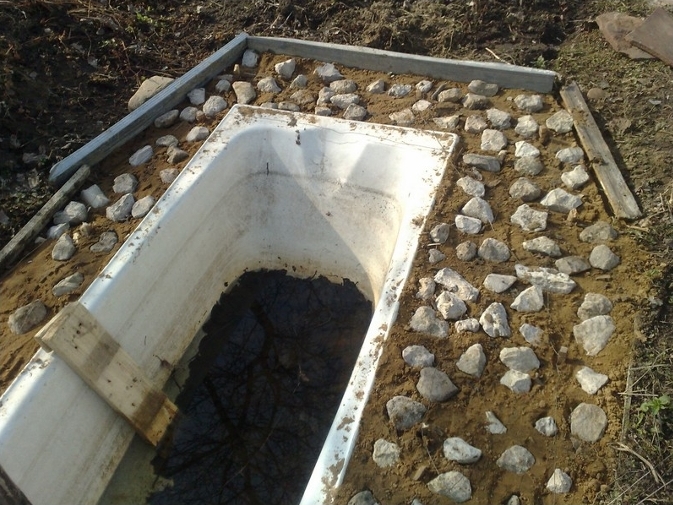
Having decided on the location, you can start digging a hole for the bath. In order not to remove excess soil, the shape of the “pit” should exactly match the container, but a little deeper. Before lowering, the turf around the perimeter is removed with a shovel to the sides and down. As a result of immersion, the edges should be approximately 30 cm below the soil level.During installation, it is important to maintain horizontality; to do this, you need to gradually fill the gaps with sand and compact them evenly on each side, constantly monitoring the process with a level. The backfill ends before reaching the surface by 20 cm.

Next, the tile adhesive is diluted to doughy state and this mass is applied to the walls inside the bath, the bottom remains unused. Try to apply without smoothing, creating natural unevenness.
Then the mesh is lined inside and covered cement mortar, elements of driftwood and pebbles are pressed in chaotically. If desired, shelves are made on the mesh for placing large stones and pots with vegetation. After drying, a thick clay solution is placed on the bottom and left for a couple of hours to dry.
Decorating a pond
To fill, it is better to use a hose and keep an eye on weak pressure, which will not wash out the clay. It’s a good idea to find a natural reservoir and bring aquatic plants and fish from it or with roots; if this is not possible, you can purchase plants and fry at a pet store.We fill the groove left around the circumference with large stones, so as to create differences in the coastal topography. Now you can drop off moisture-loving plants, arranging according to plan. Relying on your imagination, plant decorative algae inside the pond, fixing the roots at the bottom between the stones, or simply immersing them in weighted pots.
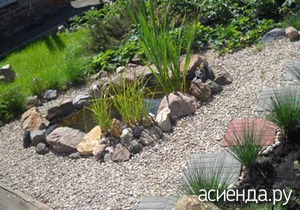
In an effort to get away from the geometry of the bathtub, you need to change the shape of the pond. Asymmetry is introduced by creating different heights relief and forced expansion of the banks. For example, at one end you can arrange a small rock garden, and on the other side create a rocky beach made of pebbles or gravel. Plant bergenia at the edge of one side, which with powerful leaves will change the shape of the reservoir. Availability flat stones will make it possible to create an overhanging rocky shore.
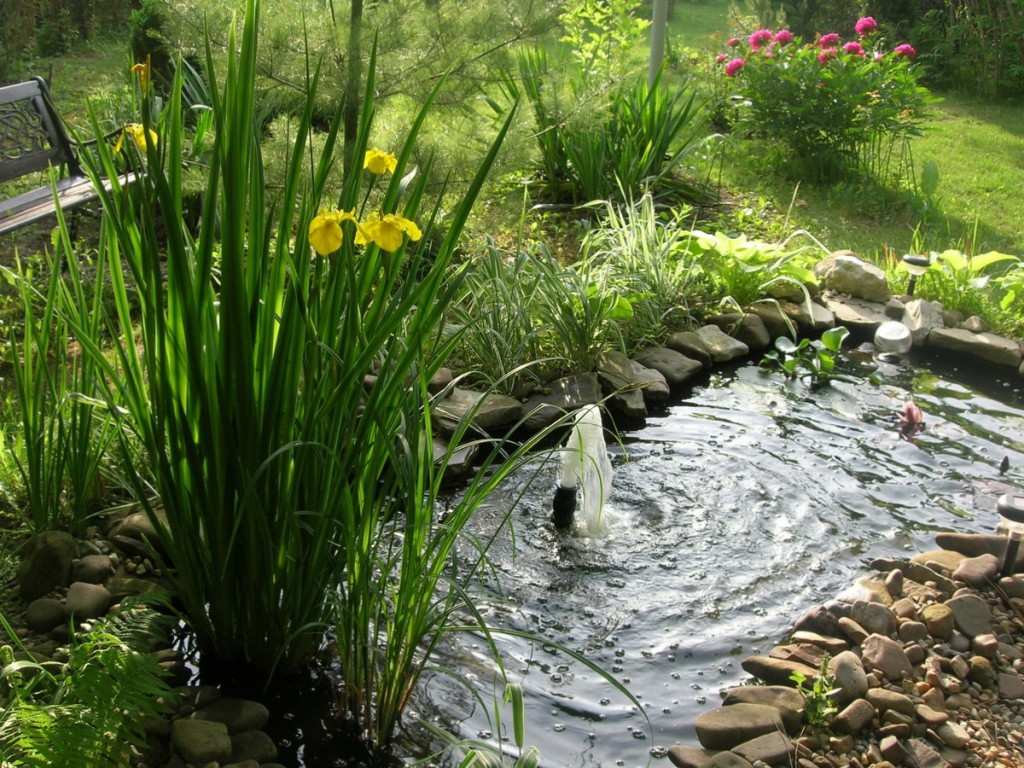
From the vegetation, ground cover, low-growing species and moss. They will disguise the sides and make the shore look natural. Great solution There will be a spreading fern placed on the central point; it will look especially elegant framed by small pebbles. You can arrange a fountain in this pond. Don't forget about the lighting. One or three is enough solar lanterns that will create mystery and emphasize beauty water body at dusk. Any imaginative maneuvers will add uniqueness to your idea.
You can perfectly complement the design of your summer cottage by creating a small pond made by yourself. And if you decorate it as a plus beautiful plants, stones and even lighting, adding even more mystery and originality to your landscape.
How to make a pond from your bathroom yourself?
The first impression may show that this is quite difficult and time-consuming, but if you have an old cast-iron bathtub at your dacha, then anyone can create such “watery” beauty.
Features of creation;
It doesn’t take much time to create a pond from a bathroom. The advantage is that there is almost no need to spend money on this pond; everything can be made from scrap materials, which are easy to care for in the future. If desired, you can add pebbles and plants to the pond itself, and even breed fish. By using natural stone or plants can be hidden around the edges of the bathtub.
What materials will we need... In order to create a pond from the bathroom we will need:
- Cast iron bath;
- Clay;
- Tile or tile adhesive;
- A piece of steel or aluminum mesh;
- Gravel and crushed stone;
- Metal wire;
- Natural stones for decoration;
- Container for solution;
- Water container;
- Tools for cement works;
- Metal scissors;
- Pliers;
Let's get to work...
First of all, we select a place for the pond. An area with an average degree of light, where there is some shadow and sunlight. It will be convenient and beautiful if there is a fruit tree nearby.
We dig a hole for the bathtub. In shape, the pit should describe the shape of the bathtub, but be 30 cm deeper.
It is necessary to lower the bathtub into the hole carefully, checking the horizontal level with the level and pour sand behind the walls all the time while lowering. The result should be a bathtub in a hole and above it a gap of earth, 30 cm high.
We dilute the glue and process the inner surface of the bath without covering the bottom. There is no need to level the glue; on the contrary, this will create a more natural color for the pond. Let it dry until the next day. With this treatment, the surface will subsequently be covered with plants.
Next, after completely dry we lay metal mesh. You don't need to cover the entire bottom, just the edges and half the walls.
If you wish, you can attach wire rings to the mesh so that you can then hang horizontal shelves.
Then we cover the mesh with cement as unevenly as possible, adding crushed stone and pebbles on the contrary. We seal all the holes in the bathtub. Let it dry for a few days.
After the solution has dried, pour dry clay onto the bottom of the bath. This preparatory stage in creating a mixture for processing cement walls baths and further planting of plants there.
Let it dry for a couple of hours. Next, carefully pour water from a bucket or hose so as not to blur the clay.
How to decorate a pond
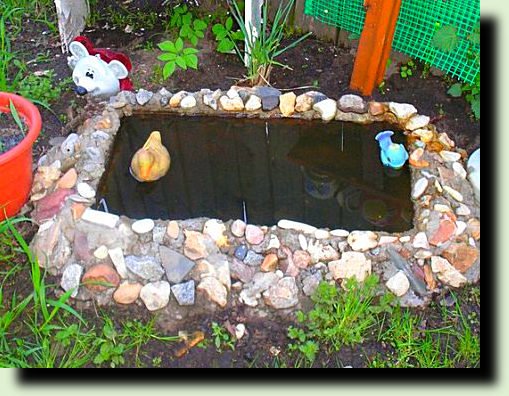
Well, the pond from the old bathtub is ready, now we need to decorate it. While pouring water, you can immediately plant aquatic plants there, first securing them with pebbles. This will be a small microclimate for its future inhabitants.
Give a significant role to decoration. You can plant moisture-loving plants along the edges of the bath. To regulate the temperature of the water in the pond throughout the summer, you need to plant a fern with large leaves next to it.
What to do to make the pond fabulous and unique
You need to take the time to create lighting. If you have the opportunity and strength, you can install a fountain. In the evening, the fabulous lighting around the pond and the murmur of the pond will add extraordinary emotions, inspire and refresh.
To winter period the water is not frozen, let in a school of fish, this will bring your pond even closer to natural.


Water is a huge source of peace for humans. And if water is located near the house, this will mean that prosperity and joy will come to your home. On summer cottage Not everyone has a real body of water. But there's no need to worry. It turns out you can simply do it yourself.
In order to build an artificial pond at your dacha, you should definitely take into account the features of your land plot. For example, it is recommended to install a pond next to the house. And if we turn to the teachings of Feng Shui, then the reservoir should be located in the southern or eastern part of the yard. However, if the dacha has a lot free space, and its owner is considered a wealthy person, then these rules are not particularly important. But if the dacha does not have a lot of space, and the financial budget is limited, then a decorative pond small size easy to make from handy materials. In particular, in this case you can even use old bath. A pond from an old bathtub will definitely decorate your summer cottage and can lift your spirits. In this article, we will tell you how to make a pond at your dacha with your own hands, step by step, from the bathtub. And in addition to the description, here you can also see a photo.
The process of creating a pond from an old bathtub in the country
Choosing a place for a pond.
To organize a decorative pond, a place is selected that should be in the sun for half a day and in the shade for half a day. For example, this place may be located next to a tree, which will cover it with shadow for half the day.
The terrain is important indicator. The reservoir should not be located in the lowest part of the site. Remember that in this case, high water will flow into it and it will become polluted.
Tools and materials.
Here we are talking about how to make a pond from a bathtub. Of course, in this situation you cannot do without tools, and you will also need consumables.
Materials:
- Tile adhesive and an old bathtub,
- Pieces of wire and stainless steel mesh,
- Sand, clay, gravel and cement mortar,
- Decorative stones.
The tools here are the following:
- Trowel and shovel
- Pliers and metal scissors.

We make a pit.
The pit is dug after the location for the reservoir has been selected. Its size should correspond to the size of the bath. In addition, it is worth digging it up with a reserve. The depth of the pit should also be 30 cm greater than the height of the bath.
After you dig a pit and install a bathtub in it, the edges of the pit should be 30 cm higher than the bathtub. The bathtub in the pit should stand level. Therefore, the horizontal position of its position is controlled using a level.
Construction of the pit.
If you are interested in how to make a pond from a bathroom, then in this publication you can find the answer to this question. The construction of a pond can be divided into several stages. After the foundation pit has been created, you need to begin covering the walls of the bathtub with glue. This must be done so that the surface of the bath has a structure and color that will imitate a pond. To make this coating, the glue is diluted in water, following the included instructions. Then it is applied to the walls of the bath. If the glue works out white, then brown pigment is added to it. The walls of the bath are coated with this composition, and then the glue dries for 24 hours.
As soon as the glue has dried, you need to begin installing the metal mesh. This item installed on the edges of the bath and the mesh should reach half the walls of the bath. In the mesh, wire rings are tied at the corners. In the future, pokes for aquatic plants will be attached to them.
When the mesh is installed, you need to install crushed stone into it. To secure the crushed stone and mesh, you need to apply a cement solution to its surface. There is no need to level this solution. These irregularities will simulate well real look pond. Work on creating a reservoir after applying cement is stopped so that the solution can harden. Hardening occurs within several days.
When the cement hardens, add a layer of clay to the bottom of the bath. A solution is made from clay and water, which should be thick. This solution is used to coat the walls of the bathtub and cover the concrete coating in order to fill all the voids.
Let the clay dry and then use a hose to fill your pond with water. But in this case, make sure that the water cannot wash away the clay.

Decorating a pond
Now you understand how to make a pond from an old bathtub. IN in this case you may find the photos and detailed description. To make the pond look more attractive, they plant around it ornamental plants, and also install decorative stones. You can also plant plants on the bottom of the pond and on the shelves. It is best to plant plants with clods of soil. As a result of these actions, microorganisms that exist under normal conditions may appear in your pond.
In order to maintain ecological pleasure in the reservoir, fish are released into it. And in order for the pond to look beautiful in dark time day, it is necessary to organize lighting around it from LED lamps, which will be powered by solar panels.
How to prepare a pond for wintering
We decided to make a pond from the bathroom at the dacha with our own hands, then this article is for you. Here we described the main points of the construction and decoration of such a structure. In order to admire this structure next year, you need to prepare it for a long winter season. It is worth noting that bodies of water that are small in size can freeze completely during severe frosts. In this case, under such circumstances, the structures of the reservoir are damaged. And this happens because water expands when it freezes. That's why important point To winter preparation is draining water from the pond.
But before draining the water, the fish and also all the plants are removed from the pond to a warm place. After draining the water, the reservoir must dry, and then it is cleaned of debris and rot.
Finally
You could learn a lot from this article. In particular, you understood how to make a pond from an old bathtub. Indeed, in order to improve your summer cottage, you can build a pond from an old bathtub. You can plant plants in such a pond and also add fish. But this is done after the walls of the bathroom are treated with clay. And, of course, you should not forget about the arrangement of the adjacent territory to the reservoir. In this case, stones and plants are used.
It is widely believed that relaxation by the water promotes relaxation and has a beneficial effect on the body. To do this, it is not at all necessary to purchase a plot of land near a natural reservoir. If you have the desire, it is not difficult to independently arrange a decorative pond on your summer cottage using scrap materials. Anyone can build a pond from a used bathtub.
With the advent of new high-tech materials, many residents of private and apartment buildings replace old ones metal baths new, more modern acrylic or shower stalls. In this case, the problem of disposing of a used bathtub arises. As a rule, this old-school product is made to last, so it can be used for a long time. for long years– for example, on a summer cottage in the form of a mini-reservoir. If you or your neighbors don’t know what to do with a used bathtub, try using this idea and “breathe” into it new life. To do this, you will need to transport such “construction waste” in the form of an old bathtub to your summer cottage in order to try to turn it into a mini-pond.
How to make your own pond from a bathtub
Using the equipment of a pond, you can create a new recreation area at the dacha for the family. A small decorative pond from an old bathtub will fit perfectly into the overall picture garden plot, decorating landscape composition adjacent territory. It’s not difficult to make such a dream come true - to do this, you will first need to learn more about how to make a pond from a bathtub. Various master classes Making a pond from an old bathroom can be viewed on the Internet. A mini-reservoir equipped on your own will decorate the landscape of your summer cottage, and observing the picture of lush greenery at the water’s edge, aquatic plants and, perhaps, even small swimming fish will undoubtedly delight you and your household.
Choosing a site for a pond
First of all, you need to choose the most appropriate place for a mini pond. You should not build a pond in a lowland, damp place where melt and nearby groundwater can accumulate.
According to Feng Shui, it is recommended to use the southern or eastern part of the site to place a reservoir. A flat, drained, dry place with dense soil, including clay and sand, is optimal. It is worth using a shaded area of the garden area; you can also place a mini-pond on sunny side plot - in this case, after equipping the reservoir, it is advisable to plant plants and shrubs near it that will form shade. You should also take into account the following - if there is a layer of snow in the chosen place in winter, the inhabitants of the pond in the form of fish will have a chance of surviving the winter frosts.
Tools and materials
To make a pond from a bathtub with your own hands, you will need the following devices, tools and materials:
- crushed stone (1-2 buckets);
- pebbles, bricks, stones of various sizes;
- cement and sand;
- clay (for planting plants on the bottom of a reservoir);
- wheelbarrow;
- bucket;
- container for cement mortar;
- Master OK;
- metal grid;
- shovel;
- a sheet of tin or an old leaky pan (for drainage equipment at the bottom of the pit);
- cement-based tile adhesive;
- dye or color film;
- roulette;
- building level.
Sequence of work
To transform a used bathtub into an element garden landscape in the form of a mini-reservoir, you will need to do the following sequence of work:
- First you need to prepare the bath as suitable container under the pond. For this:
- it is necessary to cement the side drainer in the bath. After the cement has dried, you can proceed to the next stage;
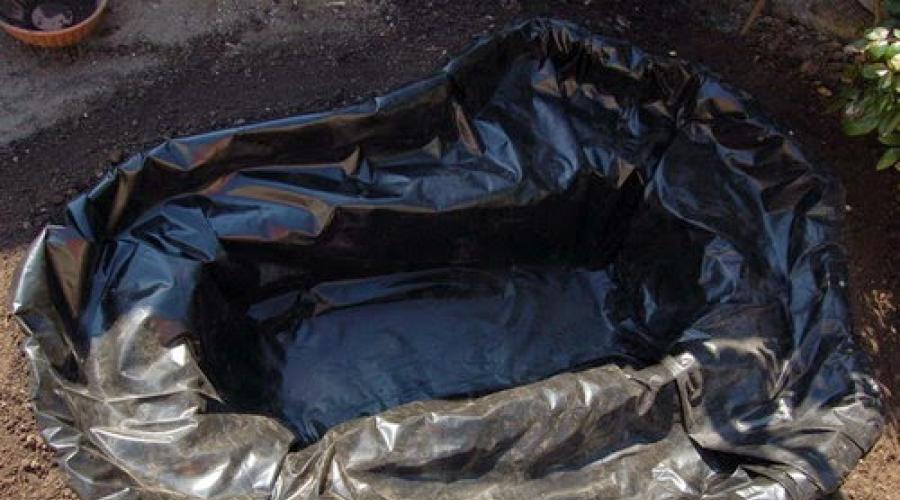
- then you will need to give the surface of this container more natural look– to do this, you can cover it with a colored film or paint it in natural tones (beige, grey, black or brown). Or you can treat the surface of the bathtub using a special adhesive composition to give it a natural look. To do this, put on protective gloves, mix ceramic tile adhesive diluted with water according to the instructions with a coloring pigment of a suitable tone - you will get a quickly hardening dough-like mass. Immediately after preparing the mixture, lightly coat the surface of the bathtub from the inside. An uneven, rough layer of such glue will imitate the natural bottom of a reservoir. The bathtub treated in this way should be covered with rain film on top and left to dry for 24 hours.
- While the painted bathtub is drying, you can dig a hole according to its shape. Place the bathtub at the planned location of the pond to mark the location of the pond. To do this, you need to surround the container with small pegs and stretch a rope between them. According to its location, it is necessary to mark the boundaries of the reservoir on the ground, remove the corresponding layer of turf and dig a hole under the pond. It is necessary to select such a depth that the side of the bathtub placed inside is approximately 25 cm below the main ground level.
- At the drainage site, you need to dig an additional hole to provide drainage. The excavated soil can be taken away - it will not be needed for further development of the reservoir.
- Next, build a funnel for drainage. A sheet of tin rolled into a cylinder or a pan with a hole in the bottom must be placed in the prepared recess and filled with gravel or crushed stone - 20 cm above the bottom of the main pit. This drainage will allow you to drain the water from the bath in winter.
- It is necessary to lay a small layer of crushed stone at the bottom of the pit and cover it with a layer of sand - in general, such a coating will be about 20 cm. After this, you need to compact these materials and carefully remove the tin funnel or pan.
- Place bricks at the corners of the pit and lower the bathtub into the prepared recess (so that its bottom drain hole coincides in location with the crushed stone drainage). Such transportation will require several strong hands or a winch. Align with building level symmetry of the horizontal location of the upper edges of the container. Add on the sides installed bath sand, moisten it with water and compact it as tightly as possible.
- Place a metal mesh on the sides of the bathtub - in a continuous strip or in the form of four pieces along the sides of the bathtub. Coat the mesh with a solution to stiffen the structure, inserting pebbles into it here and there. Using wire on the mesh, you can form rings for further equipment of horizontal shelves in the bath - in the future you can place plants on them. In this way, you can form asymmetrical, more natural outlines of the future reservoir. Wait for the concrete to dry.
- Place clay at the bottom of the container of the future reservoir, add a little water and coat the bottom. For high-quality fixation of the root system of aquatic plants, a layer 6-7 cm thick will be sufficient.
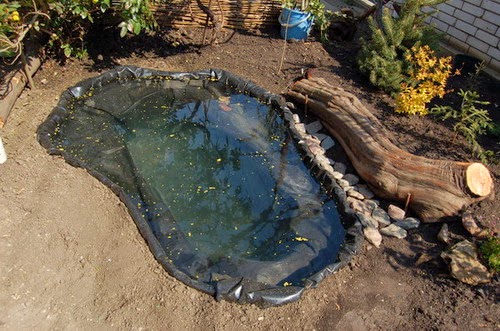
- Along the perimeter of the pond, carefully remove upper layer turf, lay the reinforcing mesh. Cover this trench with a layer of thick cement-sand mixture, leaving a small groove 30-40 cm deep for planting coastal plants. To decorate the pond, you can place rounded stones, pebbles or flagstones around the bathtub in a random order (so that the edges of the bathtub are covered) and secure them with concrete mortar.
- While filling the mini-pond with water, make sure that the soil at the bottom does not erode. You will need to place the end of the garden hose at the bottom of the bathtub and turn on the water so that it flows in a thin stream (to do this, it is advisable to cover the end of the hose with a spray nozzle).
Having equipped such a mini-pond from a bathtub on your own, you can begin to further plant aquatic plants in it and populate it with inhabitants of your choice.
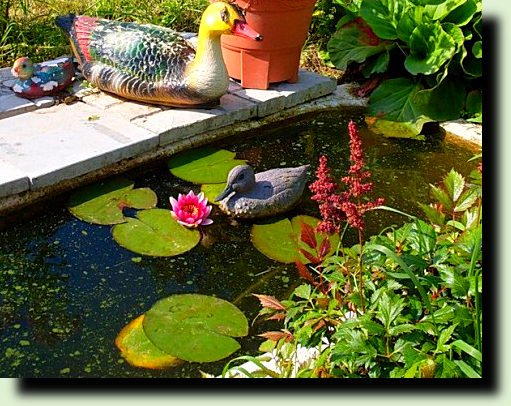
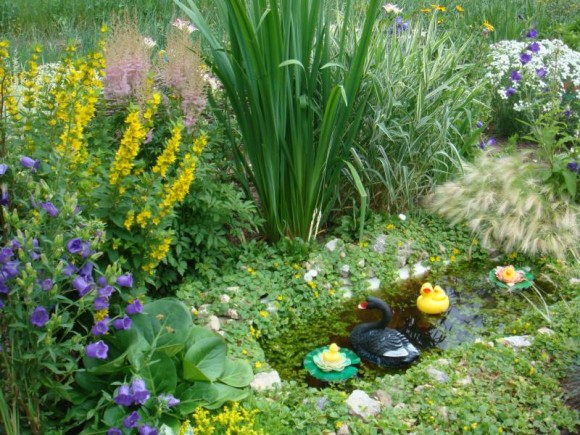
Decorating a pond from an old bathtub with plants
- in an earthen groove left along the perimeter of the reservoir, you can plant various perennials, coastal moisture-loving and marsh plants, and also place several large stones there to form the relief of the banks;
- Having selected groups of aquatic plants to your liking, plant them in an improvised pond. To do this, you will need to fix the roots of the plants in a layer of bottom clay and stones, place them in flowerpots at the bottom of the bathtub or among small pebbles on horizontal shelves.
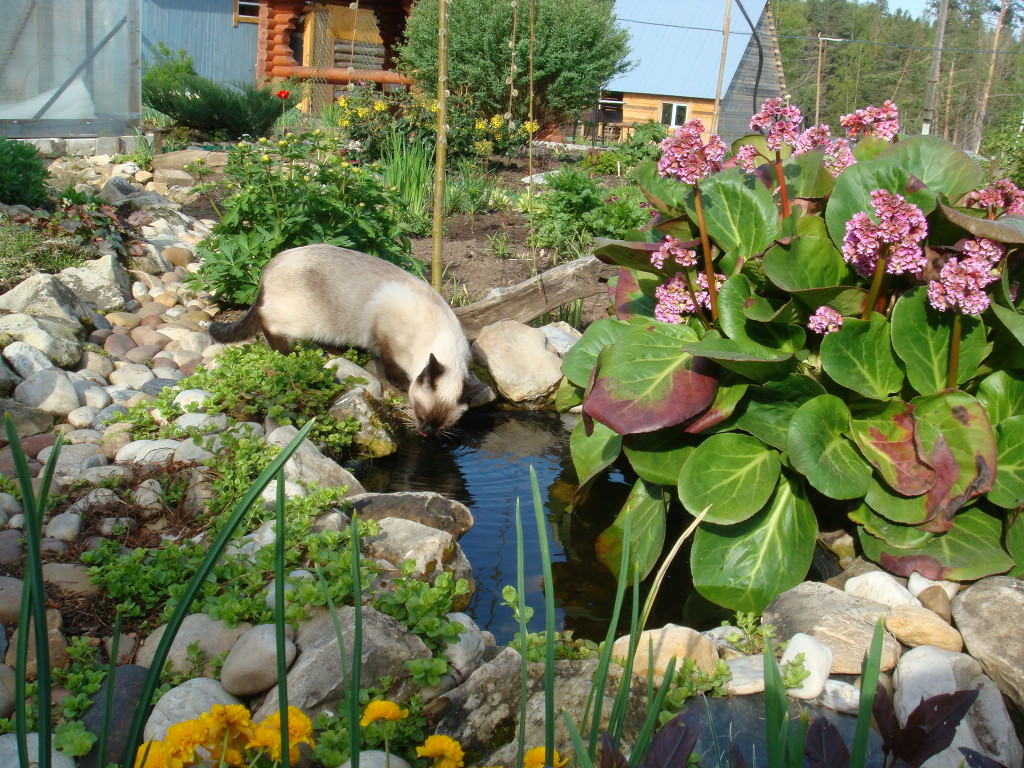
For decorative design Small or dwarf water lilies, water lilies, and duckweed are suitable for the surface of the reservoir. Get some money aquatic plants with roots and a formed root ball of silt, you can in the nearest natural body of water. Place fry of small fish from the reservoir (for example, verkhovka) into the water.
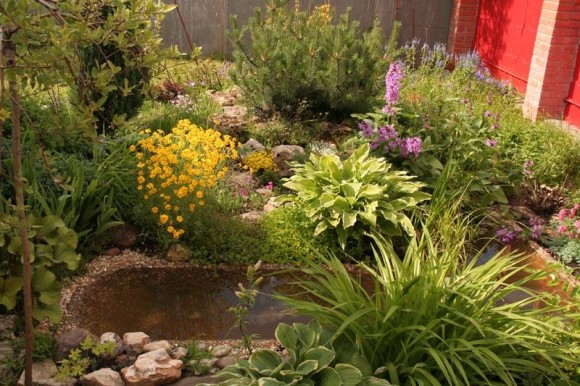
It is not difficult to give a reservoir a natural asymmetry by changing the width and height of its banks. You can implement this in the following ways:
- form a mini-beach of crushed stone on one side of the shore;
- place nearby alpine slide or mixborder.
The introduced microorganisms, fish and planted plants will gradually multiply and form the microclimate of the pond on the site. Gradually, the water will lose transparency, and water will appear on the walls of the reservoir. natural plaque. Thus, the artificiality of a man-made pond will not be obvious, thanks to decorative landscaping it will take on a completely natural look.

With the help of a mini-pond from a bathtub it is possible to create with my own hands fantastic at the dacha beautiful corner. When designing it, you can fully use your creative abilities and imagination. Caring for a small pond open area not difficult. However, try to take into account some practical advice on design and operation of the pond:
- It is not recommended to populate snails from a bathtub into a country mini-pond, as they are capable of multiplying in significant quantities and clean the surfaces of the bathtub walls;
- no need to try to convert a mini-pond into a country aquarium at fresh air with goldfish and crystal clean water. In addition, crucian carp thrown into a pond will make the water extremely cloudy, since they prefer to dig in the bottom soil;
- Verkhovka fish, which actively clean the water surface, are suitable for populating an artificial reservoir;
- in a mini-reservoir from the bathtub there is no need to change the water, you only need to top it up periodically (once or twice a month). The water overflowing over the sides of the pond will be absorbed into the soil;
- cleaning the mini-pond will be required in case of uncontrolled reproduction of any microorganism or plant in it.

If there are fish in the mini-pond, you don’t need to drain the water from the bathtub in the cold season - the preservation of the microclimate in it will be facilitated by the freezing layer of ice on the surface, the warmth of the deep layer of soil, as well as a layer of snow that protects from frost.
If you want to leave water in the pond for the winter, place several plastic bottles on its bottom - they will protect the bathtub container from cracking if a significant amount of ice freezes. In a frosty winter with little snow, you will also need to take care of raking a layer of snow at least half a meter thick that covers the surface of the pond.
Pond from an old bathtub - photo


![]()