Do floors on the ground need crushed stone. The correct arrangement of floors on the ground - the nuances of technology. Instructions for the manufacture of a rough screed for the floor on the ground
Floors on the ground - universal way devices of a warm and reliable foundation in the house. And you can do them at any level. ground water and type of foundation. The only limitation is the house on stilts. In this article, we will describe in detail all the layers of the "floor pie" and show how to organize it yourself.
Concrete floors on the ground, imply no basements or gaps for ventilation in the underground.
At its core, this layered cake. Where the bottom layer is soil and the top layer is flooring. At the same time, the layers have their purpose and a strict sequence.
There are no objective restrictions for organizing the floor on the ground. High groundwater is not a hindrance in this. Their only weakness– production time and financial costs. But on such floors you can put brick or block walls and even heavy equipment.
The correct "floor cake" on the ground
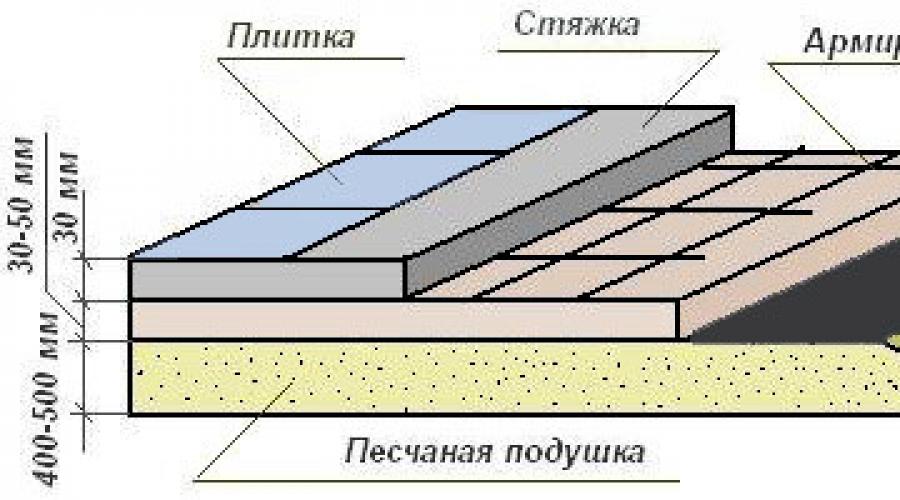
The classic floor cake on the ground implies the presence of 9 layers:
- prepared clay;
- sand cushion;
- crushed stone;
- Polyethylene film;
- Rough concreting;
- Waterproofing;
- insulation;
- Finishing screed;
- Flooring.
We deliberately did not indicate the thickness of each layer, so as not to set any strict restrictions. Below, approximate values \u200b\u200band the factors influencing it will be indicated. But first we would like to point out the very important point: groundwater levels can change dramatically in a relatively short period of time.

In our practice, there were cases when, within 5-7 years, dry semi-basements and cellars in private houses had to be filled up, because groundwater completely flooded the underground premises. At the same time, such a phenomenon was observed not in one separate house, but immediately in the whole block of private buildings (40-60 houses).
Experts explain such phenomena by improper drilling of wells under water. Such actions lead to mixing of aquifer lenses, fracturing and alteration of aquifers. Moreover, they can drill a well far enough from your home. So be careful about the purpose of each layer of the floor cake on the ground and do not think that there are extra elements here.
- prepared clay. The purpose of this layer is to stop groundwater. In general, the three lower layers of the floor cake are for this purpose. Of course, if you, removing the fertile layer, have reached the layer of clay, then you do not need to bring and fill it up, only a little preparation is required. But more about that in due time.
- Sand. There are no special requirements for sand. You can use any, for example career and not even washed.
- Rubble. Large, fraction 40-60 mm.

These three layers are responsible for cutting off the capillary rise of water. A layer of clay cuts off the main access, sand weakens the capillary water rise and relieves pressure upper layers, and crushed stone does not allow water to rise in principle. At the same time, each layer must be rammed. The thickness of each layer is at least 10 cm. Otherwise, it makes no sense to fill it up. But according to maximum height need to be explained in more detail. The fact is that tamping is most often done makeshift gadgets. The weight of such instruments is 3-5 pounds.
It has already been empirically proven that to compact a layer of rubble, sand or clay more than 20 cm. hand tool impossible. Therefore, the thickness of one of the first three layers maximum - 20 cm. But, if you need to make the floor cake higher, then tamping can be carried out in two stages. First, 15-20 cm of sand are poured and rammed well. Then another layer of the same thickness is poured, and rammed again.
The order of occurrence of clay-sand-gravel layers cannot be changed. The reason here lies in the fact that if sand is poured on top of rubble, then after some time it will seep through it. Which in turn will lead to subsidence and destruction of the concrete layer, and then the deformation of the entire floor.

- Polyethylene film. Be sure to take the film with a sleeve, and fit without cutting. That is, there will actually be two layers of polyethylene. It is intended solely to prevent the solution from draining from concrete into rubble.
- Rough concreting. The minimum layer thickness is 8 cm. Sand can be taken from a quarry, but it must be washed. But crushed stone is required with a fraction of 10-20 mm. This layer will be the basis for the final part of the floor on the ground. Dispersed steel fiber reinforcement is recommended.
- . When done correctly preliminary work, an ordinary roofing material without powder can cope with waterproofing. If in doubt, you can lay the roofing material in two layers.
- Thermal insulation. It is recommended to use only Extruded Polystyrene Foam (EPS) here. The thickness should be determined according to the region and climatic conditions. But we do not recommend the use of XPS with a thickness of less than 50 mm.
- Finishing stitch. Depending on the project, water floor heating pipes or cables can be integrated into it electric heating floors. Sand is used only river. This layer must be reinforced. Dispersed reinforcement with steel fiber is possible. The thickness of the screed is at least 50 mm.
- Flooring. Concrete floors on the ground, organized in a private house in this way, have no restrictions on the use of flooring.
Do-it-yourself flooring on the ground
Before starting work, calculate the depth of excavation. The calculation is carried out in reverse order. That is, the threshold is taken as zero front door. Then begin to summarize the thickness of each layer. For example:
- Linoleum - 1 cm;
- Finishing screed - 5 cm;
- Insulation - 6 cm;
- Rough screed - 8 cm;
- Crushed stone - 15 cm;
- Sand - 15 cm;
- Prepared clay - 10 cm.
The total depth turned out to be 60 cm. But keep in mind that we took minimum values. And each building is different. Important: add 5 cm of depth to the result obtained for you.
Excavation is carried out to the estimated depth. Of course, that the fertile layer will be removed, but clay may not always be at the bottom. Therefore, we will describe the process of organizing a floor cake on the ground in full.

Before filling the layers, draw with chalk, at all corners of the foundation, level marks in 5 cm increments. They will facilitate the task of leveling each layer.
Soil compaction
For these purposes, any clay will do. It crumbles in an even layer, and before tamping it is abundantly moistened with an aqueous solution of liquid glass. The proportions of the solution are 1 tsp of liquid glass and 4 tsp of water.
For compacting the first three layers, you can use a one and a half meter piece of timber 200x200. But the process will be better if you make a special fixture. For this, to a one and a half meter segment metal pipe, T-shaped weld a piece of the channel. The lower part of the channel should not have an area of more than 600 cm 2 (20 by 30 cm). To make the rammer heavier, sand is poured into the pipe.

The compacted layer of prepared clay is well moistened with cement milk. For its preparation, 2 kg of cement is dissolved in 10 liters of water. Make sure that no puddles form on the surface of the clay. That is, it should be fairly even.
Almost immediately after the contact of the cement with liquid glass the chemical process of crystallization begins. It passes quickly enough, but during the day it should not be disturbed in any way crystal formation. Therefore, do not walk on clay, but rather leave work for a day for a technological break.
The main layers of the "floor pie"
Sand. After a day, you should start filling the sand. At the same time, try not to walk on the first layer. Pour in the sand and step on it. Chemical processes between liquid glass and cement will continue for another week and a half. But air access is no longer needed for this, and water is present in the clay. Having poured a layer of 15 cm, boldly step on it and tamp.
Rubble. Spreads evenly over the surface of the sand and is also rammed. Pay attention to the corners. It is very important that after tamping the surface is as even as possible.

Polyethylene film. Laid with an overlap of 10 cm and glued with adhesive tape. A small, 2-3 cm bend on the walls is allowed. You can walk on the film in soft shoes with extreme caution. Remember that a plastic film is not, but only a technological layer to prevent cement milk from flowing into crushed stone.
Rough concreting. Preparing "lean concrete" in next proportion: cement M500 - 1 hour + sand 3 hours + crushed stone 4 hours. For dispersed reinforcement, steel fiber should be added at the rate of 1 kg. fibers per 1 cube of concrete. Try to level the freshly poured mortar, guided by the corner marks. On a more even surface, it will subsequently be more convenient to lay layers of waterproofing and insulation.
48 hours after pouring, the concrete must be hardened. This will require a solution of liquid glass in water (1:10) and cement. First, the solution is passed over the entire surface. You can use a roller, or you can use a spray gun. Then concrete is powdered with a thin layer and immediately begins to be rubbed into the cement into the surface. It is most convenient to do this with grout.

This procedure increases the strength of concrete by an order of magnitude, and in combination with liquid glass makes it as waterproof as possible. Concrete will mature within a month and a half, but work can begin on the next stage in a week.
Warming and waterproofing
To create a waterproofing layer, the floor surface is cleaned and treated with liquid bitumen. The roofing material is overlapped, with an allowance of 3-5 cm. The joints are carefully soldered using a building hair dryer. Wall allowance 5 cm. IMPORTANT: Make sure that the roofing material adheres to the corners, do not leave voids. The second layer of roofing material is laid with an offset of half the width of the roll. During waterproofing work, it is best to walk on the surface in shoes with soft soles (sneakers, galoshes).
For thermal insulation, the best option is extruded polystyrene foam. A layer of XPS 5 cm thick replaces 70 cm of expanded clay. And additionally, XPS has a practically zero water absorption coefficient and a rather high compressive strength. We recommend laying 3 cm thick XPS in two layers. In this case, the laying of the top layer is carried out with an offset. This method guarantees the absence of cold bridges and increases the heat-insulating properties of the floor cake. The joints between the XPS boards are glued with special adhesive tape.

Proper thermal insulation of the floor cake is an extremely important component for the energy efficiency of the whole house as a whole. Up to 35% of heat escapes through the floors! Even if the floors themselves will not produce heat (warm floors), they must be thermally insulated as much as possible. This will allow you to save on heating in the future quite impressive amounts.
Floor screed
Glue along the room, 15-20 mm thick. Wherein lower part must be glued to the XPS boards. To reinforce the floor on the ground in residential premises, a masonry mesh with cells of 100x100 mm is used. Wire thickness 3 mm. The grid must be placed on the supports so that it is approximately in the middle of the screed layer. To do this, it is placed on special stands. But you can use ordinary corks from PET bottles.

The installation of beacons is possible, but in combination with a reinforcing mesh, this will create a rather bulky and extremely fragile structure. After all, if the mesh is rigidly fastened, this will require additional costs for fastening and it will be necessary to violate the integrity of the XPS. And if the reinforcement is not fixed, then it can easily change the levels of the beacons. Therefore, it will be more convenient to pour this layer and then level it with a self-leveling screed.
For the finishing screed, the solution is diluted in the proportion of 1 part M500 cement + 3 parts river sand. Work is carried out promptly. For rough leveling of the surface, you can focus on the corner marks.
After pouring the finishing screed, it must be allowed to gain strength within 3-5 days. With a thickness of 5 cm, the maturation period of this layer will be 4-5 weeks. During this time, regular wetting of the surface with water is required.
Acceleration of the cement hydration process is unacceptable! After about a month, you can check the degree of readiness. To do this, in the evening they take a roll of dry toilet paper, put it on the floor and cover it with a pan on top. If in the morning toilet paper will be dry, or slightly damp, then the layer is ready. You can level the floor with a self-leveling screed.
Self-leveling screed is spread according to the manufacturer's instructions and poured onto the surface of the concrete floor. With scrupulous performance of work, height differences do not exceed 8-10 mm. Therefore, a self-levelling screed is required minimal amount. It dries pretty quickly. And after 1-2 days, the floor cake on the ground will be completely ready for laying the flooring.
Schemes for flooring on the ground in a house, basement, garage or bath
In houses without basements, the floor of the first floor can be made according to two schemes:
- with support on the ground - with a screed on the ground or on logs;
- based on walls - like a ceiling over a ventilated underground.
Which of the two options would be better and easier?
In homes without a basement, ground flooring is a popular solution for all ground floor spaces. Floors on the ground - cheap, simple and easy to perform, it is also beneficial to arrange in the basement, garage, bathhouse and other utility rooms. A simple design, the use of modern materials, the placement of a heating circuit in the floor (warm floor), make such floors comfortable and attractively priced.
In winter, the backfill under the floor always has a positive temperature. For this reason, the soil at the base of the foundation freezes less - the risk of frost heaving of the soil is reduced. In addition, the thickness of the thermal insulation of the floor on the ground may be less than that of the floor above the ventilated underground.
It is better to refuse the floor on the ground if it is necessary to backfill with soil at too high a height, more than 0.6-1 m. The cost of backfilling and compacting the soil in this case may be too high.
The floor on the ground is not suitable for buildings on a pile or columnar foundation with a grillage, which is located above the ground.
Three basic schemes for laying floors on the ground
In the first variant a concrete monolithic reinforced floor slab rests on load-bearing walls, Fig.1.
After the concrete hardens, the entire load is transferred to the walls. In this option, a monolithic reinforced concrete floor slab plays the role of a floor slab and must be calculated for the standard load of floors, have appropriate strength and reinforcement.
The soil is actually used here only as a temporary formwork when constructing a reinforced concrete floor slab. Such a floor is often referred to as a "suspended ground floor".
A suspended floor on the ground has to be done if there is a high risk of shrinkage of the soil under the floor. For example, when building a house on peat bogs or when the height of bulk soil is more than 600 mm. The thicker the backfill layer, the higher the risk of significant subsidence of the fill soil over time.
Second option - this is the floor on the foundation - the slab, when reinforced concrete monolithic slab, poured onto the ground over the entire area of the building, serves as a support for the walls and the base for the floor, Fig.2.
Third option provides for the installation of a monolithic concrete slab or laying wooden lag between bearing walls supported on loose soil.
Here, the floor slab or logs are not connected to the walls. The load of the floor is completely transferred to the bulk soil, Fig.3.
It is the last option to correctly call the floor on the ground, which will be our story.
Floors on the ground should provide:
- thermal insulation of premises from the conditions of energy saving;
- comfortable hygienic conditions for people;
- protection against penetration into the premises of ground moisture and gases - radioactive radon;
- prevent the accumulation of water vapor condensate inside the floor structure;
- reduce the transmission of impact noise to adjacent rooms along the building structures.
Backfilling a soil cushion for a floor on the ground
The surface of the future floor is raised to the required height by installing a cushion of non-porous soil.
Before starting work on backfilling, be sure to remove the top soil layer with vegetation. If this is not done, then the floor will begin to settle over time.
As a material for the pillow device, any soil that can be easily compacted can be used: sand, fine gravel, Sand and gravel, and at a low level of groundwater - sandy loam and loam. It is advantageous to use the soil left in the area from, the well and (except for peat and black soil).
The soil of the pillow is carefully compacted in layers (not thicker than 15 cm.) by tamping with spilling the soil with water. The degree of soil compaction will be higher if a mechanical rammer is used.
Large crushed stone, broken bricks, pieces of concrete should not be laid in the pillow. There will still be voids between large fragments.
The thickness of the pillow from bulk soil is recommended to be made within 300-600 mm. Compact the bulk soil to a state natural soil still fails. Therefore, the soil will settle over time. thick layer bulk soil can lead to too much and uneven subsidence of the floor.
To protect against ground gases - radioactive radon, it is recommended to make a layer of compacted rubble or expanded clay in the pillow. This underlying capping layer is made 20 cm thick. The content of particles with a size of less than 4 mm in this layer should be no more than 10% by weight. The filtration layer must be ventilated.
The top layer of expanded clay, in addition to protection from gases, will serve as additional thermal insulation for the floor. For example, a layer of expanded clay with a thickness of 18 cm. in terms of heat-saving capacity corresponds to 50 mm. foam. To protect against punching of insulation boards and waterproofing films, which in some floor designs are laid directly on the backfill, a leveling layer of sand is poured over the compacted layer of crushed stone or expanded clay, twice the thickness of the backfill fraction.
Before the start of dumping soil cushion it is necessary to carry out the laying of water and sewer pipes at the entrance to the house, as well as pipes ground heat exchanger ventilation. Or lay cases for mounting pipes in them in the future.
Ground floor construction
In private housing construction, the floor on the ground is arranged according to one of three options:
- ground floor with concrete screed;
- ground floor with dry screed;
- ground floor on wooden beams.
A concrete floor on the ground is noticeably more expensive in the device, but more reliable and durable than other designs.
Concrete floor on the ground
Floors on the ground are a multi-layer structure, Fig.4. Let's go through these layers from bottom to top:
- Laid on a soil cushion ground filter materialmoisture contained in freshly placed concrete (e.g. polyethylene film at least 0.15 mm.). The film is put on the walls.
- Along the perimeter of the walls of the room, to the total height of all layers of the floor, fix separating edge layer from strips with a thickness of 20 - 30 mm cut from insulation boards.
- Then arrange a monolithic concrete floor preparation thickness 50-80 mm. from lean concrete of class B7.5-B10 on crushed stone fraction 5-20 mm. This is a technological layer designed for sticking waterproofing. The radius of the junction of concrete to the walls 50-80 mm. Concrete preparation can be reinforced with steel or fiberglass mesh. The mesh is laid in the lower part of the slab with a protective concrete layer of at least 30 mm. For reinforcing concrete foundations, it can alsouse steel fiber length 50-80 mm and diameter 0.3-1mm. At the time of hardening, the concrete is covered with a film or poured with water. Read:
- For hardened concrete floor preparation bonded waterproofing. Or two layers of rolled waterproofing or roofing material on a bitumen basis are laid on the mastic with each layer being placed on the wall. Rolls are unrolled and joined with an overlap of 10 cm. Waterproofing is a barrier to moisture, and also serves as protection against the penetration of ground gases into the house. The waterproofing layer of the floor must always be connected to the same waterproofing layer of the wall. Butt joints of film or roll materials must be sealed.
- On a layer of hydro-gas insulation laying insulation boards. Extruded polystyrene foam will probably the best option for ground floor insulation. Foam plastic is also used, with a density of at least PSB35 (residential premises) and PSB50 for heavy loads (garage). Styrofoam collapses over time upon contact with bitumen and alkali (this is all cement-sand mortars). Therefore, before laying foam plastic on a polymer-bitumen coating, one layer of polyethylene film should be laid with an overlap of sheets 100-150 mm. The thickness of the insulation layer is determined by heat engineering calculation.
- On the insulation layer laying underlayment(for example, a polyethylene film with a thickness of at least 0.15 mm.), which creates a barrier to the moisture contained in the freshly laid concrete floor screed.
- Then lay a monolithic reinforced screed with a "warm floor" system (or without a system). When underfloor heating, it is necessary to provide expansion joints in the screed. Monolithic screed must be at least 60 thick mm. performed from concrete class not lower than B12.5 or from mortarbased on cement or gypsum binder with a compressive strength of at least 15 MPa(M150 kgf / cm 2). The screed is reinforced with welded steel mesh. The grid is laid in the lower part of the layer. Read: . For a more thorough leveling of the surface of the concrete screed, especially if the final floor is made of laminate or linoleum, a self-leveling mortar from factory-made dry mixes with a thickness of at least 3 cm.
- For screed installing a clean floor.
This is a classic floor on the ground. Based on it, it is possible various options performance - both in design and in the materials used, both with and without insulation.
Option - concrete floor on the ground without concrete preparation
Applying modern Construction Materials, concrete floor on the ground is often done without a layer of concrete preparation. A layer of concrete preparation is needed as a base for the sticker roll waterproofing on a paper or fabric basis, impregnated with a polymer-bitumen composition.

 In floors without concrete preparation as a waterproofing, use a more durable specially designed for this polymer membrane, profiled film, which is laid directly on the soil cushion.
The profiled membrane is a sheet of polyethylene high density(PVP) with protrusions molded on the surface (usually spherical or in the form of a truncated cone) with a height of 7 to 20 mm. Available in density from 400 to 1000 g/m 2 and is supplied in rolls with a width of 0.5 to 3.0 m, length 20 m.
Due to the textured surface, the profiled membrane is securely fixed to the sandy base, without deforming or moving during installation.
Fixed into the sand base, the profiled membrane provides a solid surface suitable for laying thermal insulation and concrete.
The surface of the membranes can withstand the movement of workers and machines for transporting concrete mixtures and mortars without breaks (excluding tracked vehicles).
The service life of the profiled membrane is more than 60 years.
The profiled membrane is laid on a well-compacted sand cushion with spikes down. The spikes of the membrane will lock into the pillow.
The seams between the overlapped rolls are carefully glued with mastic.
The studded surface of the membrane gives it the necessary rigidity, which makes it possible to lay insulation boards directly on it and concrete the floor screed.
 If extruded polystyrene foam boards with profiled joint joints are used for the construction of the thermal insulation layer, then such boards can be laid directly on the ground backfill.
Bedding of crushed stone or gravel with a thickness of at least 10 cm neutralizes the capillary rise of moisture from the soil.
The polymer film of waterproofing in this embodiment is laid on top of the insulation layer.

If the top layer of the soil cushion is poured out of expanded clay, then the insulation layer under the screed can be abandoned.
The thermal insulation properties of expanded clay depend on its bulk density. From expanded clay with a bulk density of 250–300 kg / m 3 it is enough to make a heat-insulating layer with a thickness of 25 cm. Expanded clay with a bulk density of 400–500 kg / m 3 to achieve the same thermal insulation capacity, you will have to lay a layer 45 thick cm. Expanded clay is poured in layers with a thickness of 15 cm and compacted with a manual or mechanical rammer. The easiest way to compact is multifraction expanded clay, which contains granules of different sizes.
Expanded clay is quite easily saturated with moisture from the underlying soil. Wet expanded clay decrease thermal insulation properties. For this reason, it is recommended to arrange a moisture barrier between the base soil and the expanded clay layer. A thick waterproofing film can serve as such a barrier.
 Expanded clay concrete is coarse-pored without sandy encapsulated. Each expanded clay granule is enclosed in a waterproof cement capsule.
 Durable, warm and with low water absorption will be the base for the floor, made of coarse-pored claydite concrete without sand.
Ground floor with dry screed
 In floors on the ground as the upper bearing layer, instead of a concrete screed, in some cases it is advantageous to make a dry prefabricated screed from gypsum-fiber sheets, from sheets of waterproof plywood, as well as from prefabricated floor elements from different manufacturers.
For residential premises of the first floor of the house more simple and cheap option there will be a floor installation on the ground with a dry combined floor screed, Fig.5.
The floor with a prefabricated screed is afraid of flooding. Therefore, it should not be done in the basement, as well as in wet rooms - a bathroom, a boiler room.
The floor on the ground with a prefabricated screed consists of the following elements (positions in Fig. 5):
1 - Flooring - parquet, laminate or linoleum.
2 - Glue for joints of parquet and laminate.
3 - Standard underlay for flooring.
4 - Prefabricated screed from prefabricated elements or gypsum-fiber sheets, plywood, chipboard, OSB.
5 - Glue for assembling the screed.
6 - Leveling backfill - quartz or expanded clay sand.
7 - Communications pipe (water supply, heating, electrical wiring, etc.).
8 - Insulation of the pipe with porous-fibrous mats or polyethylene foam sleeves.
9 - Protective metal casing.
10 - Expansion dowel.
11 - Waterproofing - polyethylene film.
12 - Concrete reinforced base made of class B15 concrete.
13 - Foundation soil.
The device for adjoining the floor to the outer wall is shown in Fig. 6.
The positions in Fig. 6 are as follows:
1-2. Lacquer coating parquet, parquet, or laminate or linoleum.
3-4. Adhesive and primer for parquet, or standard underlay.
5. Prefabricated screed from prefabricated elements or gypsum fiber sheets, plywood, chipboard, OSB.
6. Water-dispersion adhesive for screed assembly.
7. Moisture insulation - polyethylene film.
8. Quartz sand.
9. Concrete base - reinforced concrete screed class B15.
10. Separating gasket made of waterproofing roll material.
11. Thermal insulation from polystyrene PSB 35 or extruded polystyrene foam, thickness by calculation.
12. Foundation soil.
13. Plinth.
14. Self-tapping screw.
15. Outer wall.
As mentioned above, the soil cushion at the base of the floor always has a positive temperature and in itself has certain heat-insulating properties. In many cases, it is enough to additionally lay the insulation in a strip along the outer walls (pos. 11 in Fig. 6.) in order to obtain the required thermal insulation parameters for the floor without underfloor heating (without warm floors).
The thickness of the floor insulation on the ground
 Fig.7. Be sure to lay insulation in the floor, along the perimeter of the outer walls, with a tape, at least 0.8 wide m. Outside, the foundation (basement) is insulated to a depth of up to 1 m.
The temperature of the soil under the floor, in the area adjacent to the plinth along the perimeter of the outer walls, depends quite strongly on the outside temperature. A cold bridge forms in this zone. Heat leaves the house through the floor, soil and plinth.
The soil temperature closer to the center of the house is always positive and depends little on the temperature outside. The soil is heated by the heat of the Earth.
Building regulations require that the area through which heat escapes must be insulated. For this, it is recommended to arrange thermal protection at two boundaries (Fig. 7):
- Insulate outside the basement and foundation of the house to a depth of at least 1.0 m.
- Lay a layer of horizontal thermal insulation in the floor structure along the perimeter of the outer walls. The width of the insulation tape along the outer walls is at least 0.8 m.(pos.11 in Fig. 6).
The thickness of the thermal insulation is calculated from the condition that the total resistance to heat transfer in the floor - soil - basement section must be no less than the same parameter for the outer wall.
Simply put, the total thickness of the basement plus floor insulation must be no less than the thickness of the outer wall insulation. For the climatic zone in the area of Moscow, the total thickness of the foam insulation is at least 150 mm. For example, vertical thermal insulation on plinth 100 mm., plus 50 mm. horizontal tape in the floor along the perimeter of the outer walls.
When choosing the dimensions of the thermal insulation layer, it is also taken into account that the insulation of the foundation helps to reduce the depth of freezing of the soil under its sole.
These are the minimum requirements for floor insulation on the ground. It is clear that what more sizes thermal insulation layer, the higher the energy saving effect.
Lay thermal insulation under the entire floor surface in order to save energy, it is absolutely necessary only in the case of underfloor heating in the premises or the construction of an energy-passive house.
In addition, a continuous layer of thermal insulation in the floor of the room is useful and necessary to improve the parameter heat absorption of the floor surface. The heat absorption of the floor surface is the property of the floor surface to absorb heat in contact with any objects (for example, the soles of the feet). This is especially important if the finishing floor is made of ceramic or stone tiles, or other material with high thermal conductivity. Such a floor with insulation will feel warmer.
The heat absorption index of the floor surface for residential buildings should not be higher than 12 W / (m 2 ° С). A calculator to calculate this indicator can be found
Wooden floor on the ground on logs on a concrete screed

Base plate made of concrete class B 12.5, thickness 80 mm. on a layer of crushed stone, compacted into the ground to a depth of at least 40 mm.
Wooden bars - logs with a minimum section, width 80 mm. and height 40 mm., it is recommended to lay on the waterproofing layer in increments of 400-500 mm. For vertical alignment, they are placed on plastic pads in the form of two triangular wedges. By sliding or pushing the linings, the height of the lag is adjusted. Span between adjacent support points lag no more than 900 mm. Between the lags and the walls should leave a gap of 20-30 mm.
The joists lie freely without attachment to the base. At the time of installation of the subfloor, they can be fastened together with temporary bonds.
For the device of the subfloor, wood-based boards are usually used - OSB, chipboard, DSP. The thickness of the plates is not less than 24 mm. All joints of the plates must necessarily rely on the logs. Wooden lintels are installed under the joints of the plates between adjacent lags.
The subfloor can be made from a grooved floorboard. Such a floor made of high-quality boards can be used without a floor covering. Permissible humidity wood floor materials 12-18%.
If necessary, insulation can be laid in the space between the lags. Mineral wool slabs must be covered from above with a vapor-permeable film, which prevents the penetration of microparticles of insulation into the room.
Rolled waterproofing from bitumen or bitumen-polymer materials applied in two layers on the concrete underlying layer by melting (for welded roll materials) or by sticking on bitumen-polymer mastics. On device pasting waterproofing it is necessary to provide longitudinal and transverse overlapping of panels not less than 85 mm.
To ventilate the underground floor space on the ground along the logs, slots in the baseboards must be provided in the rooms. At least two opposite corners of the room leave holes with an area of 20-30 cm 2 .
Wooden floor on the ground on the logs on the posts
There is another constructive scheme of the floor - this is wooden floor on the ground on logs, laid on posts, Fig.5.
Positions in Fig.5.:
1-4 - Elements of the finishing floor.
5 —
6-7 - Glue and screws for assembling the screed.
8 - Wooden log.
9 - Wood leveling gasket.
10 - Waterproofing.
11 - Brick or concrete column.
12 - Foundation soil.
The device of the floor on the logs along the columns allows you to reduce the height of the soil cushion or completely abandon its device.
Floors, soils and foundations
Floors on the ground are not connected to the foundation and rest directly on the ground under the house. If heaving, then the floor in winter and spring can "walk" under the influence of forces.
To prevent this from happening, the heaving soil under the house must be made not to heave. The easiest way to do this, and the underground part
The design of pile foundations on bored (including TISE) and screw piles involves the installation of a cold base. Warming the soil under the house with such foundations is a rather problematic and expensive task. Floors on the ground in the house on pile foundation can only be recommended for non-heaving or slightly heaving soils on the site.
When building a house on heaving soils, it is also necessary to have an underground part of the foundation to a depth of 0.5 - 1 m.
 |
| In a house with outdoor sandwich walls with insulation from the outside, a cold bridge is formed through the basement and the bearing part of the wall, bypassing the wall and floor insulation. |
Filling the subfloor on the ground is one of the laborious, but economical methods of constructing a floor covering. This coating should be done only when the soil is dry, otherwise all the advantages of the floor will be negated by serious problems with the waterproofing layer. This design does not require the installation of beams, floor slabs and other elements, the main thing here is to carefully consider the soil base pie, including an insulating layer.
Ground floor pie
In order for the draft floor on the ground to be filled with high quality, it must include the following layers:
- Compacted base;
- A mixture of purified river sand and gravel;
- Rough concrete screed;
- Vapor barrier membrane or other insulation material;
- A layer of insulation, such as expanded polystyrene or other material;
- Polyethylene film;
- Concrete screed with reinforcement;
- Floor covering, which is laid on a special substrate if necessary.
Undoubtedly, certain adjustments can be made to this scheme, which will depend on the characteristics of the soil, the type of flooring and other factors. Everything makes sense to consider general scheme, on laying the floor on the ground with your own hands.
Foundation preparation
The first step is to determine the zero point using a level, taking into account the relief and surface level. Thanks to this, you will be able to correctly assess the amount of work with the soil. The ground on which the floor is planned to be laid must be carefully compacted to reduce the risk of subsidence of the soil and cracking of the floor itself.
After that, a pillow of sifted river sand is poured onto the recessed base:
- The first layer should be 25% thicker than necessary;
- The layer is moistened and rammed, due to which the thickness should become in accordance with the calculations;
- Compaction can be done with a vibrator or roller.
A layer of expanded clay or gravel is poured on top of the sand, due to which it is possible to compact the sand layer and create a solid foundation for subsequent filling.
Draft base waterproofing
In order to completely cut off the capillary suction of ground moisture, it is necessary to perform waterproofing:
- Best in this case use bituminous roll material or a suitable polymer membrane as waterproofing. In some cases, it is permissible to use a thick polyethylene sheet, which is laid in one seamless piece. The materials are overlapped, and all joints require gluing with construction tape. At this stage, it is important to ensure that there is no damage in the waterproofing layer: it is not broken through, there are no defects on the surface.
- The insulation should go onto the walls 15-20 cm in height, all excess will then be cut off after the final screed.
- It happens that it is impossible to lay waterproofing before the rough screed, then a concrete base is poured and a coating waterproofing material (bitumen or polymer) is applied on top of it.
Subfloor installation
The device of the subfloor begins with lean concrete. This layer does technical functions and it is the basis for hydro and vapor barrier materials. The rough screed is made of lean concrete of class B 7.5-10. As a filler, crushed stone of a fraction from 5 to 20 mm is used. If gravel bedding is used, you can do rough screed from concrete class 50-75. Such a first screed is easy and without special requirements. The draft layer should have a thickness of up to 40-50 mm and not exceed 4 mm horizontally after checking with a level.
Pouring a concrete floor on the ground in the video below.
Now you can make a vapor barrier layer. Optimal material for this, a polymer-bitumen membrane based on fiberglass or polyester. These are quite cheap durable and high-quality materials. There are also polyvinyl chloride membranes, which are much more expensive and at the same time are prone to rotting and various types damage. Therefore, choosing a material, be guided not only by price, but also by durability.
Thanks to this layer, you can save on heating at home in the future by reducing heat loss up to 20%. This insulation is the first step on the way to warmth in the house.
You can insulate with a number of materials:
- Expanded polystyrene extruded is one of the best options for insulation. So you protect the floor from permanent deformation during compression and it can withstand significant loads.
- Polyfoam PSB50 (garages, warehouses) and PSB35 (for residential premises). In order not to damage the foam layer during its contact with cement, it is necessary to lay a plastic film overlapping 10 cm on both sides of the material. This is a fairly reliable insulation.
- Quite often, insulation with mineral wool is also used. However, it tends to actively absorb moisture from cement mortar and screeds, because it, like polystyrene, is recommended to be insulated on both sides with plastic wrap.
Additional Information:
- Insulation of the floor in a private house primarily depends on the design of the building. The house may have a basement or…
 Floor insulation with expanded polystyrene (styrofoam) under the screed is quite simple and at the same time reliable way make your home warmer. Besides…
- Water heated floor has a fairly simple design. Typically, this system is concrete screed, in the thickness of which pipes are located ...
Navigation
How to make a draft floor on the ground - scheme, device, filling
For strip foundations and low grillages, the construction budget can be saved by a rough floor screed on the ground instead of floors on beams or from PC slabs. It is manufactured in accordance with the construction standards SP 31-105 of 2002 (frame energy efficient houses, item 5.6).
Ground floor construction
SP 31-105 specifies the minimum allowable floor construction on the ground:
- an underlying layer of 10 cm (sand or crushed stone must be compacted layer by layer with a vibrating plate);
- polyethylene film 15 microns;
- concrete screed 5 cm.
Floor construction on the ground in accordance with SP 31-105.
In practice, the design of the pie is supplemented by the following elements:
- footing - a screed on the underlying layer, which allows you to protect the waterproofing from point punctures with crushed stone and reliably seal the joints; Footing for the floor on the ground
- insulation - high-density extruded polystyrene foam grades EPPS or XPS;
- reinforcing mesh - prevents the destruction of concrete from tensile loads in the sole of the subfloor on the ground;
- damper layer - usually strips of expanded polystyrene installed on the edge, along the perimeter of the basement, grillage or foundation; Damper tape.
- warm floor - reduces heat loss inside the structure, increases the comfort of building operation. Warm floor inside the floor on the ground.
However, even this scheme of the floor pie on the ground is not final. For example, expensive expanded polystyrene is often replaced with expanded clay concrete, combining two layers (We do not recommend doing this, it is explained below why).
Ideally, the subfloor screed on the ground should be cast between the foundation elements. However, it is often supported by heavy partitions or internal load-bearing walls.
Therefore, at the locations of these enclosing structures, the floor on the ground is reinforced with stiffeners:
- an increase in the thickness of the structure - gaps are created in the insulation layer so that expanded clay concrete or concrete reaches the underlying layer;
- the device of two reinforcement belts - a reinforcing cage is laid inside the stiffening rib, rigidly connected by wire twists to the lower mesh.
Strengthening the floor on the ground under the partition
Important! In places where heavy free-standing structures are located (fireplace, internal staircase, stove, pump equipment or a boiler weighing from 400 kg) it is better not to risk it. Need to build separate foundation and adjoin the floor to it on the ground through the damping layer.
There are a few more nuances when pouring the floor on the ground from expanded clay concrete or a conventional mixture with crushed stone filler:
- risers of engineering systems - wrapped with a damper tape for the entire height of the screed to reduce structural noise inside the room;
- GKL partitions - drywall will inevitably absorb moisture from the screed during its drying, therefore, before pouring, only galvanized profile frames are mounted and sheathed with a GKL strip to a height of 10 - 15 cm, the remaining surfaces are sewn up after the floor has dried on the ground. Options for adjoining the screed to the walls.
Wall or ring drainage should be included in the cottage project.
However, even if it is present, the sandy underlying layer is a technogenic zone, within which capillary suction of soil water is possible.
Do-it-yourself floor on the ground
Even with information about the design of the floor pie on the ground, the question remains open for an individual developer when to pour the screed. The sequence of work may be different:
- laying the floor on the ground immediately after curing with a foundation (grillage);
- after the completion of the construction of the box and the overlap of the last floor.
The first option is possible if the construction site is not mothballed in the winter. Since after wetting and freezing, expanded clay concrete will inevitably crack, reduce strength.
The second method is preferable, since the place of work is protected from precipitation, there are walls to which a damper tape is attached or expanded polystyrene is installed vertically.
backfilling
The rough floor screed on the ground must be based on a reinforced underlying layer, since any subsidence is fraught with destruction. Therefore, the following requirements must be met:
- removal of the arable layer - chernozem contains organic matter, which decomposes under concrete by anaerobic microorganisms and settles in the first 3-8 months of floor operation;
- layer-by-layer compaction - 10-15 cm of non-metallic material or natural soil with a minimum clay content (loam, sandy loam) is poured inside a low grillage or MZLF, it is rammed with a vibrating plate until there are no footprints left on it, after which the operation is repeated until the design mark is reached.
Compaction of backfill material for ground floor
Advice! If the fertile layer lies at a great depth on the site (0.8 - 1.2 m), the volume of earthworks and the cost of buying backfill materials will increase sharply. In this case, it is recommended to consider options for overlapping PC or beams.
The maintainability of the floor on the ground is zero, so communications are divorced at the same stage.
Under a heated building, sewerage and water pipes cannot freeze, so it makes no sense to insulate them.
To ensure the maintainability of engineering systems, communications are laid in pipes of a larger diameter so that they can be pulled out and new ones installed when the resource is depleted and clogged.
Underlayment and waterproofing
Even on dry soils, a waterproofing device is recommended, since the groundwater level can change over time, soil water is present inside the base. It is created from film or roll bituminous materials. The main problems are:
- on the sand it is difficult to seal the joints of the waterproofing of the subfloor screed on the ground;
- the sharp edges of the rubble pierce the materials, breaking the continuity of the layer.
The tasks are solved by pouring a footing with a thickness of 3 - 5 cm without reinforcement. This screed must also be cut off from the foundation elements with a damper tape. To save the construction budget, lean concrete B 7.5 is usually used.
Underlay for waterproofing.
If the underlying layer is made of expanded clay (for example, the cost of this material is low in the region or the owner has stocks left), a different technique is used:
- the underlying layer is covered with a plaster mesh with a small cell that prevents expanded clay from floating;
- the surface is poured with cement milk so that the surface resembles expanded clay concrete and is leveled for fusing rolled waterproofing.
A similar technology can be used for crushed stone, but it is cheaper to level this inert material with a layer of sand, the thickness of which is twice that of the crushed stone fraction.
The scheme of floor insulation on the ground
AT classical technologies thermal insulation of the subfloor screed on the ground is made of high-density extruded polystyrene foam, which does not collapse under load.
If you use expanded clay concrete, which is considered "warm", a much thicker layer will be required.
It is inconvenient to work with this material, since the pellets tend to float, are saturated with moisture and dry for a long time indoors.
Source: http://MasterskayaPola.ru/betonnyj/chernovoj-po-gruntu.html
Draft floor screed on the ground | Instructions on how to fill the screed
Building a house is a long-term process and includes a huge number of works in various directions. This is the erection of walls, and the construction of the roof, and a host of other types of work. One of mandatory milestones- this is the filling of the rough screed.
It is necessary to create the primary base, on which the finishing screed or finishing coating will then be laid.
A rough screed does not require special qualifications of the builder, but, nevertheless, involves big row work related to its creation.
Rough screed reinforced on the ground
Ground floor pie
Creating smooth floors in a new home is not the easiest thing to do.
And it is the construction of a rough screed that is the main stage on the way to level ground suitable for styling various kinds coatings.
It ensures the reliability of the base and its strength. This is a rather time-consuming and time-consuming process, but at the same time financially quite economical.
Performing a subfloor in a private house
As a rule, laying a rough screed on the first floors is carried out directly on the ground. And most often, the usual material is used as the base material. concrete mix made from sand and cement.
Rough coupler
Floor screed mortar
However, the process of creating a rough screed cannot be called quite simple. The fact is that it involves laying several layers of various materials and several preparatory stages:
- soil preparation - it must be carefully compacted;
- laying sand and gravel;
- flooring of waterproofing material, insulation;
- installation directly of the rough screed itself;
- installation of finishing material.
Thus, the floor consists of several layers. And this design has its own name - the pie of the floor. It may also contain a reinforcing layer. Reinforcement is necessary to increase the strength of the screed.
Footing for the floor on the ground
Important! A rough screed can only be built on dry ground.
On a wet, full-fledged one, it will not be possible to create it, since problems with waterproofing may arise.
Also, a rough screed can only be mounted if groundwater occurs at least 4 m to the surface.
Draft screed device in a private house
Also, during the installation of the rough screed, the floor heating system and other communications, if any, are necessary according to the house construction project.
In general, a concrete floor on the ground in private construction is probably the most acceptable option for creating a foundation. It is often laid inside garages, on terraces, verandas, in warehouses and others.
concrete floor in the garage
On a note! Most often, concrete floors on a soil base are equipped where there is no severe cold in the winter, that is, in the middle or southern strip of the Russian Federation. In cold regions, it is recommended to use wood to create the base of the floor.
This type of foundation appeared on the territory of the country relatively recently, at a time when there was a shortage of wood building material.
However, now it is rather difficult to find a wooden base - it is cheaper and easier to create a concrete floor.
In the photo - crushed stone bedding
Main advantages
If we consider the main advantages of creating a floor on the ground, then we can determine the following.
- Ease of all work. In general, creating a floor cake with the right approach takes only a few hours.
- High strength and resistance to deformation will provide long term flooring services.
- Such a base has good indicators of heat, hydro and sound insulation. Such a floor, even in cold weather, will not critically freeze, which will keep the house warm and cozy.
- One of the factors is economy. Arranging a rough screed is not as expensive as it might seem at first glance.
Draft floor on concrete floor
Thanks to all these advantages, many future home owners choose a concrete subfloor as a base, and not created from any other materials.
Finishing concrete floor
Types of rough screed
Rough, like a regular screed, can be different types. It all depends on the laying technology and the materials used. It can be done both dry and wet.
Dry floor screed- this is a kind of multi-layer cake, where vapor barrier (or waterproofing) material, expanded clay or sand act as layers, acting as a dry “cushion”, as well as any leveling material such as chipboard, OSB, plywood or gypsum fiber, depending on the wishes of the owner of the future home. Often, the material can be laid not in one, but in two layers, while individual sheets are fastened with self-tapping screws.
Backfilling dry screed on beacons
Wet screed made on the basis cement-sand mixture, which will be poured over previously laid other layers and carefully leveled. A waterproofing layer and insulation can be laid under it, without fail - a sand cushion.
Wet floor screed
On a note! There is also a semi-dry screed. If in the previous version the mixture during preparation and use will resemble sour cream in consistency, then in the version with a semi-dry screed it will look like wet sand.
Semi-dry screed over underfloor heating
Rough screed device diagrams
Depending on the level at which groundwater occurs, as well as depending on the level of the soil and the position of the screed relative to the foundation, there are several types of it.
Table. Types of arrangement of the rough screed.
| Screed below ground level | This method is used if under the floor it is planned to equip premises for storing food or warehouses. In this case, the screed is located below the ground level, adjacent to the foundation. |
| Screed at ground level | It can be used both in industrial construction and in the construction of residential low-rise buildings. The screed is at ground level and is adjacent to the strip foundation. |
| Screed above ground level | In this case, the screed is mounted above the foundation level, it is most effective and expedient to use it in places where groundwater occurs quite close to the surface, in areas where the risk of floods and flows is high. |
Source: https://pol-exp.com/chernovaya-styazhka/
The sequence of laying the subfloor immediately on the ground
When building houses with strip foundation often, in order to save money, a rough floor is made on the ground.
This type of base allows you to create a reliable heat-insulating coating that does not require additional reinforcement of the supporting structure.
Myself technological process pouring is not difficult, but requires a special approach to laying the construction cake.
Features of the design of the floor on the ground
The formation of a rough foundation immediately on the ground is carried out in accordance with the technological requirements specified in the building codes SP 31 - 10.
According to them, the design of this type of floor must necessarily include an underlying layer of at least 10 centimeters, a plastic film of 15 microns and a concrete screed of 5 centimeters.
To lay a durable, strong and reliable base on the ground experienced craftsmen It is recommended to supplement the cake with such layers:
- A layer of screed on an underlying cushion of crushed stone or sand. Such a protective layer will avoid damage to the waterproofing coating from below and hermetically close all joints.
- Insulation. For such an interlayer, high density extruded polystyrene foam should be used.
- Reinforcing protection. Metal mesh is used to strengthen the concrete base and prevent its destruction under loads.
- Damper layer. A special foam polystyrene tape is installed around the entire perimeter of the base, which protects the screed from expanding when exposed to external factors.
The height of the floor on the ground can be different. There are no special rules for determining it, but when determining such a parameter, one should take into account the location of the front door.
Dry
Such a rough filling is a pie consisting of a considerable number of layers. Laying the floor using the dry method is performed in the following sequence:
- vapor barrier layer;
- a pillow made of sand or expanded clay;
- floor leveling material - gypsum fiber, plywood, chipboard or OSB.
Dry rough screed
For reliability, the base is covered with a wood coating in two layers. Sheets of material are fastened with self-tapping screws.
Wet
This type of screed is performed by cement-sand filling.
Before this, a sand cushion, waterproofing and an insulating layer must be laid. The mortar is poured over the entire cake and leveled.
Subsequently, a durable coating is obtained, on which the front base can be laid.
Advantages and disadvantages of laying a rough base on the ground
Installing the floor directly on the ground has many advantages:
- good thermal insulation of the house, which is provided by the soil itself under the flooring;
- there is no need to create a ventilation system;
- low cost of work;
- the possibility of self-assembly;
- there is no need for insulation of engineering communications;
- ensuring good sound insulation in the building;
- no need for additional strengthening of the foundation.
When installing underfloor heating, this type of base allows you to evenly distribute heat throughout the entire floor.
Among the disadvantages of using rough laying of the floor on the ground are:
- in case of failure of communications laid under the floor base, complete dismantling and new installation draft basis, which entails additional costs;
- lack of a basement;
- when installing a floor heating system, the height of the room can be significantly reduced.
If you need to create a high plinth, you need a large number of soil. This greatly increases the cost of laying the bottom layer of the cake.
A properly made subfloor on the ground allows you to save heat in the house under any weather conditions. In addition, such a base provides strength to the entire floor covering and can be used for laying various finishes.
Do-it-yourself rough floor on the ground
The process of laying the subfloor immediately on the ground is quite simple. Subject to all the rules for the preparation and formation of the necessary layers, you can install such a base yourself.
Foundation preparation
Initially with the help laser level it is necessary to establish indicators of evenness of the working area.
To do this, the highest and lowest points on the surface are determined.
The established data will help to calculate the amount of material required for floor preparation and estimate the volume of the entire workflow.
Of no small importance in soil preparation is the removal of an unsuitable layer and compaction.
So that the base does not shrink after its laying, the entire cover of black soil containing organic elements is removed.
After that, the surface is covered with natural soil in the composition, which includes a minimum amount of clay mixtures.
Preparation of the base for the subfloor on the ground
In the process of designing the base for laying the floor, it is also necessary to completely tamp the ground.
For these purposes, you can use a special construction roller.
This procedure avoids further subsidence of the soil and protects the rough base from spreading.
A sand and gravel cushion is poured on top of the prepared, compacted surface. Its thickness must be at least 60 centimeters. To increase the strength over such a layer, it is recommended to lay a layer of expanded clay.
A pillow of sand and gravel must be formed gradually.
First, it is filled up, wetted with water and one layer of 20 centimeters is compacted, and then the rest of the layer is formed.
This sequence of laying will create a stronger foundation.
Waterproofing
A moisture-proof coating is an important element of the subfloor cake. The waterproofing layer allows you to protect the concrete screed from water, which can seep from the ground and will greatly extend its service life.
As a moisture-proof material, special bitumen-based roll products are used. You can also use a dense polyethylene film. It is best to spread it in two layers.
Laying waterproofing should be carried out in one large layer without joints. If, nevertheless, pieces are used, then all connections are completely tightly harmonized with adhesive tape.
The material used for waterproofing should not only completely cover the base of the subfloor, but also go 20 centimeters into sections of the wall.
Often laying a moisture barrier does not provide complete protection. This is due to the fact that it is quite difficult to close all the joints on the sand or the sharp elements of crushed stone violate the integrity of the waterproofing layer.
thermal insulation
Floor insulation is quite important when laying a rough screed. Therefore, when choosing a heat-insulating material, one should pay attention not only to its cost, but also to technical characteristics.
When creating a rough base on the ground, polystyrene foam, expanded clay or basalt wool are mainly used. Sometimes, PSB-35 foam plastic is used to insulate the floor, provided that it is protected from the cement mortar with a plastic film.
Expanded polystyrene is considered the best heat-insulating coating.
It is not cheap, but it has all the necessary properties for maximum heat retention. Expanded polystyrene plates are easy to install.
When laying them, they are not obligated to gaps, which provides a surface completely insulated from moisture.
Expanded polystyrene - material for insulating the subfloor on the ground
Any used thermal insulation material butt to joint is fixed.
This will completely protect the insulation from moisture penetration from all sides.
Using basalt wool more protection is needed. Such a material has high thermal insulation qualities, but is able to quickly absorb moisture, which leads to a deterioration in its properties.
Reinforcement
To get a strong and reliable rough screed, additional reinforcement is required.
For these purposes, a reinforcing metal grid, which will give strength to the base and make it able to withstand the highest loads.
Reinforcement is made on top of the laid layers. A mesh of metal rods is installed on special supports.
They are necessary so that when pouring mortar, the reinforcing material is in the cement-sand screed, otherwise the reinforcing layer will become useless.
To reinforce the base, a mesh with medium-sized cells is used, the size of which does not exceed 10 * 10 centimeters.
The smaller the distance between the bars, the stronger the screed will be.
But still, it should be taken into account that the cement composition freely passes between the metal elements.
When laying the mesh should be raised to a height of 2 - 3 centimeters. It should completely cover the entire surface of the subfloor. The reinforced product is installed overlapping one or two cells.
damper layer
To cut off the draft base from the elements of the foundation, walls or plinth, a damper tape is fixed around the perimeter.
It protects the entire structure of the flooring from thermal expansion, which can lead to cracking of the base.
damper tape
Styrofoam strips can be used as a damping layer. They are glued to the bottom of the walls.
Their width should somewhat exceed the layer of cement-sand fill.
Excess parts of the expansion protection material can simply be trimmed off after the subfloor has been completely installed.
fill
The last layer in the rough base on the ground is syazhka. For its formation, a solution of sand, cement and water is used. The building mixture is mixed with a special mixer.
Filling is carried out immediately on the prepared pies of the rough base. Beacons are installed beforehand to level the screed. They can be fixed with putty or plaster.
The solution laid out on the floor surface must completely cover the reinforcing mesh. In this case, the cement mixture should be evenly distributed over the base. Its alignment is carried out using the building rule according to the installed beacons.
After leveling the cement-sand screed, let the mortar set slightly and check the evenness of the created base.
For this, it is used building level. In the absence of any differences, the floor can be considered completed on the ground.
It takes at least 14 days for the concrete screed to gain strength. During this period, no further work on the design of the foundation can be performed.
The first few days after pouring, the screed must be moistened to prevent drying out. Also, for better hardening, it is recommended to cover the concrete floor with plastic wrap.
When the cement-sand fill hardens a little, all beacons can be removed. The remaining hollow areas should be filled with mortar.
Laying the subfloor on the ground will not only save money, but also create a reliable foundation.
The strength of such a coating depends on the correct installation of the entire pie.
Subject to all technological requirements, you can make a strong draft floor with your own hands.
Most developers, when choosing a ground floor floor design, consider two options. The first is reinforced concrete slabs.
The second is wooden beams (logs). The fact that you can make a high-quality and inexpensive floor on the ground, many do not know.
Meanwhile, this design cannot be called new. It began to be used after the invention of an artificial stone called concrete.
We will talk about what constitutes a floor covering on bulk soil, what are its pros and cons, in this article.
At its core, the floor on the ground is a "pillow" of fine gravel or expanded clay, on which lies a reinforced slab of monolithic concrete. Ballast bedding performs two tasks:
- raises the level of coverage to a predetermined height;
- transfers the weight of the structure to the ground.
From soil moisture and heat loss, the floor is protected by a heater laid on a waterproofing layer.
The bearing basis of such a coating is a layer of soil. Therefore, the main risk factors when arranging a floor on the ground in a private house are frost heaving and moisture. The first threat is blocked by insulating the base of the foundation from the outside with sheet foam. It cuts off the cold bridge that causes water to freeze.

It should be noted that at permanent residence in the house, the temperature of the soil under it never drops below zero degrees. If the building is empty in winter, then the forces of frost heaving can cause cracks in the concrete screed and deform it. In this case, insulation of the basement is indispensable.
Protection from soil moisture is a relatively simple measure only at a low level of groundwater (2-3 meters). In damp and swampy areas, it is better to refuse the device of such a coating. The cost of waterproofing and strengthening the foundation in this case increases significantly.
For pile and columnar foundations slab on the ground - not the best solution. In this case, the cost of protecting the bedding from frost is higher than when using the foundation "tape".
Construction technology
There are two ways to install floors on the ground:
- Concrete preparation;
- Without a draft layer of concrete directly on the compacted base (cushion).
The first method is rarely used today. It was developed at a time when roofing material was used to protect the floor from moisture. For its gluing, a layer of concrete preparation was made (rough floor).
The second option is easier and cheaper. Modern waterproofing materials can be laid directly on the ballast without sticking to a solid base.
The process of constructing a concrete floor on the ground begins with the filling of the underlying layer. Before this, the laying of water supply and sewerage networks must be completed.
Any well-compacted soil can be used for backfilling. For this, small gravel (fraction 5-10 mm), large river sand or sand and gravel. The pillow is poured in layers of 15 cm, spilling each with water and compacting with a manual or mechanical rammer.

Compaction of bedding with vibrotamper
To improve thermal insulation, the upper level of the pillow can be made of expanded clay gravel(10 cm). The total thickness of the ballast "pie" should be in the range from 30 to 40 cm.
Film waterproofing, laid under the insulation, needs to be protected from damage by sharp gravel and crushing with expanded clay. Therefore, the backfill is completed with a 5-centimeter layer of compacted sand. The thickness of the film laid on the ground must be at least 0.4 mm.

When laying the film insulation, its strips are spread with an overlap of 10-15 cm, fixing them with construction tape. The edges are laid on the masonry, to a height equal to the total thickness of the insulation, concrete screed and finish coat. A thermal gap 2-3 cm wide is left between the constructive "pie" of the floor, the walls, and partitions. It is filled with scraps of polyethylene foam or a special thermal tape.
To insulate the base, you can use EPS (extruded polystyrene foam), sawdust concrete or perlite concrete. Often, waterproofing under the foam is not laid, since it practically does not absorb moisture. From above it is covered with a polymer film. It protects the insulation from the destructive action of the alkaline environment of the cement mortar.
Under lightweight concrete on sawdust and perlite, a plastic film is needed. The thickness of the listed heat insulators is not the same. For EPPS, it is 50 mm. The layer of sawdust and perlite concrete must be at least 10 cm.

Having laid the thermal insulation, a concrete screed is made on its surface on a fine-grained filler (fraction 5-10 mm, thickness 10 cm). The work is carried out in two stages. First, a layer 5 cm thick is poured and laid on it steel mesh(cell 10x10 cm, wire diameter 3-4 mm). After that, the thickness of the screed is adjusted to the design level, determined by the calculation of the expected loads. Recommended concrete class B12.5.
This is how you get the right cake of floors on the ground with a low level of groundwater. Rough concrete preparation for hard insulation is not done. There is no real benefit from it, and the increase in the cost of 1m2 of the finished structure is very tangible.
Installation of a heating system (warm floor) changes the technology and sequence of work. In this case, first, a rough concrete preparation is poured over the compacted cushion and a waterproofing layer is laid out. Having laid the insulation (EPS), pipes are fixed to it and a leveling screed is made of concrete. Reinforcing mesh is laid over pipes or heating cable.

In passing, we note that floors on the ground can be made not only in brick, block, but also in wooden houses. With a competent approach, ballast filling does not have a negative impact on wood.
One of the options for the correct pairing of such a design with chopped walls is shown in the diagram below.

Pairing node with a wooden wall
At a low GWL, a concrete slab lying on clay or on a layer of compacted waterproofed bedding is made in basements. This is a very common option in cottage construction.

Before the screed device, the area of \u200b\u200bthe room must be divided into strips 80-100 cm wide with a steel U-shaped profile or wooden lighthouse boards placed on edge. The damper tape is attached to the walls before the start of pouring so that it protrudes 1.5-2 cm above the design mark of the finished surface.
Concrete pouring starts from the far end of the room and moves to the front door.
Laying is carried out in stripes, filling the cells slightly above their level. For leveling, use a vibrating screed or metal rule, moving it around the lighthouses.

After letting the mixture dry, beacons are removed from it, filling the formed seams with fresh concrete. After that, the concrete is covered with a film and given 4 weeks to gain strength, periodically moistening with water.
Design pros and cons
When planning to make a floor on the ground, you need to know what its advantages are over other types of bases:
- Acceptable cost;
- Readiness of the basis for laying of any floor coverings;
- There is no need to ventilate the underground space to avoid the appearance of fungus;
- Greater durability compared to wooden and reinforced concrete floors.
The disadvantages of this construct include:
- Loss of usable room height (up to 60 cm);
- The complexity of waterproofing works at high GWL;
- Poor compatibility with columnar and pile foundations;
- The high cost of repairing hidden communications.